Running Margin-Based Acquisition Campaigns Server-Side
Why optimize for margin (and not revenue)
Today, advertising algorithms are increasingly powerful — as long as you feed them the right data. But it is above all the rise in advertising costs (steadily increasing CPC, CPM) that is pushing advertisers to pay closer attention to the profitability of their campaigns.
It is therefore becoming essential to adopt a more rational, performance-driven approach by rethinking the metrics used to steer media investments.
Traditionally, acquisition campaigns are optimized around KPIs such as revenue or ROAS (Return On Ad Spend). But this approach can be misleading, because it does not account for real costs: production, logistics, returns, etc.
Margin (or profit) is a far more relevant indicator for evaluating the true economic performance of a campaign.
ROAS vs POAS: what’s the difference?
- ROAS (Return On Ad Spend) = revenue / ad spend
- POAS (Profit On Ad Spend) = profit / ad spend
Let’s take a simple example. Imagine you invested the same amount in Google Ads for two different products. Google Ads tells you that each ad generated one conversion, with the following results:
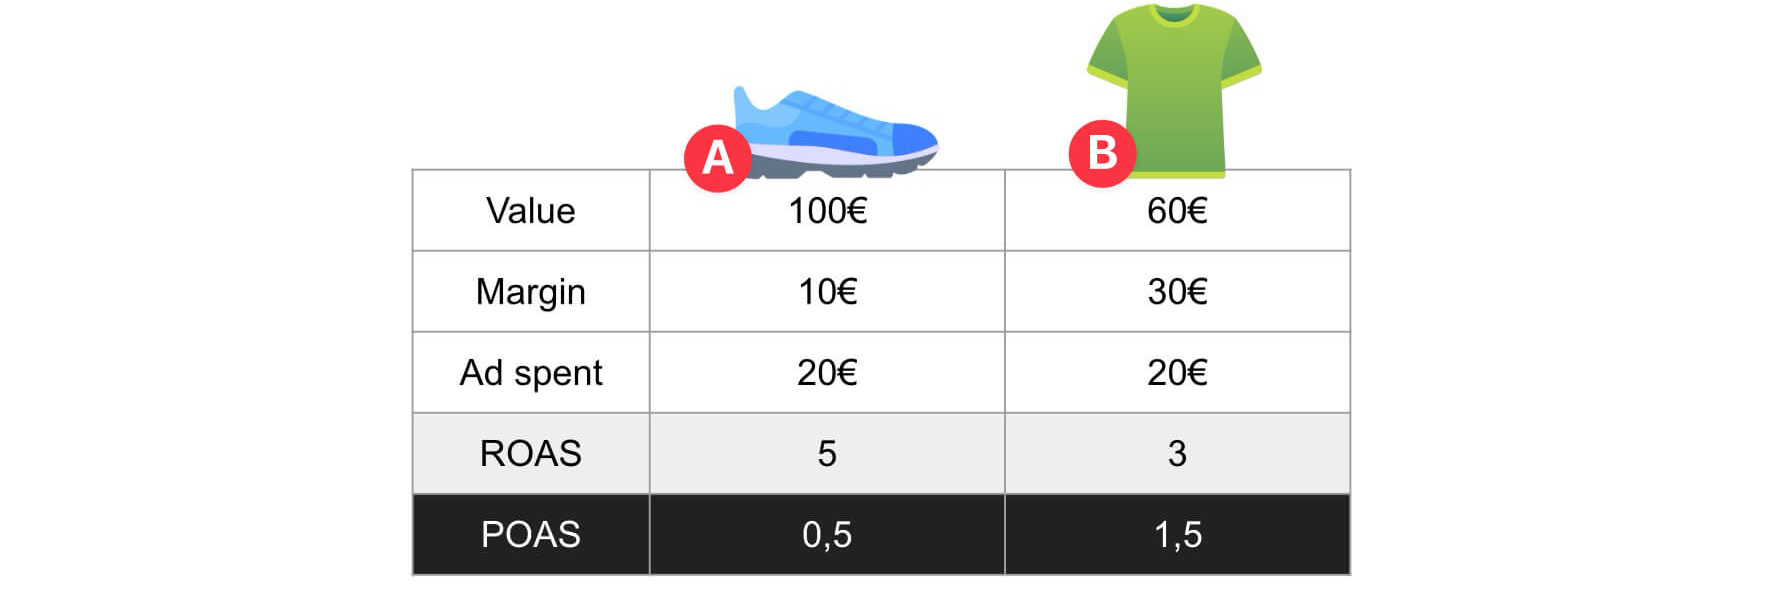
Based solely on ROAS, Google would favor product A, since it generates more revenue. But it is product B that is actually more profitable!
By optimizing with POAS, you place real profitability at the center of your strategy. This allows you to optimize your campaigns based on your margin, independently of the revenue generated.
What results can you expect?
Our client Maisons du Monde implemented a margin-based optimization strategy for their Google Ads campaigns. The post-implementation impact is significant:
- +5.7% share of revenue generated by high-margin products
- +12% overall business volume across campaigns
👉 Read the full case study here: Maisons du Monde x Addingwell
2 solutions for margin-based optimization Server-Side
Note: sending the margin client-side (in the dataLayer) is strongly discouraged, as this information is sensitive and could be exposed (particularly to competitors).
Server-Side is precisely what allows you to bypass this limitation, by enriching data without ever exposing margin in the browser.
There are currently two solutions for implementing margin-based optimization Server-Side. The choice will primarily depend on your technical architecture, product volume, and the level of complexity you wish to manage.
Solution 1: Enriched DataLayer with data encryption
This approach involves sending the encrypted margin from the client, then decrypting it Server-Side. AES encryption protects sensitive commercial data (such as margin) by making it unreadable in the browser. The data travels encrypted in the dataLayer and is decrypted only on the sGTM side, using a shared secret key. Since the data is encrypted, it is unusable if intercepted on the client side.
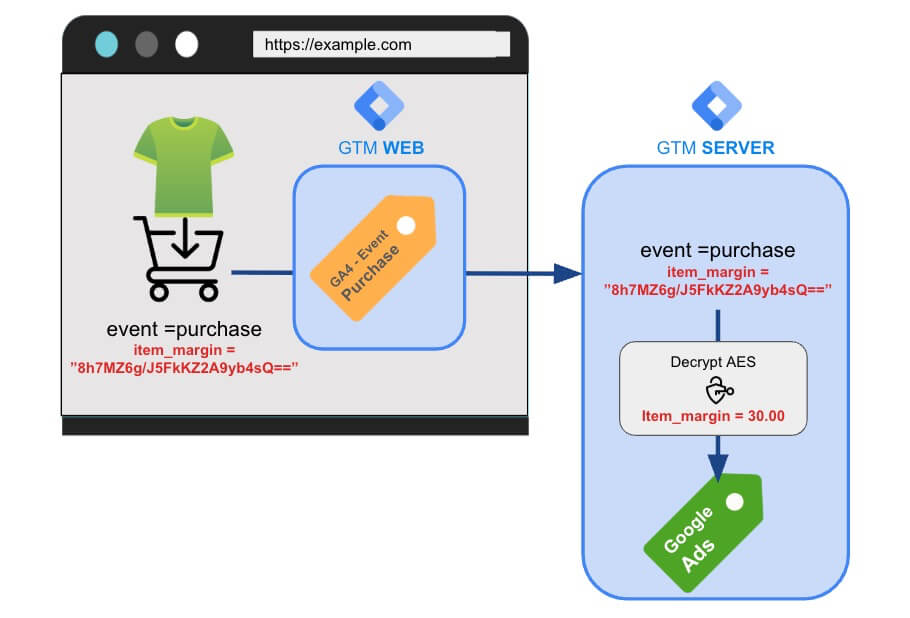
Cost impact: each decryption call on the Server-Side counts as 1 request.
The cost therefore depends directly on the number of events sent (e.g. number of purchase events).
This solution is relatively straightforward to set up, but requires the involvement of your front-end developers.
Step 1: Generate the key and IV
The encryption key and IV must be generated once. Use Node.js’s built-in crypto module to obtain them:
const crypto = require('crypto');

// ENC_KEY: exactly 32 characters
console.log(crypto.randomBytes(16).toString('hex'));

// IV: exactly 16 characters
console.log(crypto.randomBytes(8).toString('hex'));
Store the generated values as environment variables, for example:
# .env.local
ENC_KEY=d8e24ac9aa9eb3981007cc2b8fb185c4
IV=12cf31ecd57909fc
Step 2: Create the encryption module
Create the file lib/encrypt.js in your project. This file runs exclusively server-side.
// lib/encrypt.js
'use strict';

const crypto = require('crypto');

const ENC_KEY = process.env.ENC_KEY; // 32 characters
const IV      = process.env.IV;      // 16 characters

function encryptValue(val) {
  let cipher = crypto.createCipheriv('aes-256-cbc', ENC_KEY, IV);
  let encrypted = cipher.update(String(val), 'utf8', 'base64');
  encrypted += cipher.final('base64');
  return encrypted;
}

module.exports = { encryptValue };
Step 3: Encrypt and push to the dataLayer
On the pages where you want to send the margin (e.g. payment confirmation page), use the encryptValue function created previously to encrypt the margin server-side.
The encrypted value is passed as a prop to the client component that handles the dataLayer push. The plain-text margin must never leave the server.
Example:
// pages/confirmation.jsx
import { encryptValue } from '../lib/encrypt';
import PurchaseTracker from '../components/PurchaseTracker';

export async function getServerSideProps() {
  const order = {
    transaction_id: 'T-98765',
    value:          149.90,
    margin:         42.50,   // never sent to the client in plain text
    currency:       'EUR',
    items: [{
      item_id: 'SKU-001', item_name: 'Product A',
      price: 149.90, quantity: 1
    }],
  };

  const margin = encryptValue(order.margin);

  return {
    props: {
      order: {
        transaction_id:   order.transaction_id,
        value:            order.value,       // plain text
        currency:         order.currency,
        items:            order.items,
        margin,                               // encrypted
      },
    },
  };
}

export default function ConfirmationPage({ order }) {
  return <PurchaseTracker order={order} />;
}
// components/PurchaseTracker.jsx
import { useEffect } from 'react';
export default function PurchaseTracker({ order }) {
useEffect(() => {
window.dataLayer = window.dataLayer || [];
window.dataLayer.push({ ecommerce: null }); // reset GA4
window.dataLayer.push({
event: 'purchase',
ecommerce: {
transaction_id: order.transaction_id,
value: order.value,
currency: order.currency,
items: order.items,
margin: order.margin, // base64
},
});
}, []);
return null;
}Step 4: Configure the sGTM variable
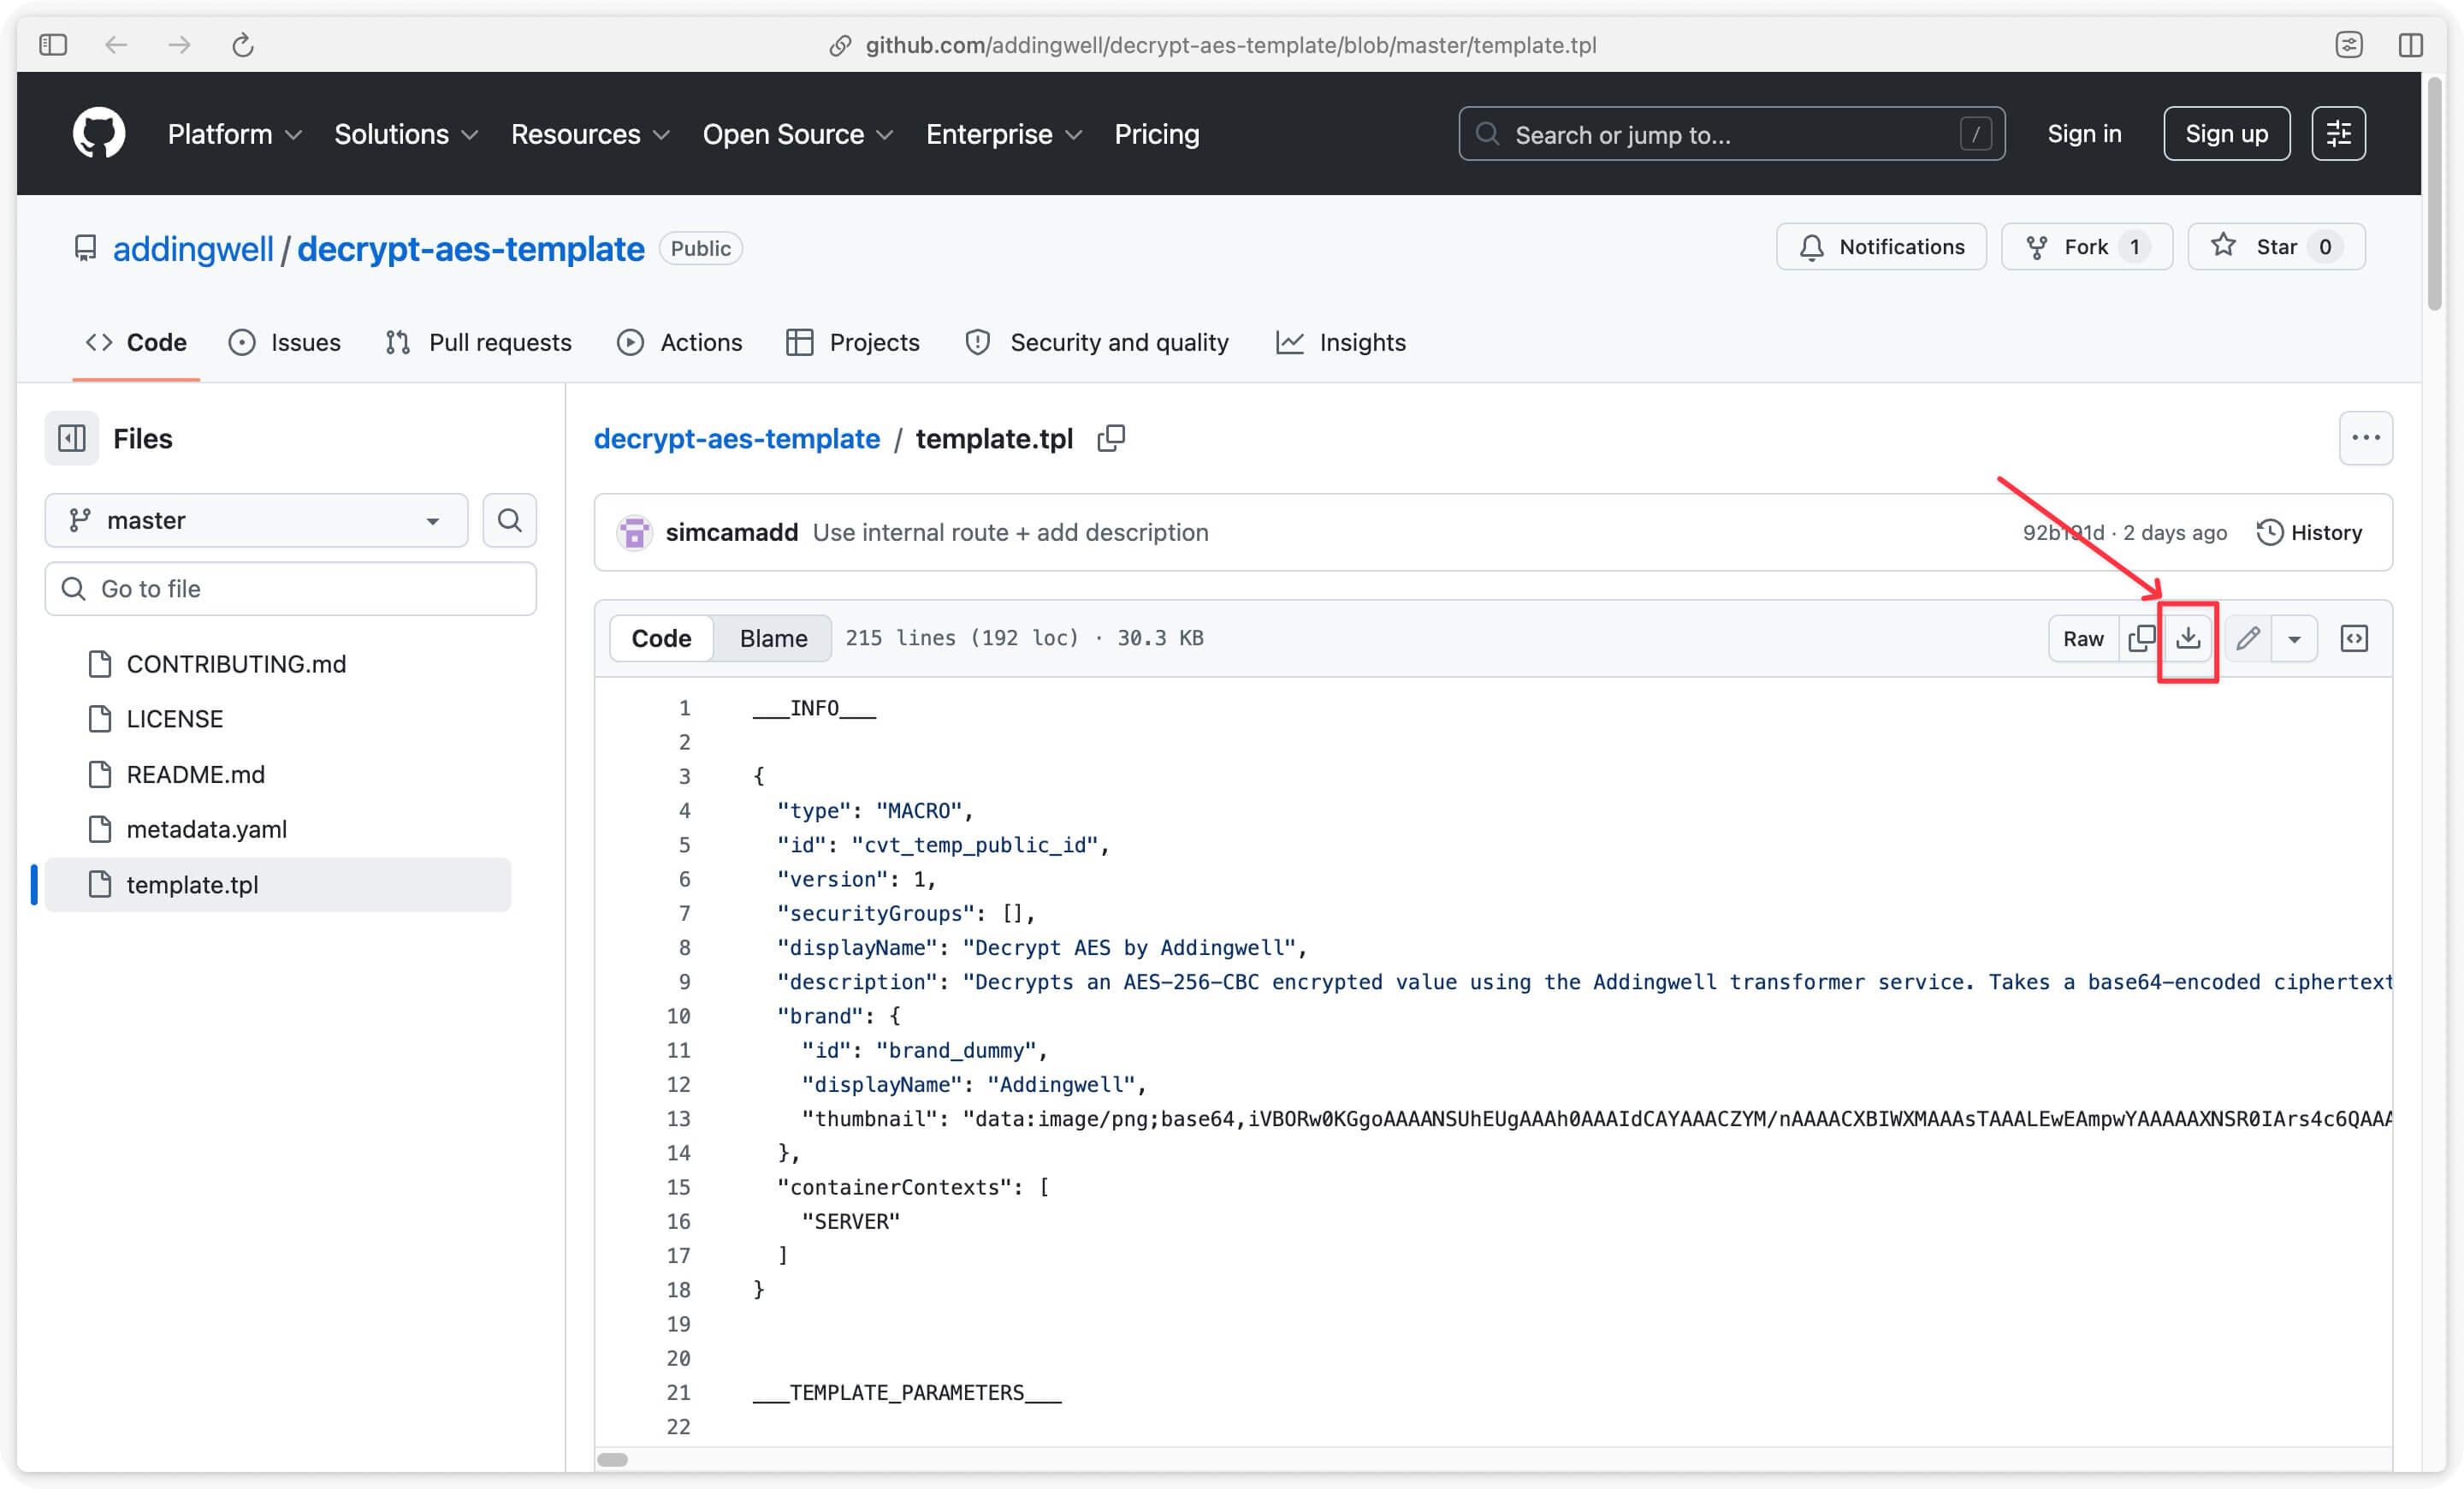
In your sGTM container, create a new variable using the Decrypt AES custom template. First retrieve this template here by clicking the download icon.
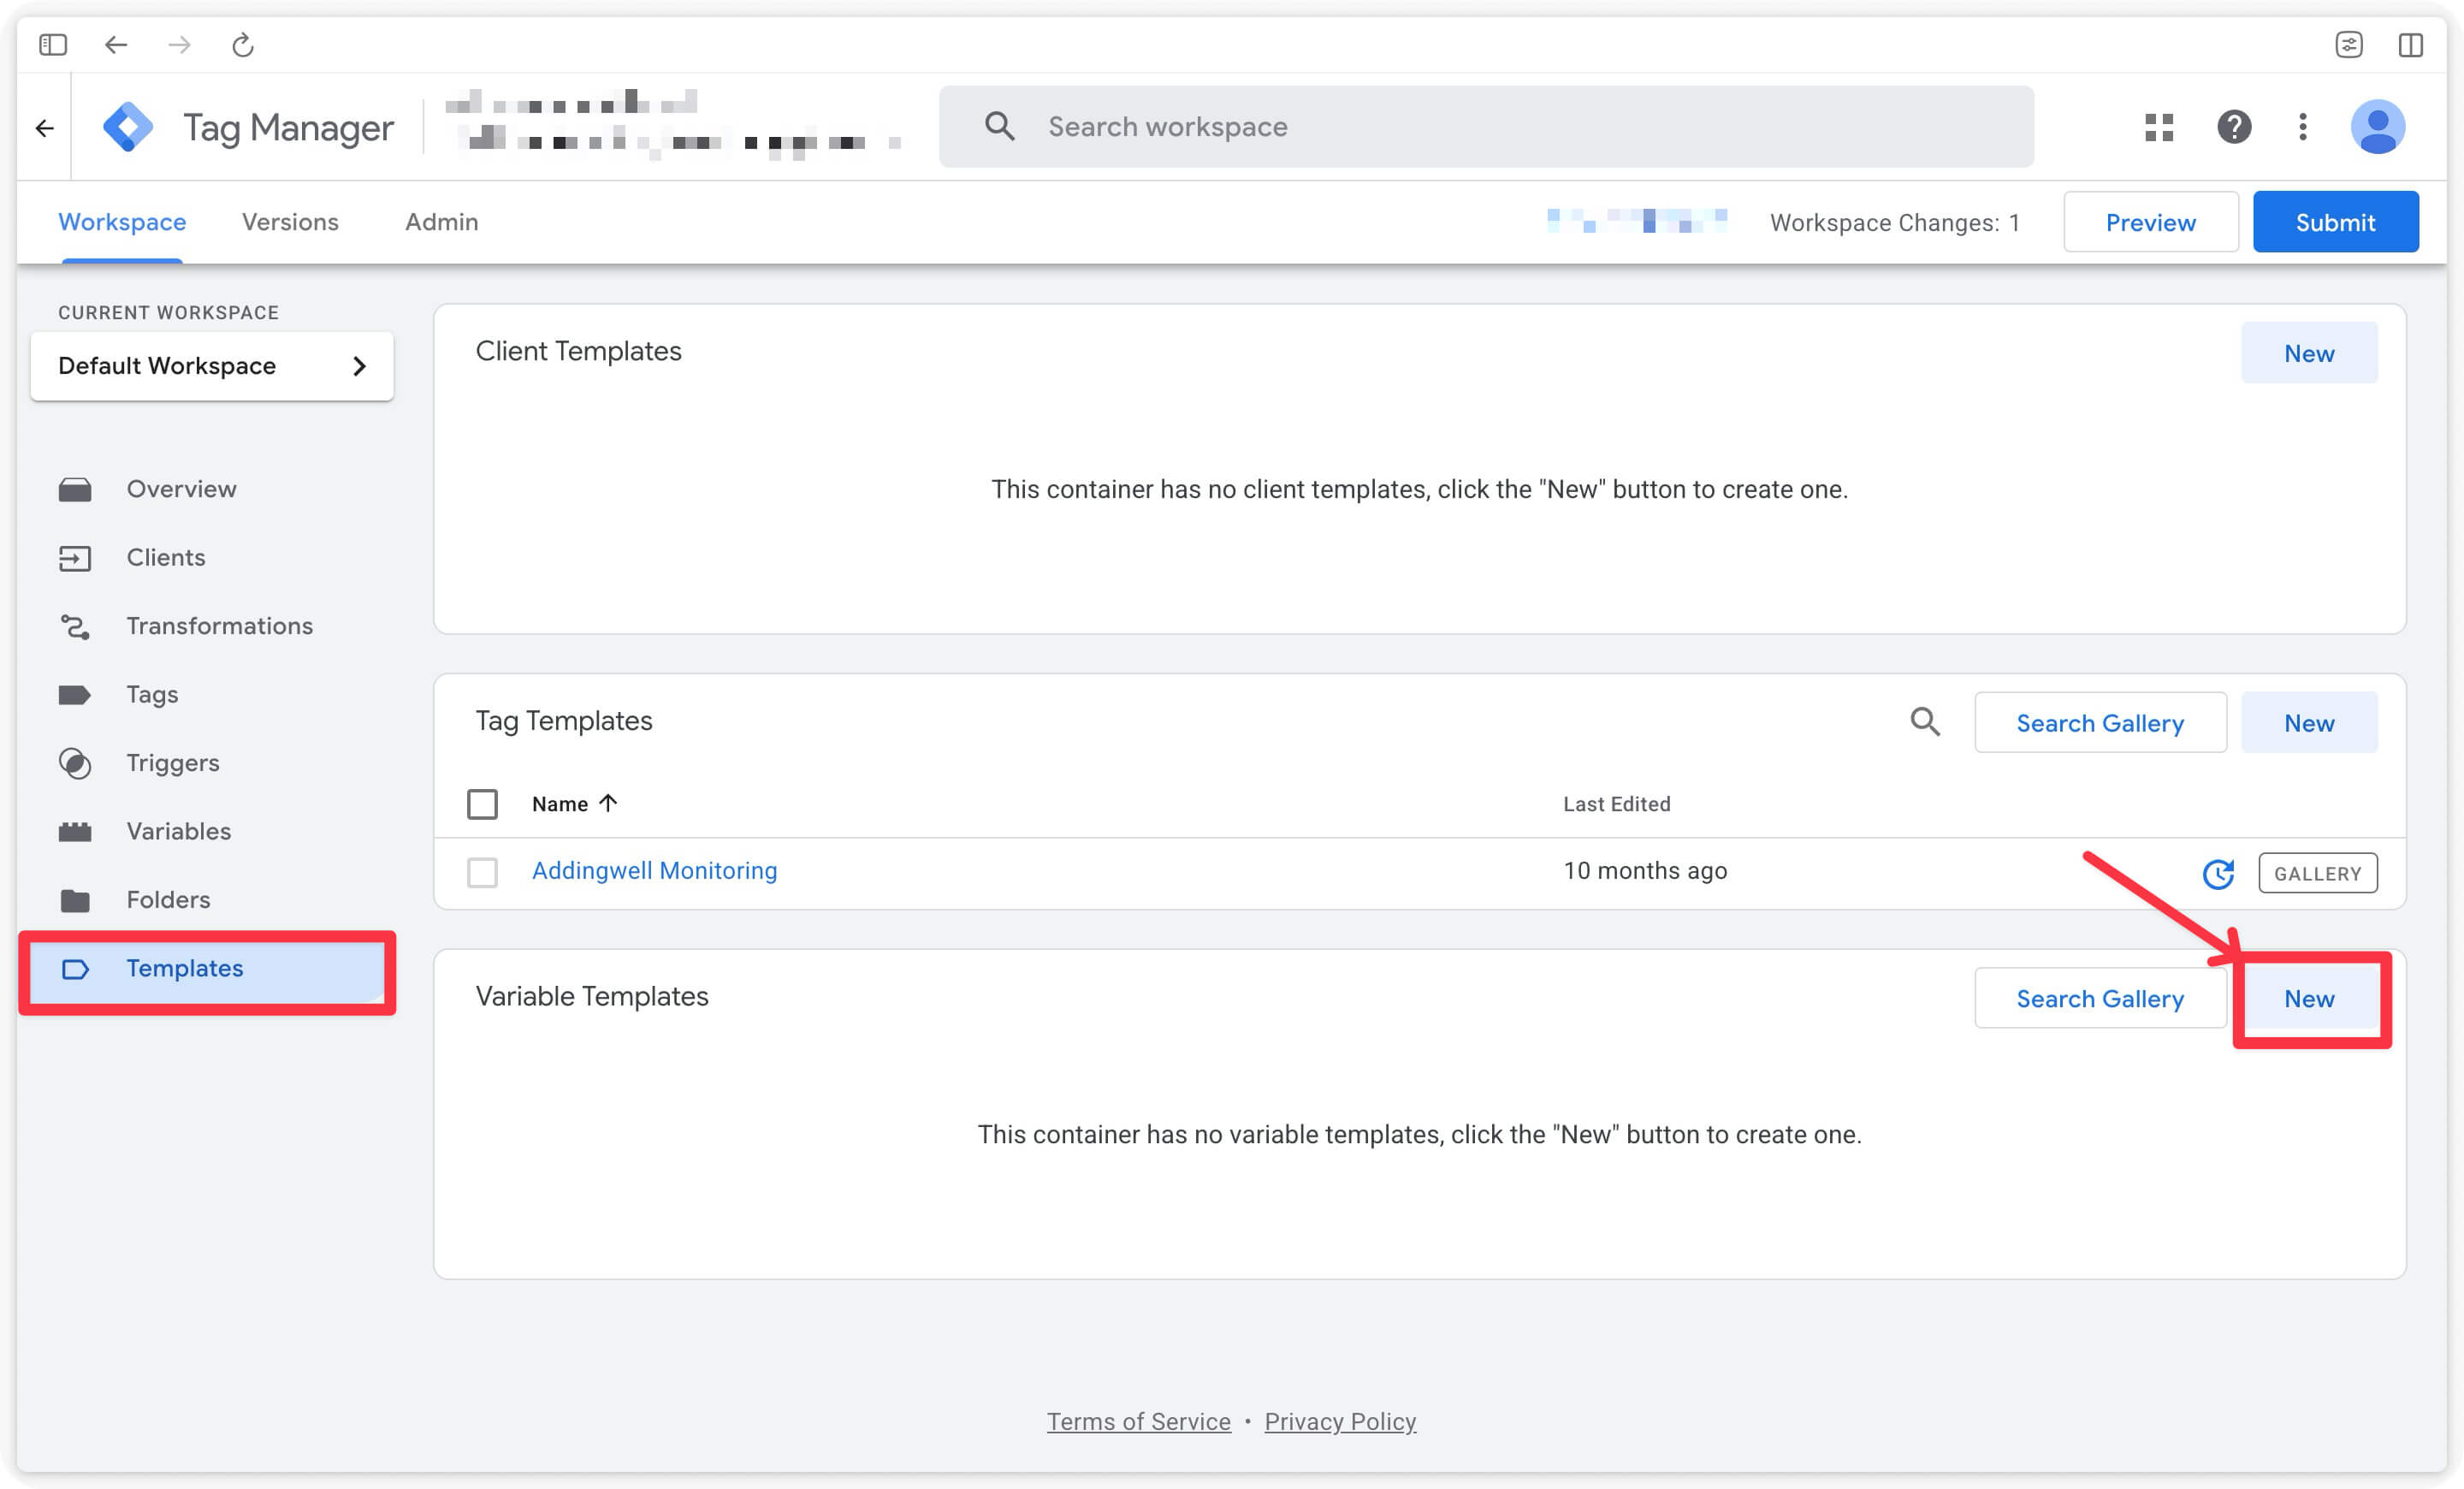
From your GTM Server, click on the Templates menu on the left, then click New under “Variable templates”.
Then click on the three dots in the top right corner and select Import.
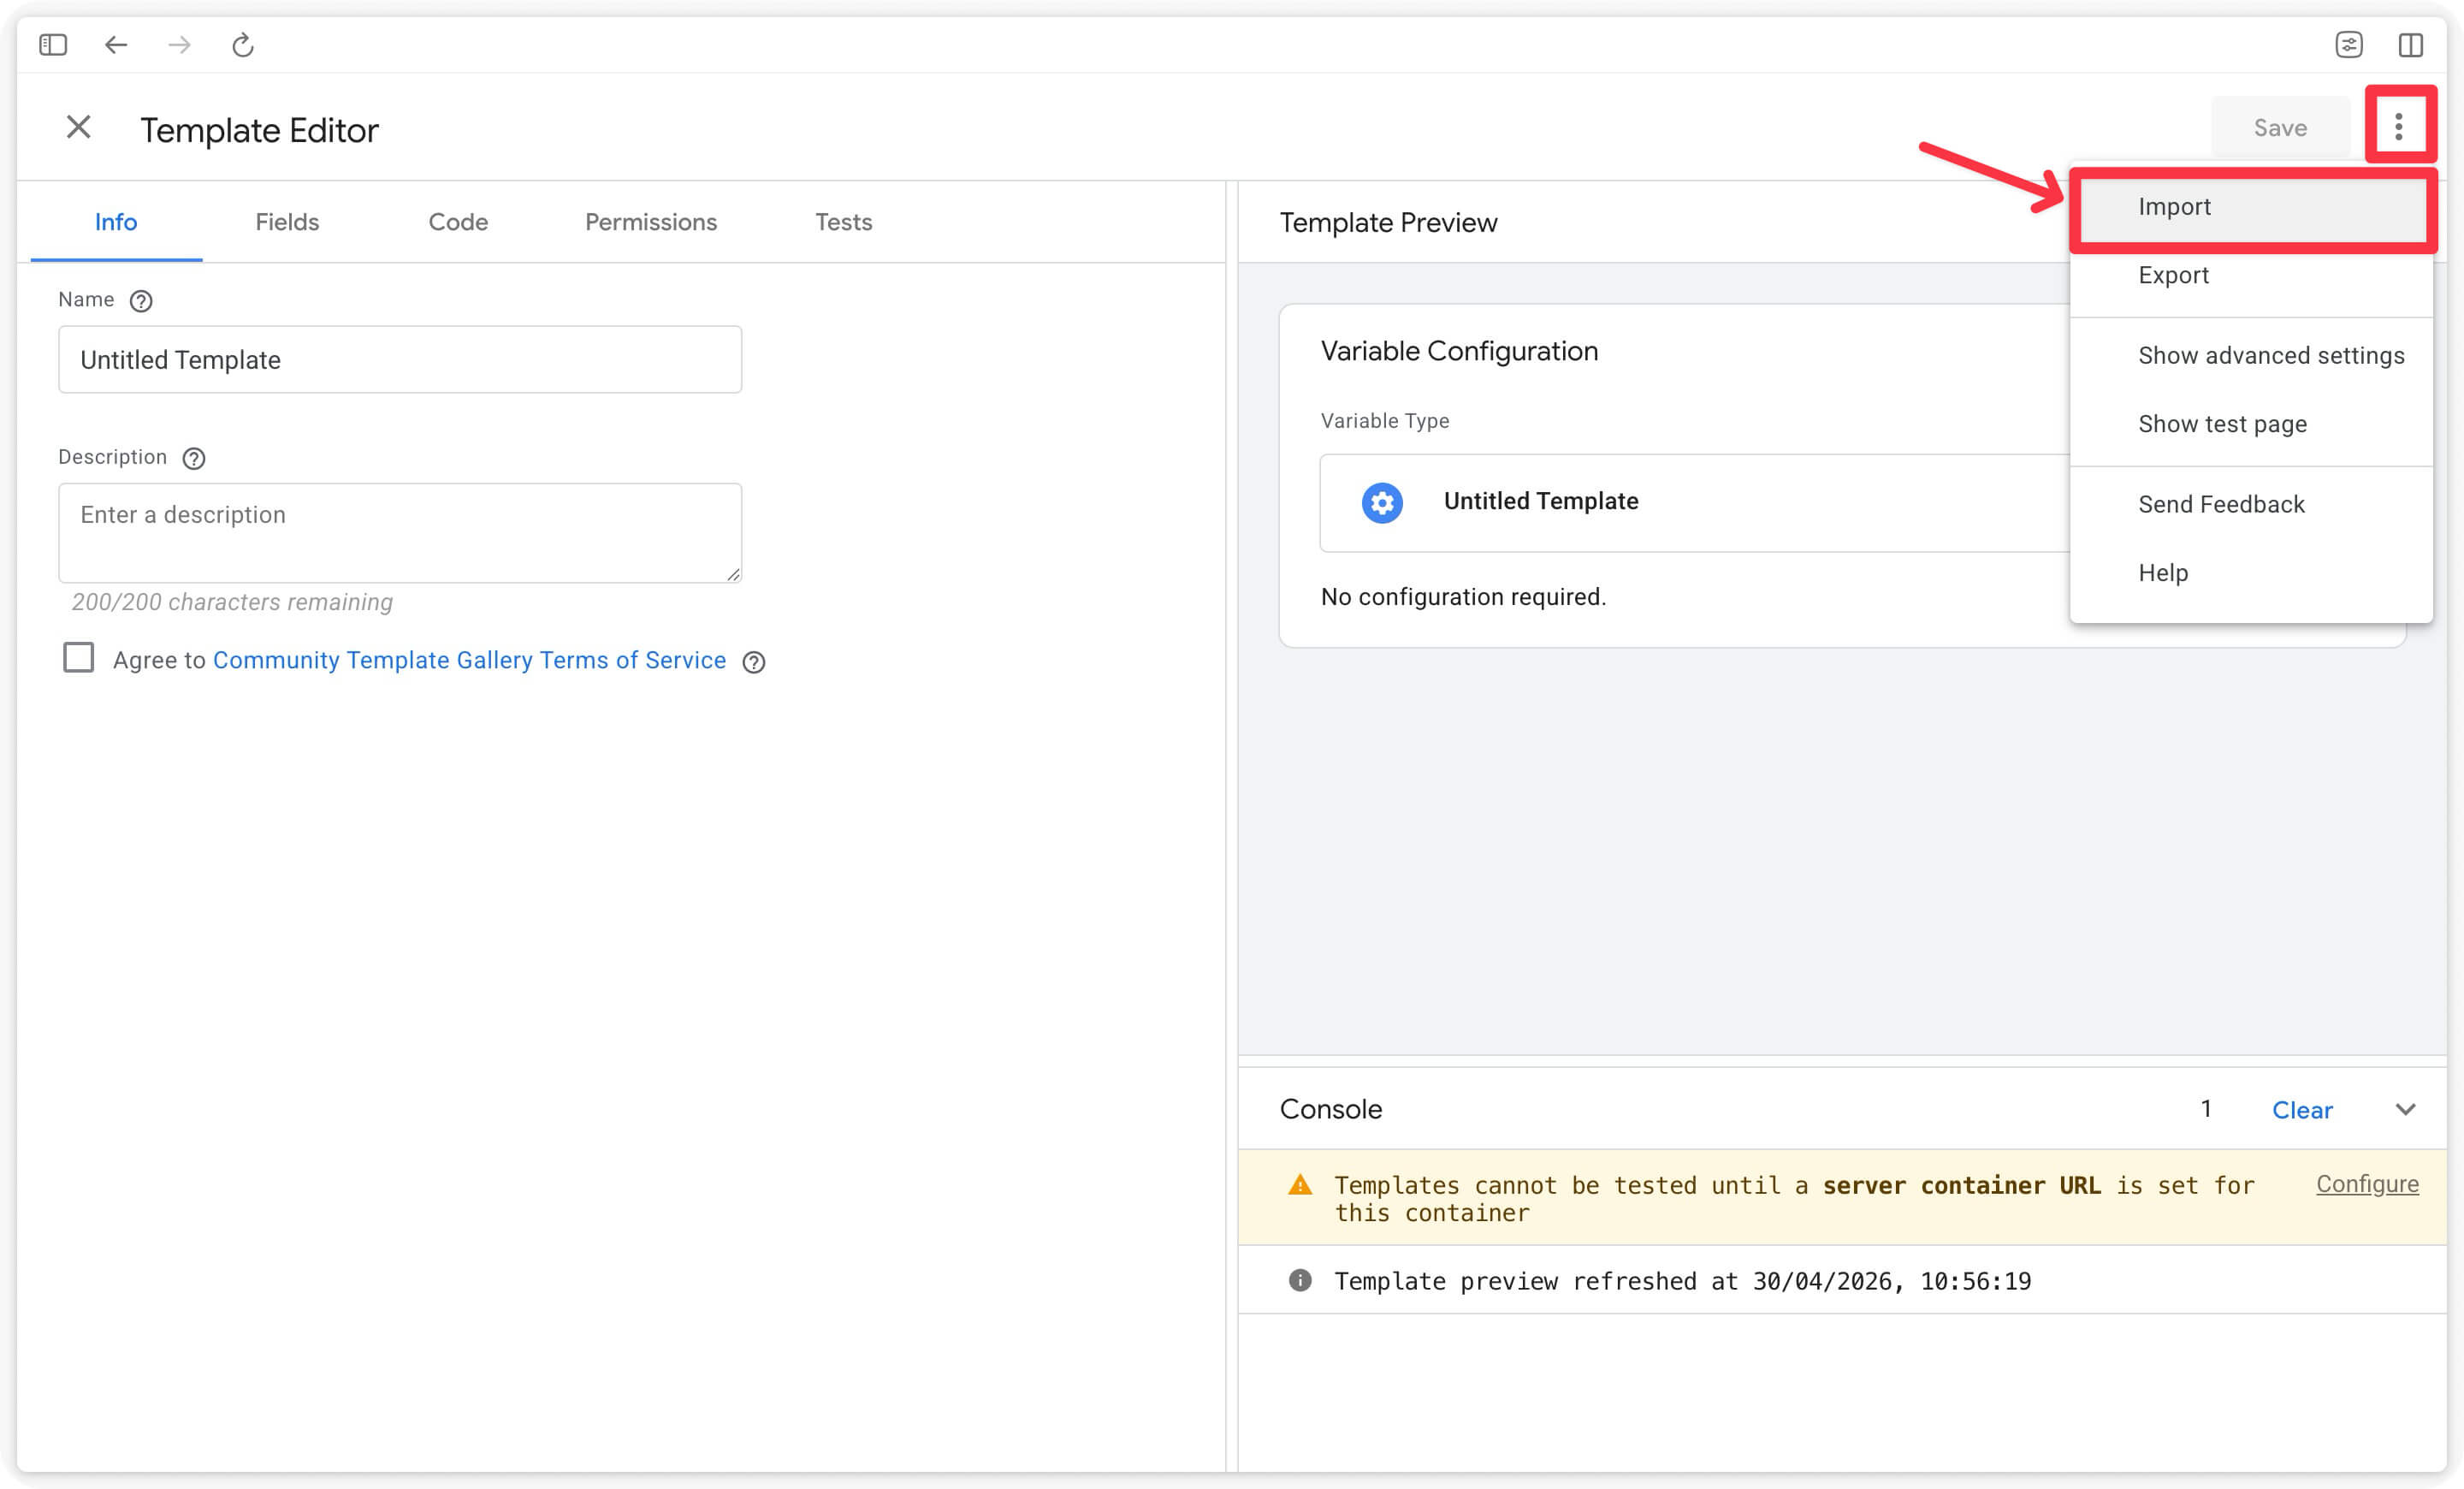
Select the template.tpl file you downloaded previously, then click Save.
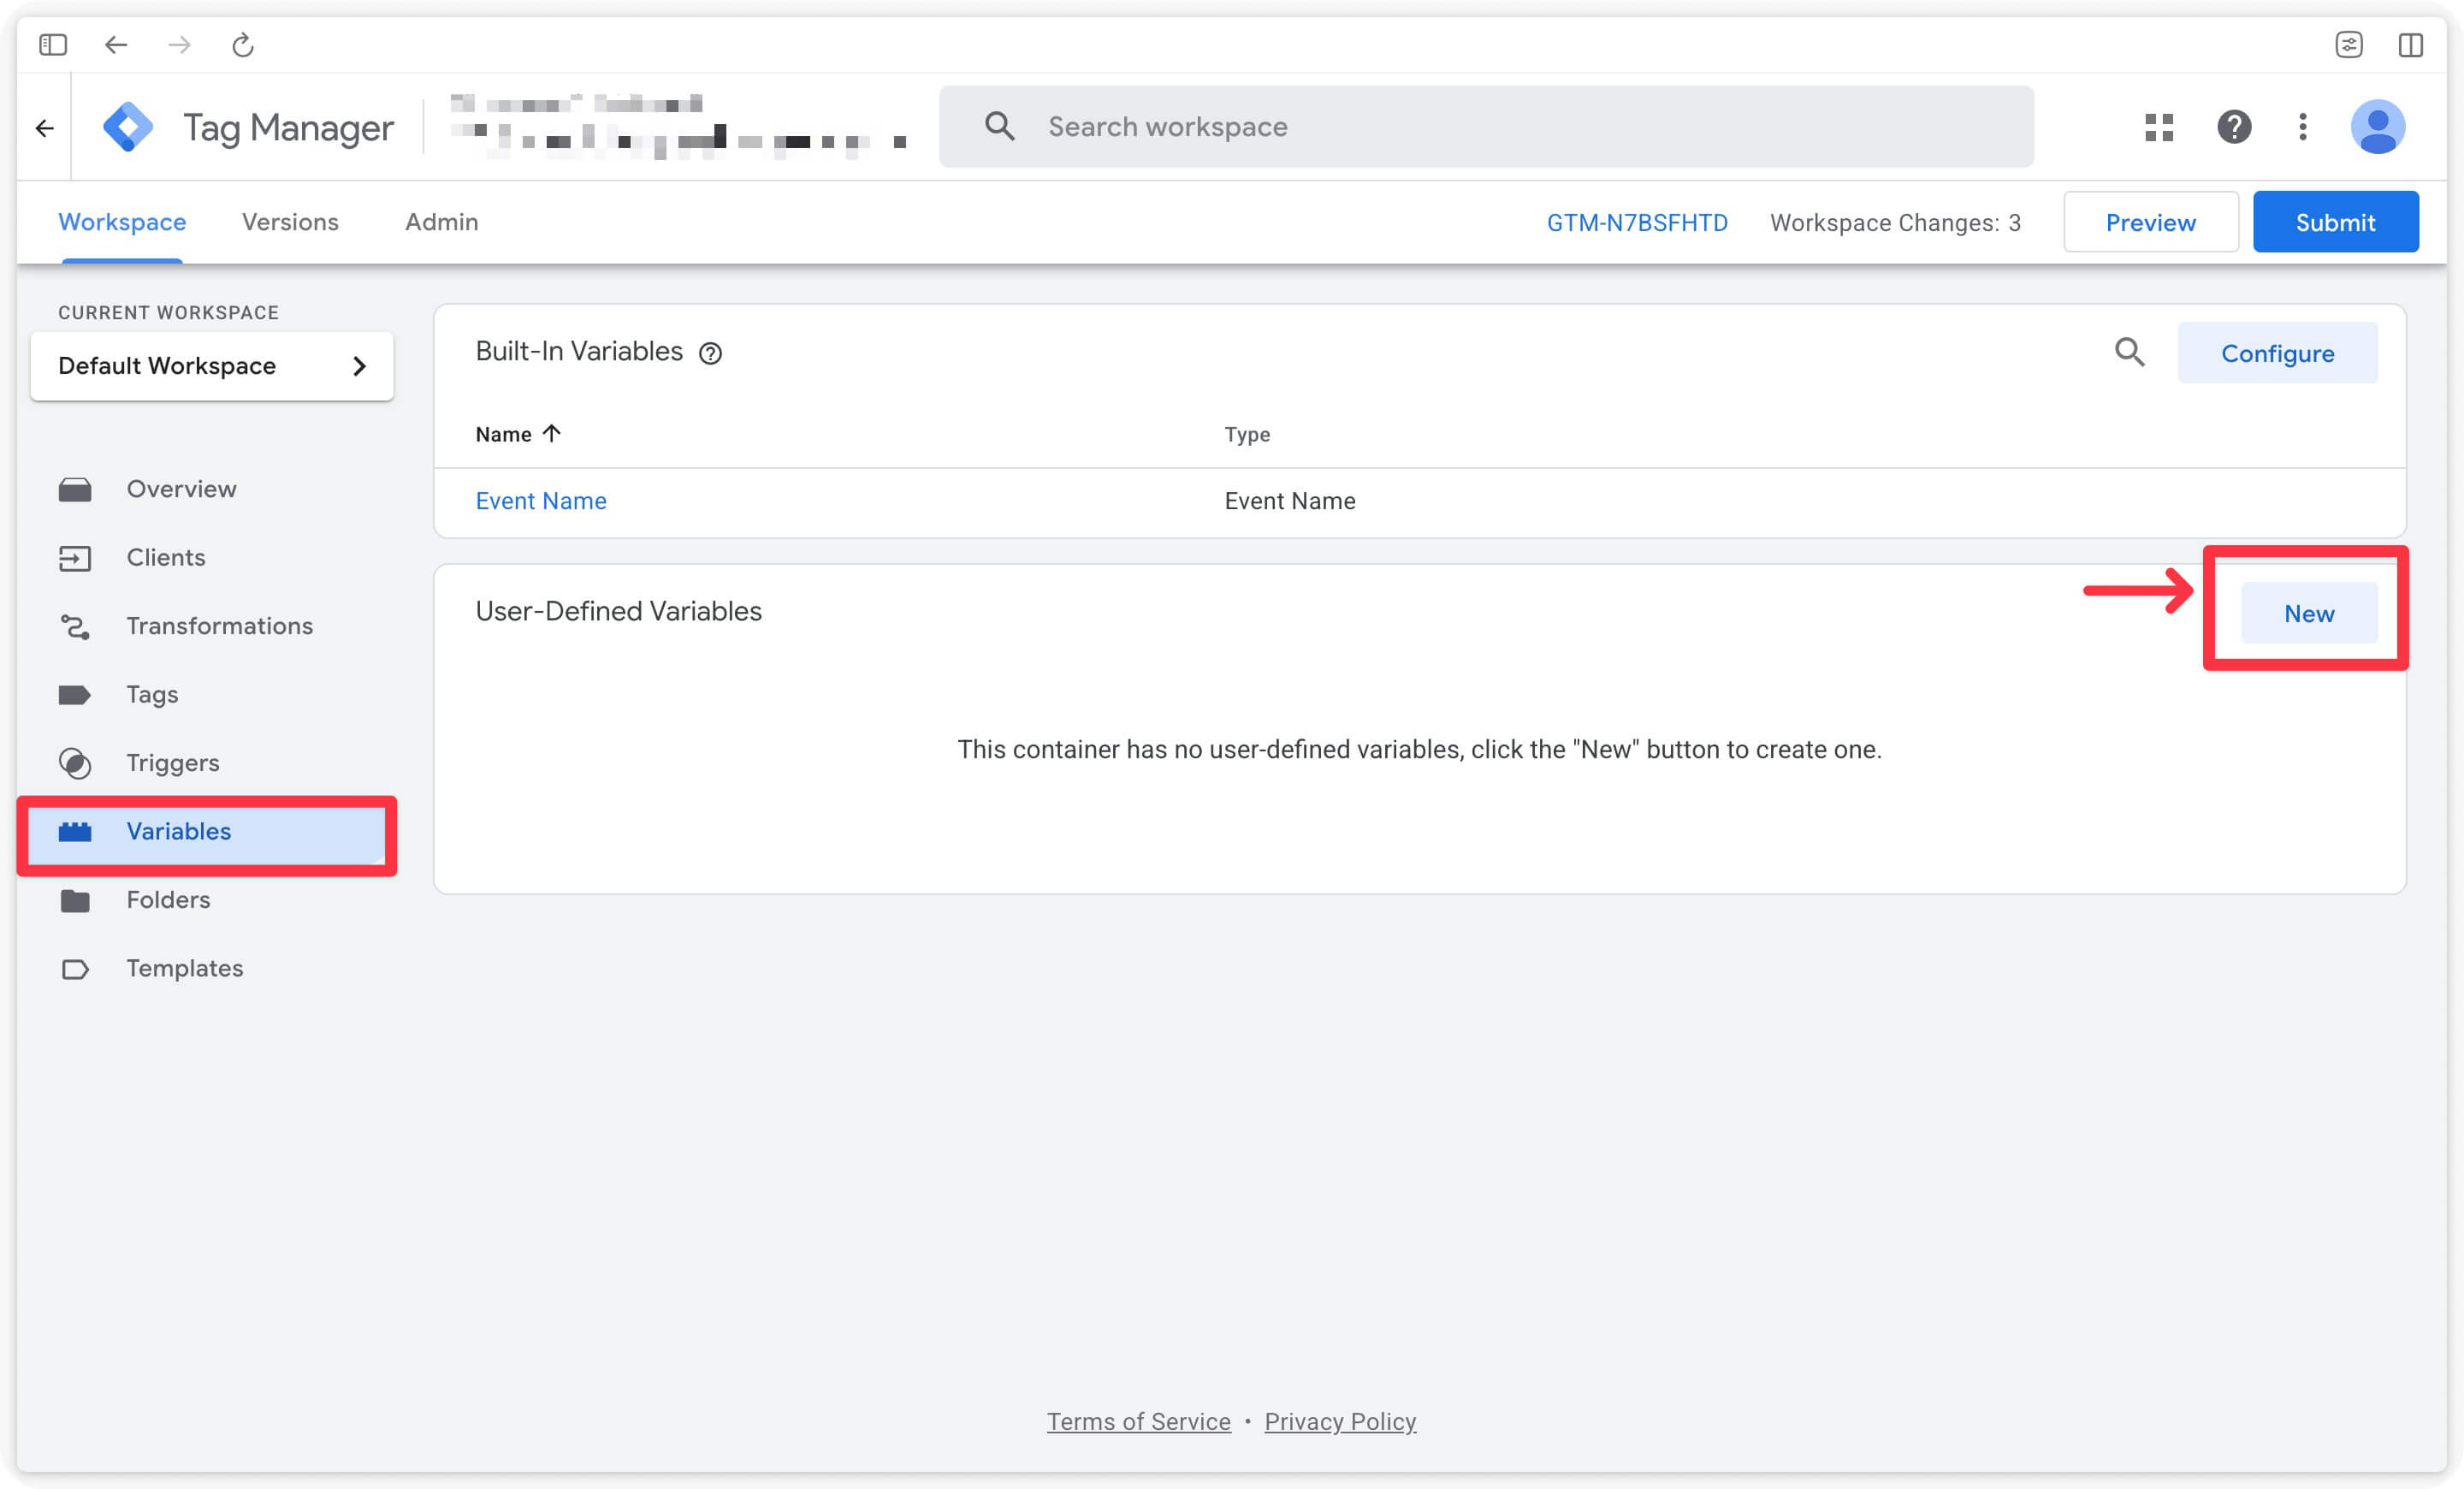
Close this window and click on the Variables tab in the left menu, then click New under User-defined variables.
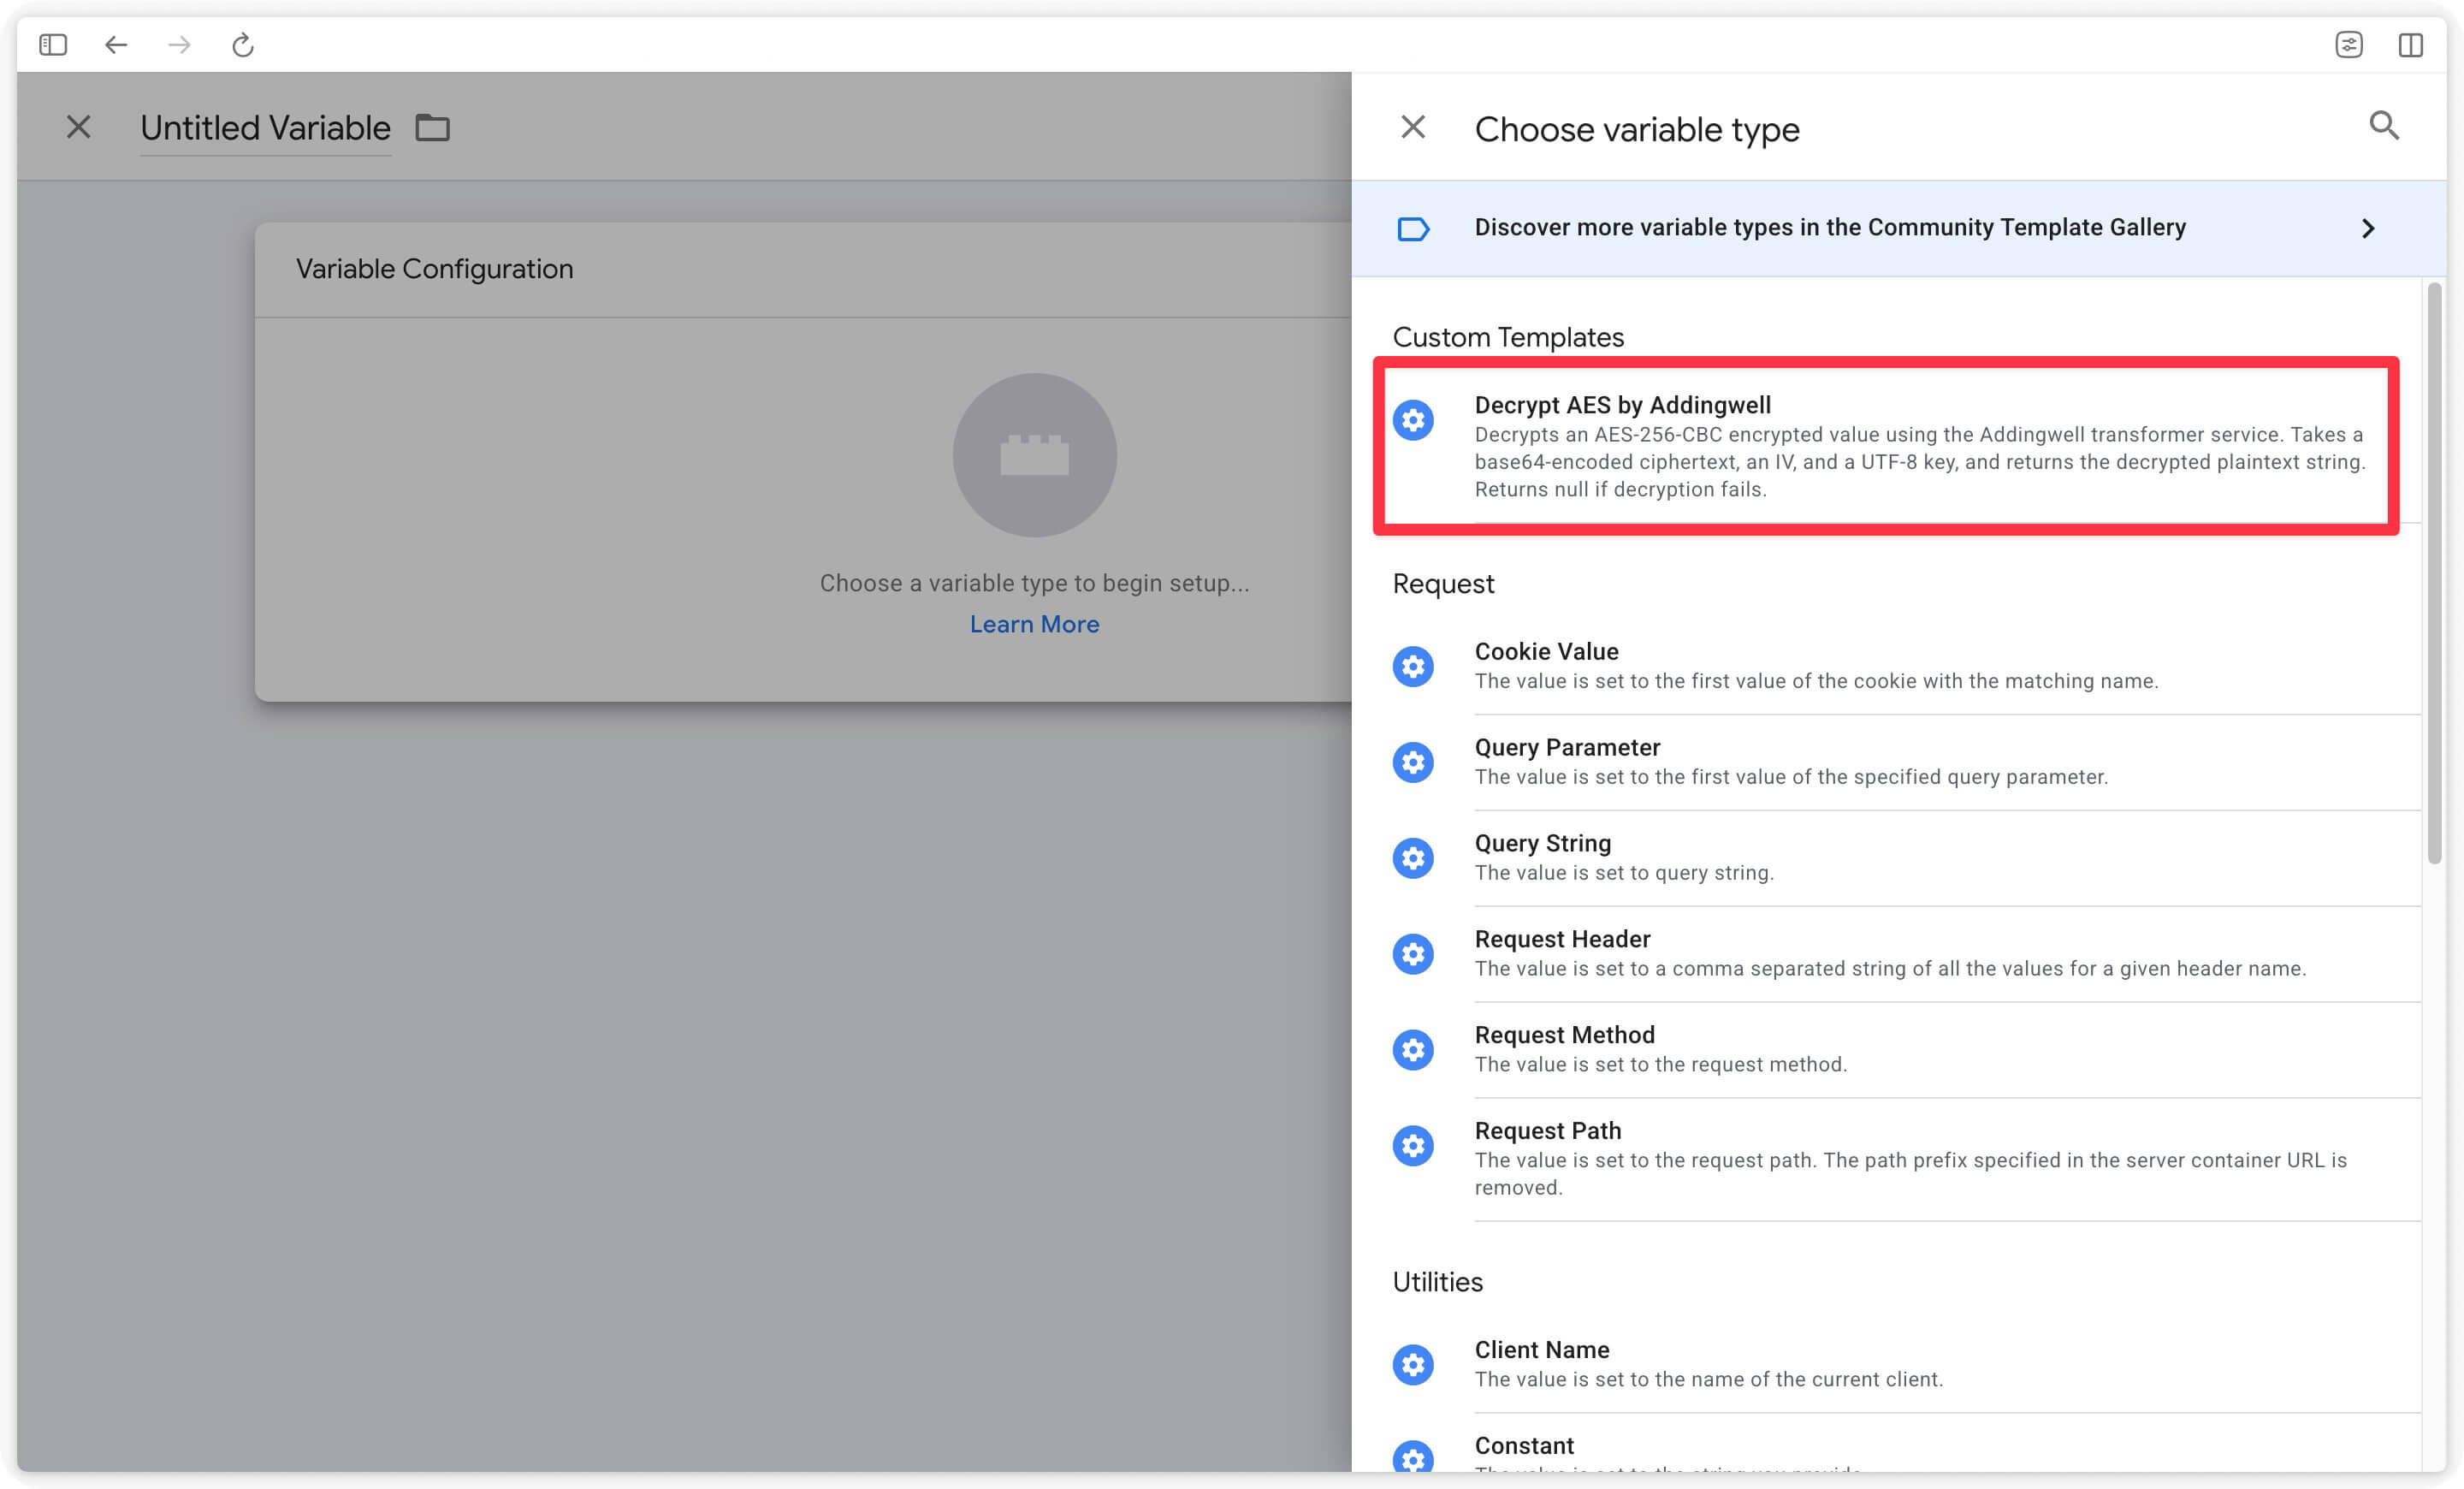
Click on Variable Configuration and choose the Decrypt AES by Addingwell template.
All that’s left is to map the three parameters as follows:
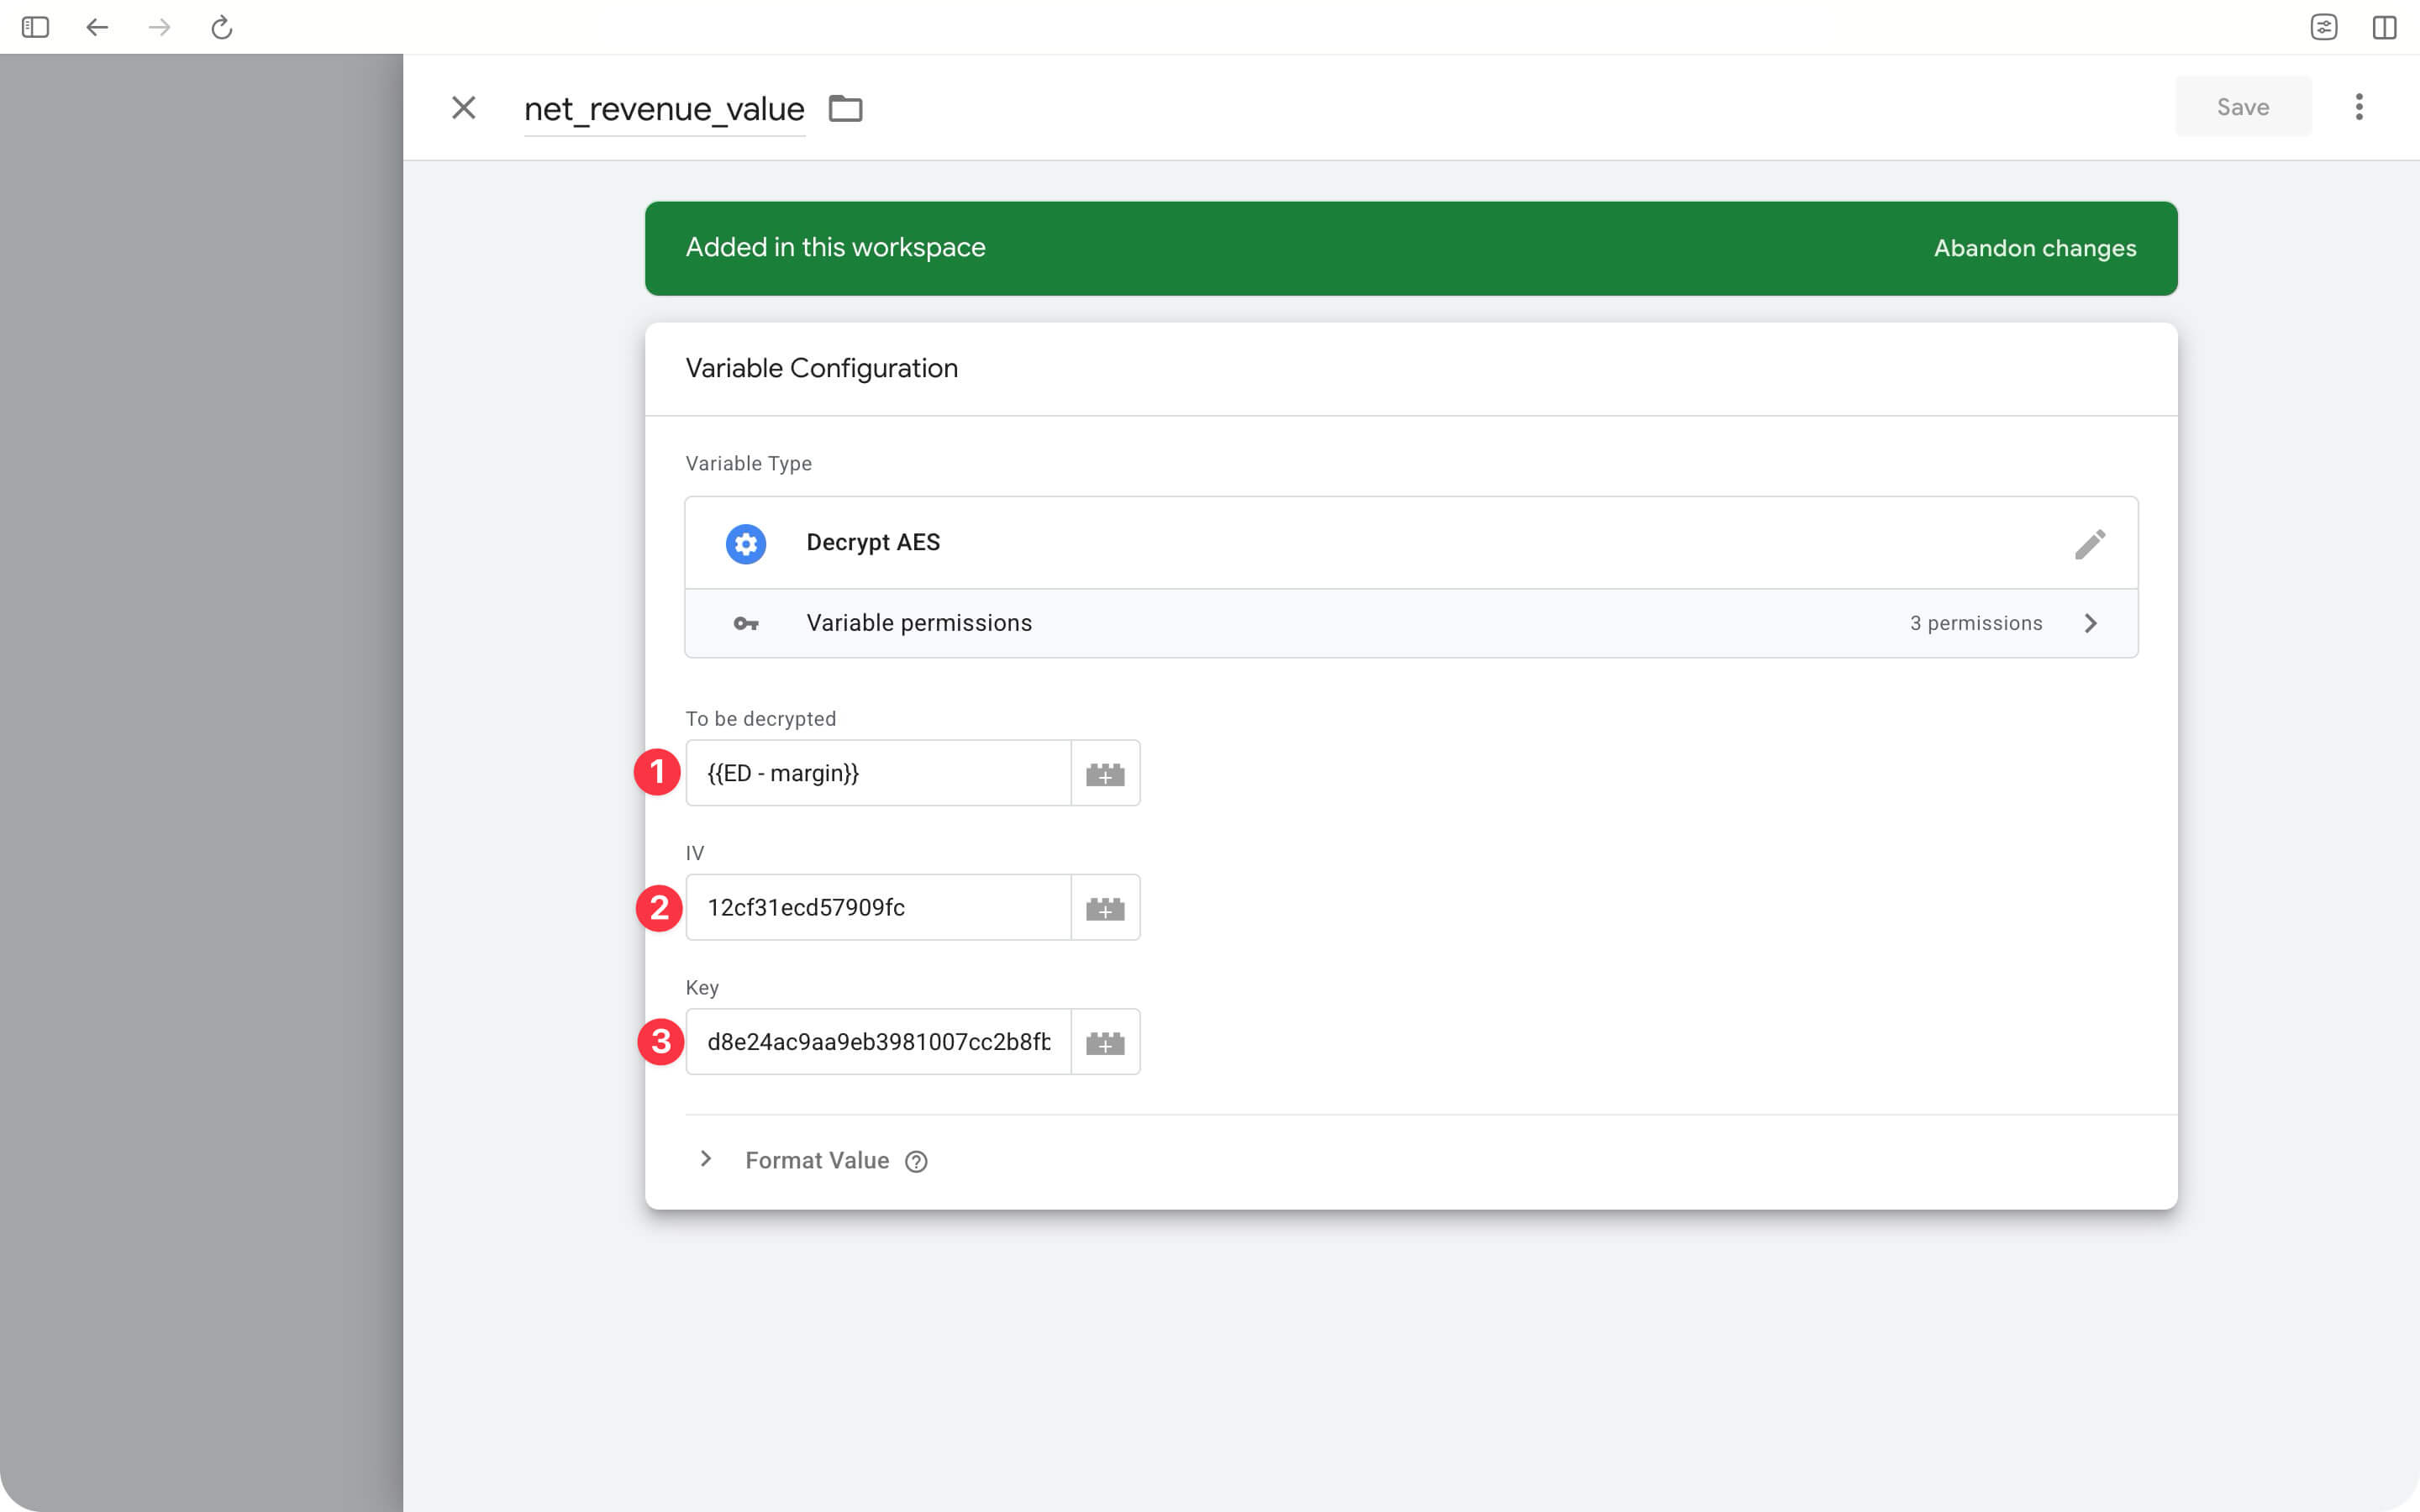
| Template parameter | sGTM variable to map |
|---|---|
| 1. To be decrypted | ”Event Data” variable → margin (dynamic) |
| 2. IV | ”Constant” variable: your IV |
| 3. Key | ”Constant” variable: your ENC_KEY |
Warning: the key and IV must exactly match the values in your .env.local. A single character difference will cause the decryption to silently return null.
Name your variable net_revenue_value and click “Save”.
Step 5: Test the decryption
Before going to production, verify that the full chain works via the sGTM preview mode.
First make sure that the GA4 event on the GTM client side is correctly pushing the margin parameter (margin in our example) to the Server-Side. If not, add this parameter to the purchase event tag.
- Open sGTM preview mode. In your GTM Server container, click Preview and connect your browser tab.
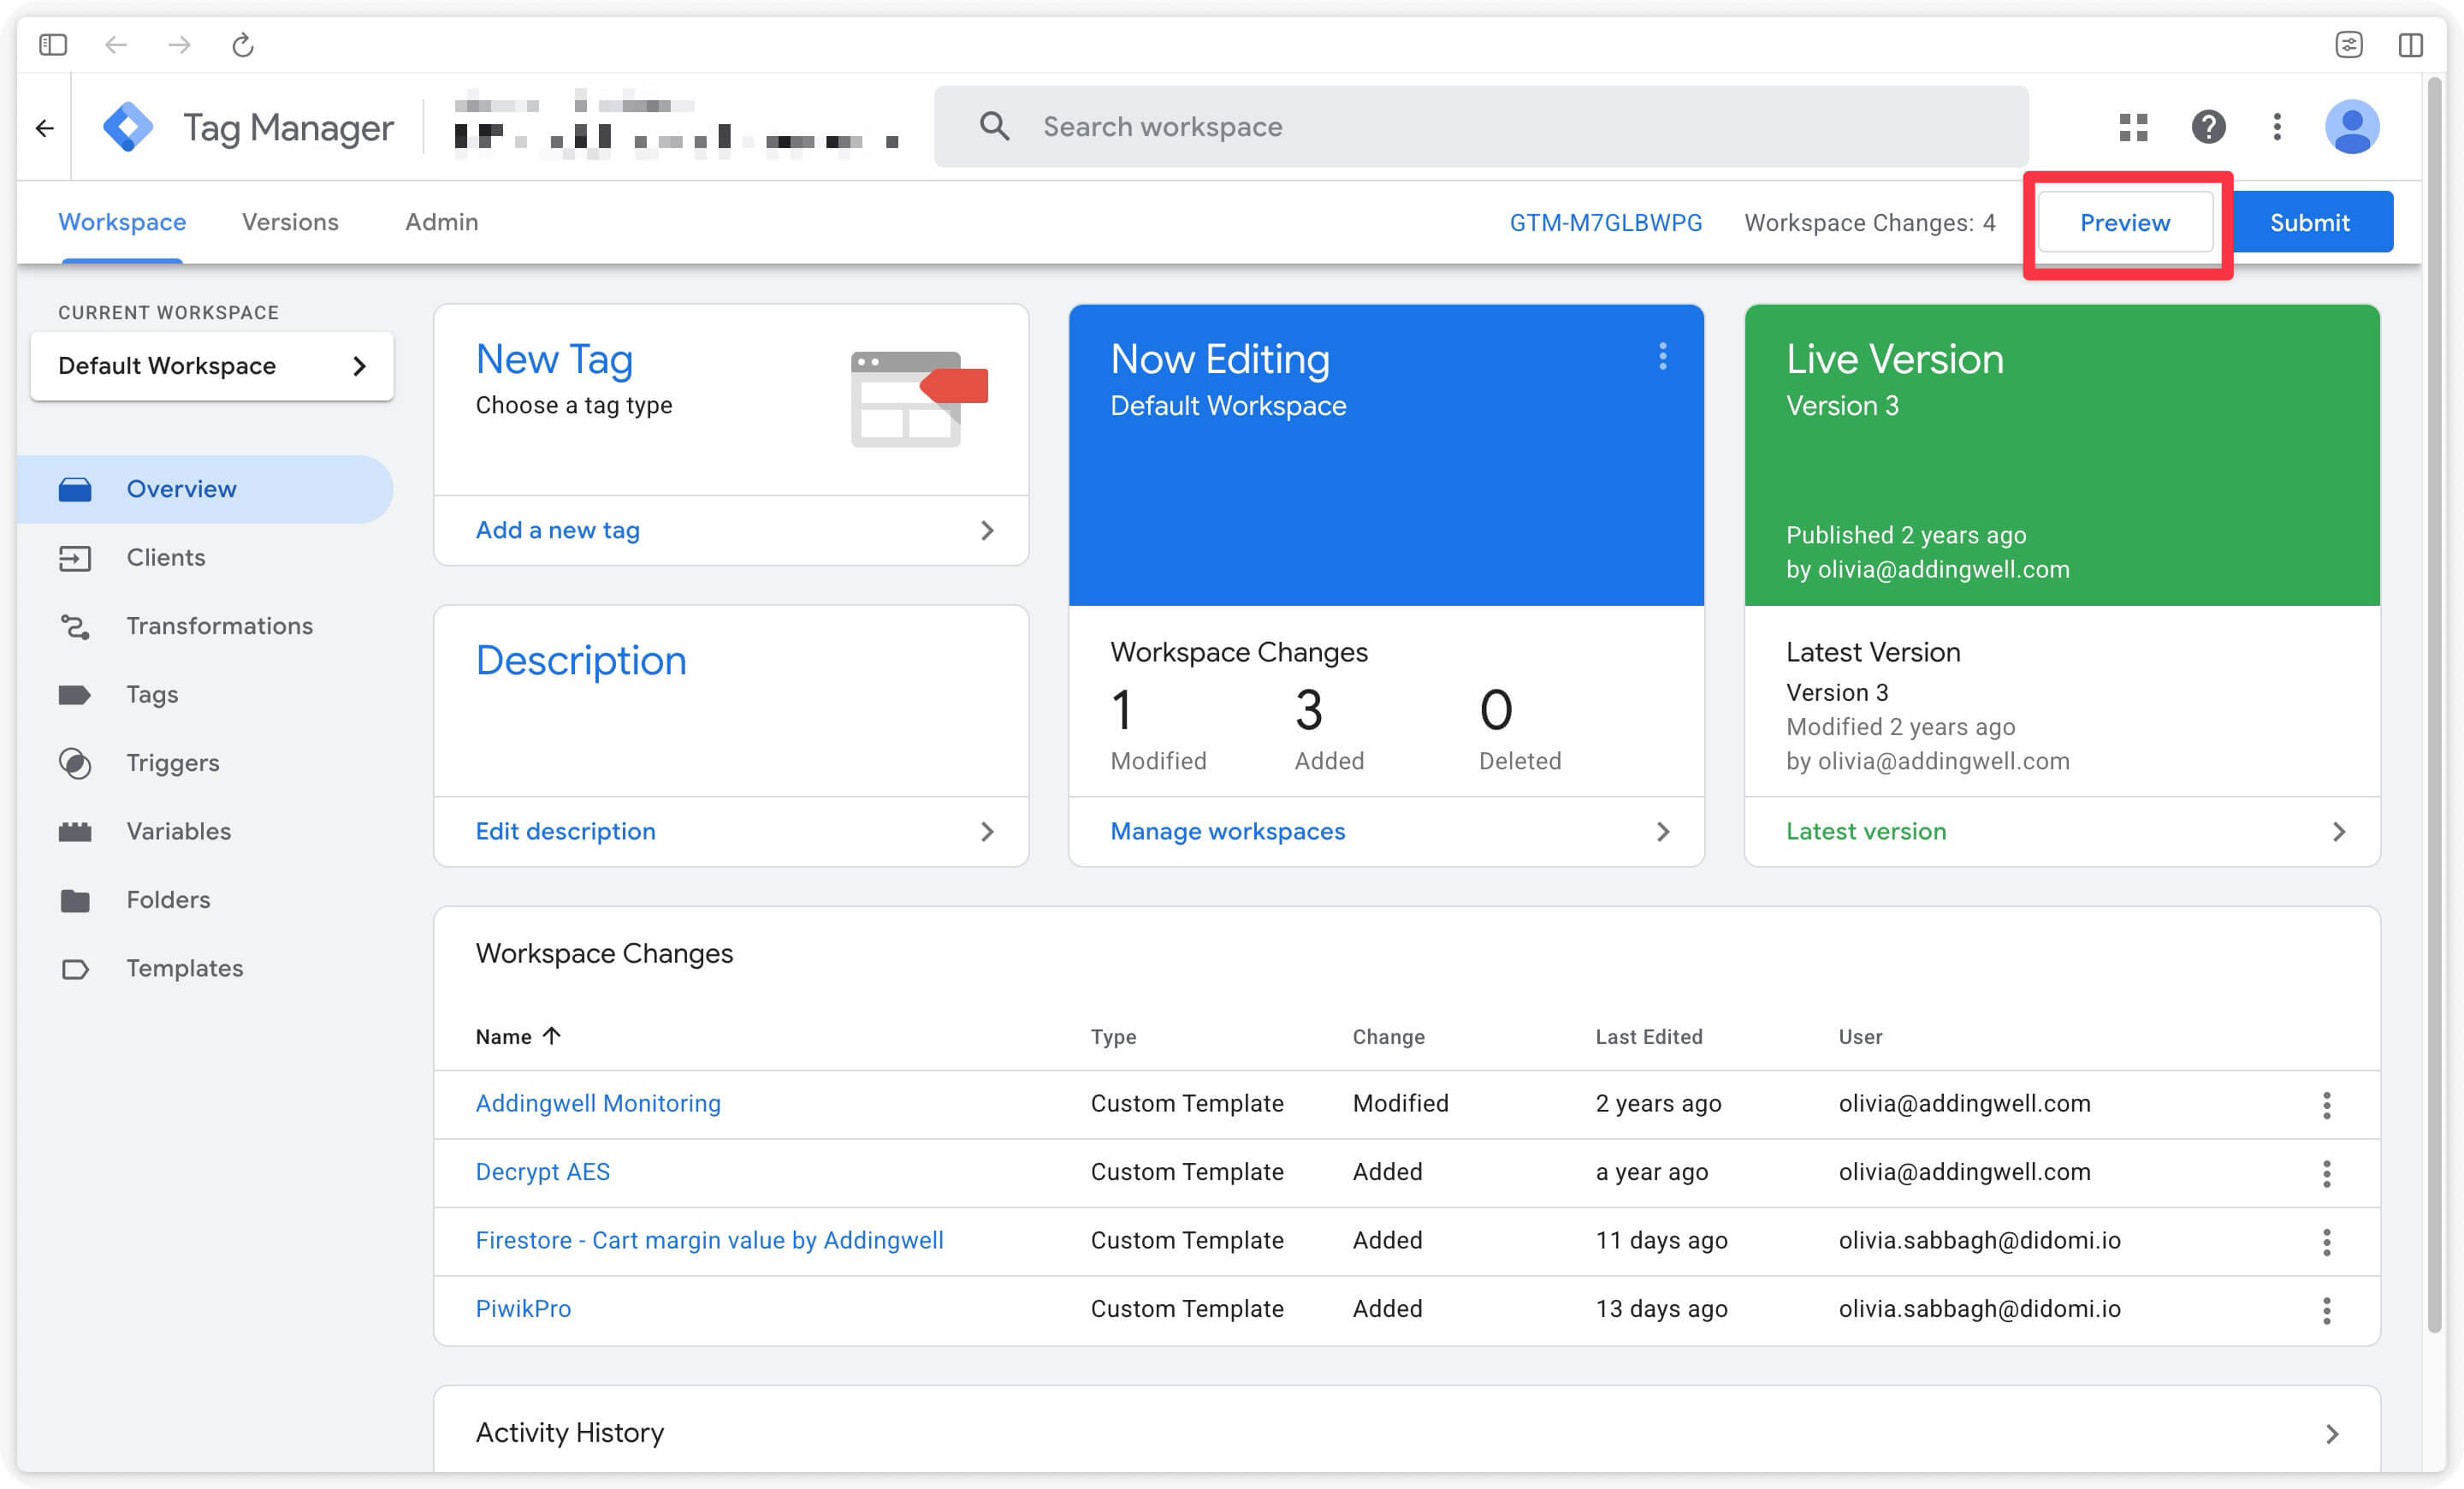
- Trigger an event with the encrypted margin. To do so, open the site in a new tab and run a manual push in the developer console.
Right-click on your site, click Inspect, and open the developer console.
Enter a dataLayer push as shown below, using your previously encrypted margin value in the margin parameter:
window.dataLayer = window.dataLayer || [];
window.dataLayer.push({ ecommerce: null });
window.dataLayer.push({
  event: 'purchase',
  ecommerce: {
    transaction_id:   'T-98765',
    value:            149.90,
    currency:         'EUR',
    margin:           '7iMDN/iKeb1CcaQchL39KQ==',
    items: [{
      item_id: 'SKU-001', item_name: 'Product A',
      price: 149.90, quantity: 1
    }],
  },
});- Check the value in sGTM. In the preview panel, select the
purchaseevent and open the Variables tab. Thenet_revenue_valuevariable should return the decrypted margin.
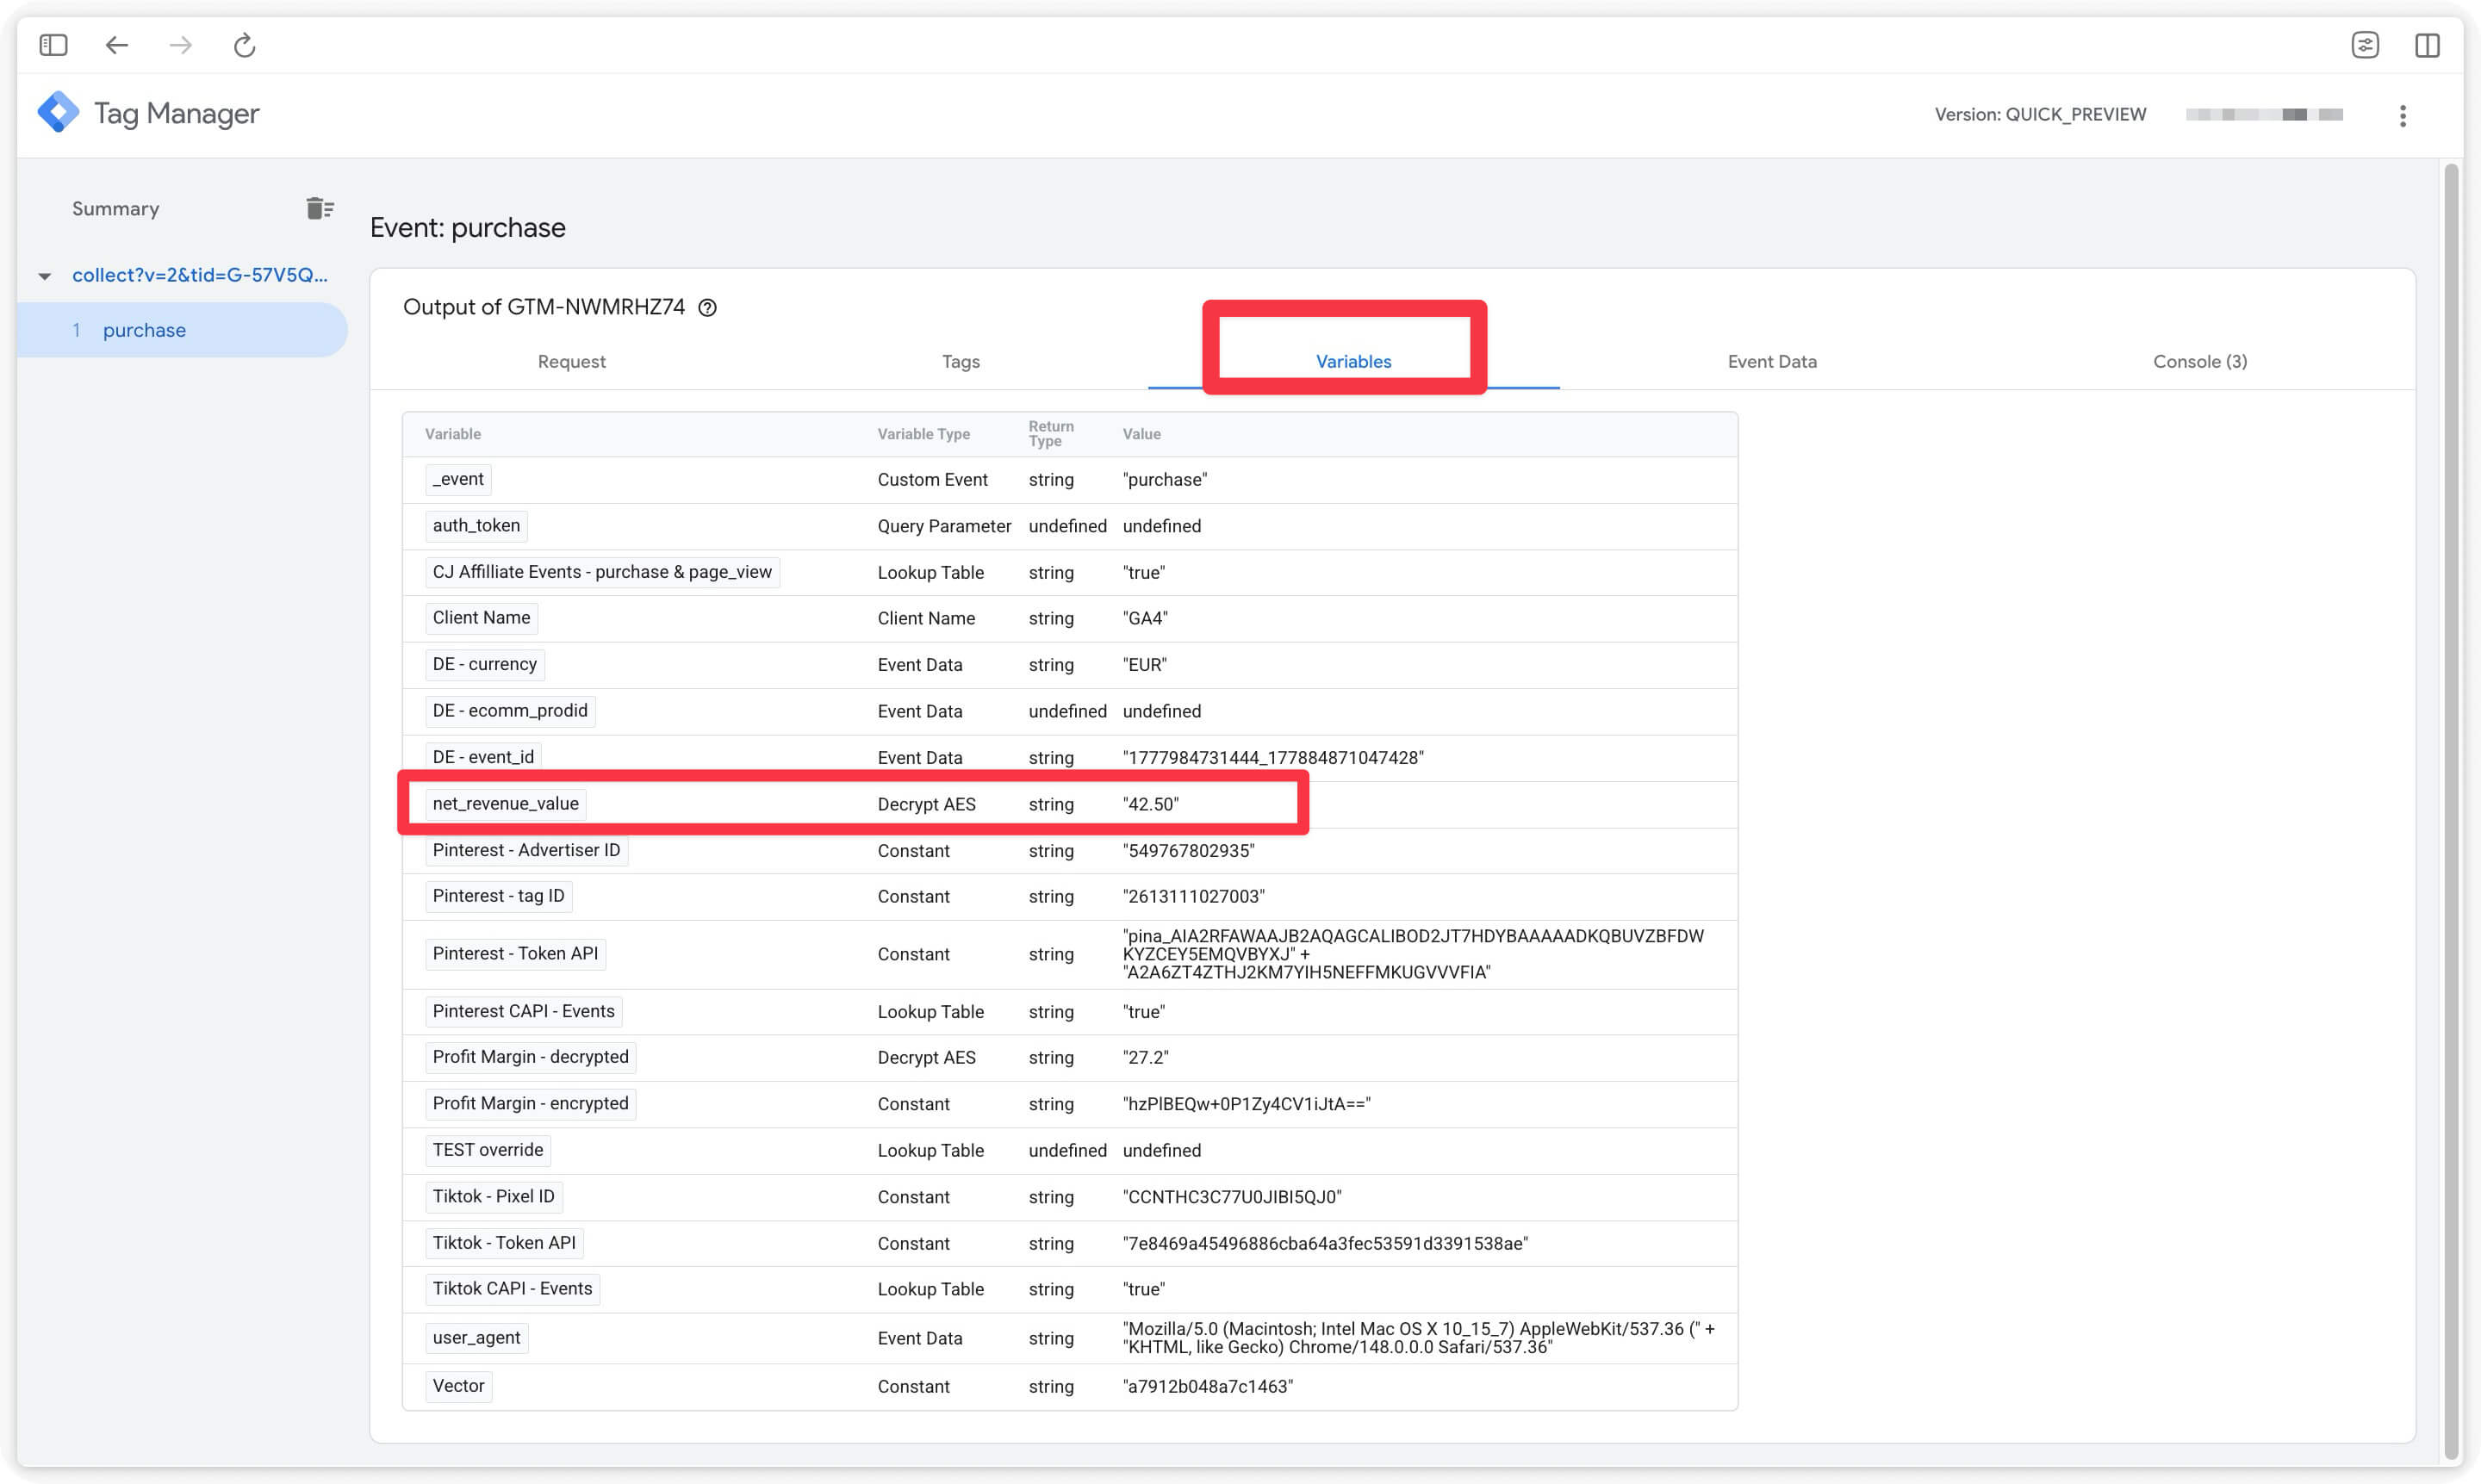
In our example, we can confirm the decrypted value on the sGTM side: 42.50.
You can then use this decrypted margin value in your tags (see section Send margin to media platforms).
Solution 2: Enrichment via a Firestore database
This approach involves not sending the margin from the client at all, but instead adding it server-side via a database. This solution therefore requires database management on your end.
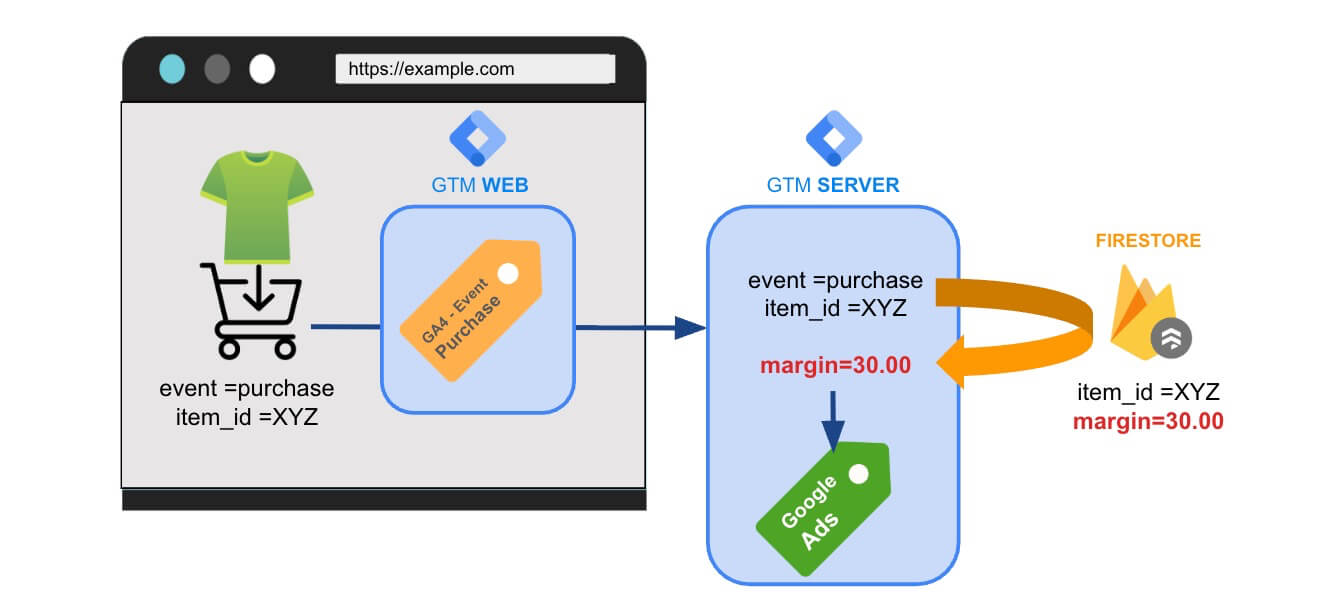
Cost impact:
- Read: ~0.1 request per call → depends on the number of products (1 call per product)
- Write: ~0.33 request per product update → adding or modifying a margin.
Step 1: Create and populate the database
Your Firestore database can be hosted by Addingwell. Contact our support team at [email protected] to request this.
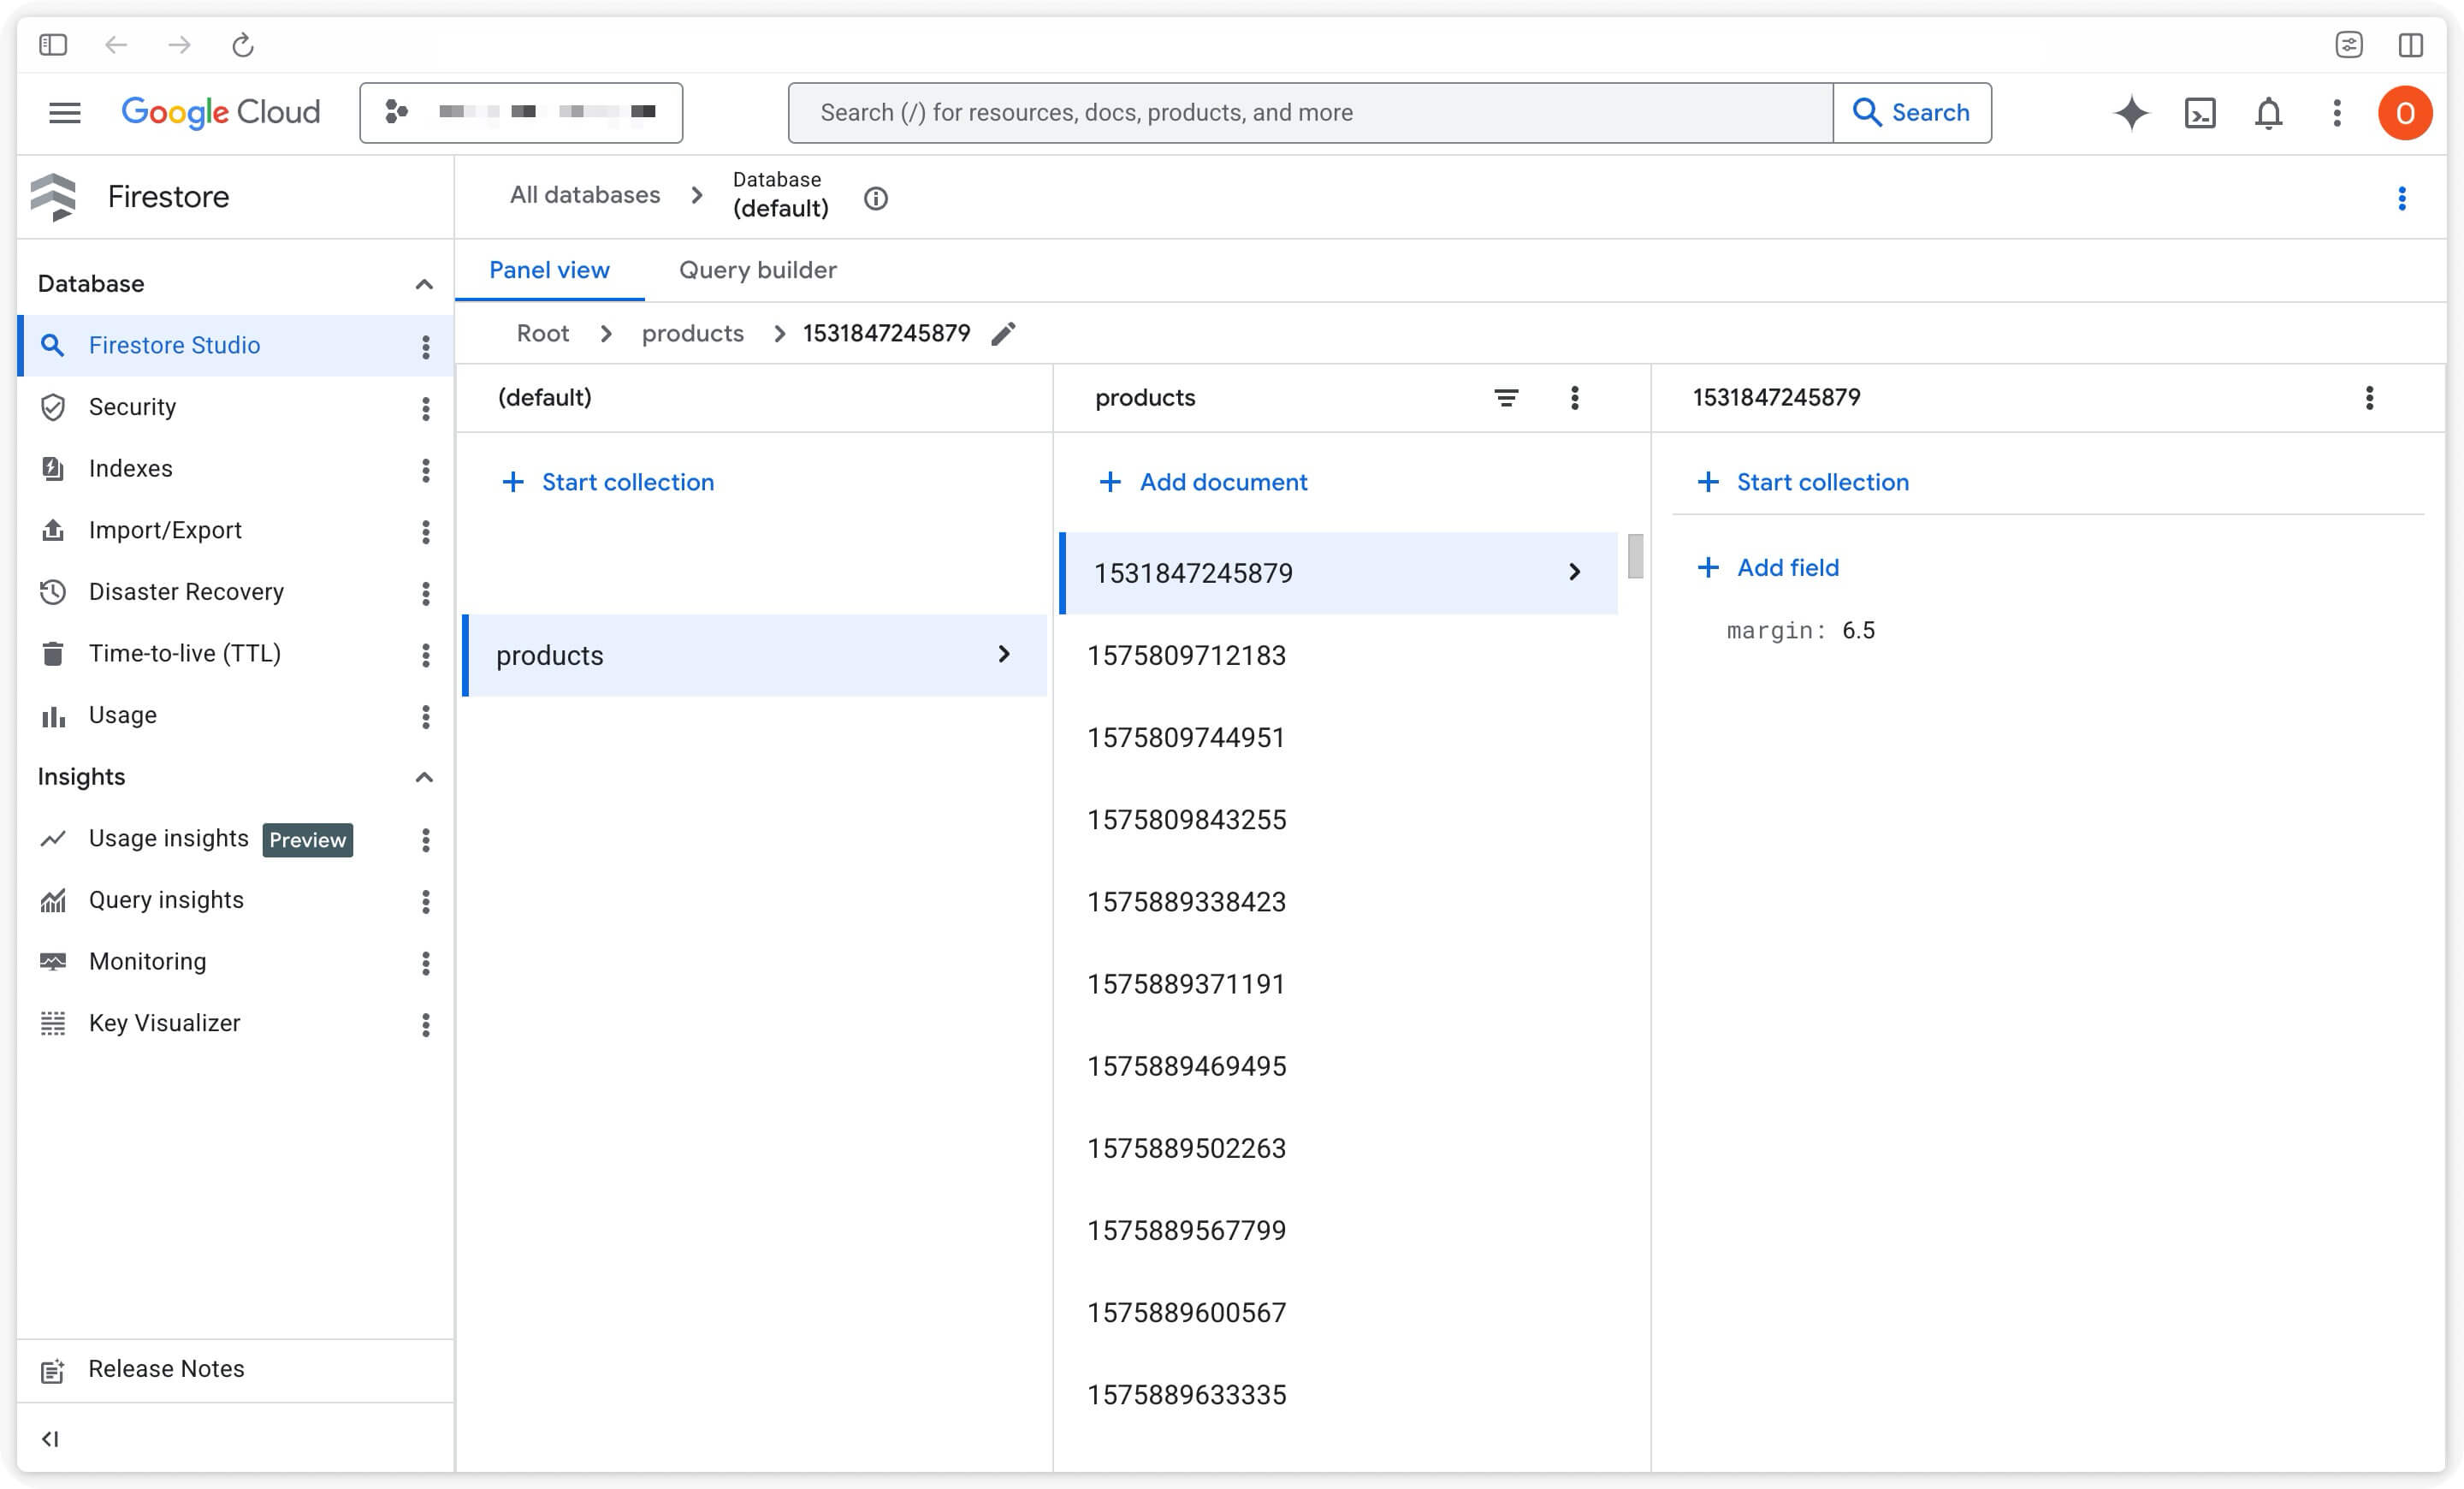
The database must contain at minimum:
- A collection grouping all your data (product and associated margin). In the example below, our collection is named products.
- A key corresponding to each of your
item_idvalues. In our example, one key is highlighted with the identifier 1531847245879: this corresponds to an item_id for a product sold on our site. - An associated margin value, or an associated margin rate for each product. In our example, we store the margin in a field we named
margin, and this field holds a value for each item_id (margin value of 6.5 for the product in our example).
Step 2: Synchronize product data
- Adding new products
- Updating existing margins
This step is essential to ensure data quality. Be careful not to re-sync the entire database on every run, but only the new products or those whose margin has changed. The frequency of this synchronization should also be planned in advance, based on your needs.
Step 3: Retrieve the margin in Server GTM
- Download our dedicated template to query your Firestore database here.
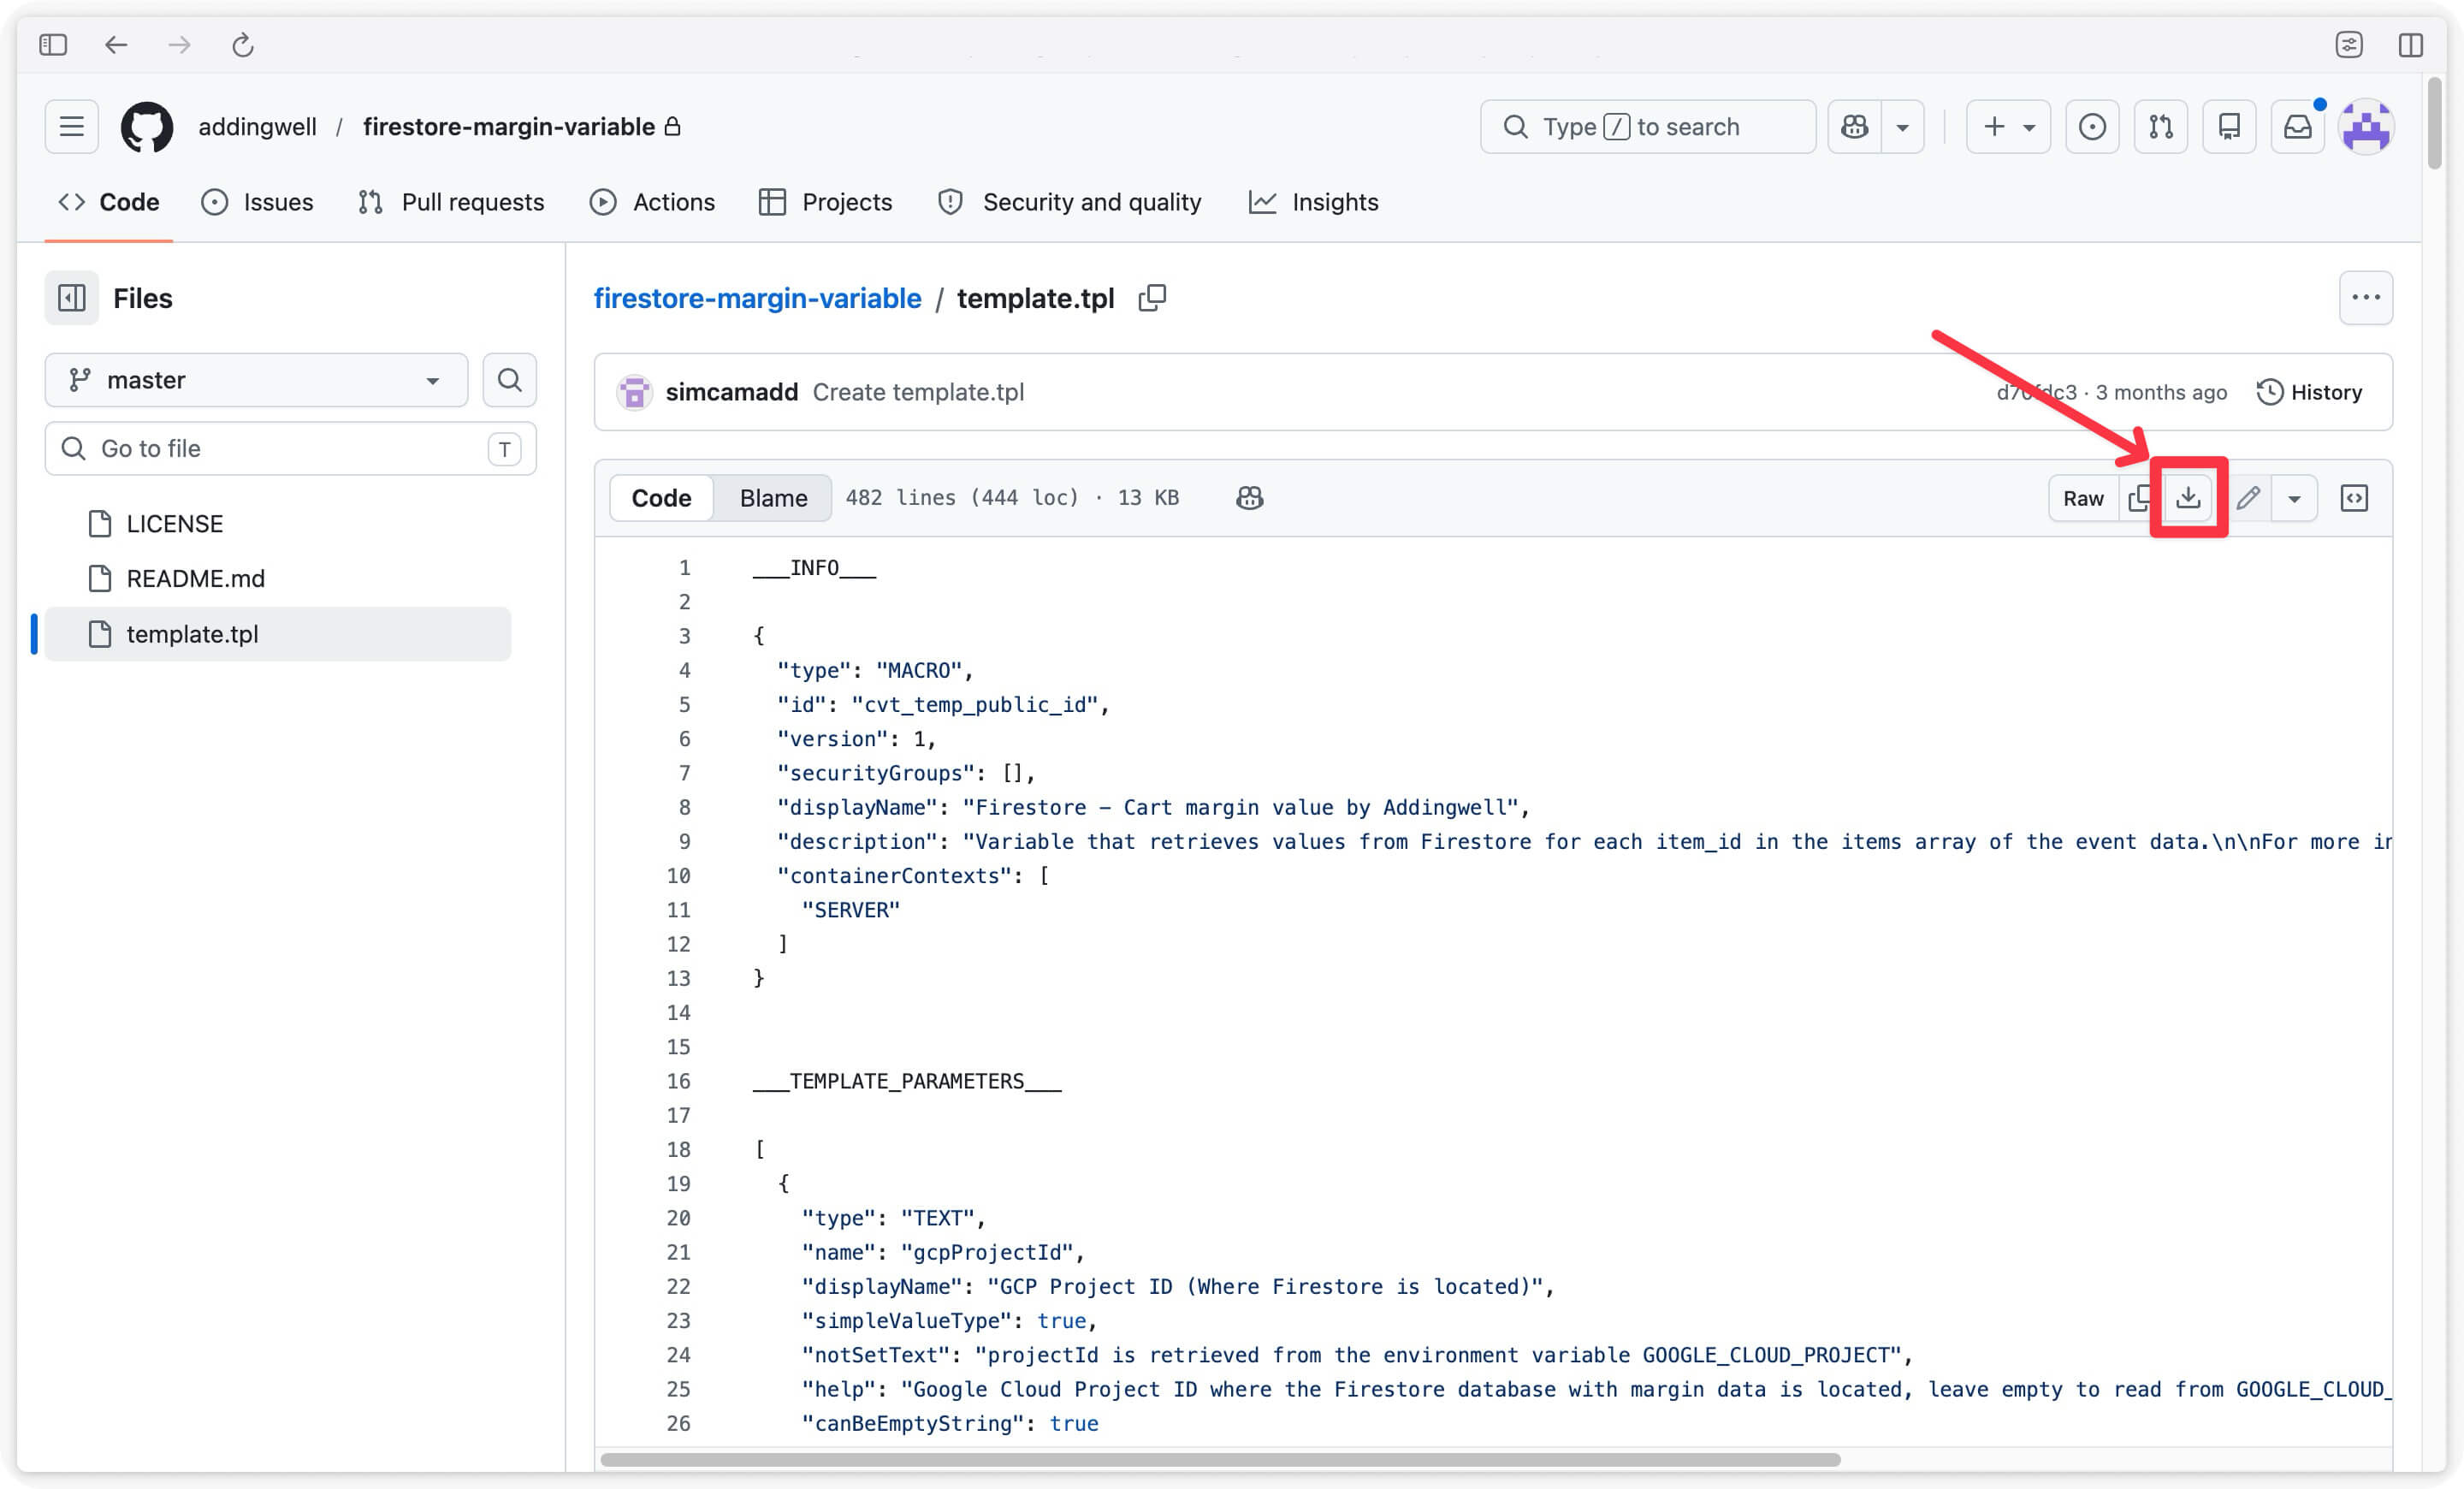
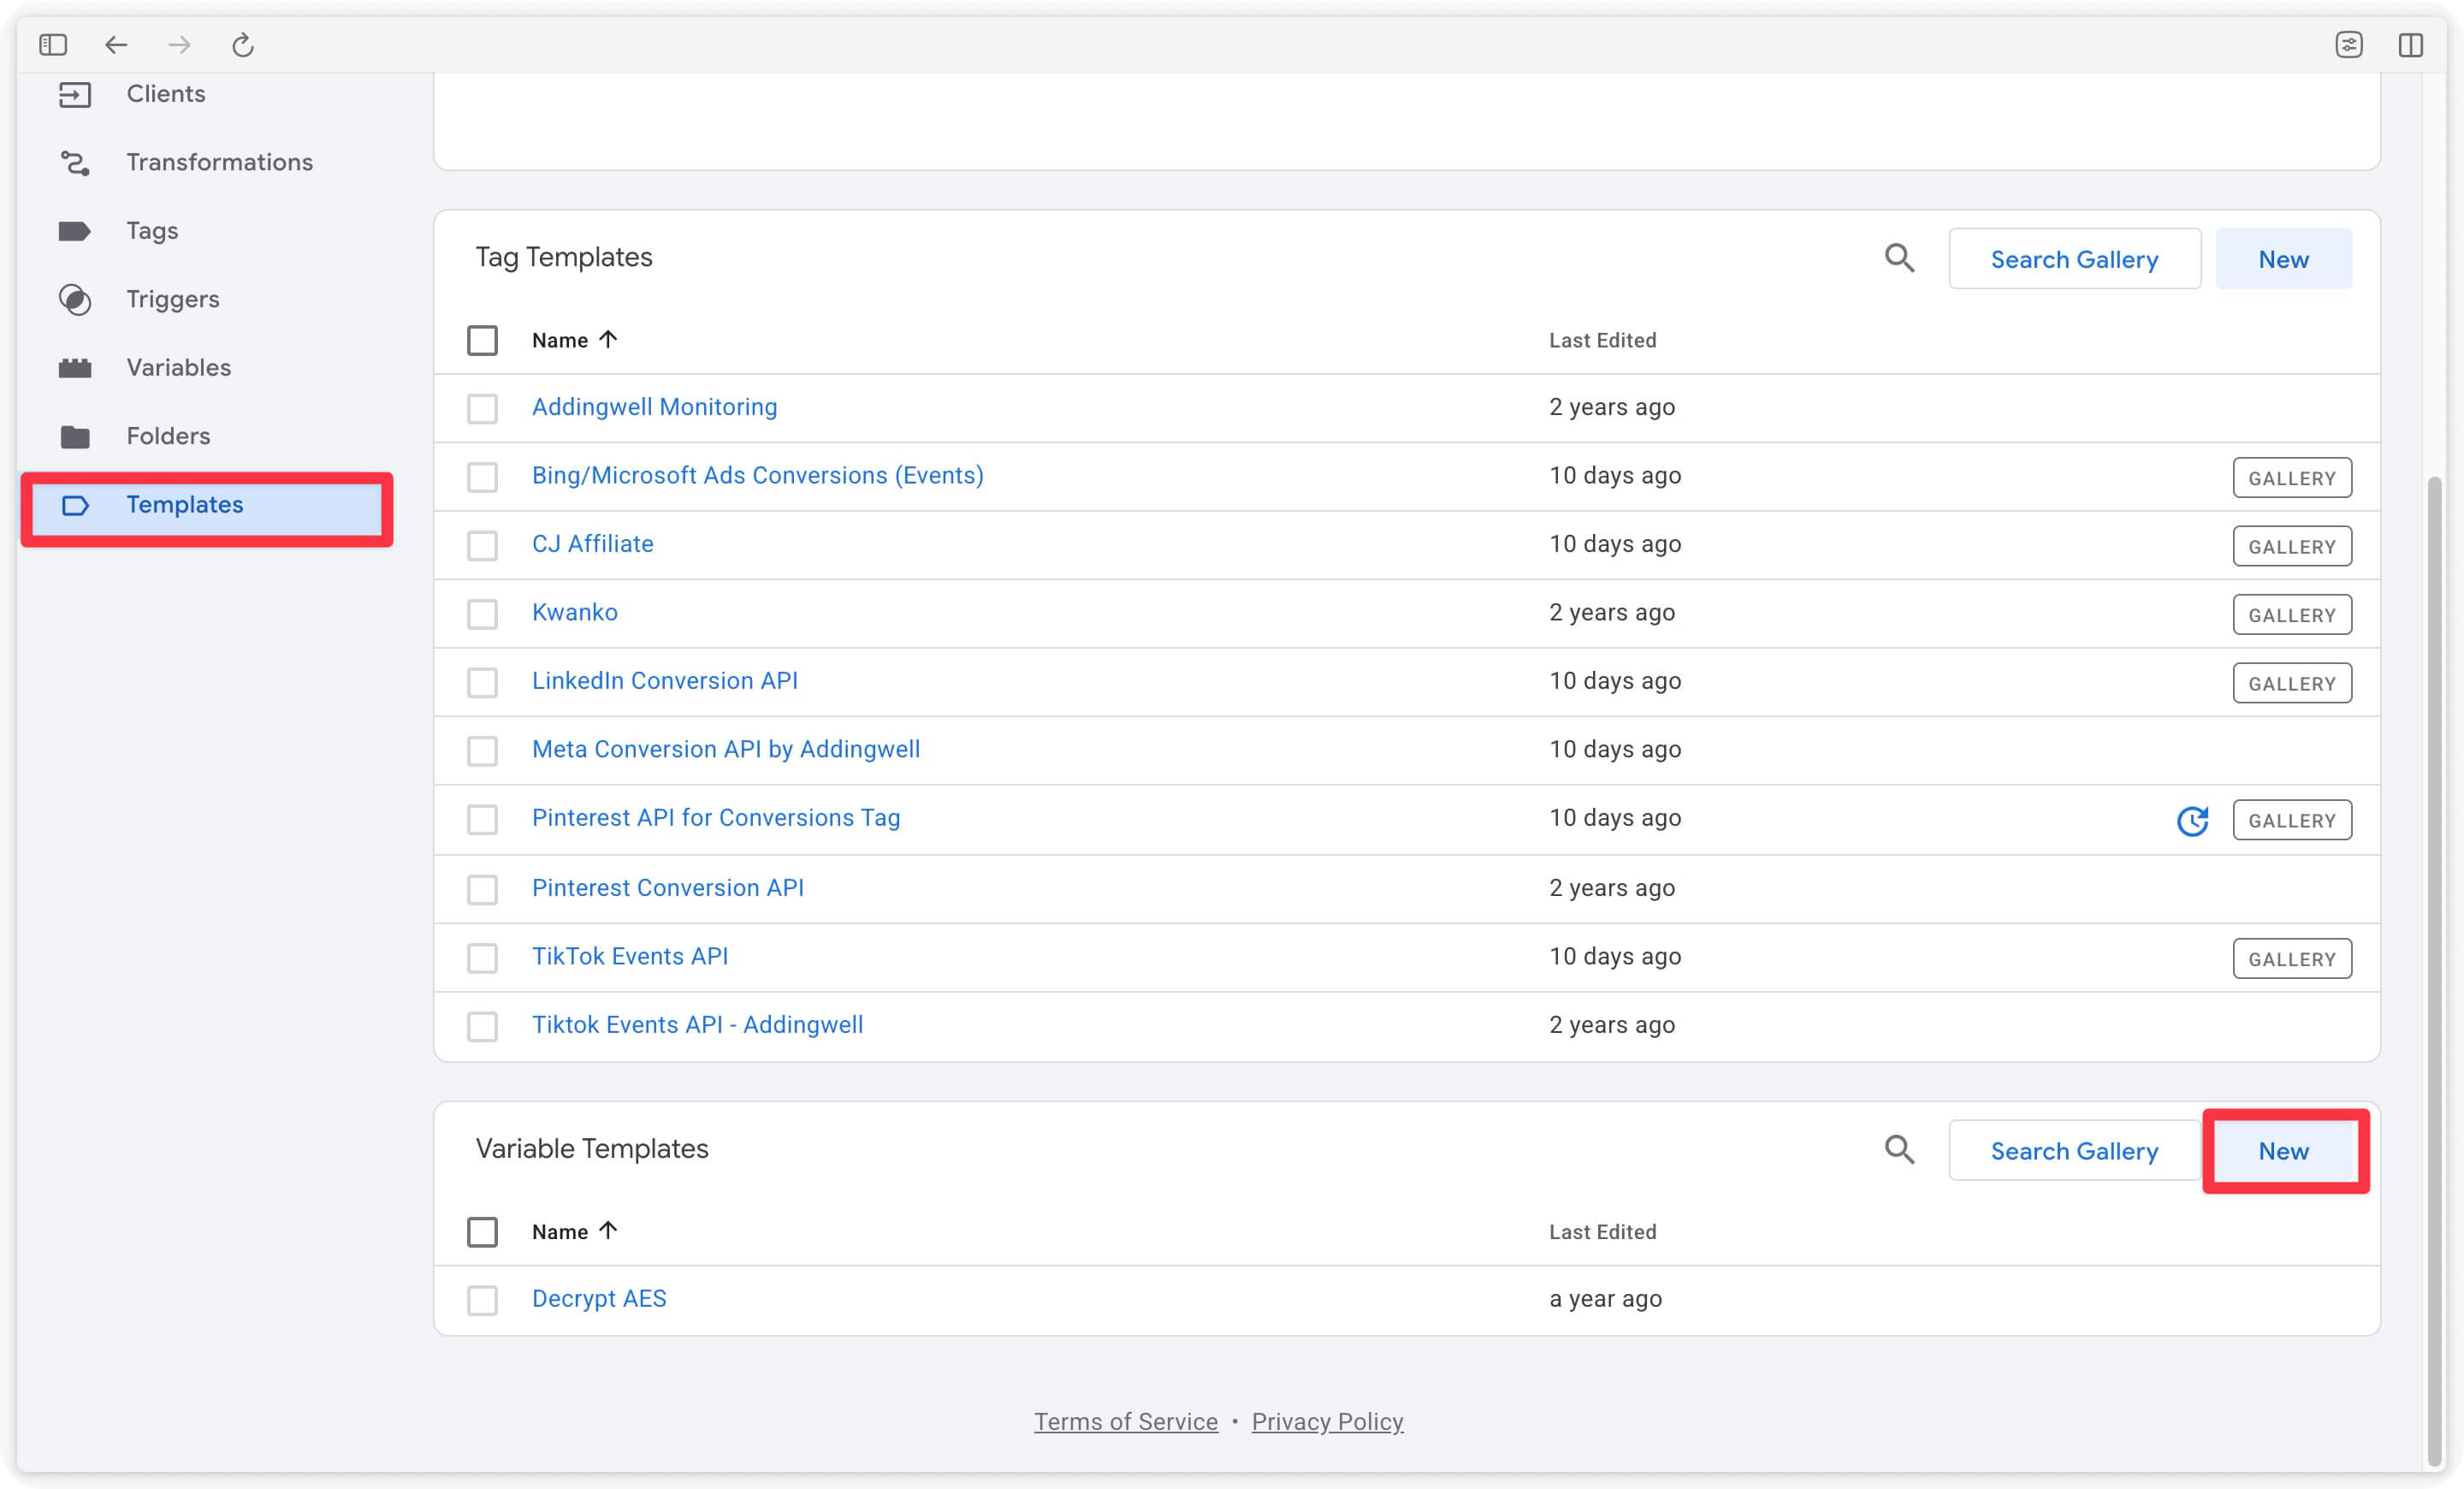
- Import this template by clicking on the Templates tab in your GTM Server, then, under
Variable templates, click New.
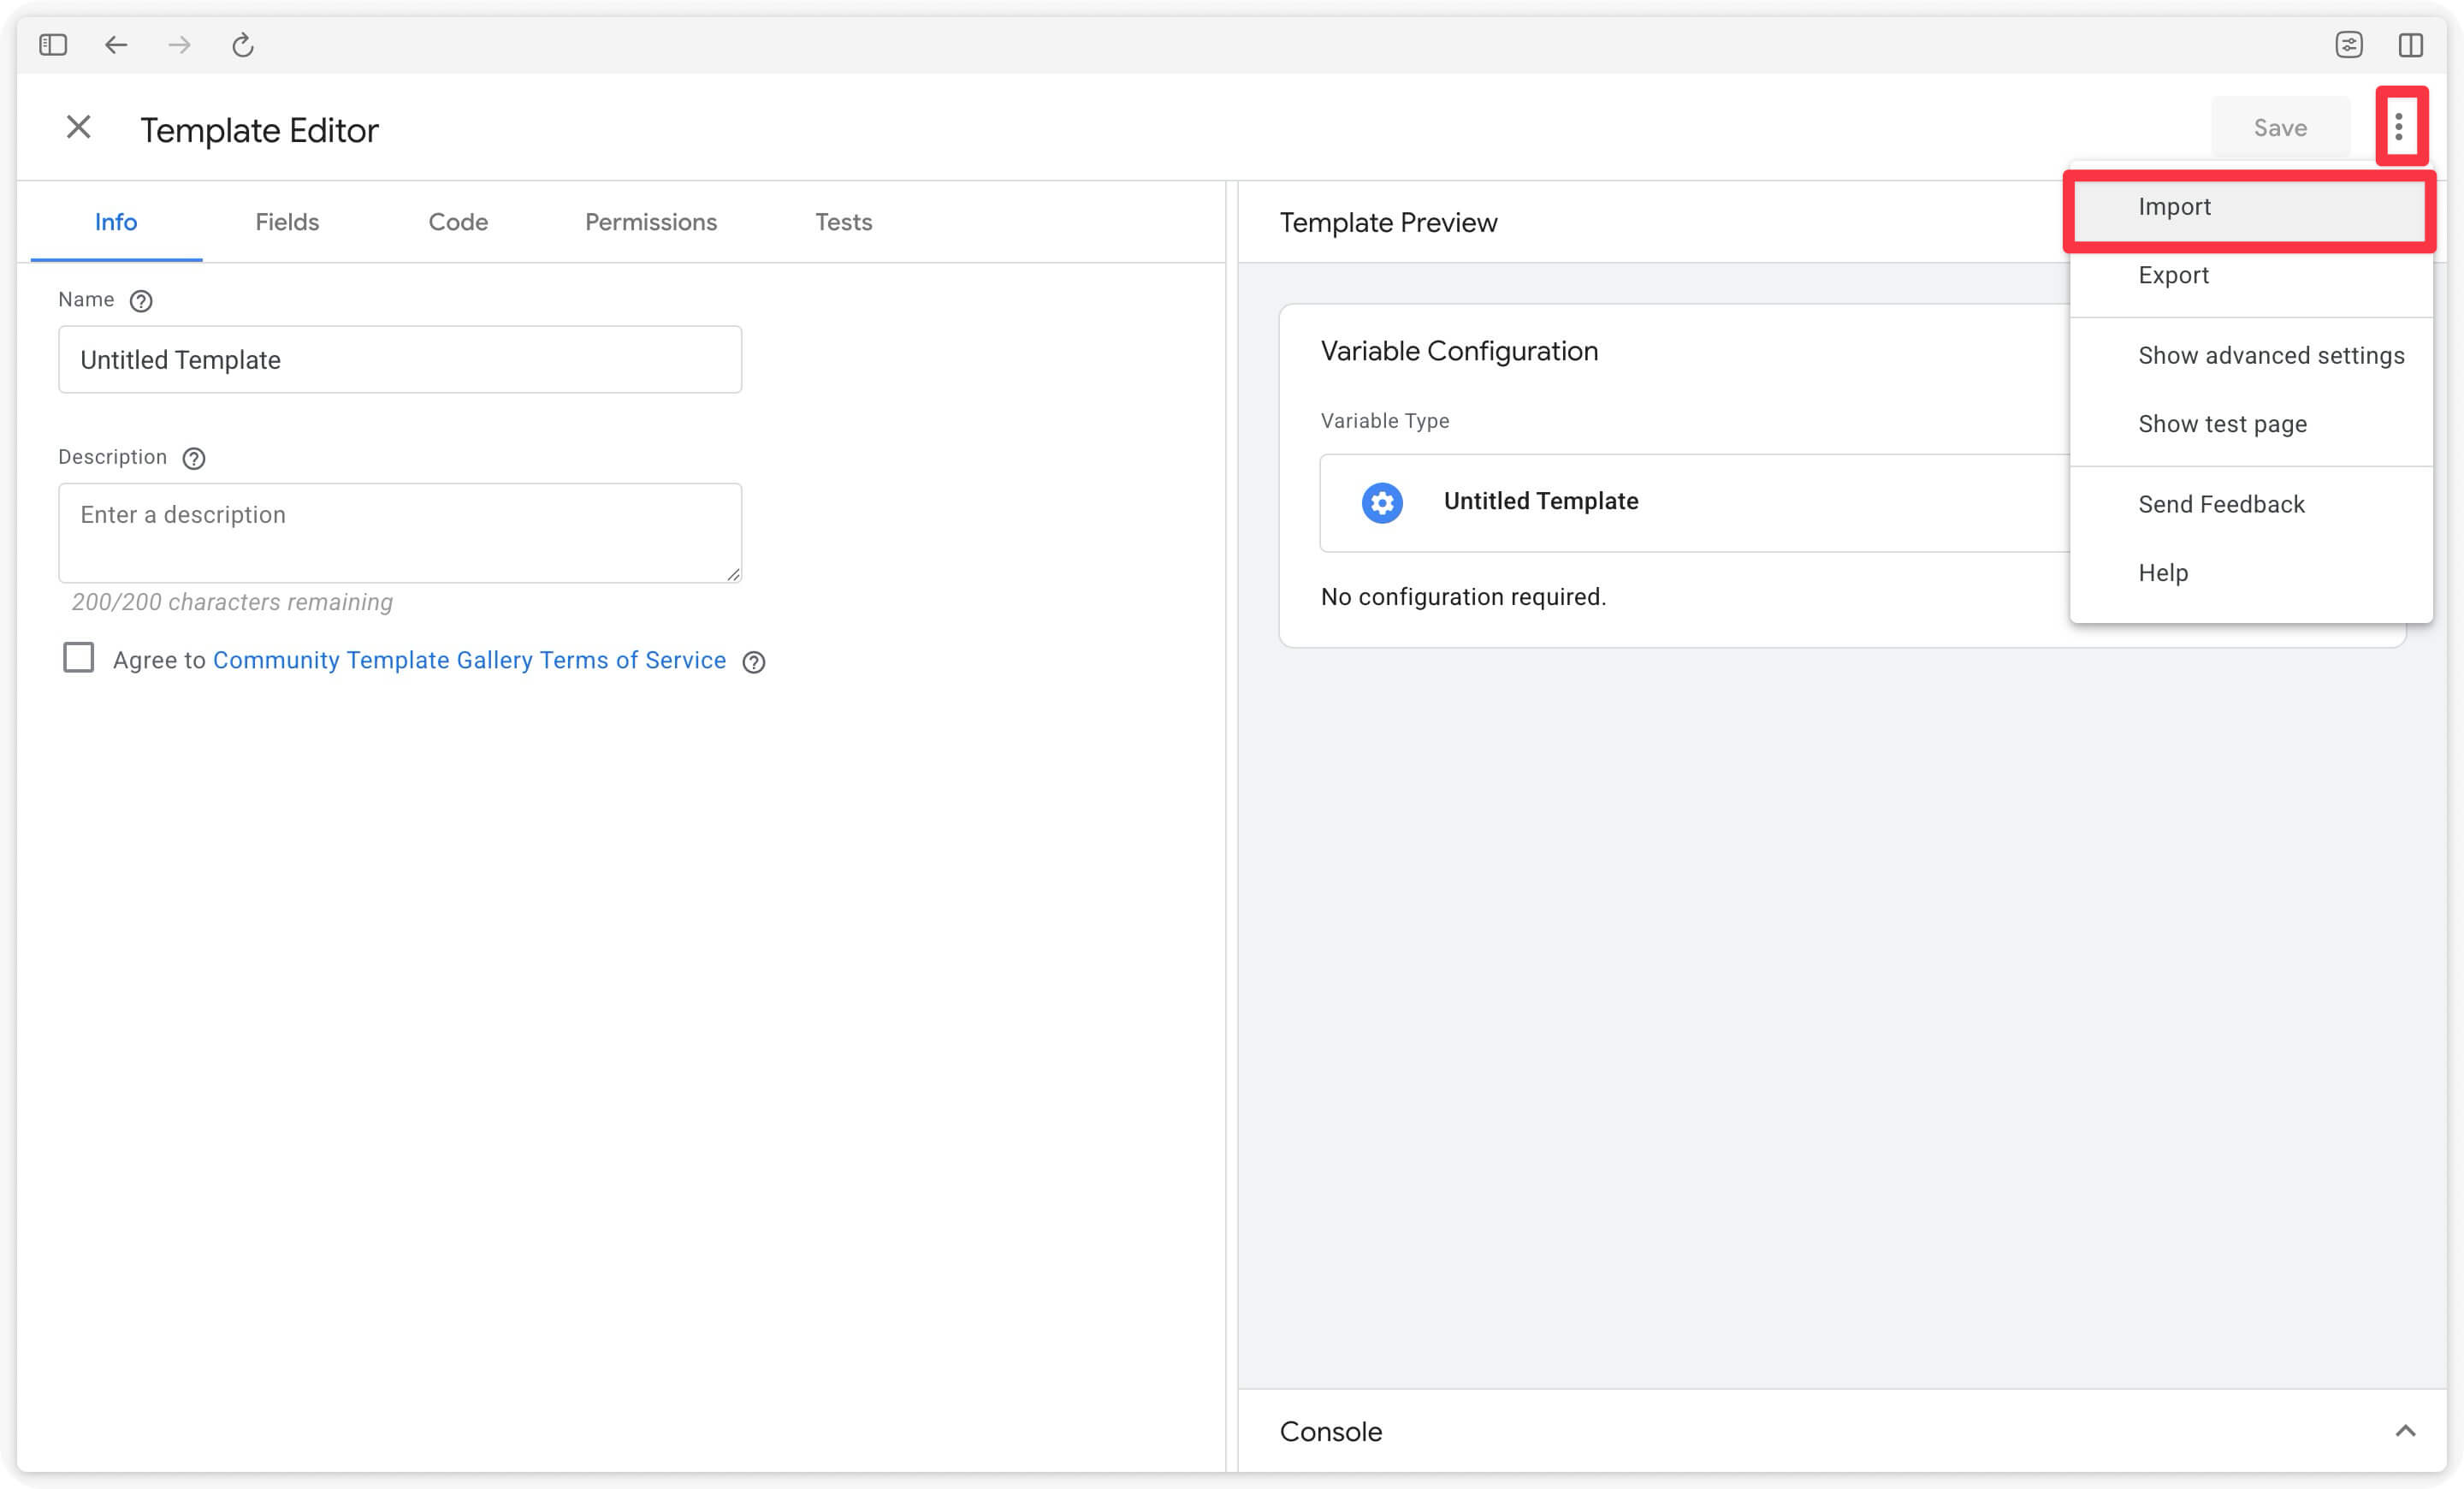
Then click the three dots in the top right corner, then Import. Select the template.tpl file you previously downloaded.
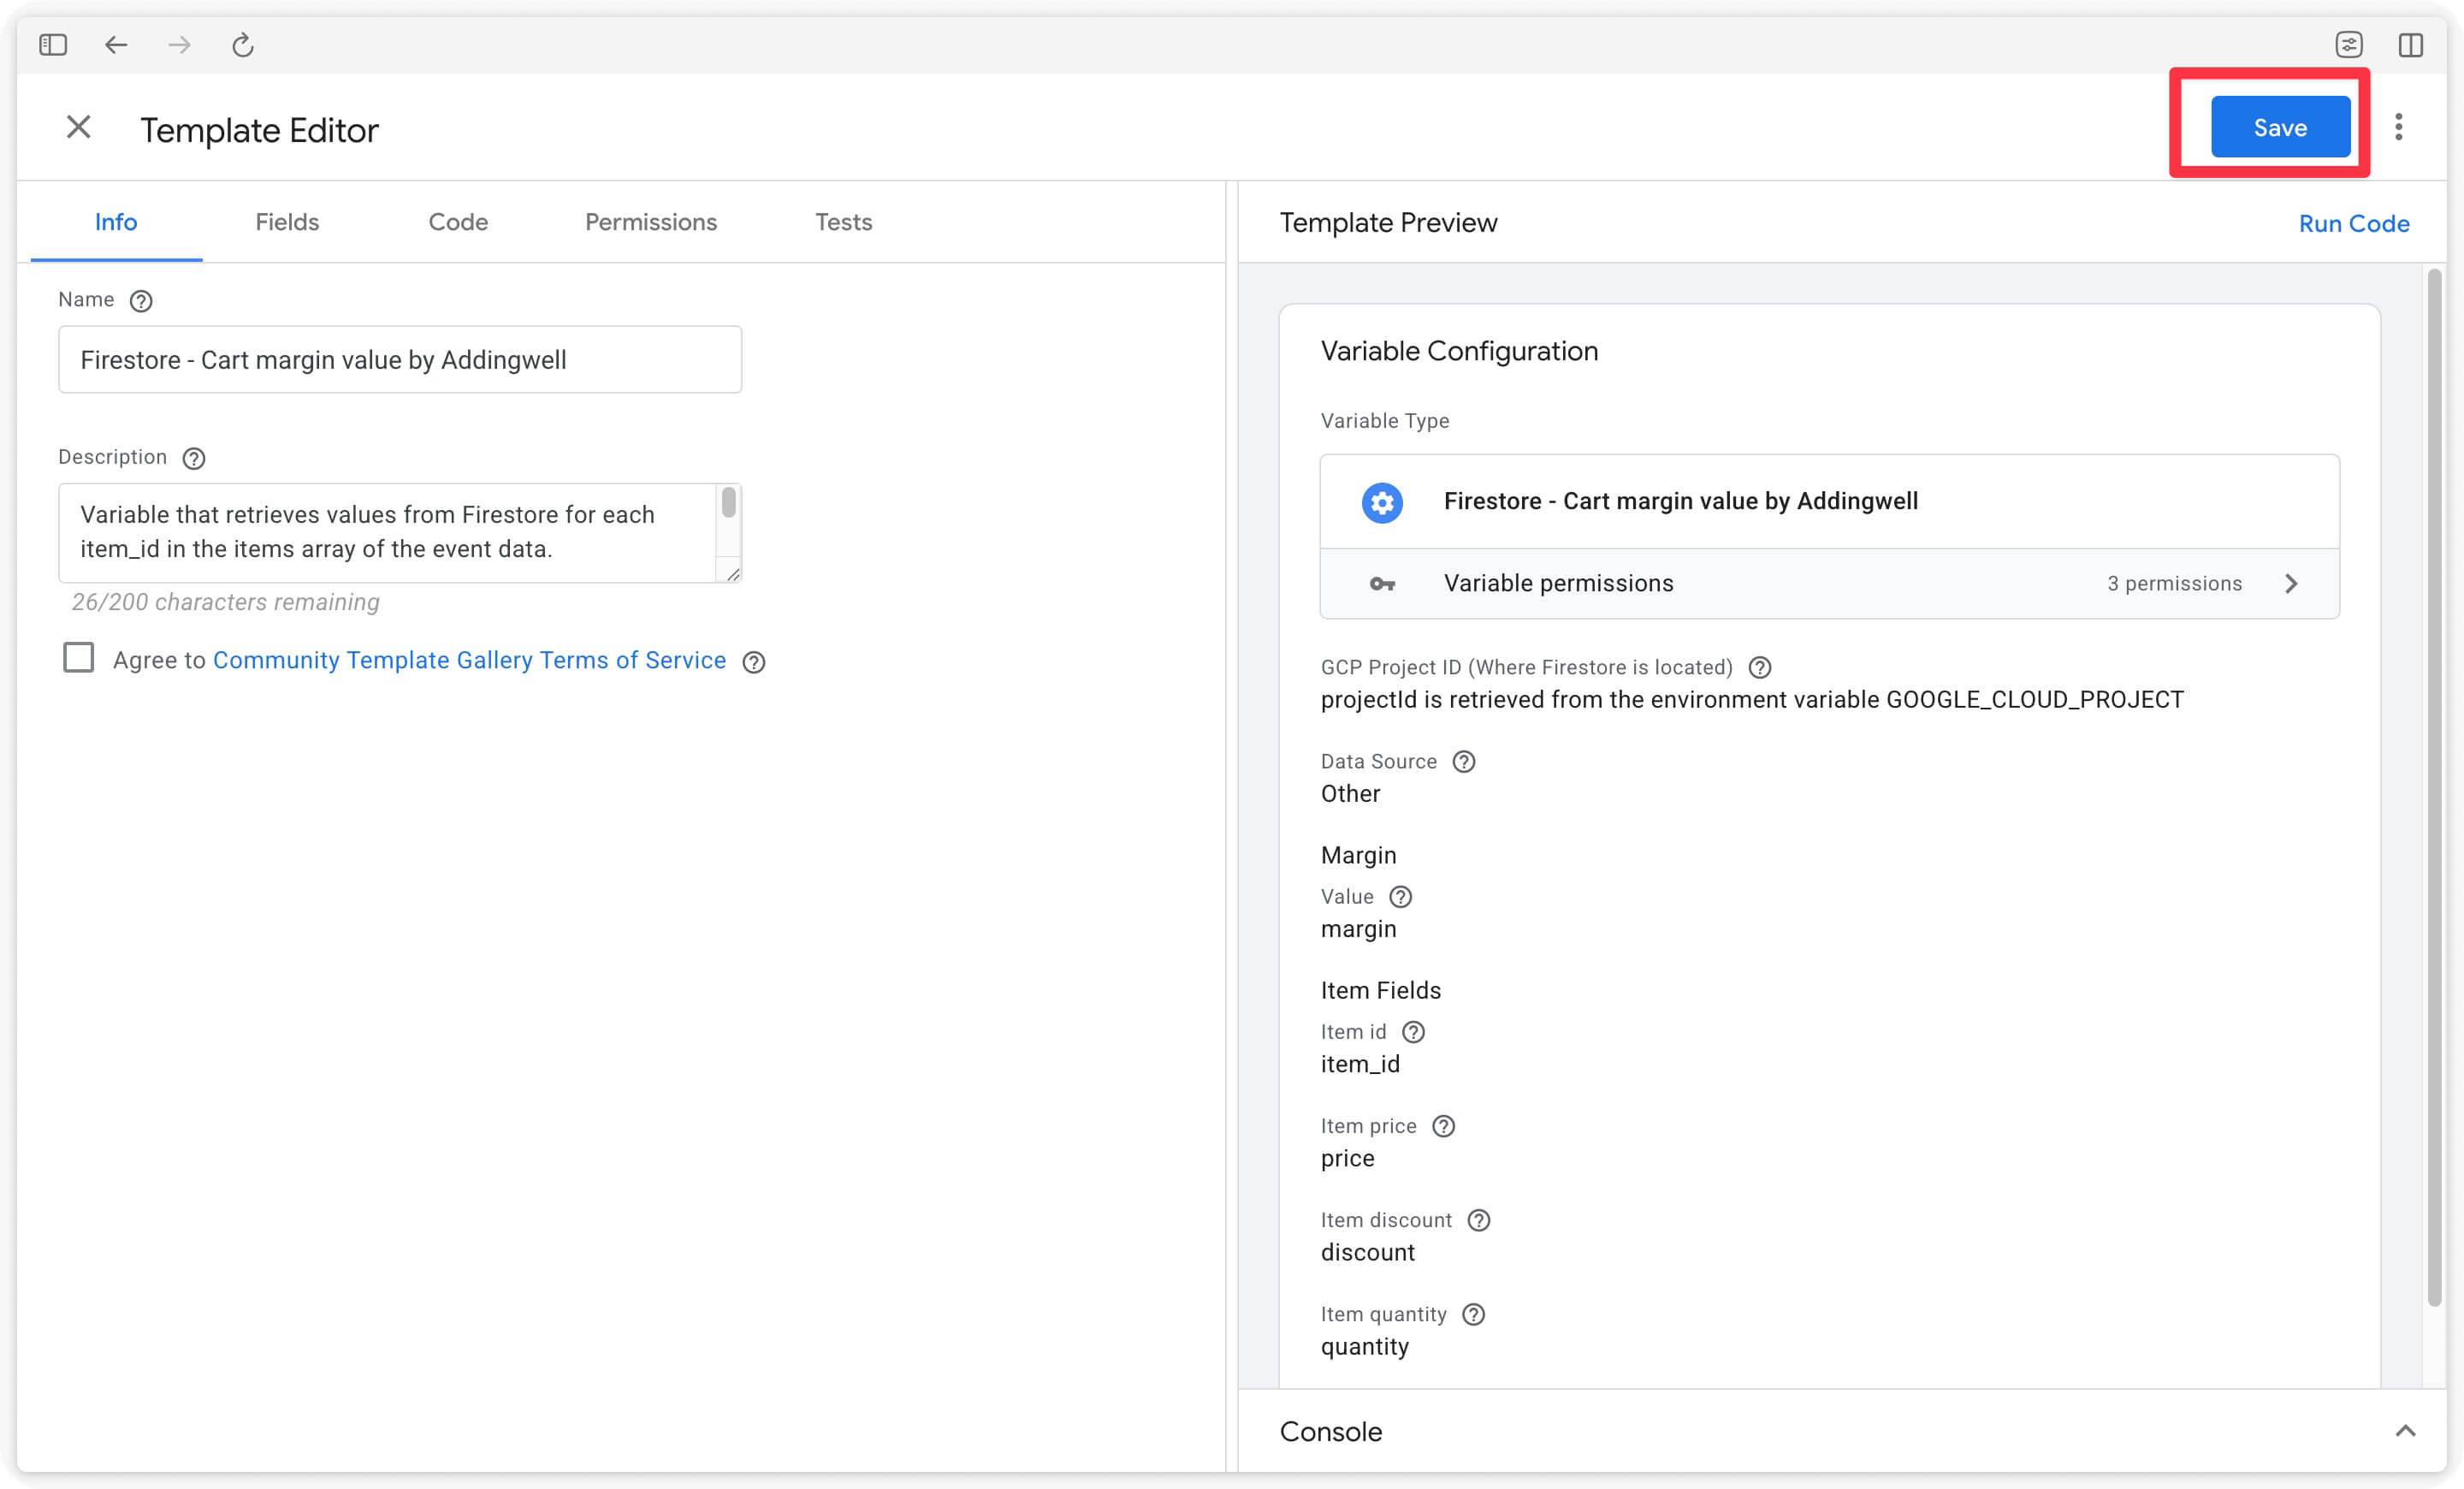
Once the template is loaded, click Save and close this tab.
- Then click on the Variables tab in the left menu, then click New under User-defined variables.
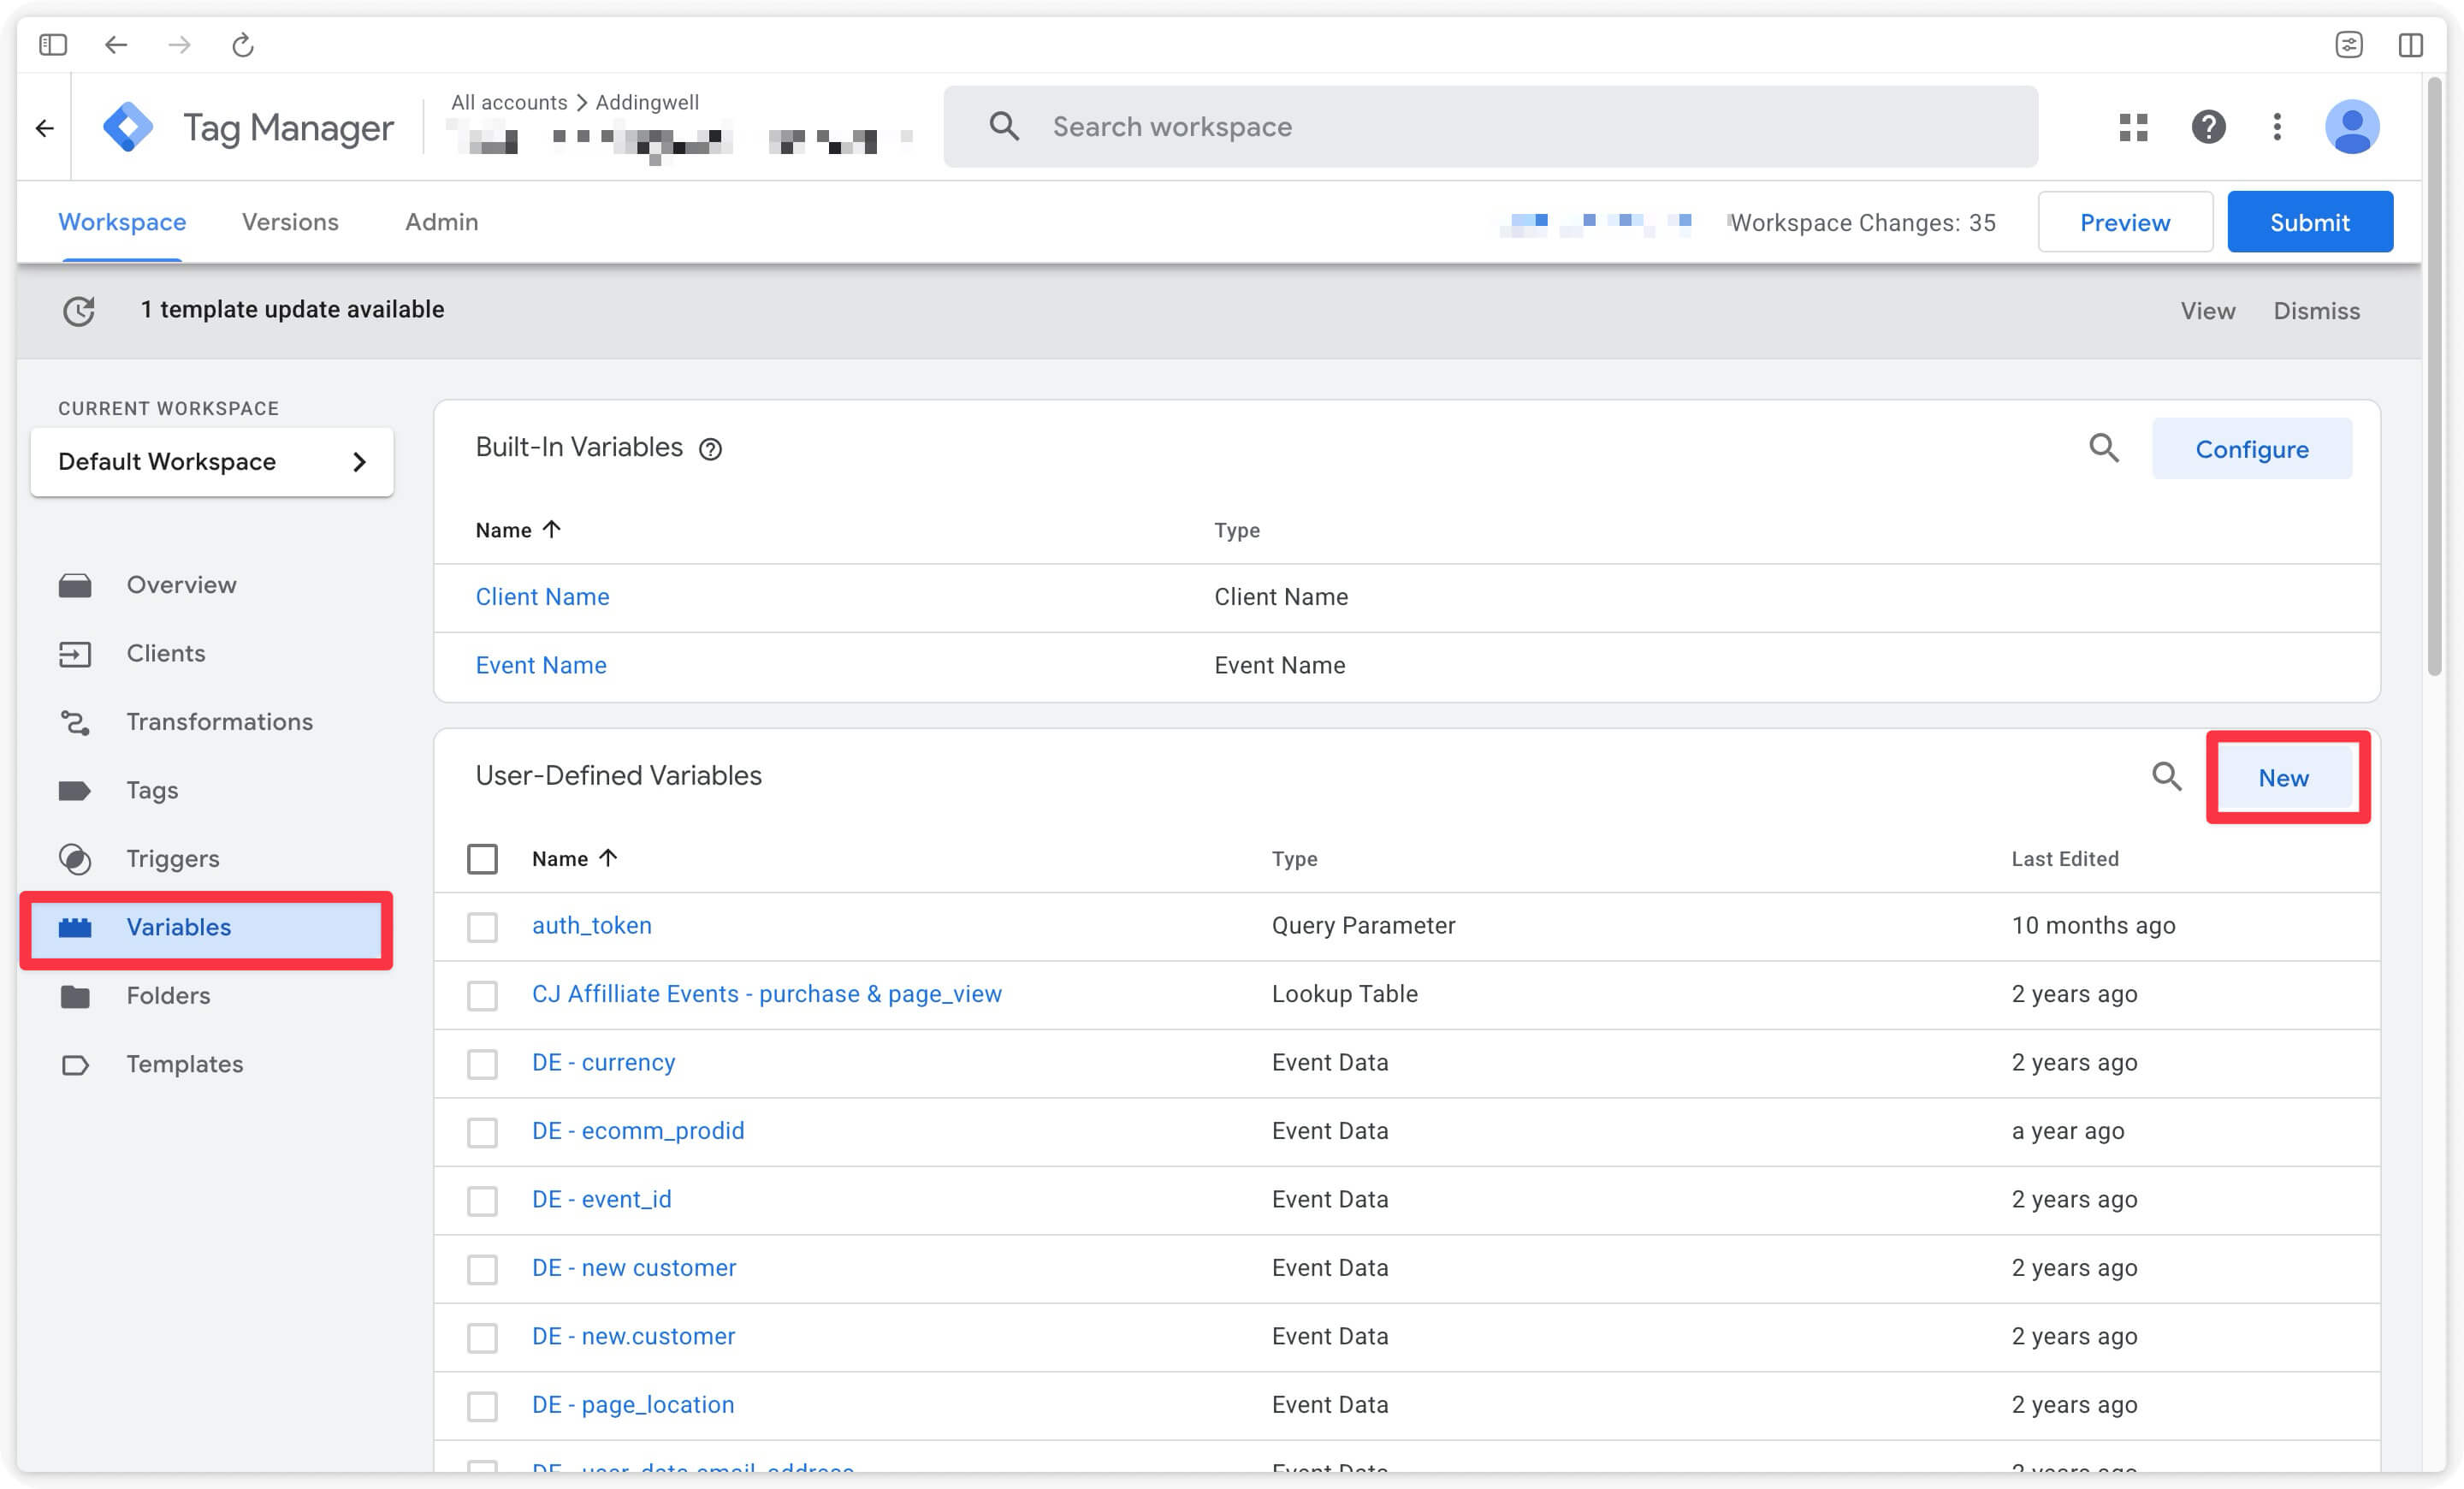
Then select the Firestore - Cart margin value by Addingwell variable template.
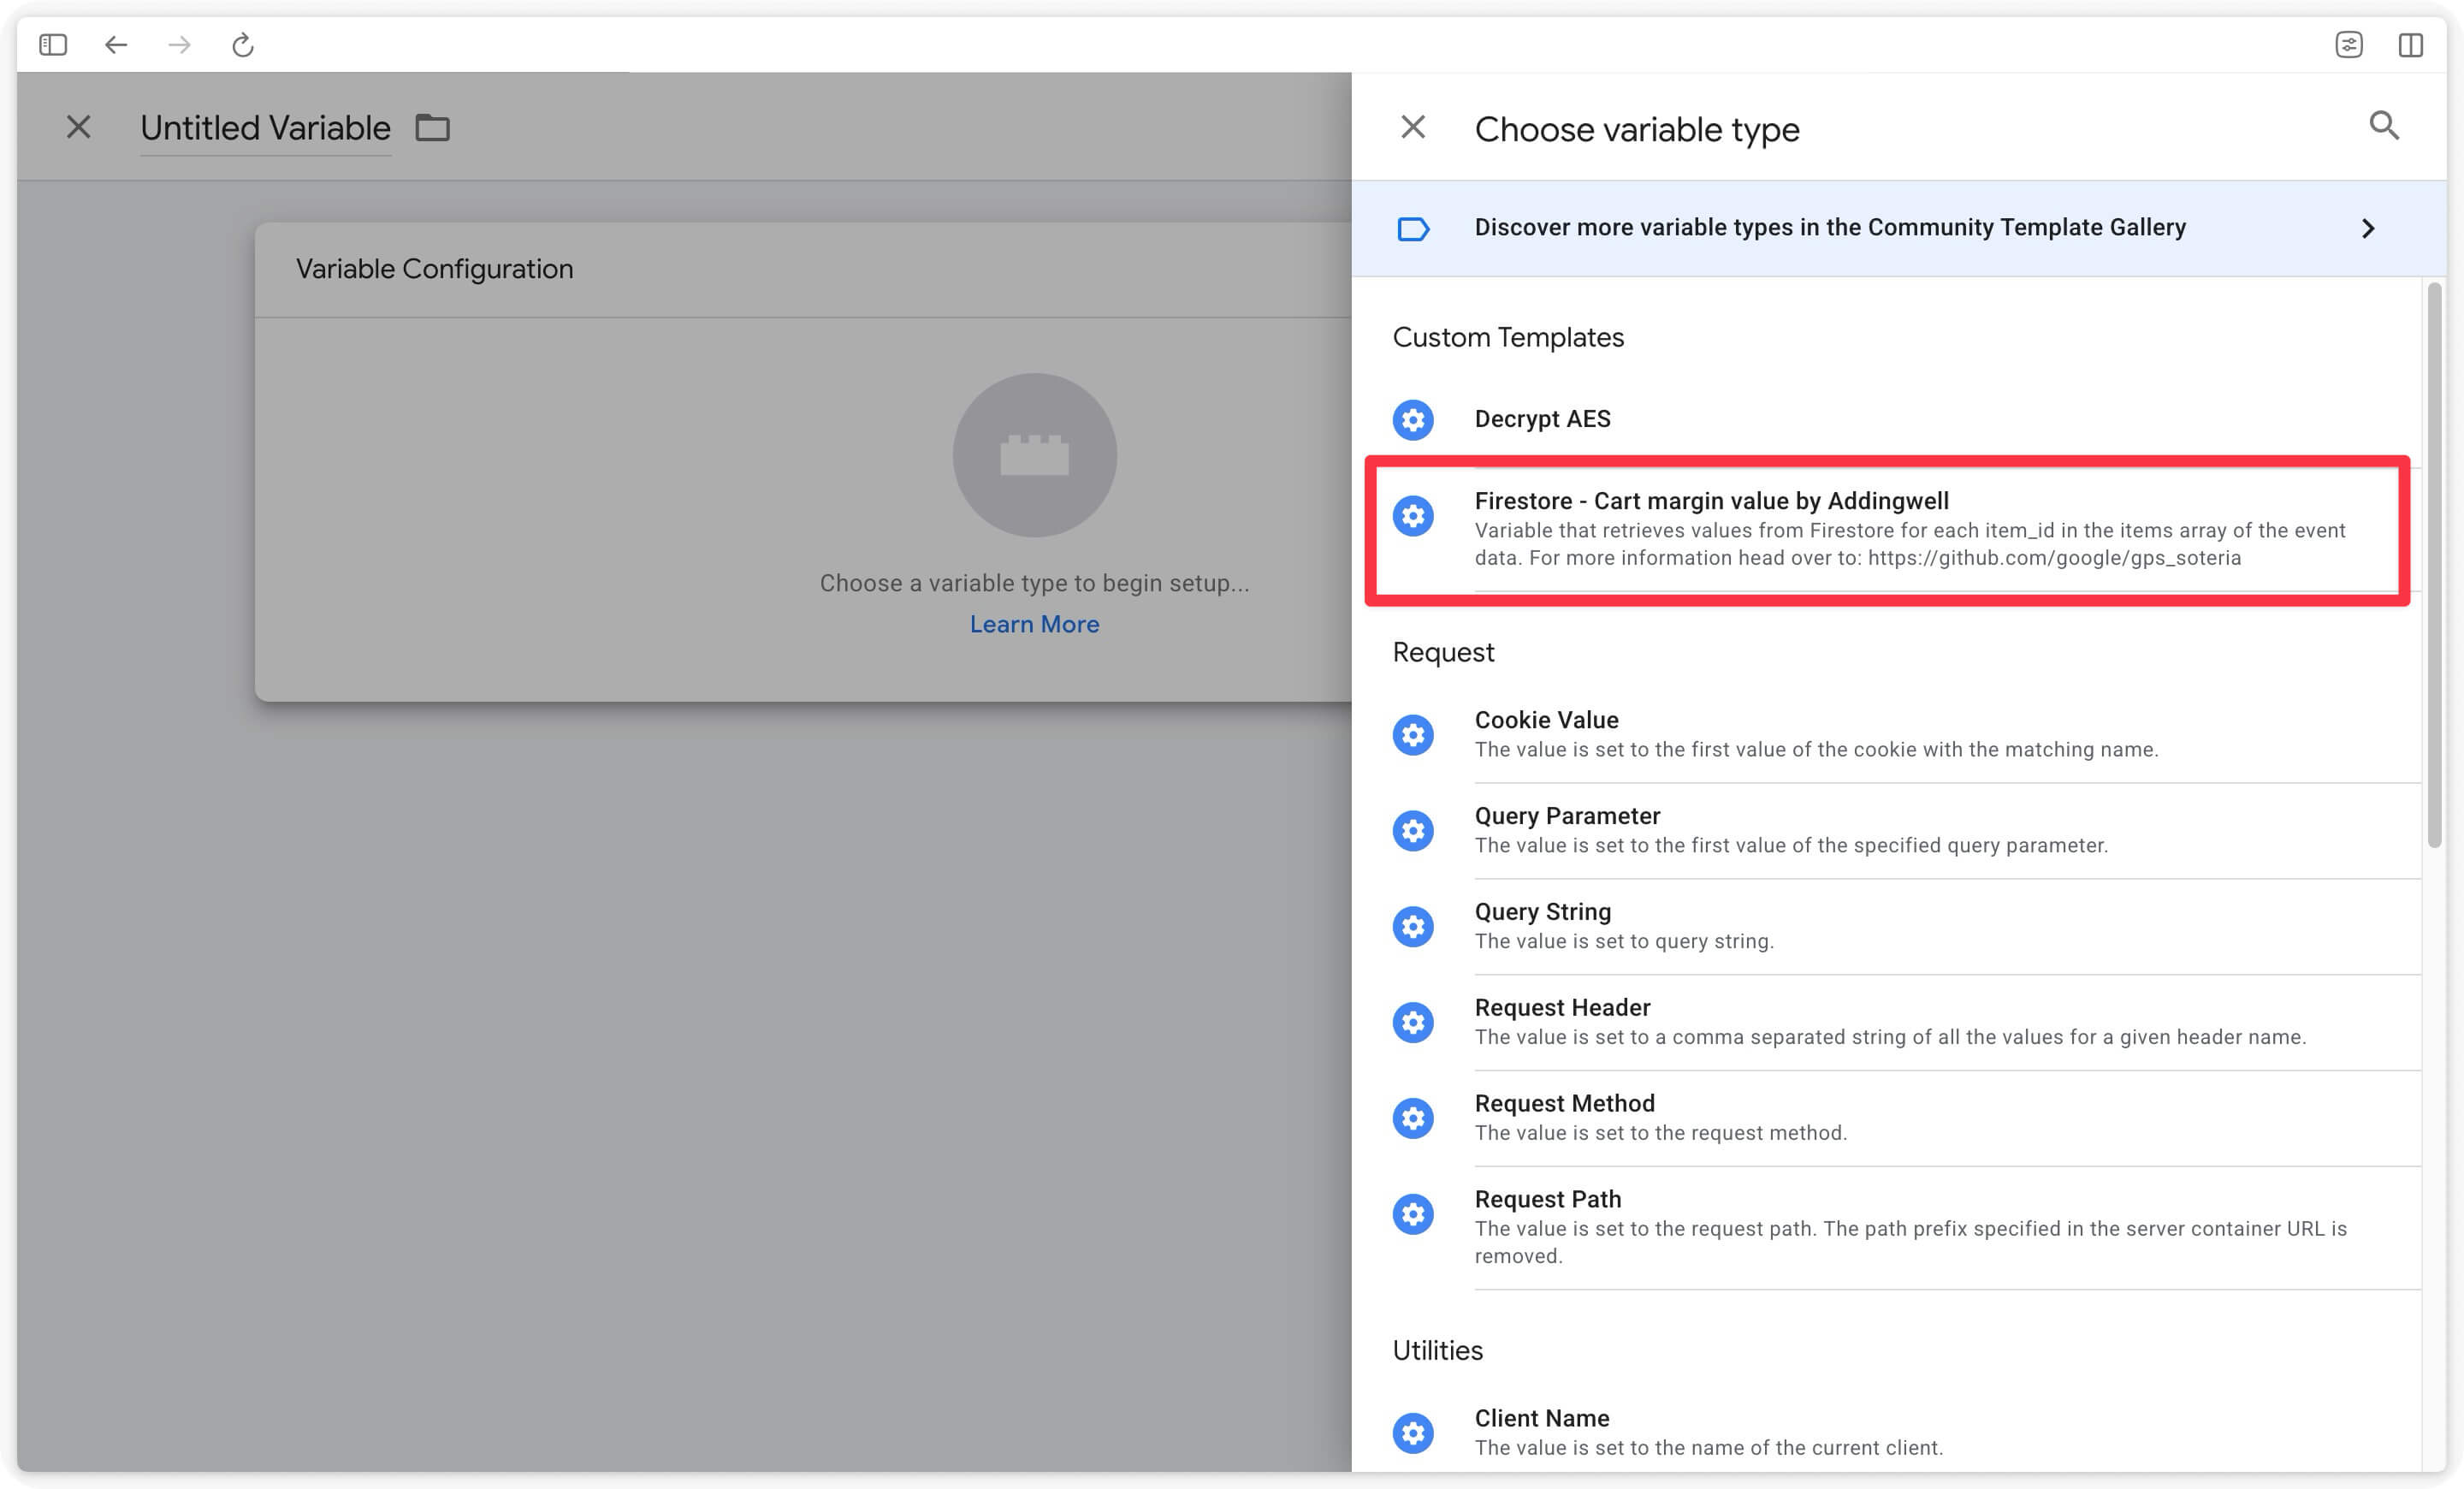
- Configure the variable.
Name the variable net_revenue_value. Then configure the 3 fields below:
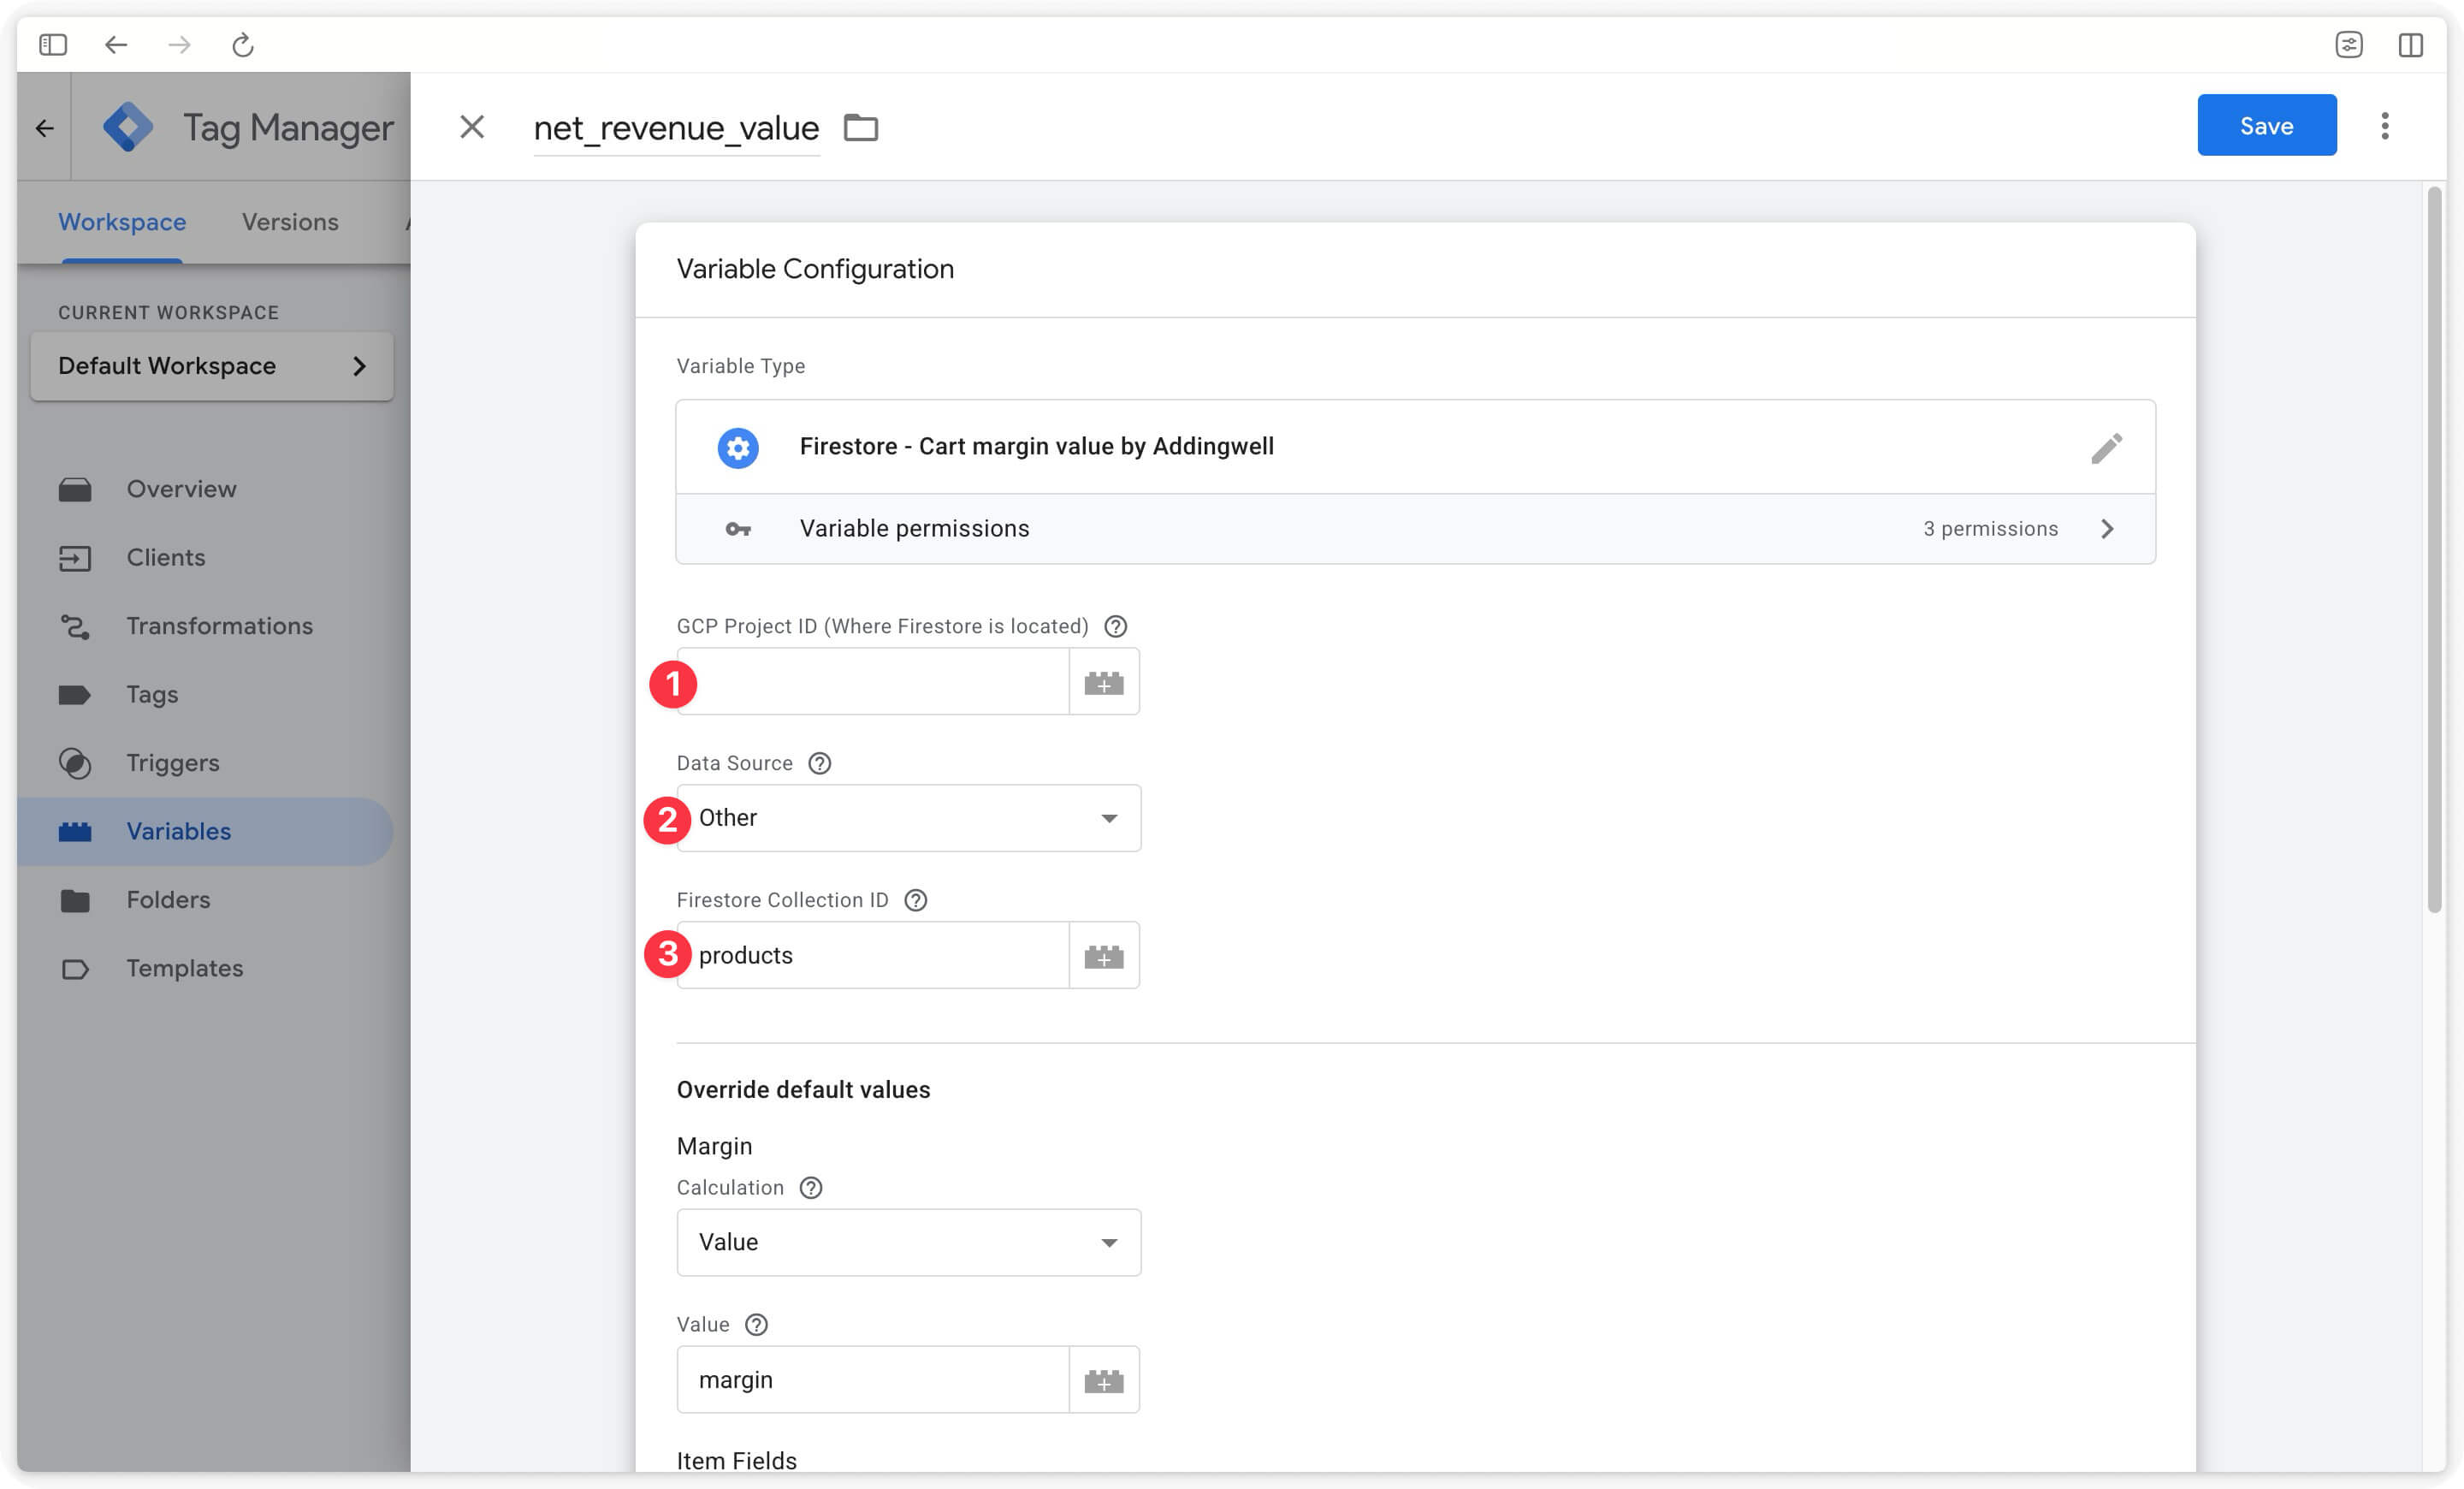
| Parameter | Description |
|---|---|
| 1. GCP Project ID | Enter the project ID provided by Addingwell. |
| 2. Data Source | Select Other. |
| 3. Firestore Collection ID | Enter the name of the Firestore collection containing your product data. In our example, the collection name is products, which matches what we set up in Firestore in step 1. |
In the Override default values menu, configure the fields as follows:
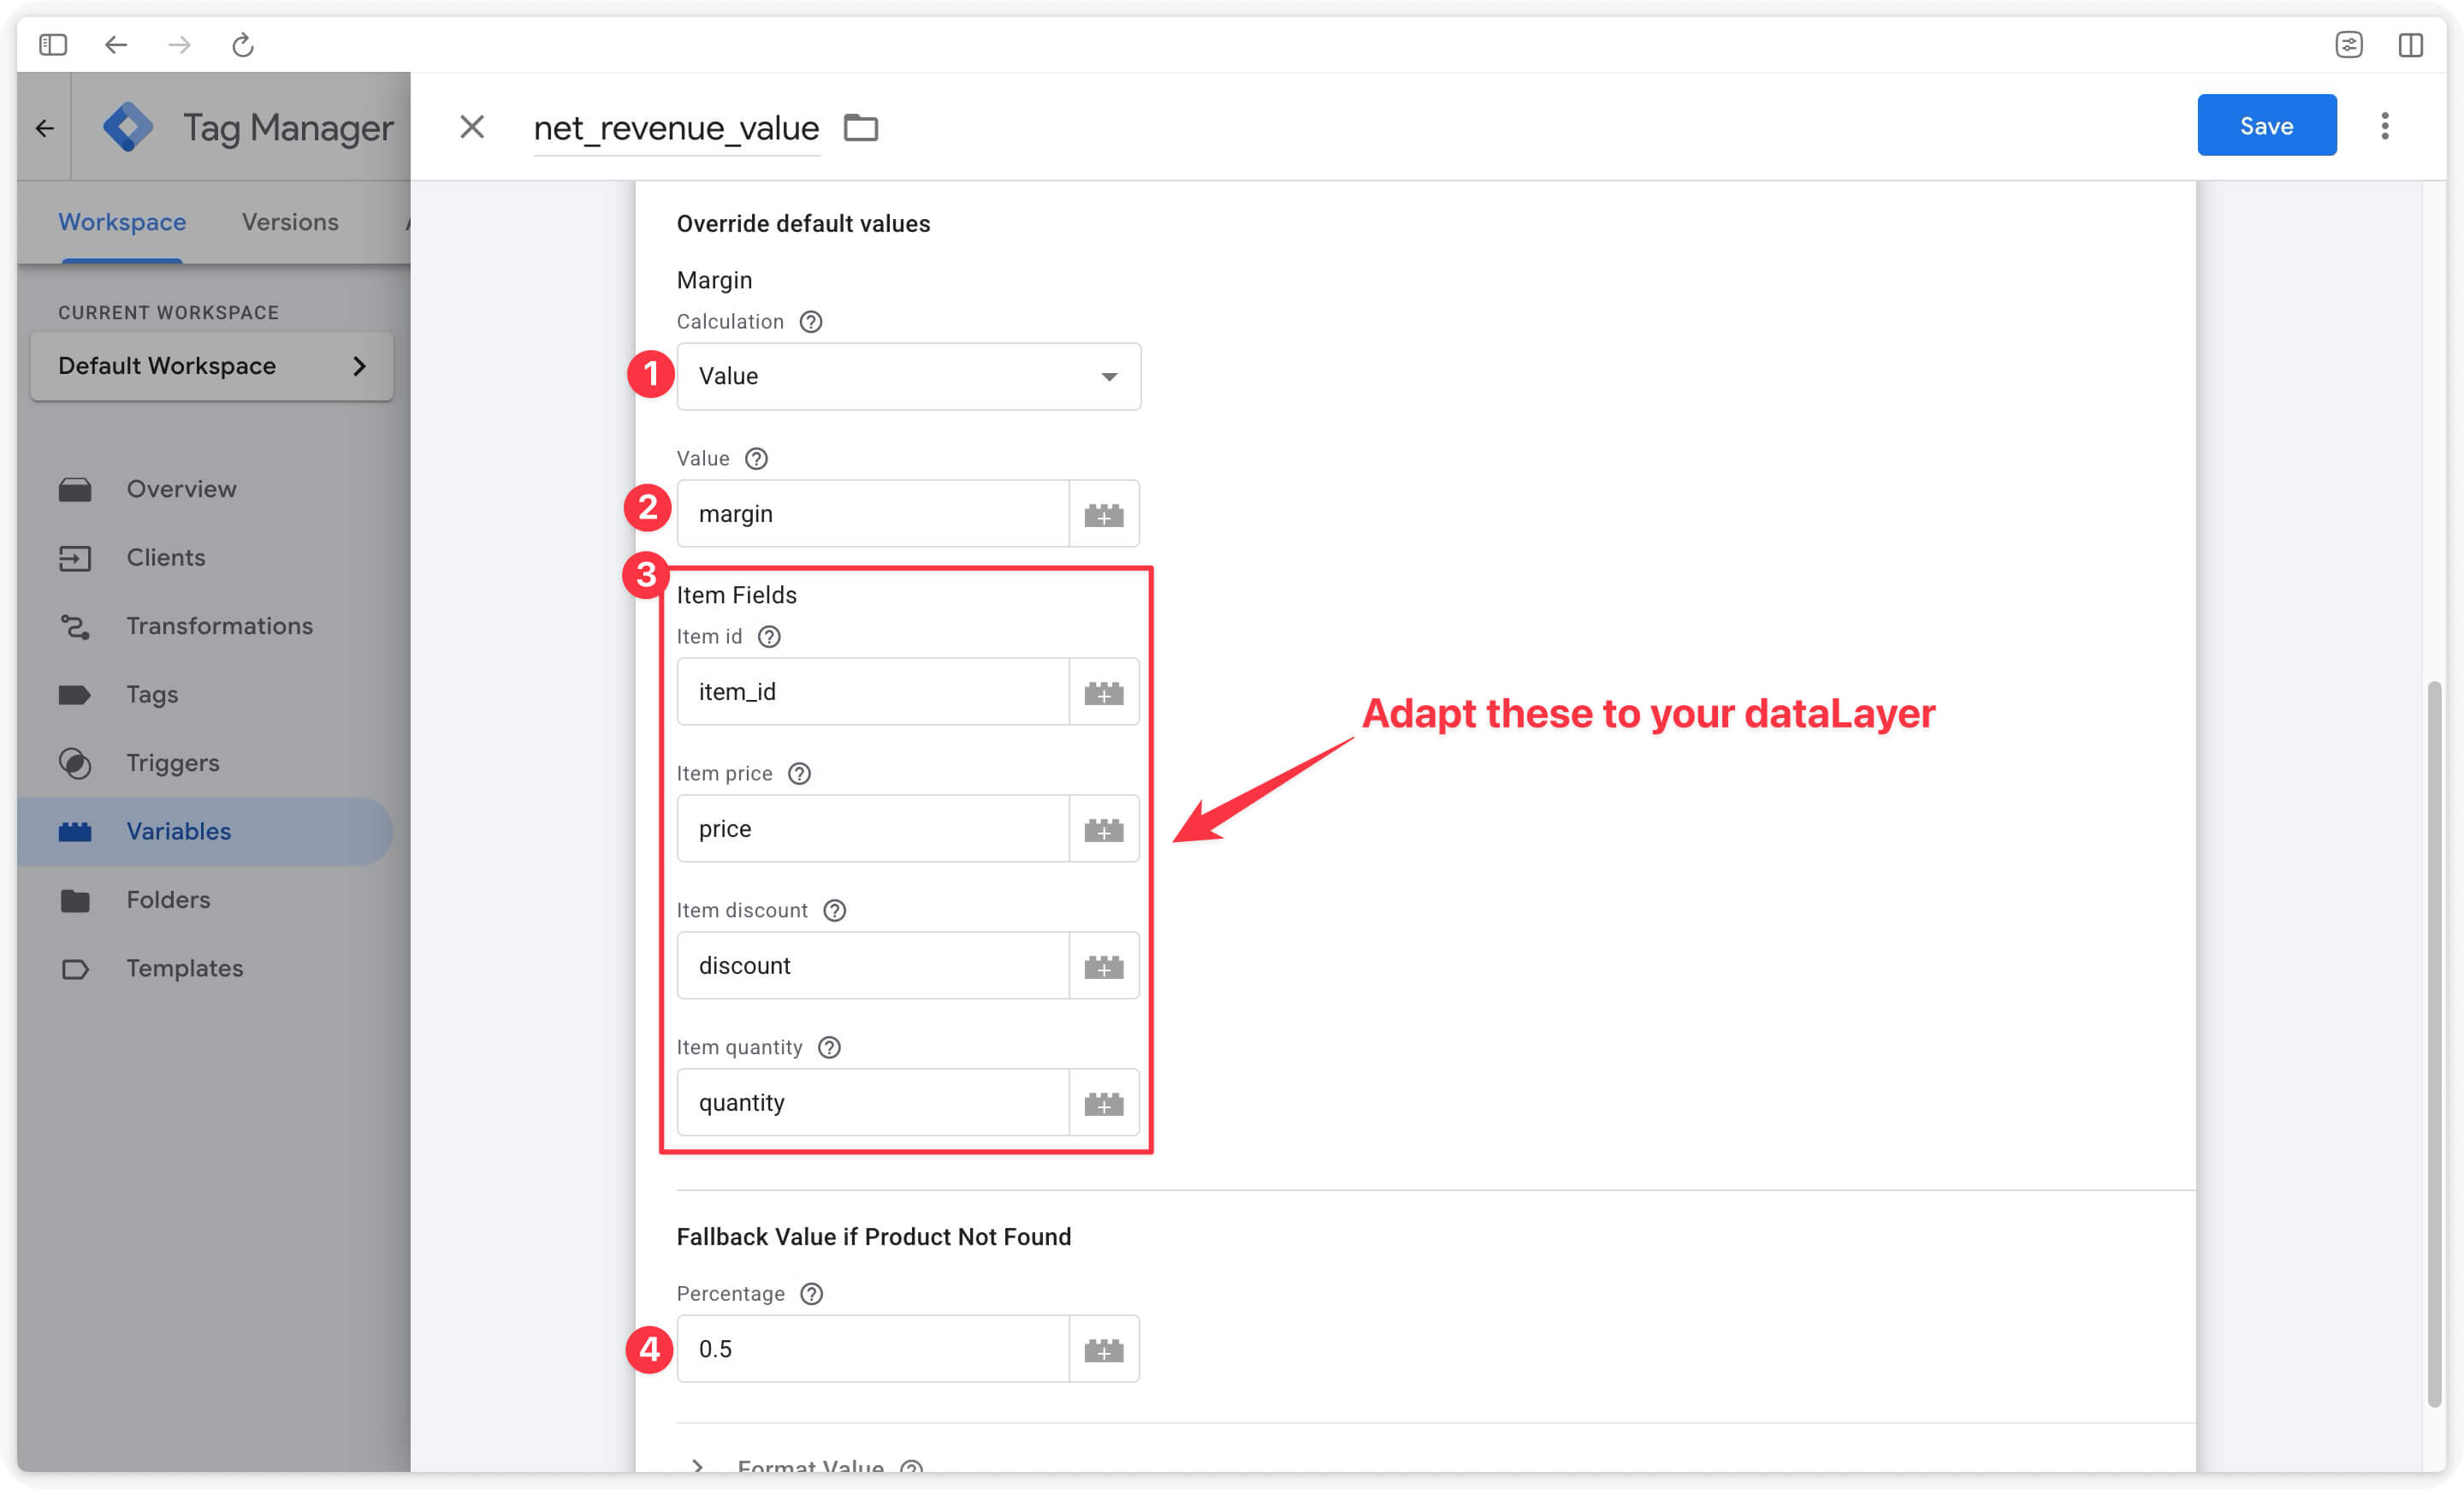
| Parameter | Description |
|---|---|
| 1. Calculation | Choose Value if you simply want to send the margin value from your Firestore file for each item_id in your cart. This will send: (margin × quantity) - discount. If your Firestore file does not contain the margin as a value but as a margin rate, choose Return Rate. This will send: (price × return_rate × quantity) - discount. |
| 2. Value | Enter the name of the Firestore key used to store your margin value, or the key used for your margin rate. In our example, we use the key margin, which matches what we set up in our Firestore in step 1. |
| 3. Item fields | You can map the fields from your dataLayer here. By default, the fields listed follow Google’s nomenclature for the items object, but you can adapt them as needed. |
| 4. Fallback Value | If your Firestore file has no entry for a given item_id, a default margin value will be applied. You can enter your average margin rate here. |
Then click Save.
One request to your Firestore is made for each item_id in your cart.
For a multi-product cart: one request per product will therefore be made.
- Verify the value in sGTM.
In the preview panel, select the purchase event and open the Variables tab. The
net_revenue_valuevariable should return the margin corresponding to the item(s) in your cart.
In our example, we can confirm the cart margin value of 42.50 in the net_revenue_value variable.
Send margin to media platforms
Once the margin is available Server-Side, you can use it in your media tags, in particular for:
- Google Ads - conversion
- Meta (Conversions API)
You can then choose to optimize your advertising campaigns based on real profitability, rather than just revenue!
Sending margin to Google Ads
If you want to send the margin to Google Ads, you must use the value parameter of the Google Ads conversion tag to pass your margin instead of the total cart value. The total cart value will therefore no longer be sent to Google Ads, as it will be replaced by the margin value.
You can absolutely send both the total purchase value and the margin value to Google Ads. Simply create a second conversion tag (e.g. “Google Ads - purchase margin”) in addition to your existing “Google Ads - purchase” tag. The latter remains unchanged and continues to send the total cart value. The new tag, triggered on the same purchase event, will send the margin value.
Tag setup
We will focus here solely on sending the margin. The full tag setup is detailed in our dedicated documentation.
Simply add the net_revenue_value variable created earlier to the Conversion Value field.
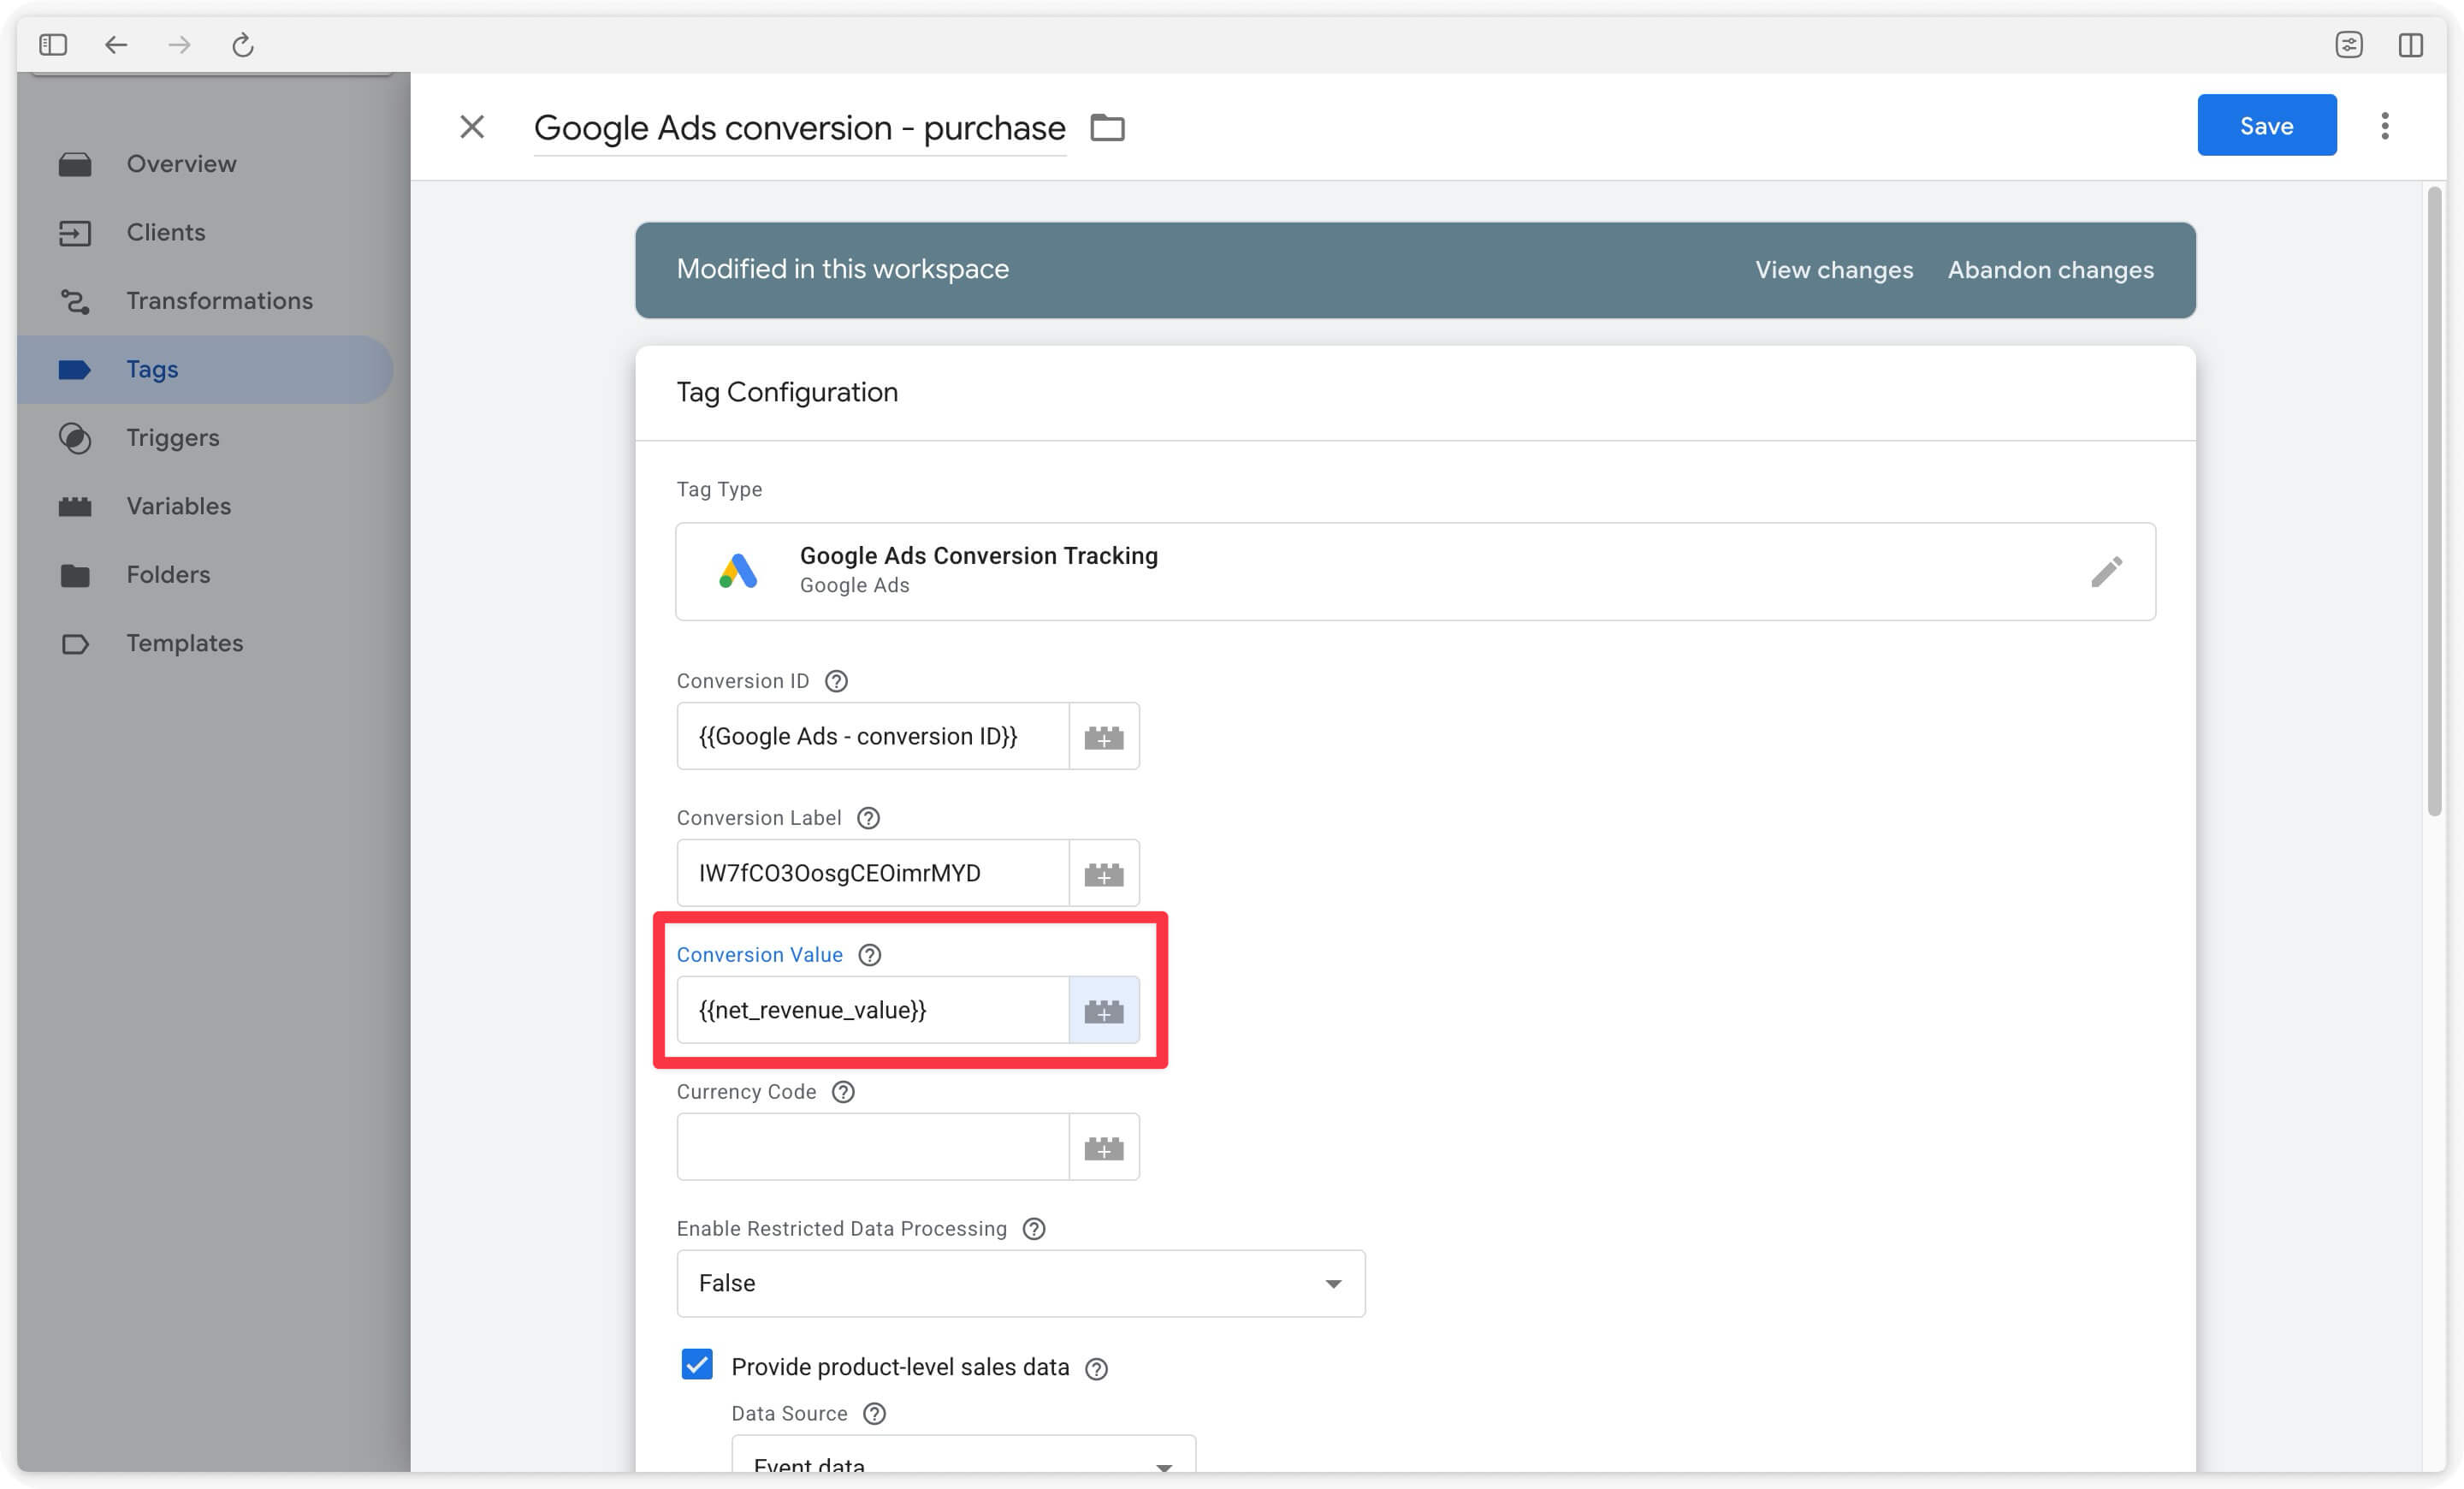
Click “Save” and publish this version.
Sending margin to Meta
The Meta by Addingwell tag template has a dedicated field for sending margin to Meta via CAPI, but does not forward this information to the Meta pixel, as the margin would then be exposed on the browser side. Here is the diagram of this data flow:
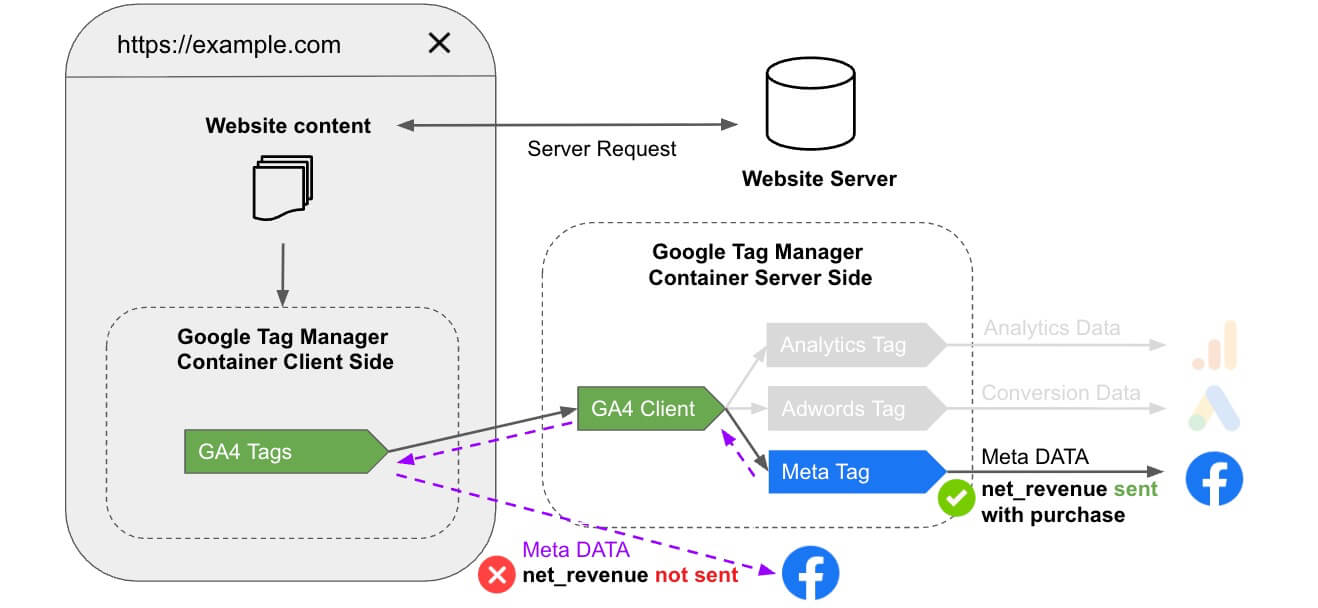
Make sure you have the latest version of our Meta CAPI tag by Addingwell, available here. This version is the only one that allows you to add margin sending directly from the tag via the net_revenue parameter.
Tag setup
We will focus here solely on sending the margin. The full tag setup is detailed in our dedicated documentation.
Click on the Custom Data Override dropdown tab, then add a net_revenue field. In the Property value field, click the + variable icon and choose the variable containing your margin value (in our example, the net_revenue_value variable created earlier).
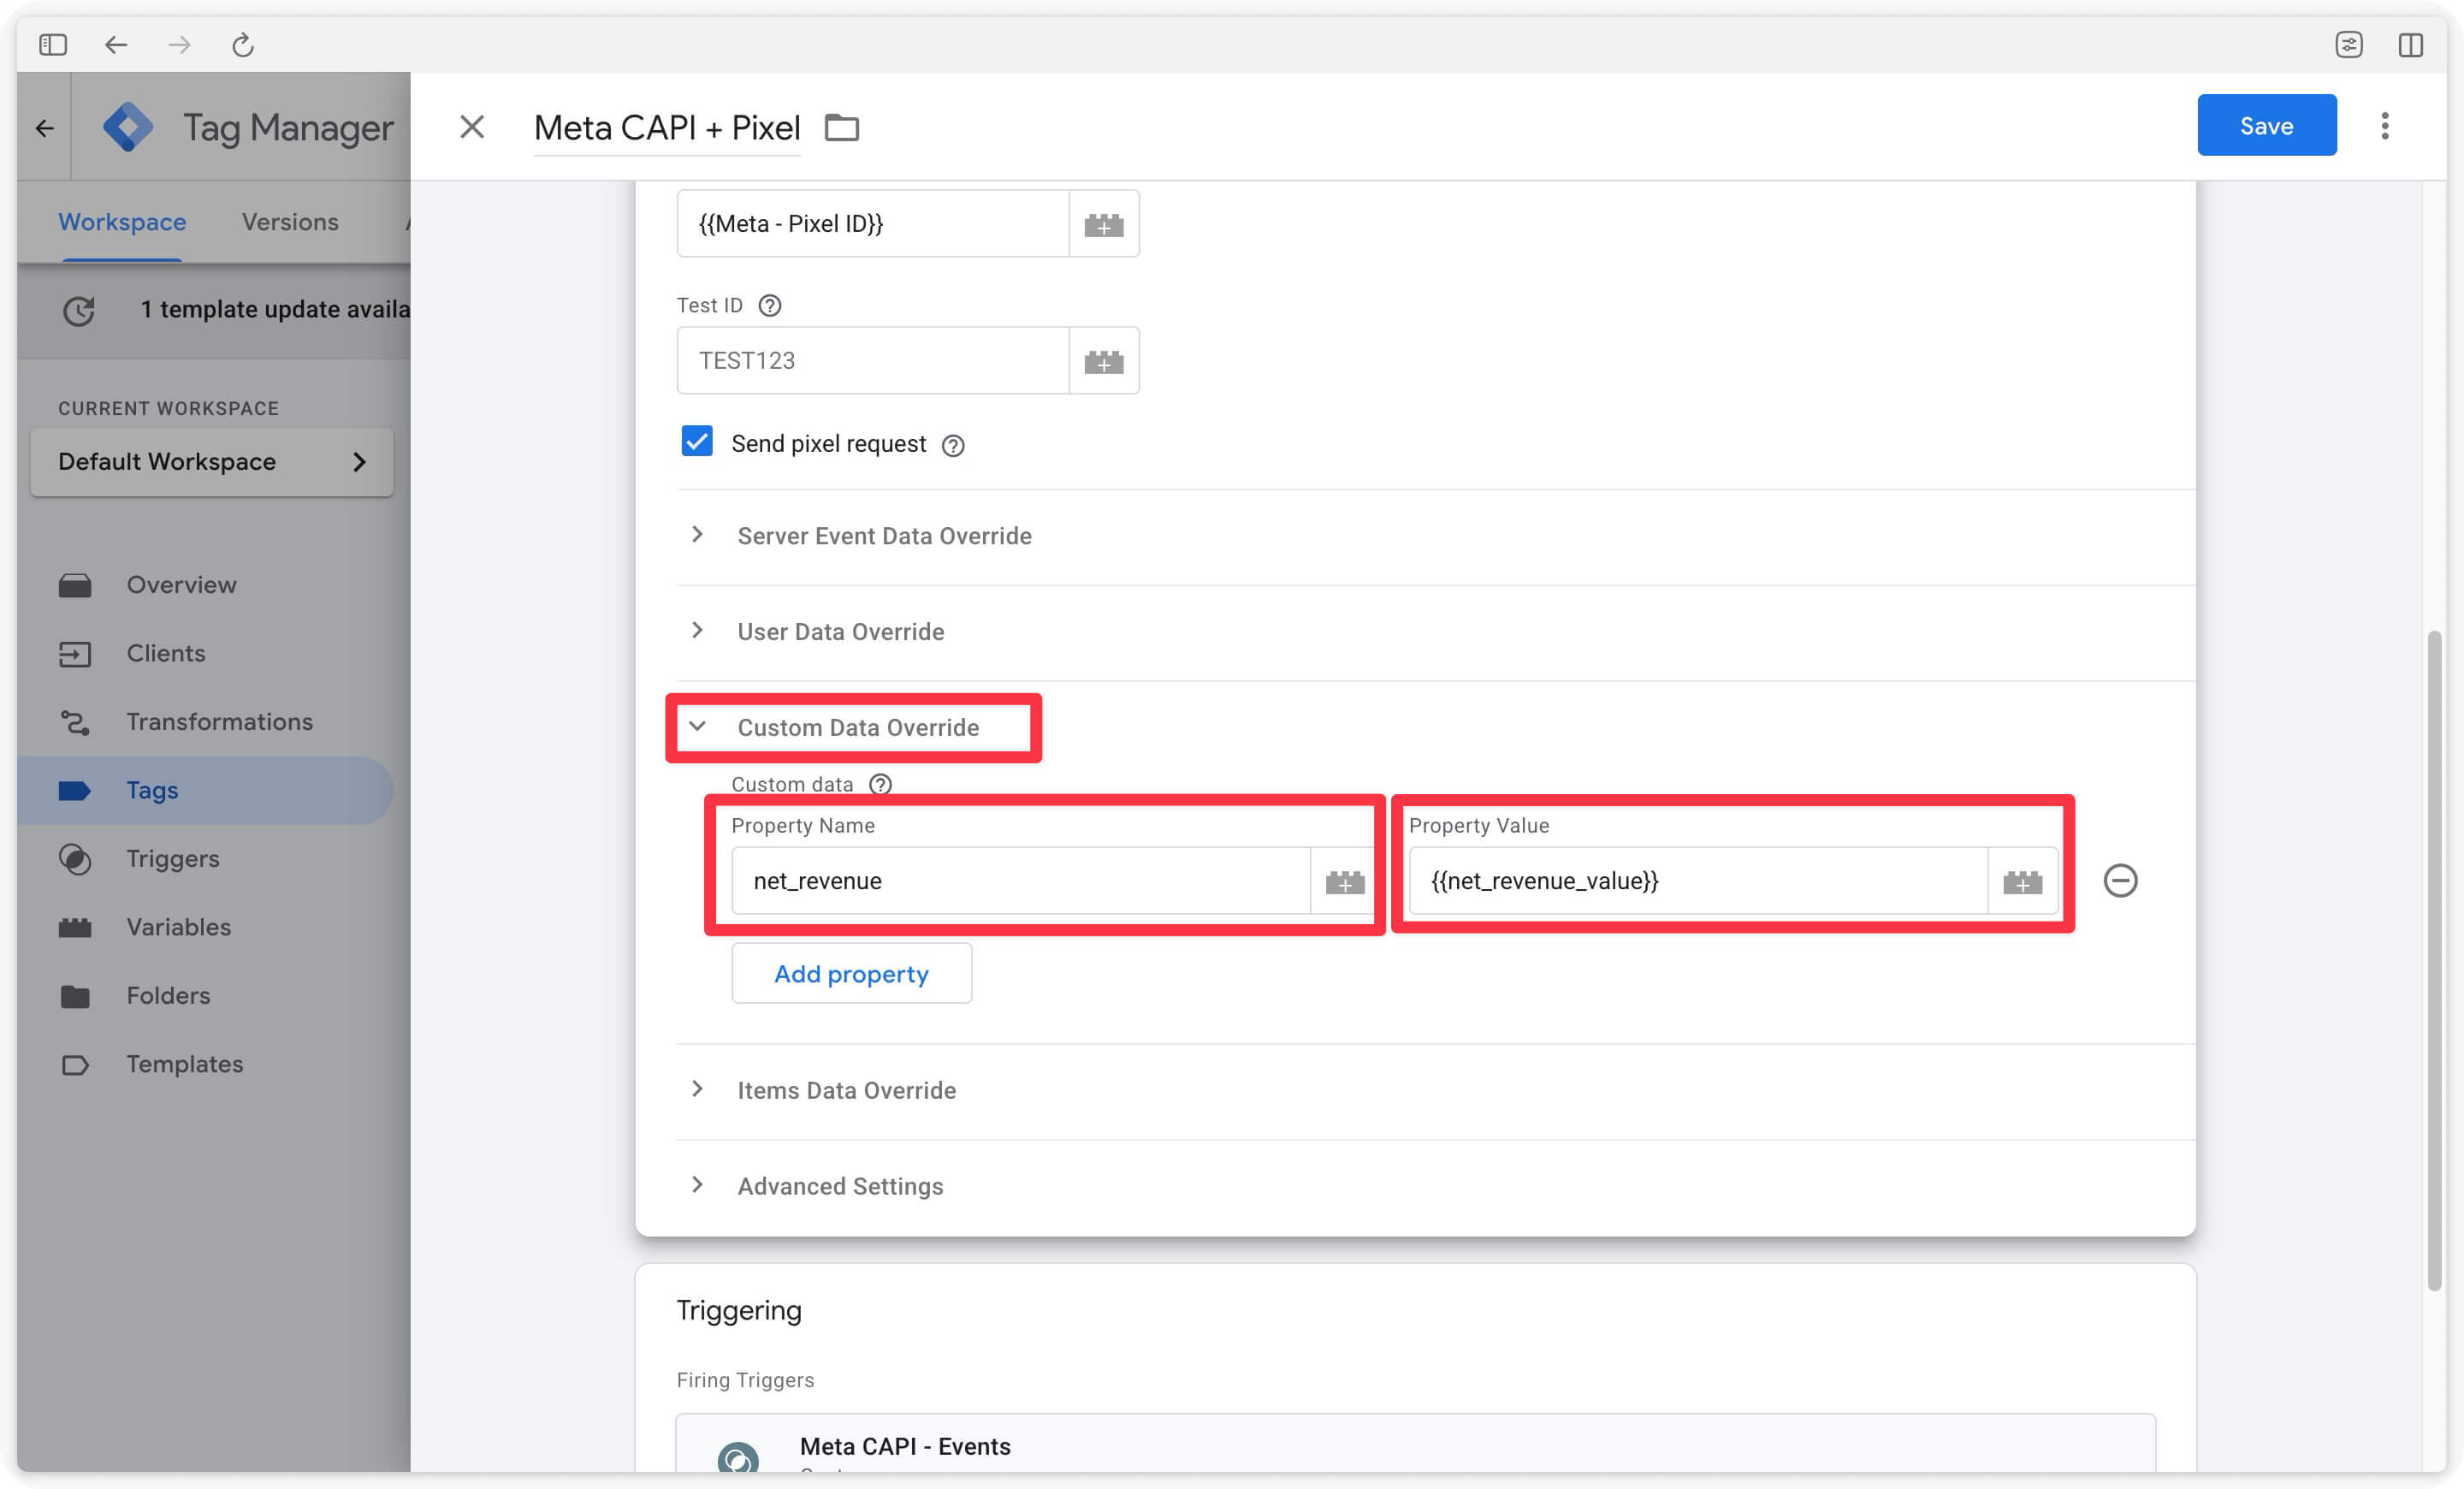
Click “Save” and publish this version.
Congratulations
You have completed the setup for sending margin values to your media partners.
If you encountered any issues during these steps, feel free to reach out to our support team.