Matomo Analytics: An alternative to GA4
Matomo Analytics is an open-source web analytics platform, alternative to Google Analytics 4, focused on privacy protection. GDPR-compliant and recommended by the CNIL, Matomo guarantees full data ownership.
It’s possible to self-host Matomo on your own server for free, or alternatively pay a subscription to Matomo Cloud.
Matomo stands out with several major advantages that make it a relevant choice for your data analytics needs. Let’s explore in detail the aspects that make Matomo a unique solution.
Open-source
Matomo is a free and open-source software, giving users total freedom to use, edit, share and study the code. Protected by the GPL (General Public License) v3, this software will always remain free and accessible, preventing any drift towards a proprietary model.
Matomo is distinguished by its active community, which contributes to the security, reliability and evolution of the software. It embodies the principles of free software, defending users’ technological autonomy.
No data sampling
Data sampling in Google Analytics 4 can result in inaccurate reports, which can lead to erroneous and costly business decisions.
For example, if you have 5 million views, only 500,000 will be accurately analyzed. Matomo, on the other hand, guarantees total data accuracy without sampling, providing a solid basis for informed decisions.
100% data ownership
Matomo enables customers to retain full ownership of their data without the intervention of external sources. The tool ensures that information remains in the hands of website owners and their visitors.
Privacy and GDPR compliance
With mechanisms such as IP address anonymization, DoNotTrack compliance, integrated GDPR tools, use of proprietary cookies and data deletion on demand, Matomo respects the privacy of your visitors.
Data is stored in the EU or in the user’s country of choice. In addition, Matomo is approved by the CNIL to collect data with consent exemption under a specific configuration .
Why Matomo in Server-Side?
Bypass ad blockers
Ad blockers (such as uBlock) block the loading of the Matomo script (matomo.js), even though Matomo has nothing to do with ad tracking.
Switching to server-side allows you to bypass this problem.
Data governance
Reminder: data governance is a set of practices, processes and policies that govern data management within an organization.
By sending data to your own server, you can delete, alter or add data before sending it to Matomo. This allows great flexibility in managing your organization’s data.
Improve page loading time
Server-side tracking improves your website’s loading time by shifting the processing of tracking scripts from the browser to the server. This reduces the number of requests and resources required to load on the user’s browser, which in turn reduces page weight and accelerates page display.
Matomo Analytics server-side configuration
In this tutorial, you’ll configure the Matomo Analytics tag developed by our partner Data Marketing School and available in the Google Tag Manager Server-Side gallery.
You’ll discover the configuration steps for sending various events to Matomo, such as page views, actions, goals, outlinks, site search and e-commerce events. We’ll also explain how to configure custom dimensions and heartbeat requests.
But first, we’ll start by importing the tag into your GTM Server-Side container.
Import the Matomo Analytics tag
Search in gallery
On your GTM Server-Side container, go to Templates > Tag Templates > Search Gallery.
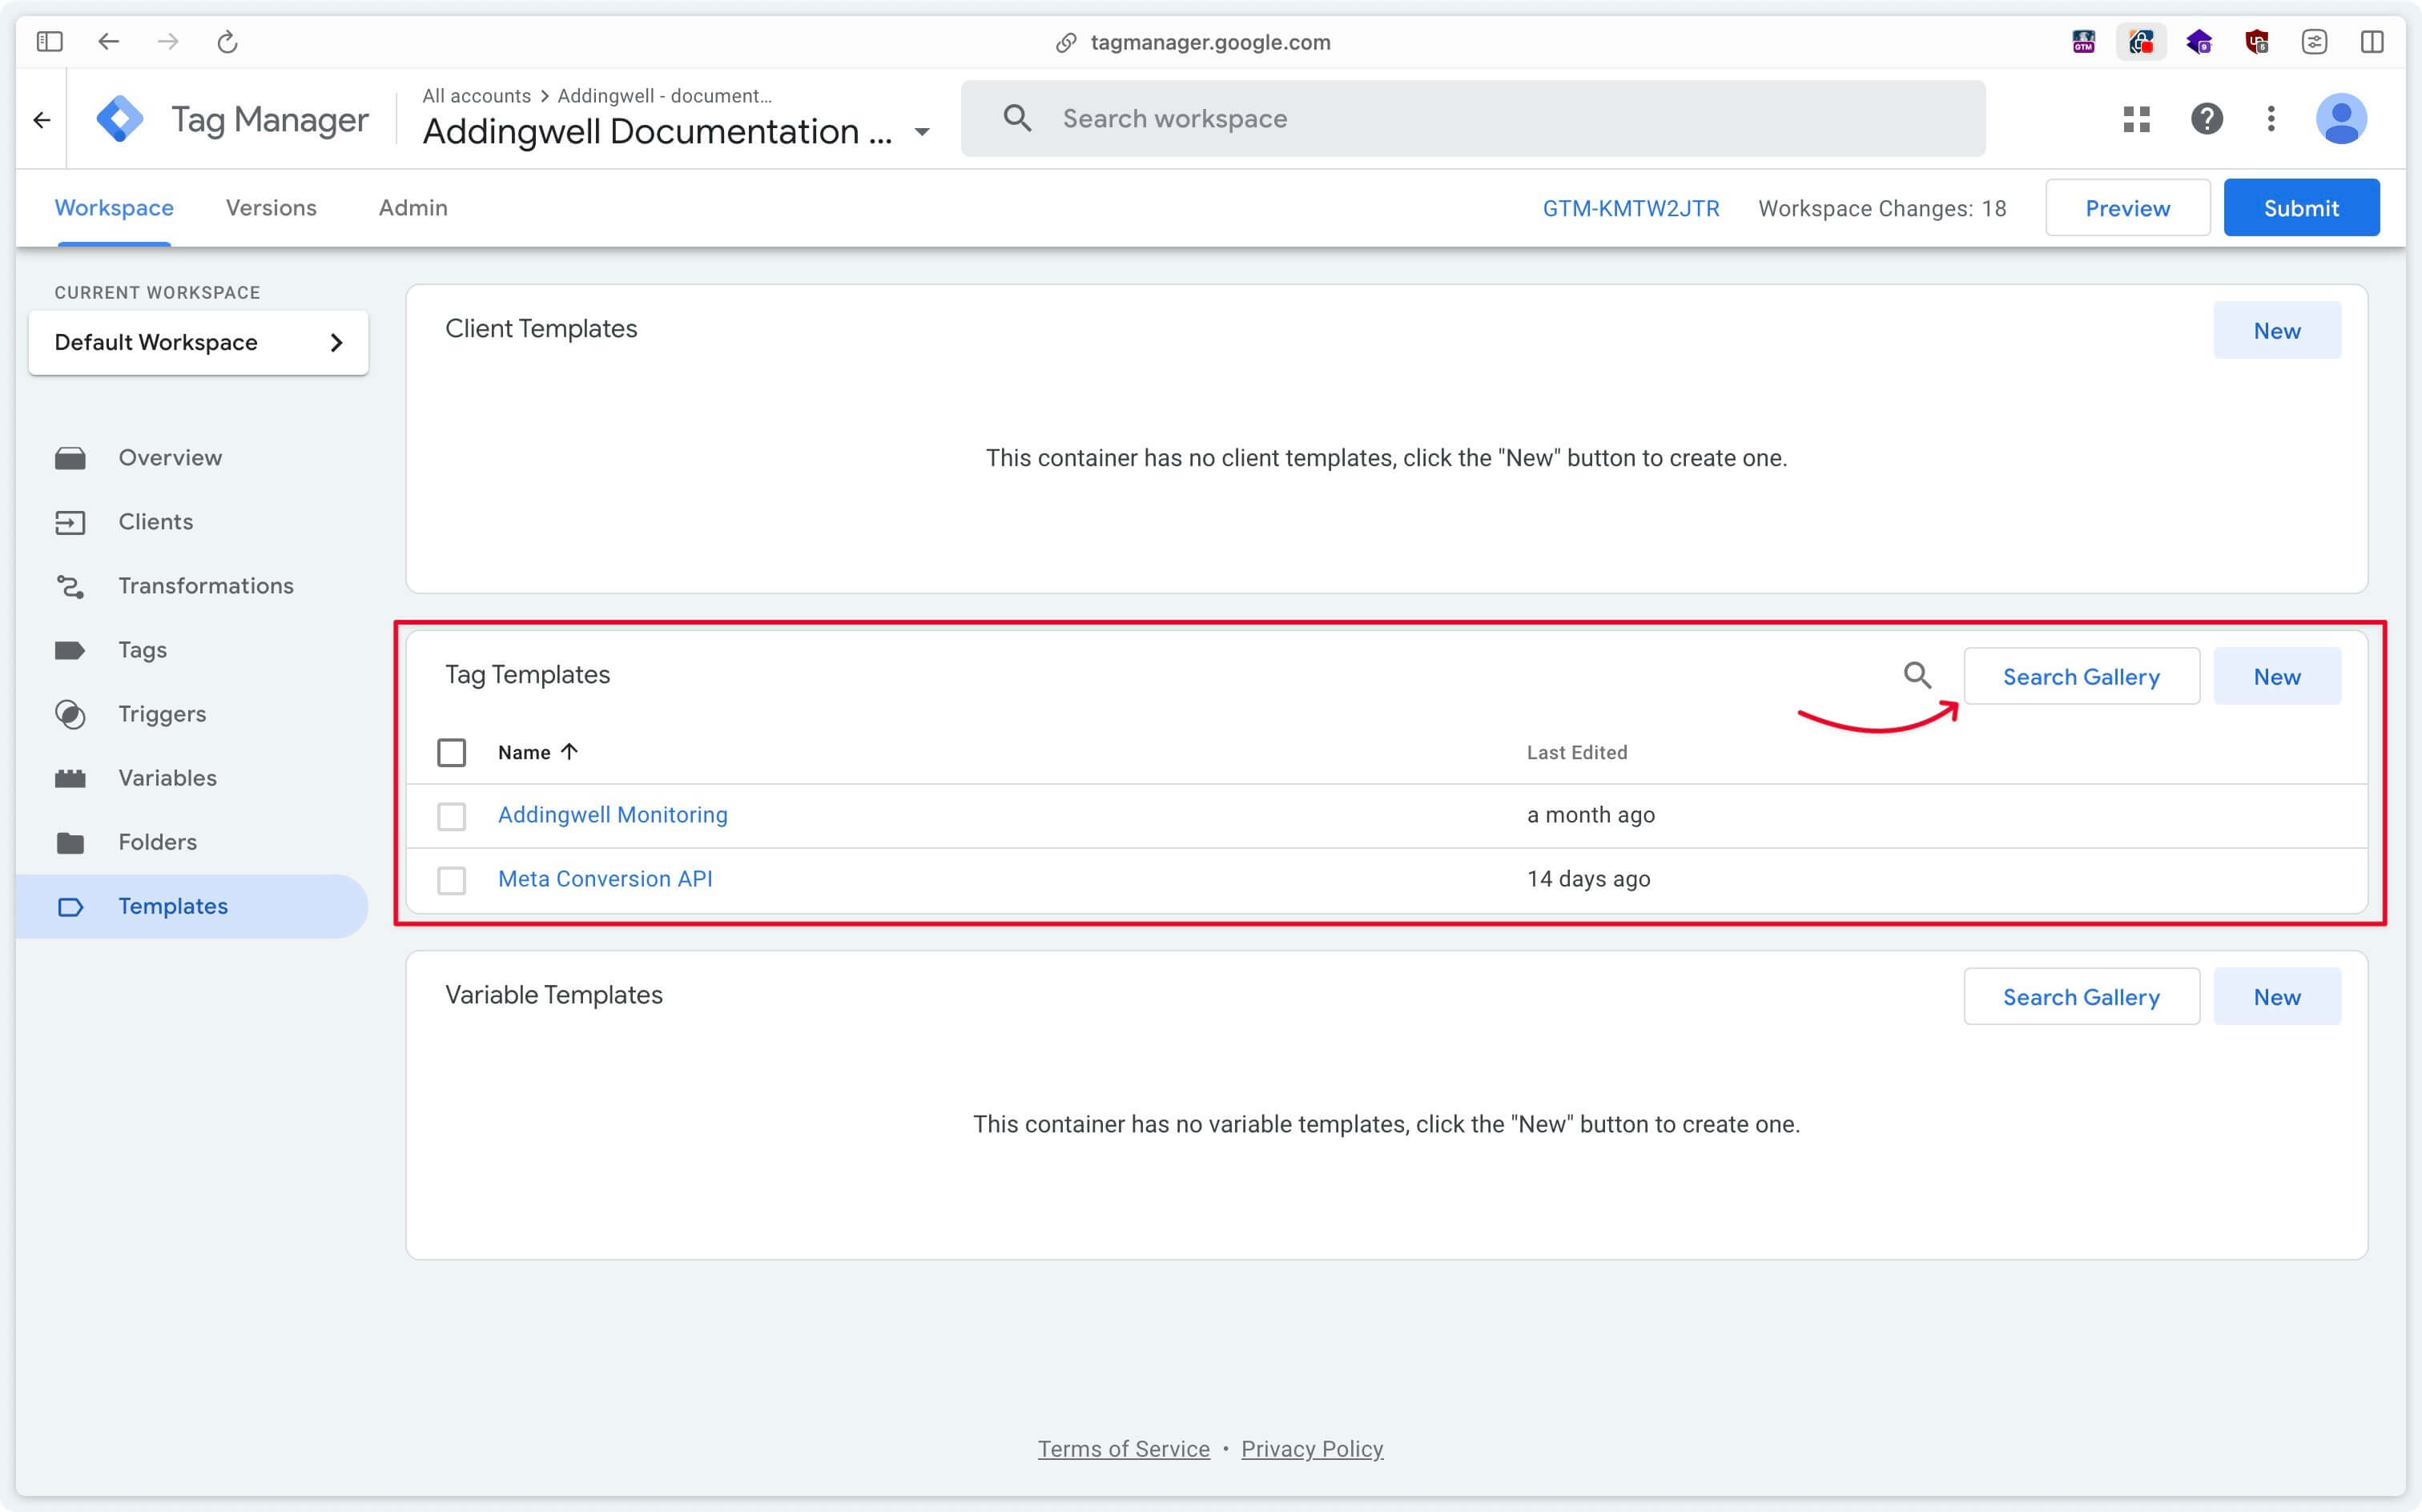
Add tag
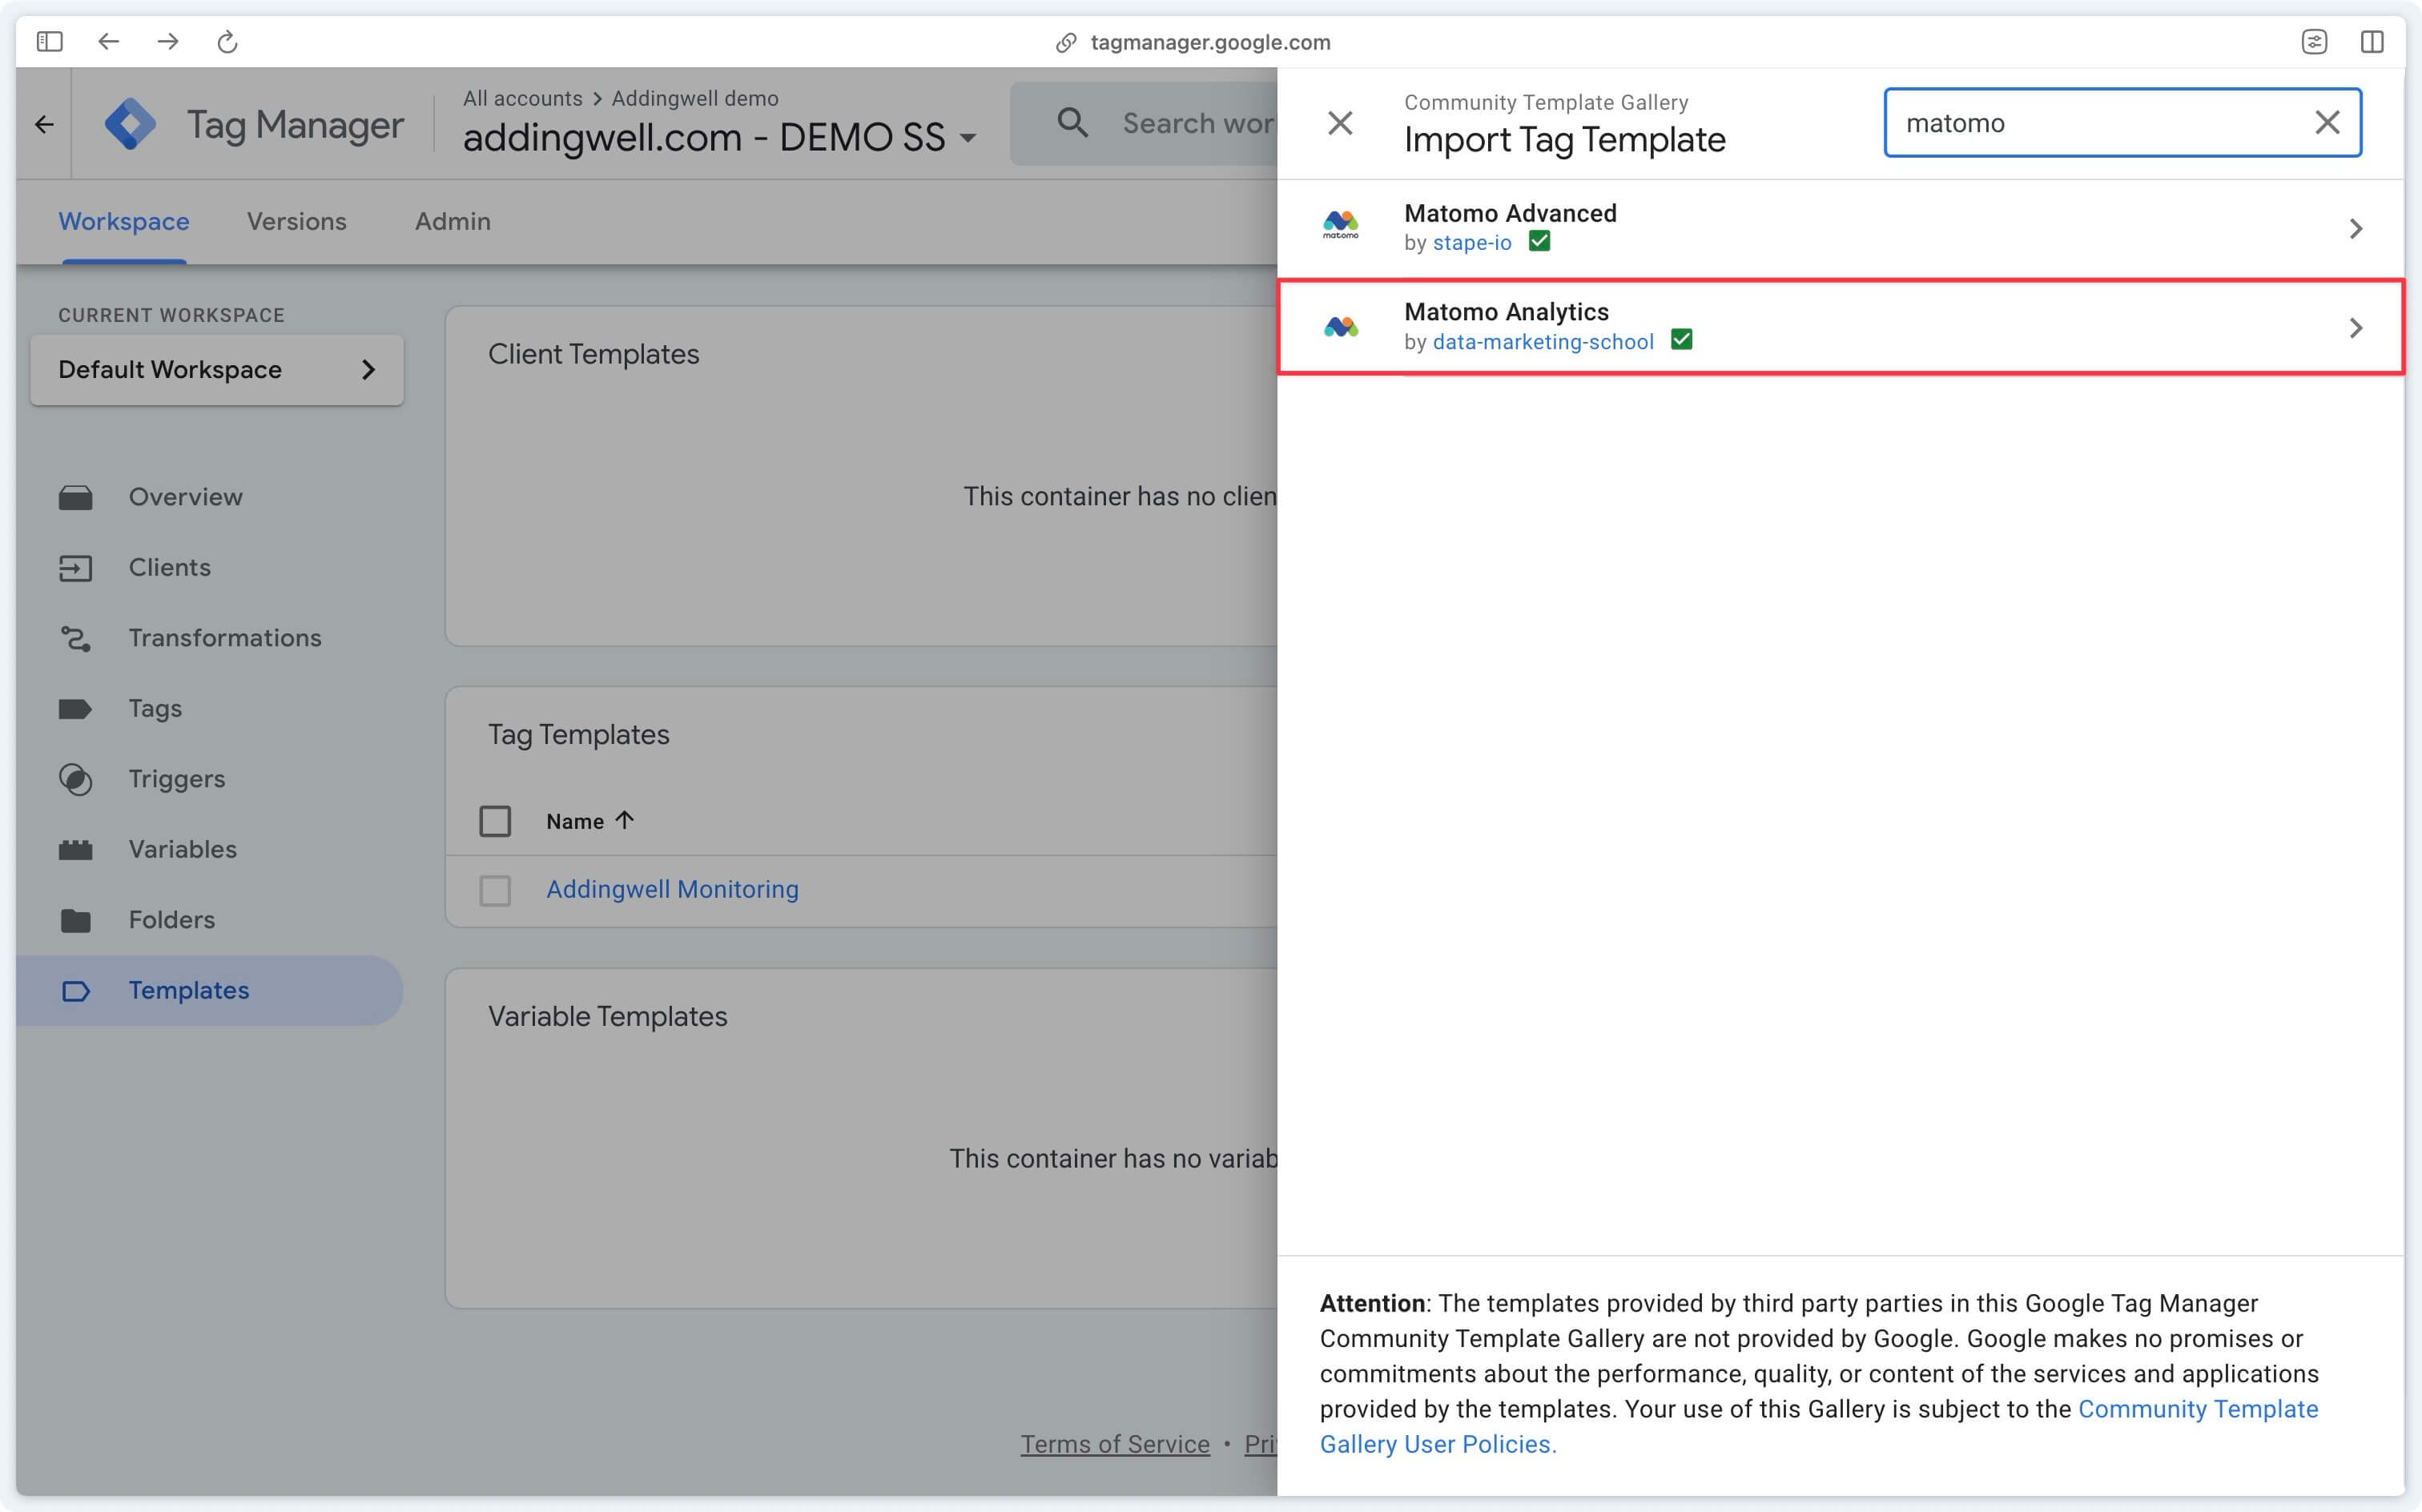
Search the gallery for the Matomo Analytics tag from Data Marketing School.
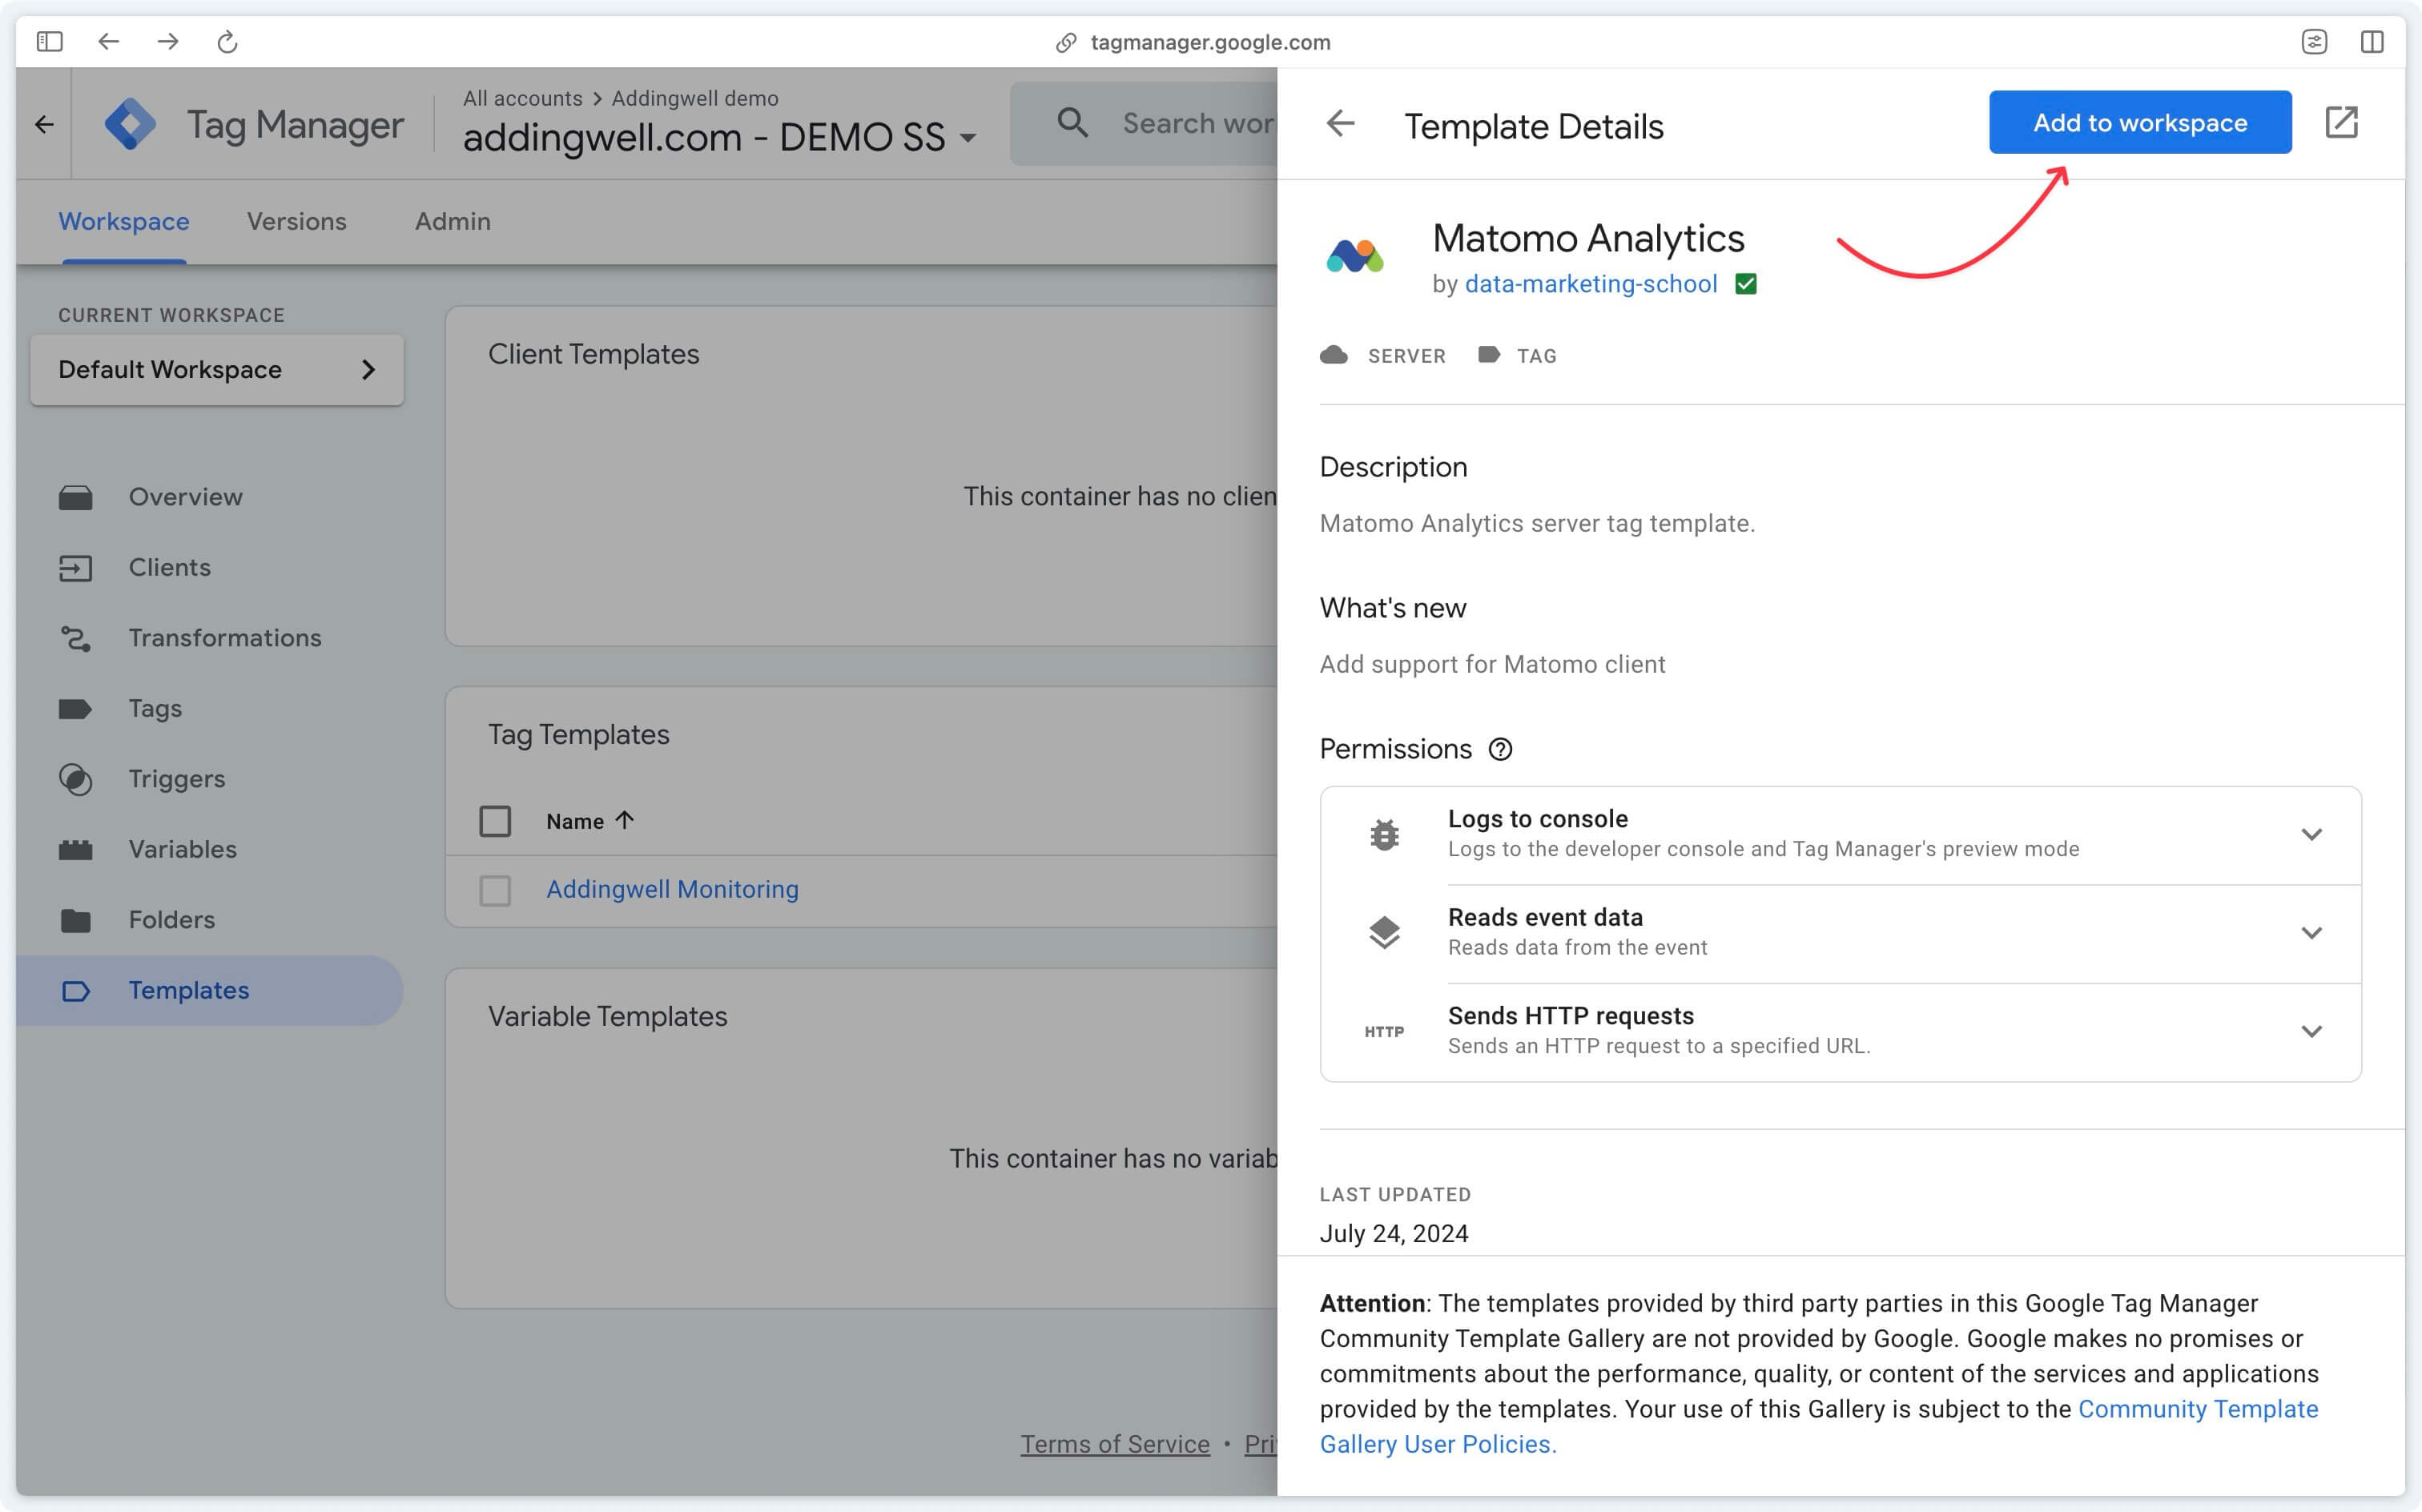
Then click on Add to workspace in the top right-hand corner.
Configure the Matomo Analytics tag
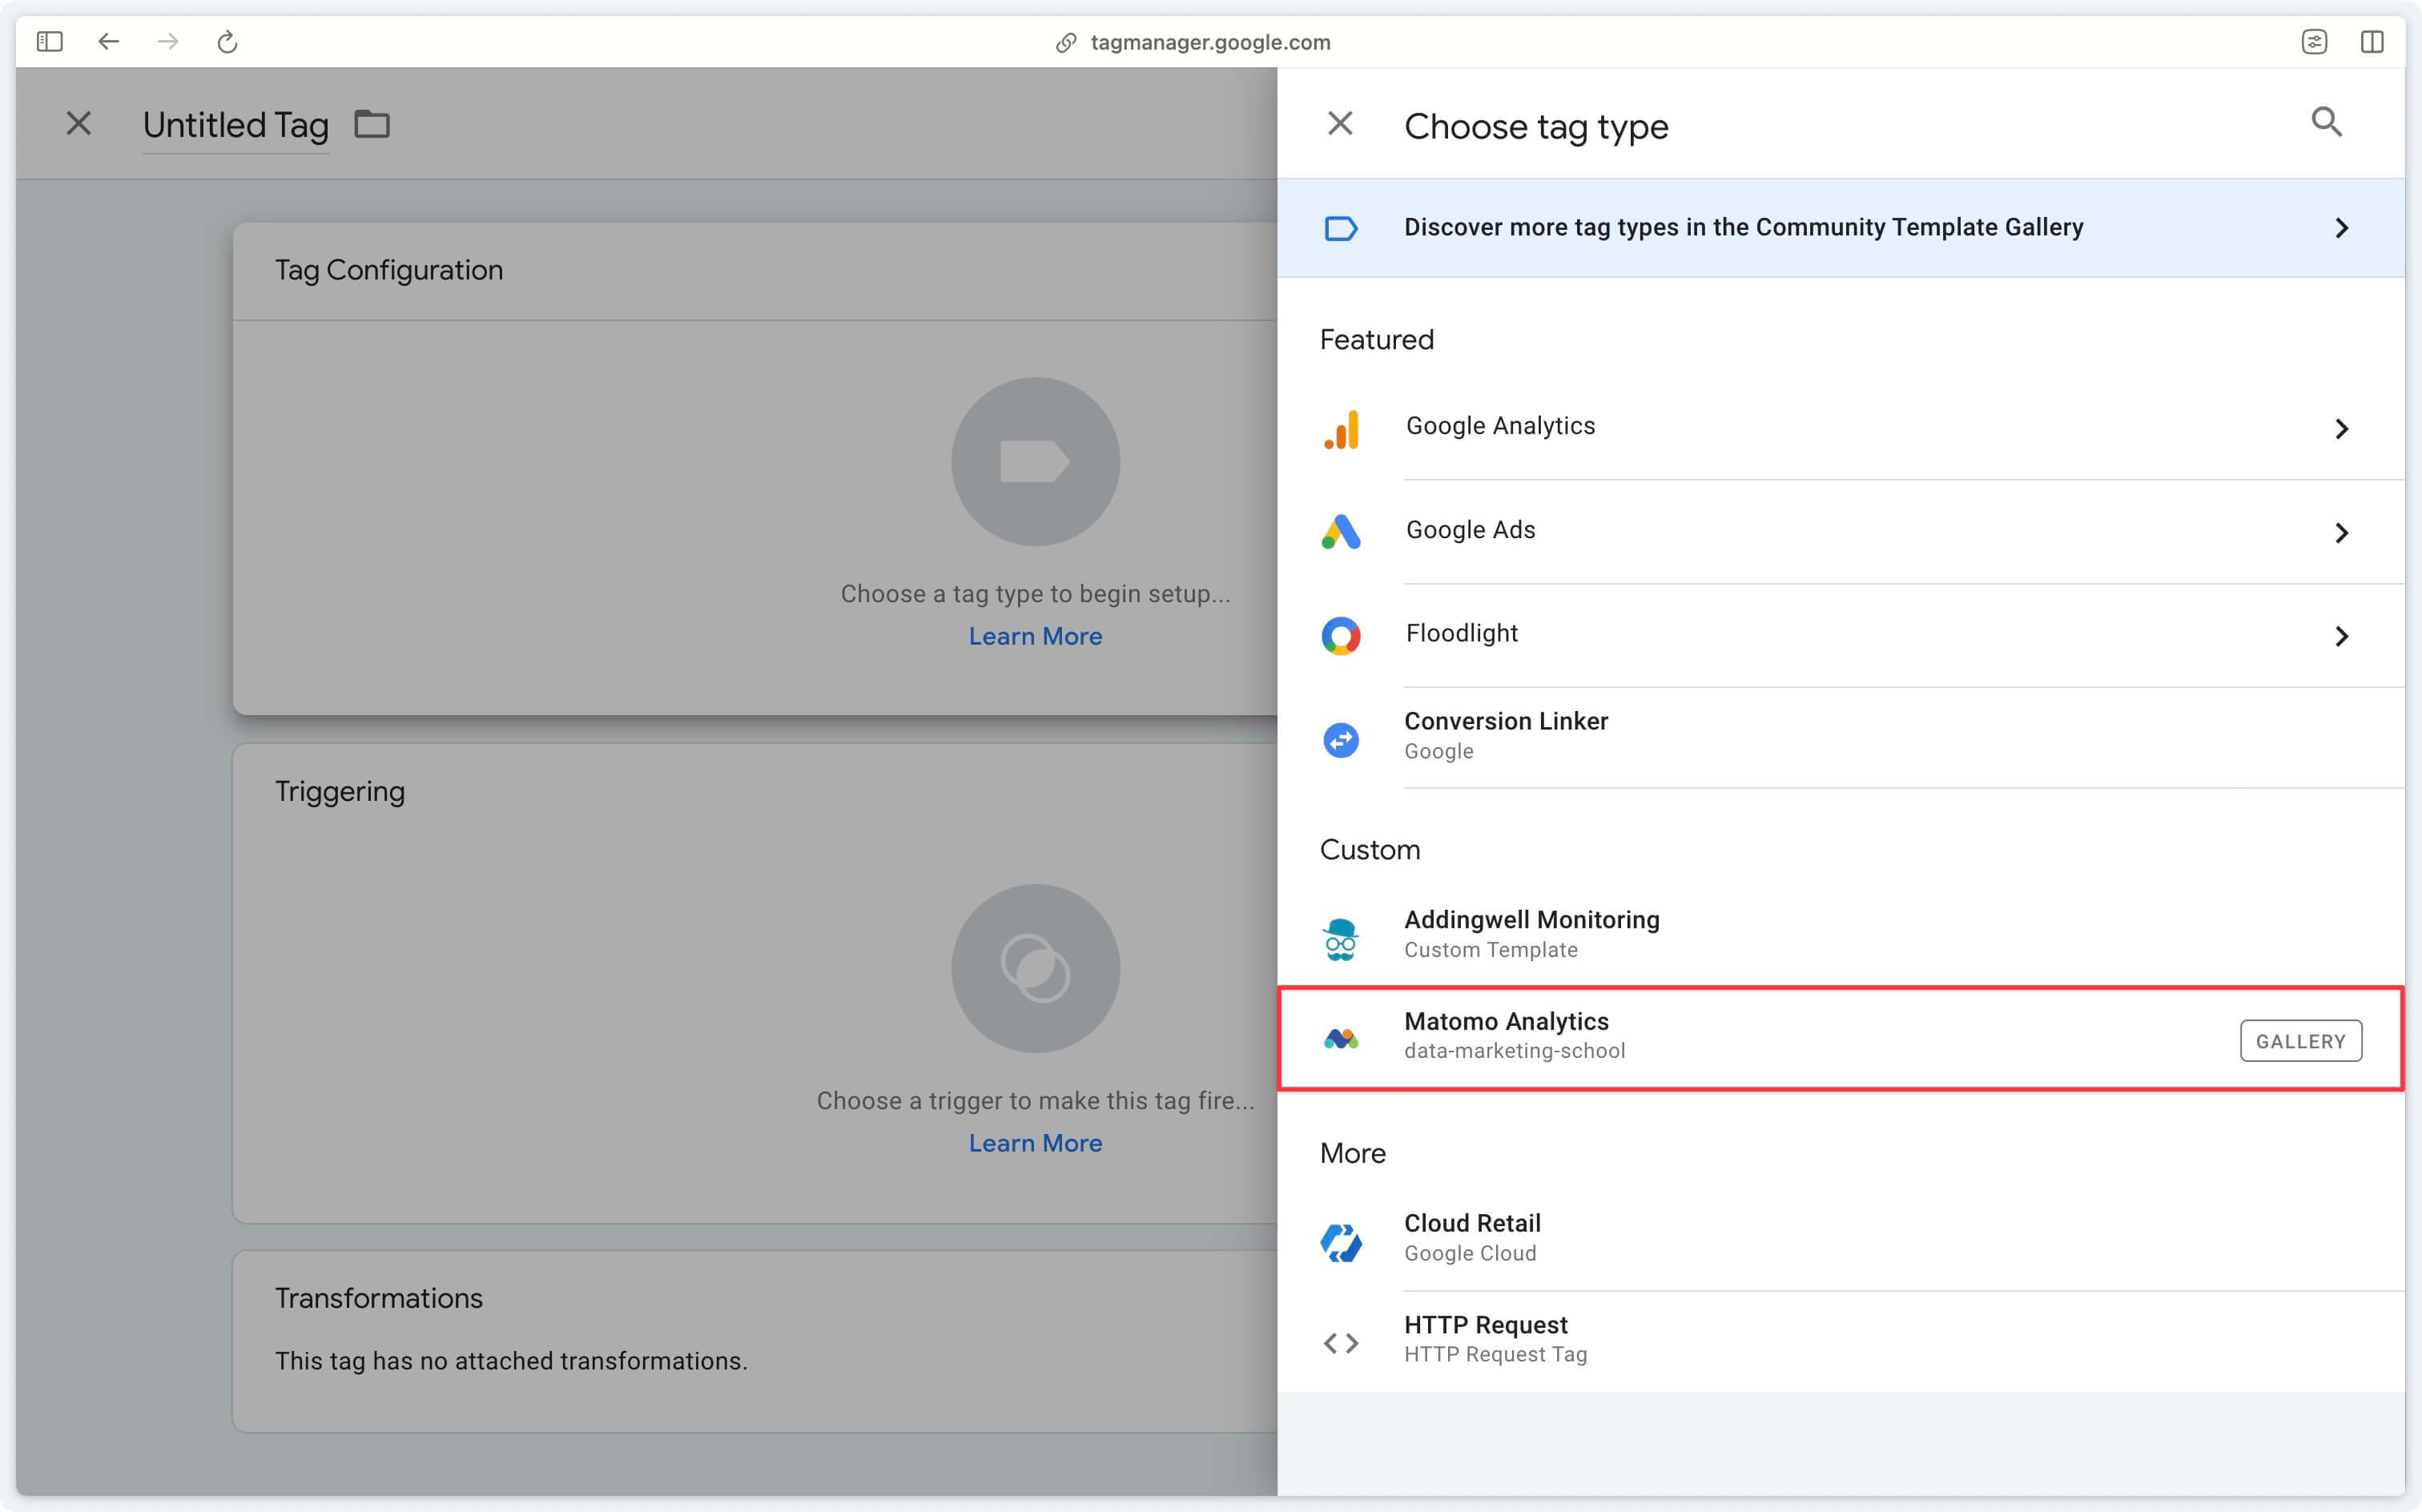
Now that the Matomo Analytics tag is imported, it’s available when you try to create a new tag.
Select the recently imported tag from the gallery.
To configure the tag, two pieces of information are required:
Once you’ve retrieved the auth token and site ID, you can move on to the next step and start configuring the tag.
Tag presentation
If you’ve already set up server-side tags you’re probably used to creating a single tag and triggering it on several events at the same time. This is the case, for example, with Addingwell’s Meta Conversion API tag.
The Matomo Analytics tag works slightly differently: you’ll need to create a new tag for each event you want to send to Matomo.
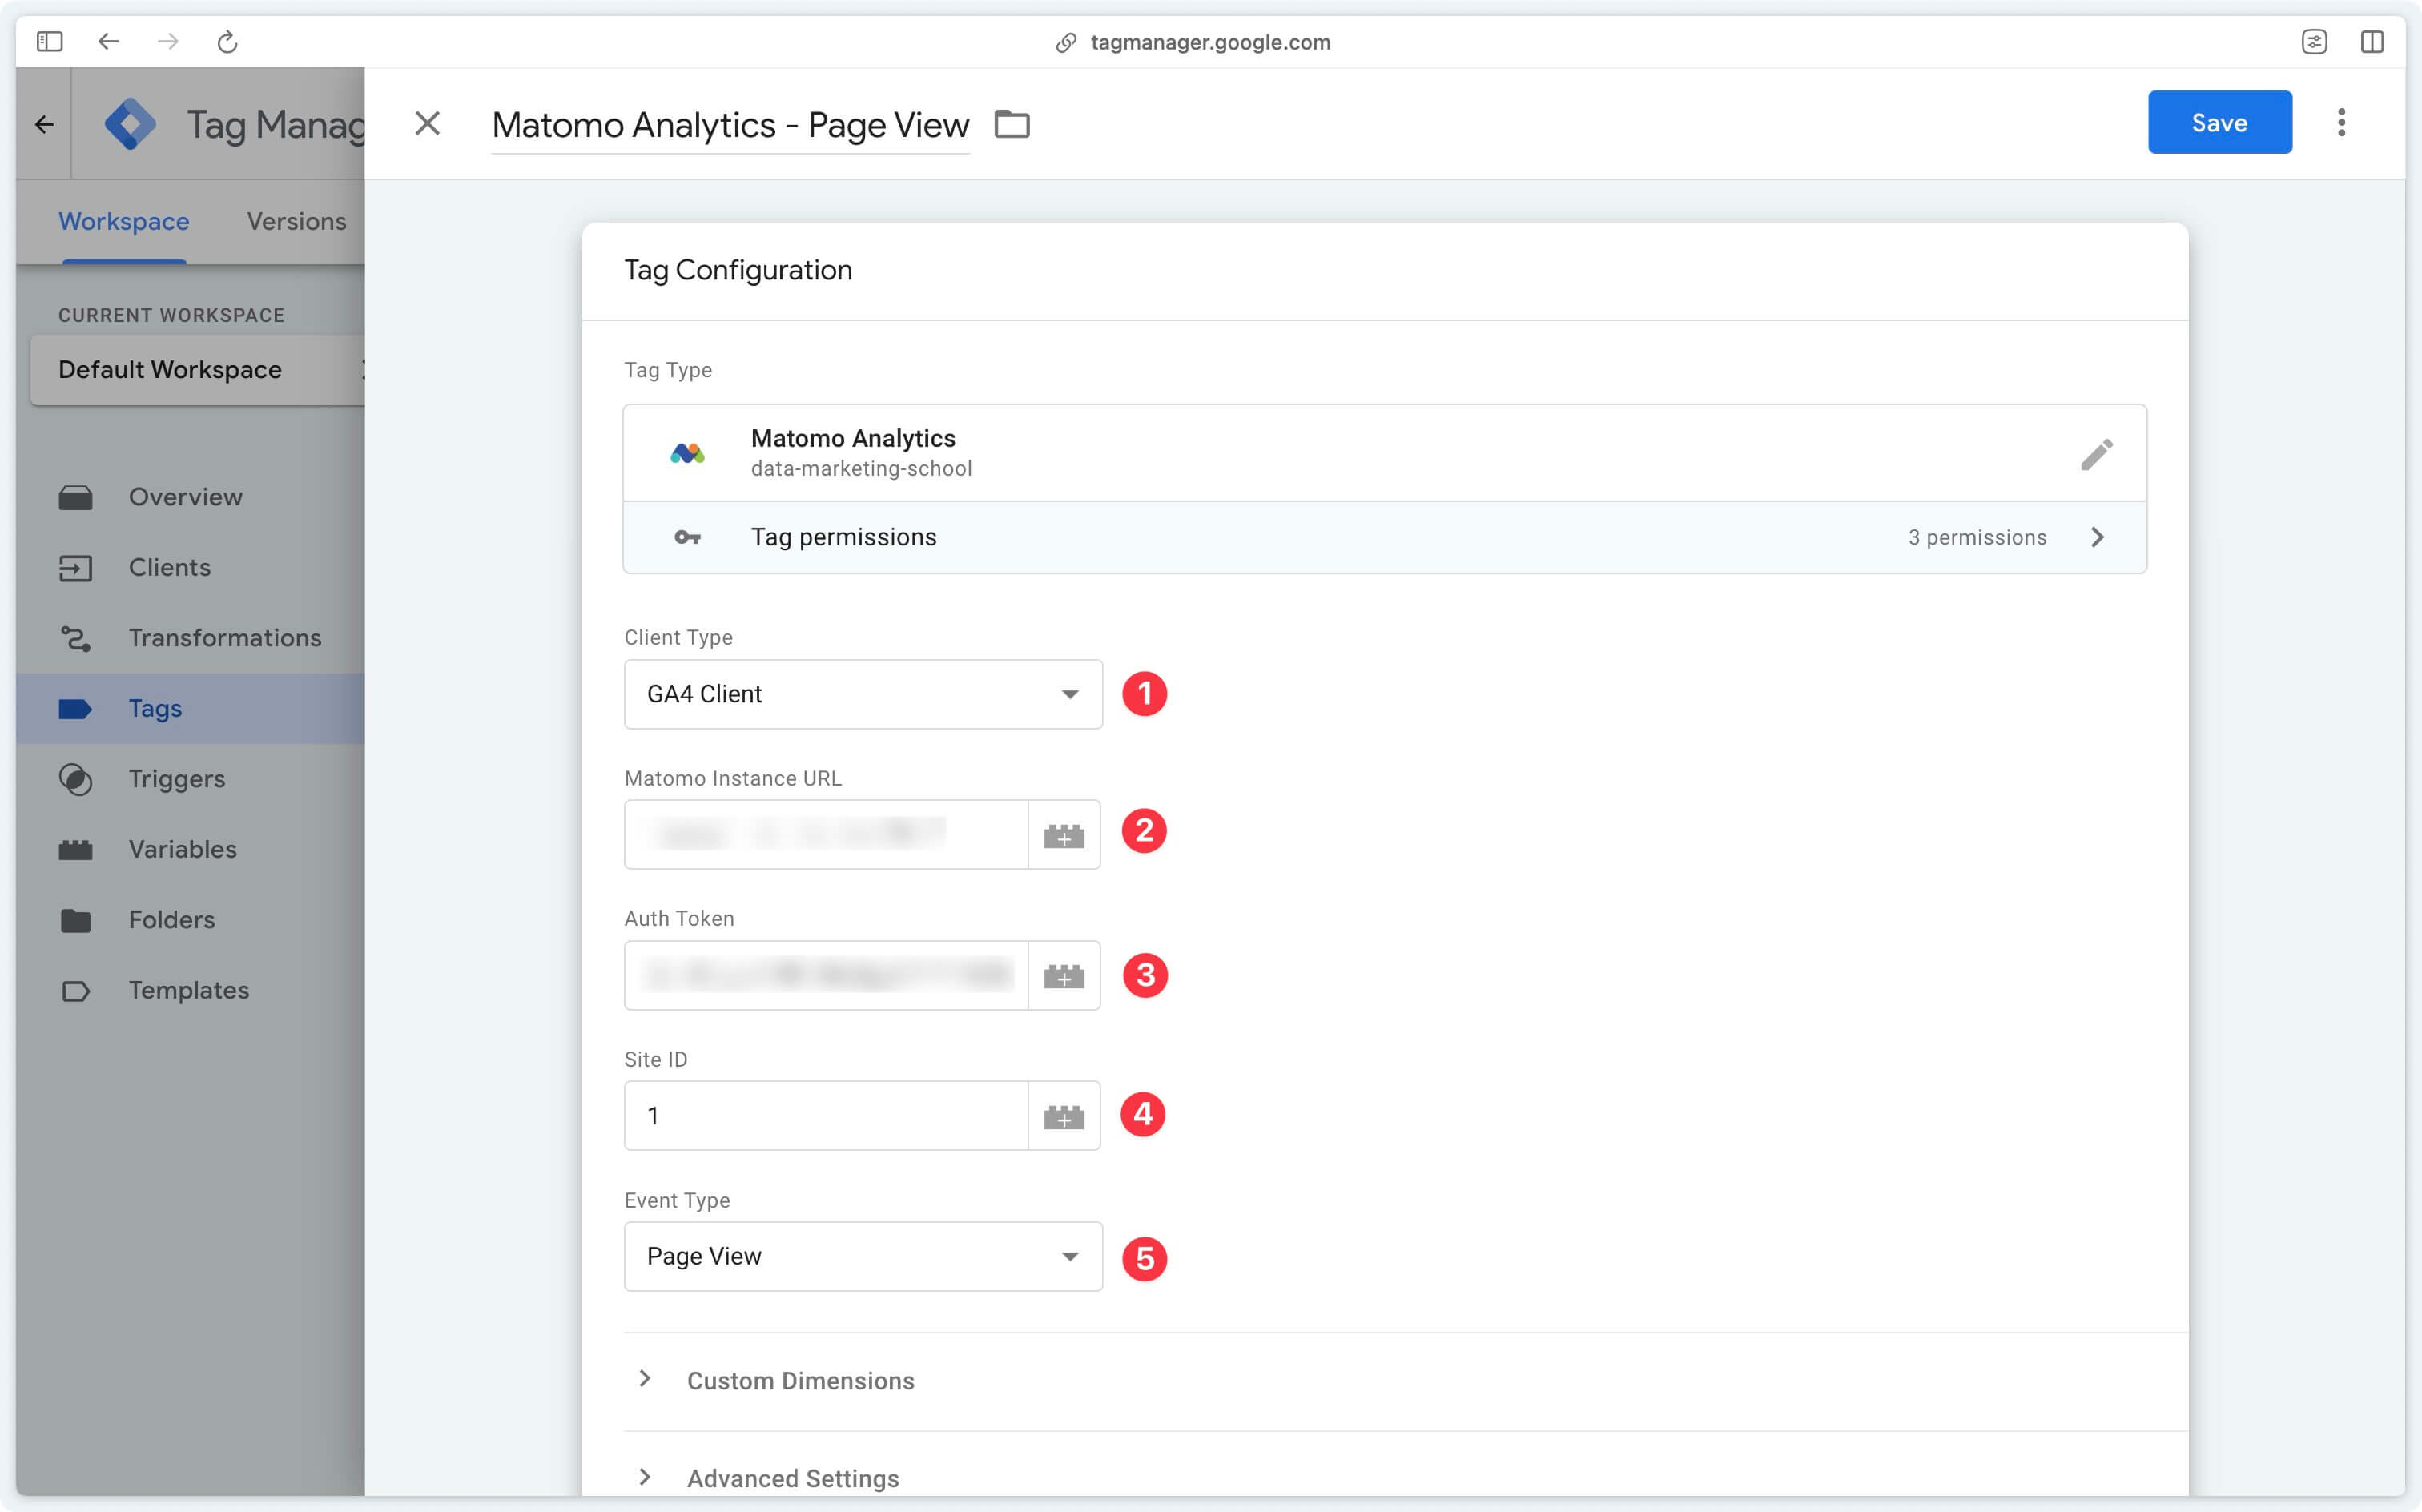
Client Type
Here you have to choose between the GA4 client and the Matomo client. If this is your very first server-side configuration you’re most likely using the GA4 client.
Matomo Instance URL
If you’re using Matomo Cloud, your instance URL will look like this: https://<your_subdomain>.matomo.cloud.
Auth Token
Enter here the auth token retrieved from your Matomo instance settings.
Site ID
Enter here the site ID retrieved from your Matomo instance settings.
If you have only one site on Matomo, it’s very likely that the site identifier is 1. If you have several sites, enter the identifier of the site to which you want to send the data.
Event Type
The type of event you wish to send to Matomo.
Here you can choose between:
- Page View
- Actions
- E-commerce Tracking
- Content Tracking
- Heartbeat
We’re going to detail all the configurations for each type of event.
Page views
In Matomo, page views are used to measure user activity on a website. They track the number of times a specific page has been viewed, helping to understand which pages are most popular, how long users spend on each page, and how they navigate from one page to the next.
To send page views to Matomo, you need to fill in the following fields:
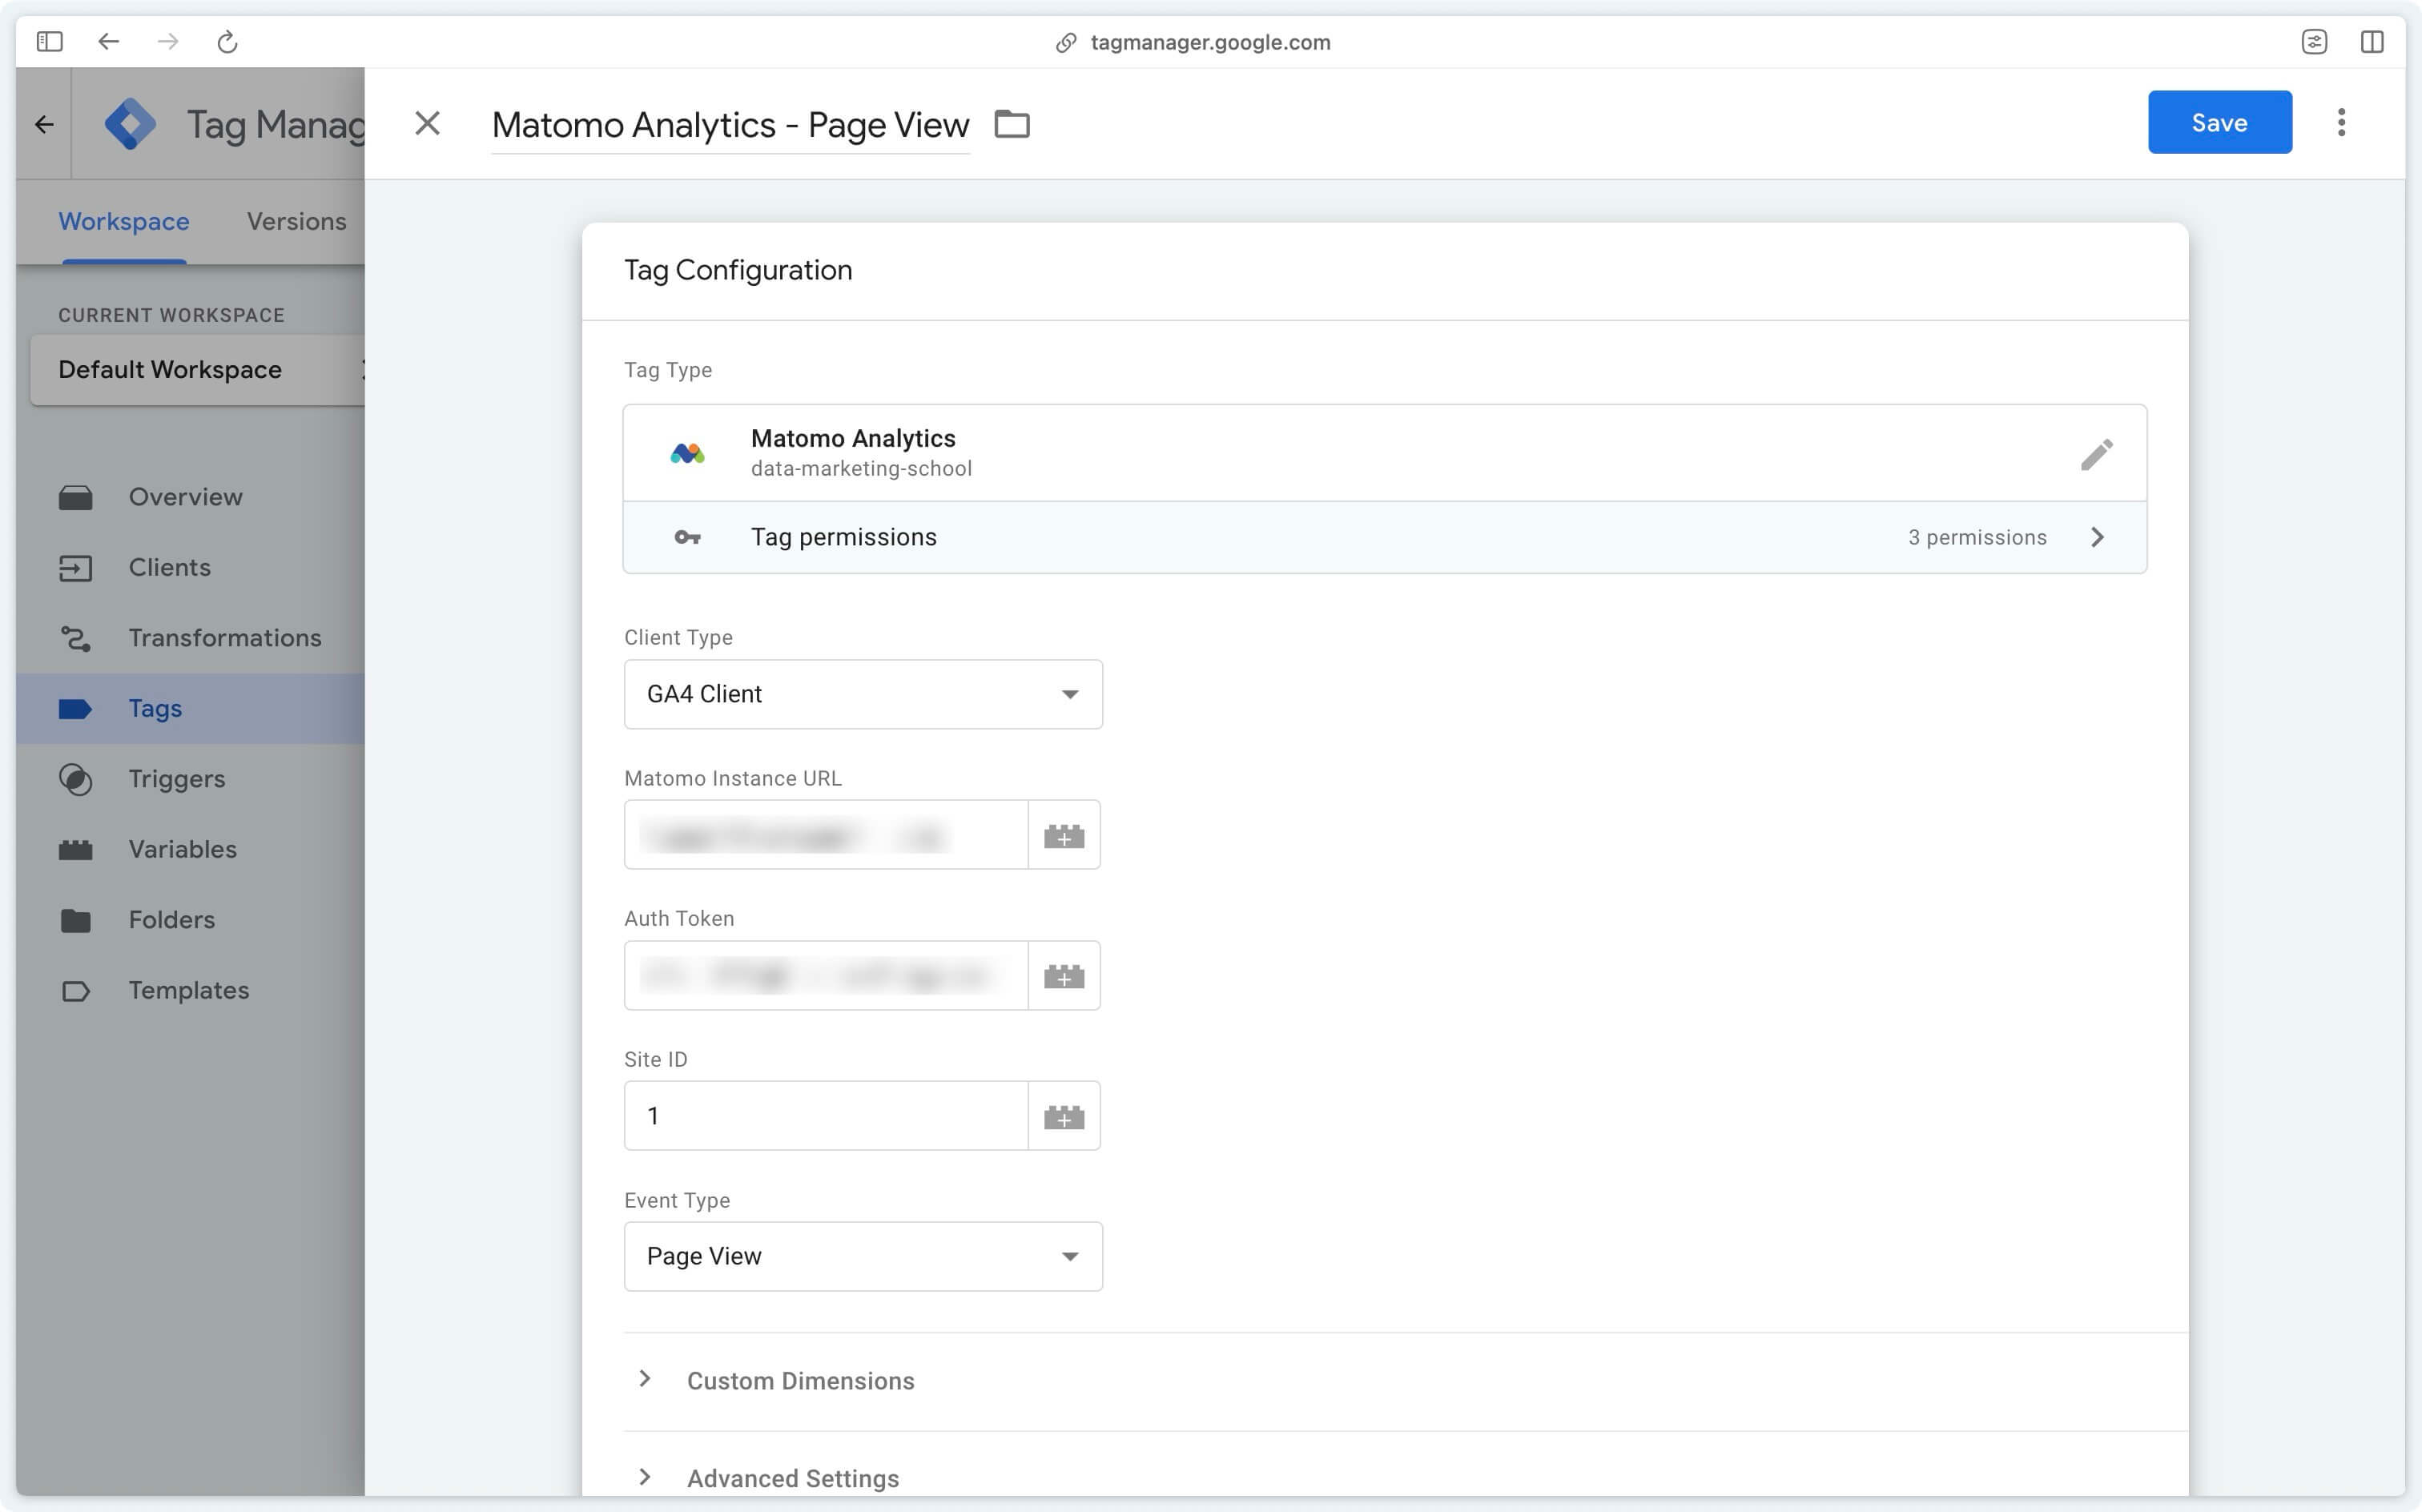
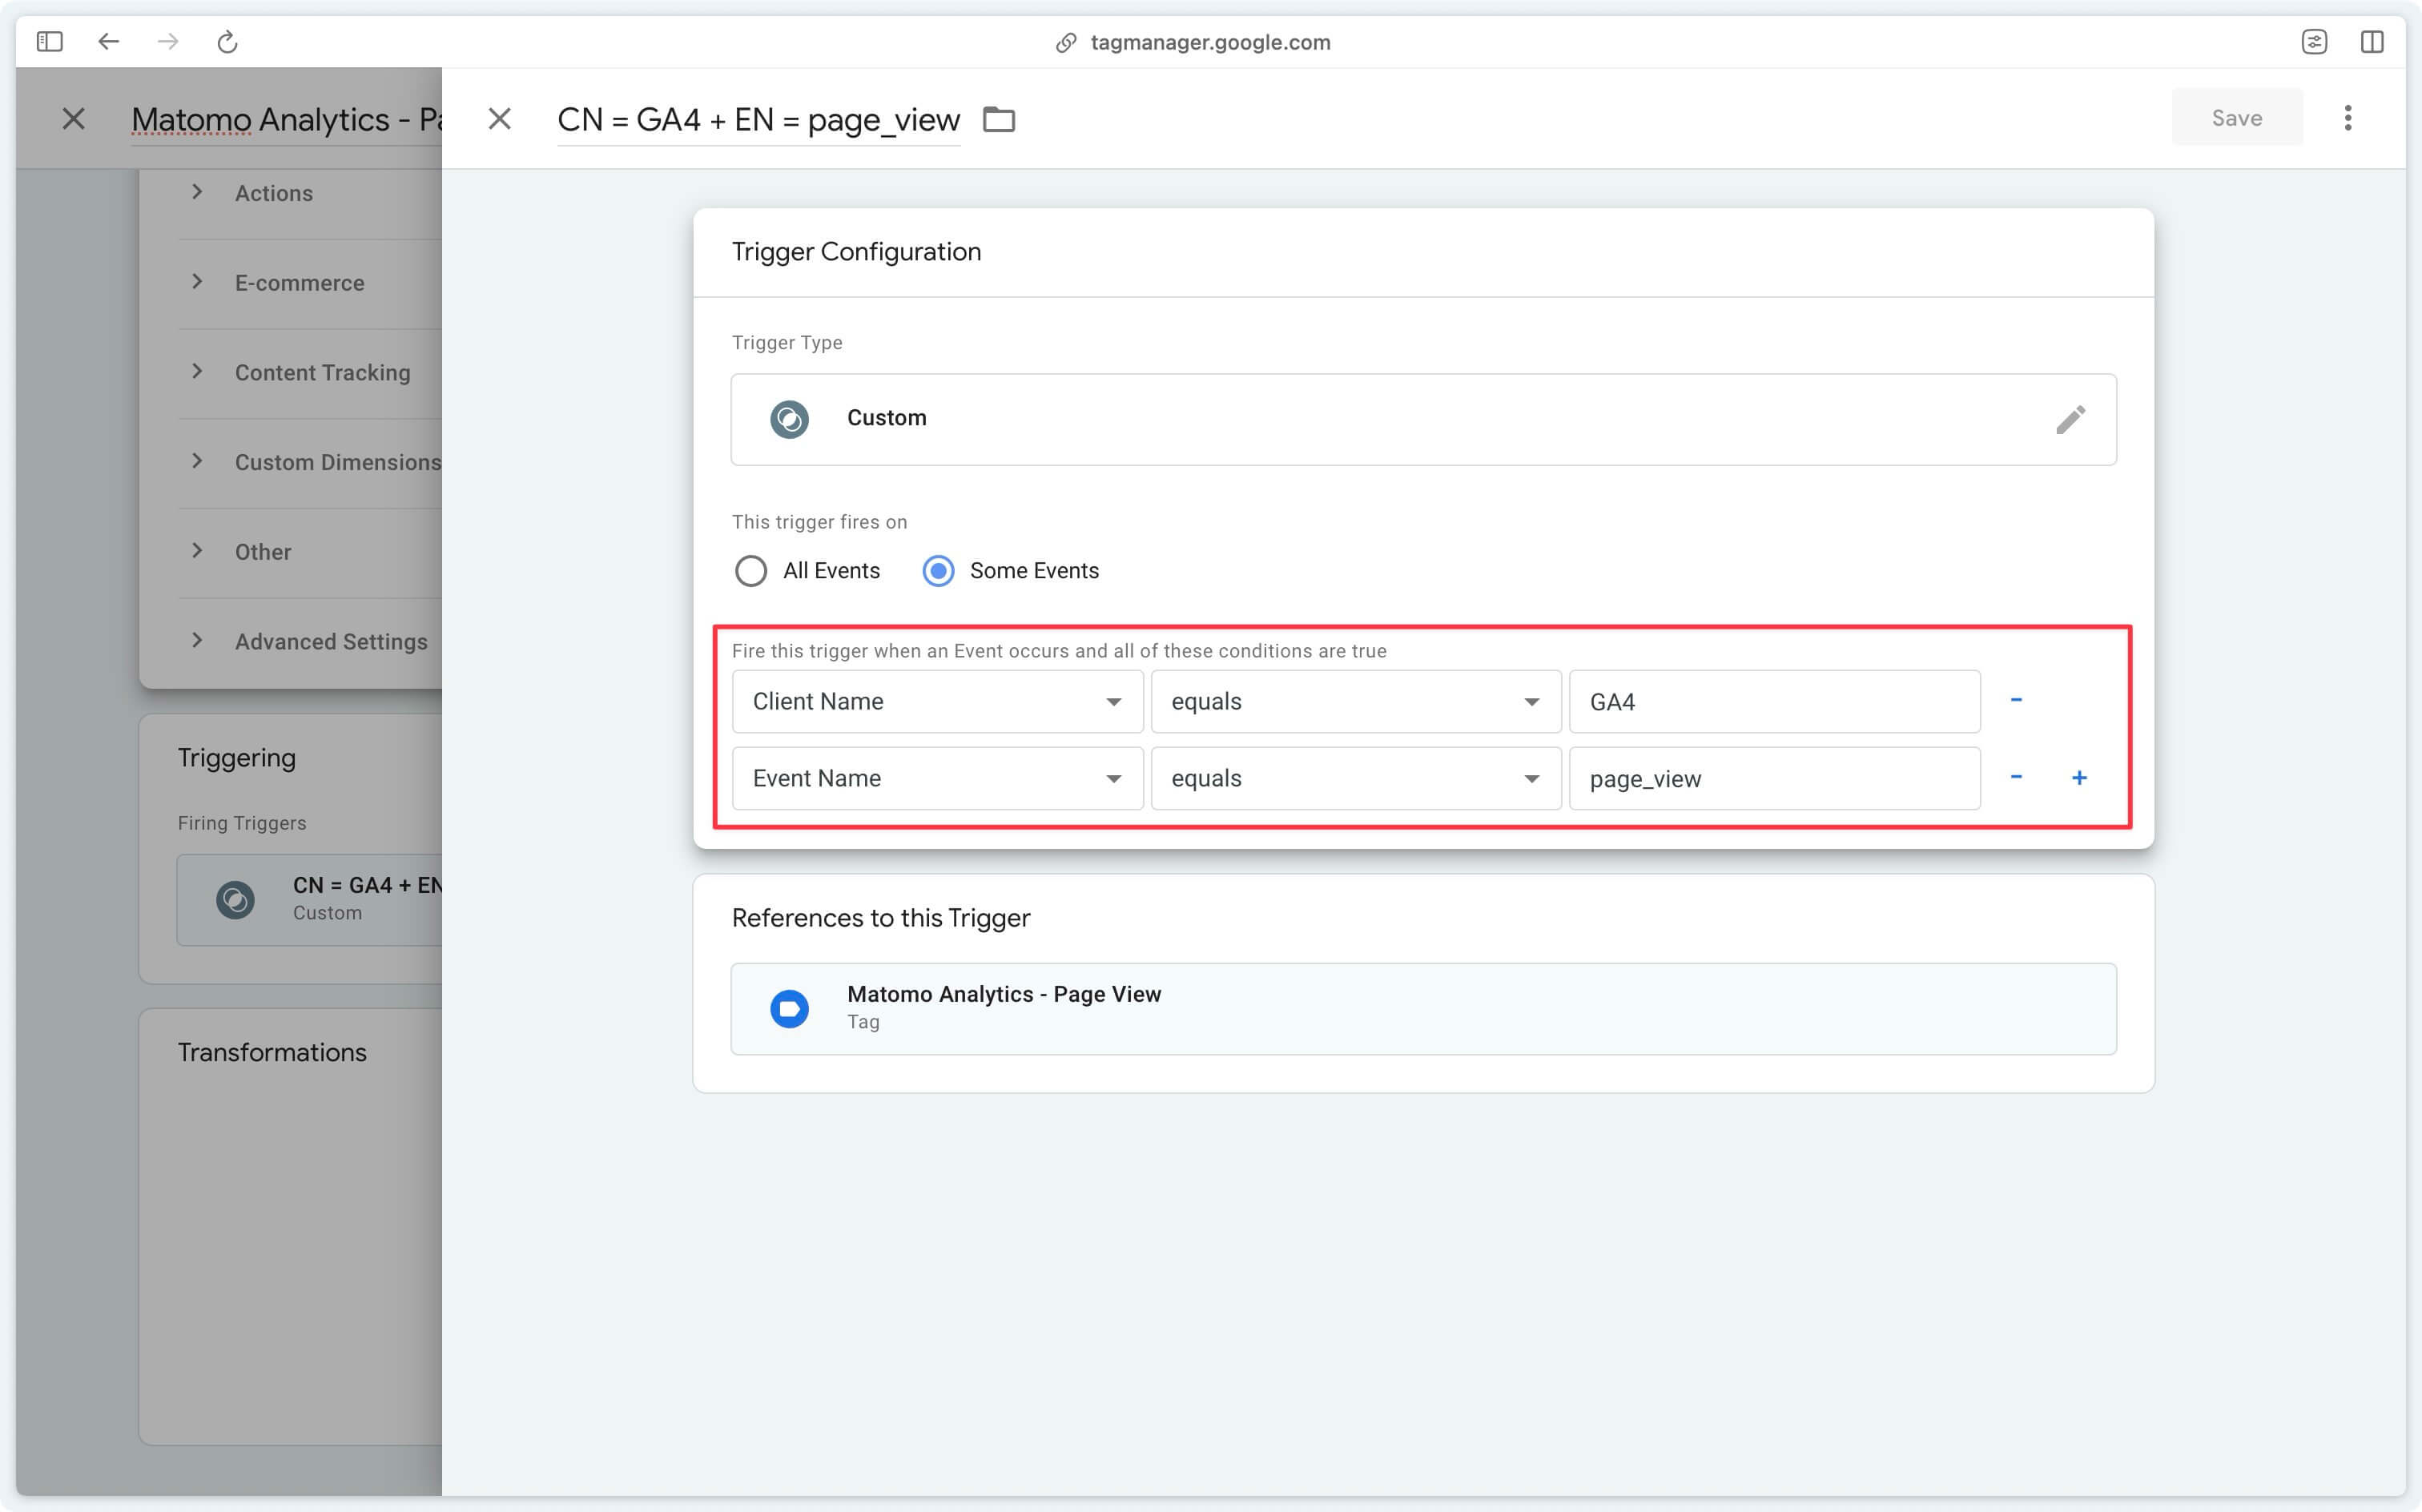
Then trigger this tag when the client name is GA4 and the event name is page_view.
=> Check page view received data
Actions
In Matomo, an action represents any significant visitor interaction with your website. It’s a broader concept than the simple page view, capturing a wide variety of interactions.
Types of actions in Matomo:
- Page views: every page visited by a user is counted as an action.
- Events: specific actions you want to track, such as clicking a button, playing a video, etc.
- Goals: achievement of a predefined goal, such as making a purchase, subscribing to a newsletter, sending a form, etc.
- Outlinks: where your users go after leaving your website.
- Downloads: your audience’s interest in your downloadable content.
- Site search: identify your visitors’ intentions.
Events
Events in Matomo are specific actions you want to track on your website. They enable you to get more details about what your visitors do between two page views (this could be a scroll, a button click, etc.).
In short, with events you can track any metrics you like, giving you more freedom. Events generally represent micro-conversions; prefer goals for macro-conversions.
For each event you wish to track, you must create a new tag, select Actions as Event Type and then Event as Action Type.
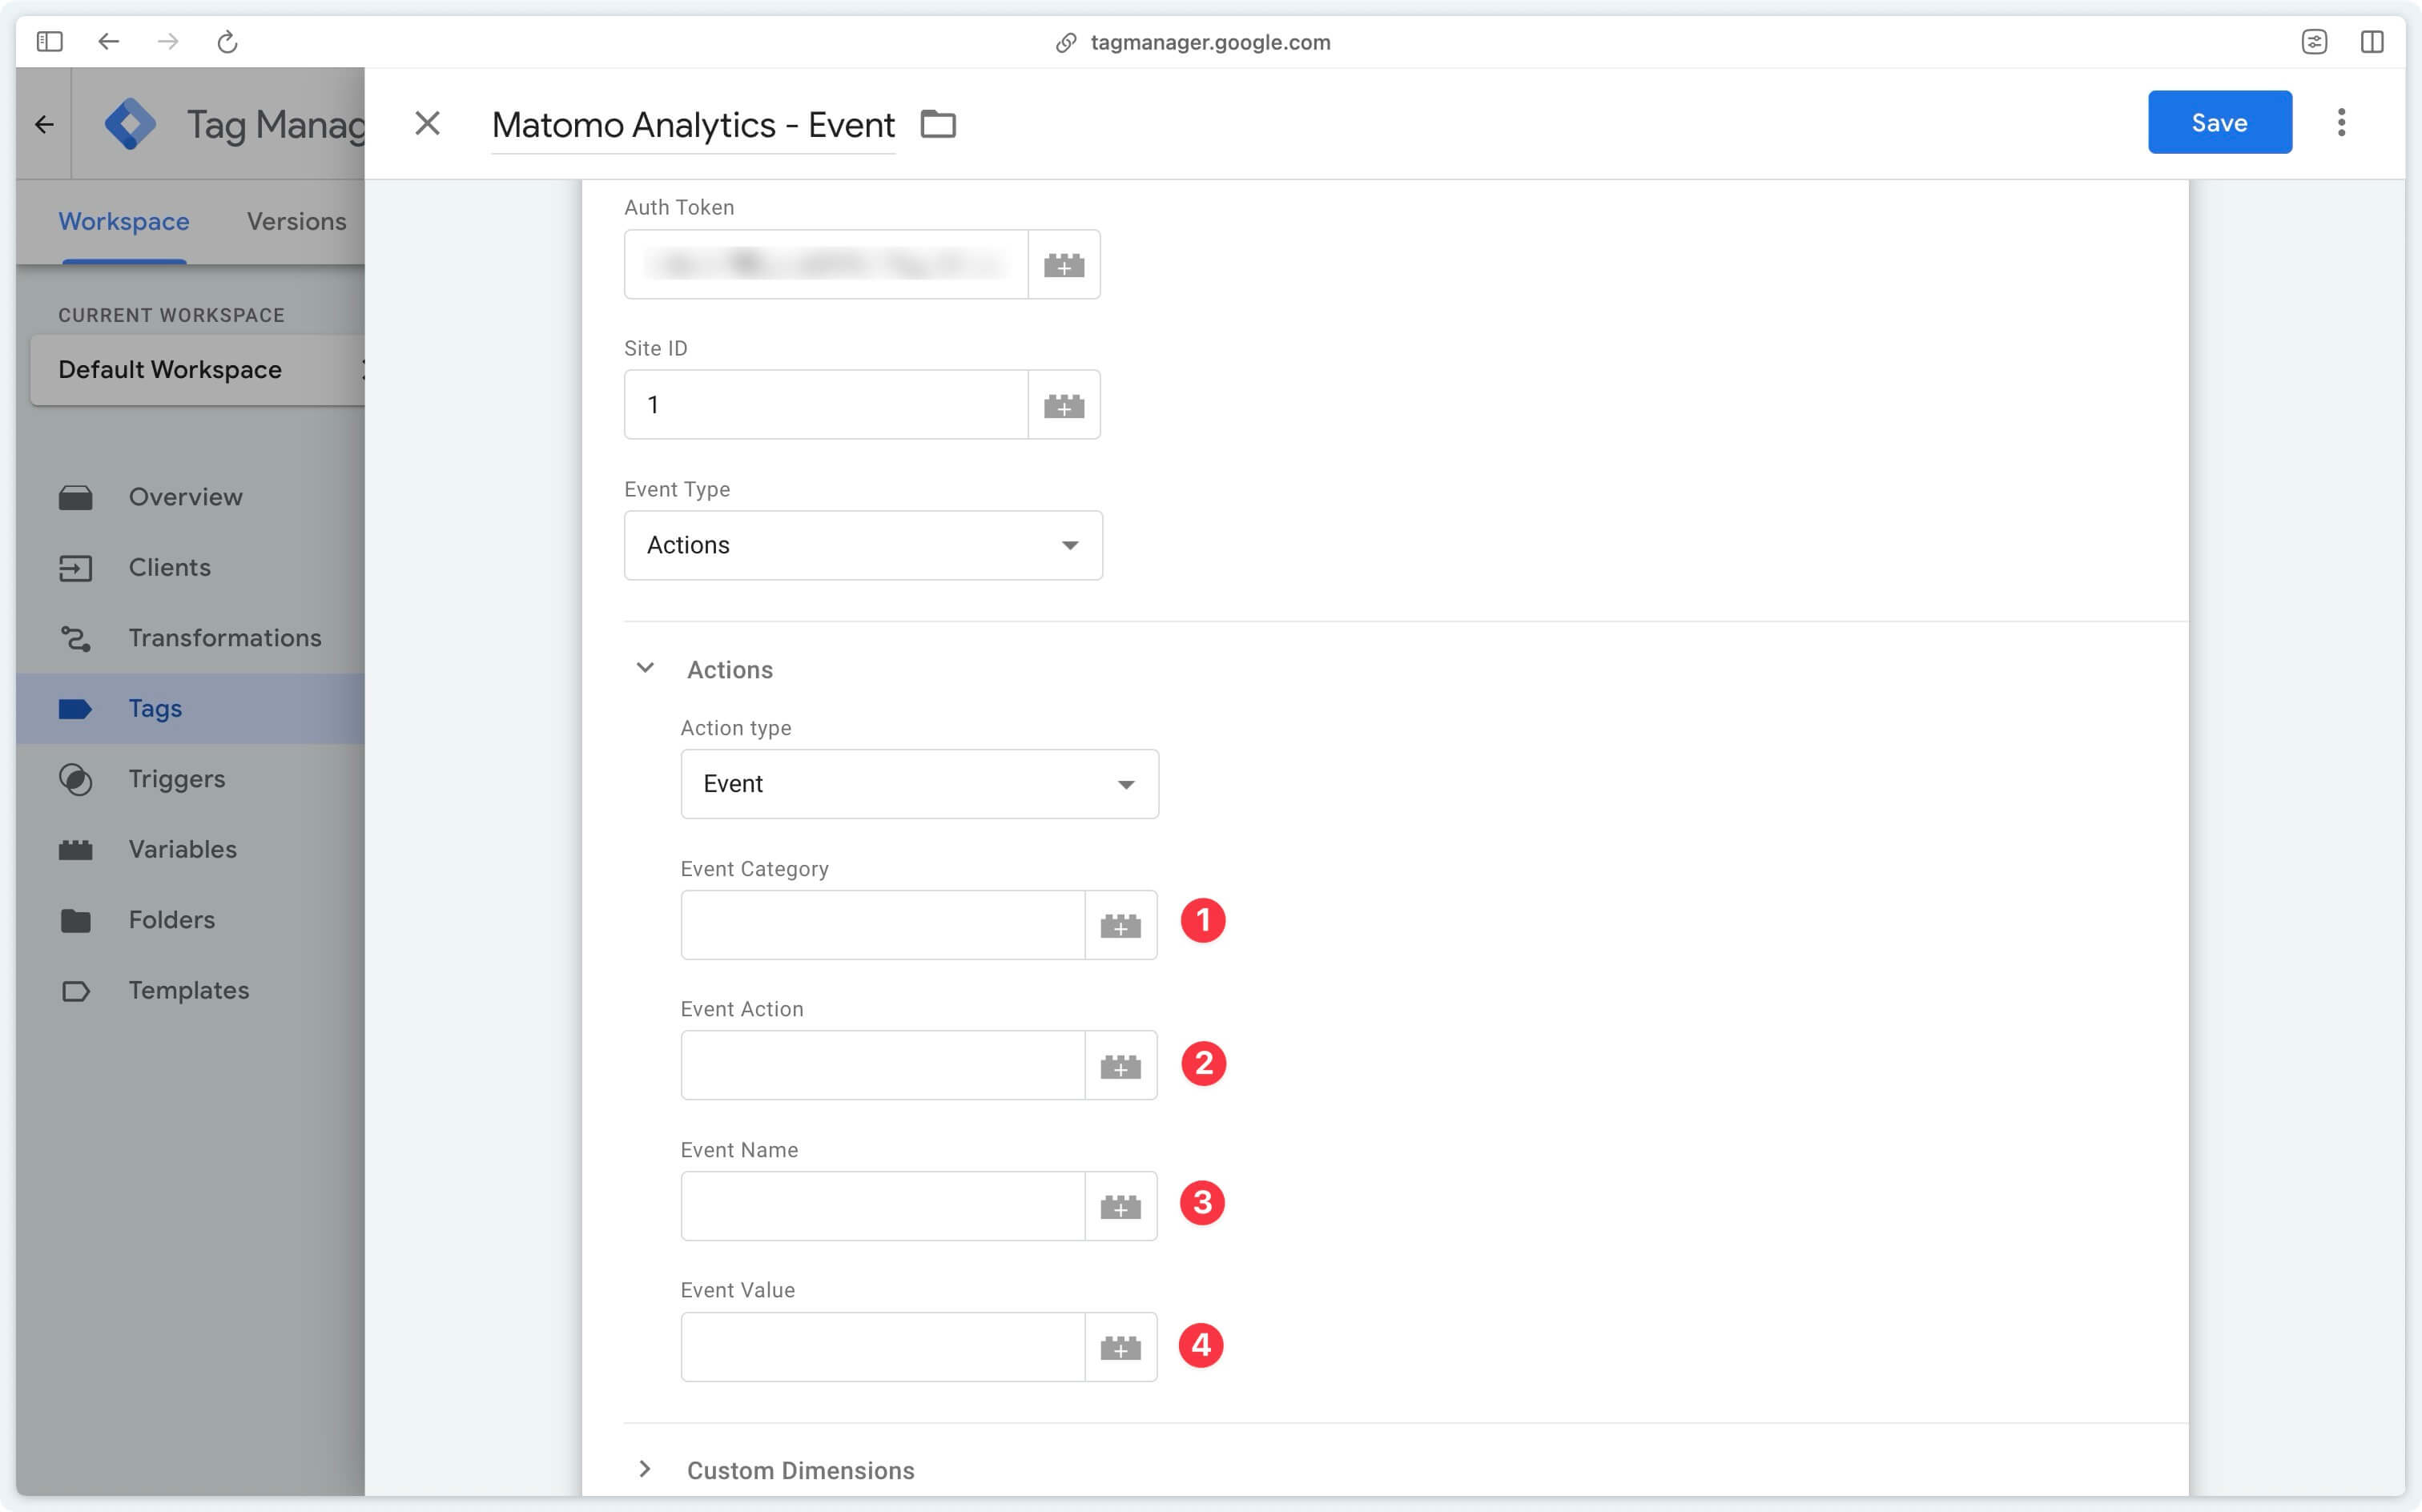
Event Category (Required)
The event category corresponds to the type of event you wish to track.
Event Action (Required)
The action taken by the user during this event.
Event Name (Optional)
The name of the event, you can put here, for example, the title of the element with which there was interaction.
Event Value (Optional)
Here you can enter the value associated with the event (if any).
You can then trigger this tag on the GA4 event of your choice.
Goals
Goals in Matomo are the larger actions (macro-conversions) that your visitors perform on your website, such as submitting a quote request form or purchasing a product.
For each goal you wish to track, you need to create a new tag, select Actions as Event Type and then Goal as Action Type.
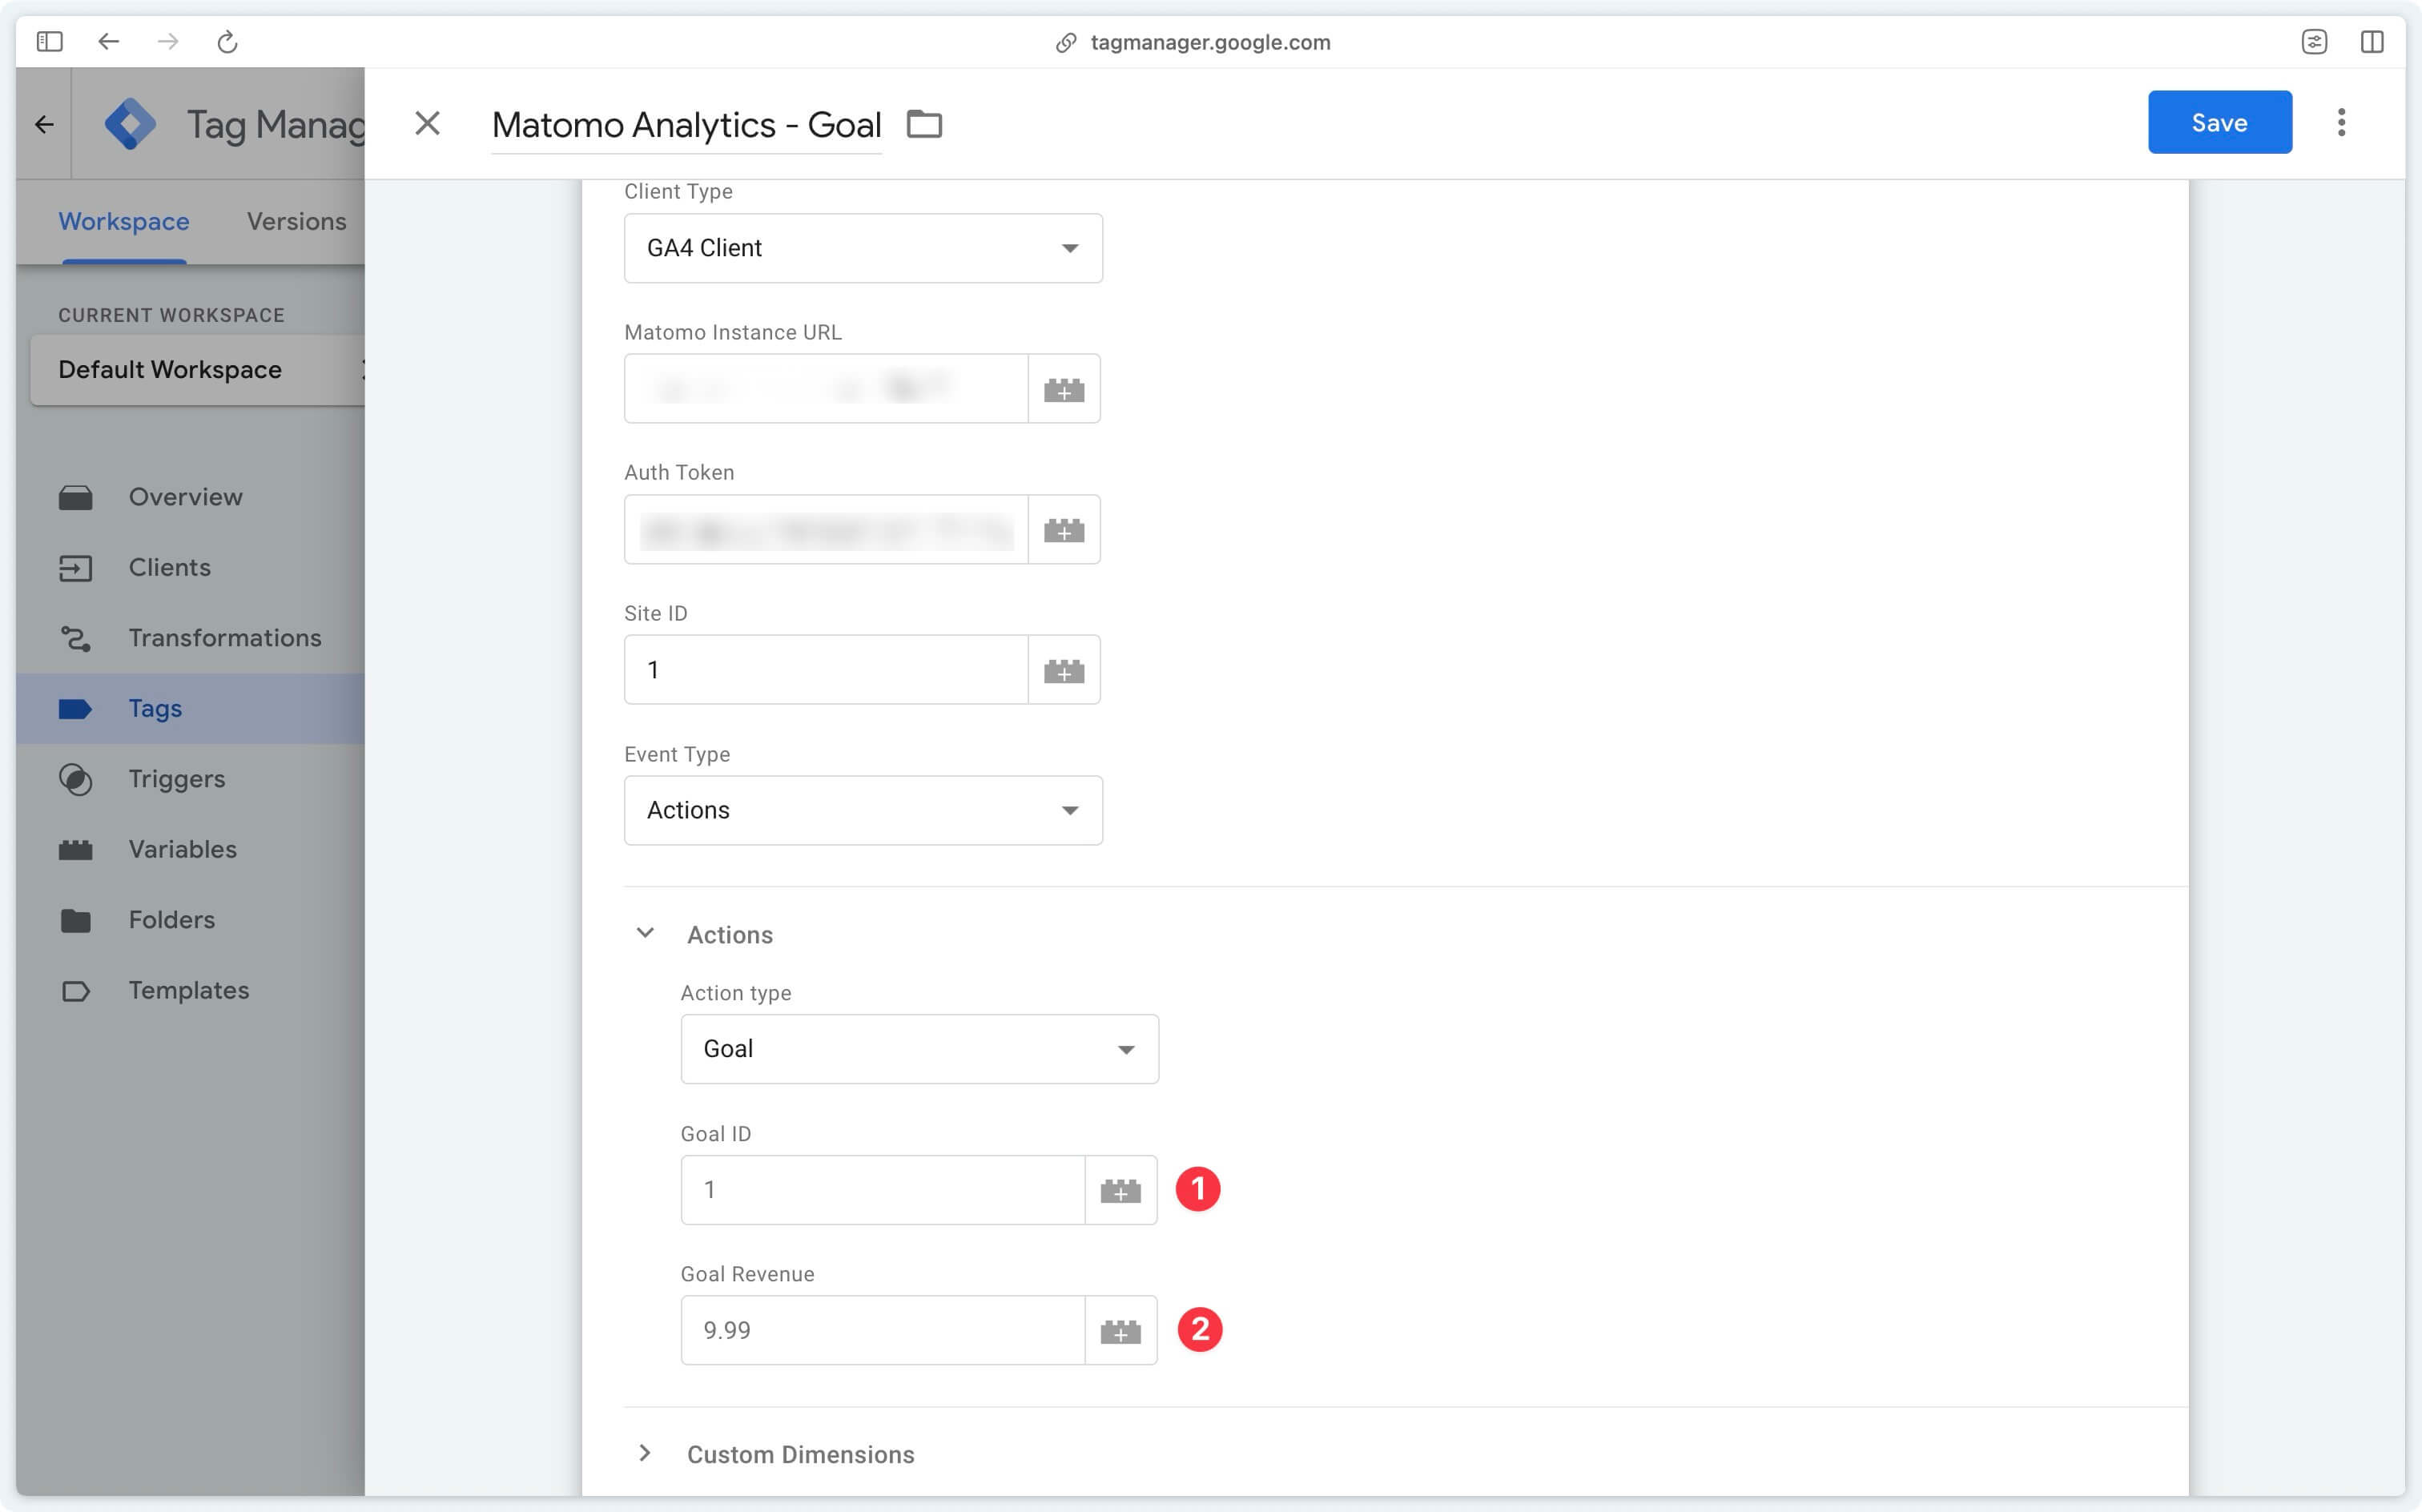
Goal ID (Required)
You can find your Matomo Goal IDs by following this tutorial.
Goal Revenue (Optional)
The value associated with the goal (if any).
Links
Outlinks in Matomo let you know where your visitors go after they leave your website.
For each outlink or download you wish to track, you need to create a new tag, select Actions as Event Type and then Link as Action Type.
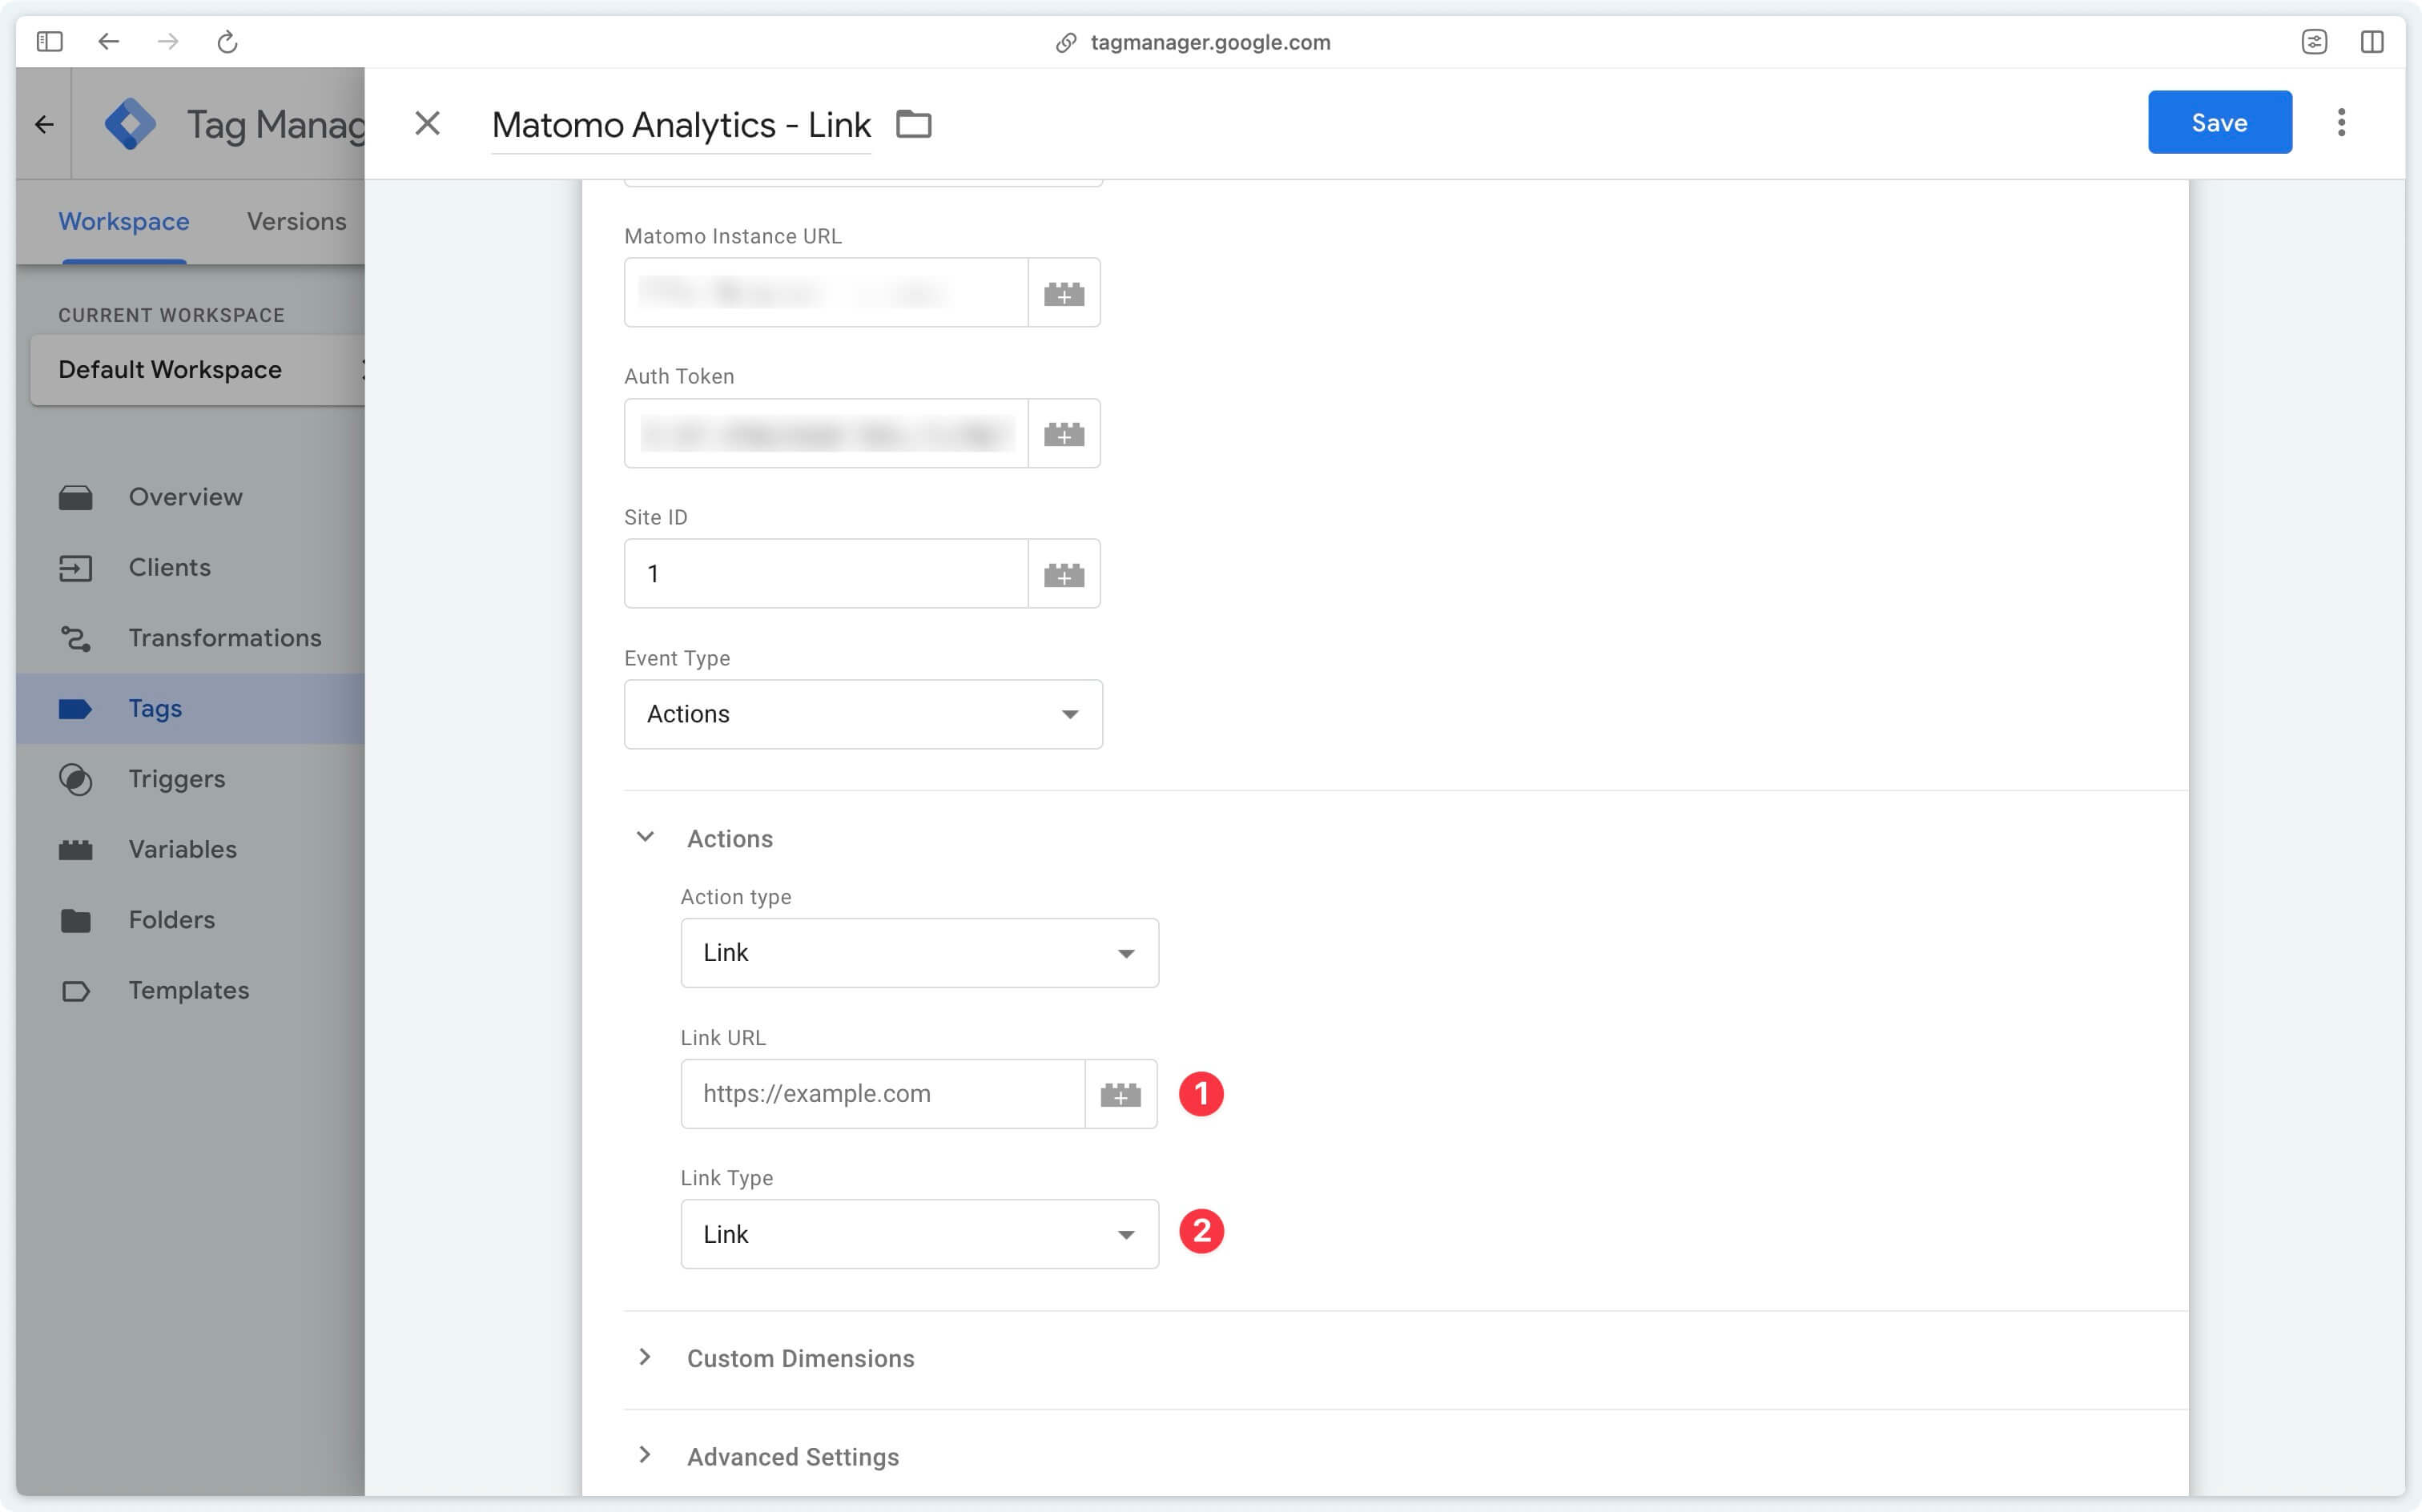
Link URL (Required)
The URL of the outlink or downloaded file.
Link Type (Required)
- Link: for an outlink
- Download: for a download
Download tracking in Matomo lets you measure the number of times your visitors download files from your website.
This allows you to study the performance of your downloadable content (PDFs, images, software, etc.).
=> Check outlinks and downloads received data
Site search
Site search enables you to analyze the terms your visitors use to find information on your website.
Among other things, this enables you to:
- understand the user’s needs
- improve and personalize their experience
- identify gaps/holes in your content
For each search you wish to track, you need to create a new tag, select Actions as Event Type and then Site Search as Action Type.
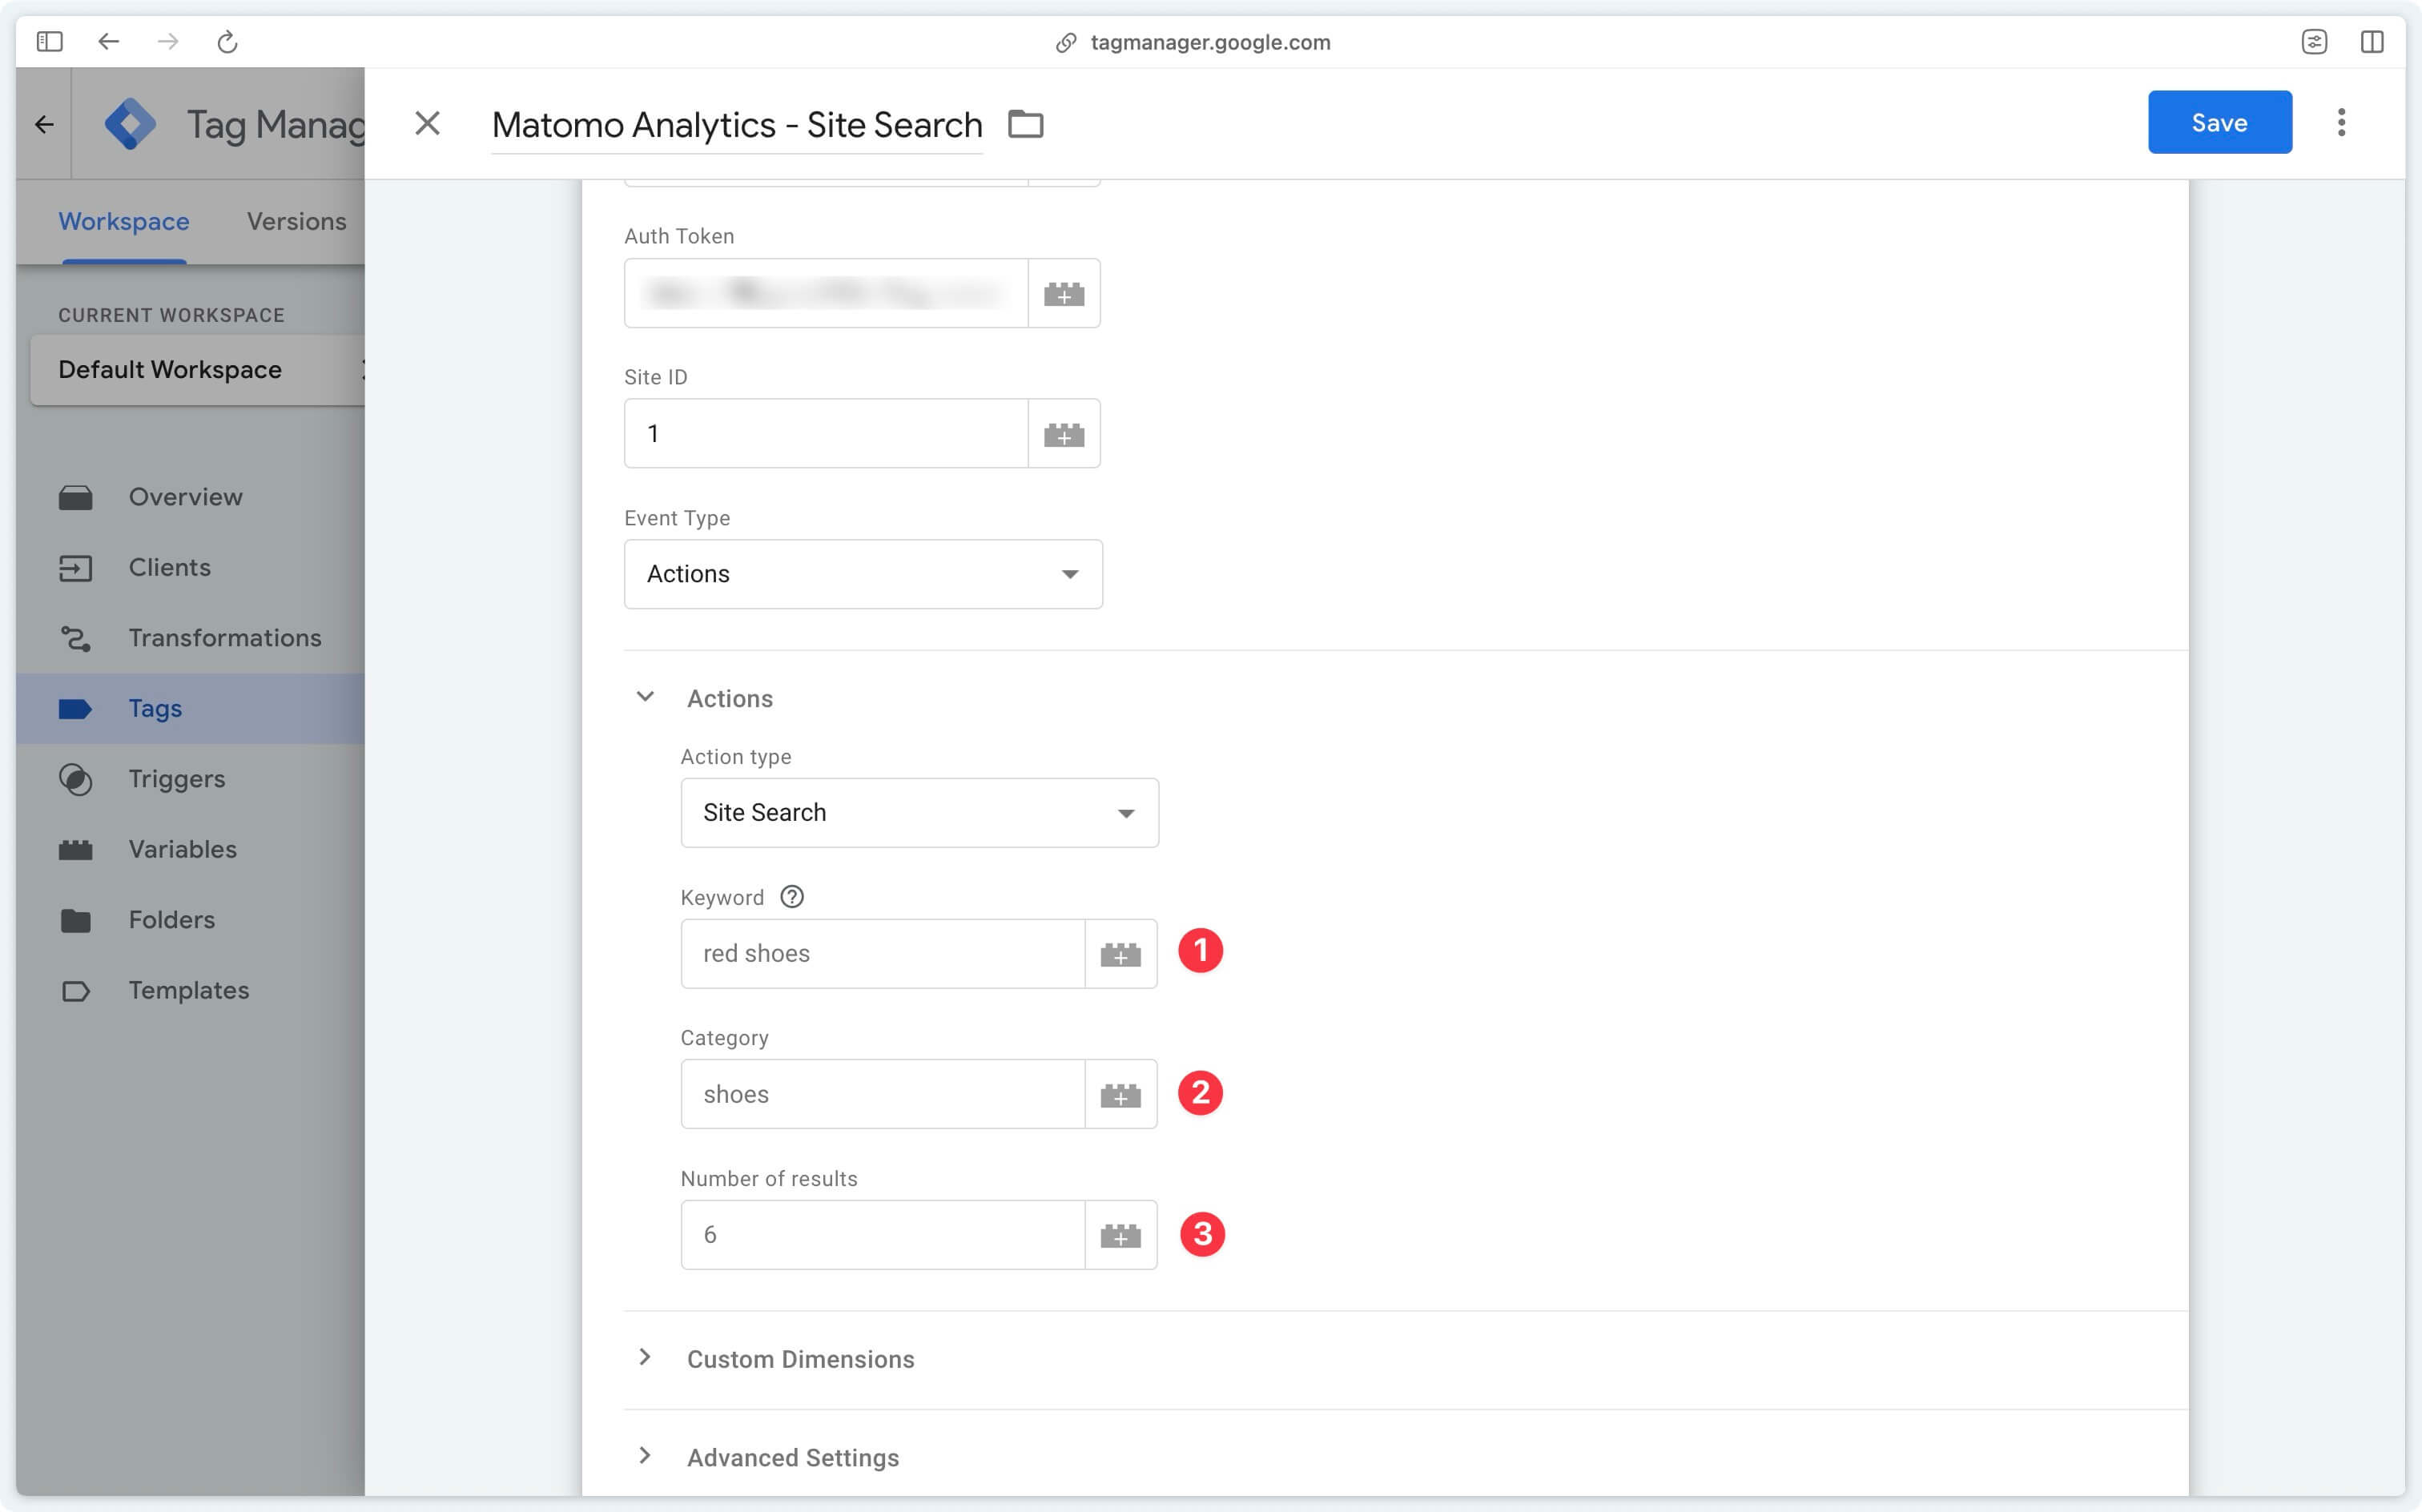
Keyword (Required)
The keyword searched for on your website.
If you leave this field empty, the tag will default to the search_term parameter in the event data if available.
Category (Optional)
The search category (if any).
Number of results (Optional)
The number of search results.
=> Check site search received data
E-commerce
E-commerce tracking allows you to track your visitors’ purchasing path.
What data can you track?
- Products viewed and added to cart: Which products and product categories are most attractive to your visitors?
- Conversion rate: What percentage of visitors make a purchase?
- Revenue per visit: What is the revenue generated by each visit?
- Traffic sources: Where do your customers come from (social networks, search engines, etc.)?
For each type of e-commerce event you wish to track, you must create a new tag, select E-commerce Tracking as Event Type.
Category views
Category views represent the number of times a specific product category has been viewed. It’s an indicator that allows you to track your visitors’ interest in different sections of your catalog.
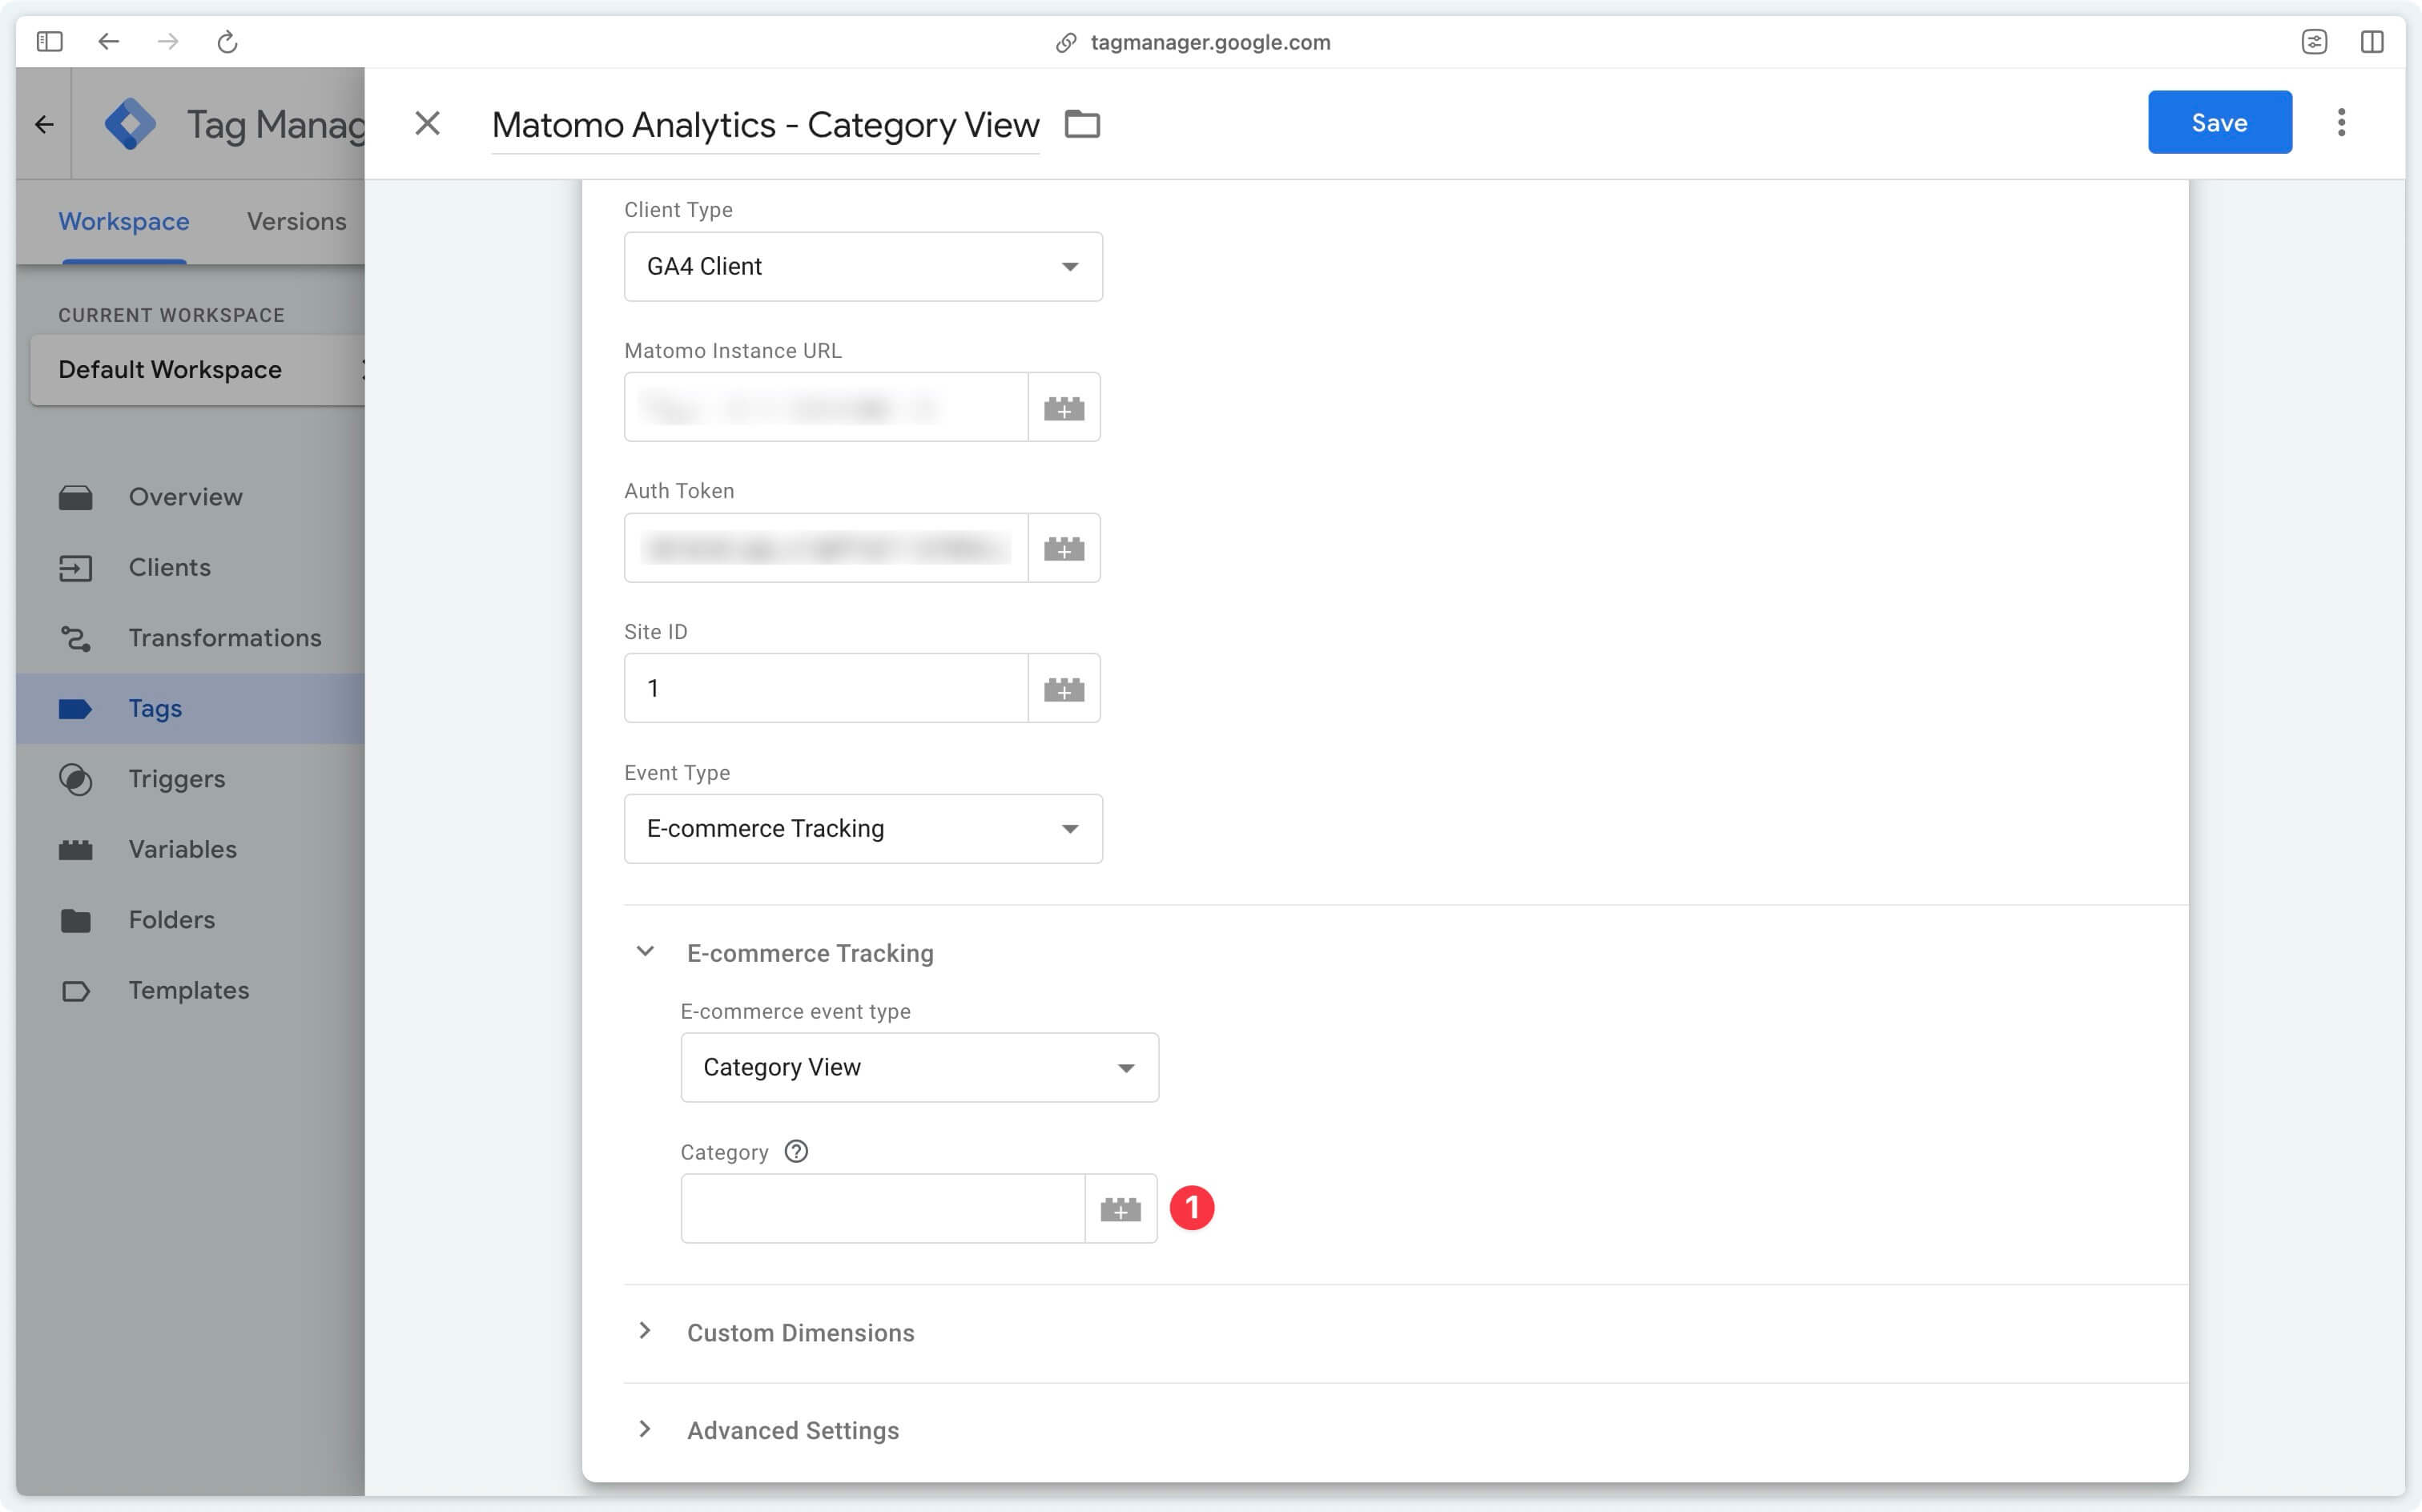
Category (Required)
The category of products visited.
If you leave this field empty, the tag will default to the item_category parameter of the first product in the items array if available in the event data.
=> Check category views received data
Product views
Product views represent the number of times a specific product has been viewed. This indicator enables you to track your visitors’ interest in different products in your catalog.
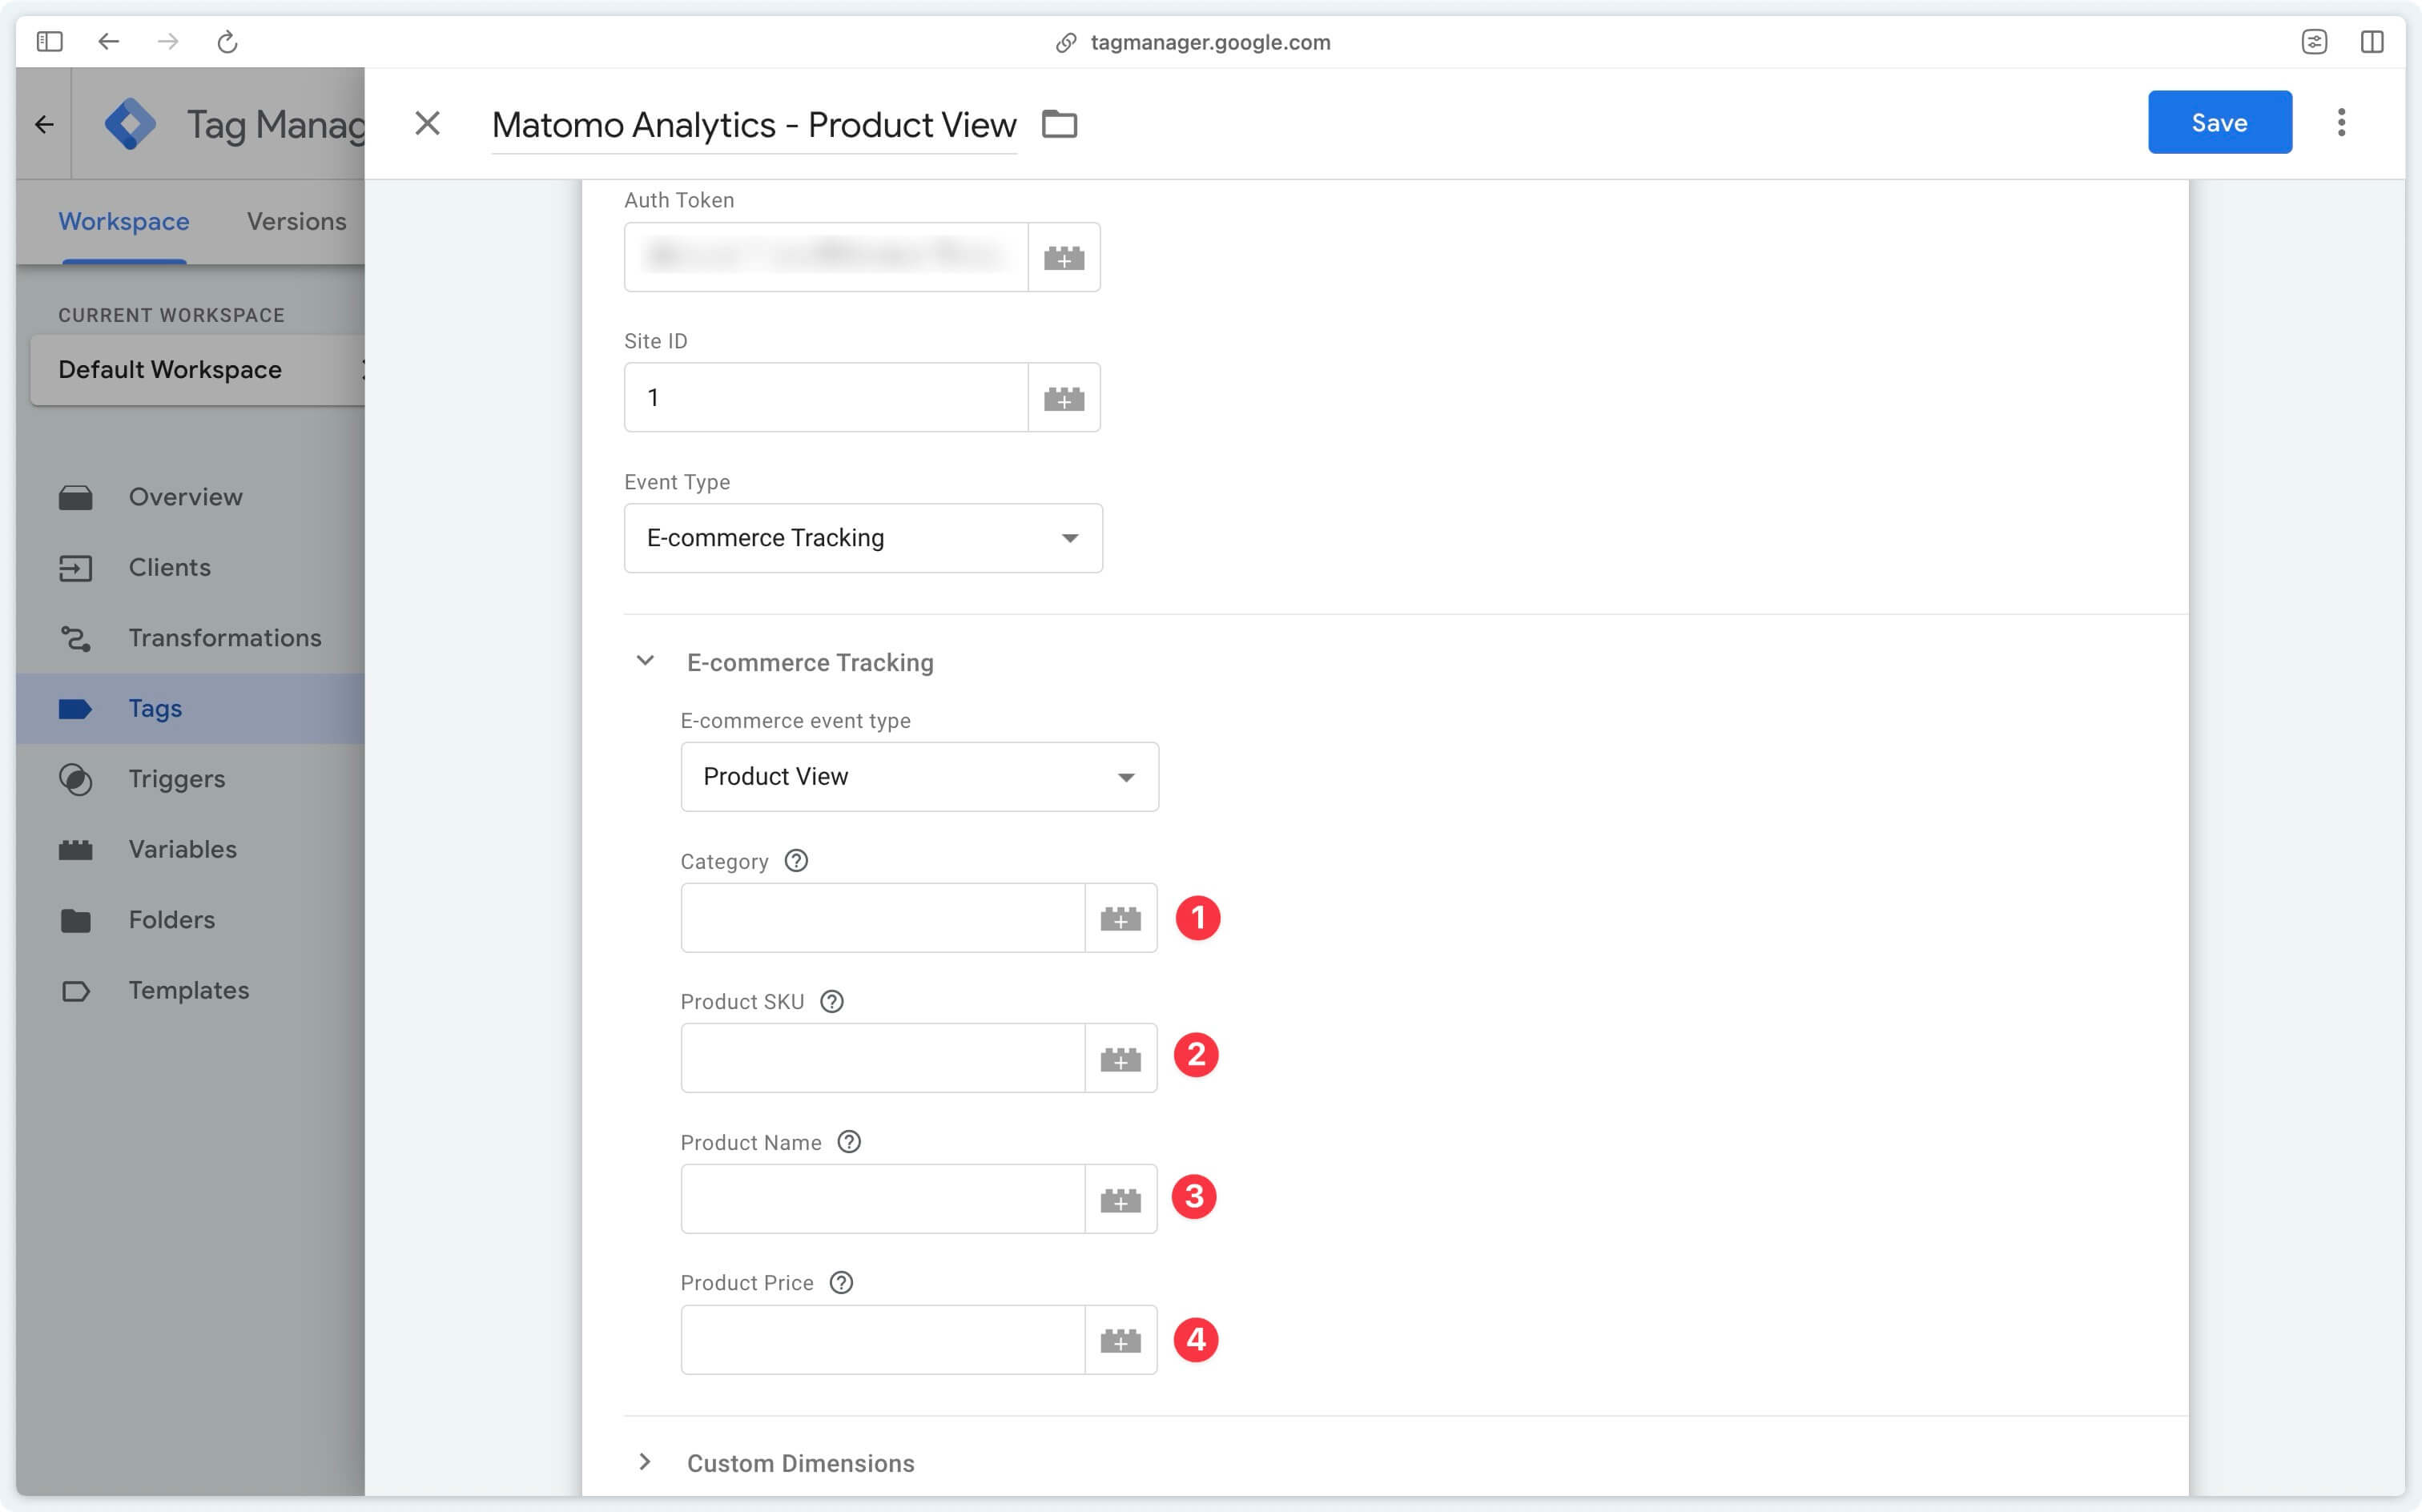
Category (Required)
The category of products visited.
If you leave this field empty, the tag will default to the item_category parameter of the first product in the items array if available in the event data.
Product SKU
The product identifier.
If you leave this field empty, the tag will default to the item_id parameter of the first product in the items array if it is available in the event data.
Product Name
The product name.
If you leave this field empty, the tag will default to the item_name parameter of the first product in the items array if it is available in the event data.
Product Price
The product price.
If you leave this field empty, the tag will default to the price parameter of the first product in the items array if it is available in the event data.
=> Check product view received data
Cart updates
Abandoned carts are a key indicator in e-commerce analysis. Matomo enables you to track these carts and understand why customers don’t complete their purchases.
In Matomo, every cart update will be considered an abandoned cart as long as there is no order within the same visit.
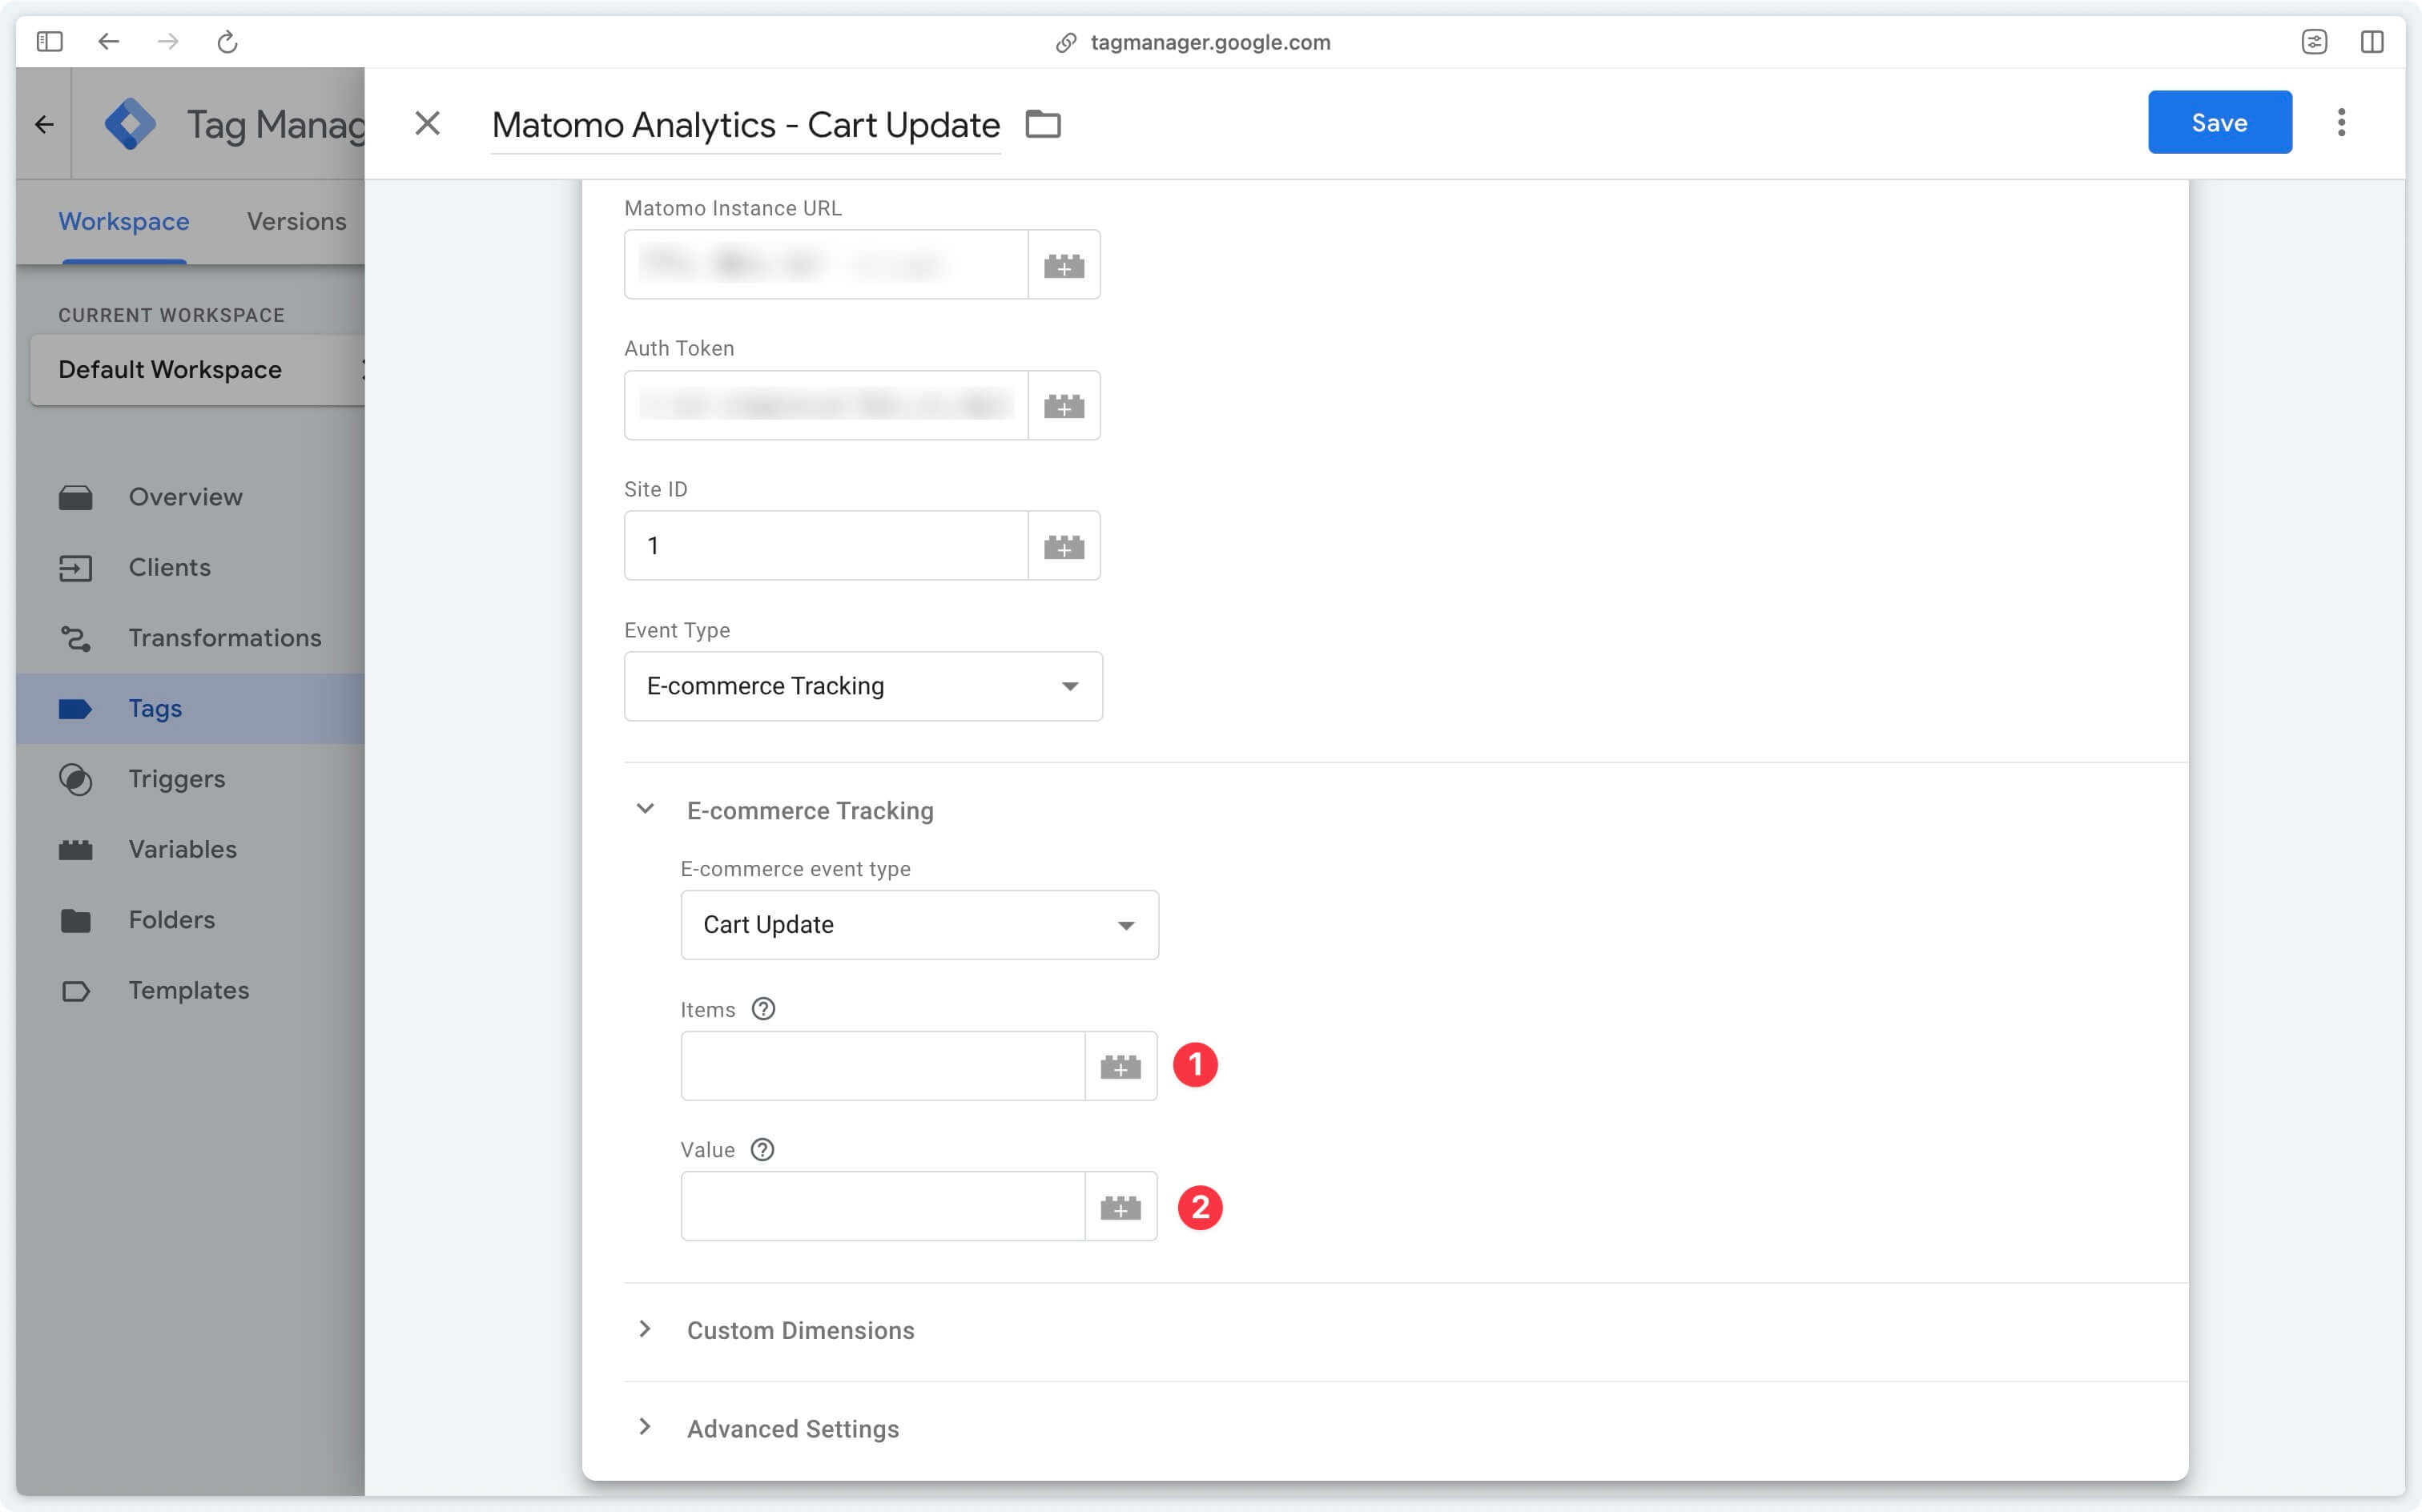
Items
Table containing all items currently in the shopping cart.
If you leave this field empty, the tag will use the items parameter by default if it is available in the event data. This items array must contain at least the item_id key.
Here you can’t trigger the tag on GA4’s add_to_cart or remove_from_cart events because you need to provide an array containing the current state of the cart, not the products that need to be added or removed.
We advise you to edit your Data Layer and use a custom cart_update event.
window.dataLayer = window.dataLayer || [];
dataLayer.push({
    event: "cart_update",
    ecommerce: {
        value: 2.99,
        items: [{ // current cart contents
            item_id: "123456",
            item_name: "Red shoes",
            item_category: "Shoes",
            price: 2.99,
            quantity: 1
        }]
    }
});
Value
Current cart value.
If you leave this field empty, the tag will default to the value parameter if it is available in the event data.
=> Check cart update received data
Orders
In Matomo, orders represent the final action in a purchasing process: the transaction carried out by a customer.
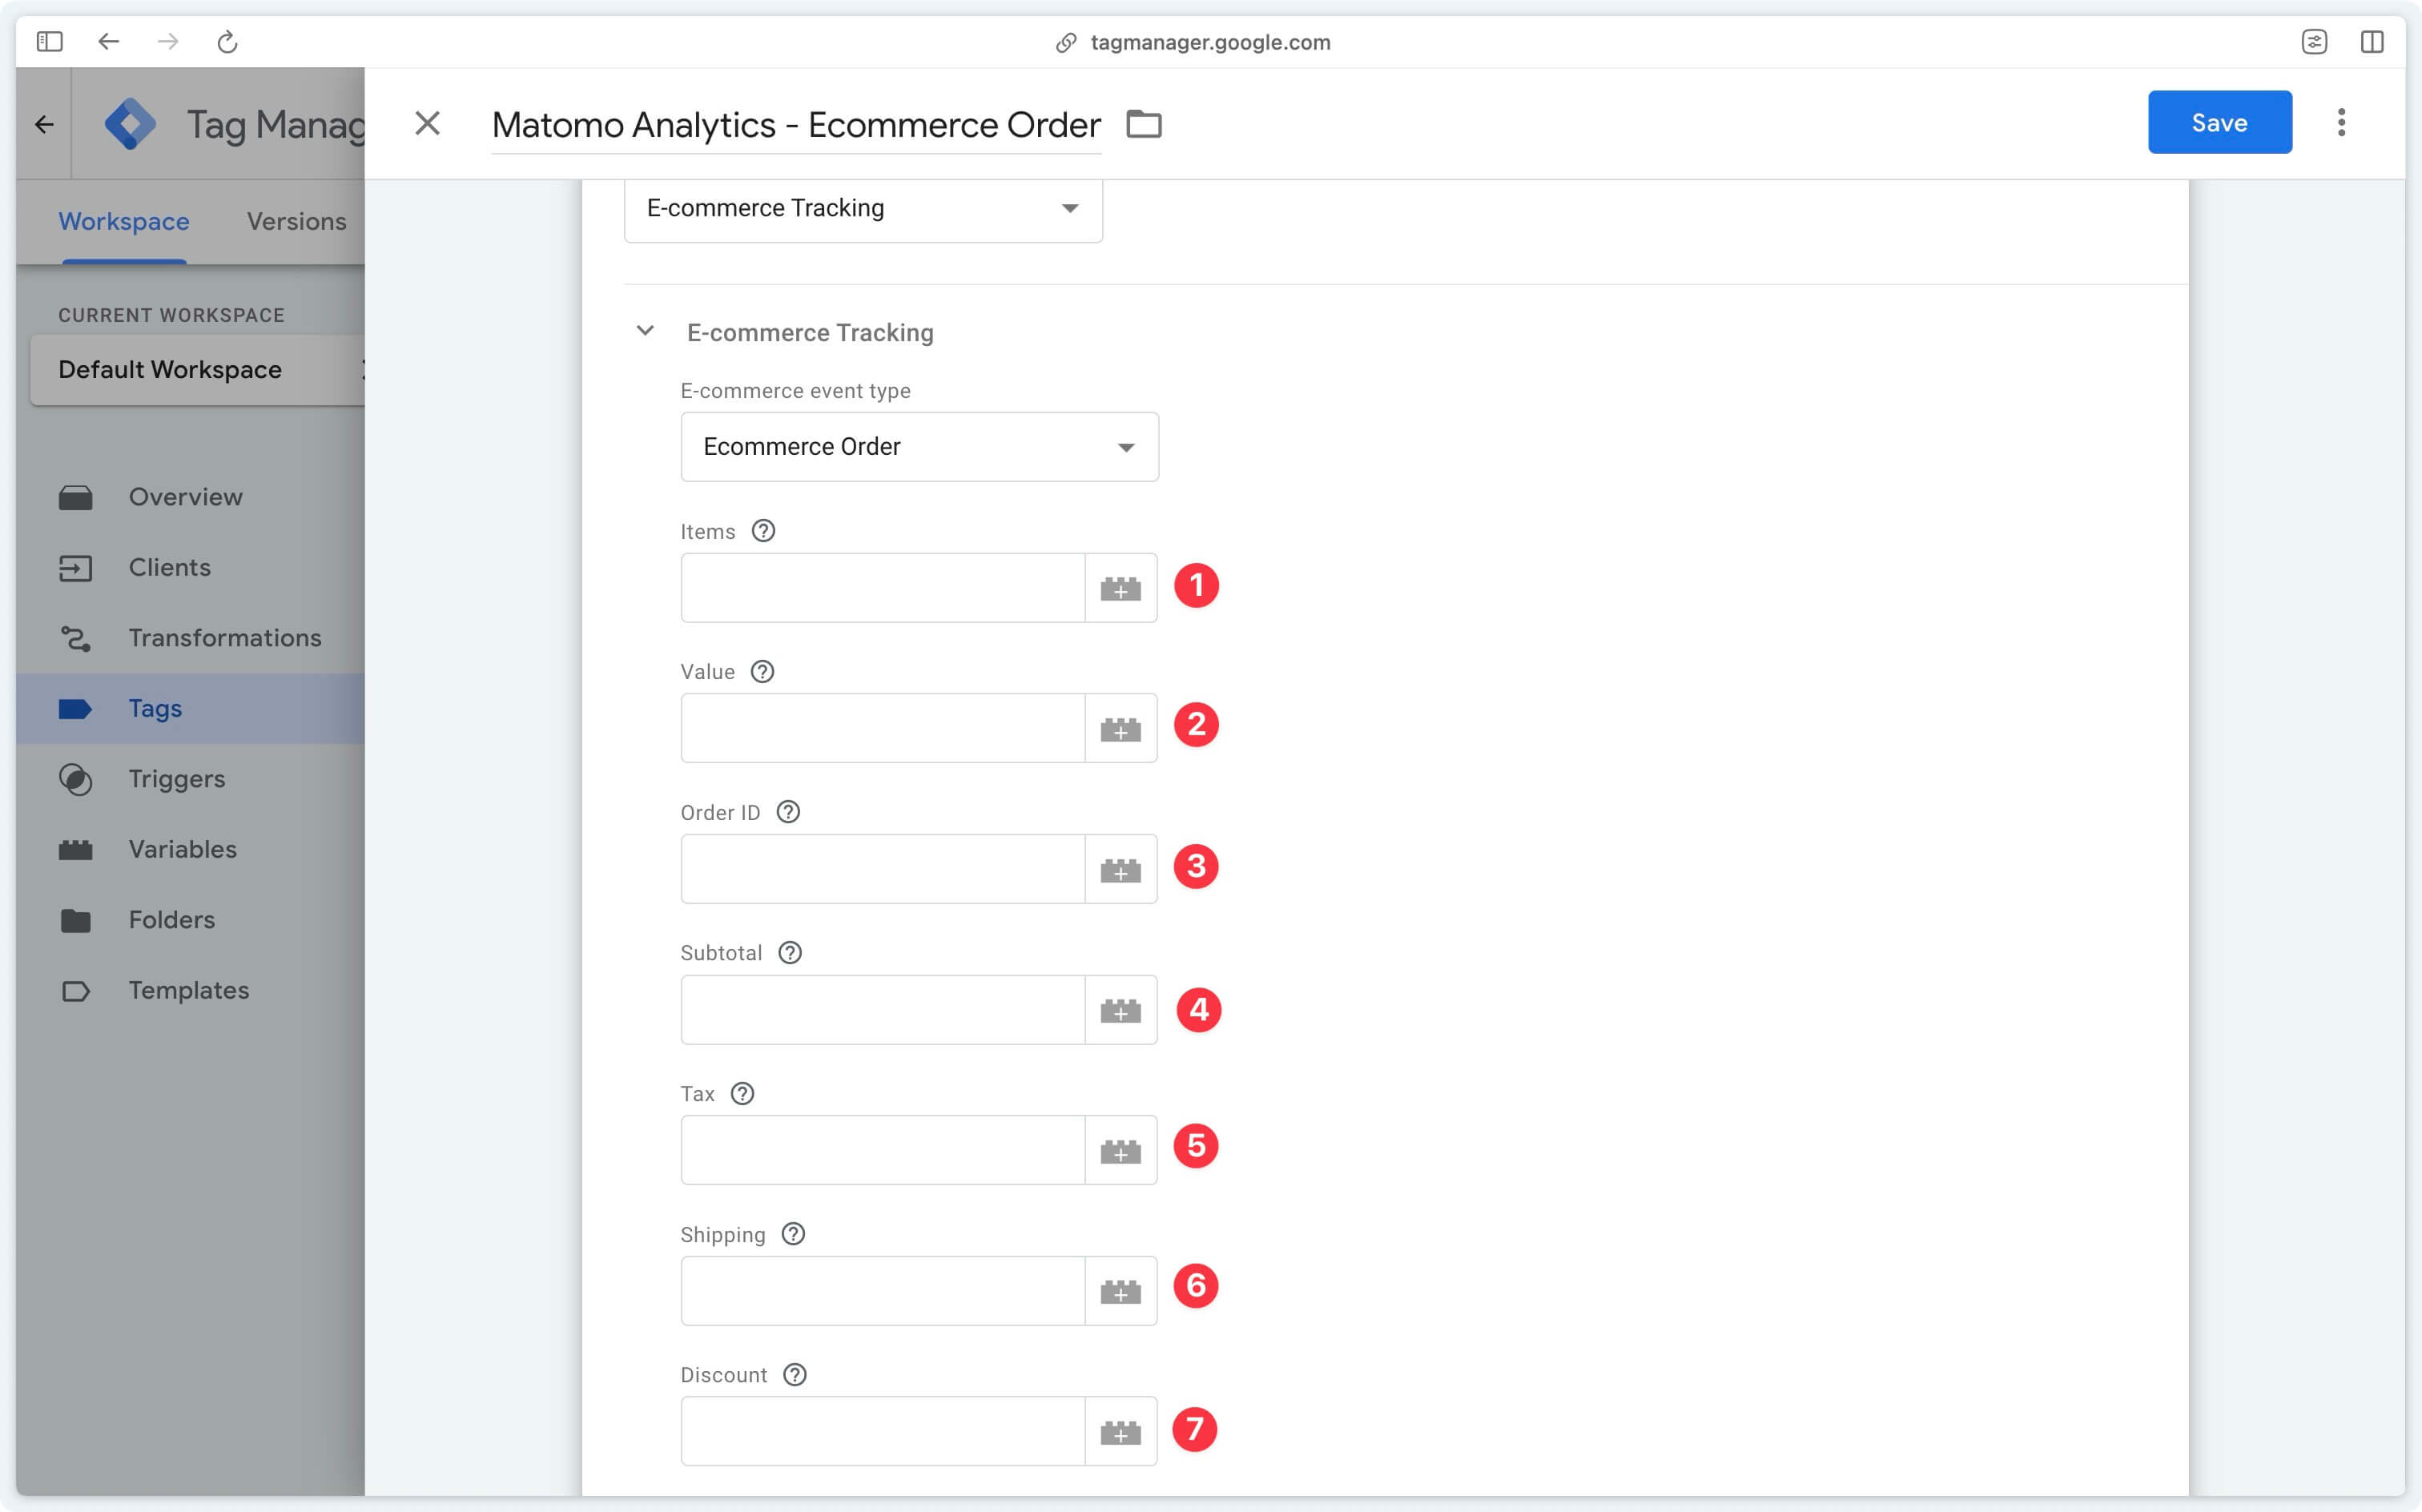
Items (Required)
The items in the order.
If you leave this field empty, the tag will default to the items parameter if available in the event data.
Value
The amount of the order including VAT.
If you leave this field empty, the tag will default to the value parameter if available in the event data.
Order ID
The order ID.
If you leave this field empty, the tag will default to the transaction_id parameter if available in the event data.
Subtotal
The subtotal.
If you leave this field empty, this parameter will not be passed to Matomo.
Tax
The tax amount.
If you leave this field empty, the tag will default to the tax parameter if it is available in the event data.
Shipping
Shipping costs.
If you leave this field empty, the tag will default to the shipping parameter if it is available in the event data.
Discount
Discount.
If you leave this field empty, the tag will default to the discount parameter if it is available in the event data.
Contents
Content tracking lets you know how many times a specific ad or banner was displayed and viewed by your visitors, and how many times they actually clicked on these elements. By comparing impressions and clicks, you can calculate an interaction rate.
For each impression or interaction with the content you wish to track, you need to create a new tag, select Content Tracking as Event Type and then Content Impression or Content Interaction as Content Tracking Type.
To find out how to use content tracking, see this guide on Matomo .
Impressions
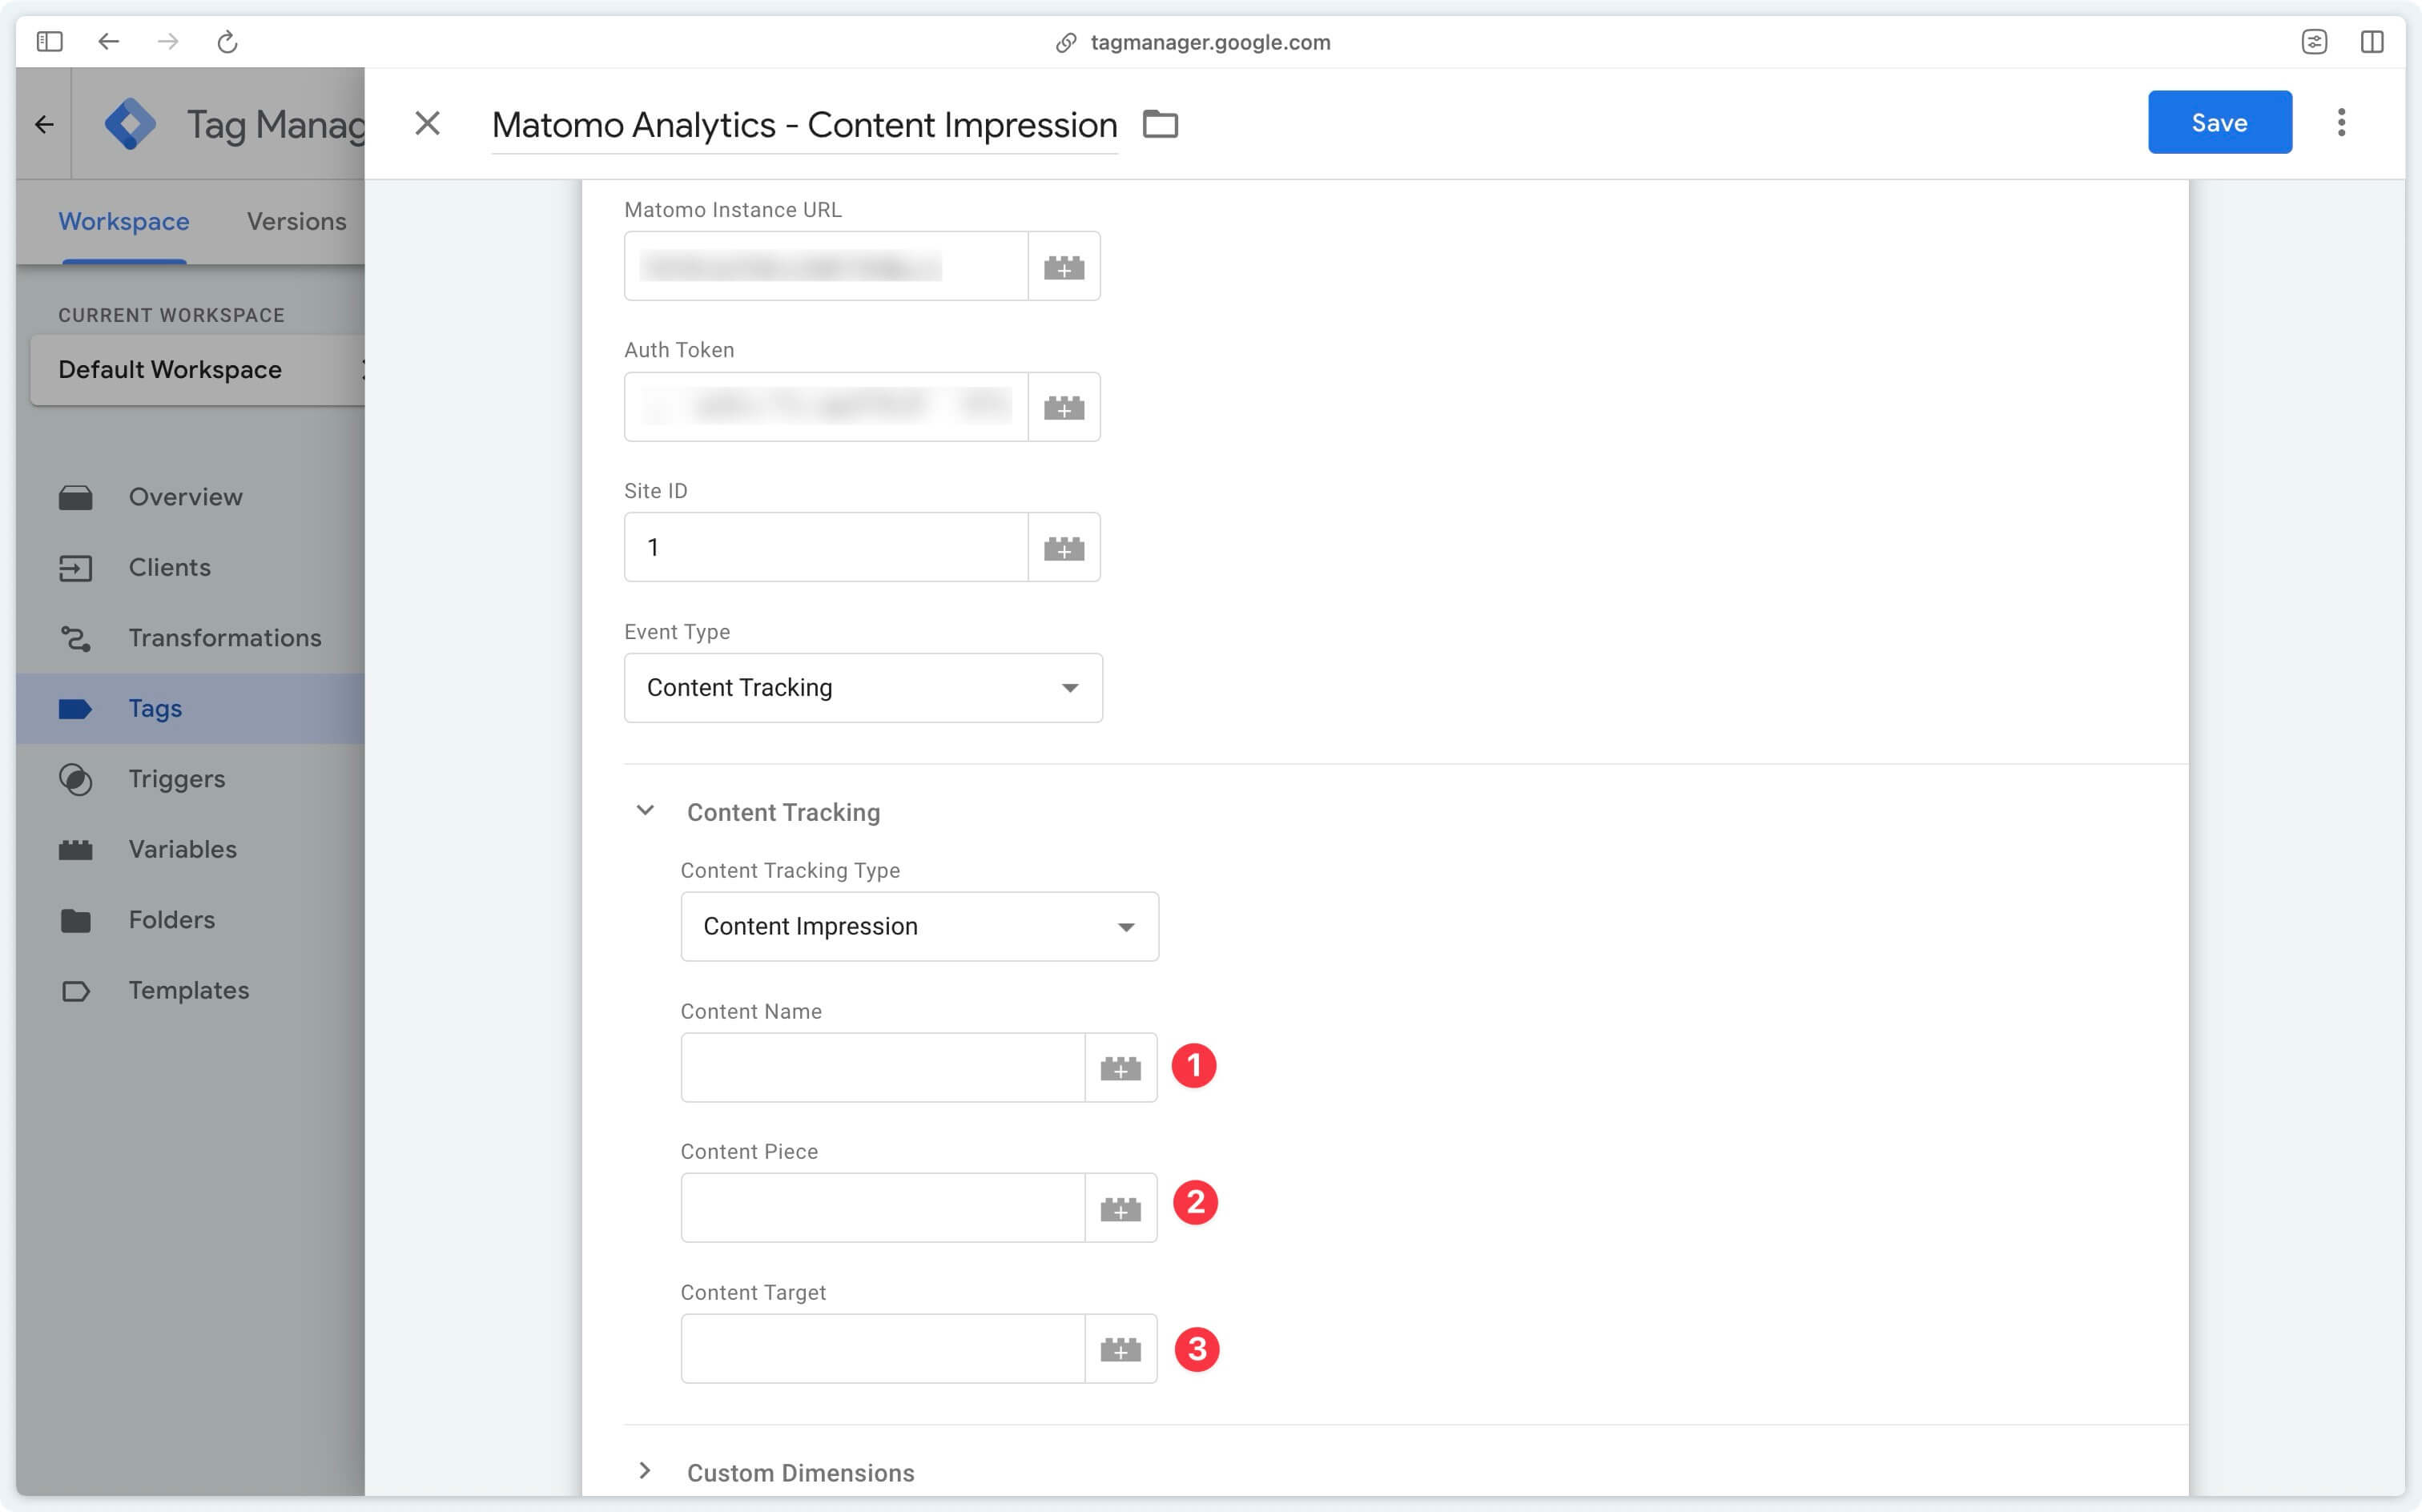
Content Name
The name of the content. Represents the content block that is being followed. A block may contain several sub-elements.
Content Piece
The content part. If the content contains several elements, the content part will refer to one of these elements.
Content Target
The content destination. The destination URL of the element that was displayed.
=> Check content impressions received data
Interactions
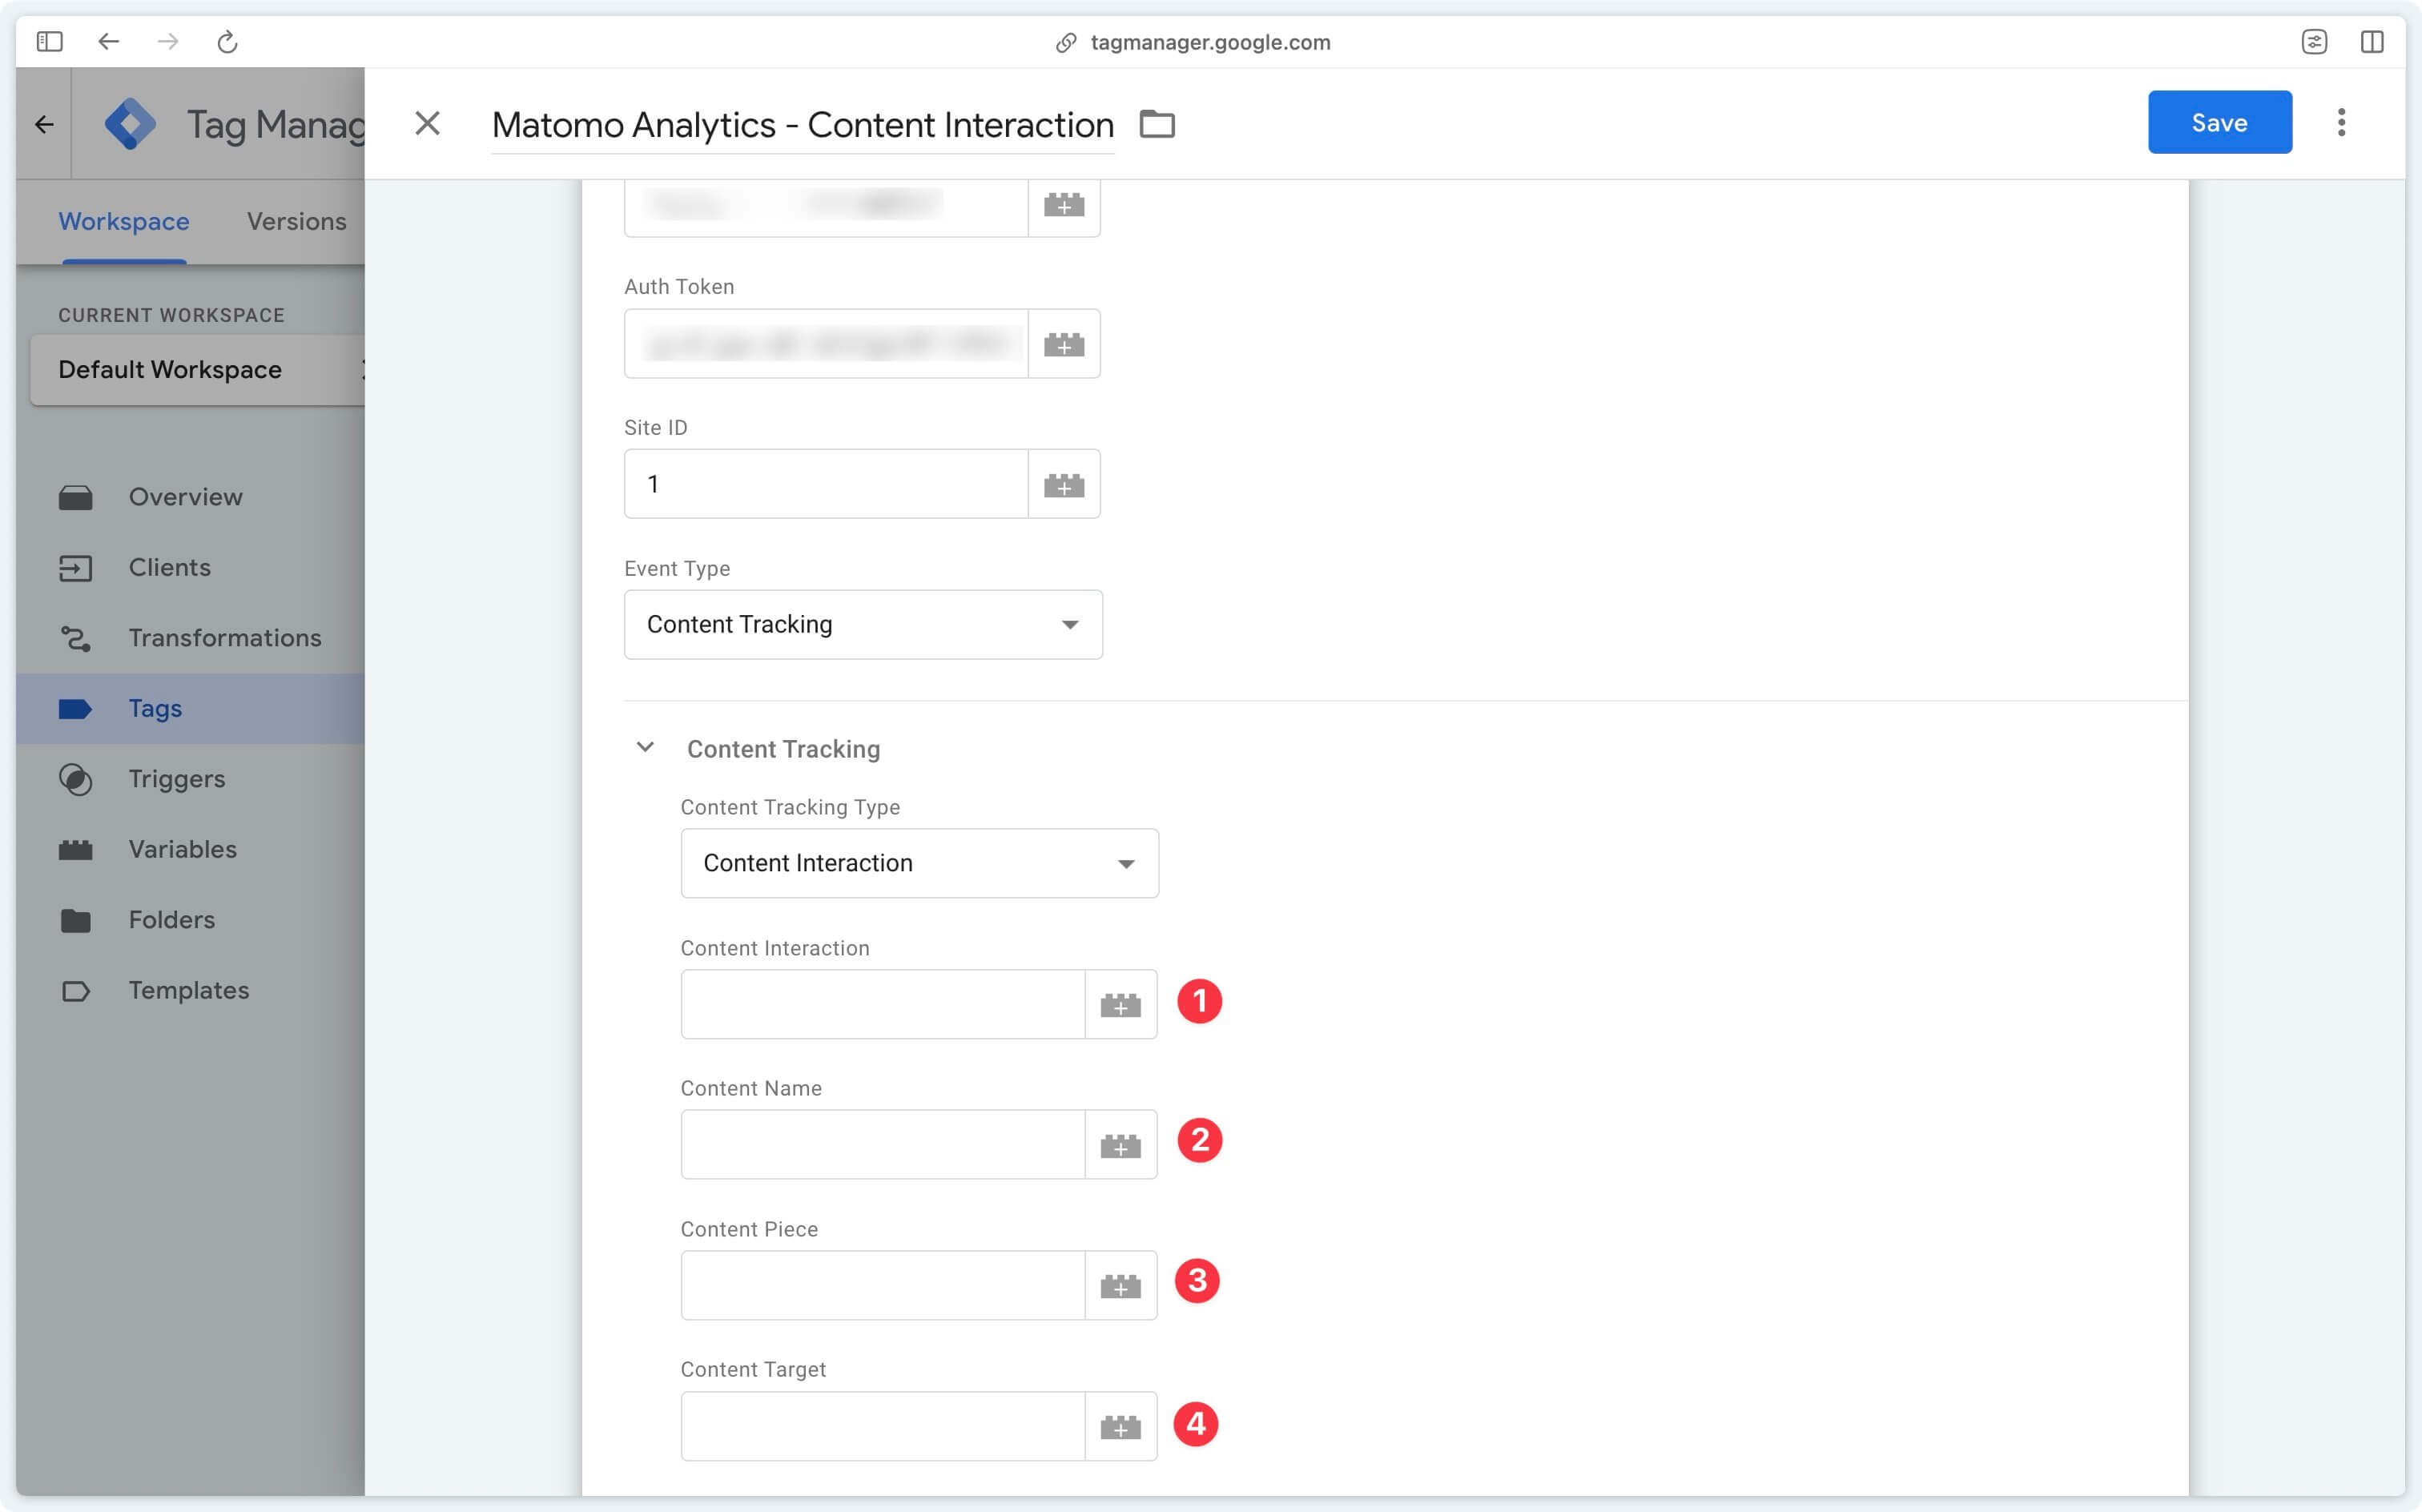
Content Interaction
The name of the interaction.
Content Name
The content name. Represents the content block that is being followed. A block may contain several sub-elements.
Content Piece
The content part. If the content contains several elements, the content part will refer to one of these elements.
Content Target
The content destination. The destination URL of the element that was clicked.
=> Check content interaction received data
Custom dimensions
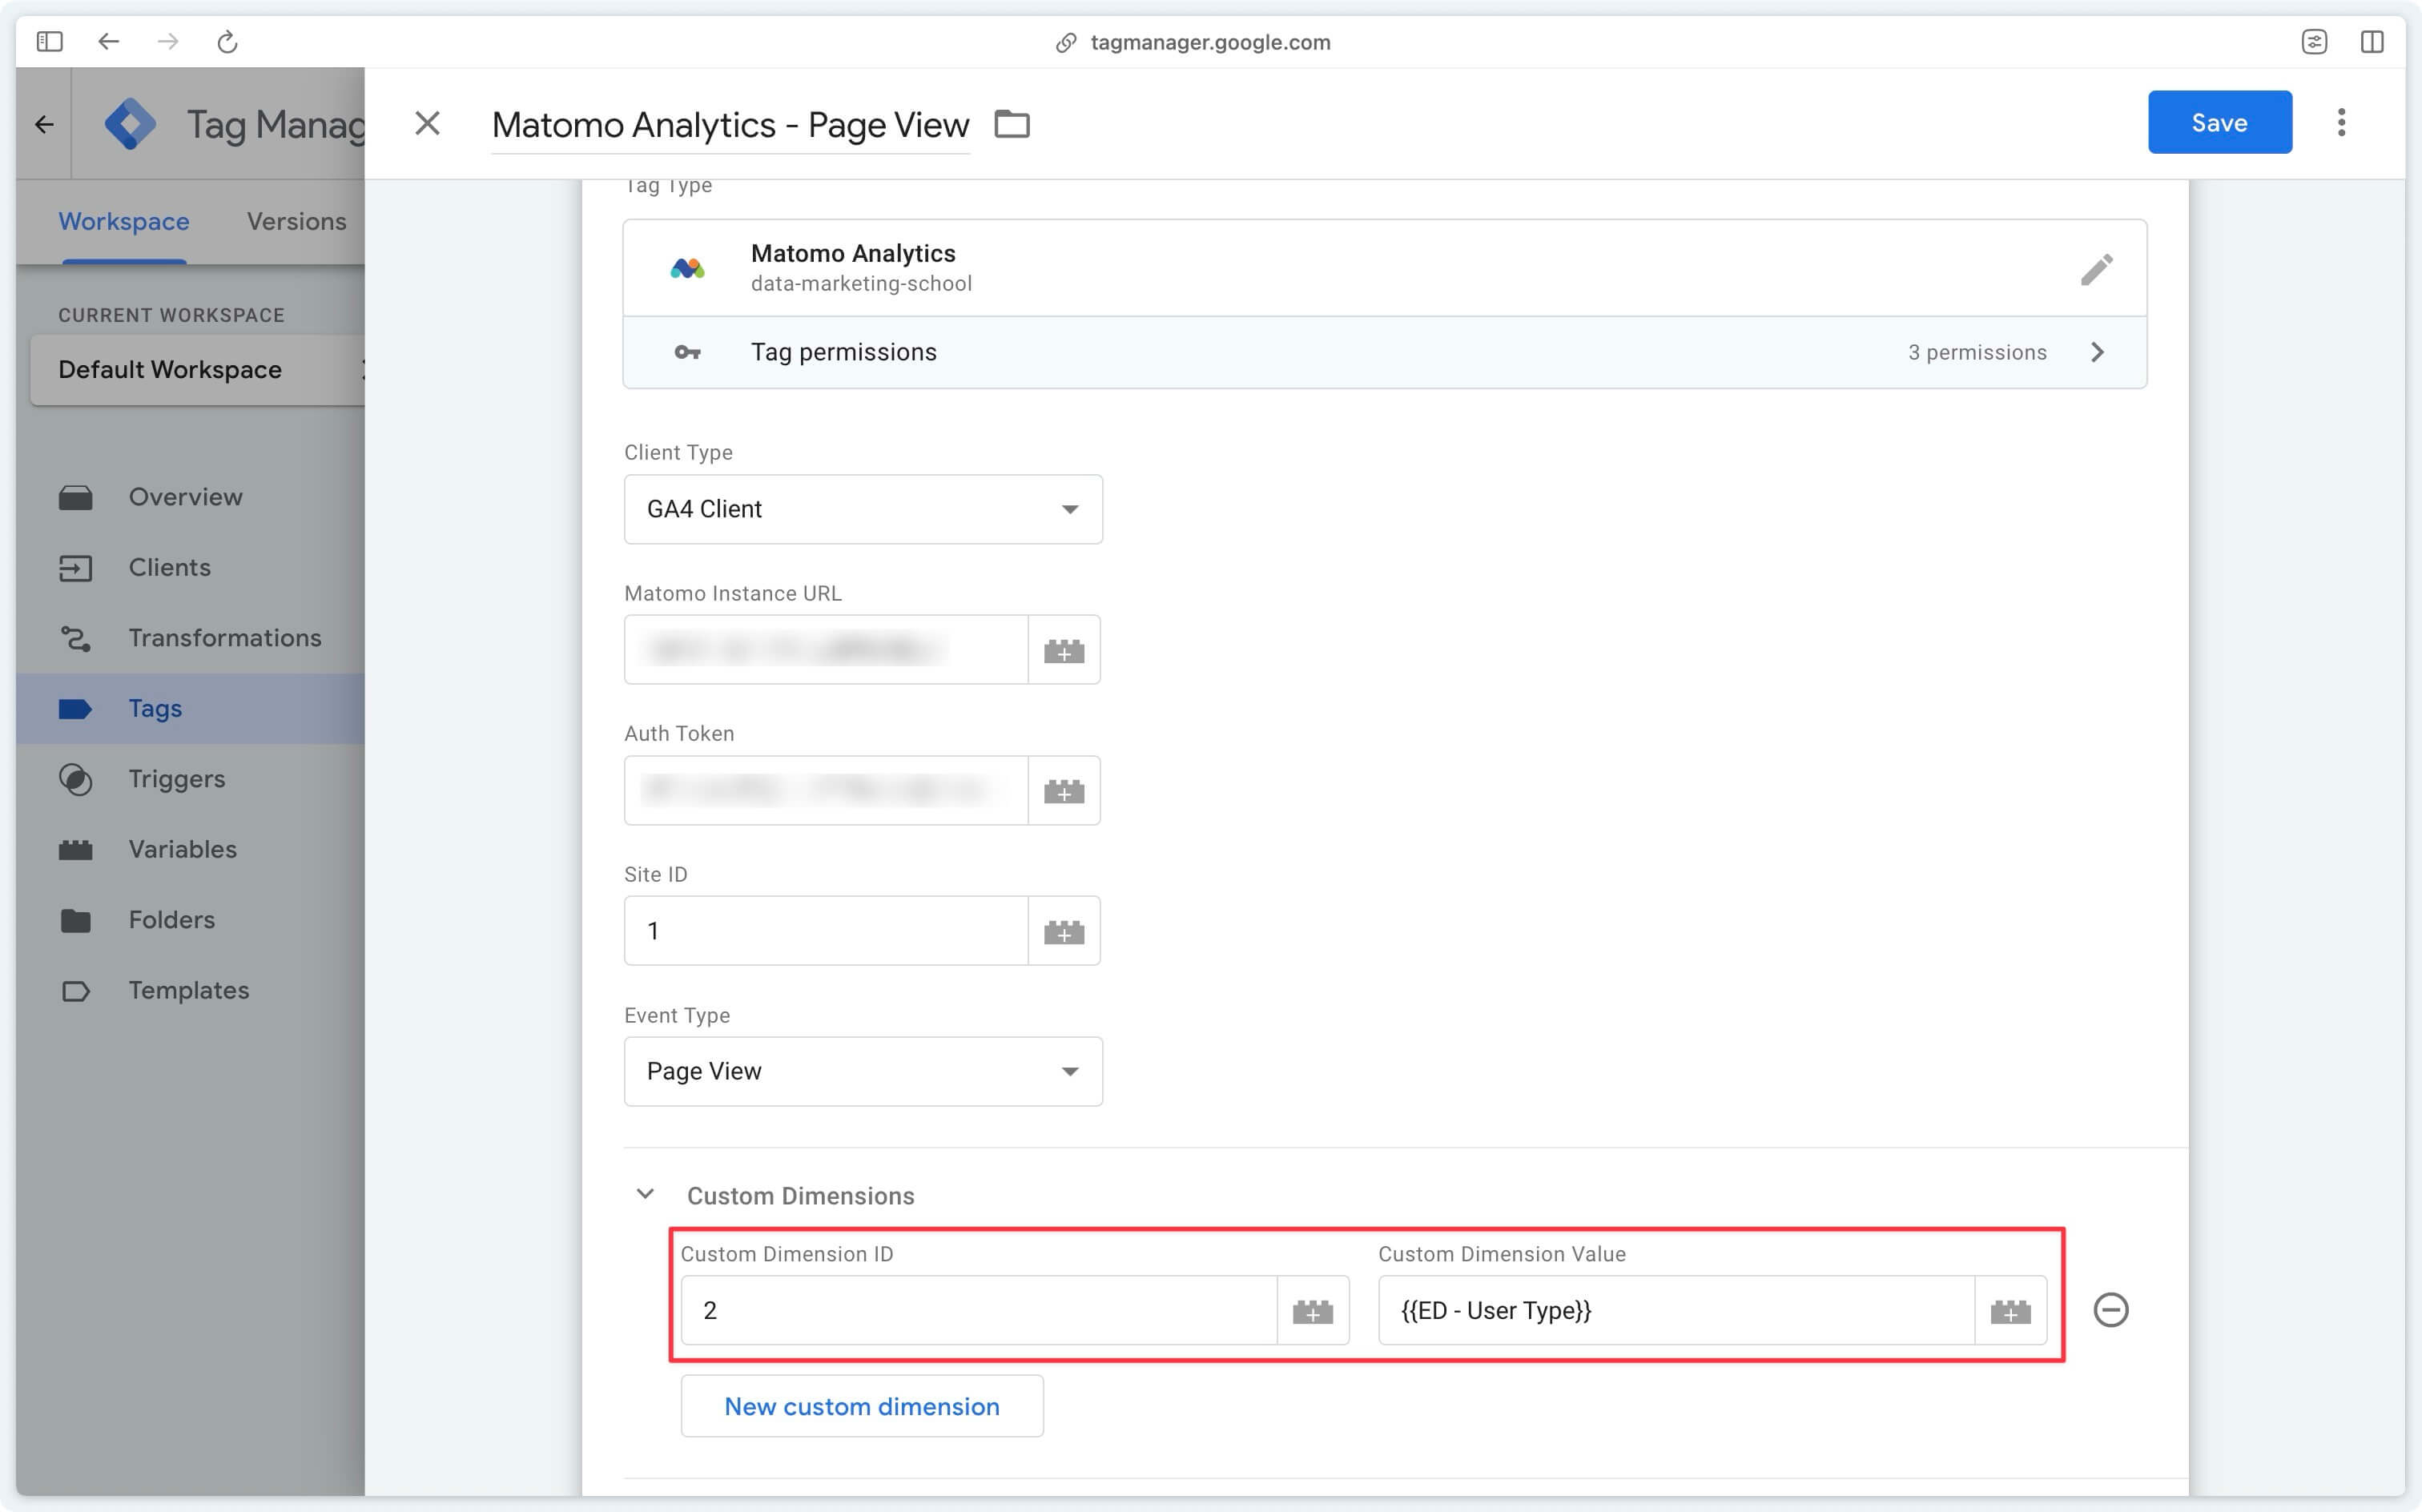
Custom dimensions are attributes you define to categorize and segment your data more precisely. Before configuring a custom dimension in the Matomo tag, you must first have created it in the Matomo settings.
Here’s a Matomo tutorial on how to create a custom dimension
In Matomo, there are two types of custom dimensions:
- visit-type custom dimensions
- action-type custom dimensions
These are the visit-type dimensions we’ll be configuring in our tag; action-type dimensions are configured from Matomo directly without touching your tracking.
For this example, here’s the visit-type custom dimension I created in Matomo:
| Name | ID |
|---|---|
| User Type | 2 |
We’re going to send a value for this custom dimension on all page views.
=> Check custom dimensions received data
Heartbeat requests
Heartbeat requests are sent periodically to measure more precisely the time spent on each page. It’s a bit like the user_engagement event in GA4.
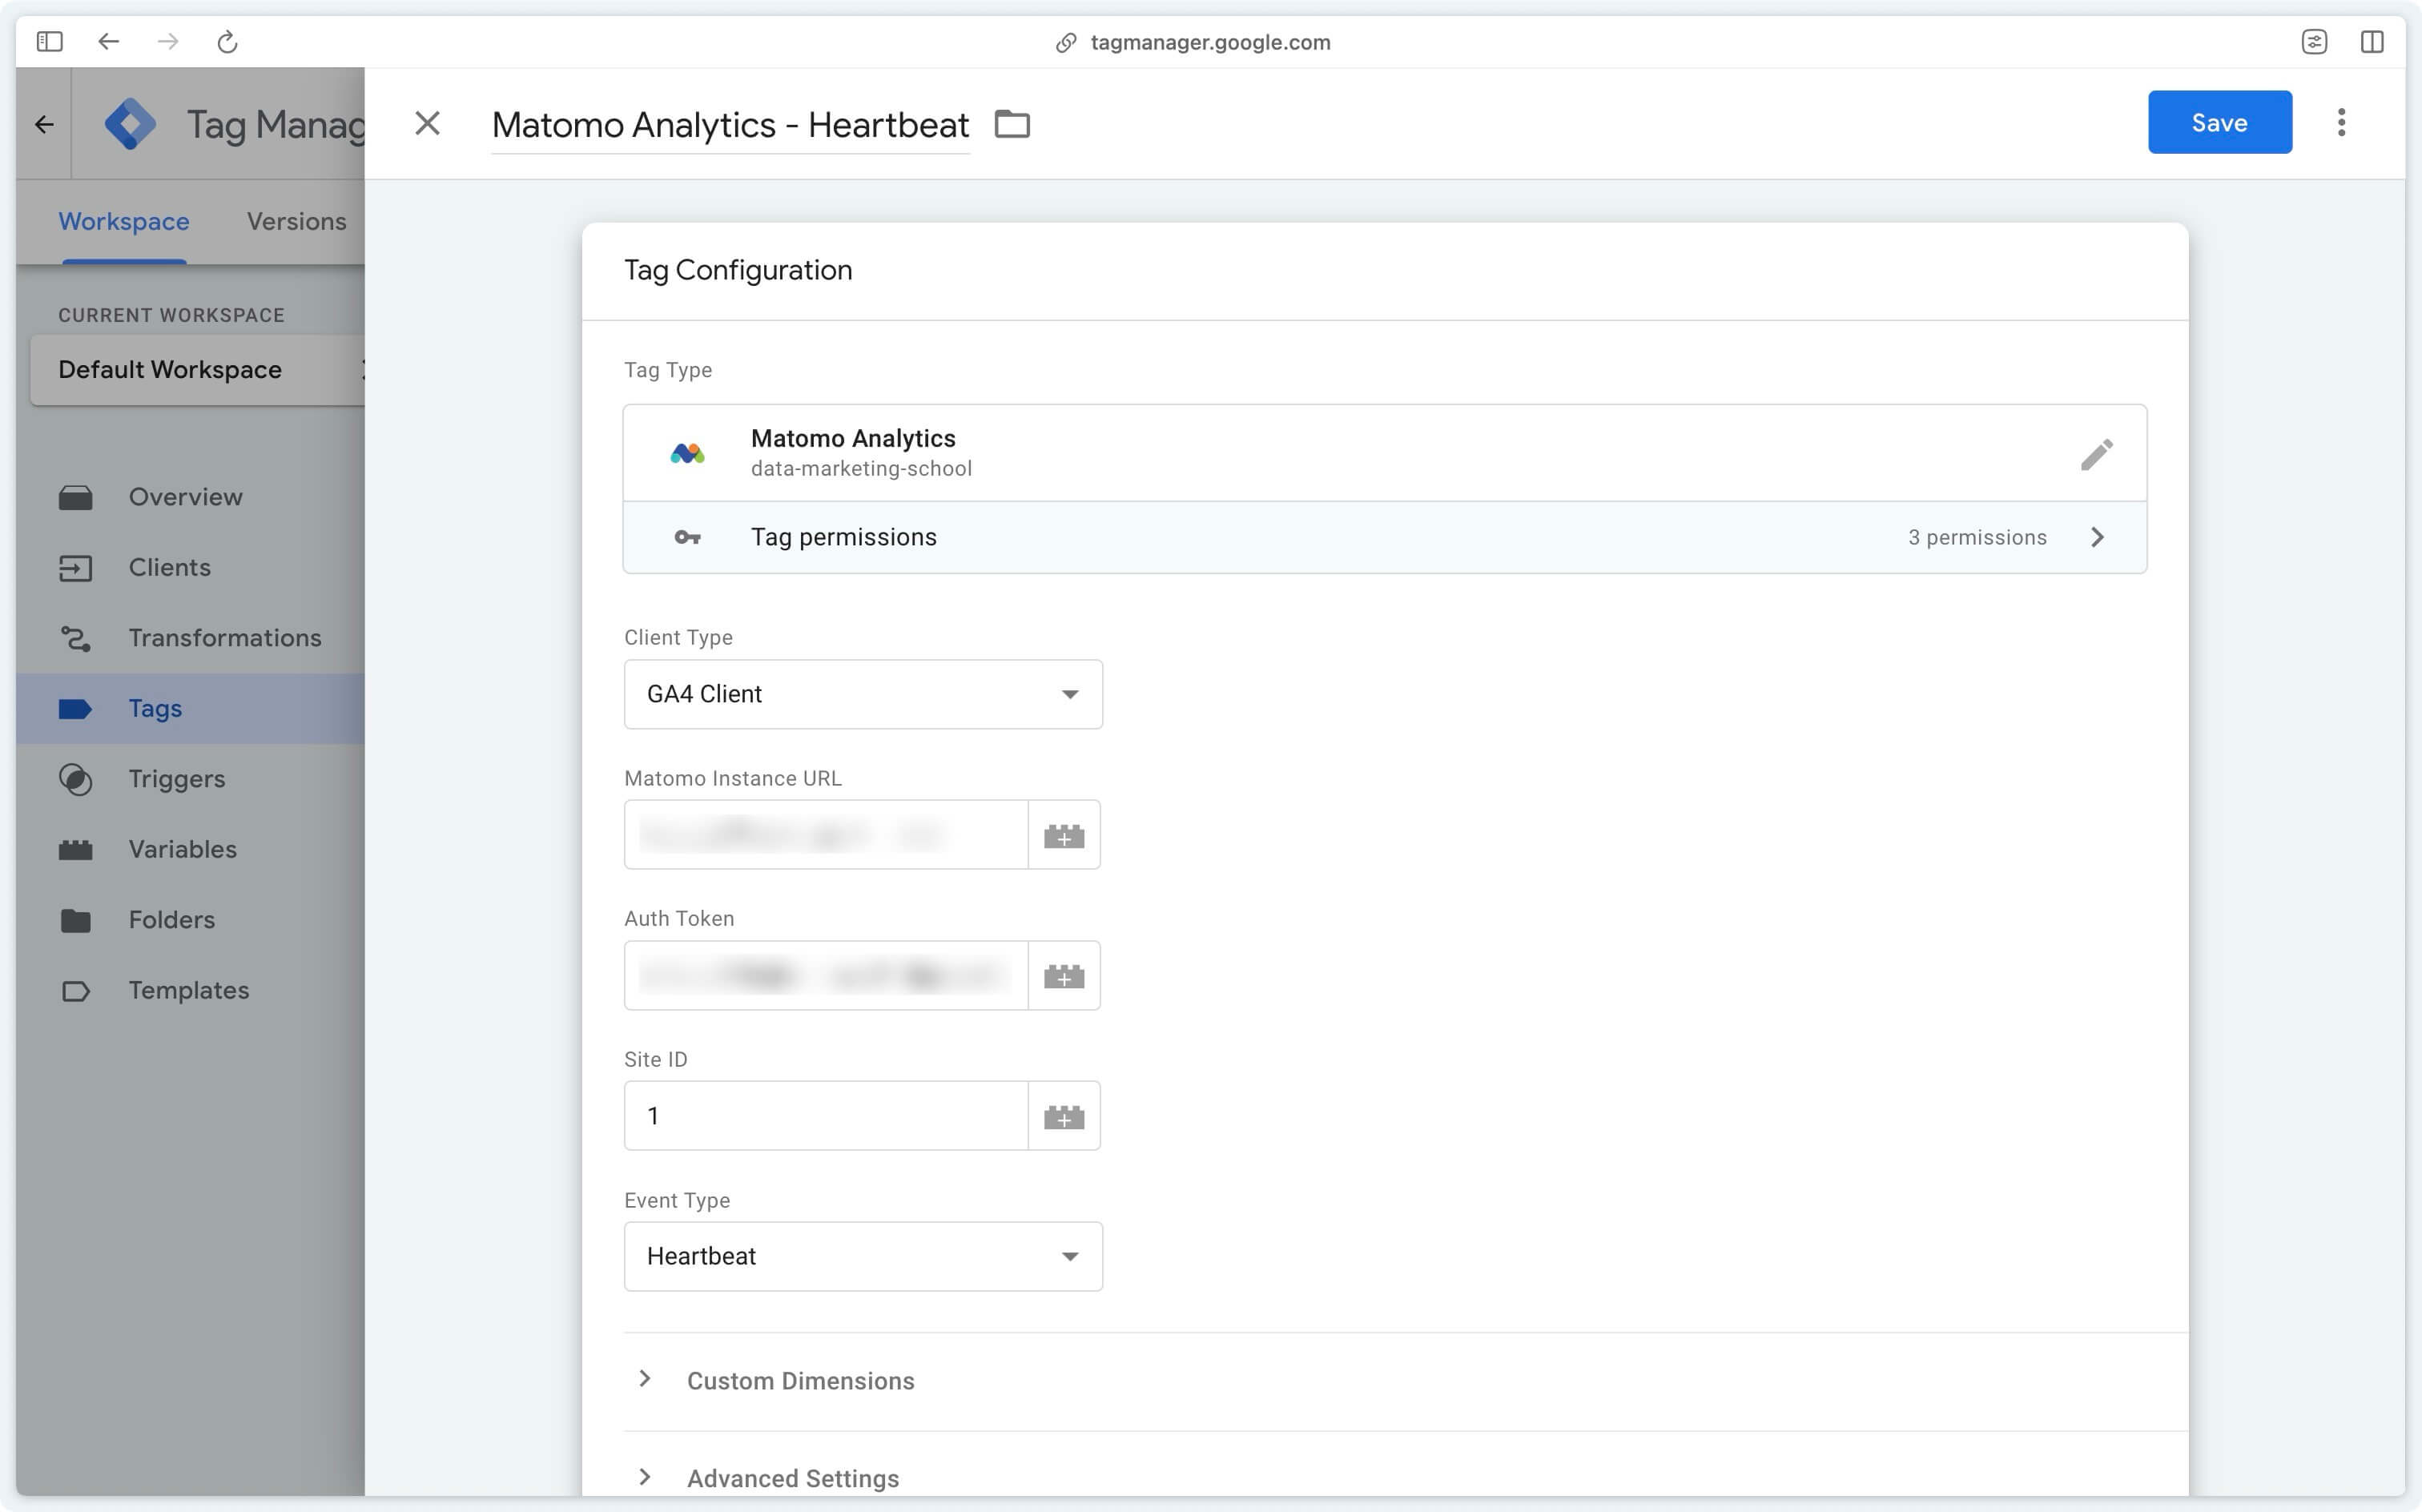
You can then trigger this tag on the GA4 user_engagement event.
=> Check heartbeat requests received data
Check the data
Once your Matomo Analytics tag has been configured, it’s important to check:
- that your server container is sending data correctly to Matomo
- that the data received in matomo is consistent with what you wish to send
Check that requests are being sent
GTM Server-Side preview
The first step is to ensure that the Matomo Analytics tag is triggered correctly for the events specified in the trigger. For this example, we’ll take the case of sending page views to Matomo.
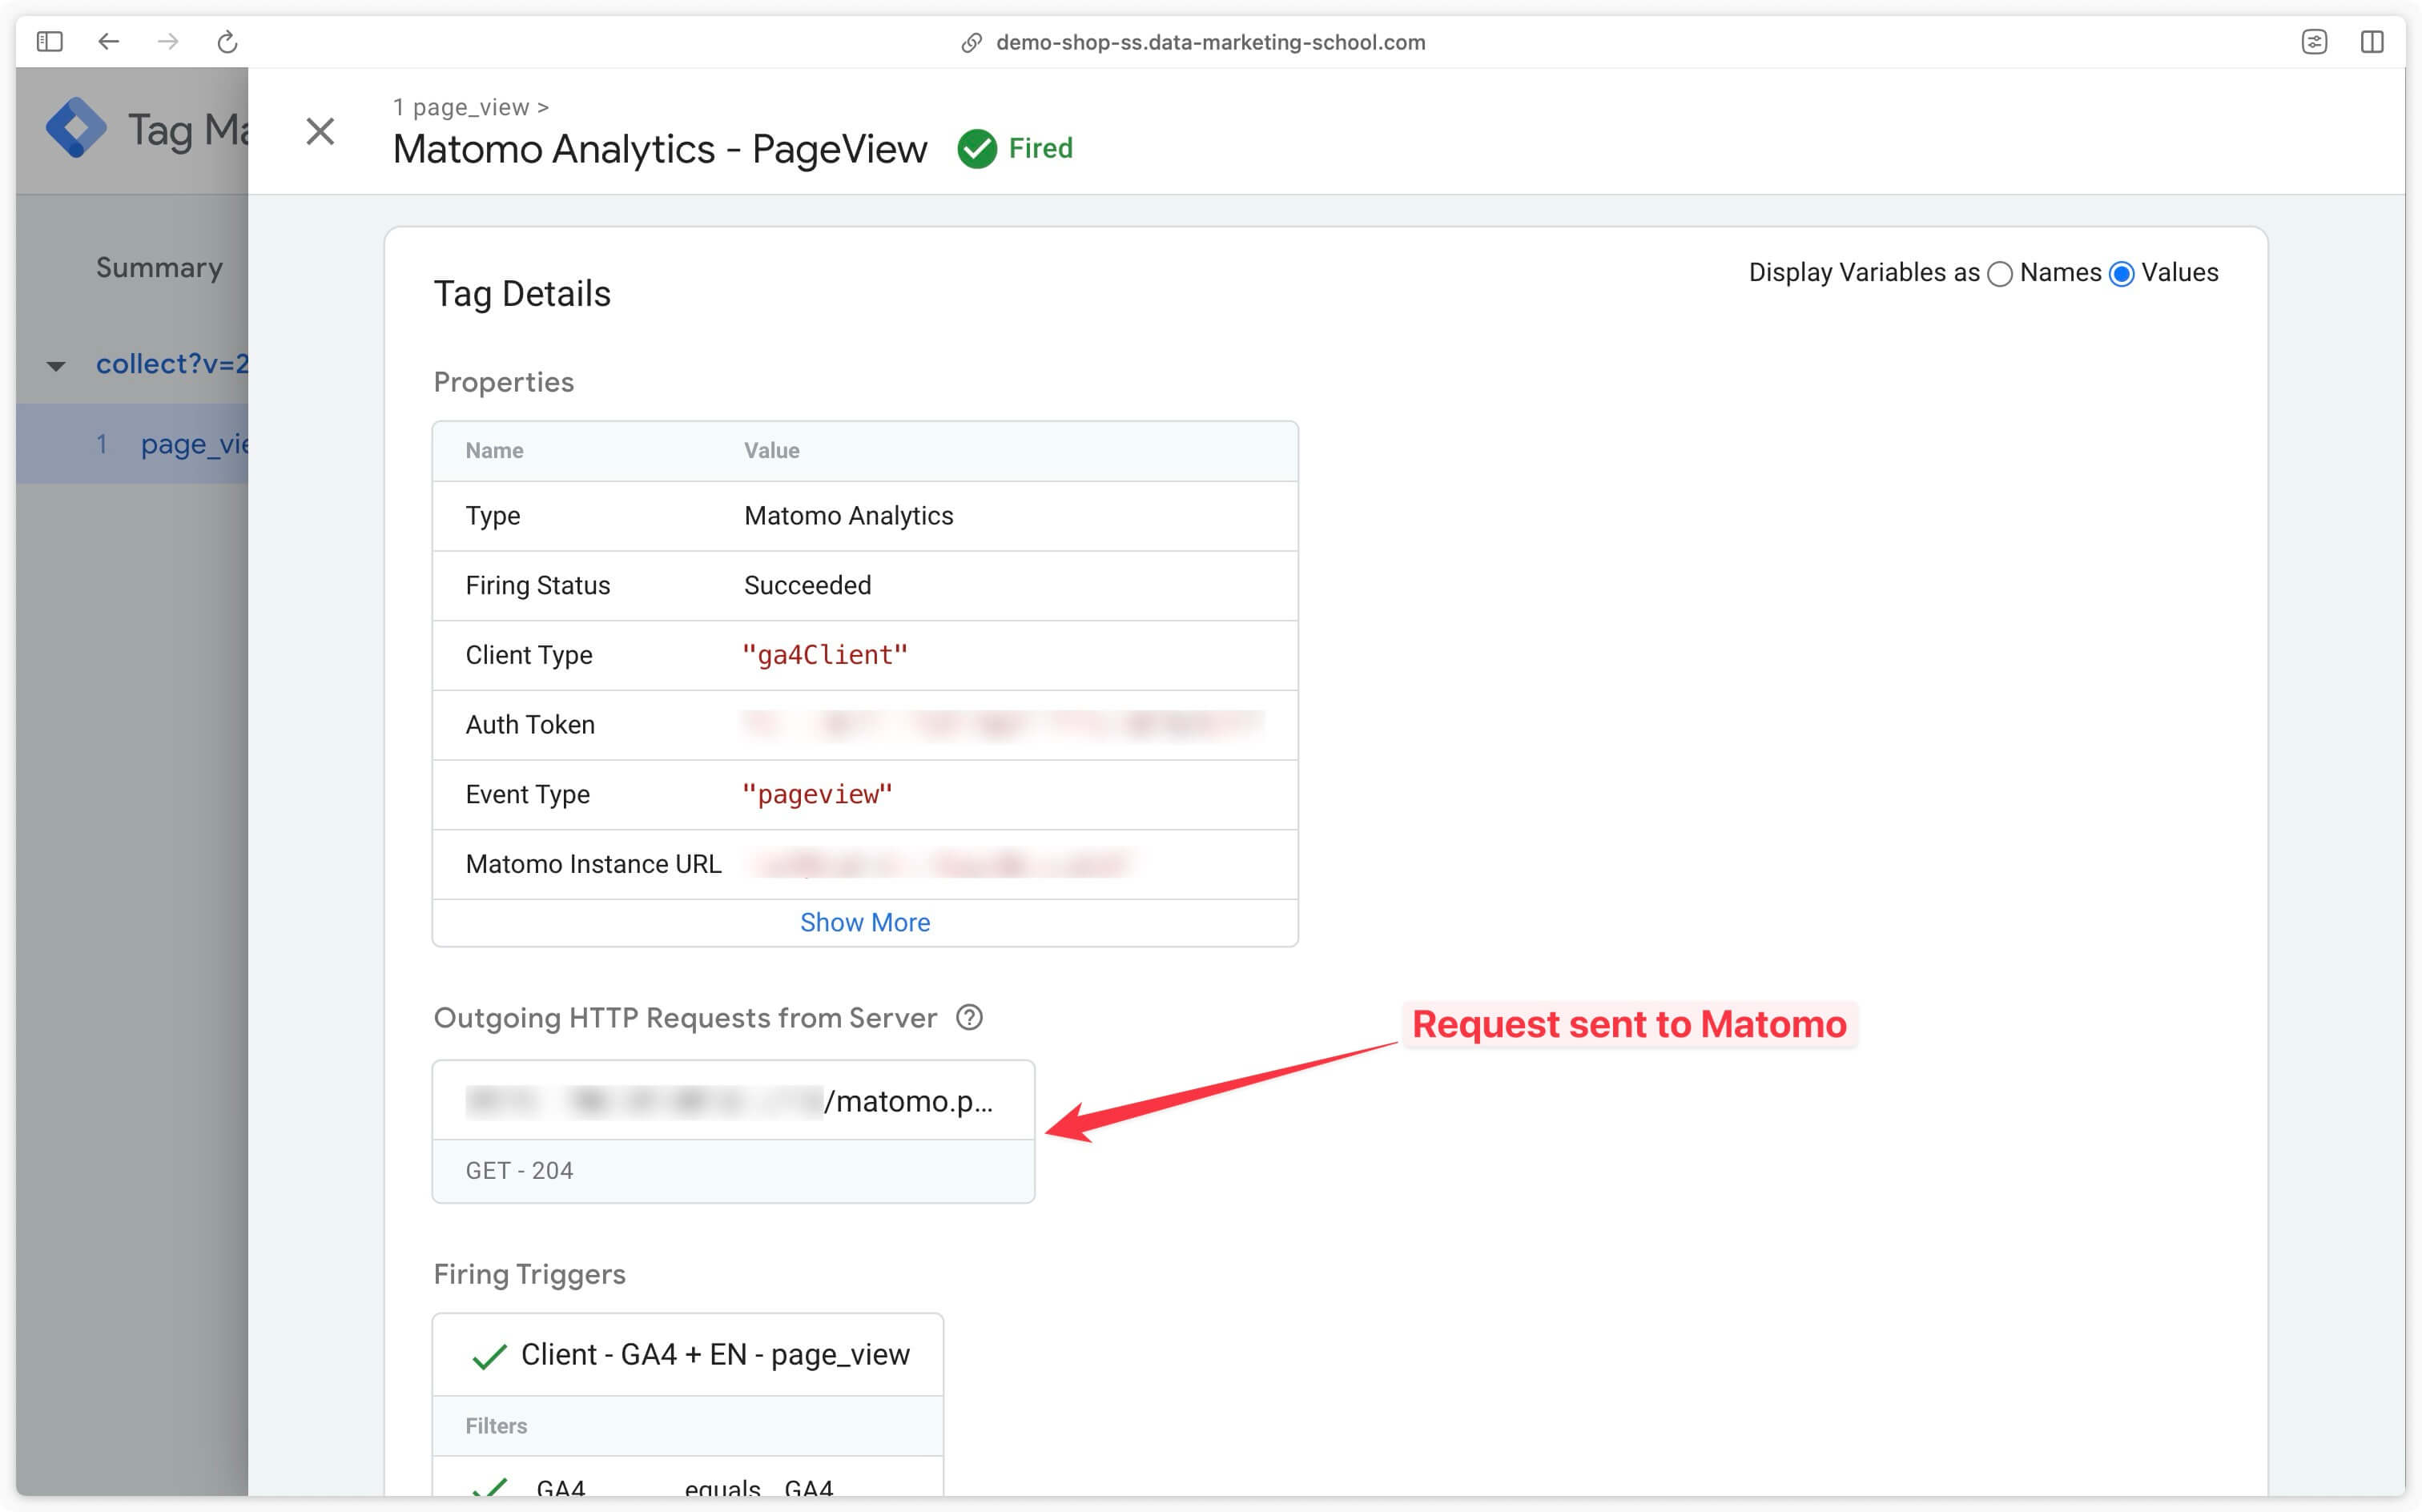
In the server container preview, confirm that the Matomo Analytics tag appears in the Tags fired section and that the tag status is Succeeded.
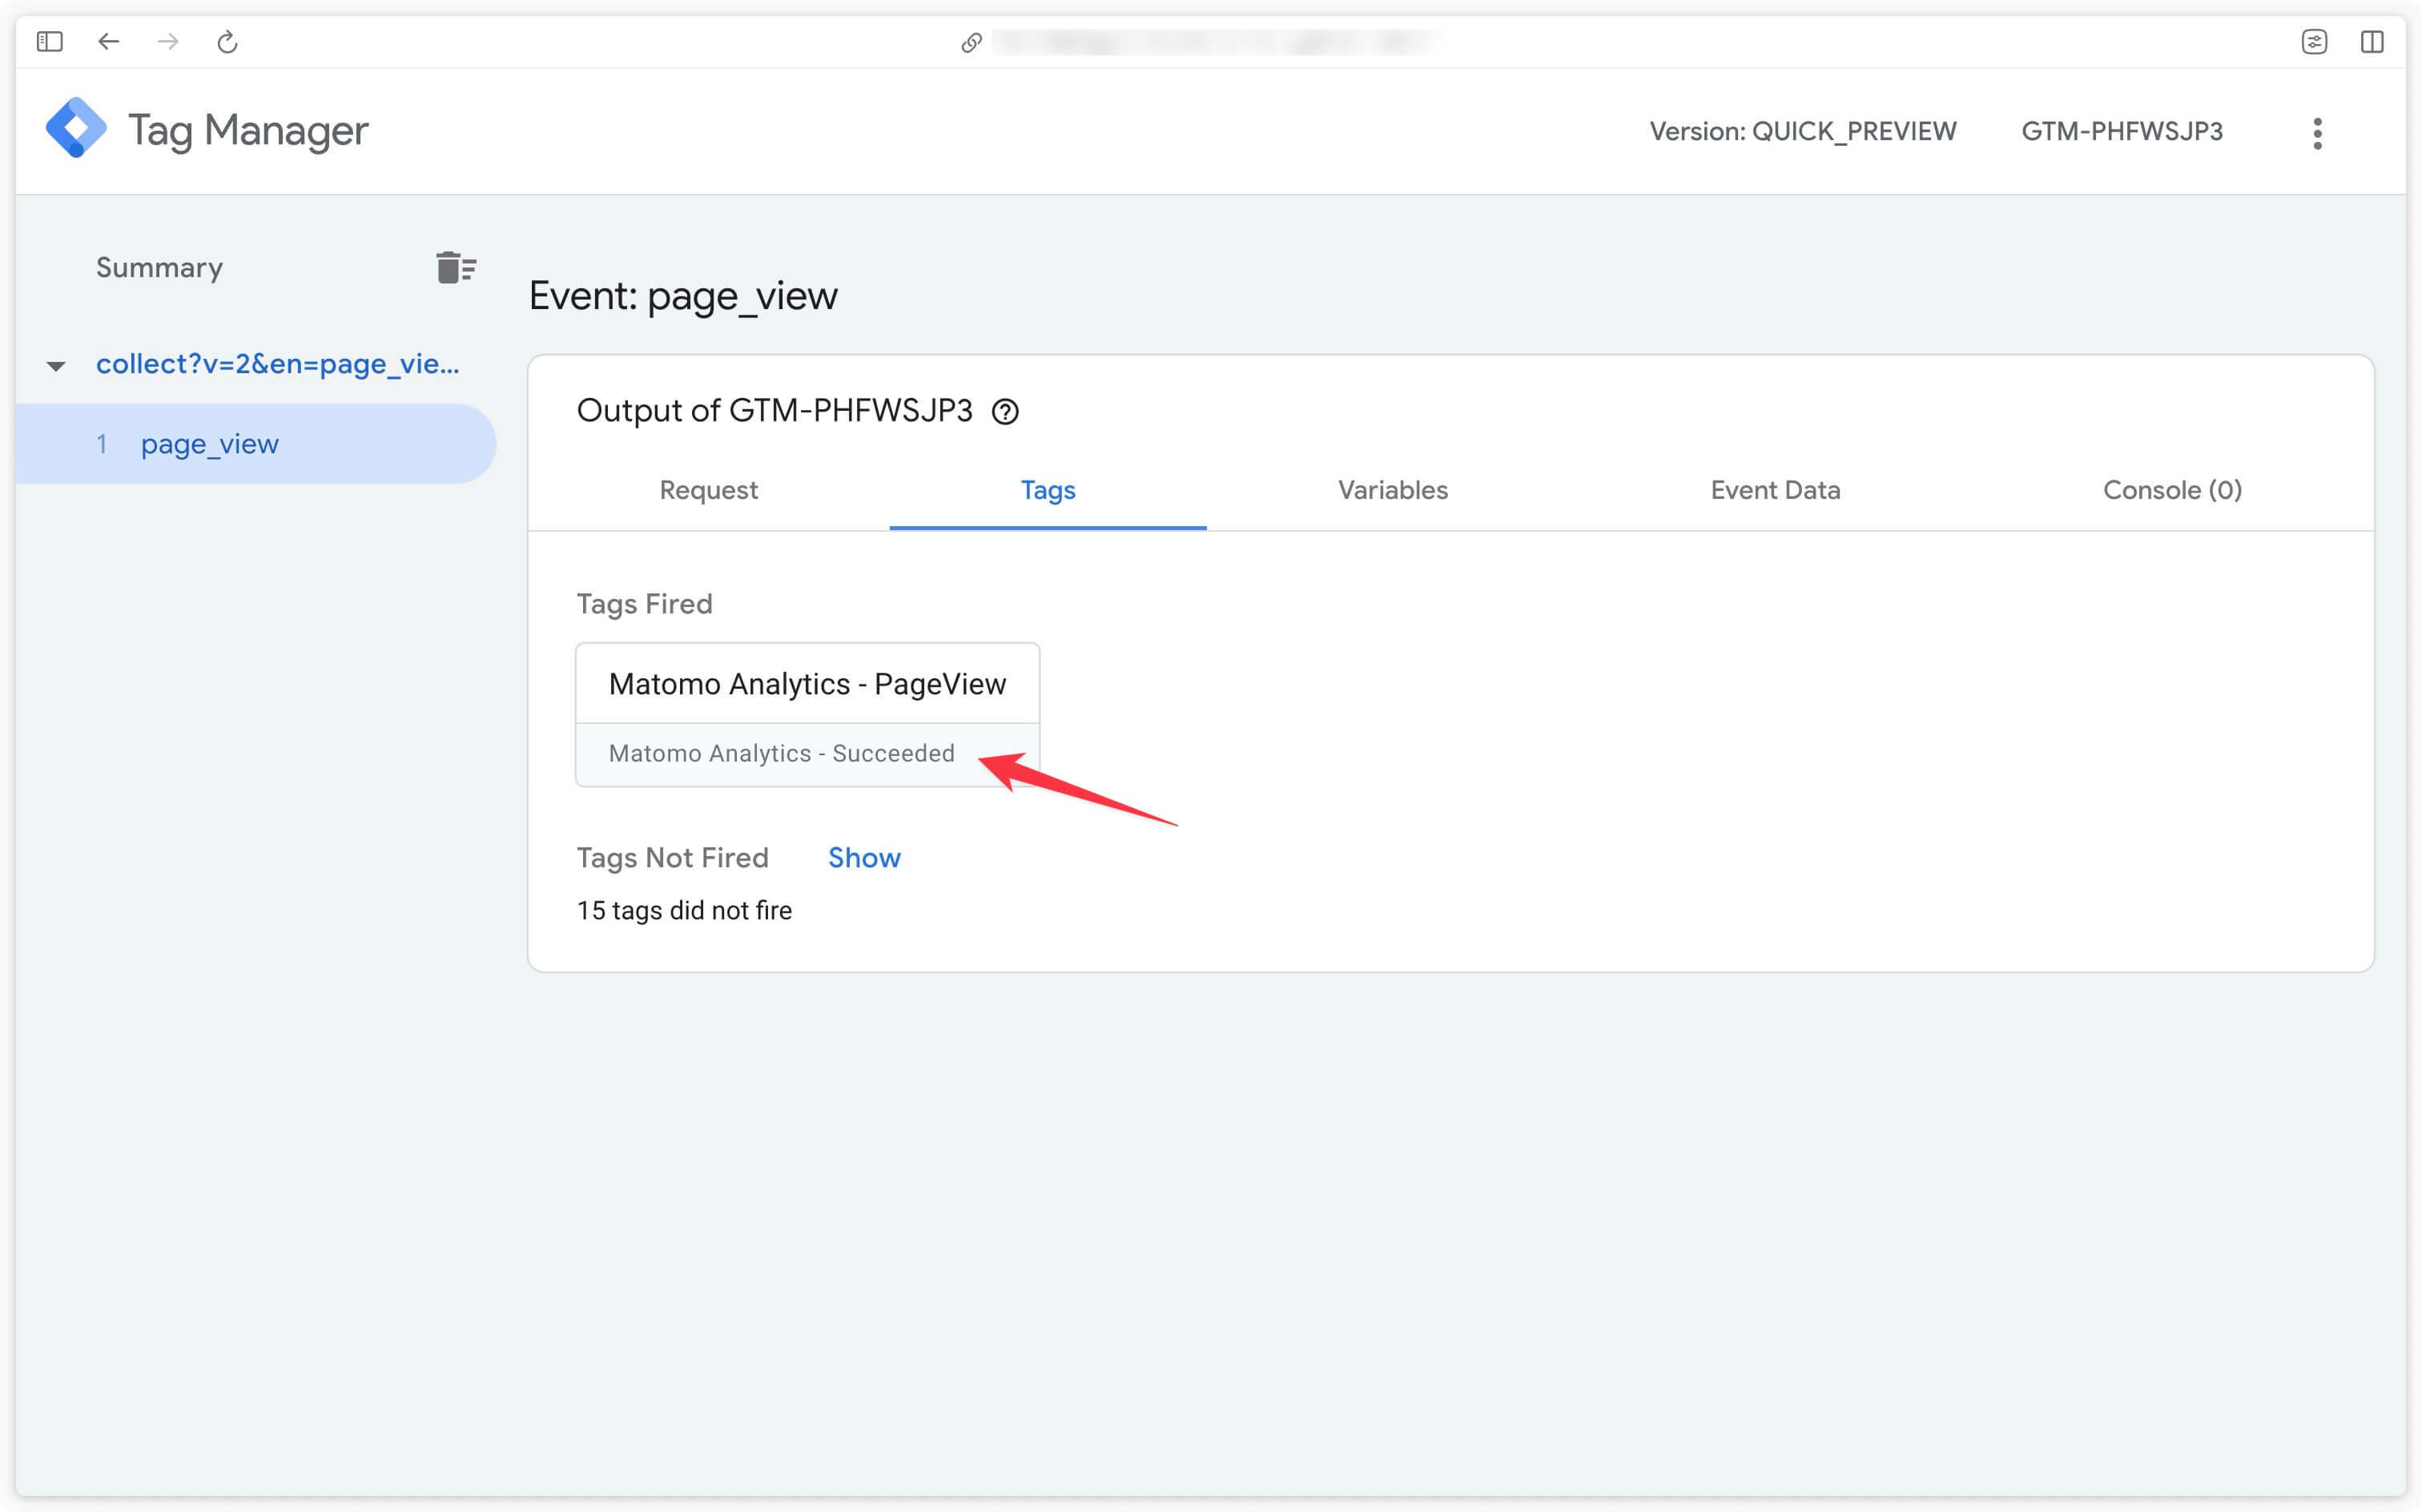
In the preview, click on the Matomo Analytics tag to check that a request has been sent to Matomo.
If the response code is 204, everything works correctly. If you have the code 400, create a new auth token by unchecking the Only allow secure requests checkbox.
Check received data
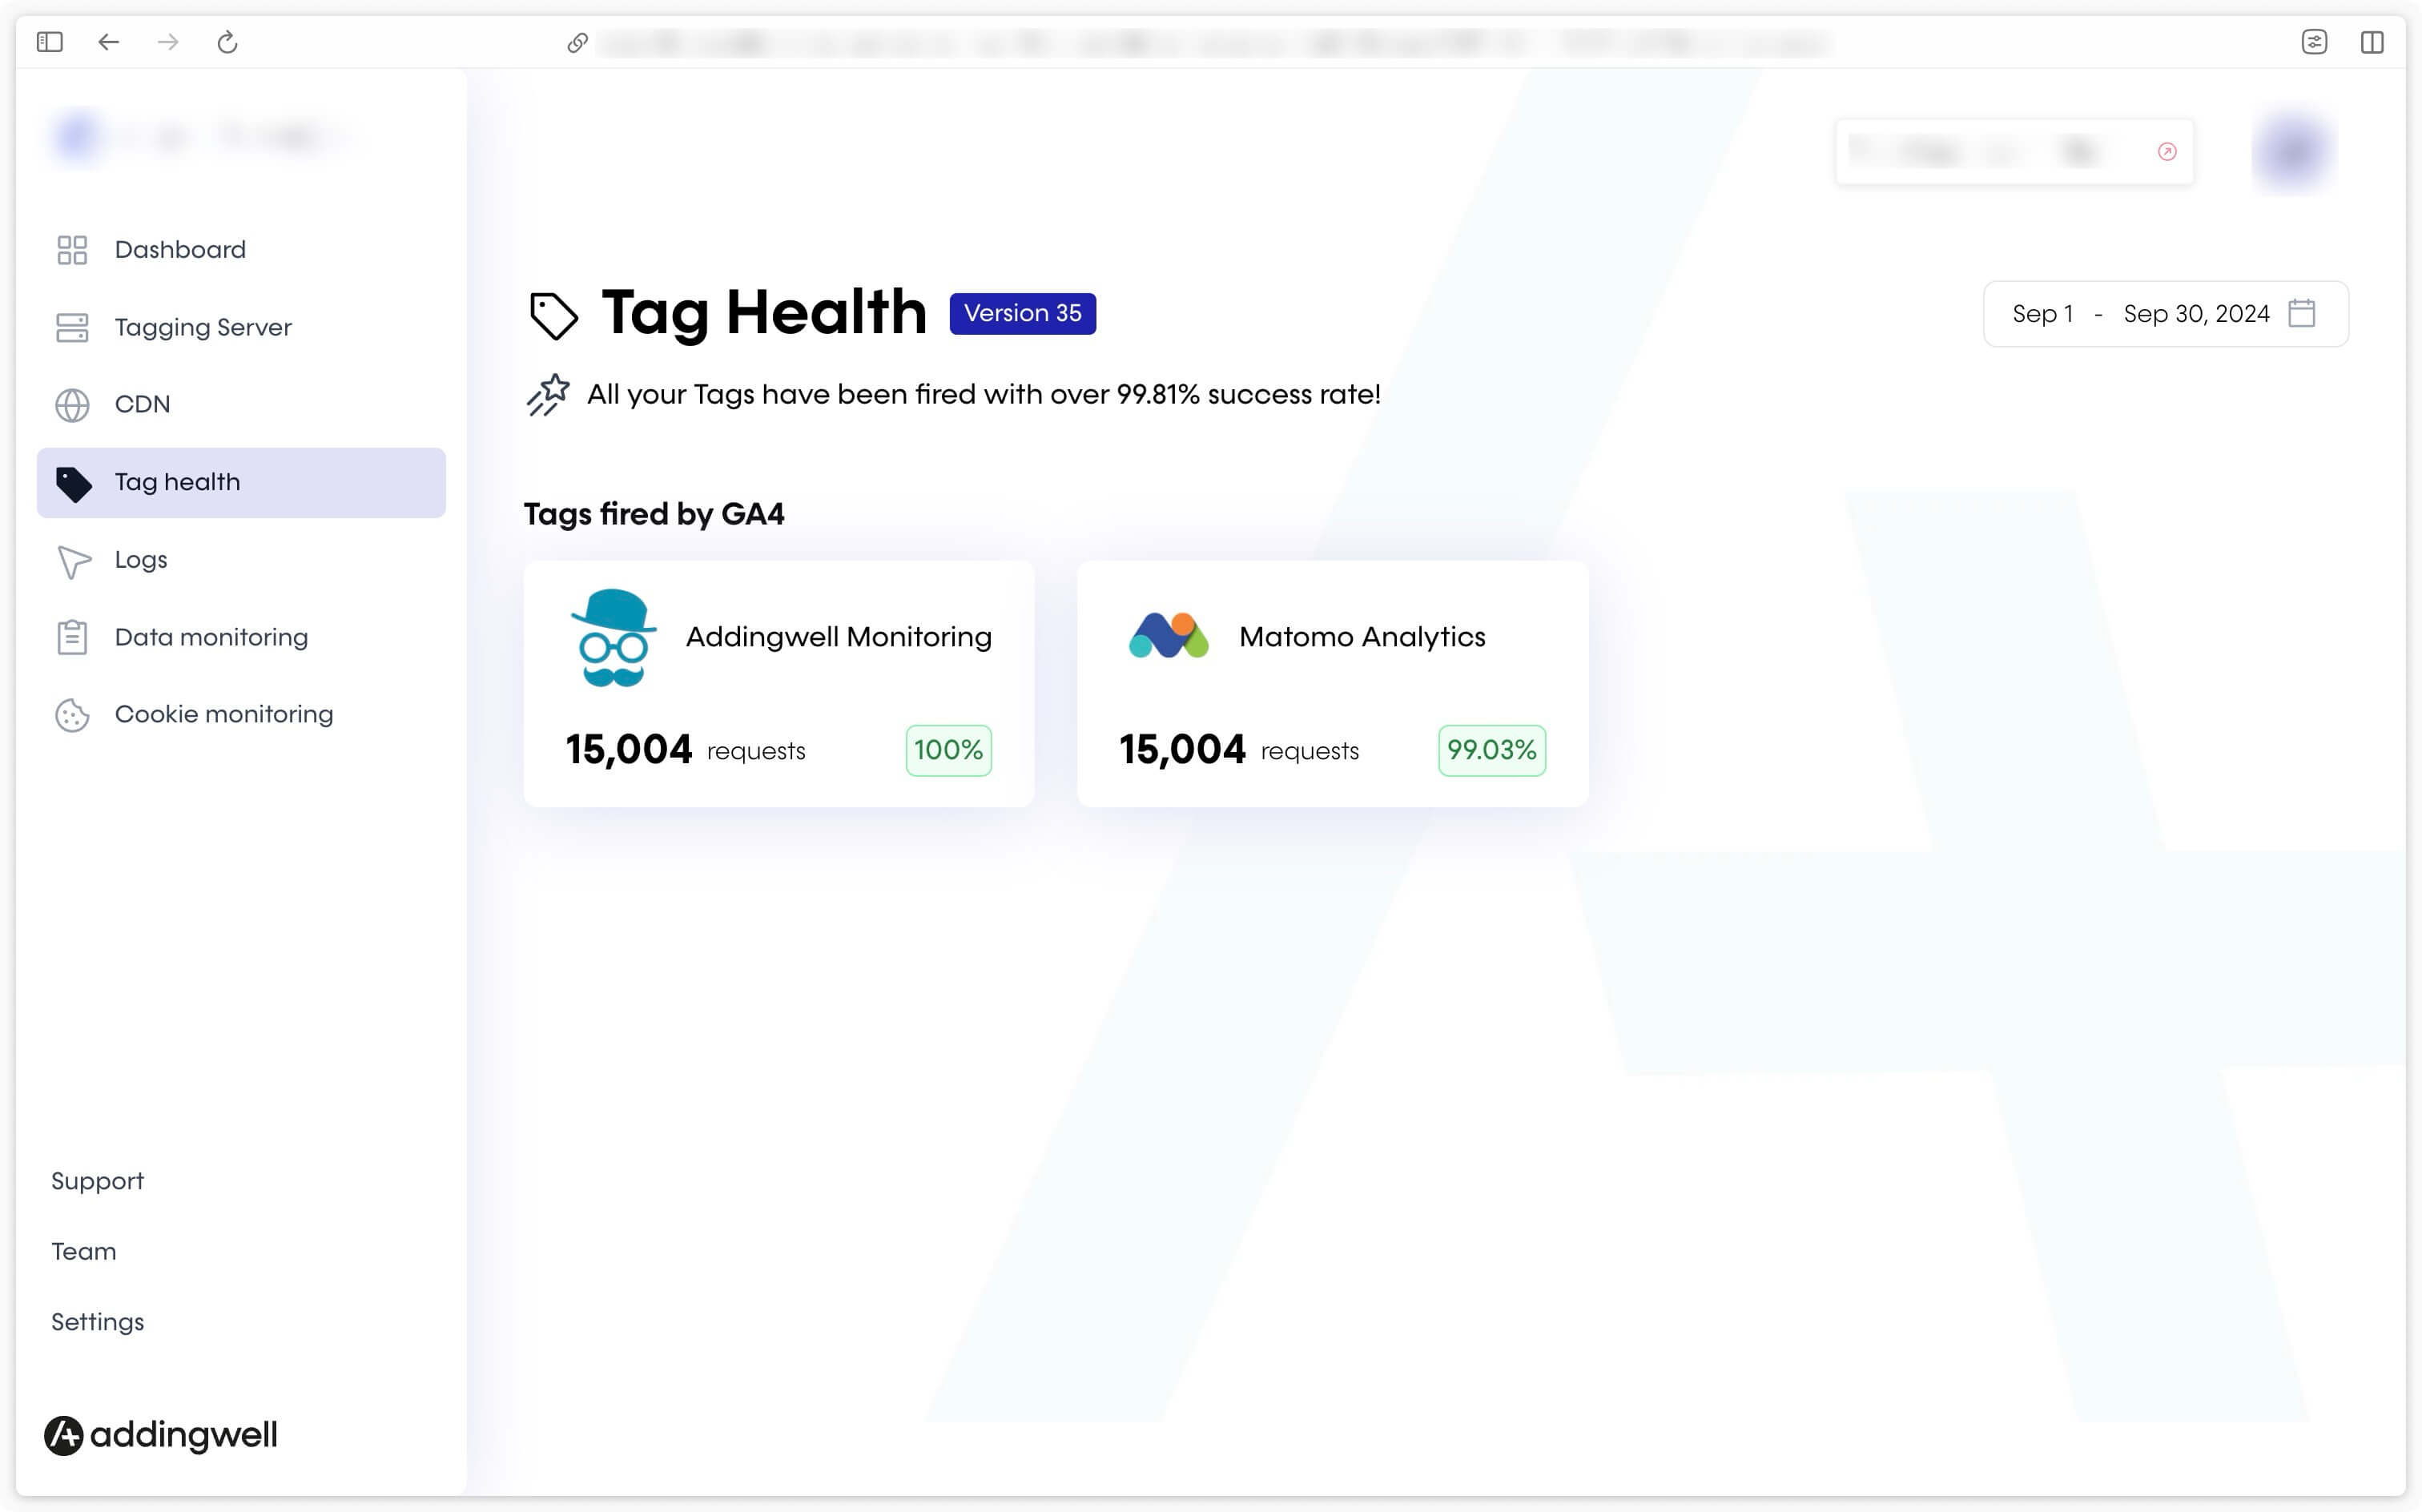
Addingwell side via Tag Health: successful requests
Click on the Tag Health tab in your Addingwell container. Start by checking the number of requests made for Matomo Analytics over a given period, as well as the percentage of successful requests.
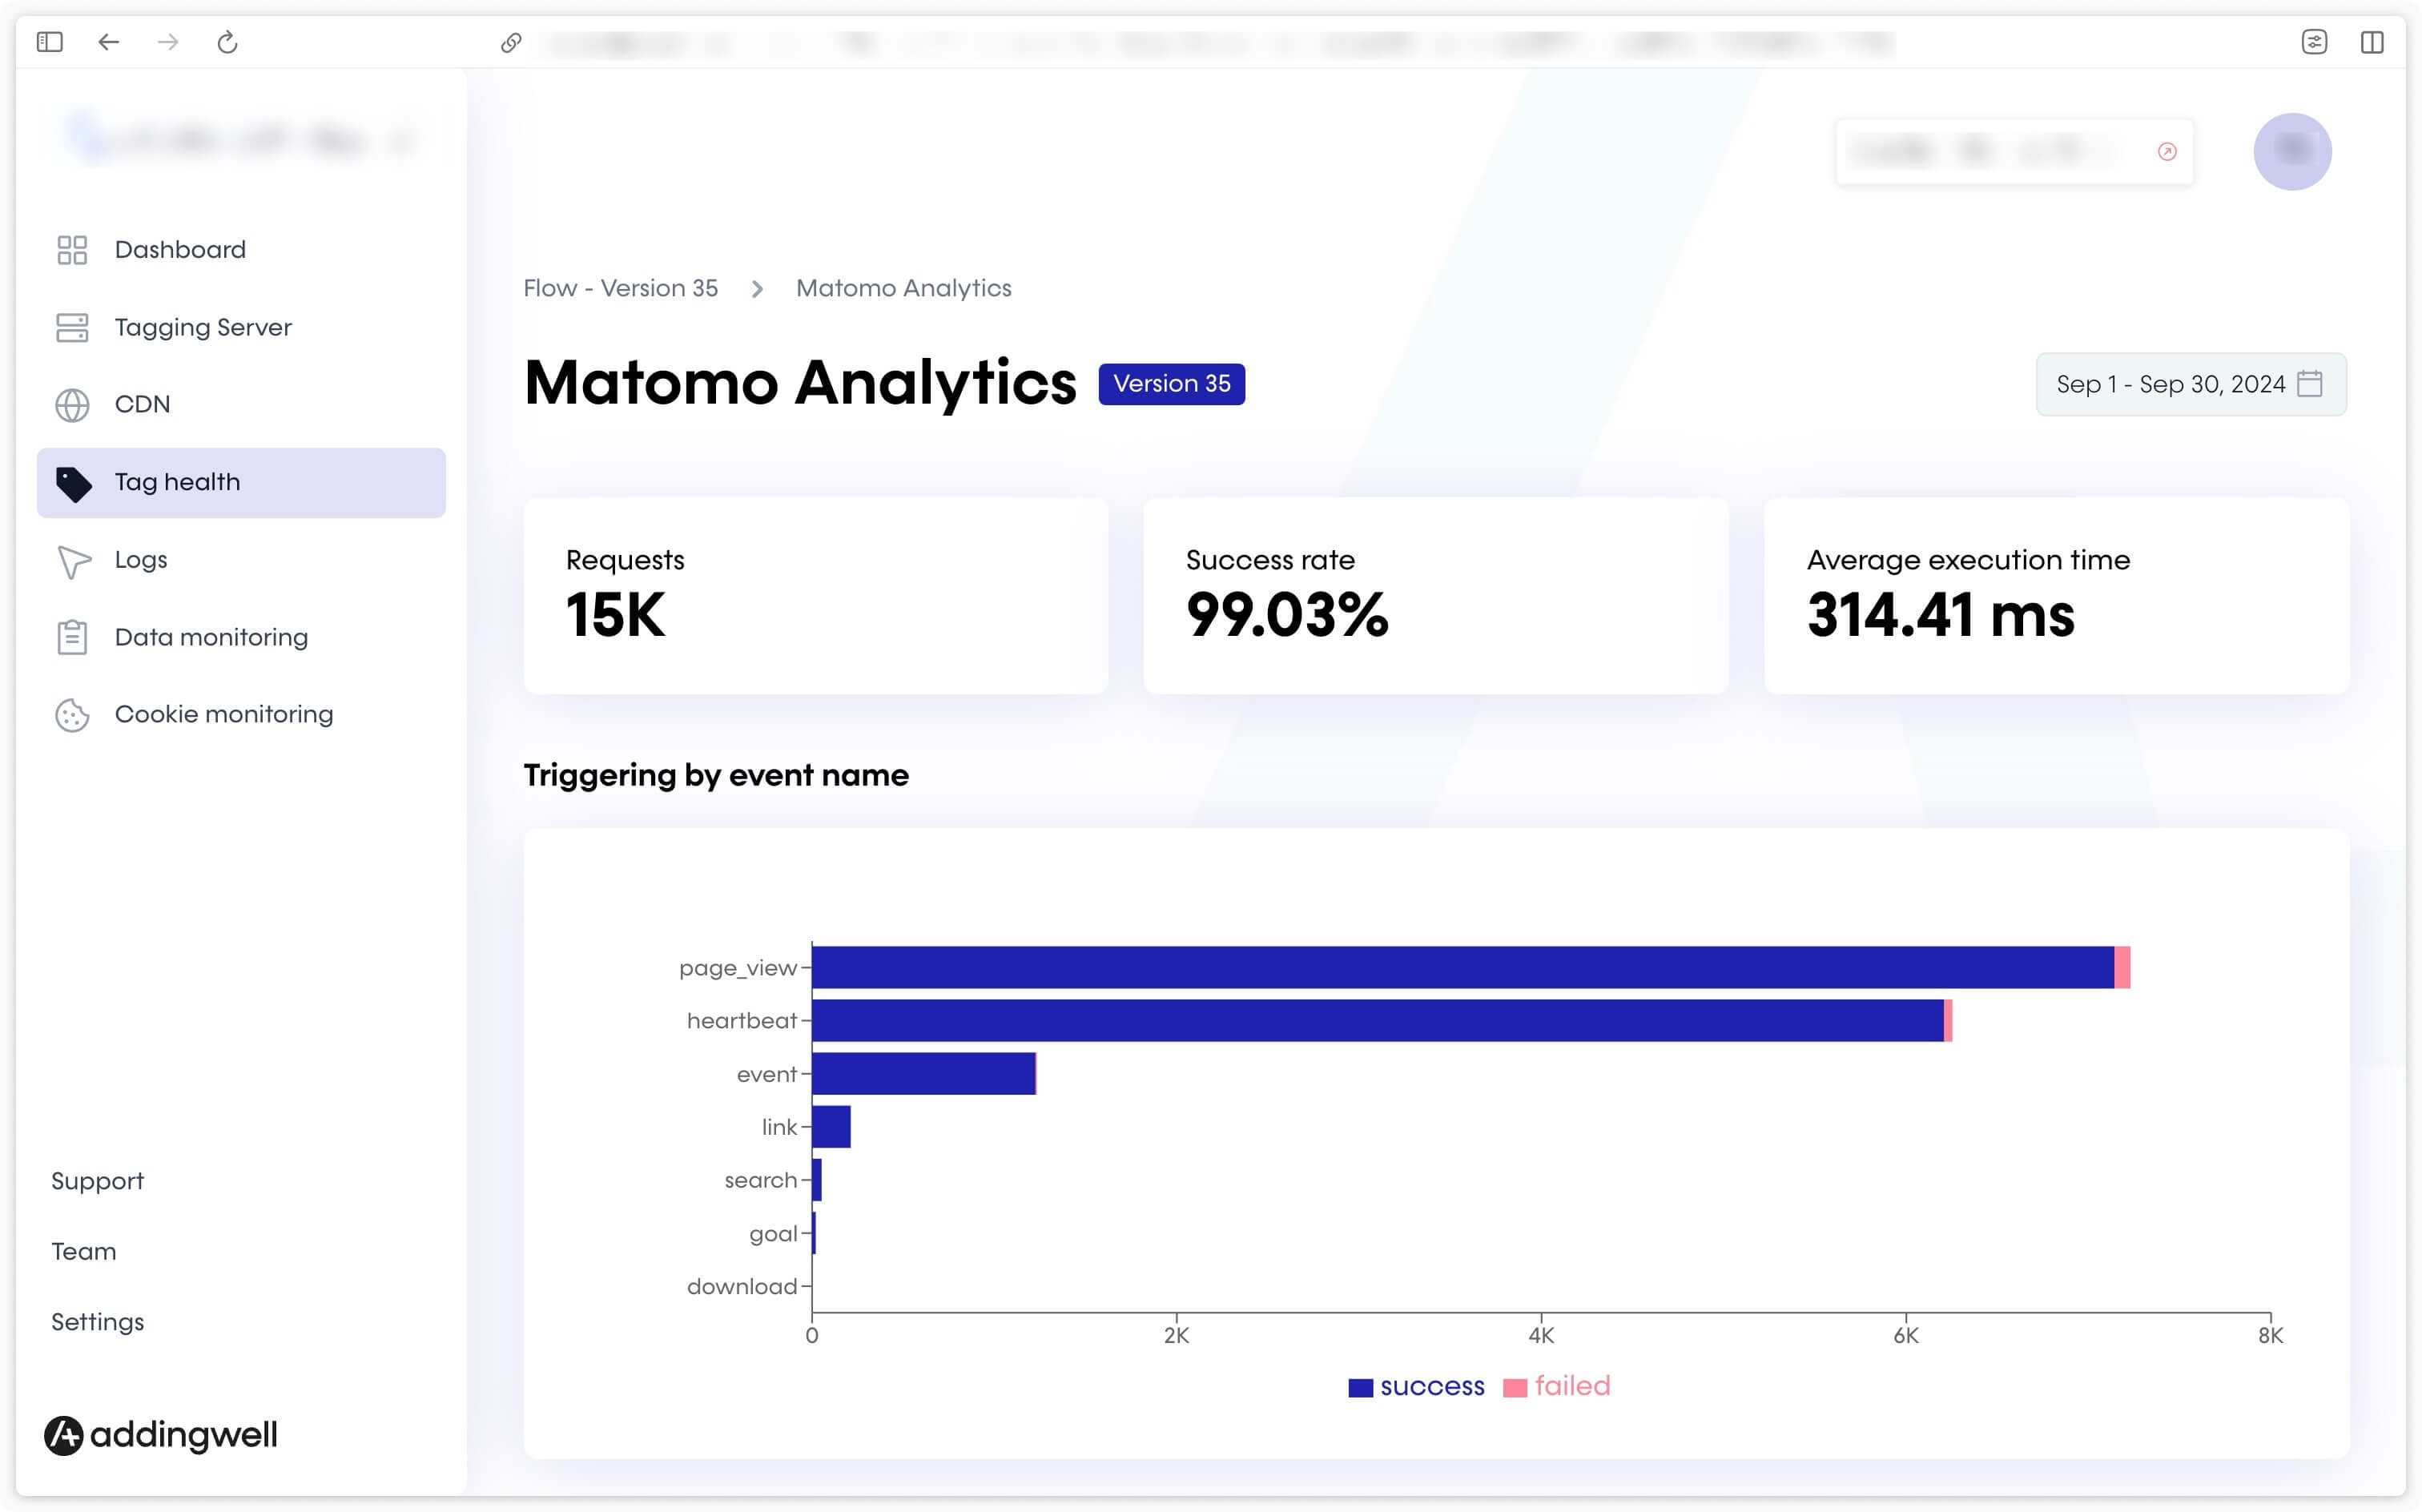
Click on the Matomo Analytics tag for more details.
This screen gives you details of the events sent by your server to Matomo Analytics, as well as the percentage of successful requests, which in our example is almost 100%.
To examine the requests in error, we’ll take a closer look at the error logs.
Go to the Logs tab and access the logs for each tag in place on your server. Click on the Logs linked to your Matomo instance (<your_subdomain>.matomo.cloud).
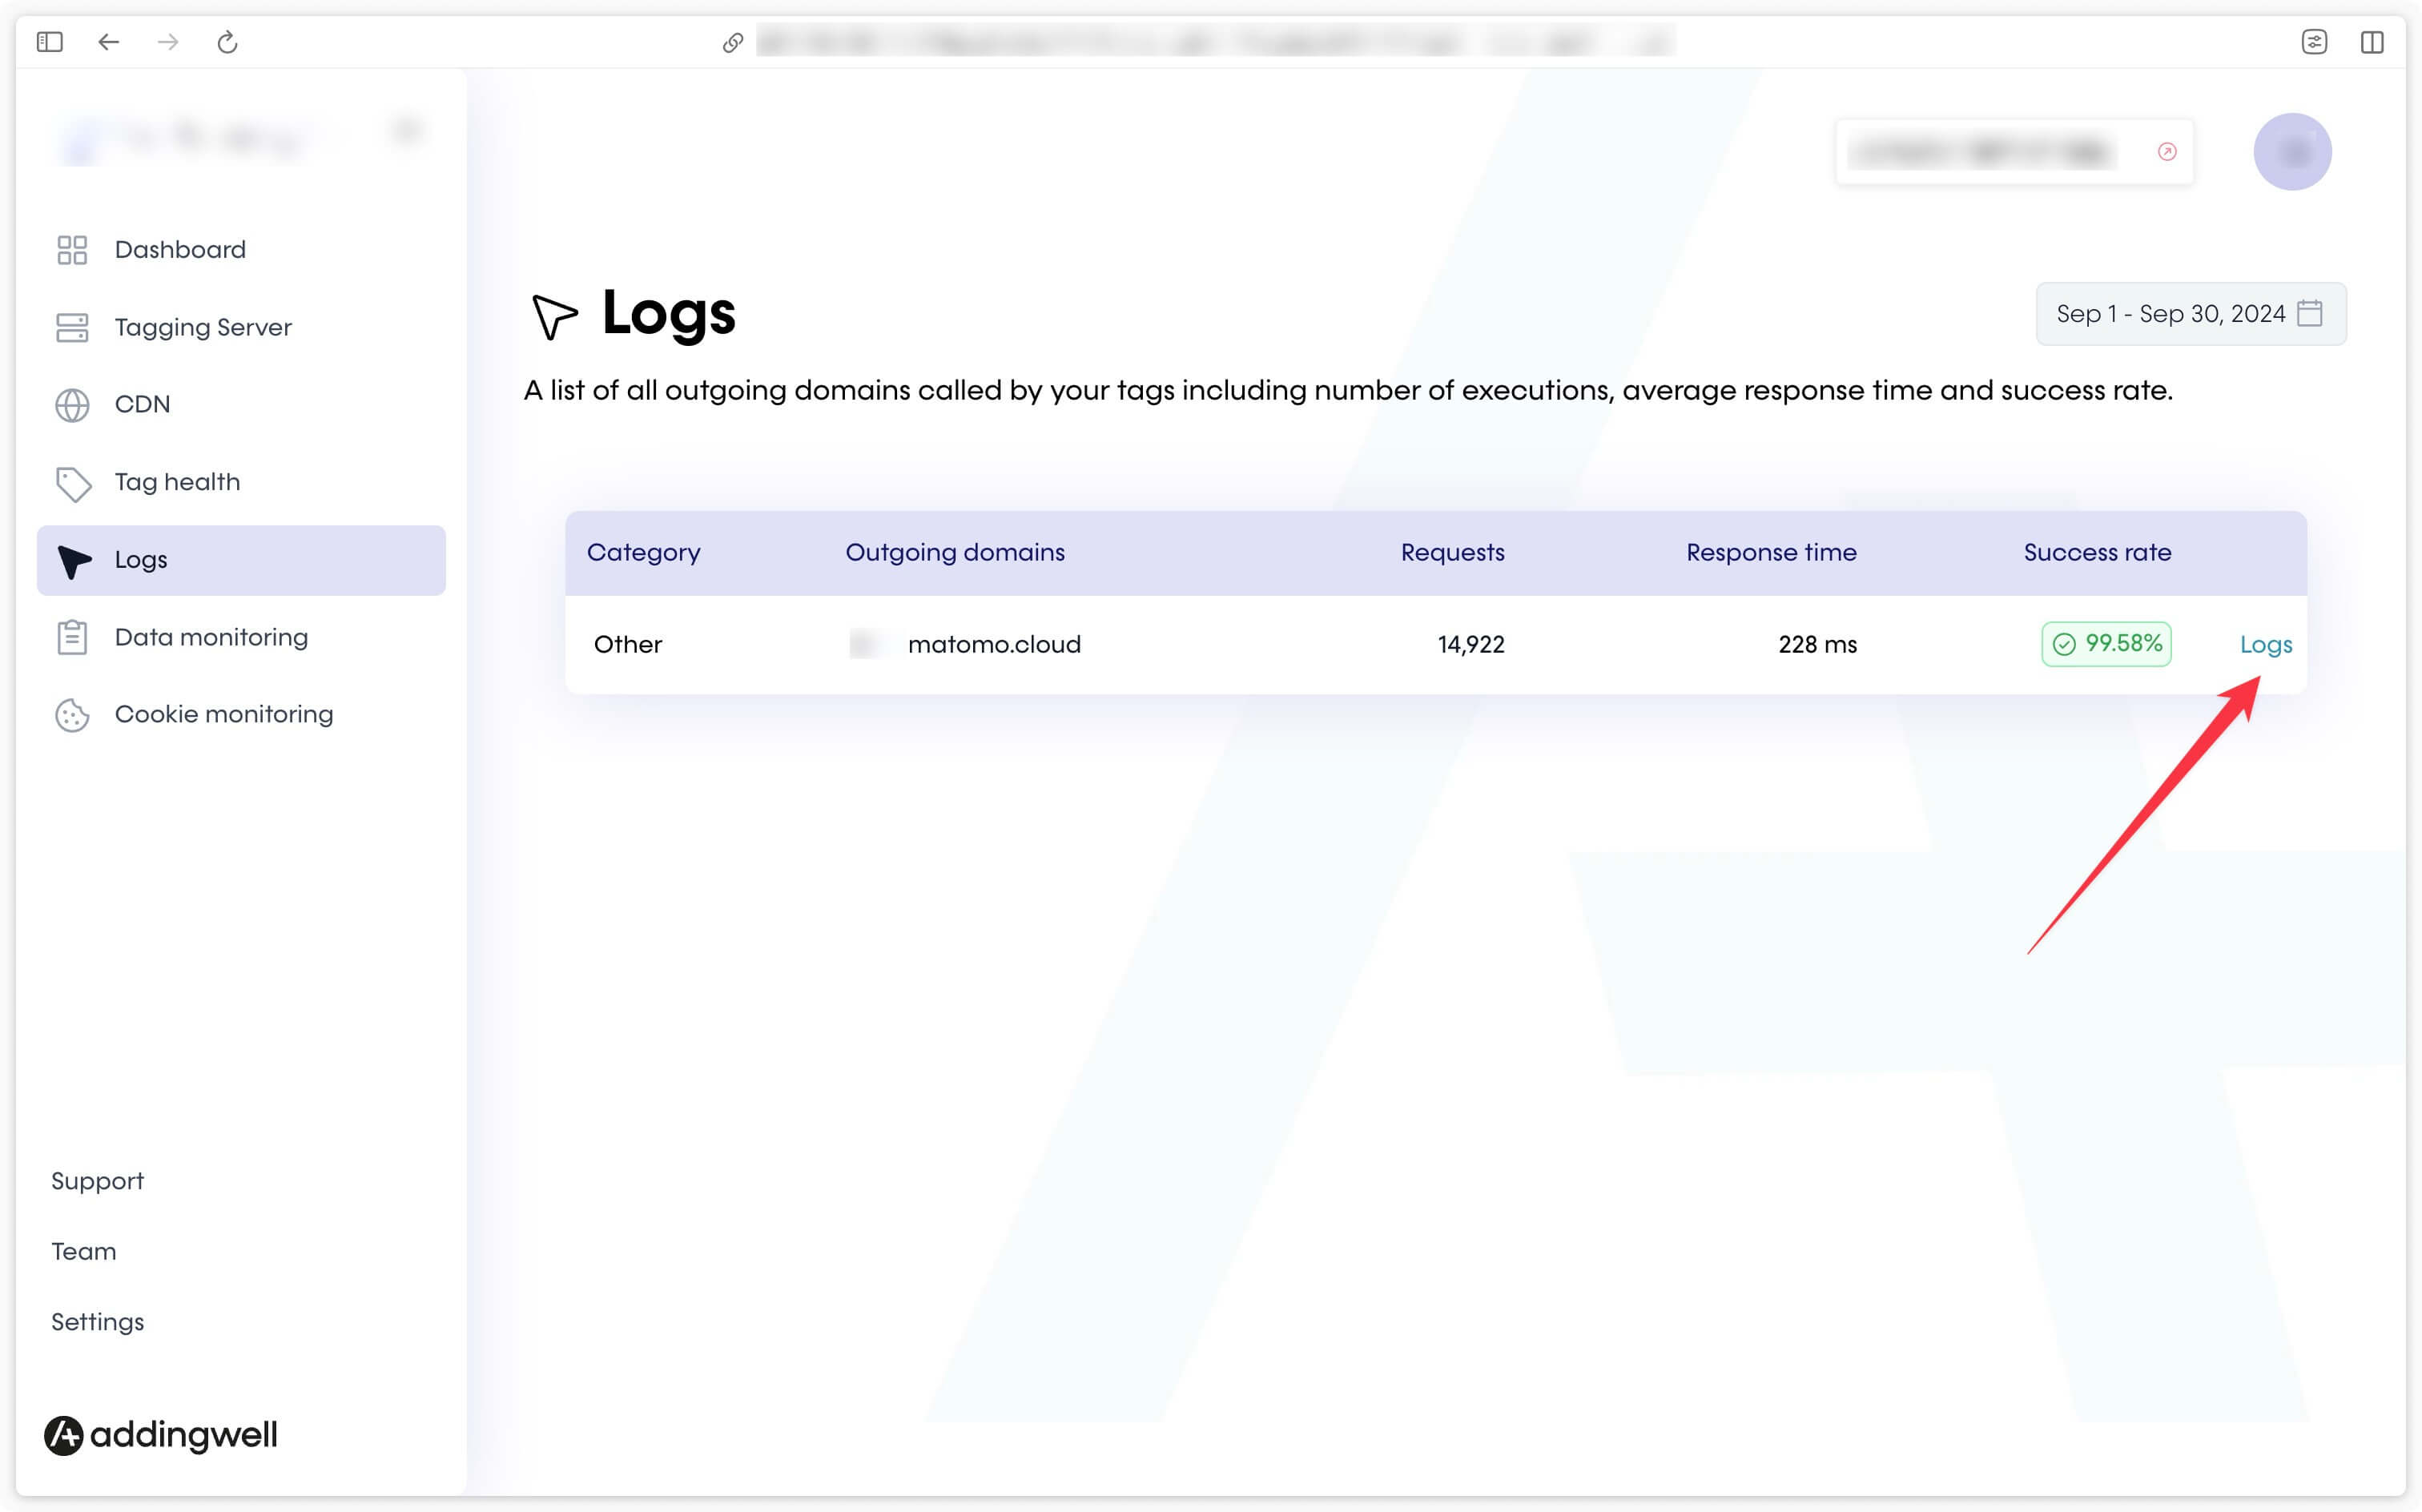
For example, in the error logs for our account, the most frequent error (63 occurrences) is not very explicit, but is due to the auth token.
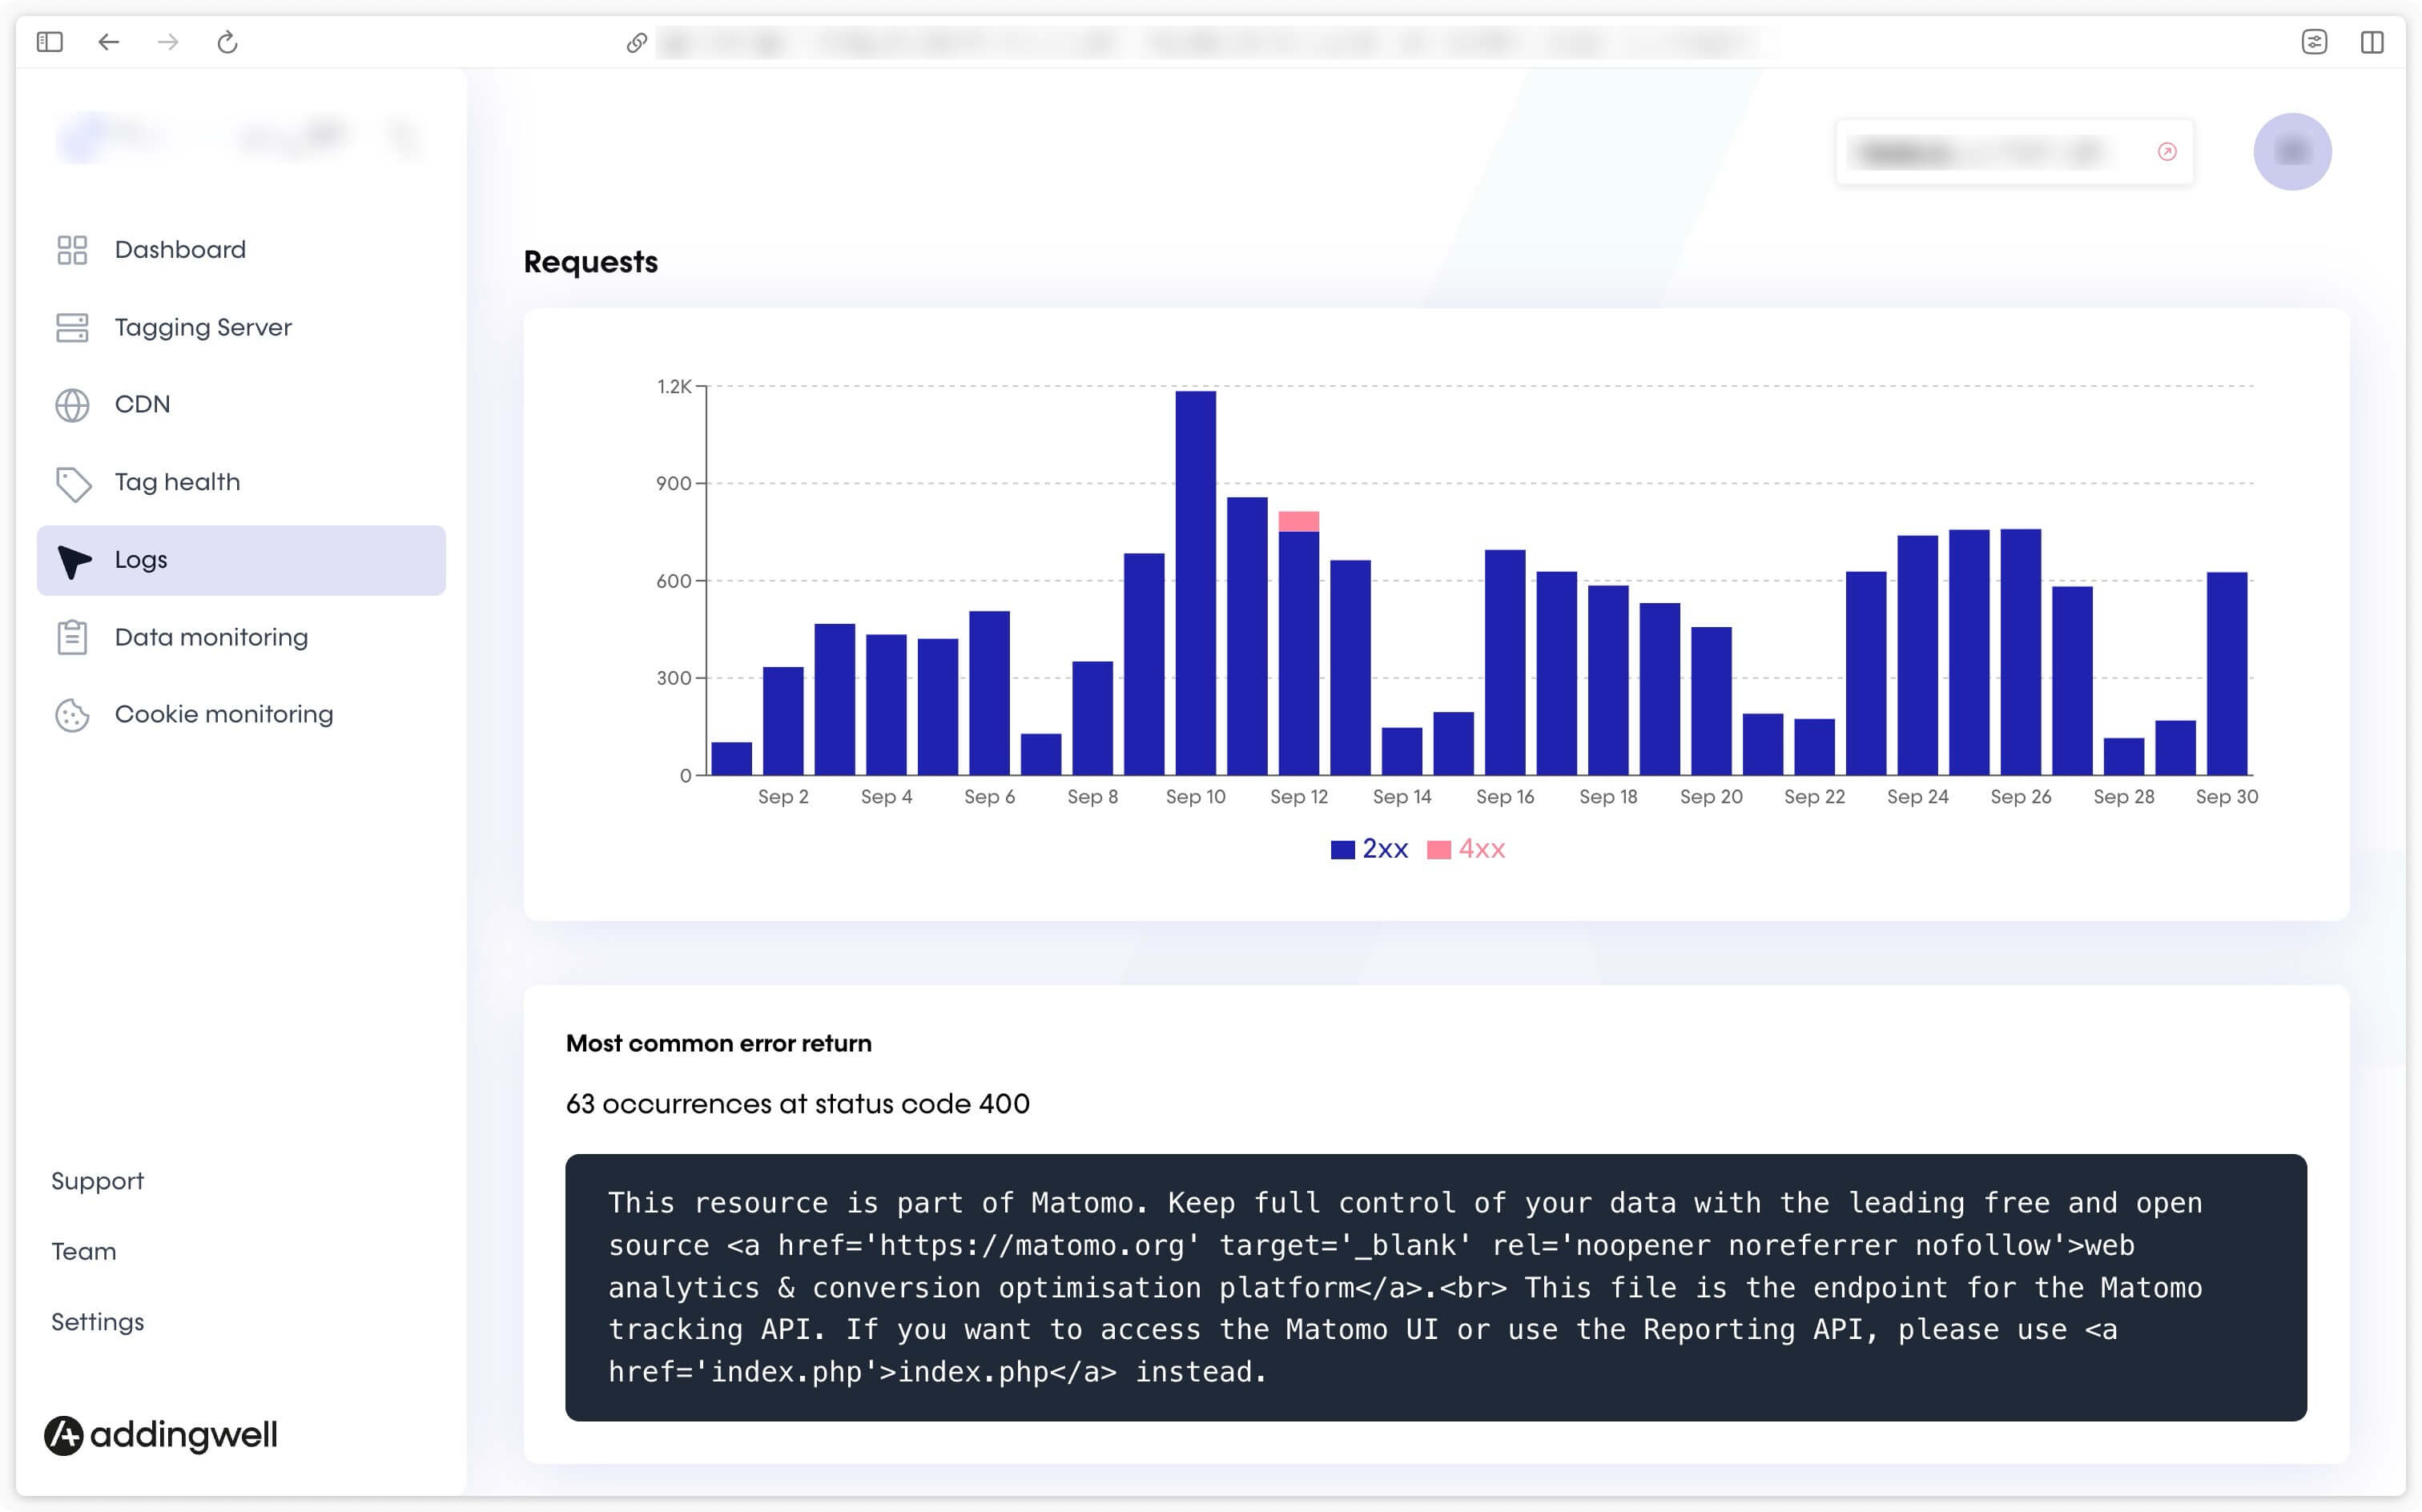
If you encounter this error, be sure to uncheck the Only allow secure requests box during token creation.
Matomo side via the real-time visit log
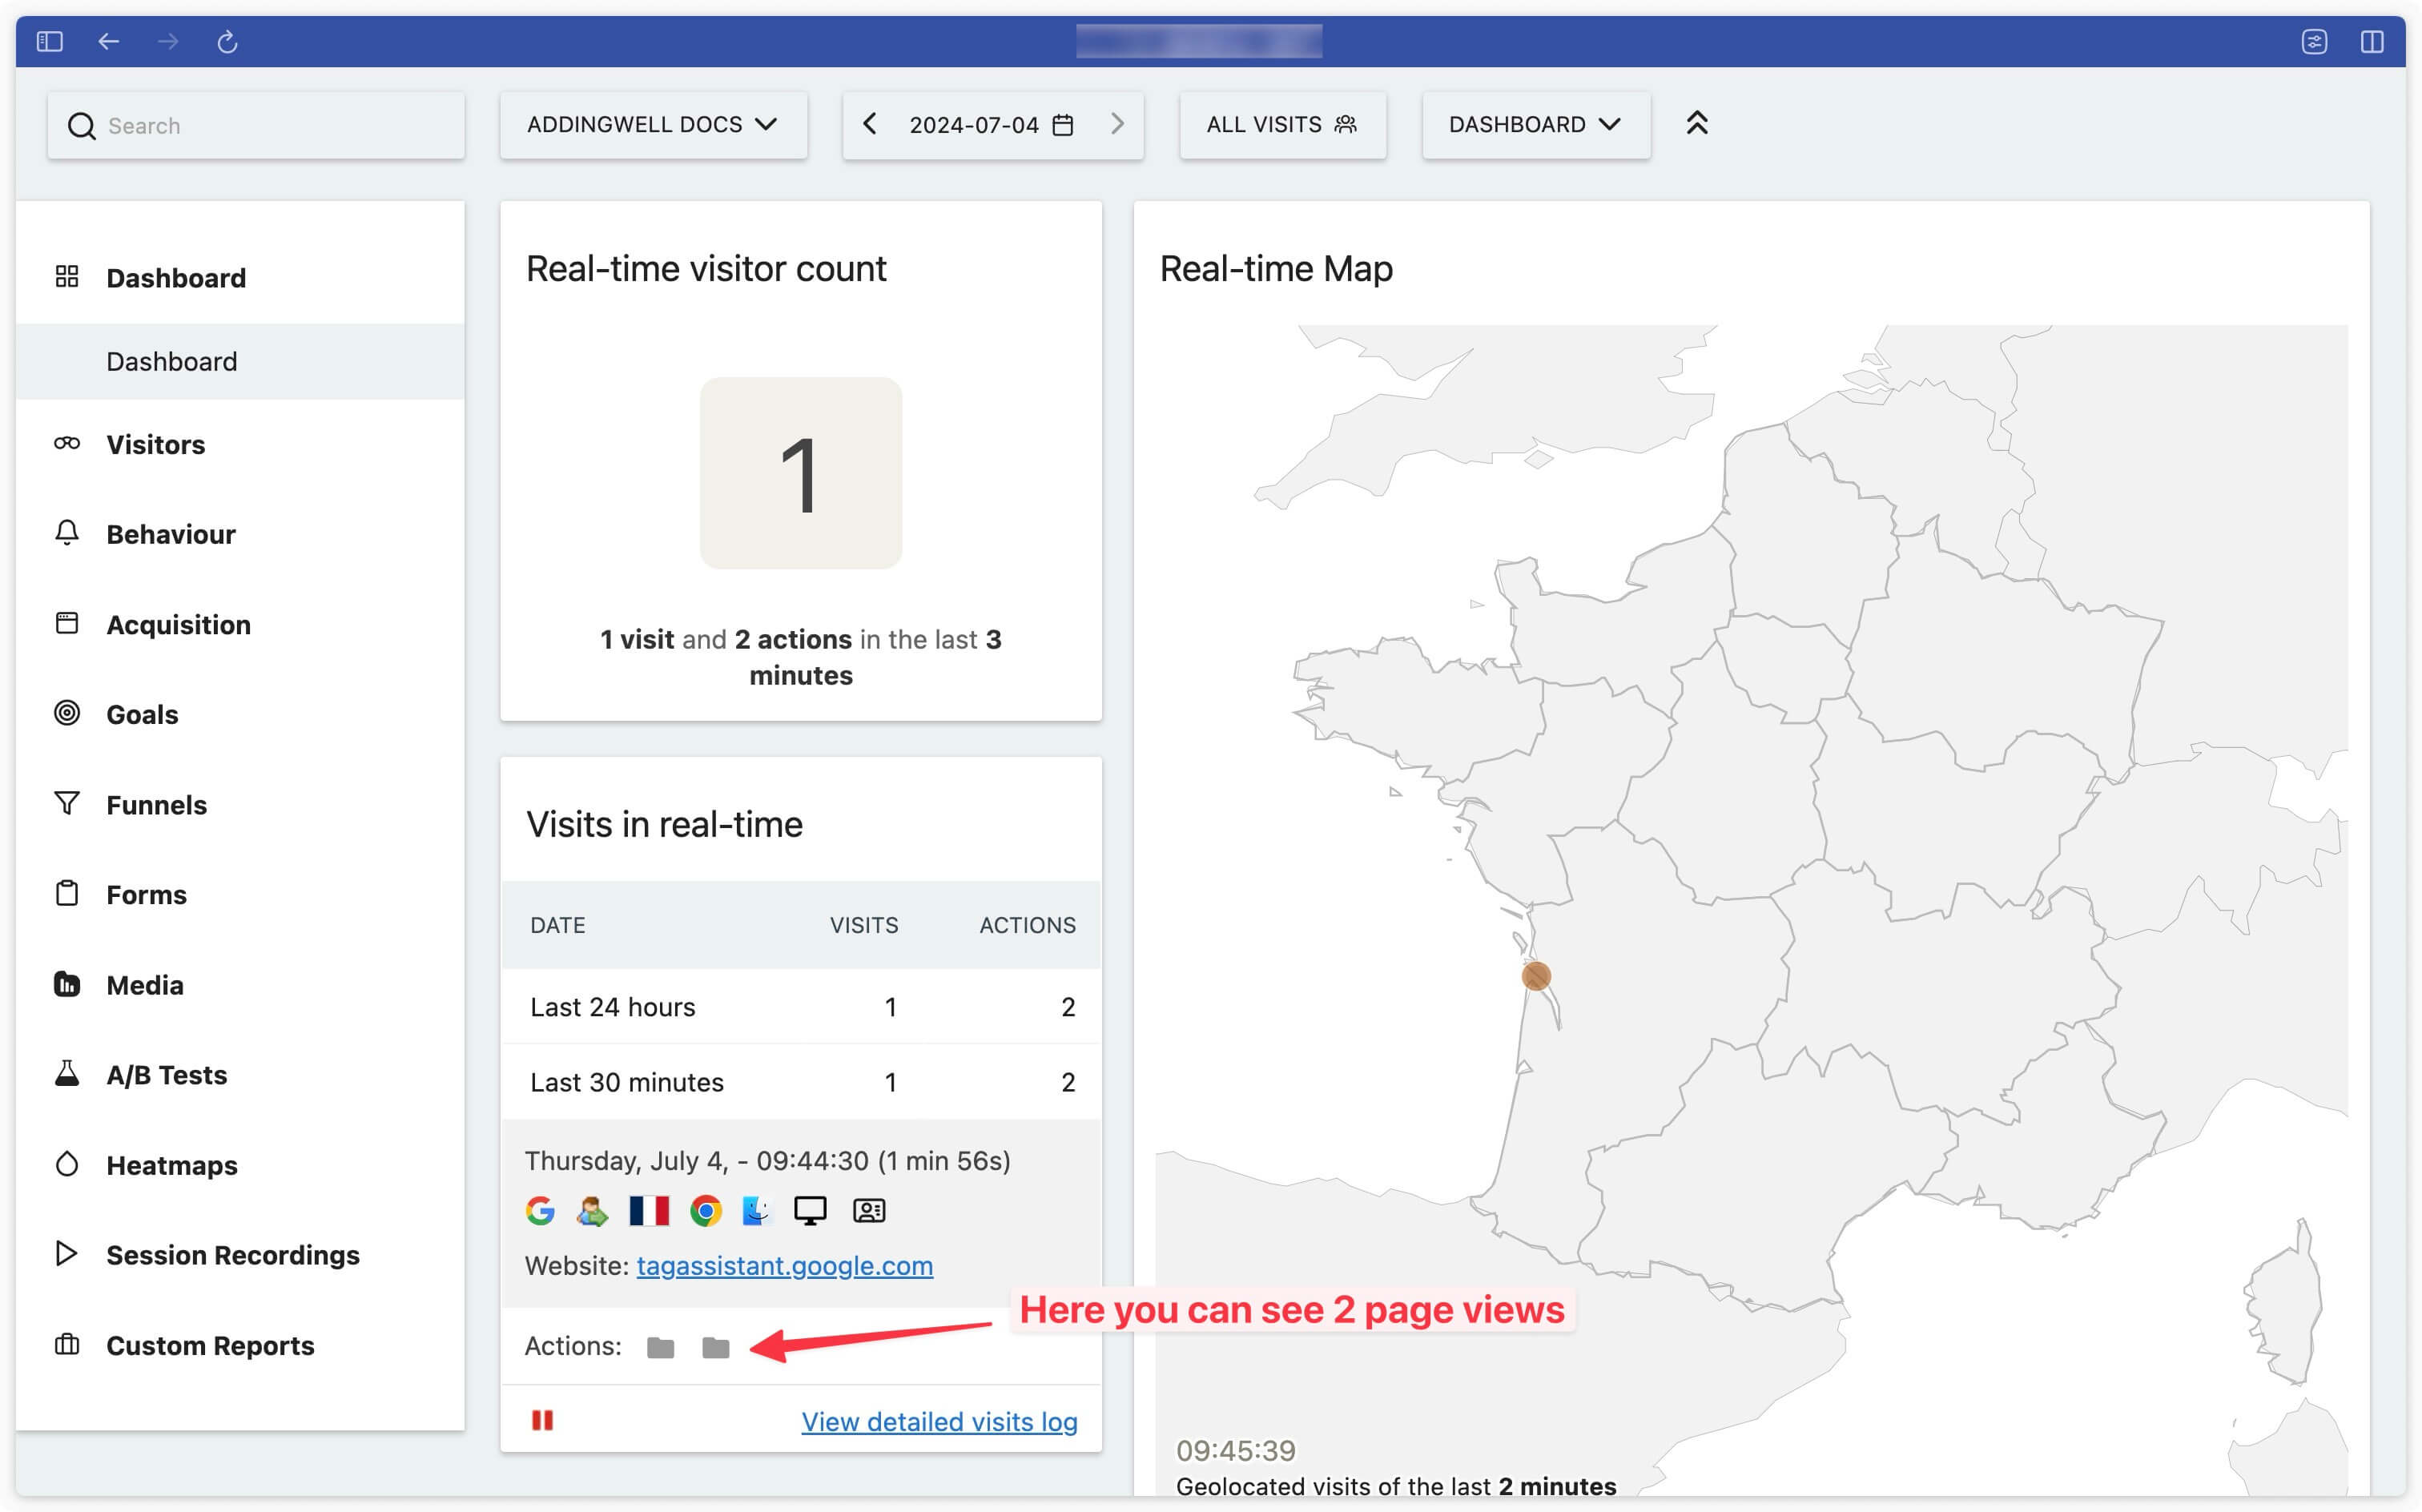
In Matomo, the real-time visit log is used to verify the data received. There is no debugging tool like the DebugView in Google Analytics 4.
In this log, page views are displayed as gray folders.
If you hover a folder you’ll see more information about the page view:
- page title
- page URL
- date and time of page view
- time spent on page
Congratulations
You’ve finished configuring Matomo Analytics, and you’ve verified that your data is being sent to Matomo.
If you’d like to check for other events in the Matomo visit log, we’ve created a dedicated page that references all event types you can receive in Matomo.
If you encounter any problems during these steps, please do not hesitate to contact our support team.