Send user data
Why send user data?
The collection of user data is there to compensate for the loss of data due to the end of third-party cookies. To fully understand the problem, it’s important to understand the purpose of third-party cookies.
What are third-party cookies used for?
Third-party cookies enable advertising platforms to create user profiles (interests, consumption habits). These cookies enable Google Ads or Meta to know who is visiting which websites.
In simple terms, third-party cookies link a visitor to a physical person (e.g. Mary) in order to create a user profile based on interests, habits and several other criteria.
The end of third-party cookies
With the end of third-party cookies on Google Chrome (announced for early 2025), the quality of data collected by advertising platforms (Meta Ads, Google Ads, Pinterest Ads, etc.) will decrease.
Indeed, without third-party cookies, a Meta or Google Ads may know that a visitor has bought a product, but won’t be able to know that it was Mary (who loves fashion and bicycles) who bought it.
It will therefore be more difficult for advertising platforms to target precise user profiles to offer them relevant advertising (and therefore effective for you as an advertiser).
With these changes, your cost per conversion (CPA) and more generally your customer acquisition cost (CAC) will increase if you don’t take action.
The solution: user data sharing
There’s a way to tell advertising platforms that it’s Mary who has bought, without using third-party cookies. The solution is to send user data.
To compensate for the loss of data due to the end of third-party cookies, you will send your visitors’ personal data yourself (this is known as first-party context).
If Mary makes a purchase on your website, you won’t just tell the advertising platforms that a visitor has bought a product, but also that it was Mary who made the purchase. For example, by sending Mary’s email and phone number.
The more user data you send to advertising platforms, the better conditions you’ll be in to seek out performance.
Email addresses and phone numbers aren’t the only user data you can send. You can also send:
- first name
- last name
- address
- city
- zip code
- country
Send user data to the server
Depending on the type of website, you may need to collect a greater or lesser amount of user data.
Example for an e-commerce website
You can share the email address when the user is logged in. Then, as the user progresses through the conversion funnel, you’ll have more and more user data to pass on to the advertising platforms.
Example for a lead generation website
You share an e-mail address and phone number when filling in a form. The amount of user data you can send will depend on the fields in your form.
To send user data to your server, you must first make it available in your Data Layer and then use it in Google Tag Manager.
The method for sending user data to the server is standardized. This saves time on the server side later if the data is received in the correct format.
To send user data to your server, we offer two options:
- Event parameters (recommended option)
- User-Provided Data variable
Even if we show you option 2, option 1 is to be preferred as it respects the GTM server-side standard which is not the case with the User-Provided Data variable.
Option 1: Event parameters
Create an event parameters variable
The first step is to create an event settings variable (Google Tag: Event Settings) that will retrieve the data available in the Data Layer.
It’s important here to respect the parameters names below so that they are interpreted correctly on the server side.
You can find all these parameters in the Google documentation . ATTENTION: remember to set the language to English, as the translation doesn’t work correctly.
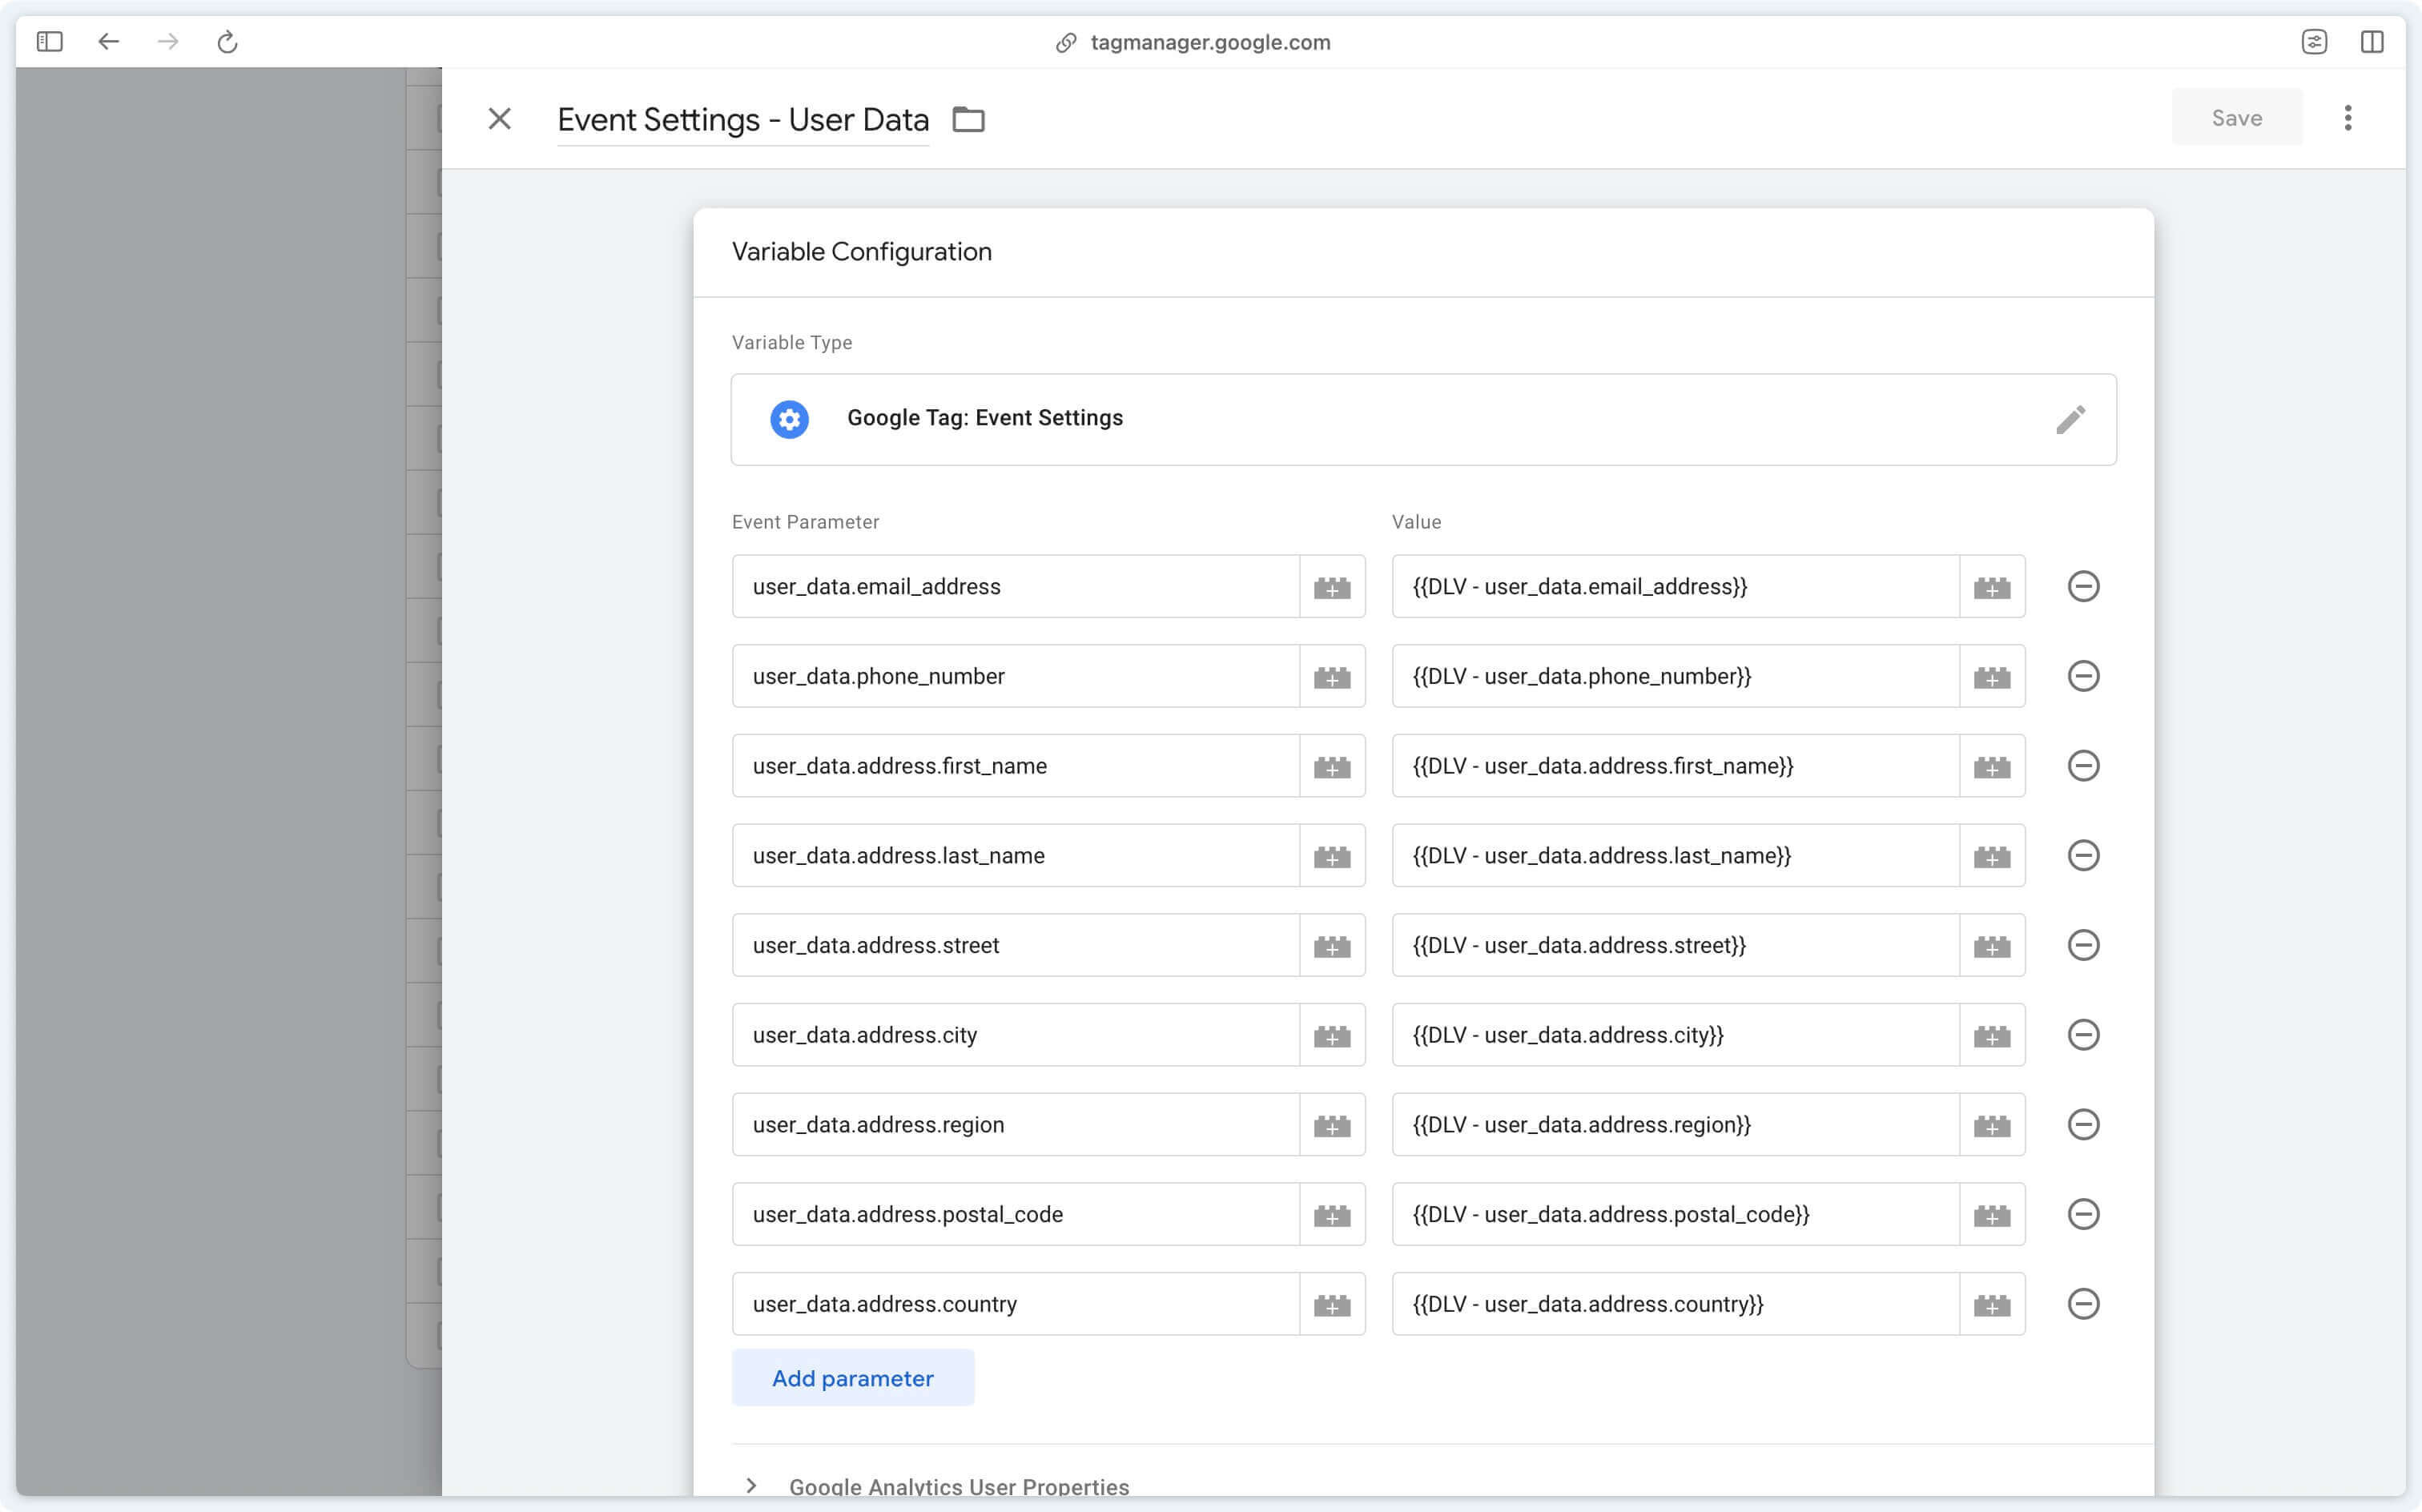
Data Layer variables are to be adapted to your own Data Layer.
Send hashed user data
To send user data that has already been hashed to the server, you need to use the SHA-256 hash function and fill in the following parameters:
user_data.sha256_email_addressuser_data.sha256_phone_numberuser_data.address.sha256_first_nameuser_data.address.sha256_last_name
Configure Google tag (optional)
If you only want to send user data on certain events, you don’t need to perform this step.
In your Google tag, you can then add the previously created variable.
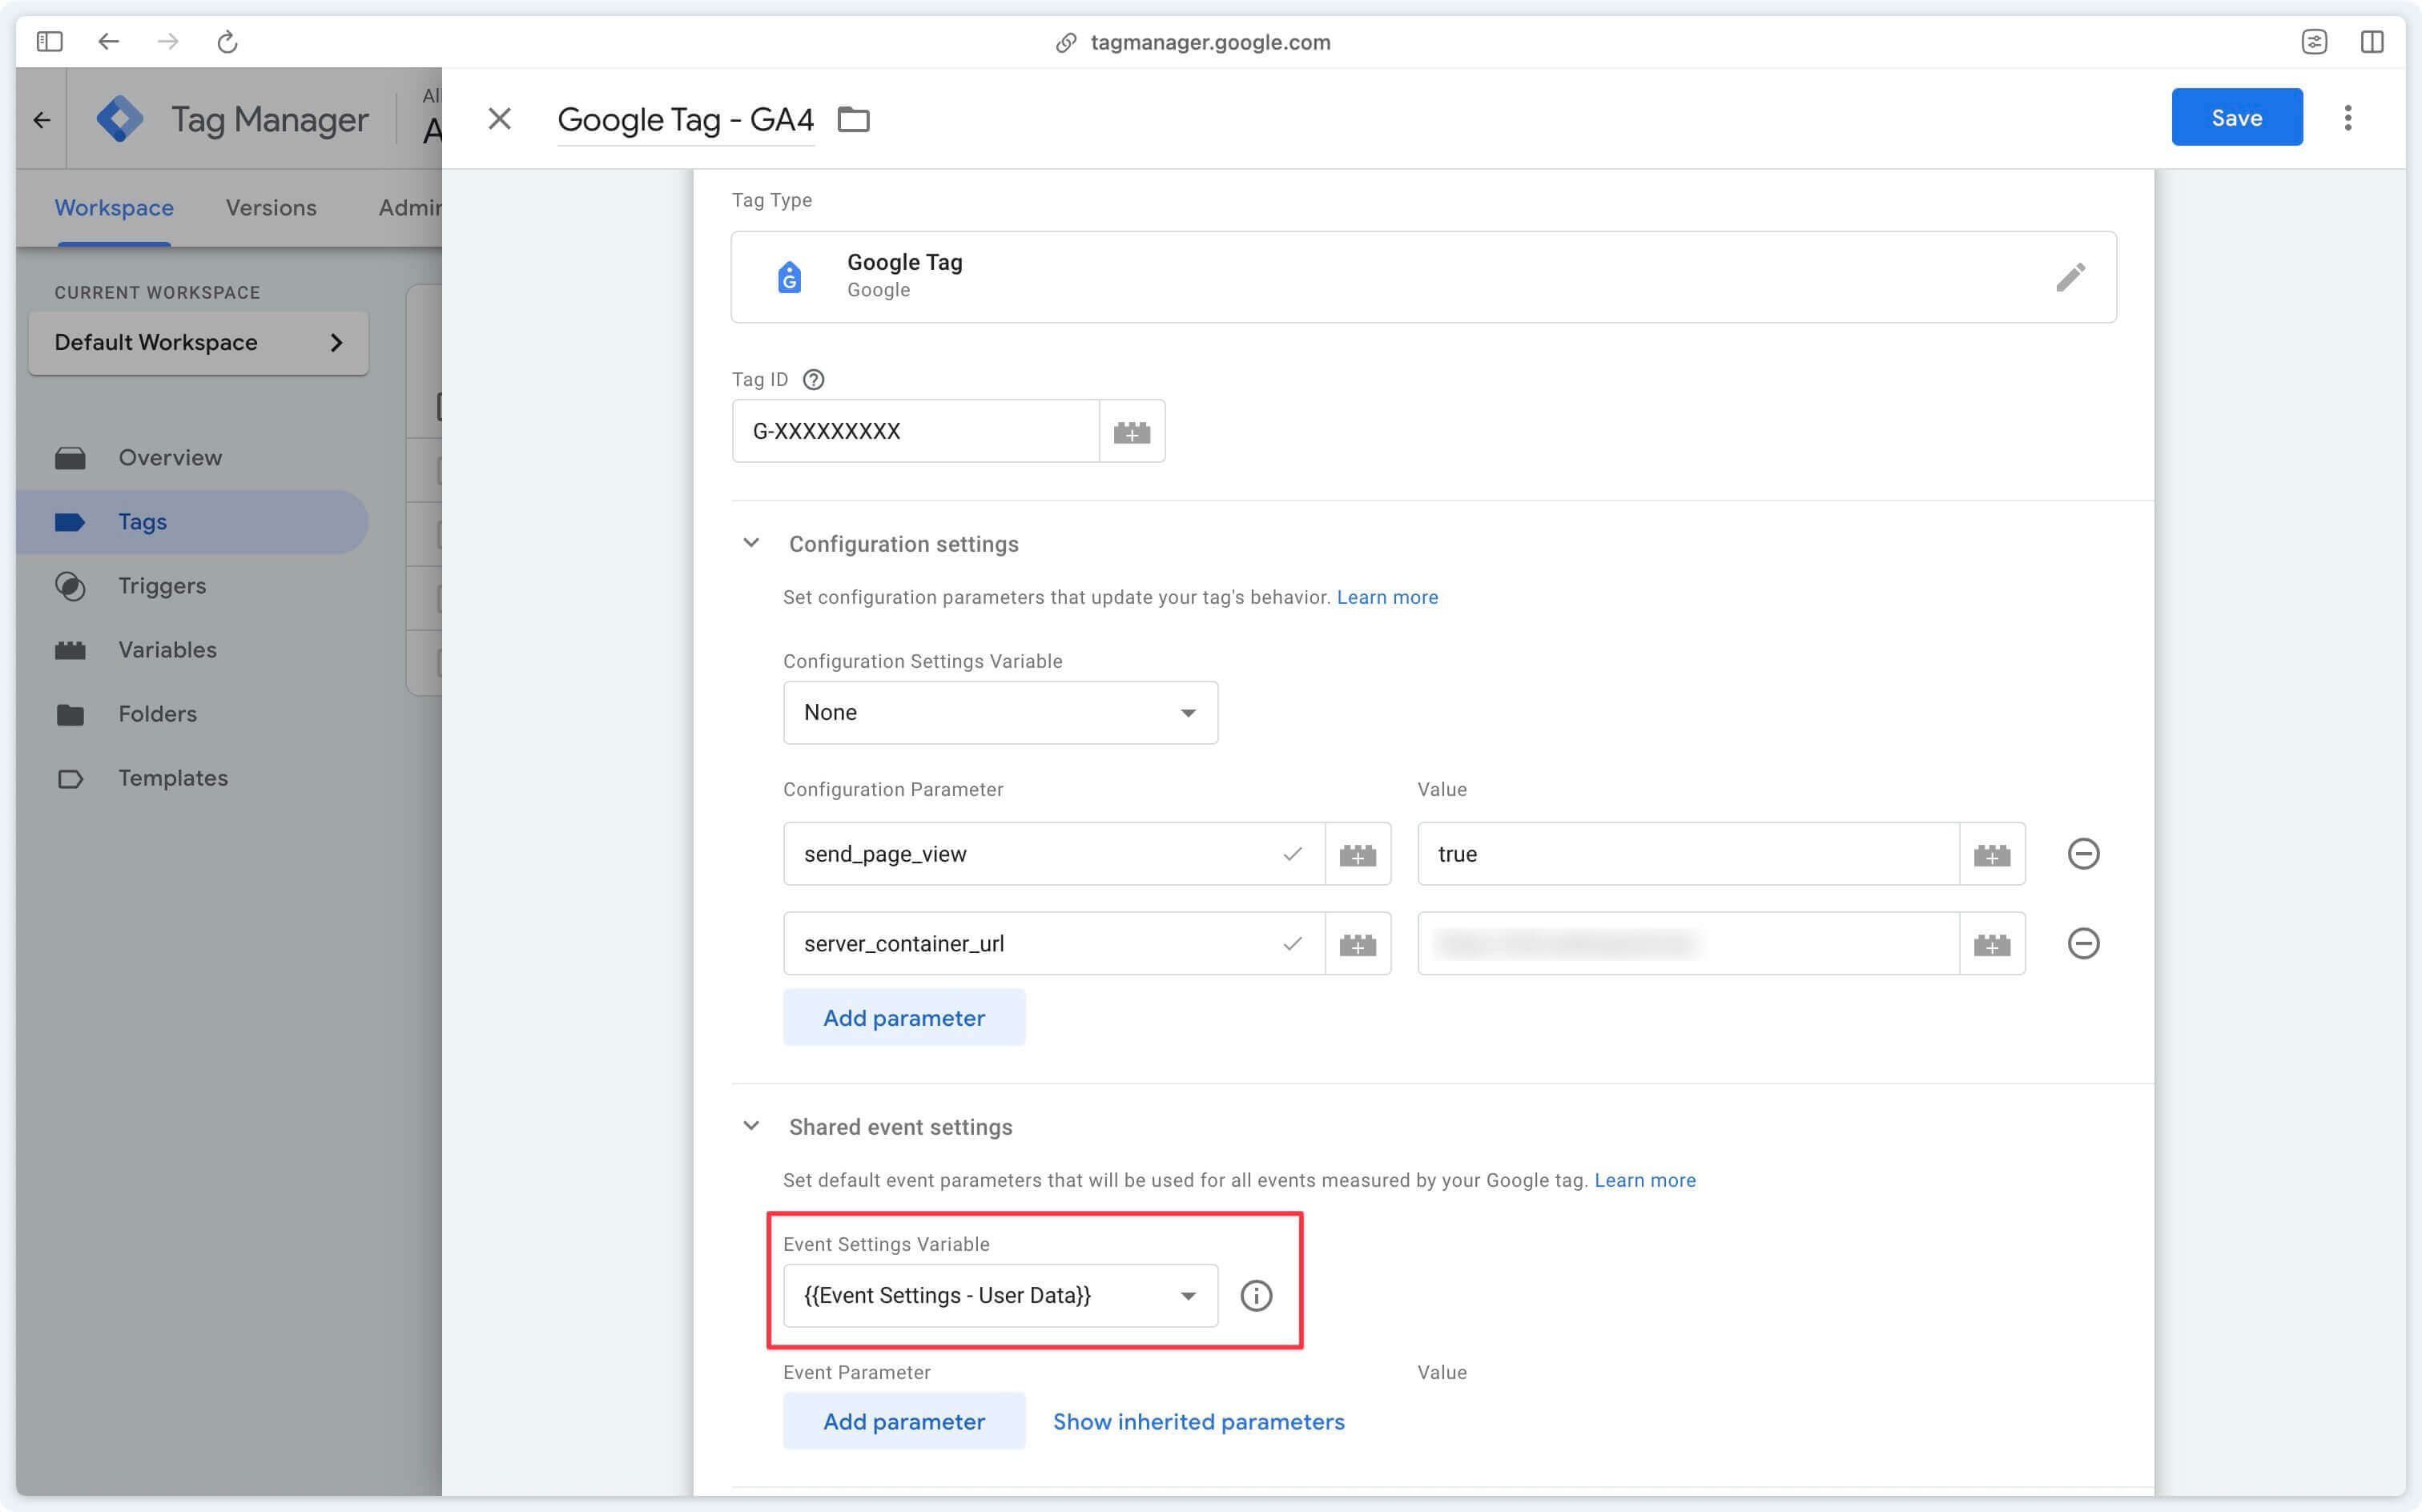
Configure GA4 event tags
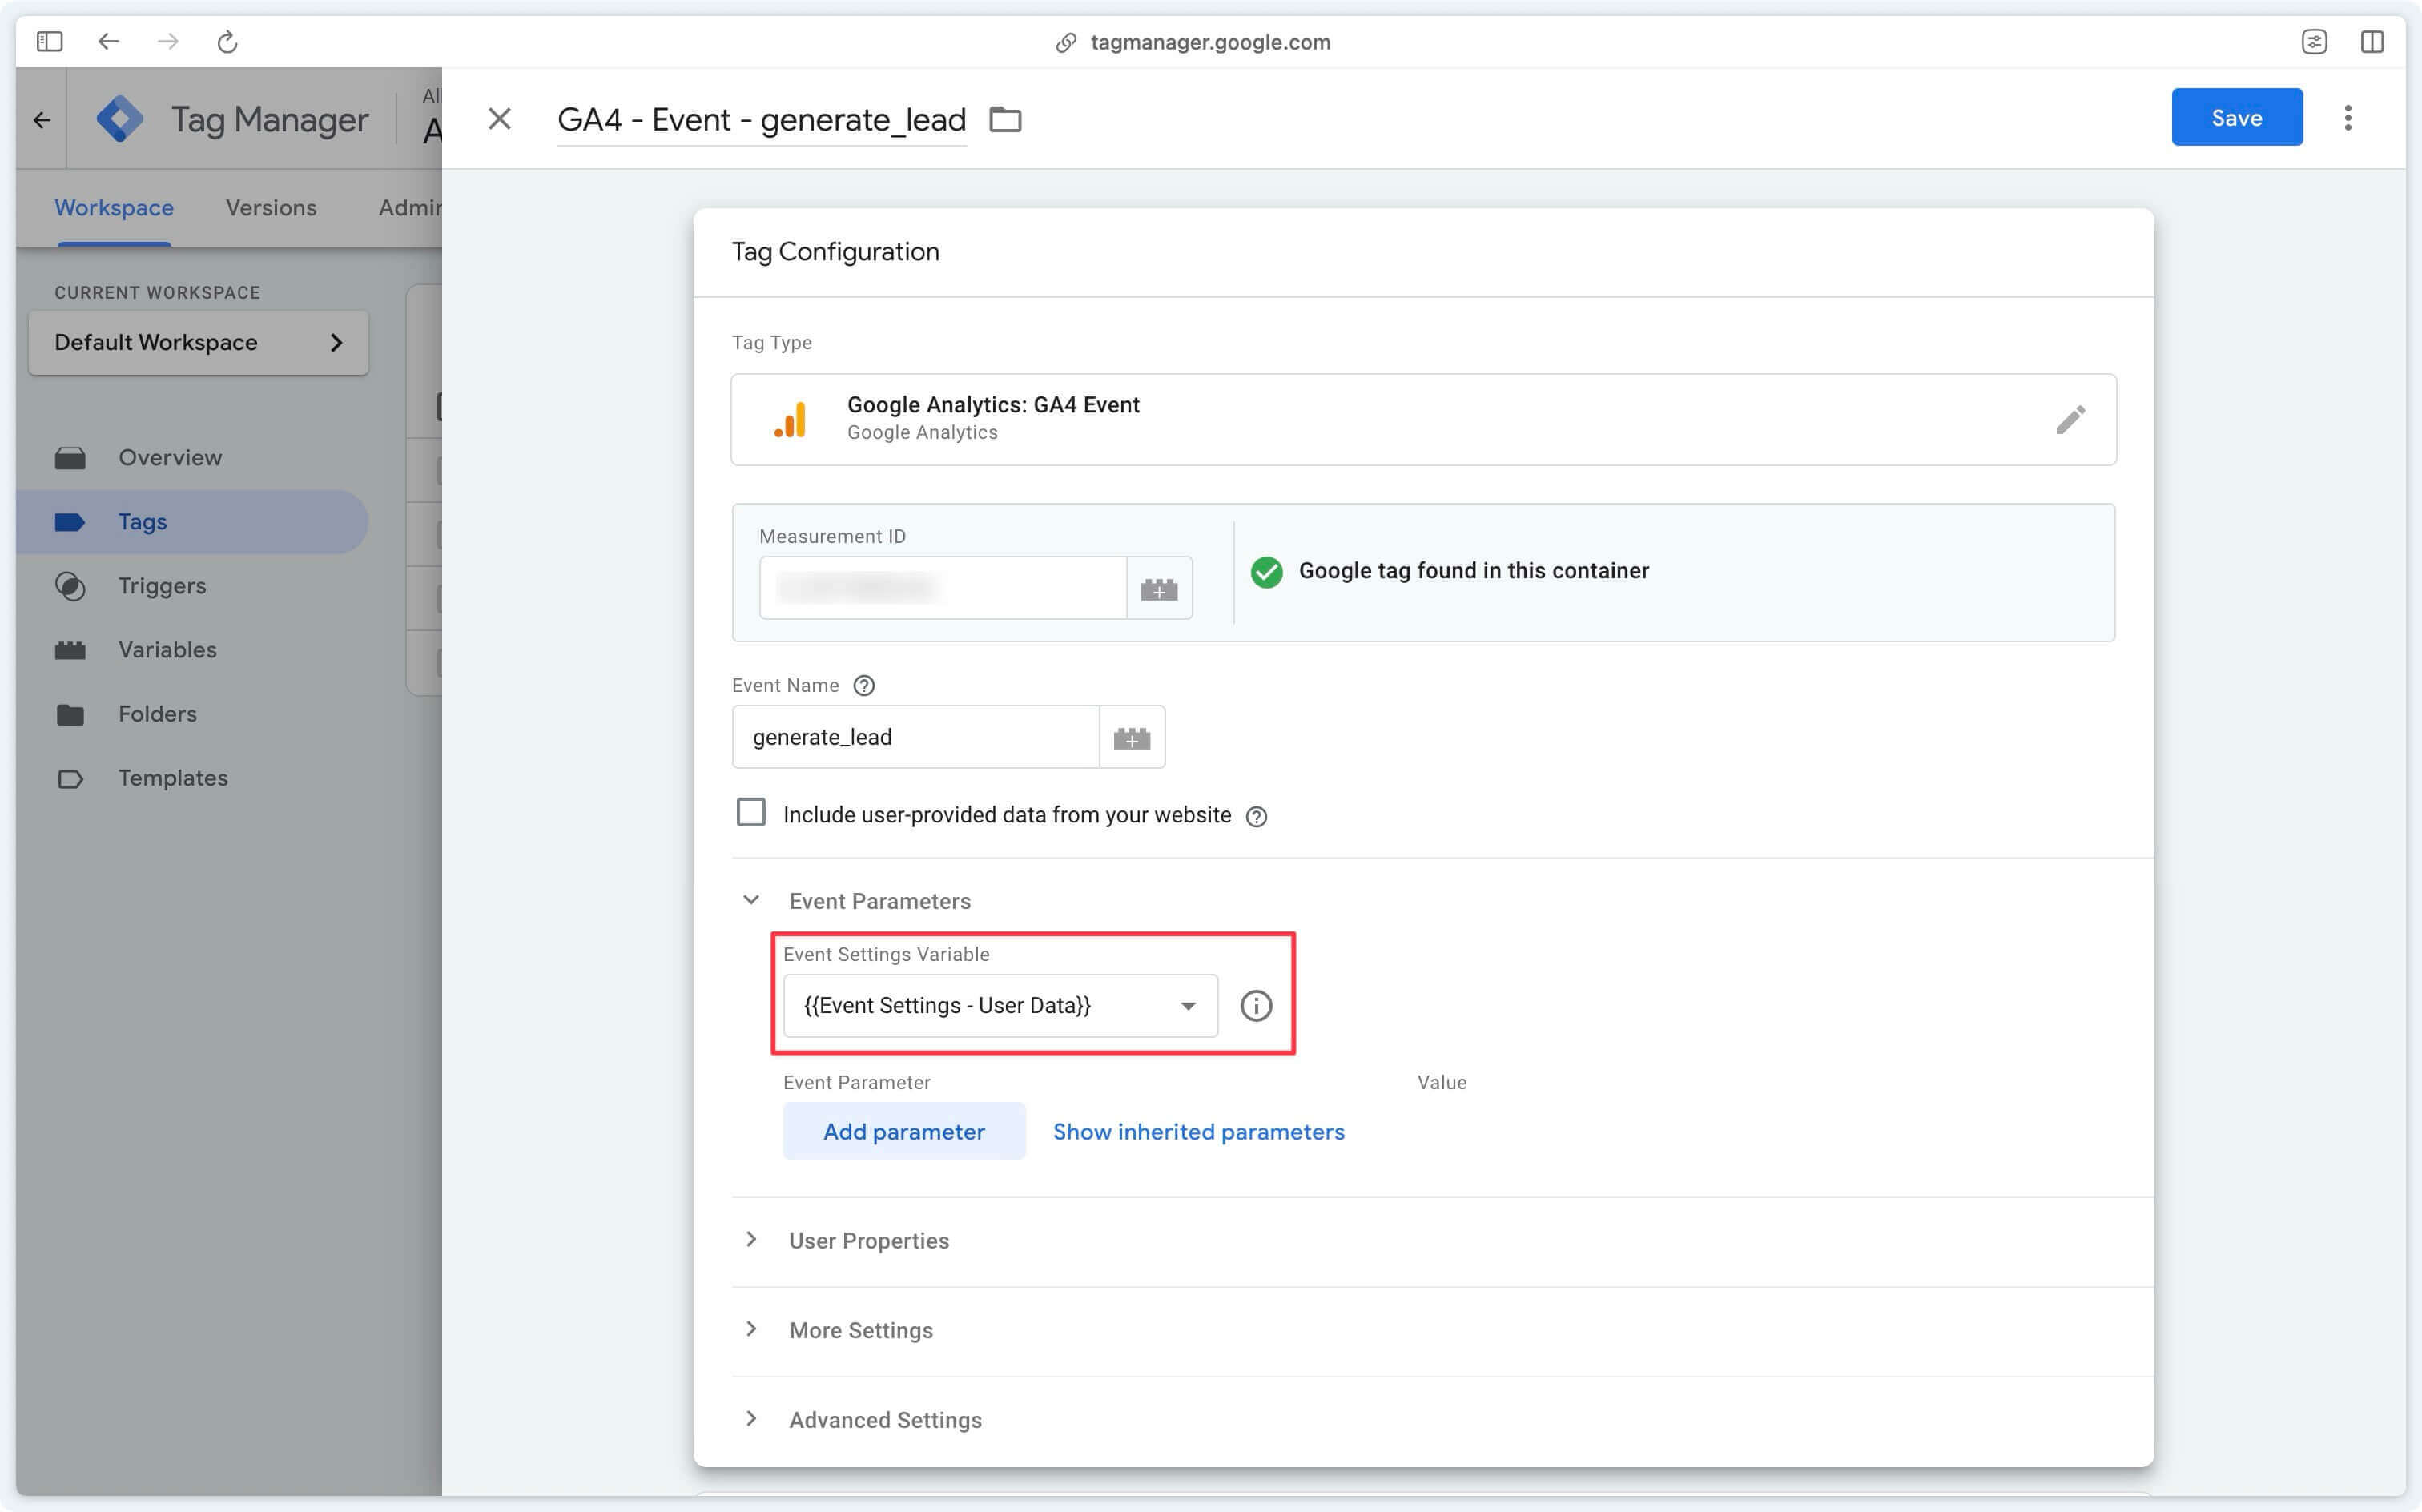
In your GA4 event tags, you can add the previously created variable.
If you wish to send user data only on certain events, add the variable only in the relevant GA4 event tags.
Option 2: User-Provided Data variable
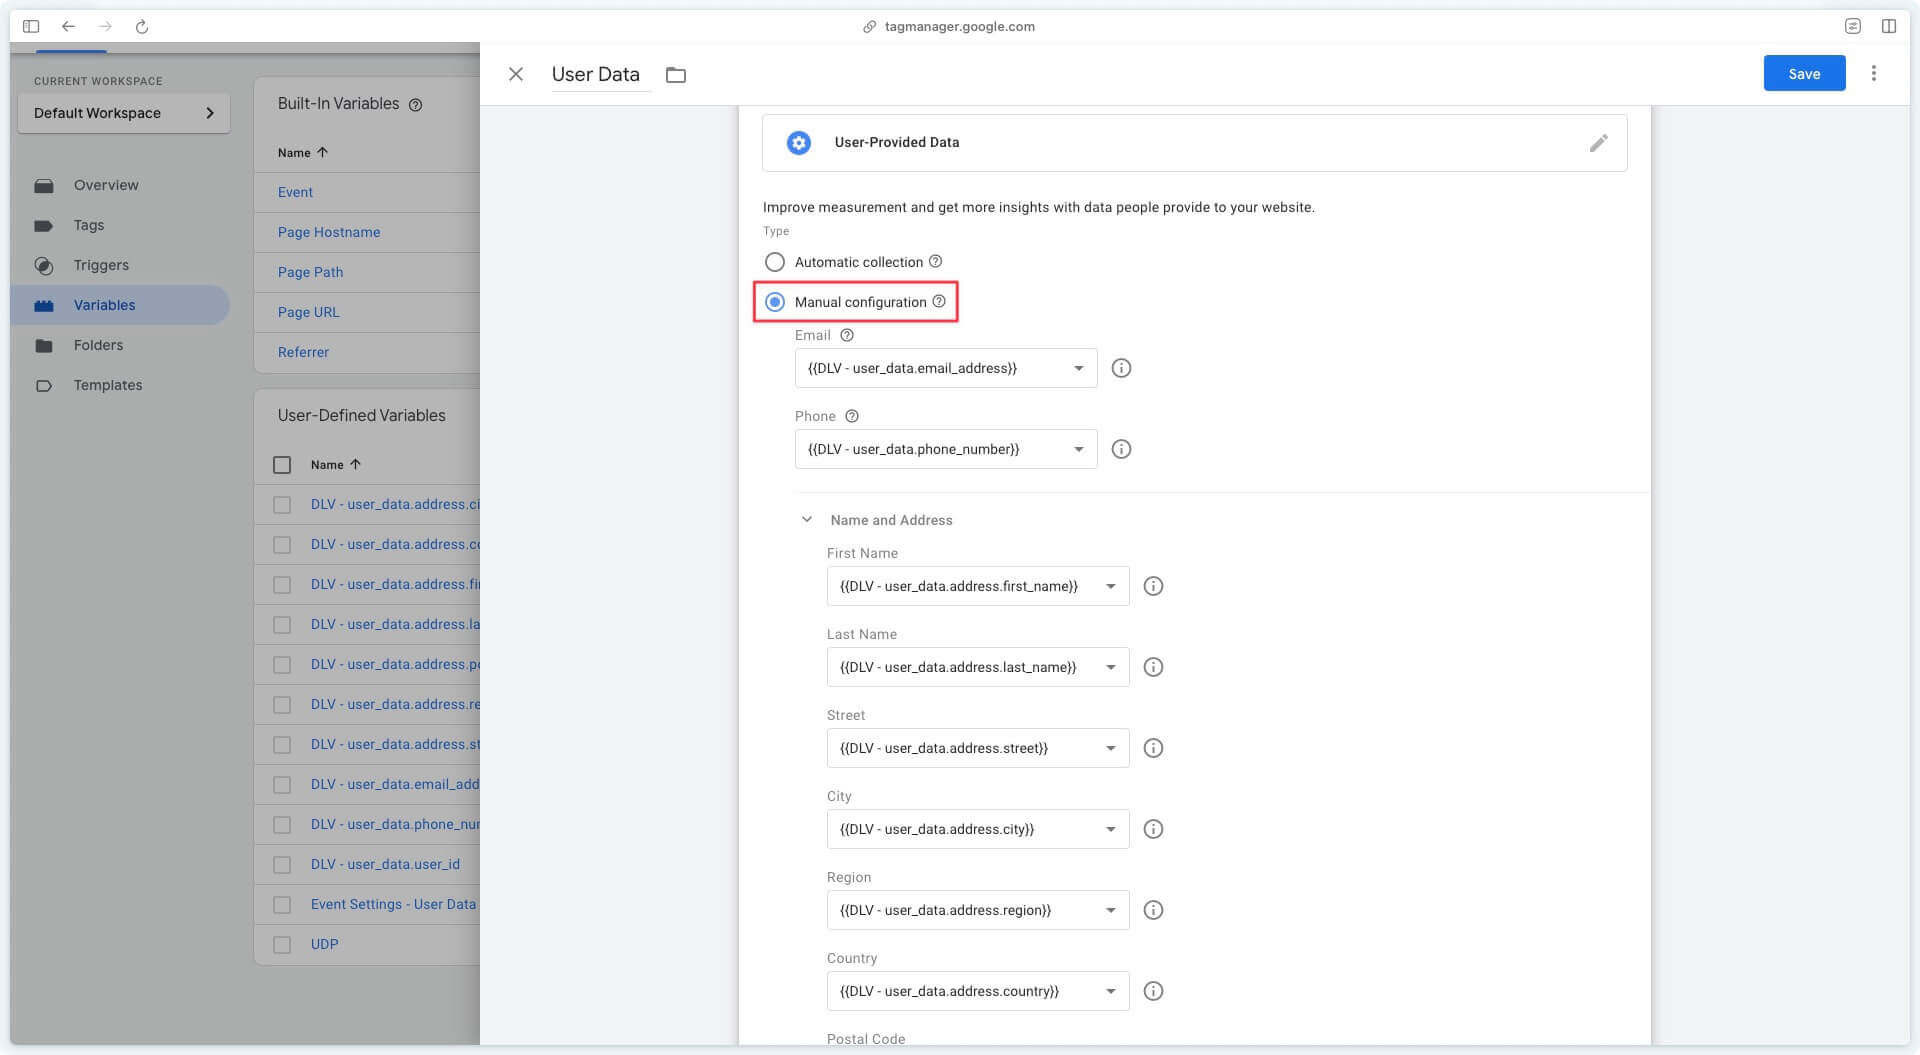
Create a User-Provided Data variable
The first step is to create a User-Provided Data variable that will retrieve the data available in the Data Layer.
Configure GA4 event tags
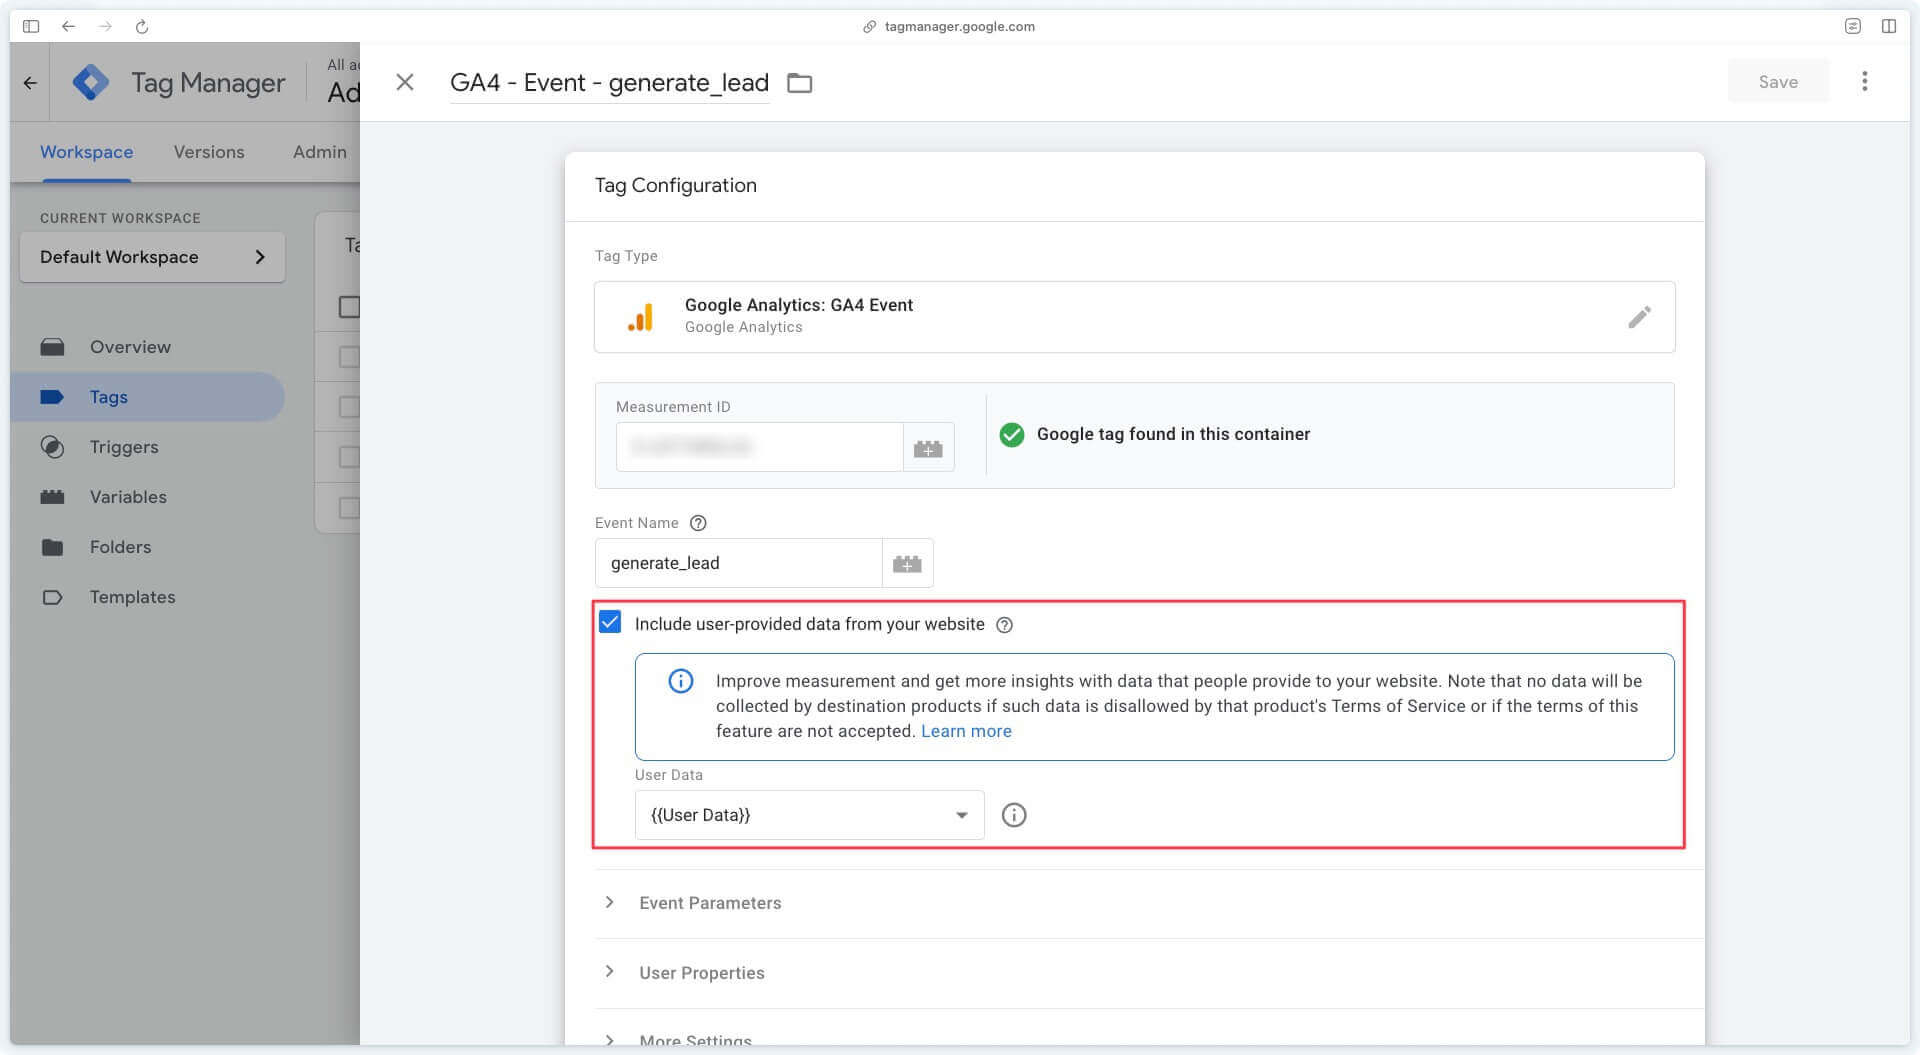
To send user data with the User-Provided Data variable, you need to check the Include user-provided data from your website checkbox in the GA4 event tags.
If you wish to send user data only on certain events, check the checkbox only in the relevant GA4 event tags.
Configure server-side tags
For most server-side tags, whether you’ve chosen option 1 or option 2, user data will be retrieved automatically and sent to the various platforms if you’ve complied with the standard discussed in this documentation.
Find out more about user data by ad platform in the following sections:
Check received data
Check reception from GTM Server
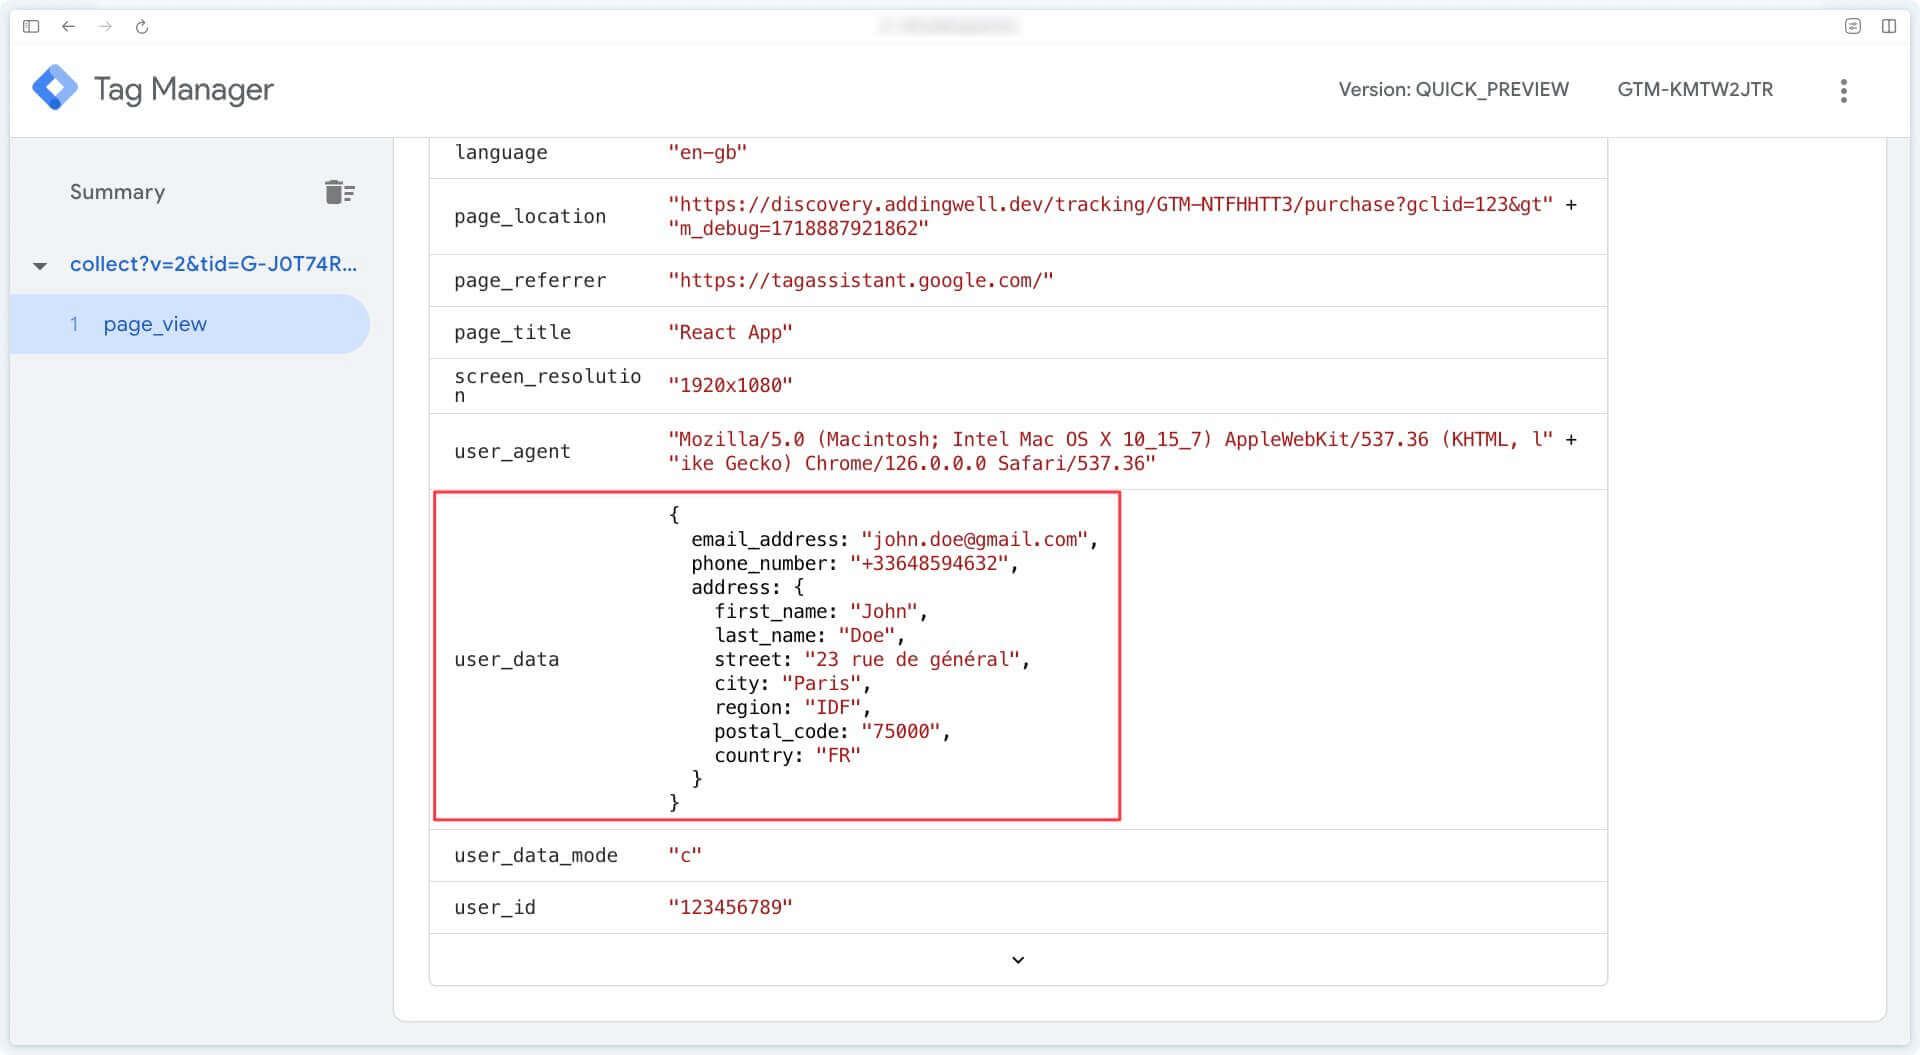
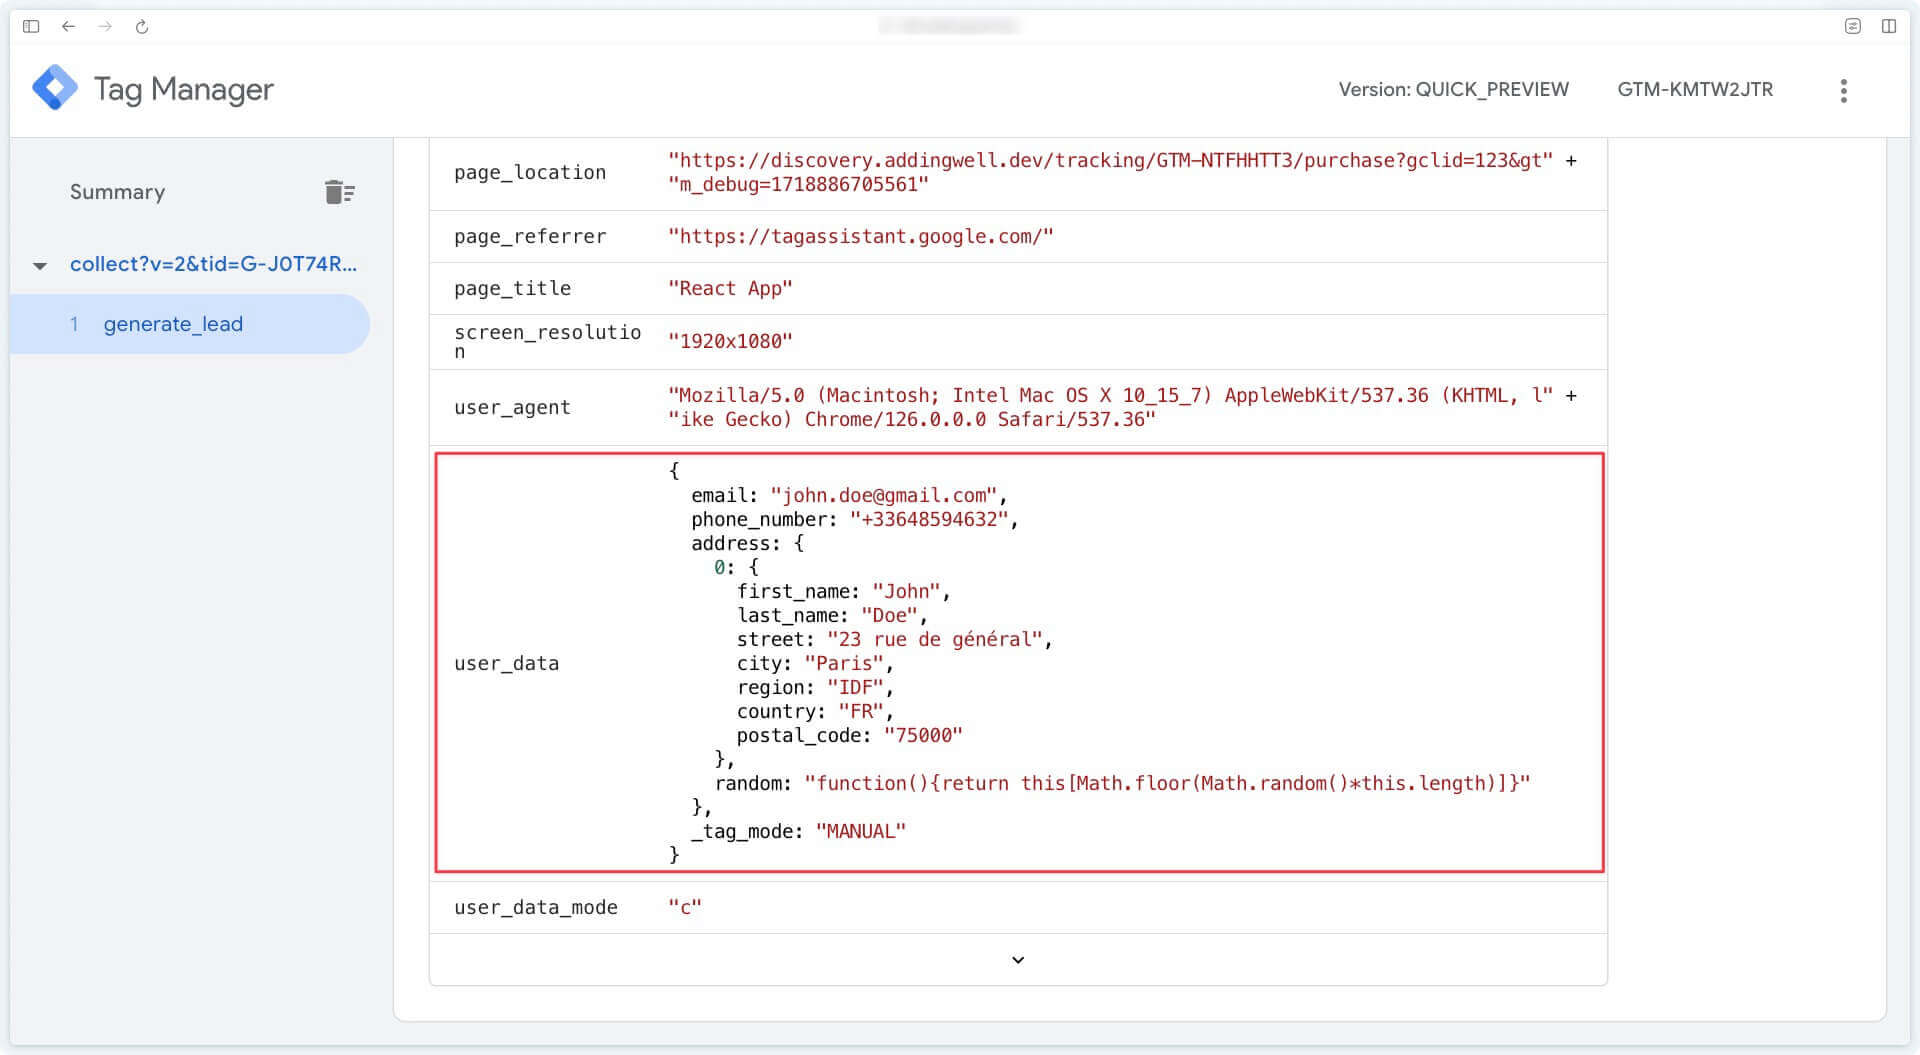
When receiving server-side events, you can check in the preview that the event data contains the user_data parameter.
In the GTM Server preview, go to the Event data tab.
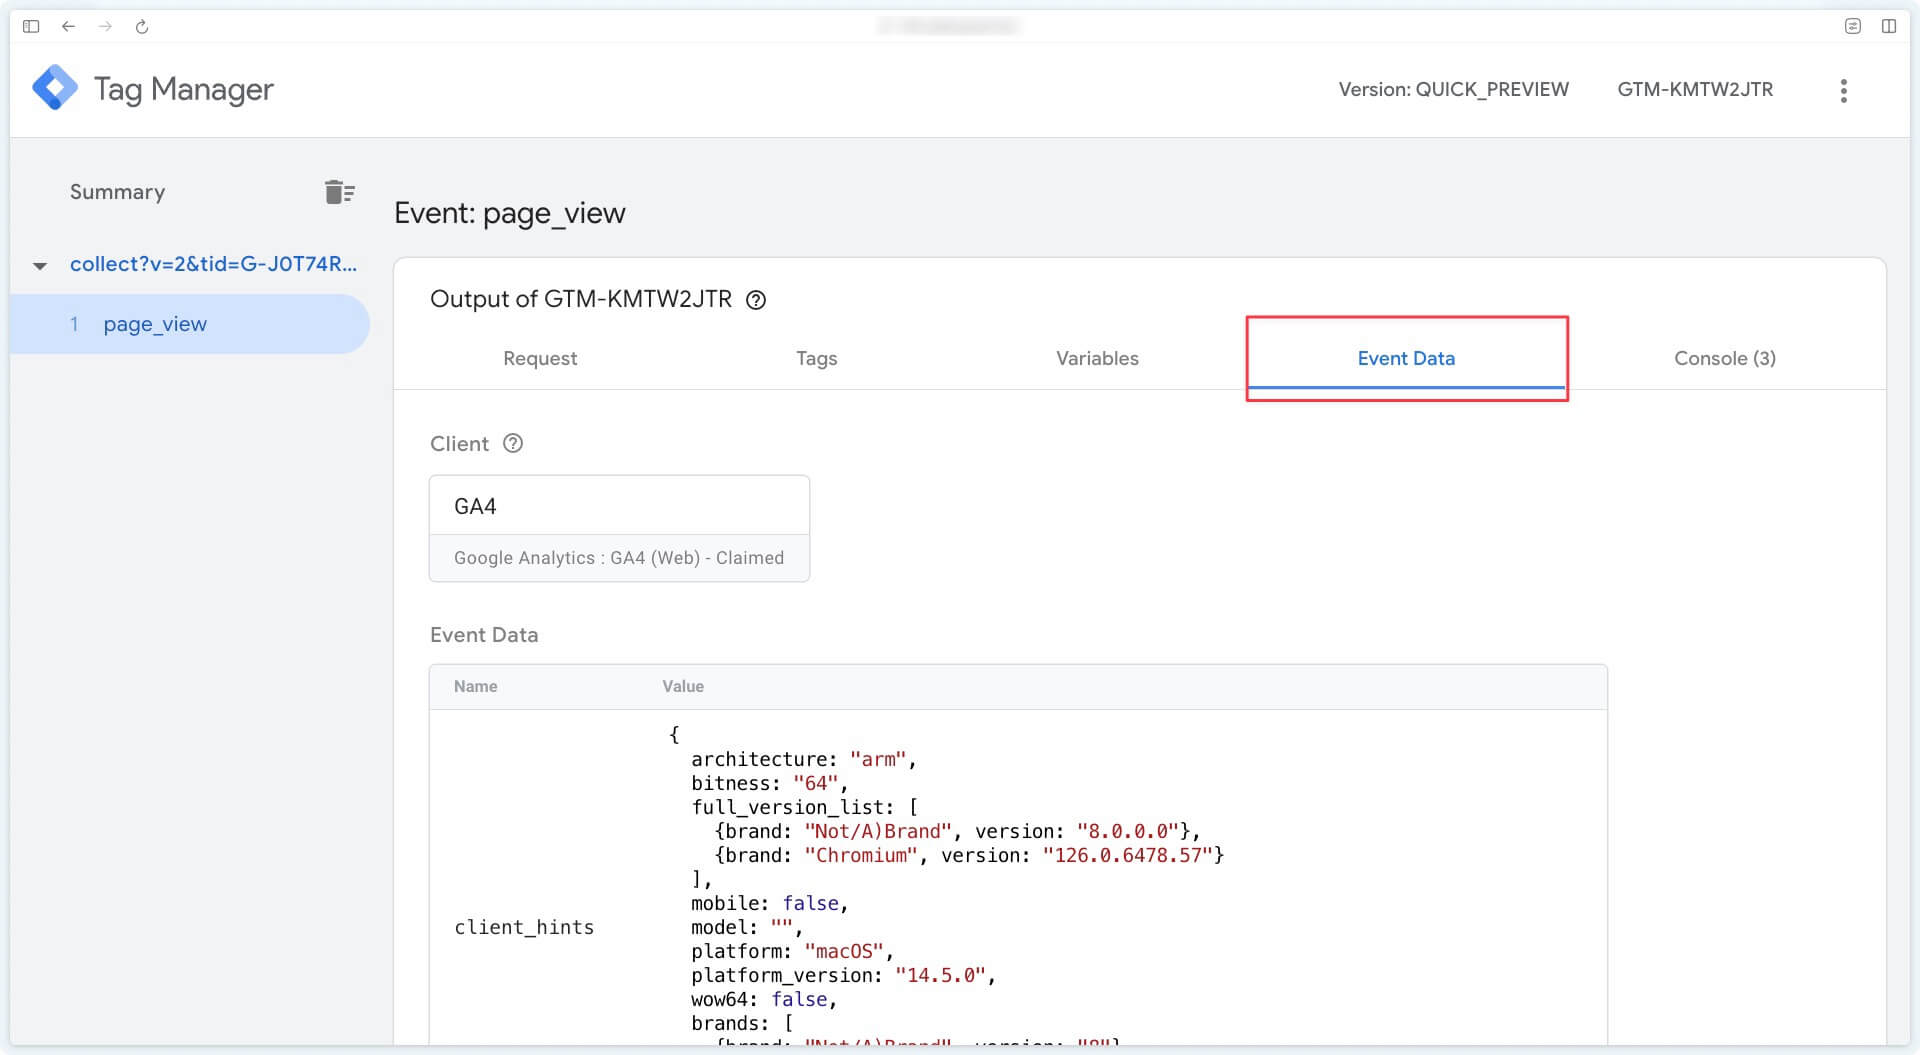
The parameters are listed in alphabetical order, so you’ll have to scroll down the page a little to see the user_data parameter appear.
Option 1: Event parameters
Option 2: User-Provided Data variable
Checking from Addingwell’s Events Monitoring
In the Events Monitoring section of your Addingwell interface, you’ll find several key insights to ensure your user data collection aligns with your business needs and legal requirements.
Parameters sent in your events
In Events Monitoring, you can view all the parameters attached to the events hitting your server. This is an opportunity to verify whether the data received matches what you intended to send — especially regarding user data.
If you notice that you’re sending too much data, or not enough, you can adjust your GTM Web configuration accordingly.
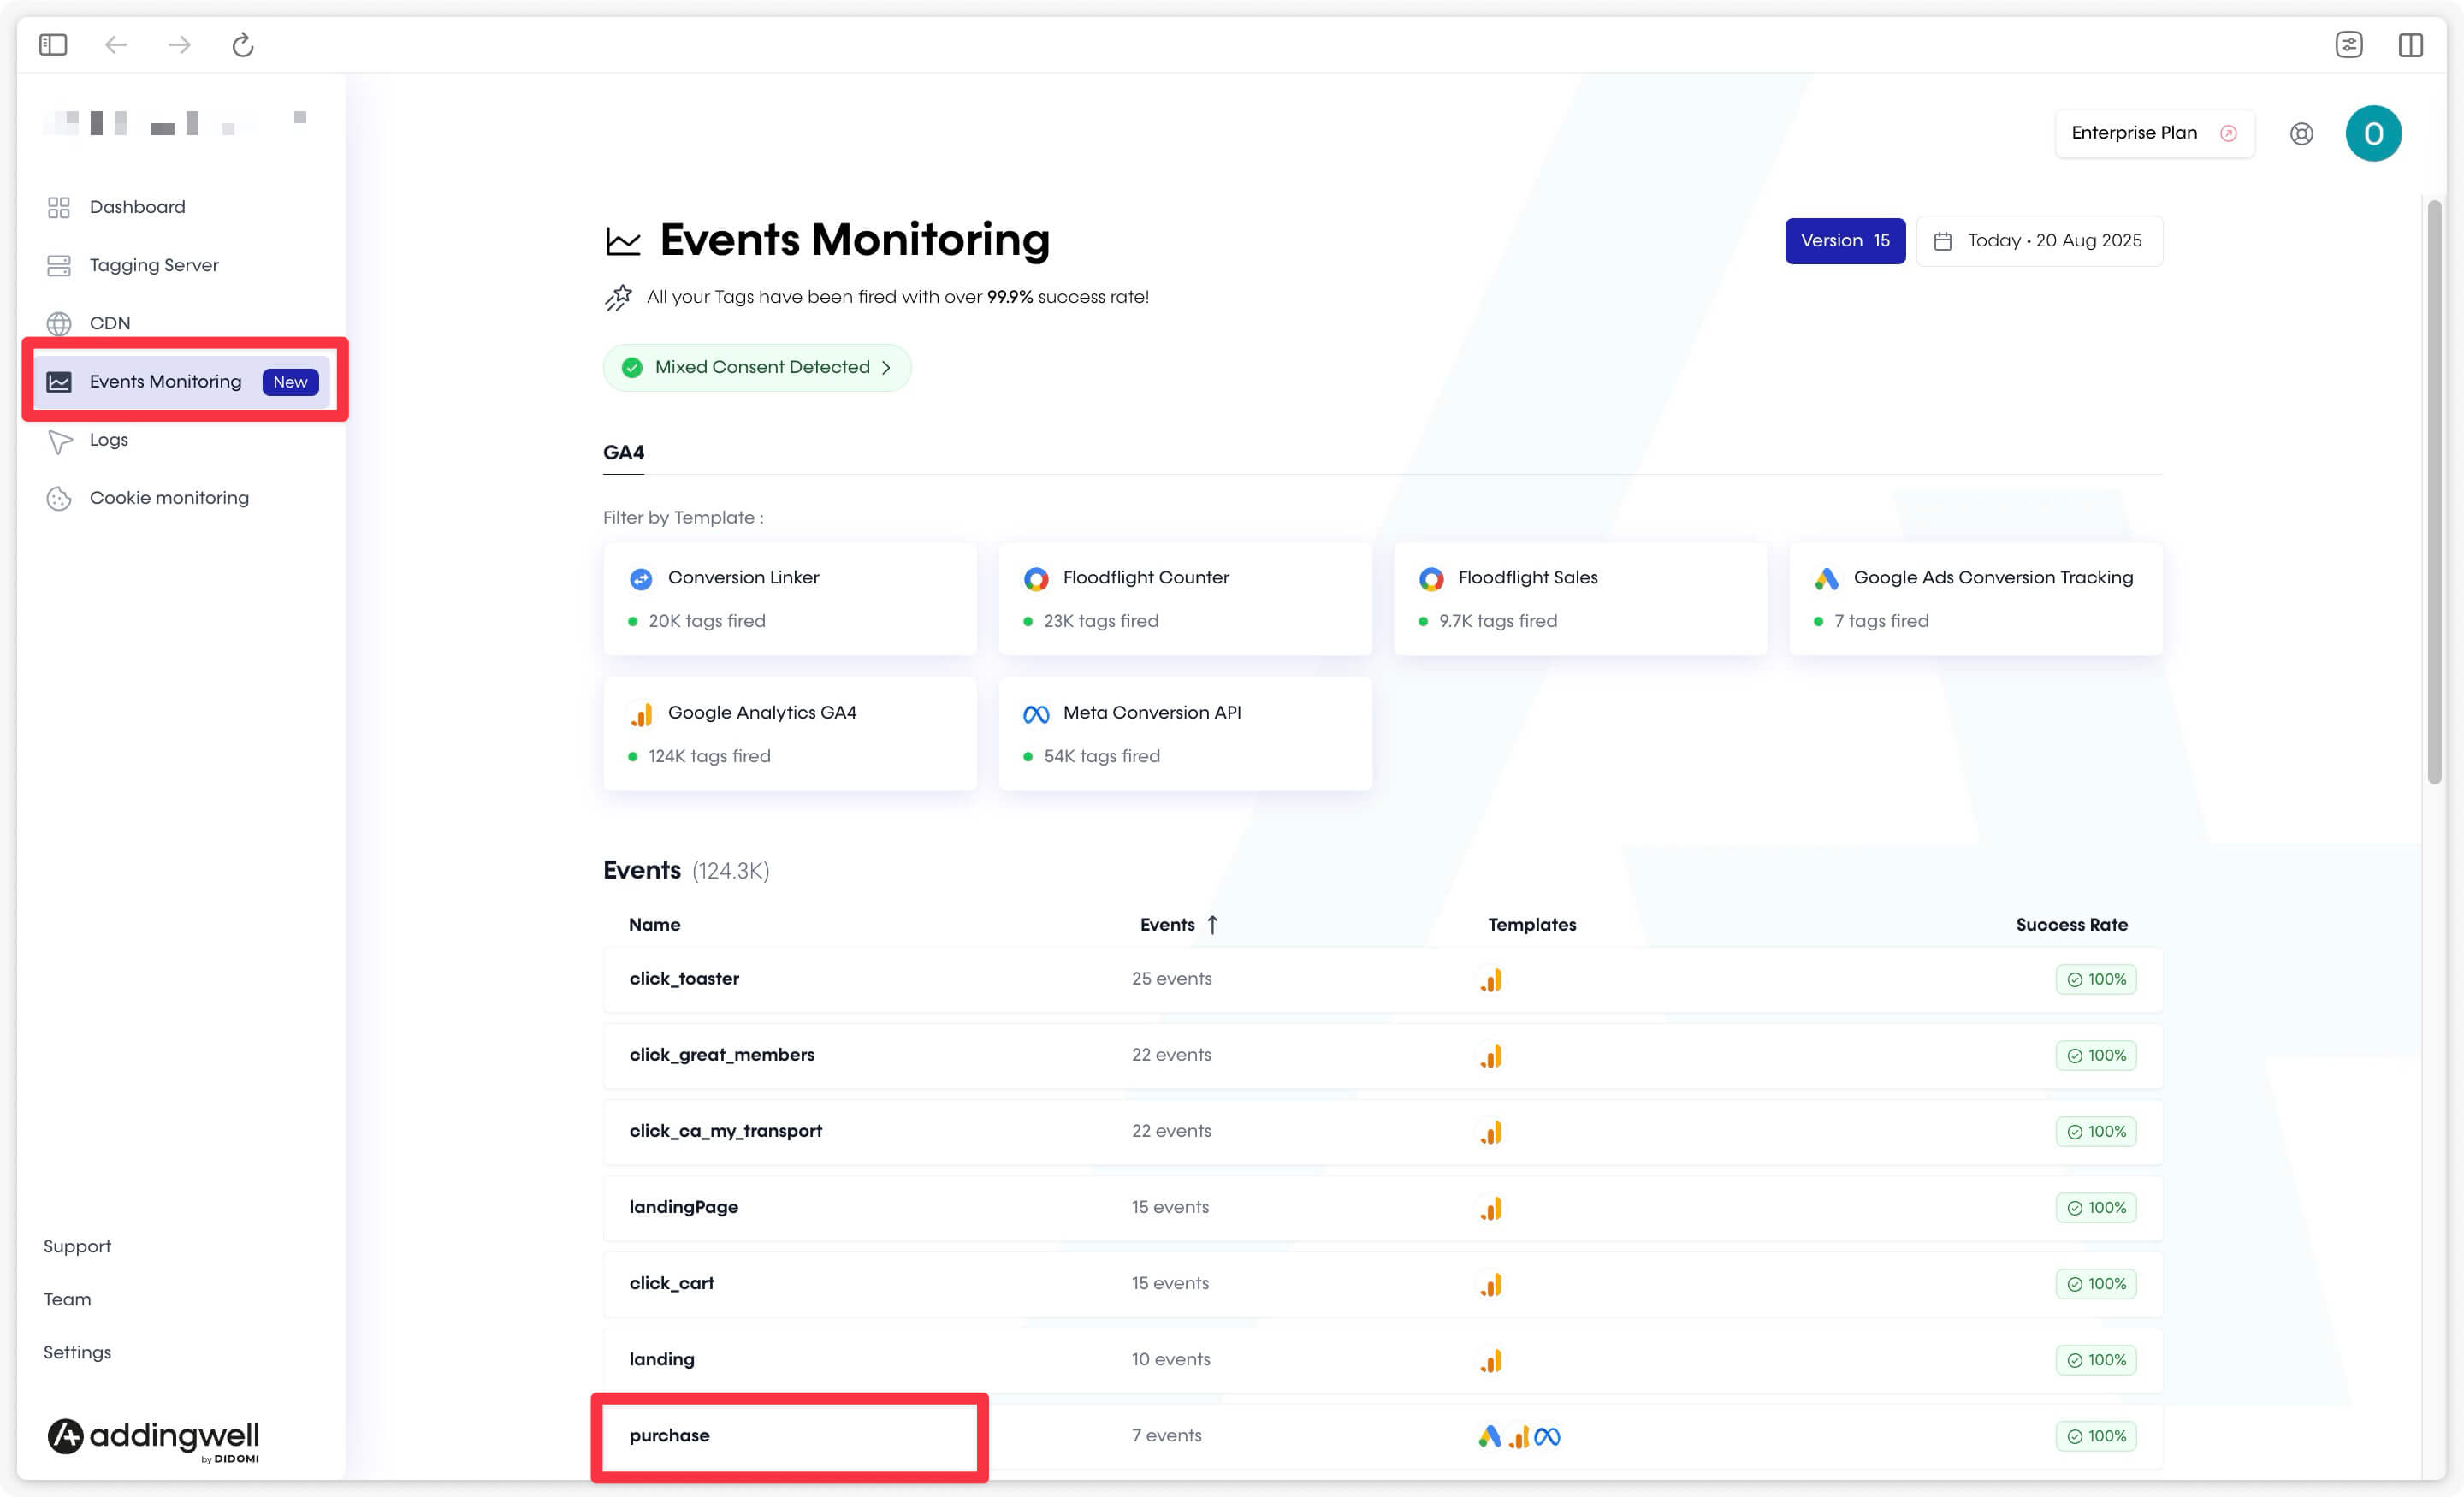
Start by clicking on Events Monitoring in Addingwell.
Then, select the event for which you’d like to check whether user data is correctly received. In our example, we’ll check the data sent with the purchase event by clicking on the event name.
User data within the event parameters
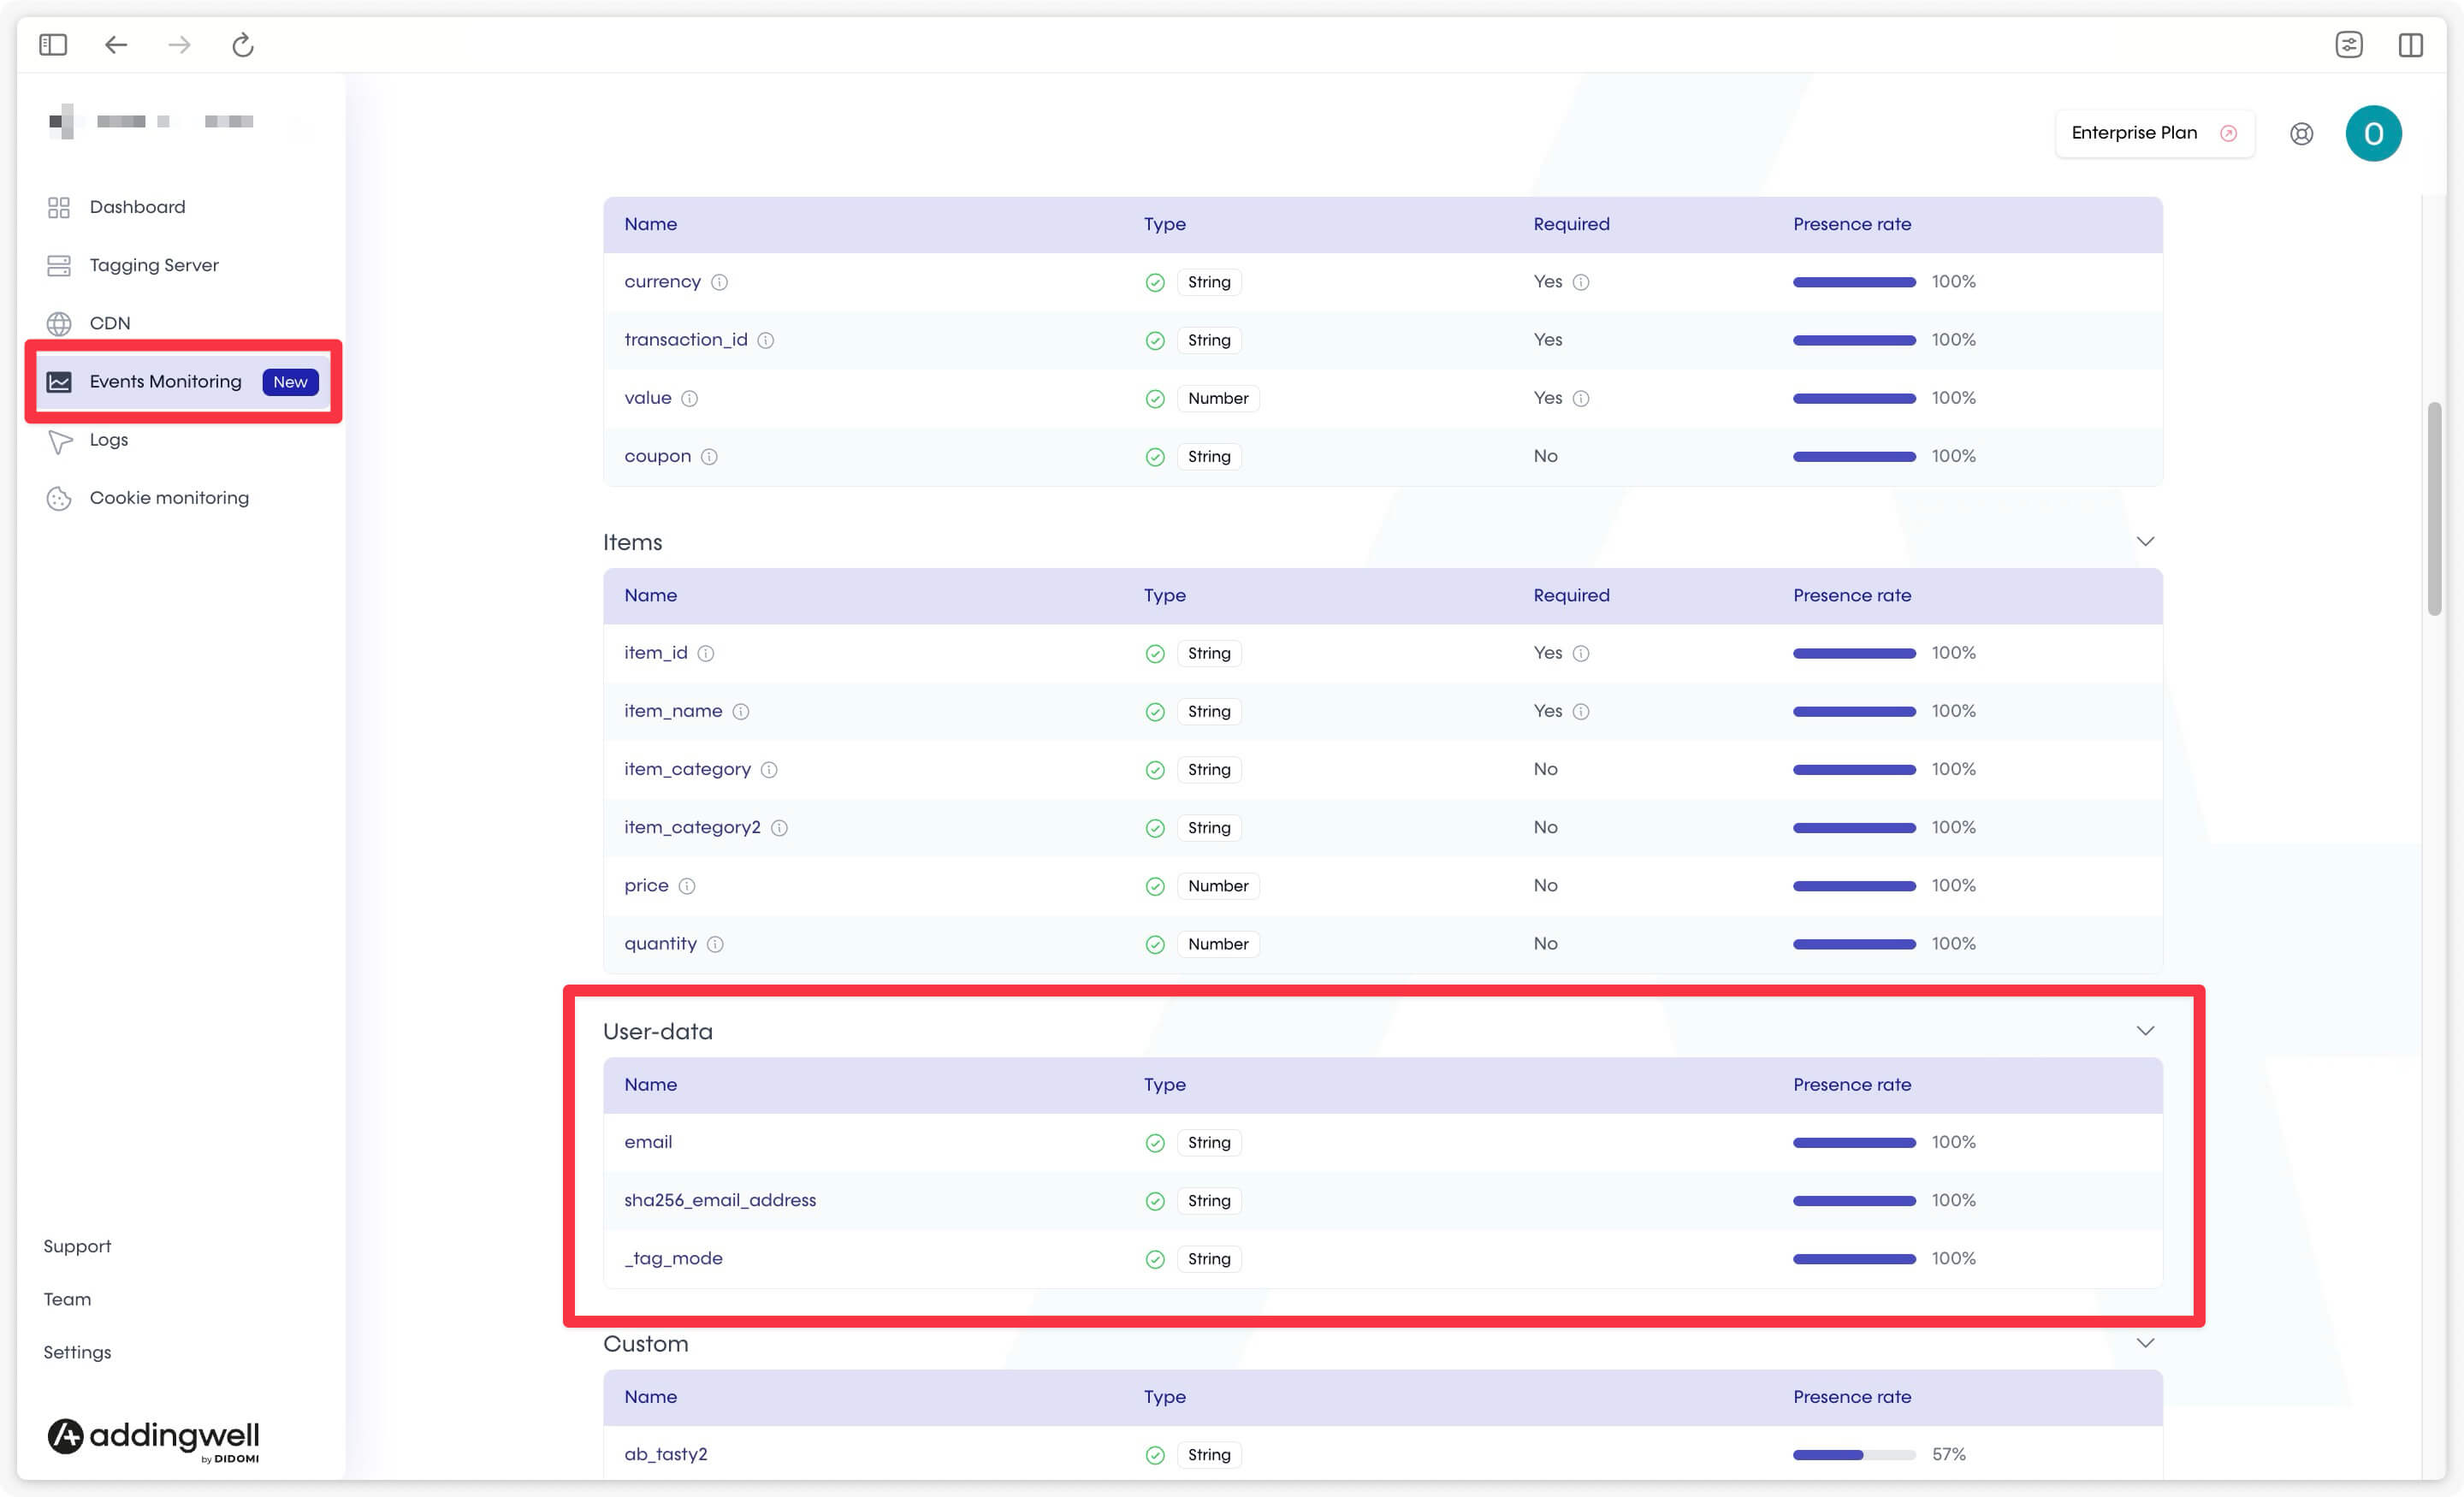
After clicking on the purchase event, all parameters received server-side for that event will appear. If you correctly formatted your user data in your GTM Web, they will be grouped in a dedicated section: User-Data.
That is the case with our purchase event — here we can see the list of associated user data, including user_data.sha256_email_address.
Presence rate of user data
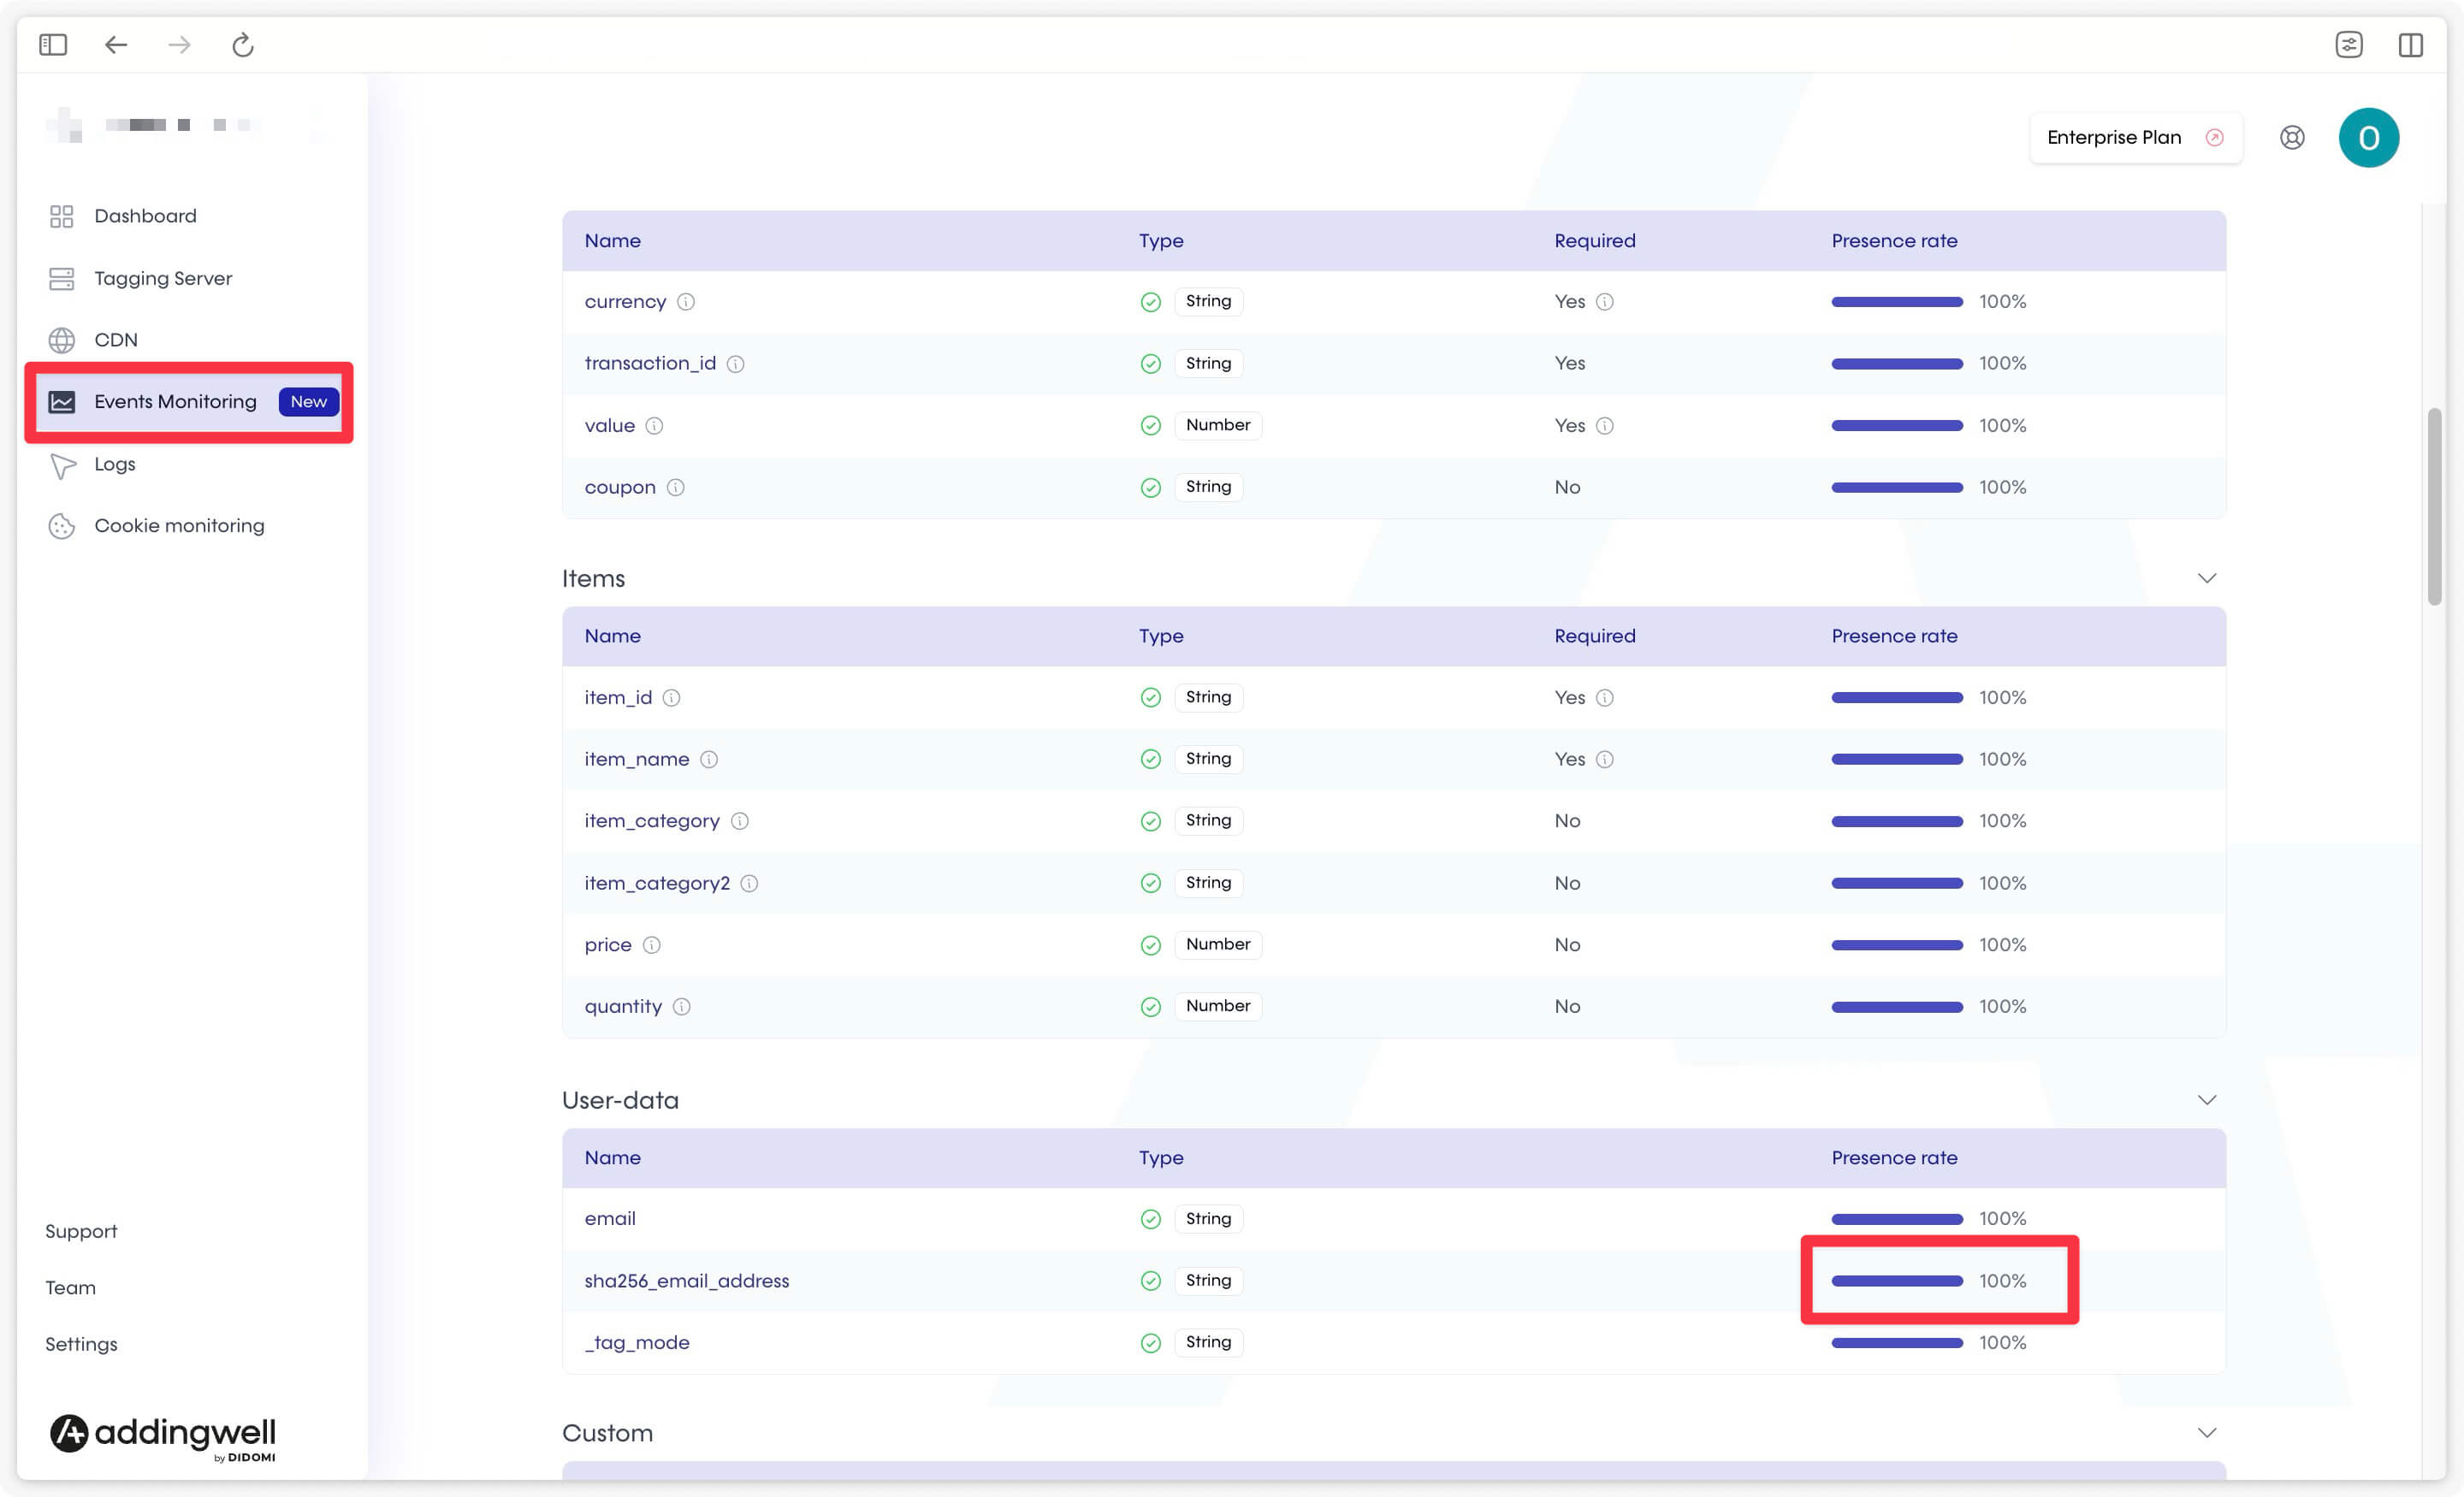
For each user data field, you can check its presence rate for a specific event.
In our example, the email address sent through the user_data.sha256_email_address parameter is present in 100% of purchase events received by the server. This is the expected presence rate, since all users are required to provide their email before finalizing a purchase.
However, it’s completely normal for the email address not to appear in 100% of events other than purchase, since the user might not be logged in, or hasn’t yet provided their email prior to completing the purchase process.
Note that this check looks at whether the parameter is present in the GA4 event request — independently of whether a value is actually attached to it.
Congratulations
Congratulations, you’ve now sent user data to your server and you know how to monitor it.