Offline Google Ads & GA4 conversions with Data Manager API
What is Data Manager API?
Data Manager API is a unified API created by Google to help advertisers connect and leverage their first-party data (CRM, point of sale, internal database, etc.) across all of Google’s advertising products (Google Ads and Google Analytics 4).
In practice, it lets you send conversion events server-to-server, directly to Google’s servers, without depending on browser restrictions.
Since October 2025, Data Manager API is available for all Google Ads accounts.
What you’ll do in this tutorial
Here are the 6 main steps you’ll follow to set up Data Manager API from your GTM Server container:
- Authentication: add the Addingwell service account to Google Ads
- Import the tag: import the Addingwell Data Manager API Conversions template into GTM Server
- Configure the tag: set up the Google Ads and/or GA4 destinations
- Measurement Protocol client: receive the offline requests on the server side
- Trigger: fire the tag on the right client/event
- Verify the data: check that the data comes through in GTM Server and in Google Ads/GA4
Why use Data Manager API for your conversions?
Sending conversions via Data Manager API offers several major benefits that complement your traditional collection:
- More reliable and more complete measurement: by using a server-to-server API connection, you get around browser limitations (ad blockers, cookie restrictions, Safari ITP, etc.) that cause a portion of conversions to be lost.
- Integration of your offline data: you can send Google Ads the conversions that happen off your website (in-store sales, conversions from a CRM, etc.) to get a complete view of your campaigns’ ROI.
- Better attribution thanks to first-party data: by sending hashed first-party identifiers (email, phone, address) in addition to the GCLID, Google can reconcile the conversion even when the original click is no longer available (Enhanced Conversions for Leads).
- Faster campaign optimization: the higher the volume and quality of the conversion signals sent to Google Ads, the more material the bidding algorithms have to optimize your bids.
- Privacy compliance: personal data (PII) is hashed (SHA-256) before being sent, and the server-side architecture gives you full control over what is transmitted to Google.
Use cases
Implementing Data Manager API from your GTM Server container can address 4 main use cases.
1. Send offline conversions to Google Ads
This is the historical use case for Google Ads: you want to track conversions in Google Ads that don’t happen on your website (a phone call that turns into a sale, an order finalized by a sales rep, a purchase in a physical store, etc.).
For this use case, you may currently be using the Google Ads Offline API . Data Manager API is the successor of this API, and we strongly recommend migrating to this new solution.
The principle: your CRM, your point of sale, or your Customer Data Platform (CDP) sends the conversion event to the GTM Server container. The Data Manager API tag then forwards it to Google Ads on a conversion action of type Website (Import from clicks), using either the GCLID (classic Offline Conversion Tracking) or hashed first-party data (Enhanced Conversions for Leads) to match the conversion to the original click.
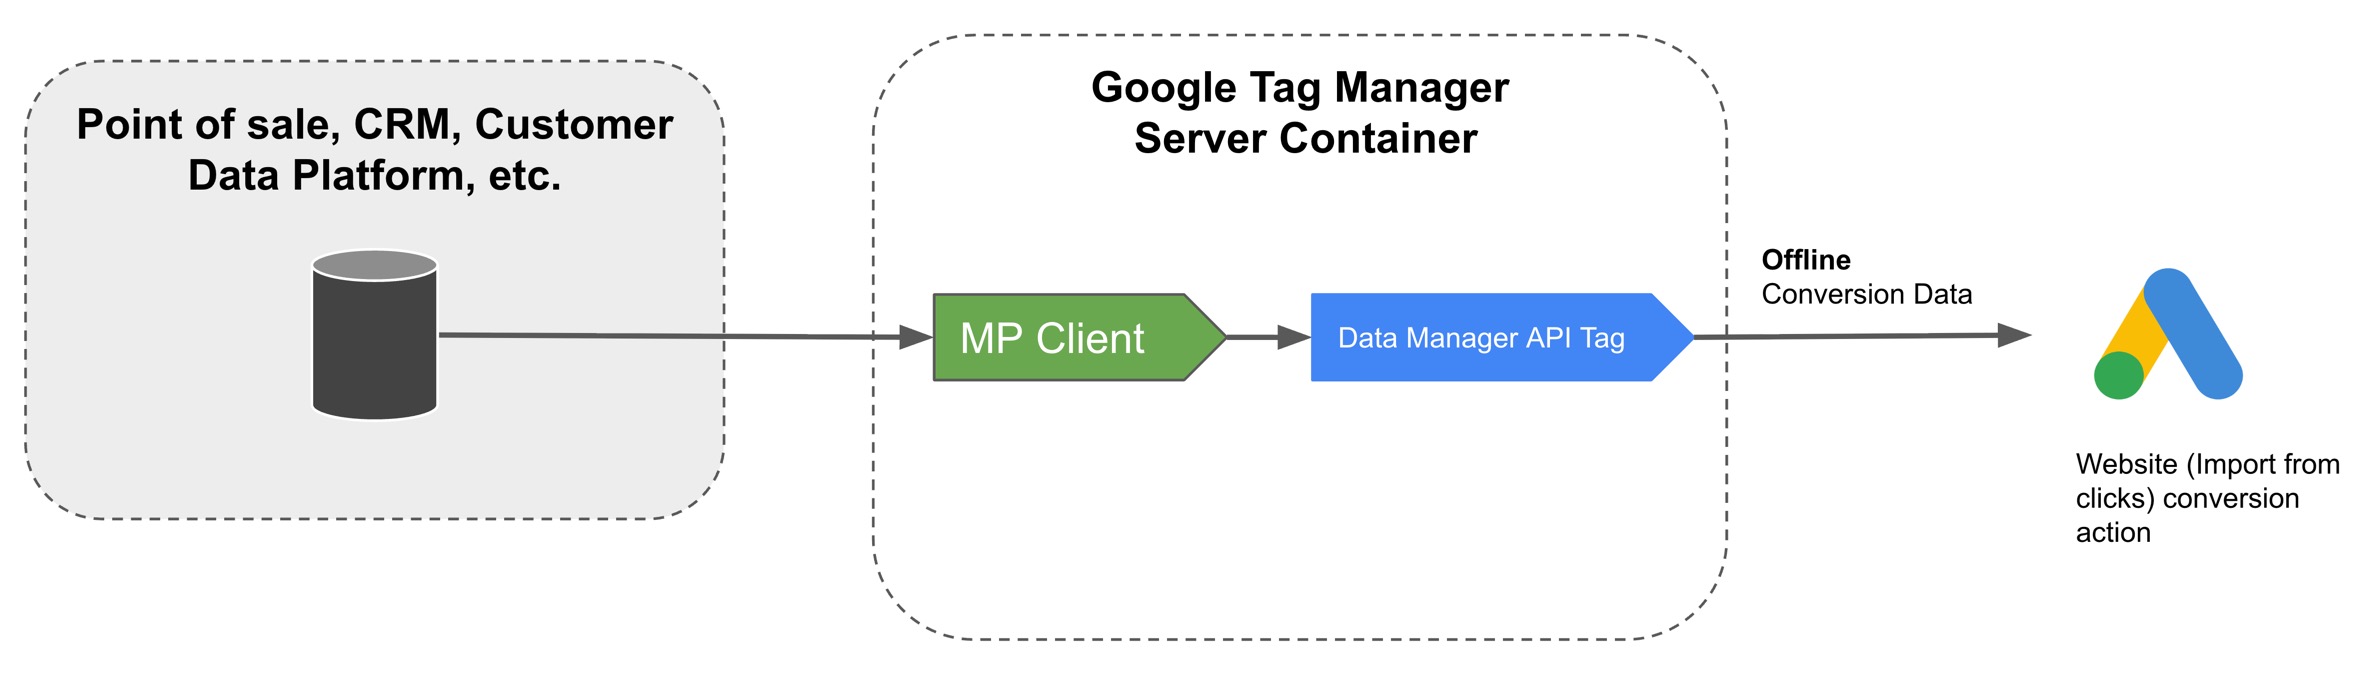
2. Enrich online Google Ads tracking with an additional data source
Data Manager API can also be used as an additional data source for your existing Google Ads tags. The goal is no longer to replace online tracking but to complement it, in order to recover conversions lost on the browser side.
The classic Google Ads tag (fired from the GA4 Client) reports online conversions in real time. In parallel, the Data Manager API tag sends the same conversions from your back-end (when the order is validated in the database, for example). Google then uses the Transaction ID to deduplicate the two flows.
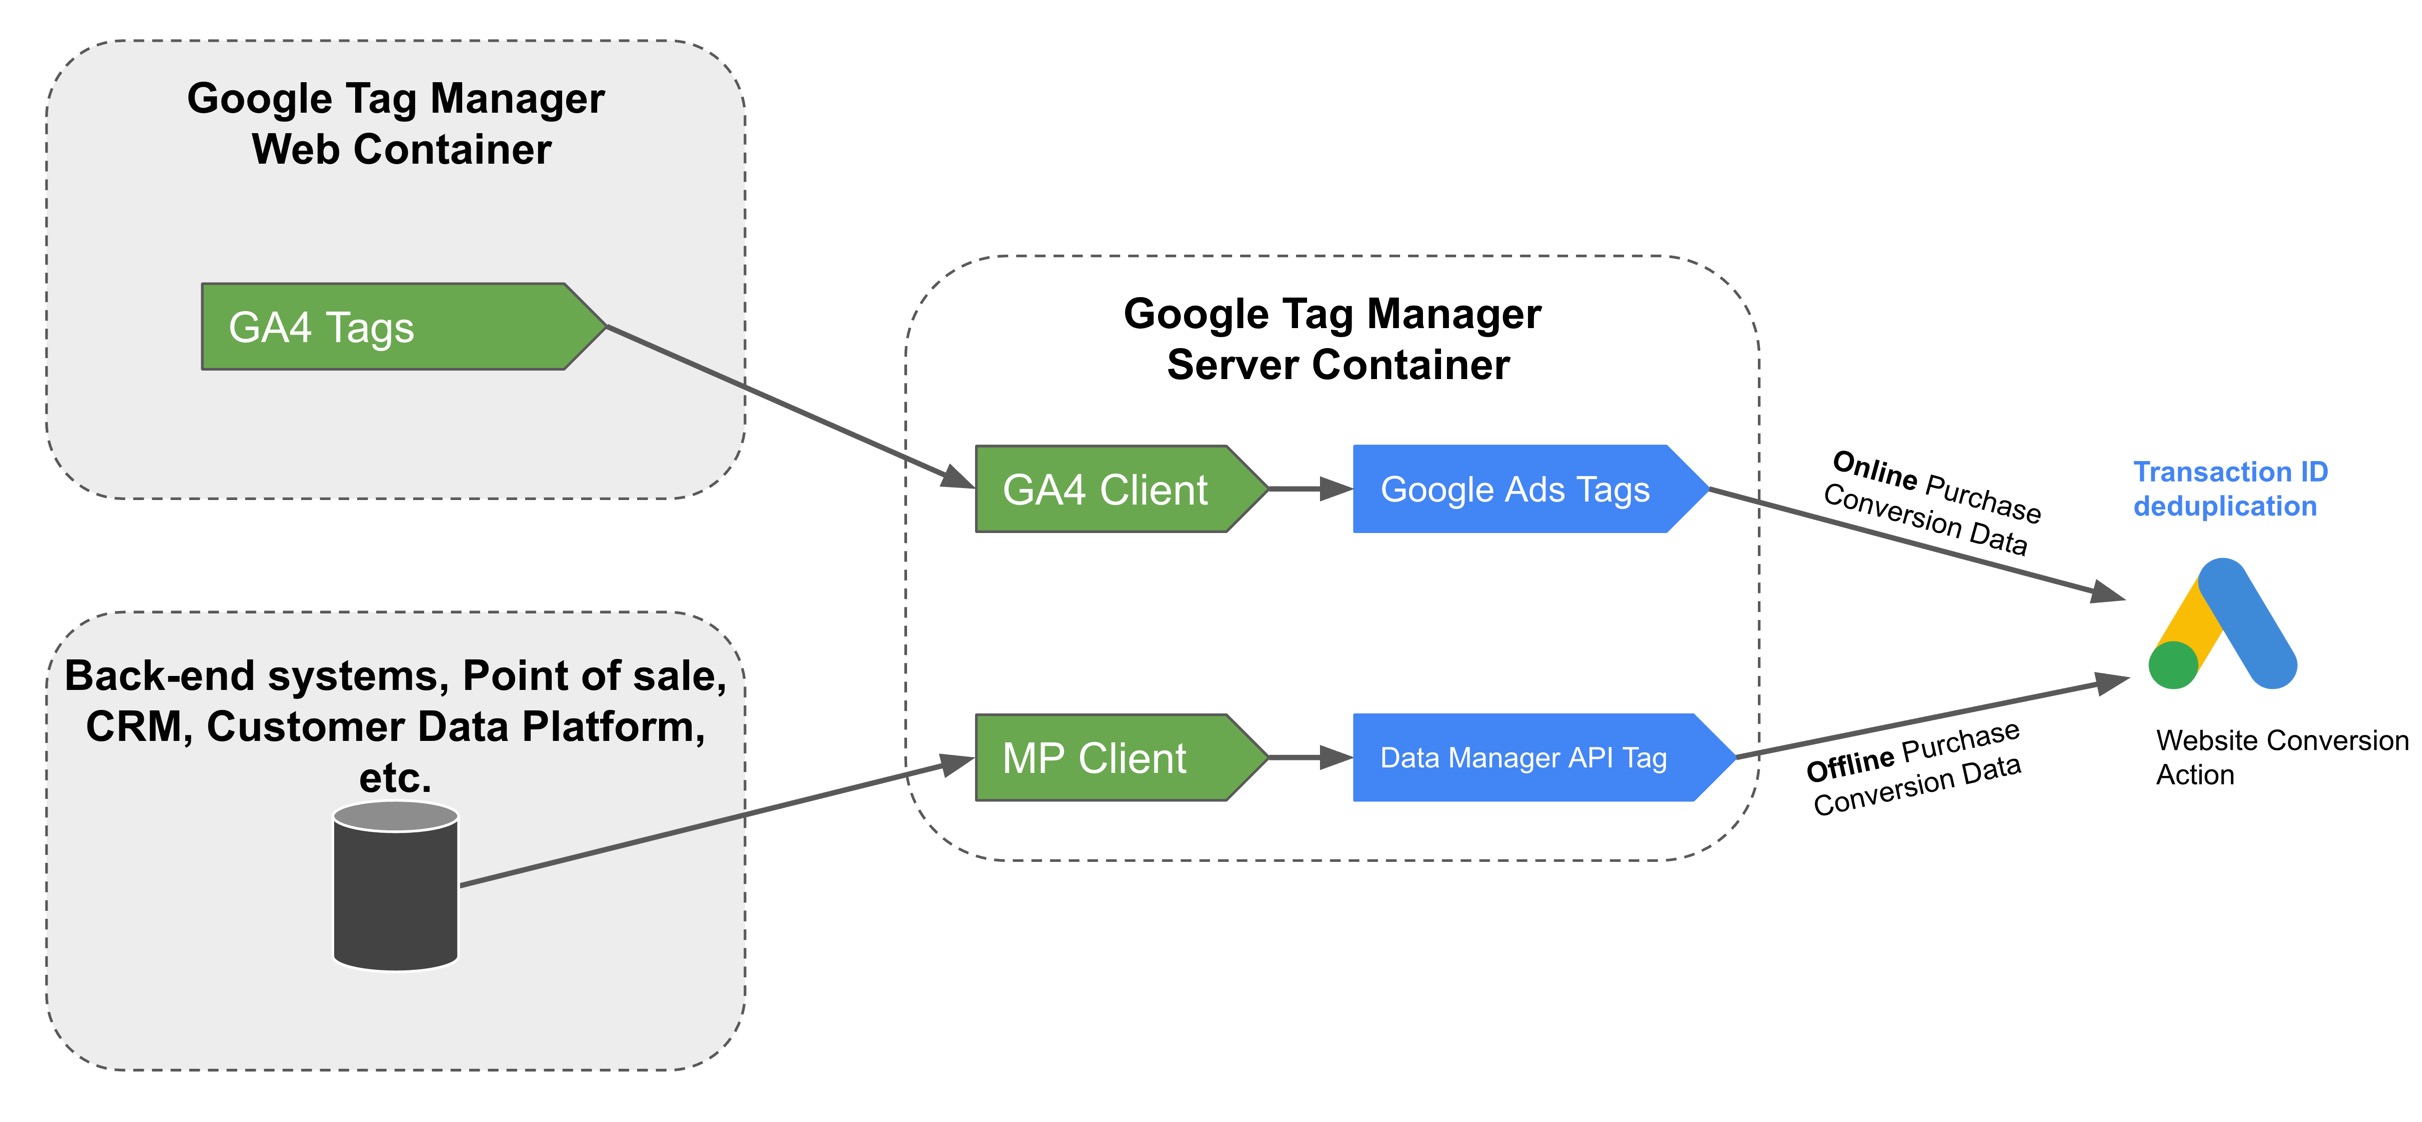
How Google Ads processes data from an additional source
Within a single conversion action, Google Ads uses the transactionId to deduplicate events coming from different sources (your Google Ads tag on the site and your Data Manager API ingestion requests). The table below summarizes the logic applied:
| Scenario | Data field | Processing applied |
|---|---|---|
1. The transactionId matches an event already received via the tag | conversionValue (with currencyCode) | Updated. The value sent by Data Manager API overwrites the one originally recorded. |
2. The transactionId matches an event already received via the tag | Other fields (for example adIdentifiers.gclid, userData, etc.) | Ignored. The other fields sent by the additional source do not overwrite the values already recorded by the Google tag for matched transactions. |
3. The transactionId doesn’t match any existing event | All the data provided (userData, conversionValue, currencyCode, etc.) | Creation of a new conversion. Google then tries to attribute it to an ad click based on the identifiers provided (adIdentifiers.gclid or userData). |
Note for scenarios 1 and 3
During the initial 14-day trial period, these new conversions appear in your reports but are not used for bidding. At the end of this period, they automatically become biddable.
In practice, this means Data Manager API is particularly useful for recovering conversions lost by the client-side tag (because of an ad blocker, for example) and for correcting the value of a conversion after the fact.
3. Send offline conversions to Google Analytics
This is the historical use case for Google Analytics: you want to track in Google Analytics the conversions of a user who started their journey on the website but completes it offline (a phone call that turns into a sale, an order finalized by a sales rep, a purchase in a physical store after a visit to the site, etc.).
For this use case, you may currently be using the Measurement Protocol API . Data Manager API is the successor of this API, and we strongly recommend migrating to this new solution.
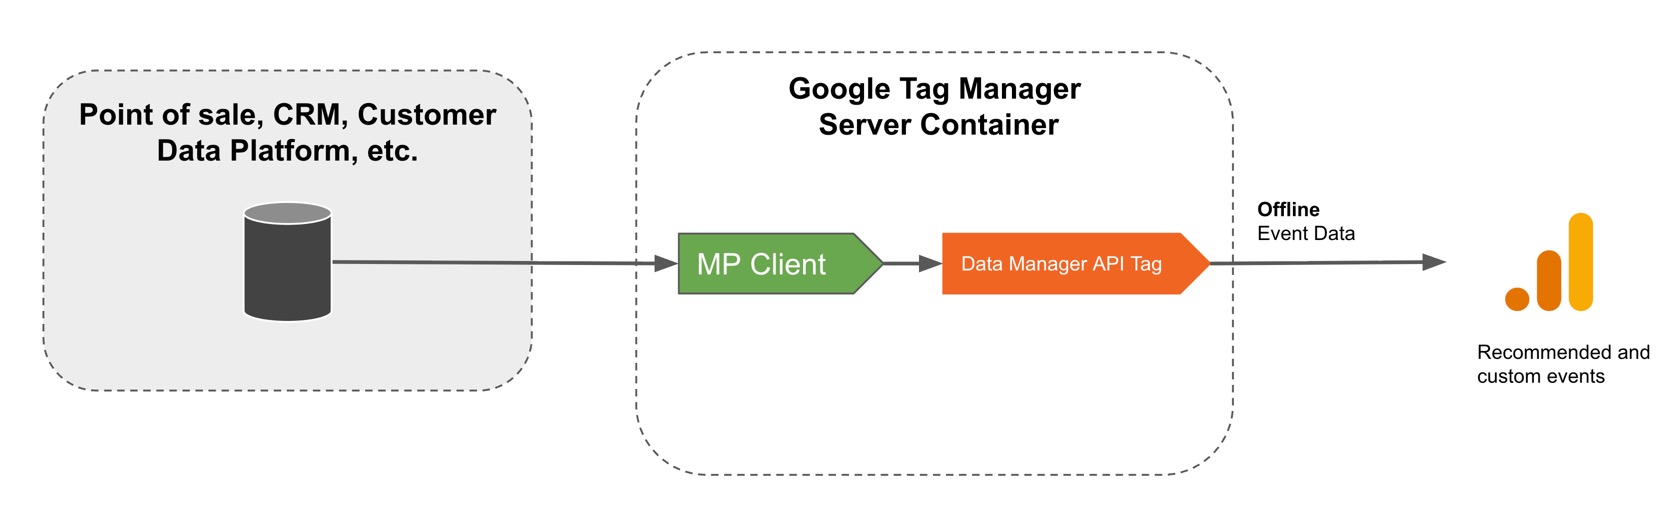
The principle: your CRM, your point of sale, or your Customer Data Platform (CDP) sends the conversion event to the GTM Server container. The Data Manager API tag then forwards it to Google Analytics, using either the GCLID (classic Offline Conversion Tracking) or hashed first-party data (Enhanced Conversions for Leads) to match the conversion to the original click.
4. Enrich Google Analytics 4 tracking with an additional data source
The same principle applies to Google Analytics 4. Data Manager API can send GA4 events (purchases, leads, custom events) from your back-end systems, in addition to the server-side GA4 tag.
GA4 also uses the Transaction ID to deduplicate events and record only one conversion per transaction, ensuring reliable reporting despite client-side losses.
The additional data source feature for GA4 is only available for properties added to an allowlist by Google. To request it, fill out this form .
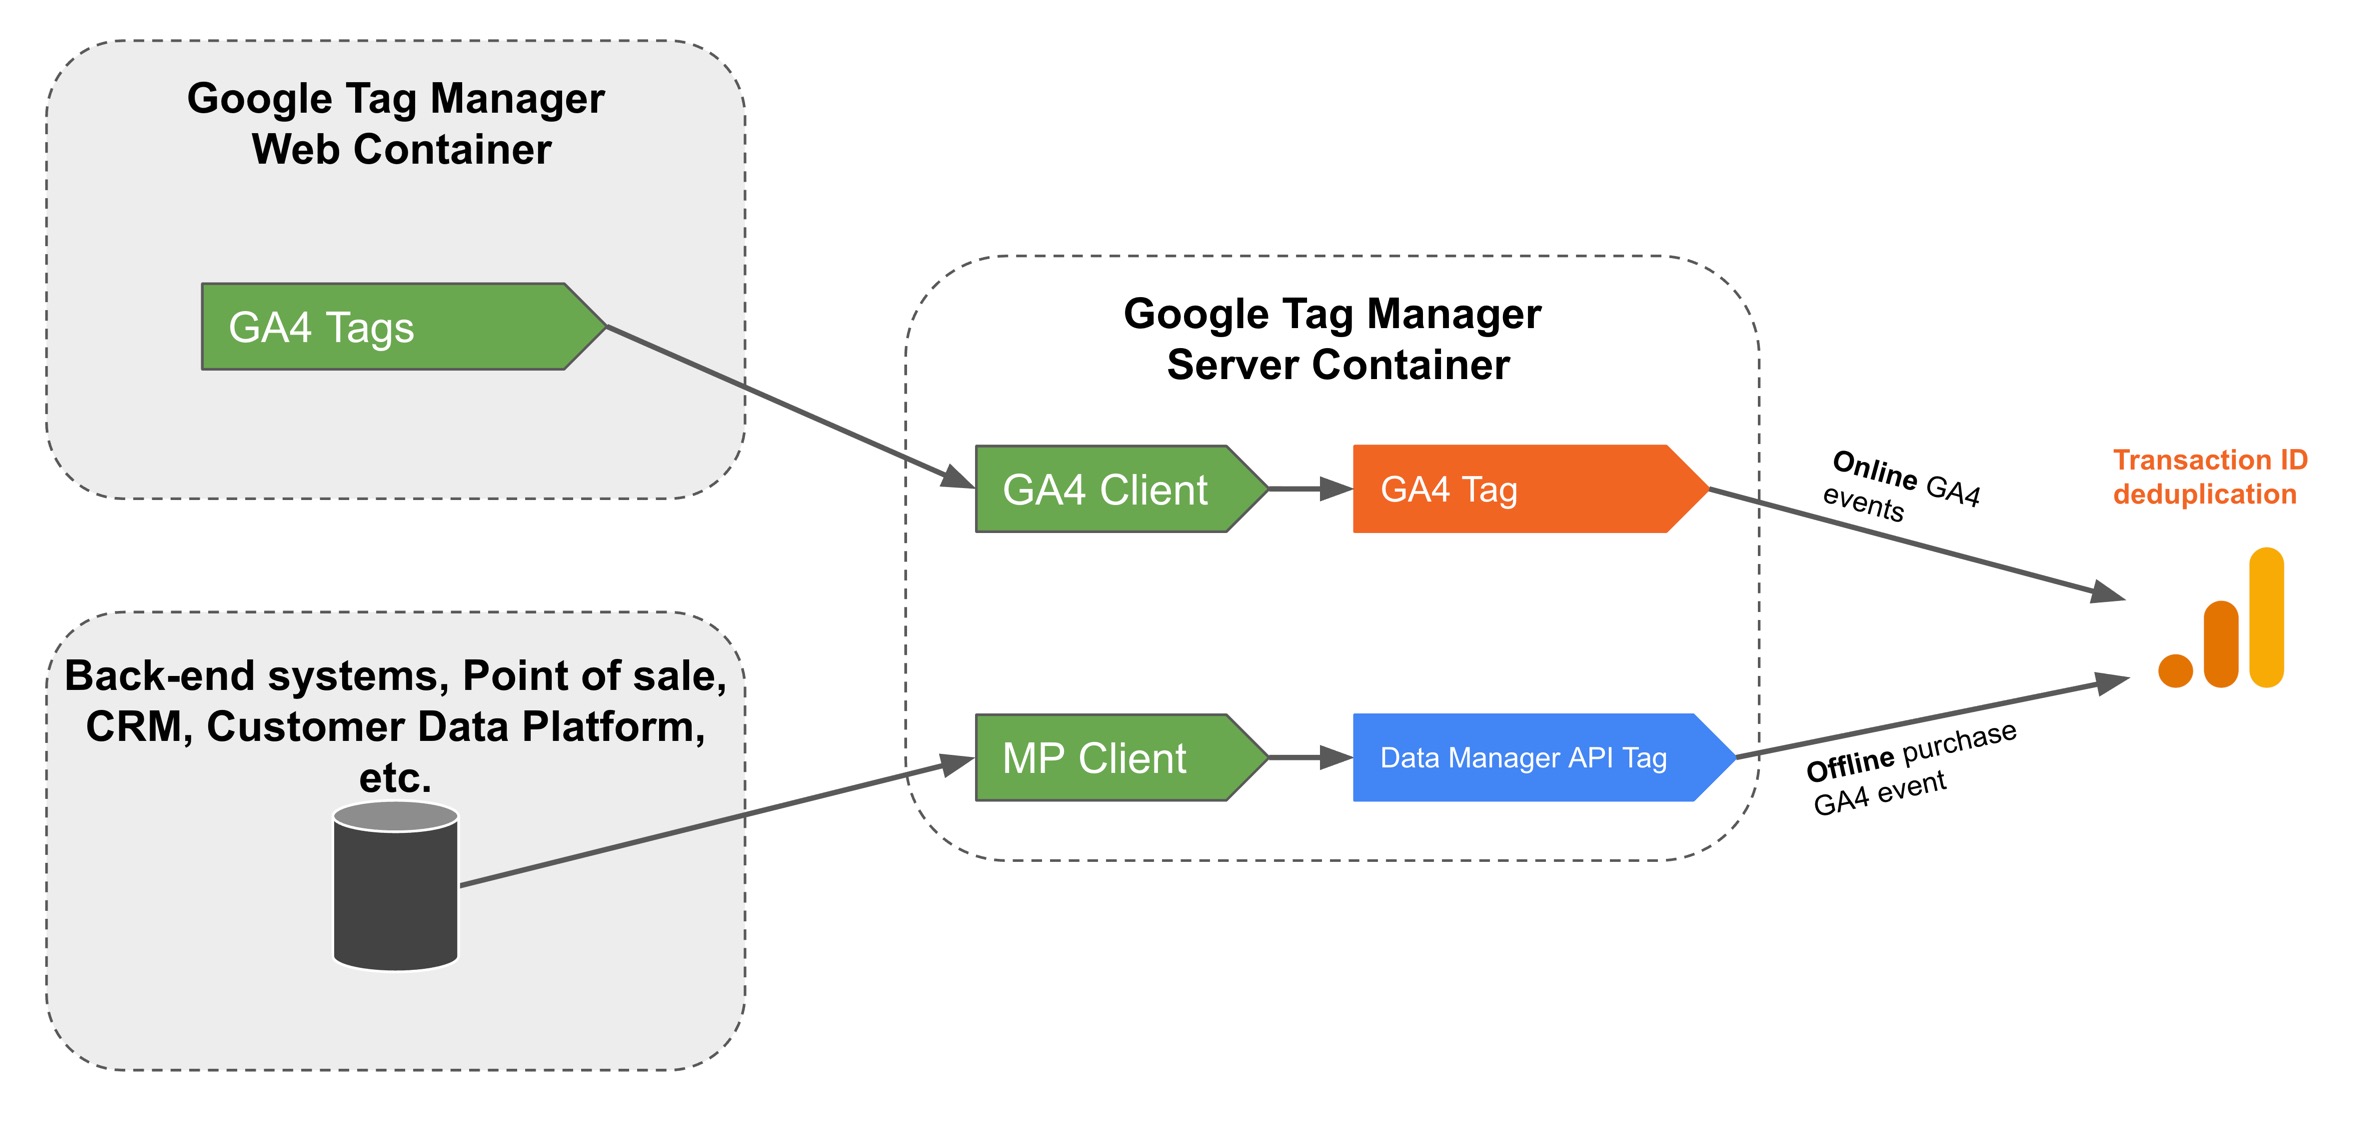
How Google Analytics processes data from an additional source
Within a single event and a single property, Google Analytics uses the transactionId to deduplicate the event coming from different sources (such as your server-side GA4 tag and the Data Manager API Conversions by Addingwell tag).
The fact that Google Analytics uses the transactionId to deduplicate events doesn’t mean you can only send purchase events with an order ID. You can just as well send a close_convert_lead event with a lead ID, or a custom_event with a unique ID generated by your back-end system. As long as the transactionId is the same for both sources, Google Analytics will only count one event.
Preparing the Data Manager API project
The technical setup of Data Manager API on the server side is relatively simple — there’s only one tag to configure in your GTM Server container. The real complexity of the project, however, lies in sending offline data to your server endpoint via the Measurement Protocol standard for building requests.
Here is a (non-exhaustive) list of questions to ask upfront to prepare your Data Manager API project and ensure its success:
- Is the offline system that hosts the conversion data (CRM, POS, e-commerce, etc.) able to send an HTTP request to the GTM Server container at the moment the conversion happens?
- Do I want to send conversions in real time or in batches (once a day, for example)? Is my offline system able to do one, the other, or both?
- Do the conversions I want to send to Google Ads have a
transaction_id, and is thattransaction_idaccessible in my offline system? (the idea here is to be able to link the conversions sent online with those sent by Data Manager API offline, to avoid duplicates in Google Ads in the context of use case number 2) - How do I match the conversion to the original ad click (GCLID)? (hidden form fields, browser storage, server-side storage with Firestore, etc.)
Prerequisites
Before implementing Data Manager API, make sure you have:
- A GTM Server container configured and operational (on Addingwell or on your own infrastructure).
- A flow of data sent from the web to the server-side container
- A Google Ads conversion action created and correctly configured for your use case (Website for online conversions, Website with Import from clicks for offline conversions) and/or a Google Analytics 4 property.
- For Enhanced Conversions for Leads: have accepted the Enhanced Conversions terms of service and enabled the feature in Google Ads (Goals → Settings → Enhanced conversions for leads).
Authentication with Data Manager API
To allow your GTM Server container to communicate with Data Manager API, you need to configure authentication with your Addingwell service account.
Retrieve the service account in Addingwell
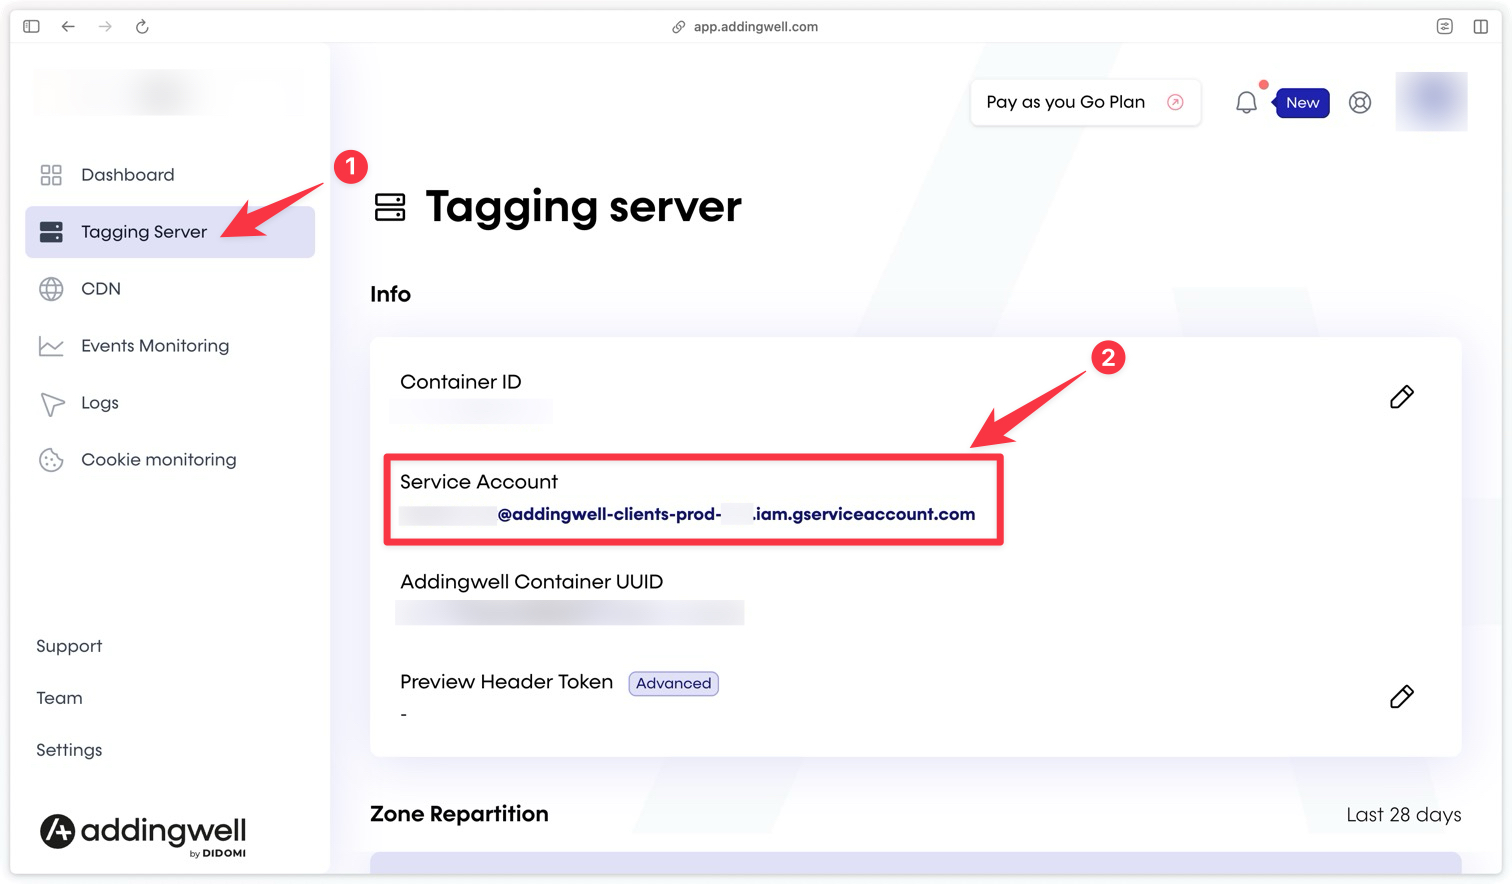
Go to your Addingwell container, click the Tagging Server menu, then copy the service account.
The service account is a technical account (an email address of the form …@….iam.gserviceaccount.com) that your GTM Server container uses to authenticate with Google. It’s this identity — not your personal account — that will send the conversions to Google Ads, so you need to authorize it explicitly in your account.
Add the service account to Google Ads
This step is only required if you want to send your conversions to Google Ads.
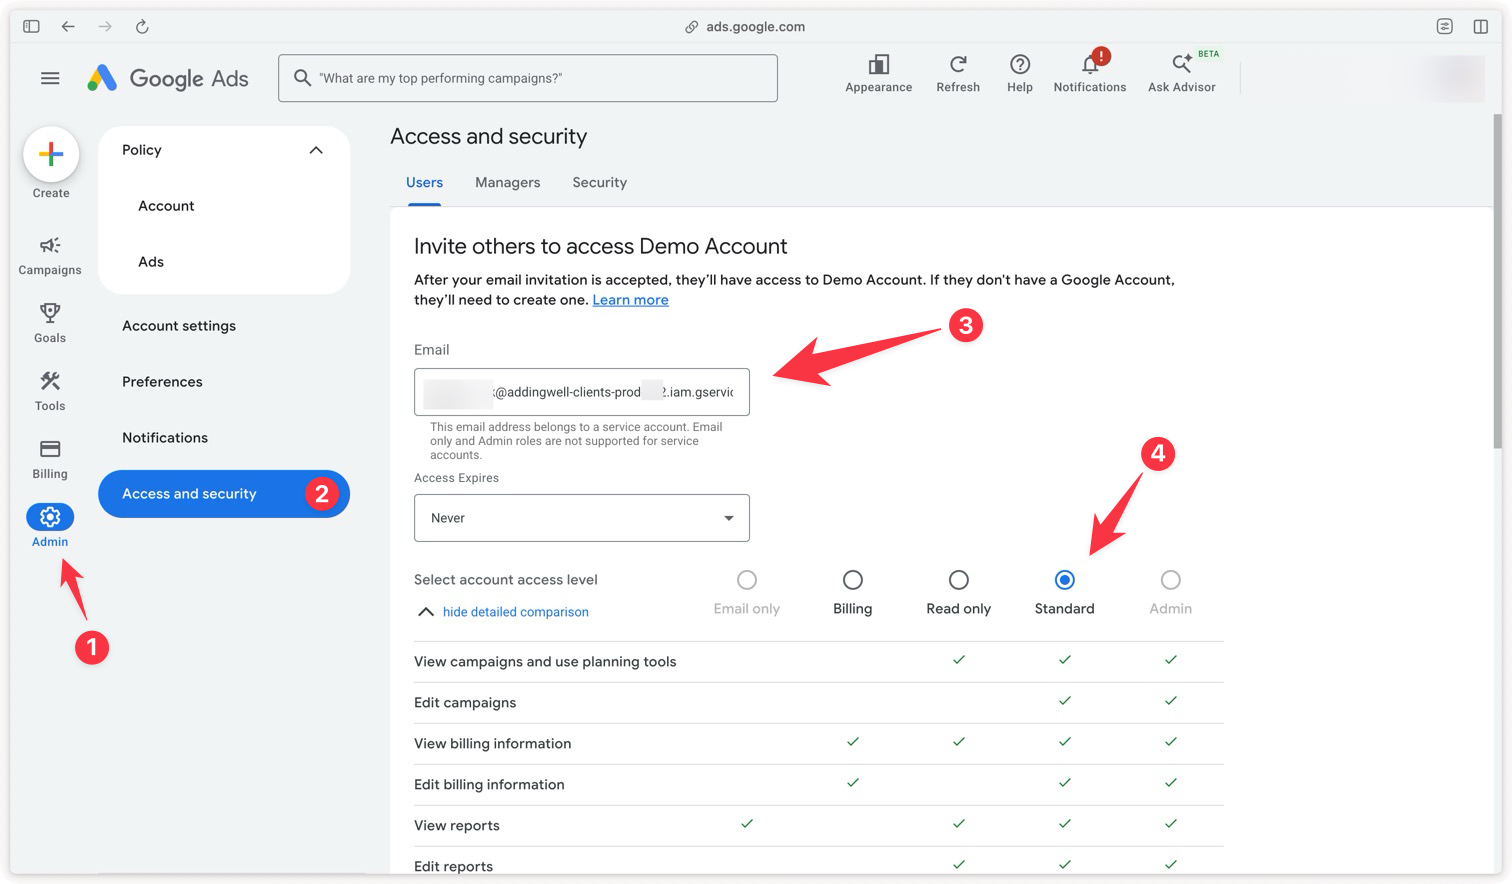
Once you have the service account email address, go to Admin → Access and security in your Google Ads account, click the + button, paste the service account address, and assign it the Standard role. This role is required to authorize the import of conversions; read-only access would not be enough. Access is active immediately — no email confirmation is required on the service account side.
Add the service account to Google Analytics 4
This step is only required if you want to send your events to Google Analytics 4.
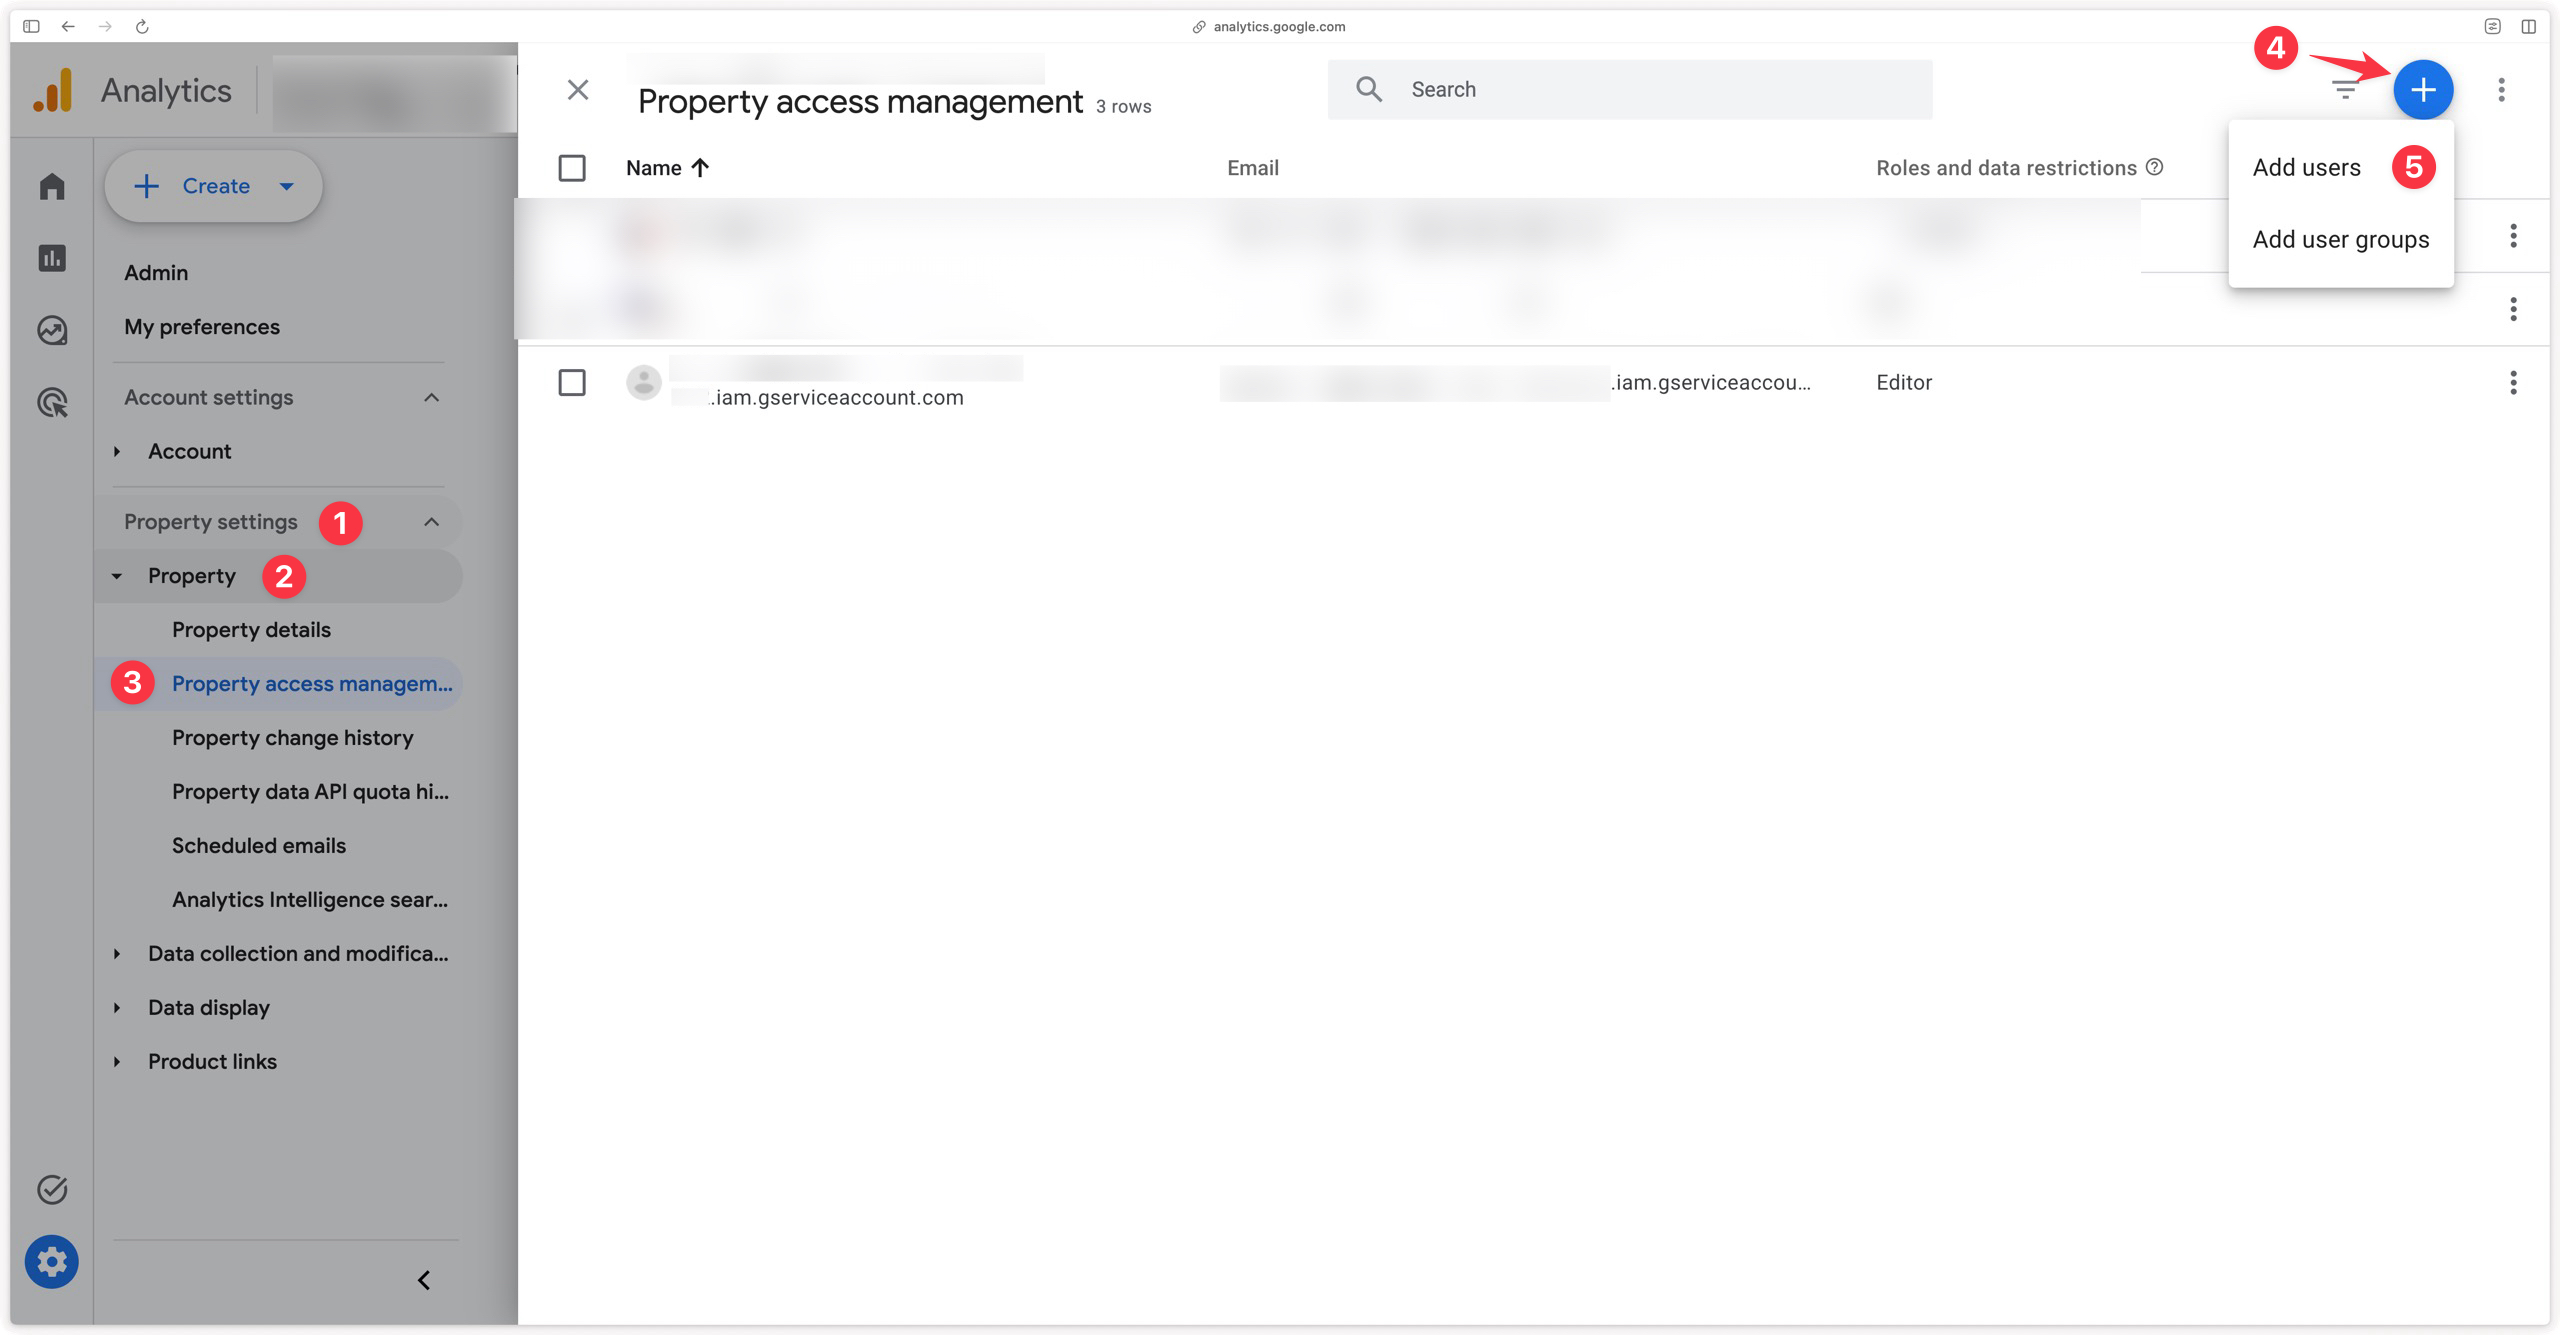
Once you have the service account email address, go to Admin → Property settings -> Property access management in your GA4 property, click the + button, then Add users.
Paste the service account address and assign it the Editor role.
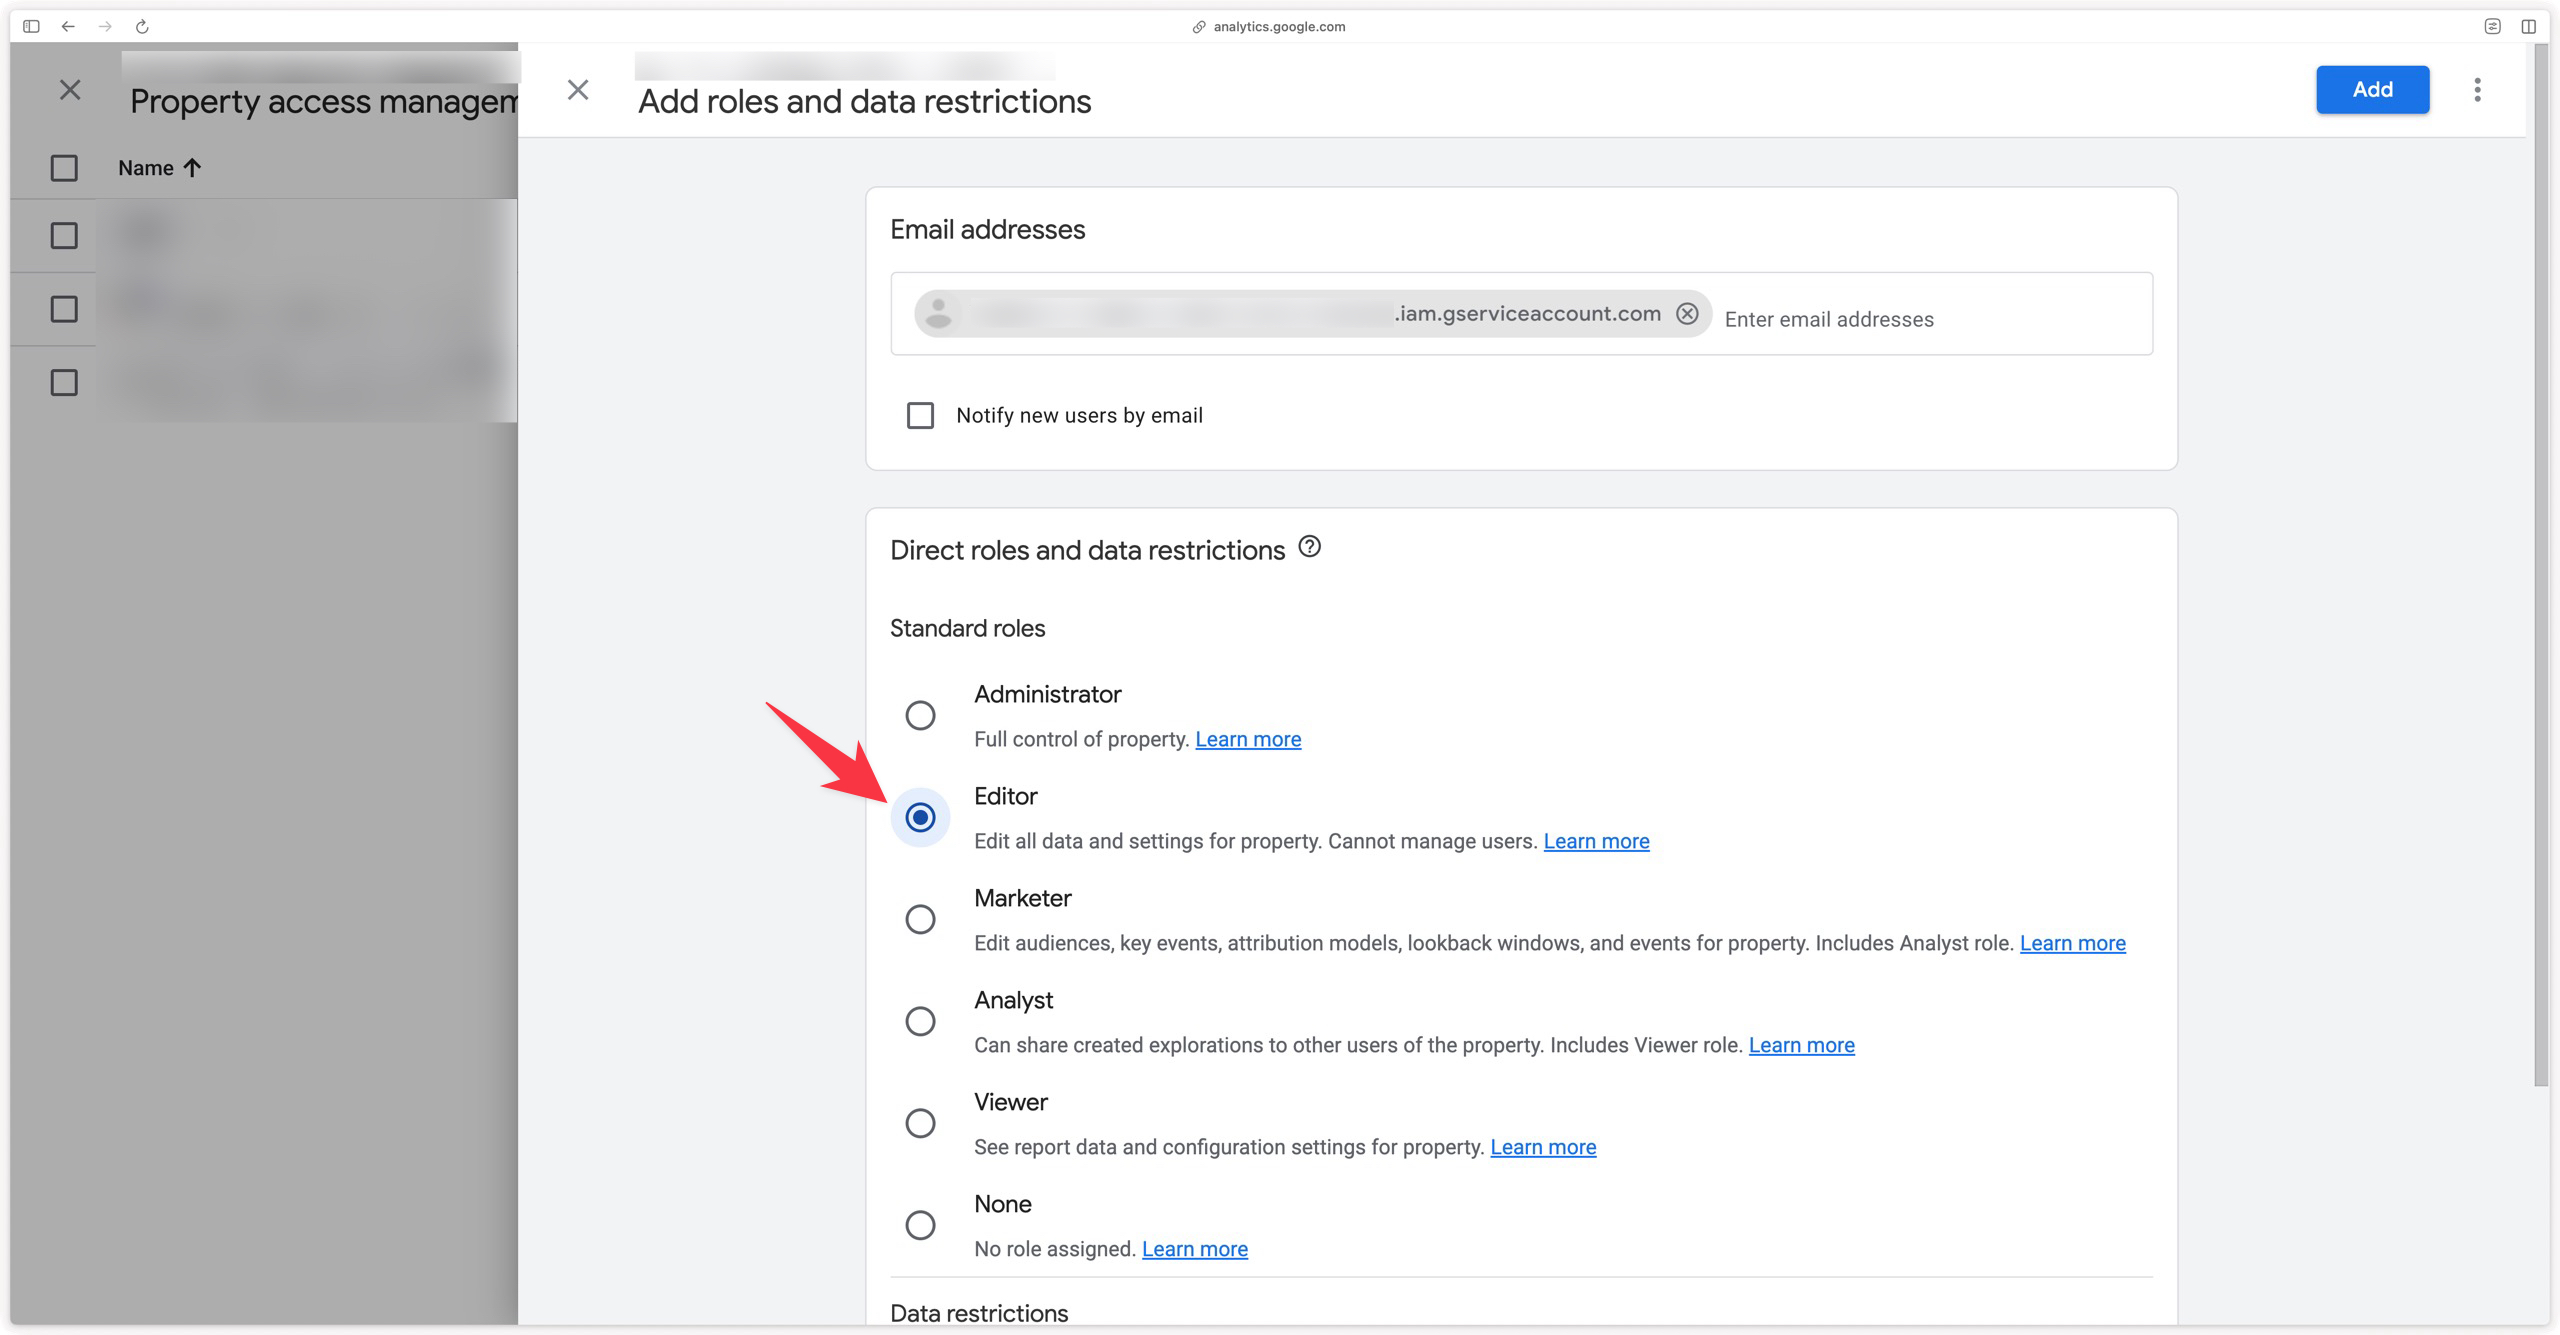
This role is required to authorize the import of events; read-only access would not be enough. Access is active immediately — no email confirmation is required on the service account side.
Setting up Data Manager API
Import the tag into GTM Server
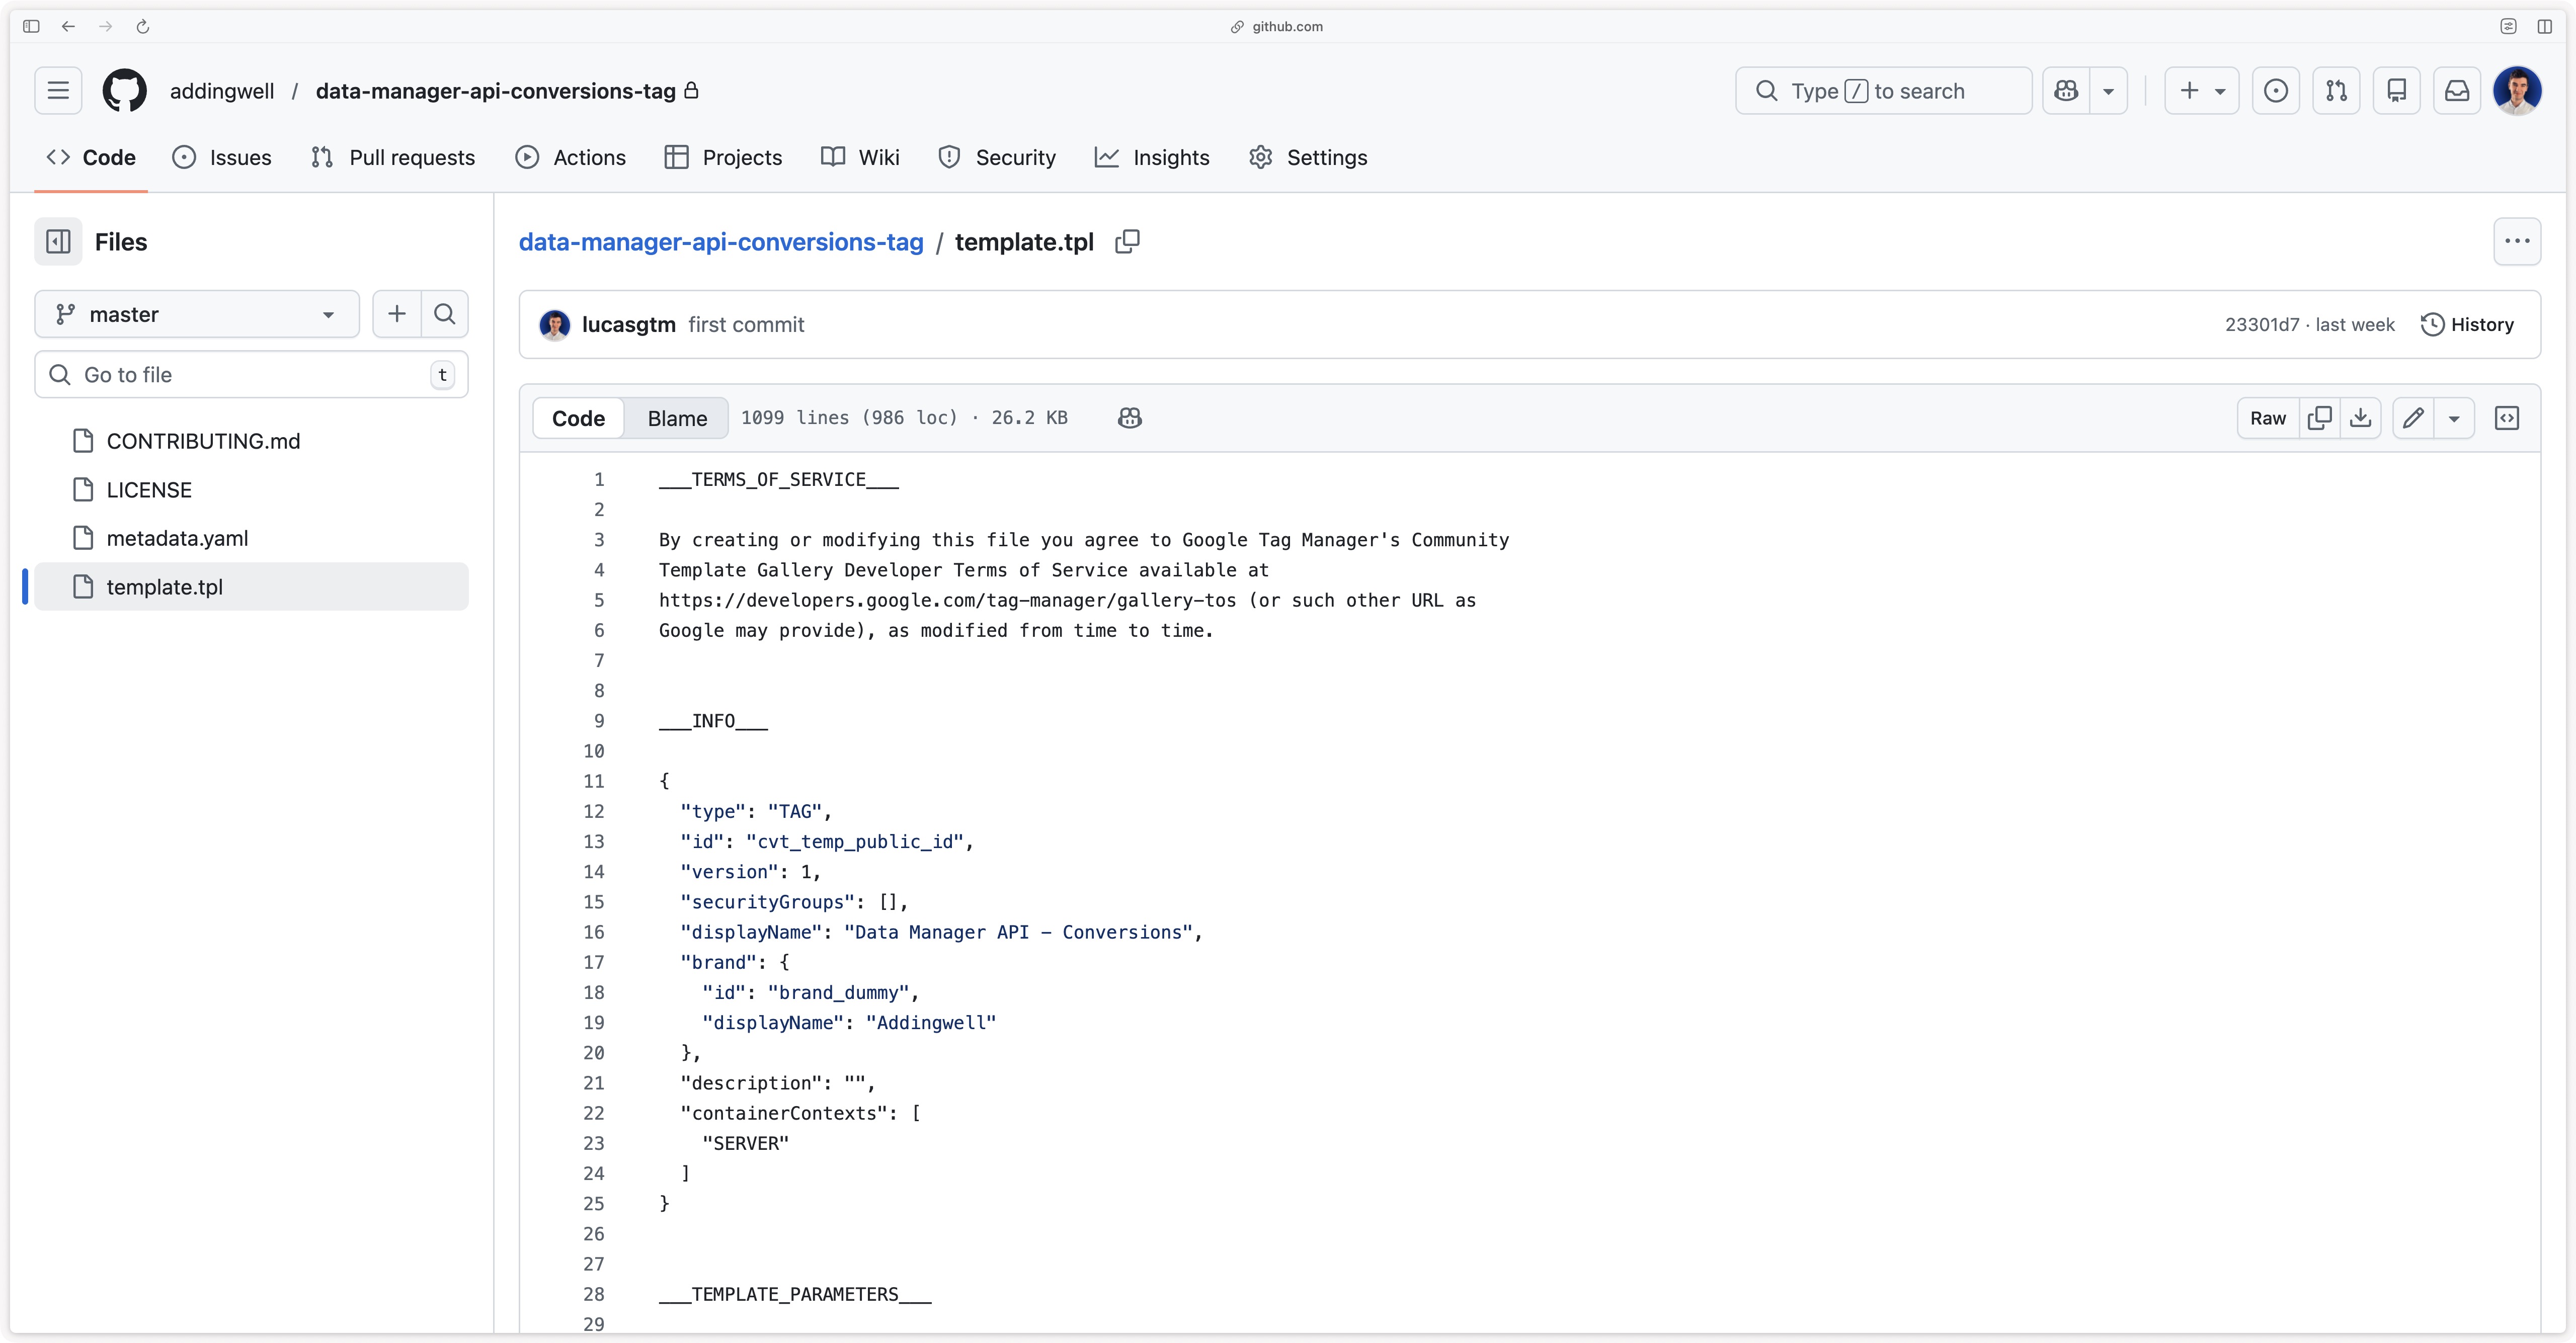
Click here to download the Data Manager API tag, then click the download icon to retrieve the file.
The Data Manager API tag is not yet available in the GTM template gallery: it’s a template maintained by Addingwell that you need to import manually into your container. The template.tpl file you download contains the entire tag — both the configuration interface you’ll see in GTM and the logic that sends the data to Data Manager API.
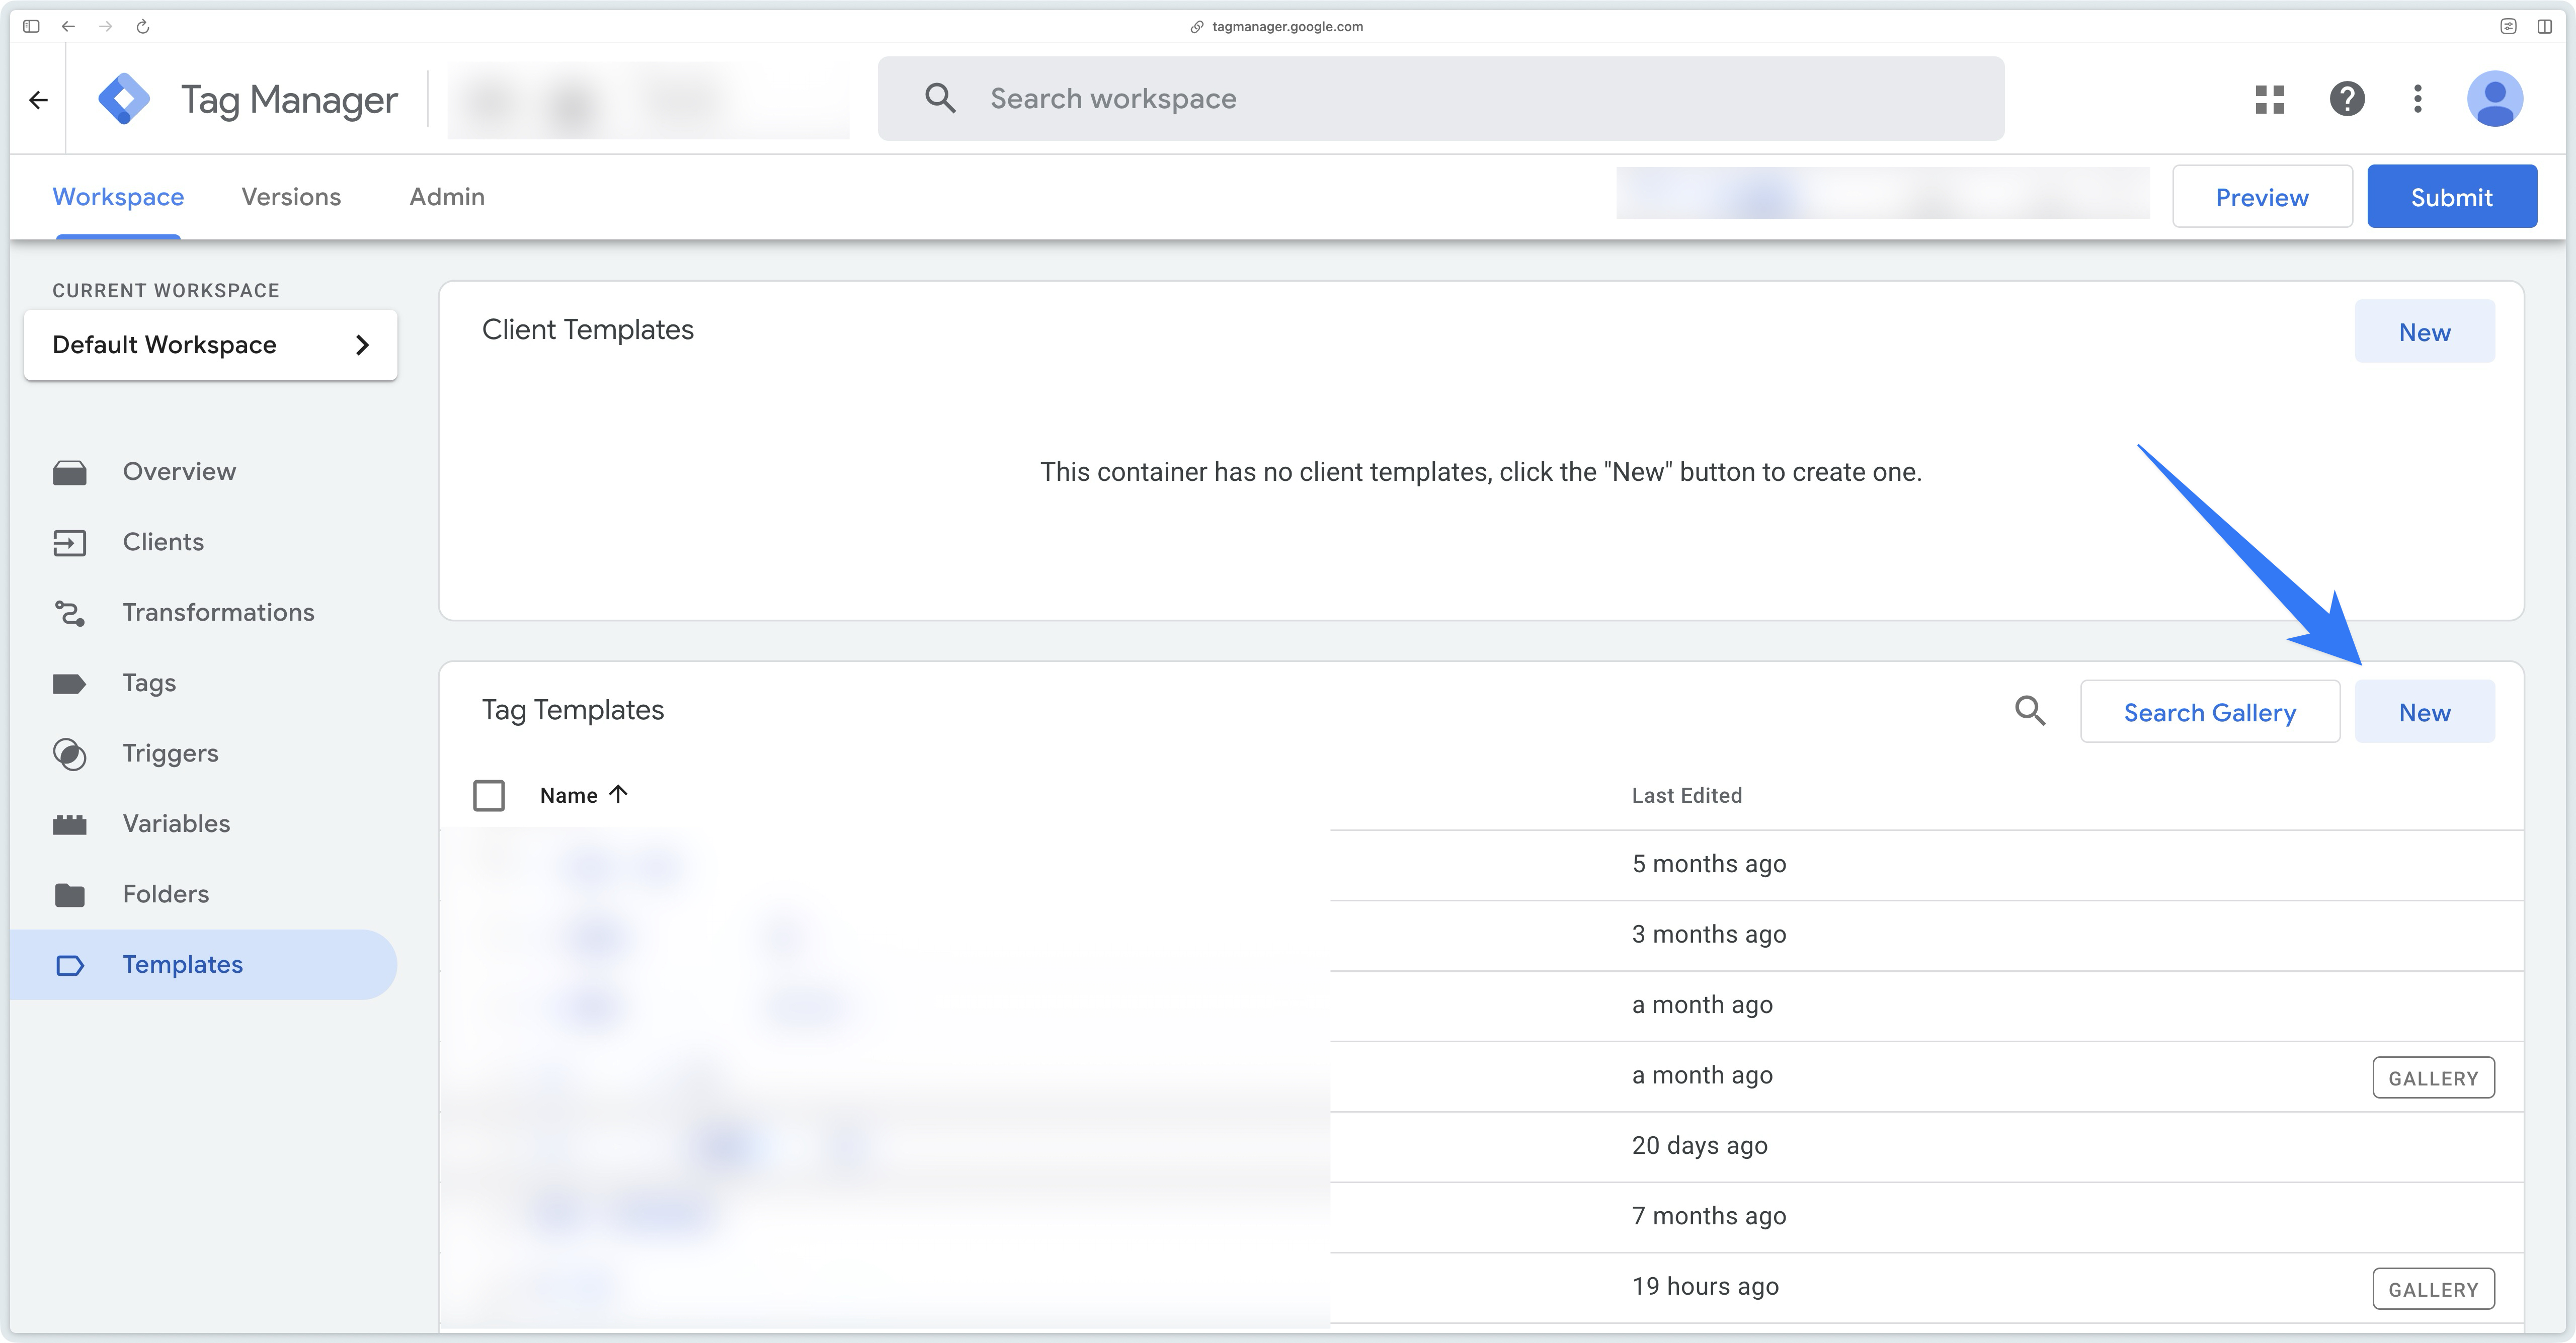
Next, go to the Templates tab of the server container, then, in the Tag templates section, click New.
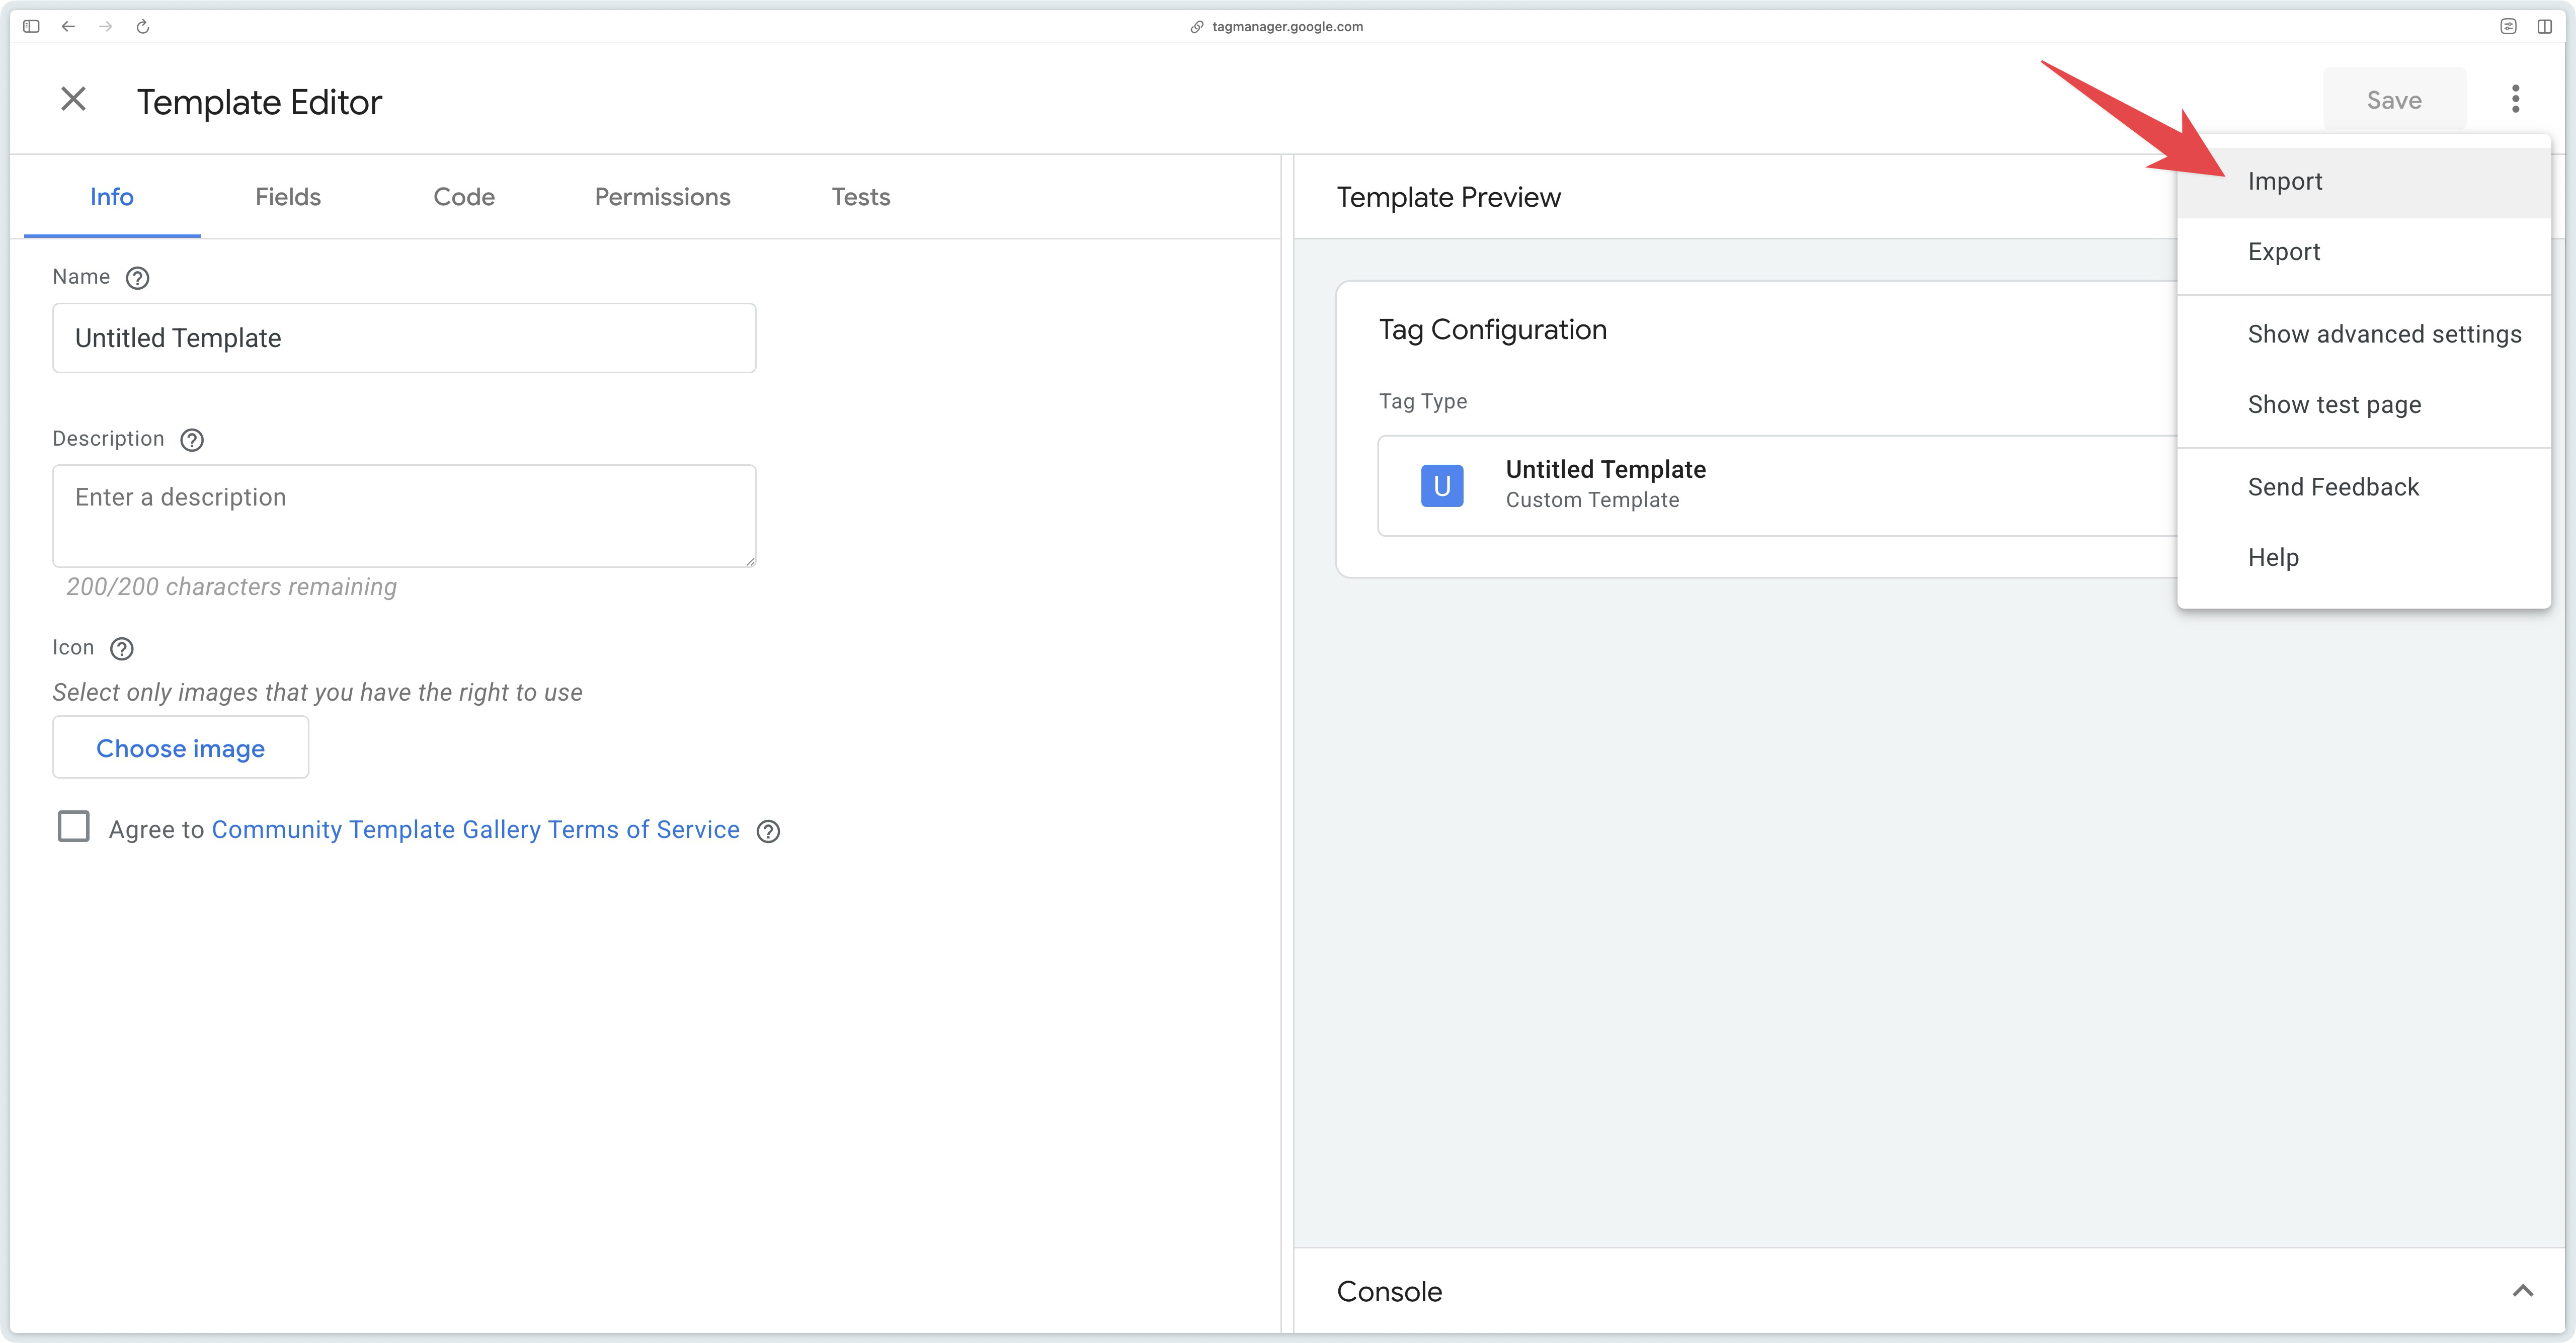
Then click the three dots in the top right, and select Import.
Then select the template.tpl file you just downloaded, and click Save.
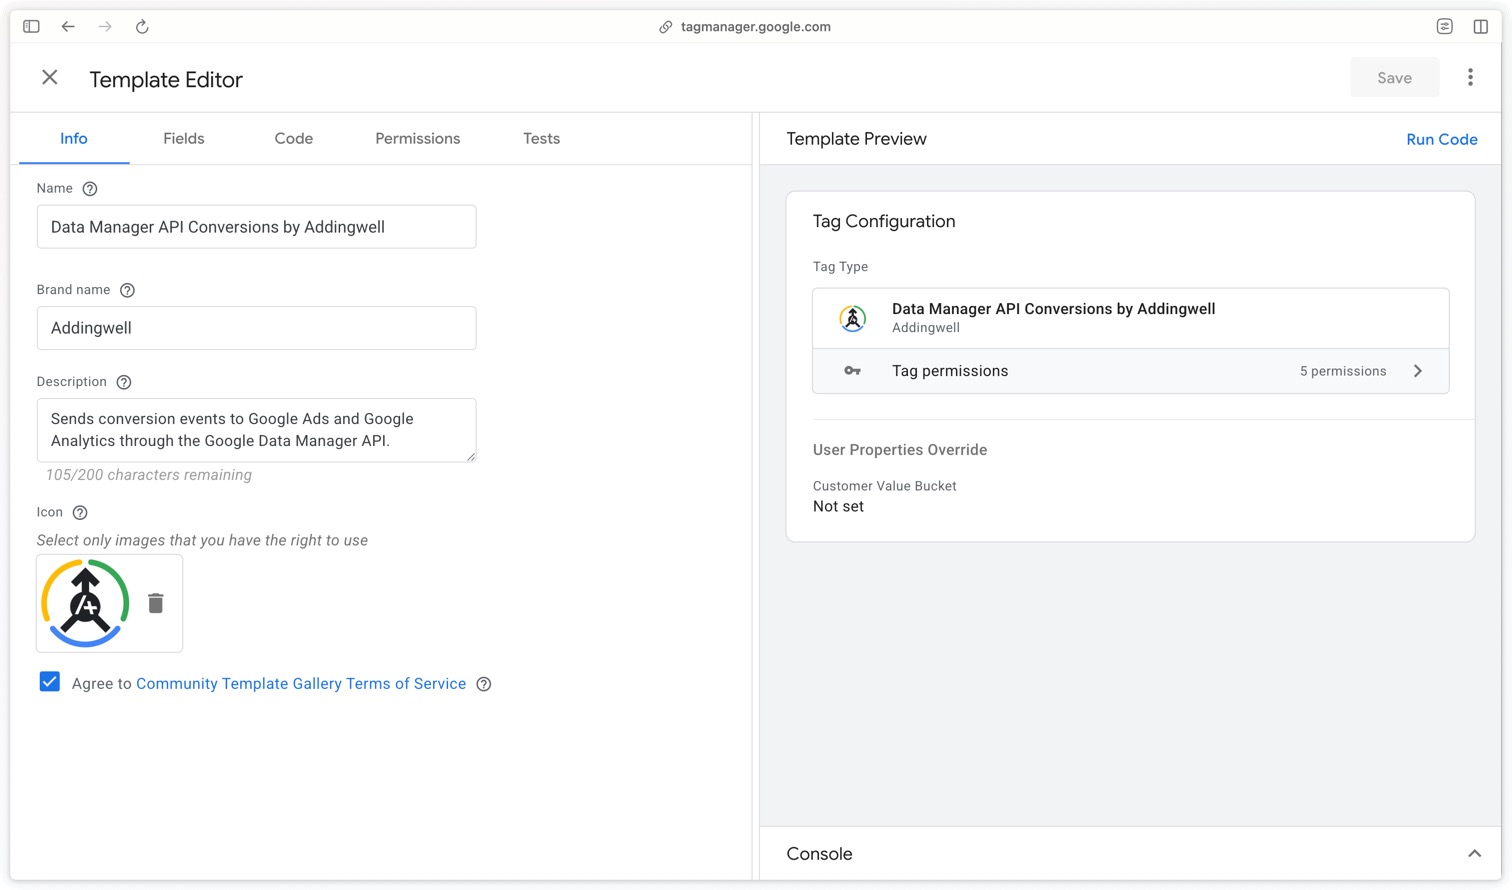
Configure the Data Manager API tag
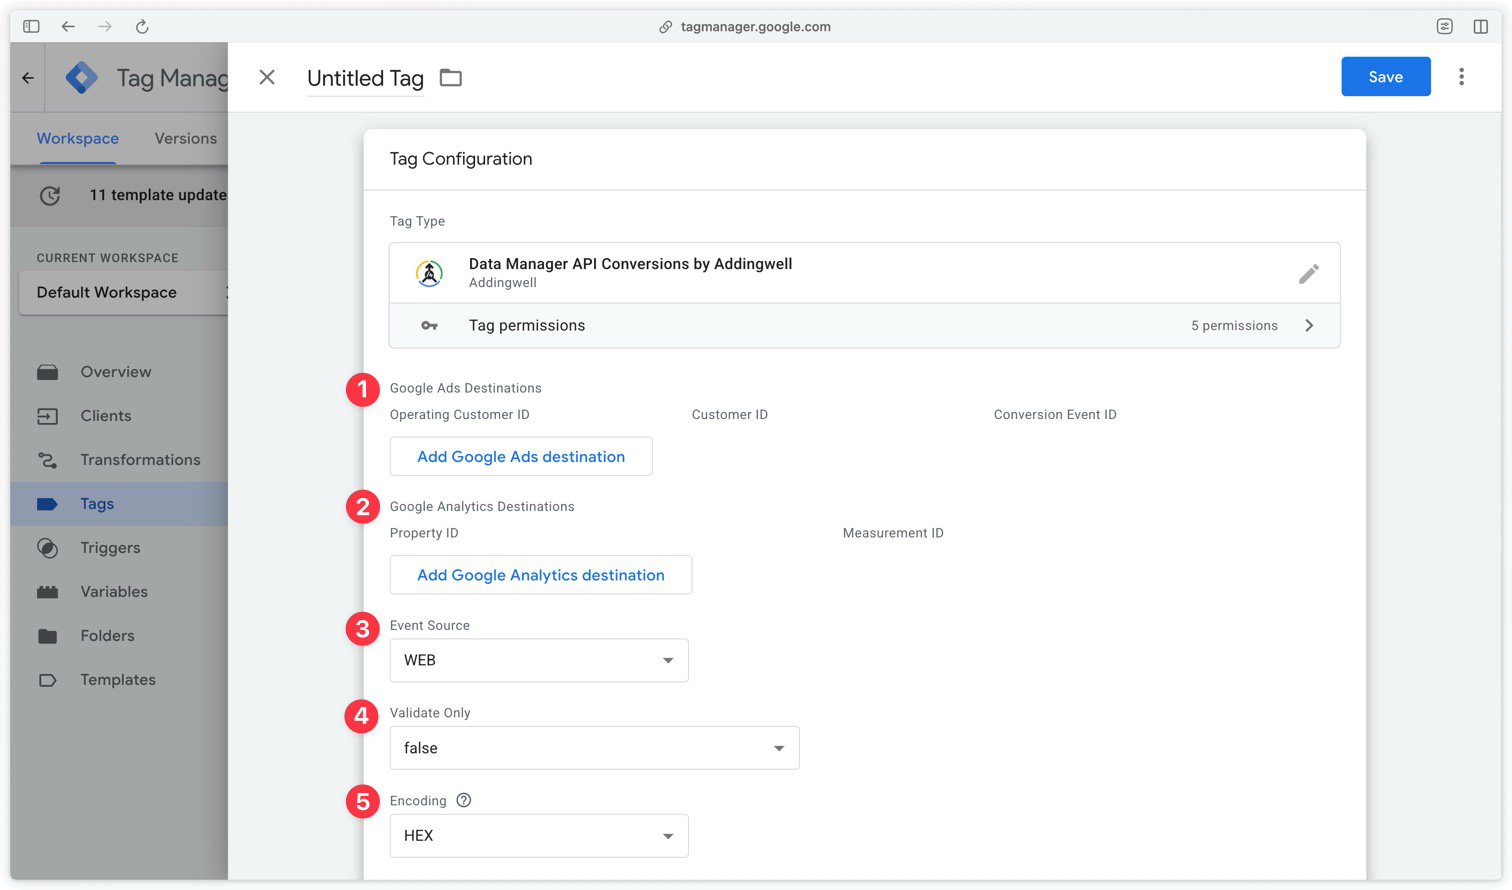
Create a new tag in Google Tag Manager Server-Side and select the Data Manager API template you just imported.
The concept: one API, multiple destinations
The idea behind Data Manager API is to provide a single entry point to send an event to multiple Google products at once. Where you previously needed a connection to Google Ads Offline and a connection to the GA4 Measurement Protocol (each with its own authentication, its own format, its own endpoints), Data Manager API centralizes everything through a single request.
A destination is the description of a place where the event should be sent. Concretely, it answers the question: “to which account, on which property, for which conversion action should this event be counted?”
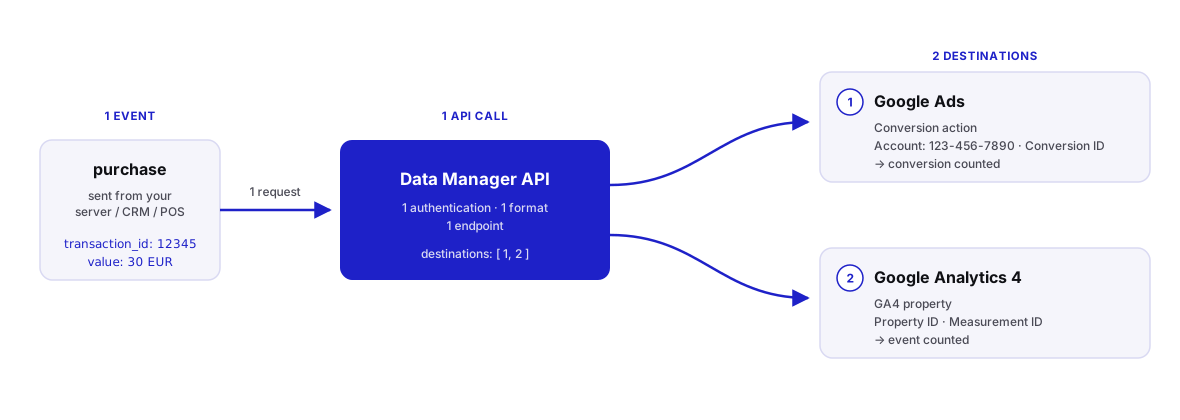
A single request can contain several destinations. This is what allows you, for example, to send a purchase event both to a Google Ads conversion action and to a GA4 property in a single API call.
Google Ads Destinations
Fill in this section only if you want to send your conversions to Google Ads.
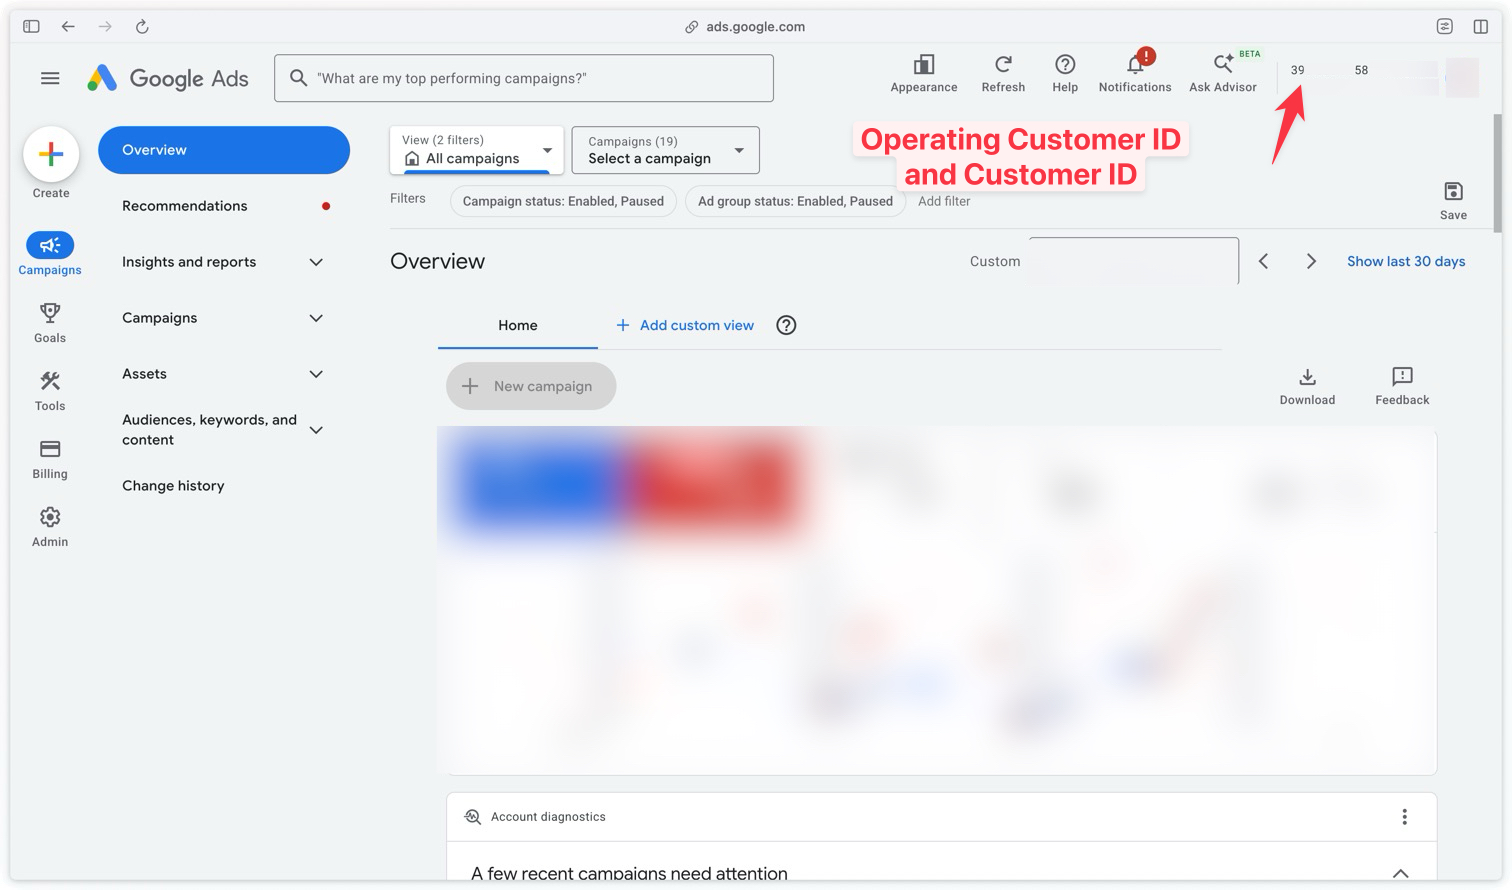
Operating Customer ID and Customer ID: Enter in both fields the ID of the Google Ads account you want to send the conversions to. (example: 123-456-7890)
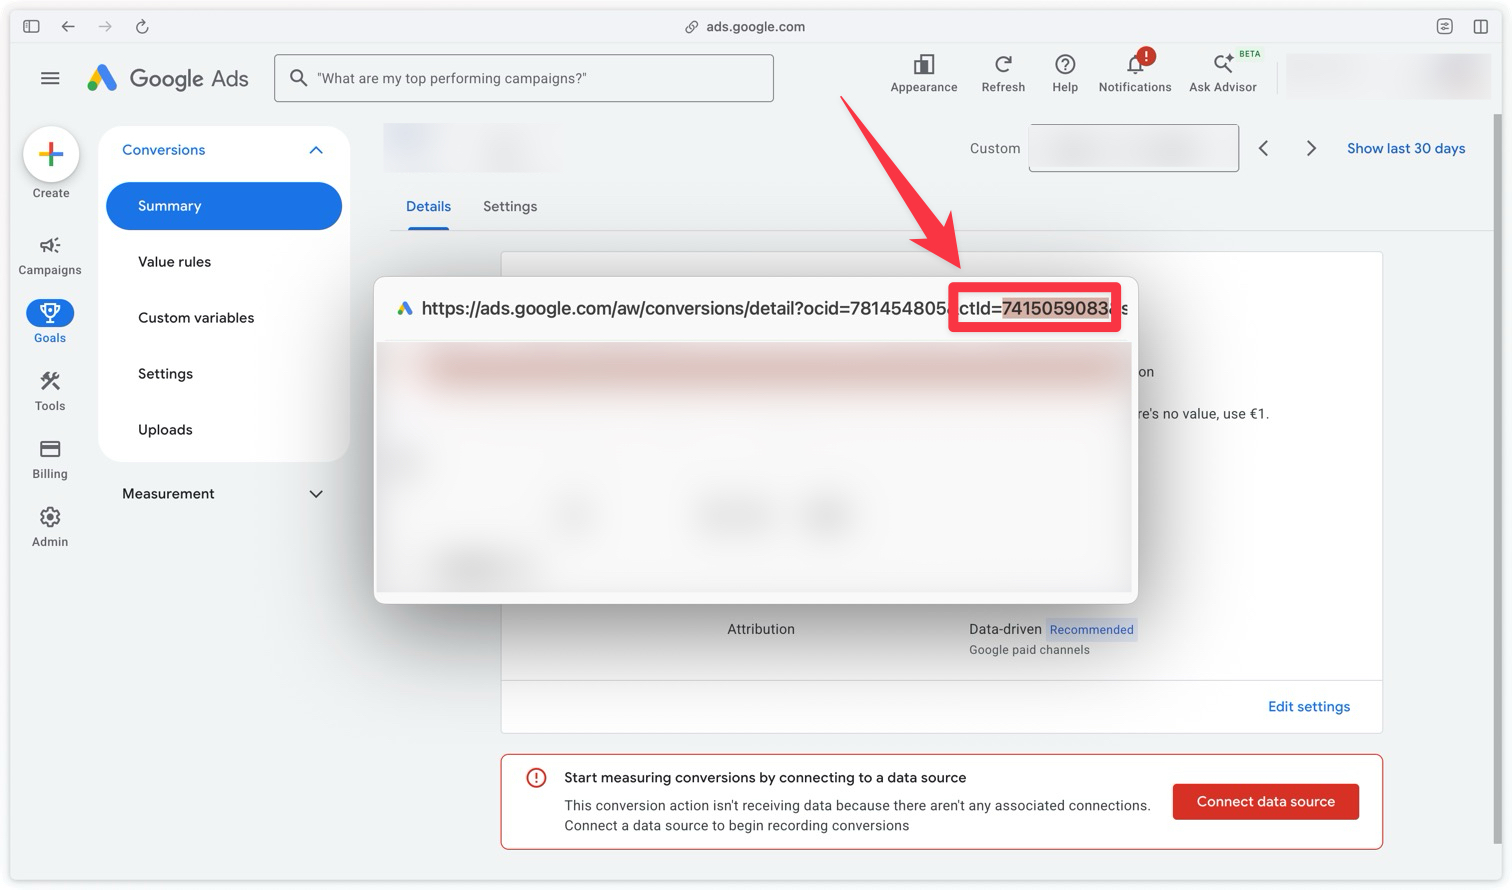
Conversion ID: Enter the ID of your Google Ads conversion action here. When you are inside your conversion action, you can find it in your browser’s URL after ctId=. (example: 1234567890)
Google Analytics Destinations
Fill in this section only if you want to send your events to Google Analytics 4.
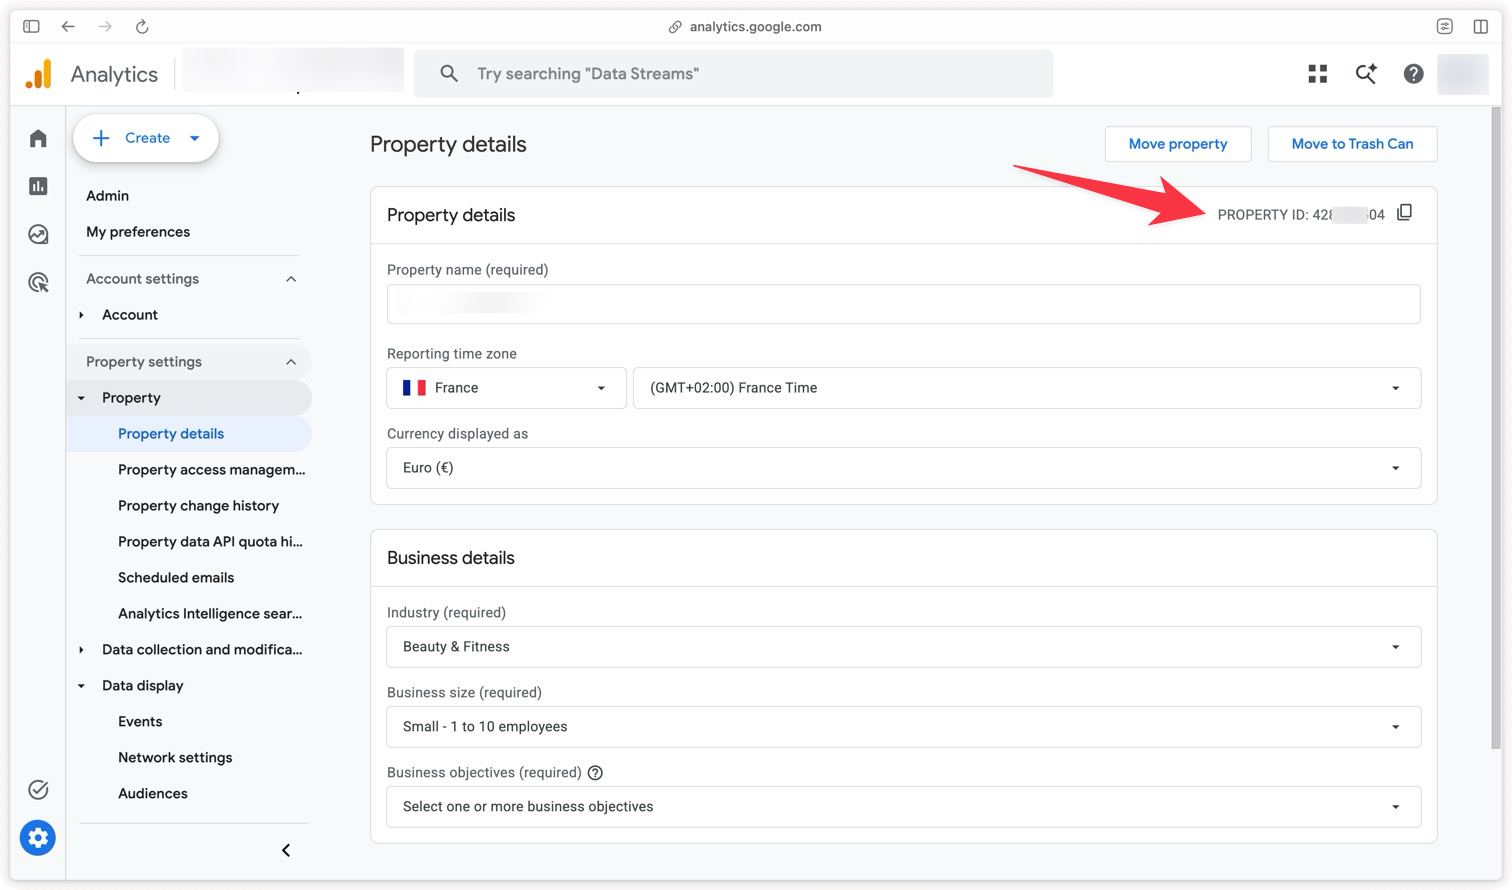
Property ID: Enter the ID of your Google Analytics 4 property here. Go to Admin → Property details → Property ID to find it. (example: 453232504)
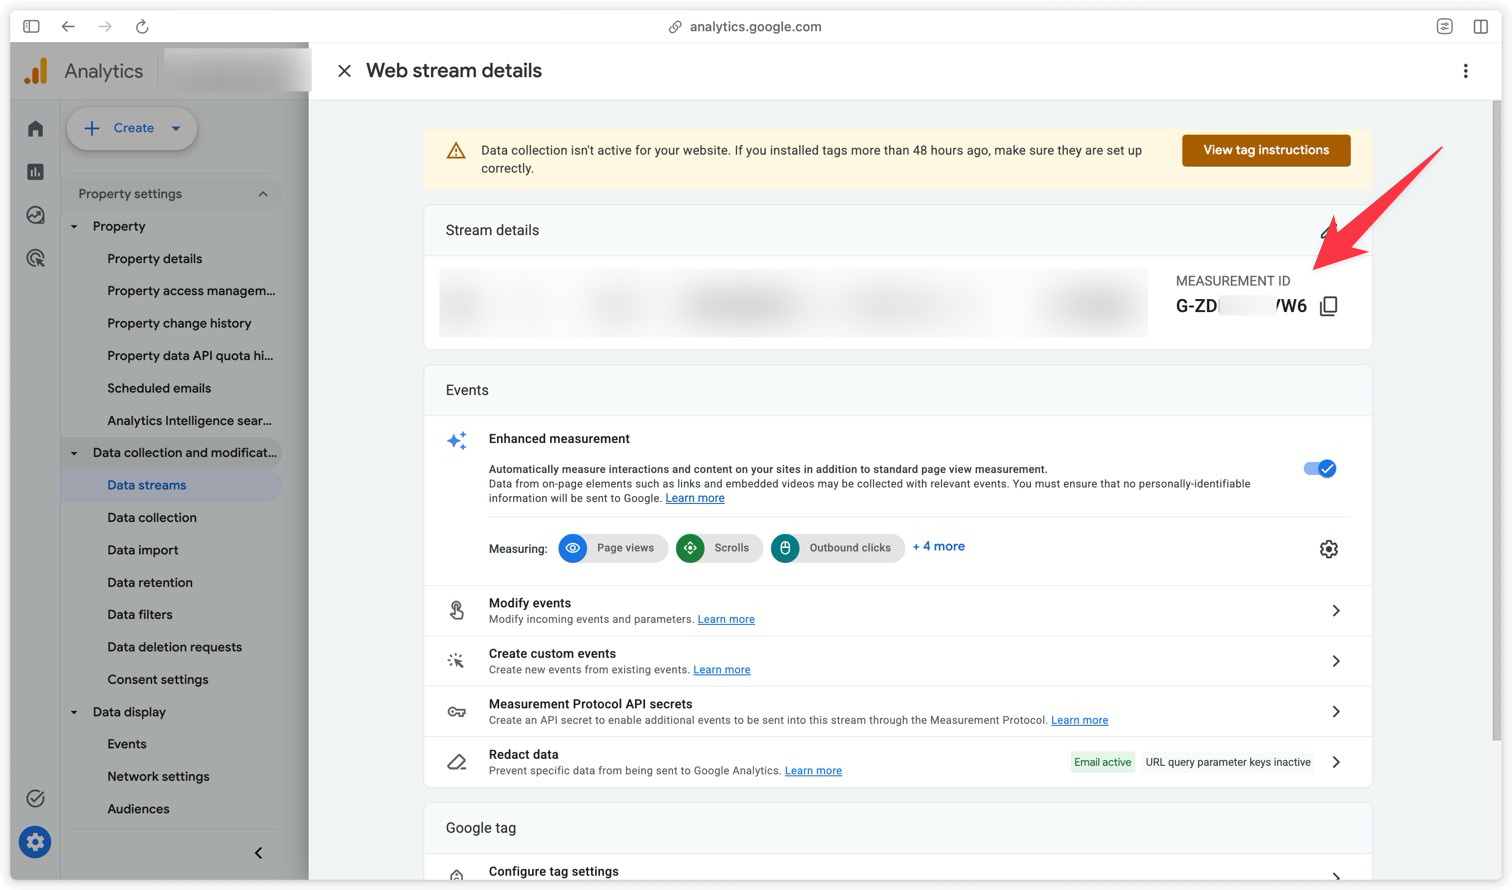
Measurement ID: Enter the measurement ID of your Google Analytics 4 data stream here. Go to Admin → Data Streams → Web → Measurement ID to find it. (example: G-1234567890)
Event Source
Choose the source of your conversion events here, from the following options:
- WEB: for use cases 2 and 4 presented above
- APP: for conversion events coming from a mobile app
- IN_STORE: for conversion events coming from a physical point of sale (potentially use cases 1 and 3 presented above, if the data source is a point of sale)
- MESSAGE: for conversion events coming from a messaging app.
- PHONE: for conversion events coming from a phone call.
- OTHER
Validate Only (Test Mode)
Set this value to true if you only want to validate your conversion events without Google Ads using them for attribution. This can be useful to test your configuration before you start sending real data. You’ll see any API errors, if there are any, without affecting your conversion data in Google Ads as long as your request is valid.
Don’t forget to set Validate Only to false once you’re ready to send your conversions to Google Ads/GA4, otherwise your conversion data won’t be taken into account.
Encoding
This one is a bit more technical: it’s the encoding used by sha256 when hashing user data.
If you’re not sure what to set, leave the default value HEX.
Managing Google Consent Mode
Data Manager API lets you pass the user’s consent status with each conversion. This is particularly important in the European Economic Area: consent signals determine how Google can use your data for attribution and optimization.
The tag exposes two consent parameters in the Request-Level Consent Settings group:
- Ad User Data → mapped to
consent.adUserDatain the Data Manager API payload - Ad Personalization → mapped to
consent.adPersonalizationin the Data Manager API payload
Each parameter accepts one of the following values:
Event Data(default value): the tag automatically reads the consent status from the incoming event (eventData.consent.ad_user_dataandeventData.consent.ad_personalization)CONSENT_STATUS_UNSPECIFIED: the consent status is not providedCONSENT_GRANTED: the user gave their consentCONSENT_DENIED: the user refused
These values can be hardcoded in the tag (for example CONSENT_GRANTED if all your offline events come from consenting users), or set dynamically thanks to the Event Data option, which reads the consent sent in the payload. This second approach, which is more reliable, is the one we detail below.
Sending the Consent Mode signals in the payload
Add a consent object to the params of your event, with the user’s consent status at the time of the conversion:
"consent": {
    "ad_user_data": "CONSENT_GRANTED",
    "ad_personalization": "CONSENT_DENIED"
}
You can send the values expected by the tag directly (CONSENT_GRANTED, CONSENT_DENIED). If your source system sends other values (for example granted / denied or true / false), the tag will understand them automatically and map them to the expected values.
| Source value | Target value |
|---|---|
granted | CONSENT_GRANTED |
denied | CONSENT_DENIED |
true | CONSENT_GRANTED |
false | CONSENT_DENIED |
CONSENT_GRANTED | CONSENT_GRANTED |
CONSENT_DENIED | CONSENT_DENIED |
The values granted / denied / true / false are accepted either as strings or booleans, regardless of case. Any other value (or a missing value) is converted to CONSENT_STATUS_UNSPECIFIED.
If you don’t fill in these fields, the consent status remains CONSENT_STATUS_UNSPECIFIED. In the European Economic Area, we recommend always passing an explicit value (CONSENT_GRANTED or CONSENT_DENIED) to stay compliant and allow Google to make the most of your conversions.
Configure the Measurement Protocol client
This part is an excerpt from our full documentation on offline events.
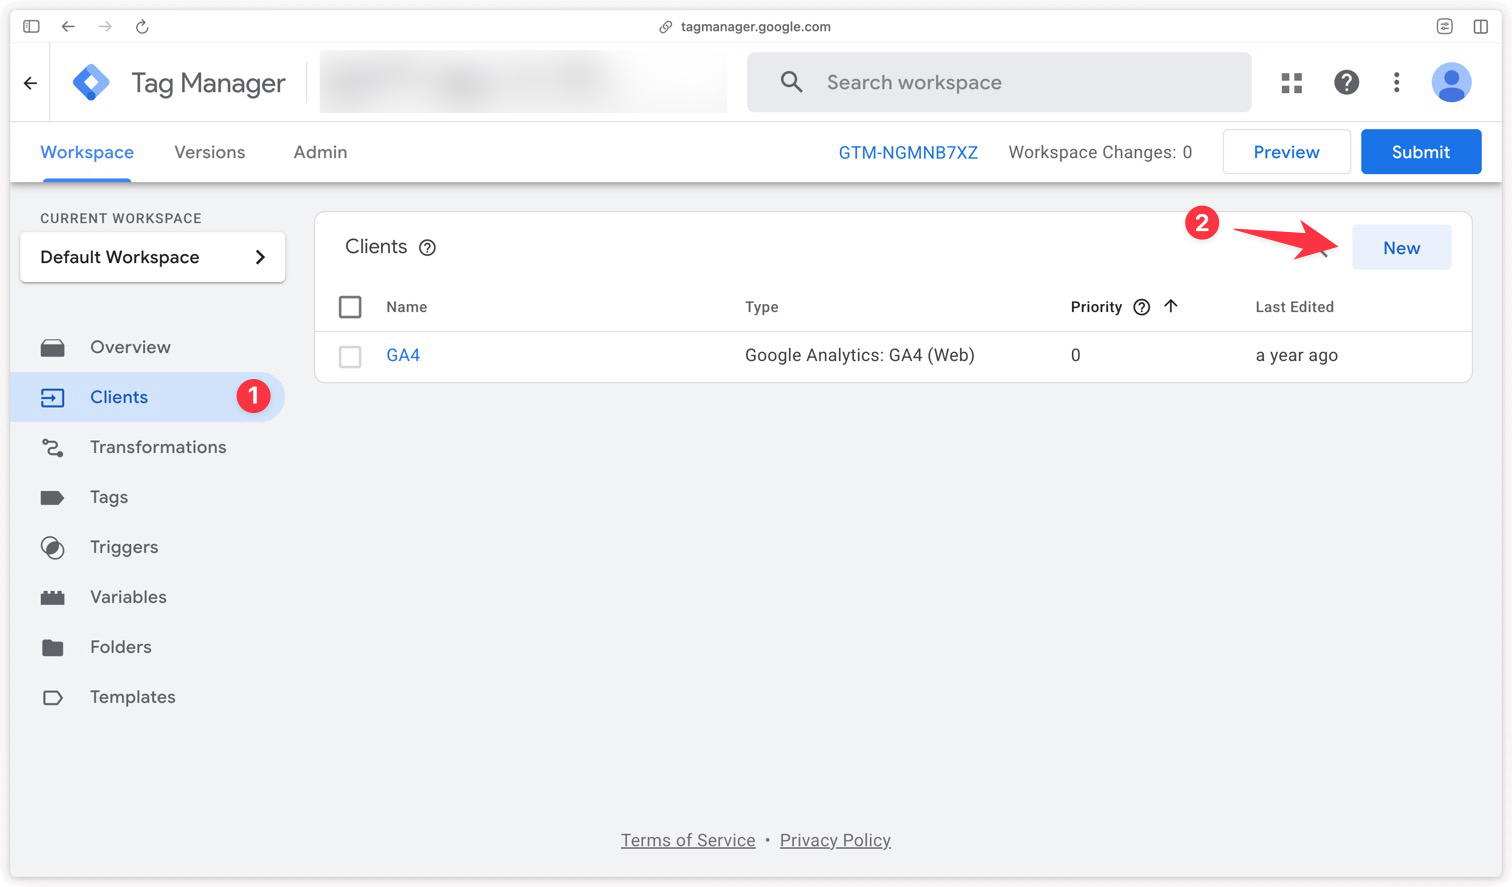
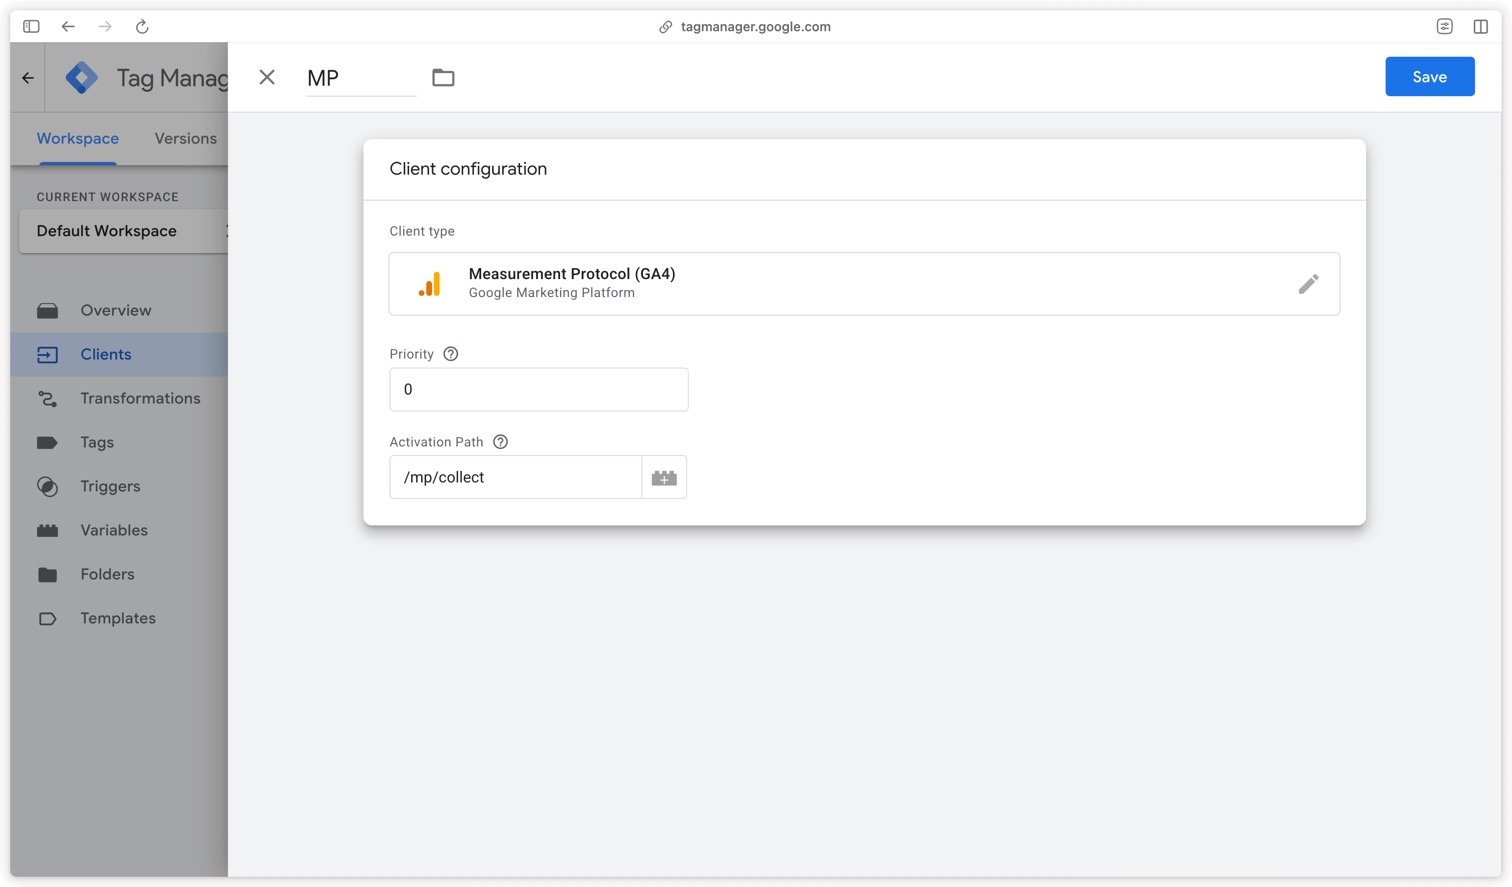
To receive the offline requests on the GTM Server side, you need to configure a Measurement Protocol client. To do so, create a new client in your GTM Server container and select the Measurement Protocol (GA4) client.
Even though the Measurement Protocol API is now deprecated, note that we use the Measurement Protocol as the standard for building the request sent to GTM Server. The Measurement Protocol (GA4) client is therefore necessary for GTM Server to correctly understand the request.
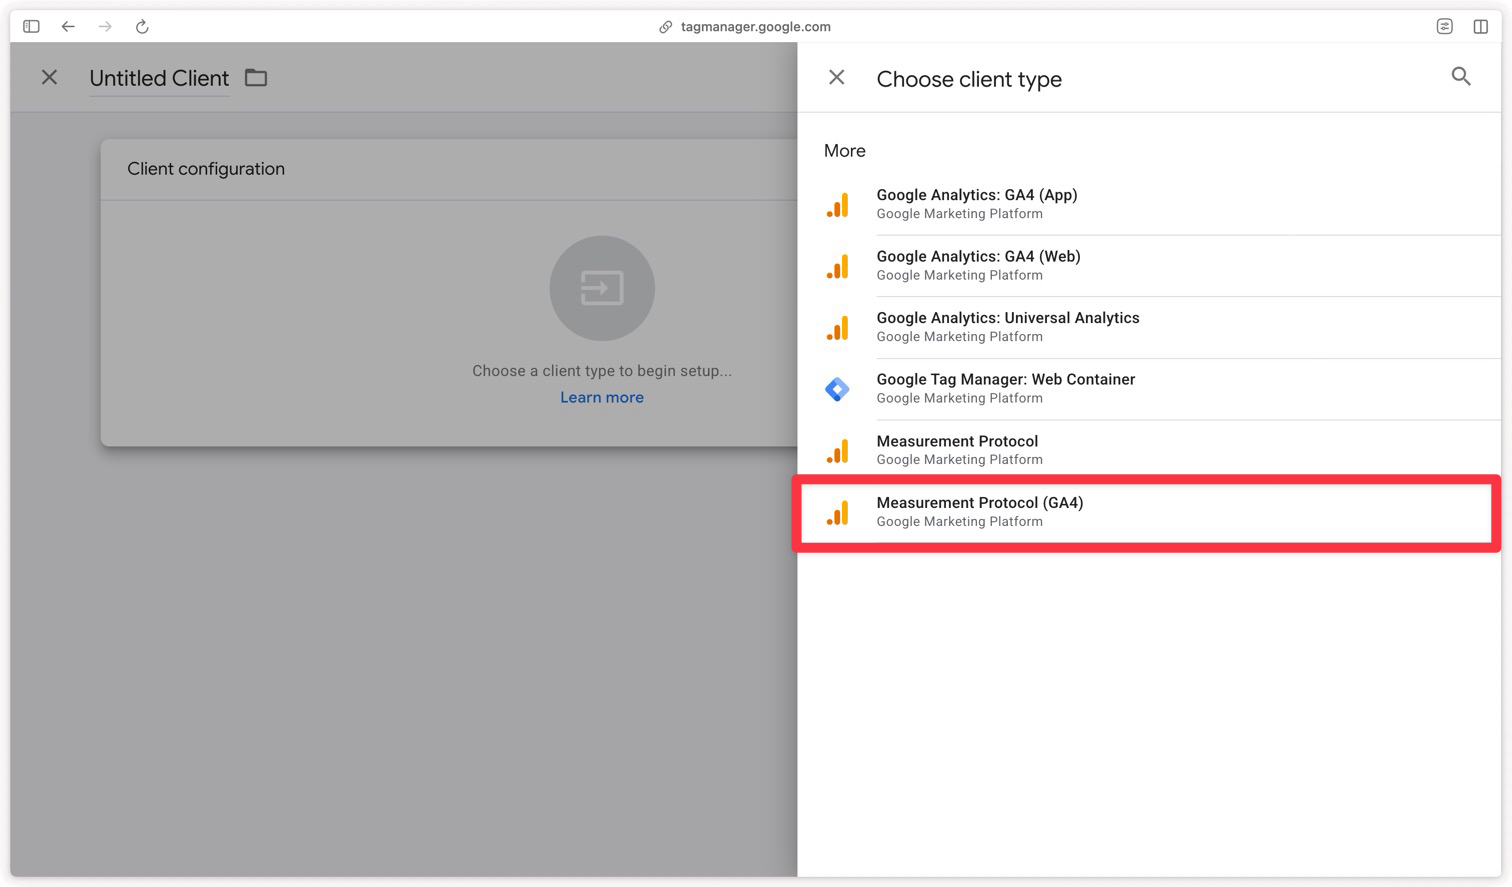
Then select the Measurement Protocol (GA4) client.
Once the client is added, configure it with the activation path /mp/collect. The choice of activation path is arbitrary, but it must be consistent with the URL you’ll use to send your conversion events to GTM Server.
Trigger the Data Manager API tag
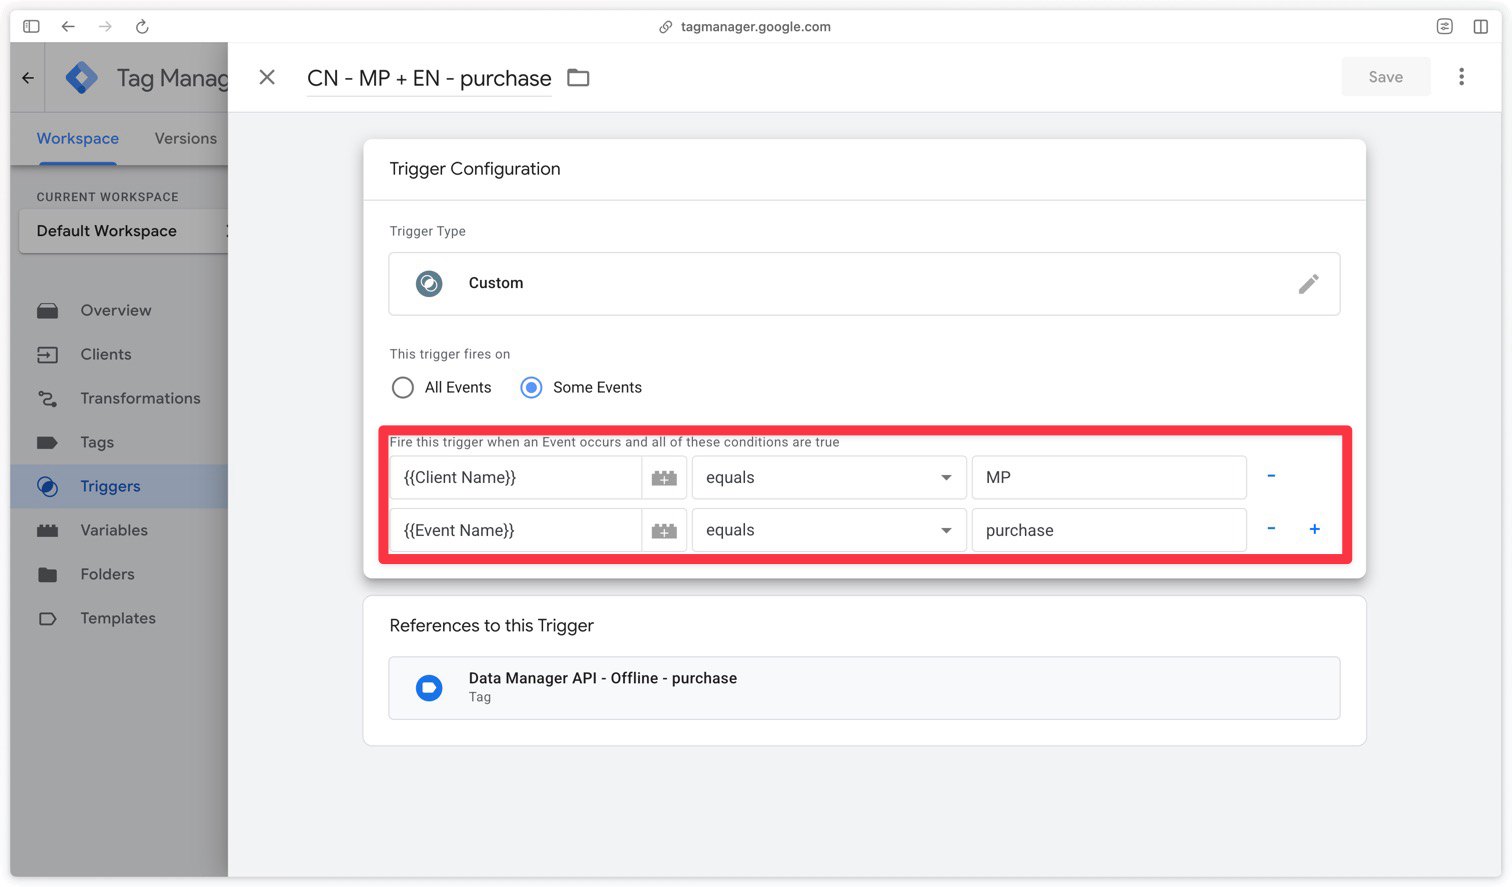
Once the Measurement Protocol (GA4) client is configured, you can create a trigger for your Data Manager API tag. To do so, create a new Custom trigger and enter the name of the event you want to use to fire the tag (in this example, we chose purchase) and the name of the client used (in this example, we chose MP).
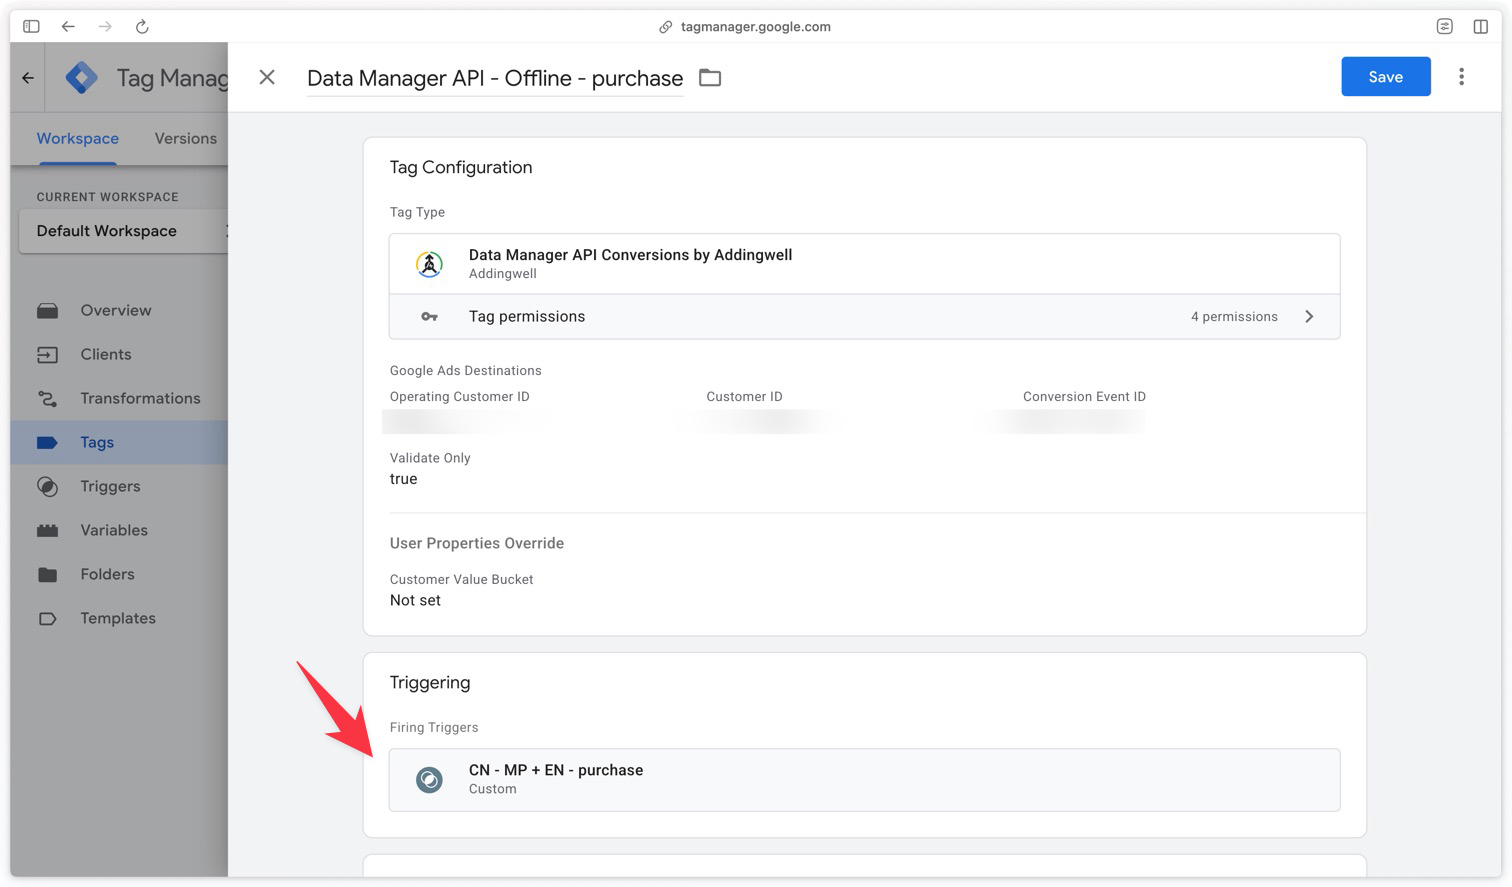
Then add this trigger to your Data Manager API tag.
Example payload to send to your GTM Server endpoint
This part is an excerpt from our full documentation on offline events.
To test the Data Manager API tag configuration, you can send a test conversion event to your GTM Server endpoint. Here is an example JSON payload you can use to test sending a purchase event to Google Ads and/or GA4 via Data Manager API.
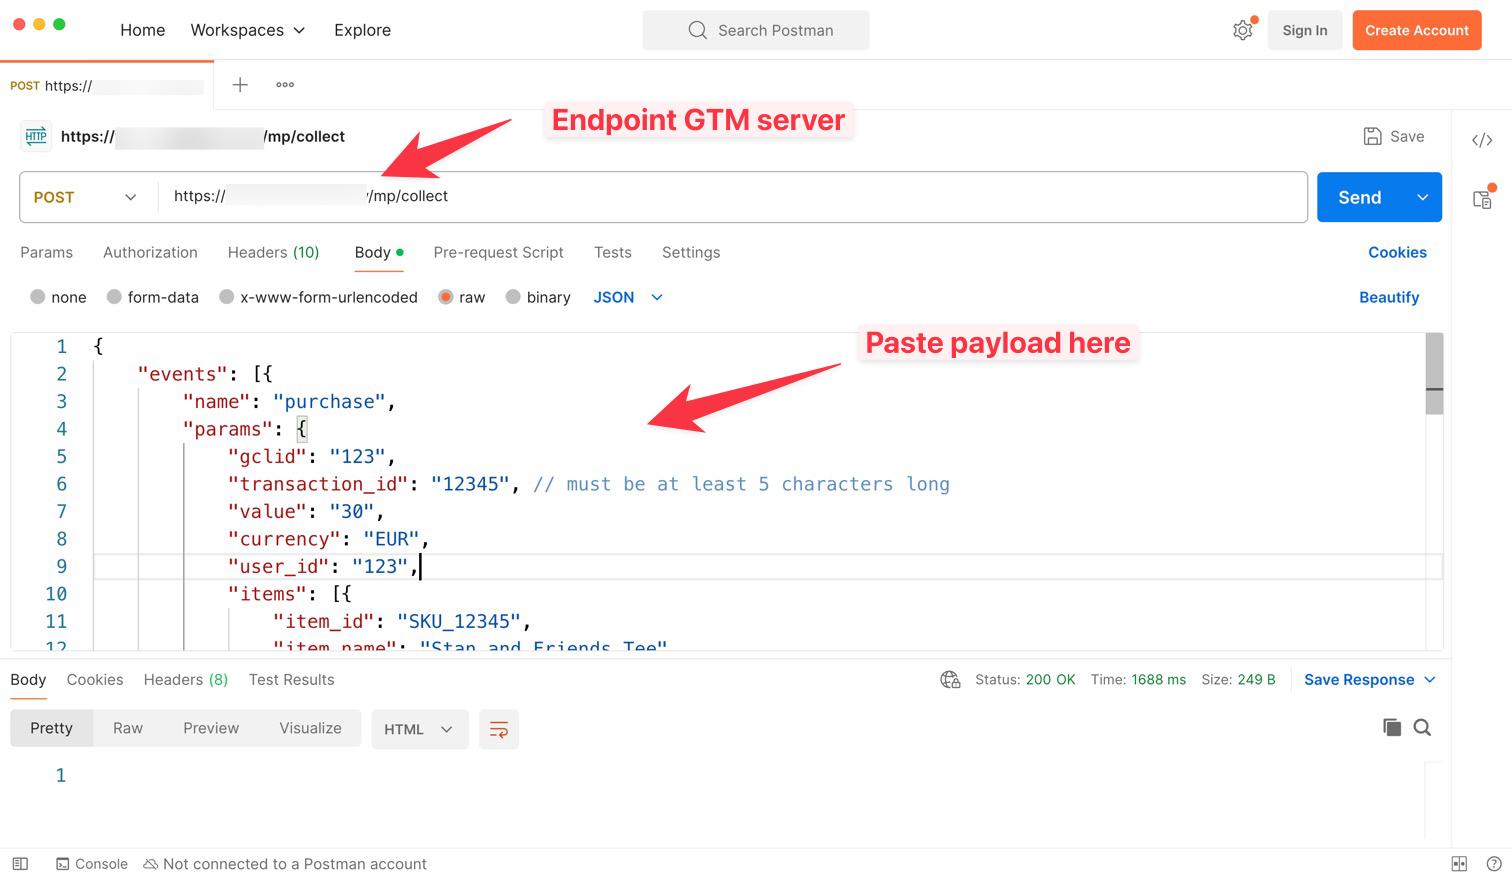
It’s important here to use the same activation path as the one configured in the Measurement Protocol (GA4) client of your GTM Server container. In this example, we chose /mp/collect.
POST https://<your-gtm-server-endpoint>/mp/collect{
"events": [{
"name": "purchase",
"params": {
"gclid": "123",
"transaction_id": "12345", // must be at least 5 characters long
"value": "30",
"currency": "EUR",
"user_id": "1234567890",
"items": [{
"item_id": "SKU_12345",
"item_name": "Stan and Friends Tee",
"affiliation": "Google Merchandise Store",
"coupon": "SUMMER_FUN",
"currency": "EUR",
"discount": 2.22,
"index": 0,
"item_brand": "Google",
"item_category": "Apparel",
"item_category2": "Adult",
"item_category3": "Shirts",
"item_category4": "Crew",
"item_category5": "Short sleeve",
"item_list_id": "related_products",
"item_list_name": "Related Products",
"item_variant": "green",
"location_id": "ChIJIQBpAG2ahYAR_6128GcTUEo",
"price": 10.01,
"google_business_vertical": "retail",
"quantity": 3
}],
"client_id": "1234567890.1234567890",
"consent": {
"ad_user_data": "CONSENT_GRANTED",
"ad_personalization": "CONSENT_GRANTED"
},
"user_data": {
"email_address": "[email protected]",
"phone_number": "+33627362122",
"address": {
"first_name": "John",
"last_name": "Doe",
"postal_code": "75000",
"city": "Paris",
"country": "FR"
}
}
}
}]
}Mapping between the eventData and the Data Manager API payload
You don’t send the format expected by Data Manager API directly: you send an event in the Measurement Protocol / GA4 format (the eventData above), and it’s the tag that transforms it into a Data Manager API request. The table below details this mapping, field by field, to help you build your own requests.
Personal data (email, phone, first name, last name) is automatically hashed with SHA-256 by the tag: you send it in clear text in your eventData, and it comes out hashed in the Data Manager API payload. You can also send already-hashed values directly — in that case they won’t be hashed again.
Event
event_name→eventNamepurchase).eventTimestampeventSourceWEB, IN_STORE, etc.), not in the eventData.user_id→userIdclient_id→clientIdcid URL parameter.Ad identifiers
gclid→adIdentifiers.gclidgbraid→adIdentifiers.gbraidwbraid→adIdentifiers.wbraidTransaction
value→conversionValuecurrency→currencyEUR).transaction_id→transactionIdUser data
user_data.email_addressoruser_data.email→userData.userIdentifiers[].emailAddressuser_data.phone_numberoruser_data.phone→userData.userIdentifiers[].phoneNumber+33627362122).user_data.address[0].first_name→userData.userIdentifiers[].address.givenNameuser_data.address[0].last_name→userData.userIdentifiers[].address.familyNameuser_data.address[0].country→userData.userIdentifiers[].address.regionCodeFR), not hashed.user_data.address[0].postal_code→userData.userIdentifiers[].address.postalCodeCart (cartData)
items[].item_id→cartData.items[].itemIditems[].merchant_product_id→cartData.items[].merchantProductIditem_id.items[].quantity→cartData.items[].quantityitems[].price→cartData.items[].unitPriceitems[].{item_name, affiliation, coupon, …}→cartData.items[].additionalItemParameters[]item_name, affiliation, coupon, discount, index, item_brand, item_category…) are passed through as-is as parameterName / value pairs.items[].discount→cartData.transactionDiscountAdditional parameters
taxorcouponorshippingorcreative_nameorcreative_slotorpromotion_idorpromotion_name→additionalEventParameters[]parameterName / value pairs.User properties
new_customerorcustomer_type→userProperties.customerTypenew_customer (true/false) is translated into NEW / RETURNING; customer_type is passed through in uppercase.Consent
consent.ad_user_data→consent.adUserDataCONSENT_GRANTED / CONSENT_DENIED (see the Consent Mode section).consent.ad_personalization→consent.adPersonalizationCONSENT_GRANTED / CONSENT_DENIED (see the Consent Mode section).Most of these fields can also be set or overridden directly in the tag configuration (GCLID, email, name, country code, etc.). A value set in the tag takes precedence over the one present in the eventData.
Sending the payload to GTM Server with Postman
We recommend using a tool like Postman to test sending this request to your GTM Server endpoint. Make sure to replace the URL with your own GTM Server endpoint and to set the HTTP method to POST.
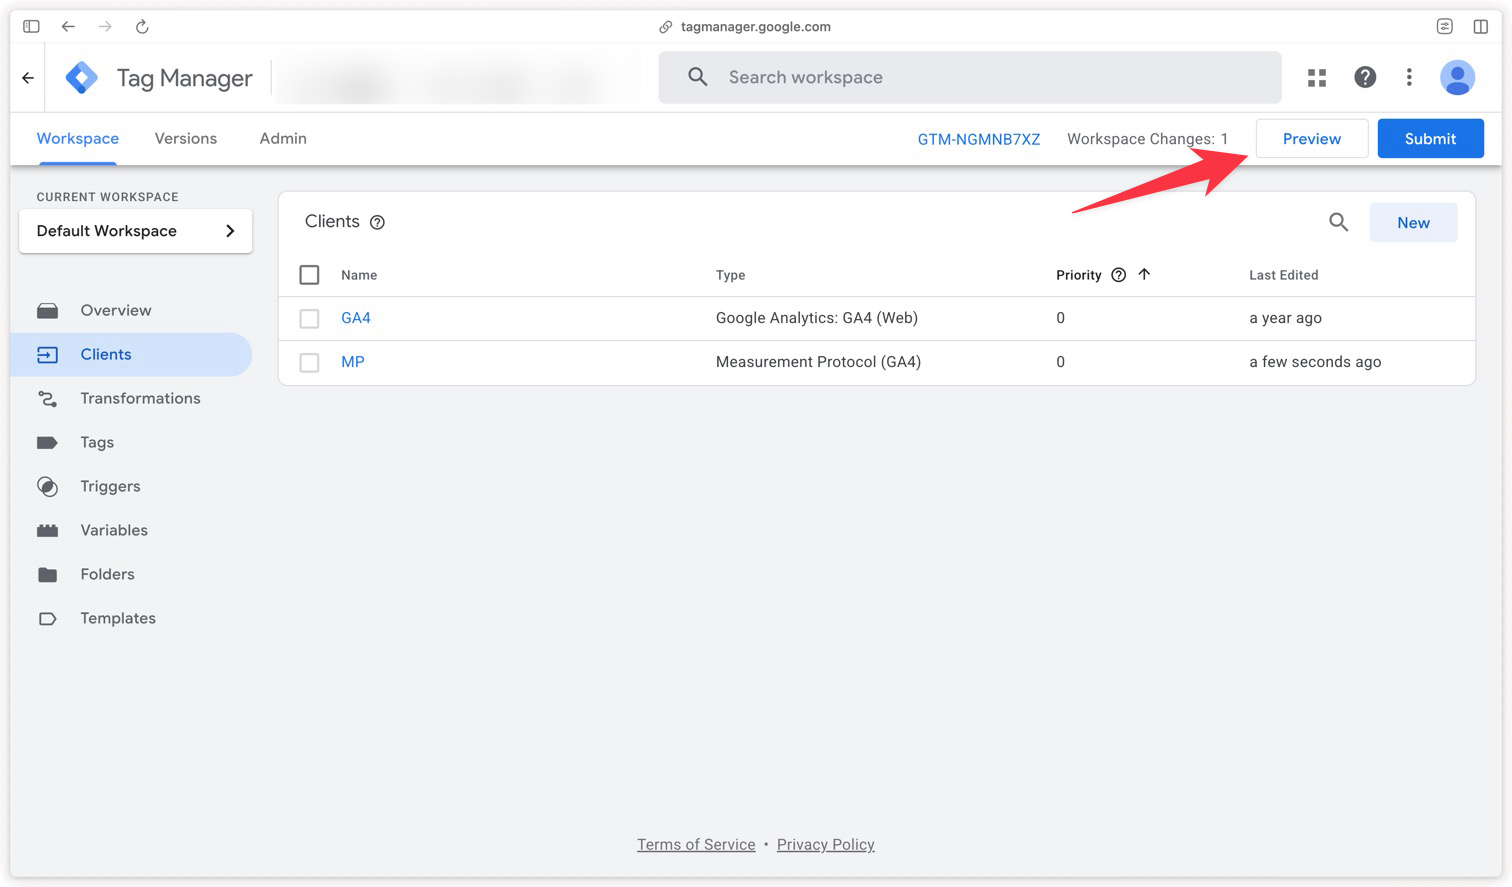
Then open your GTM Server preview by clicking Preview.
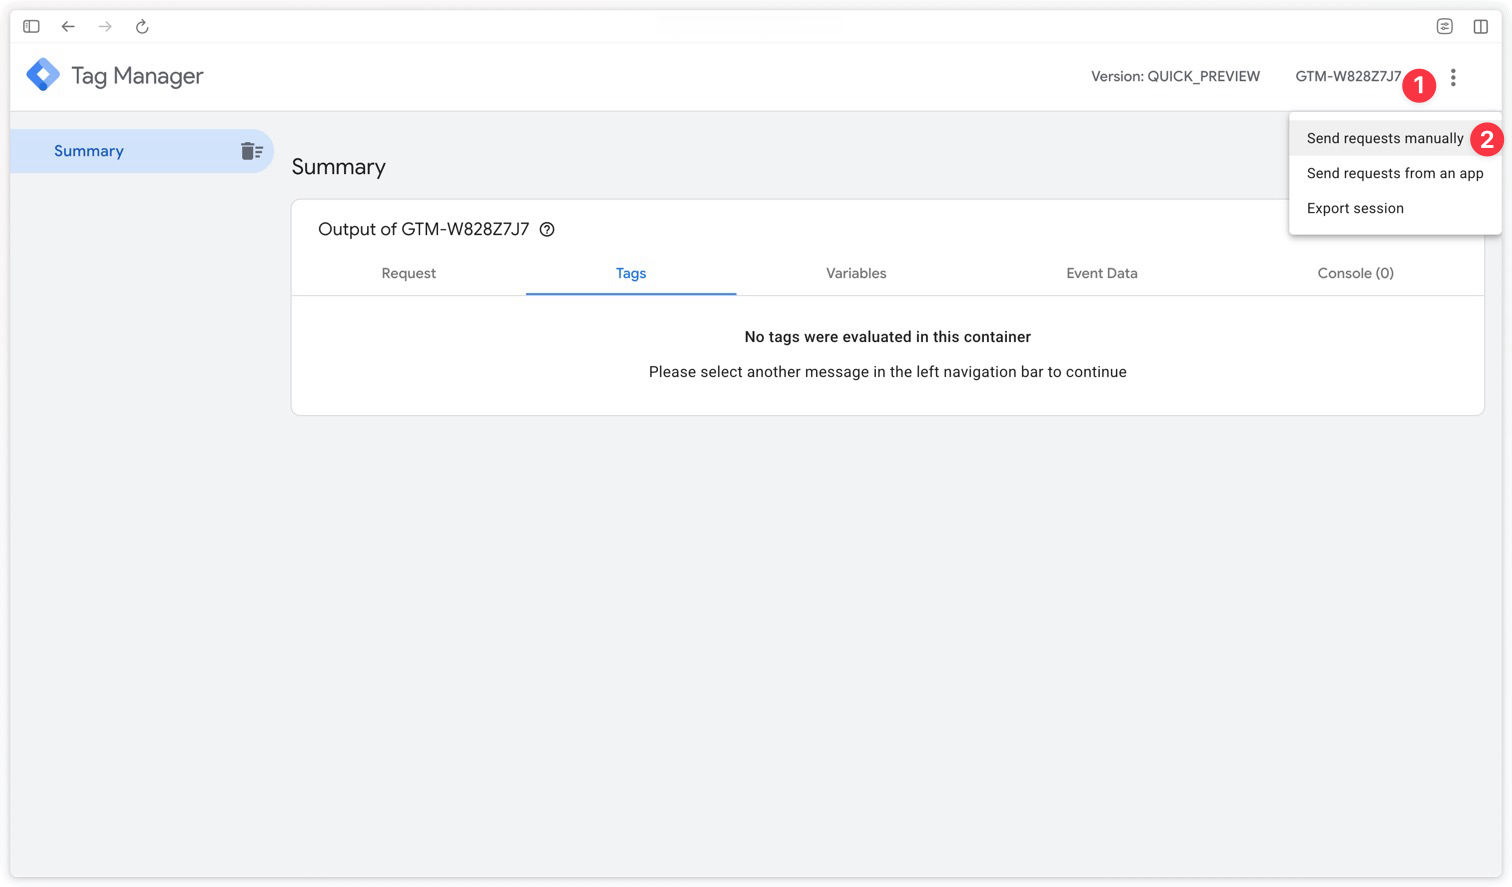
Then click the three dots in the top right of the preview window and select Send requests manually.
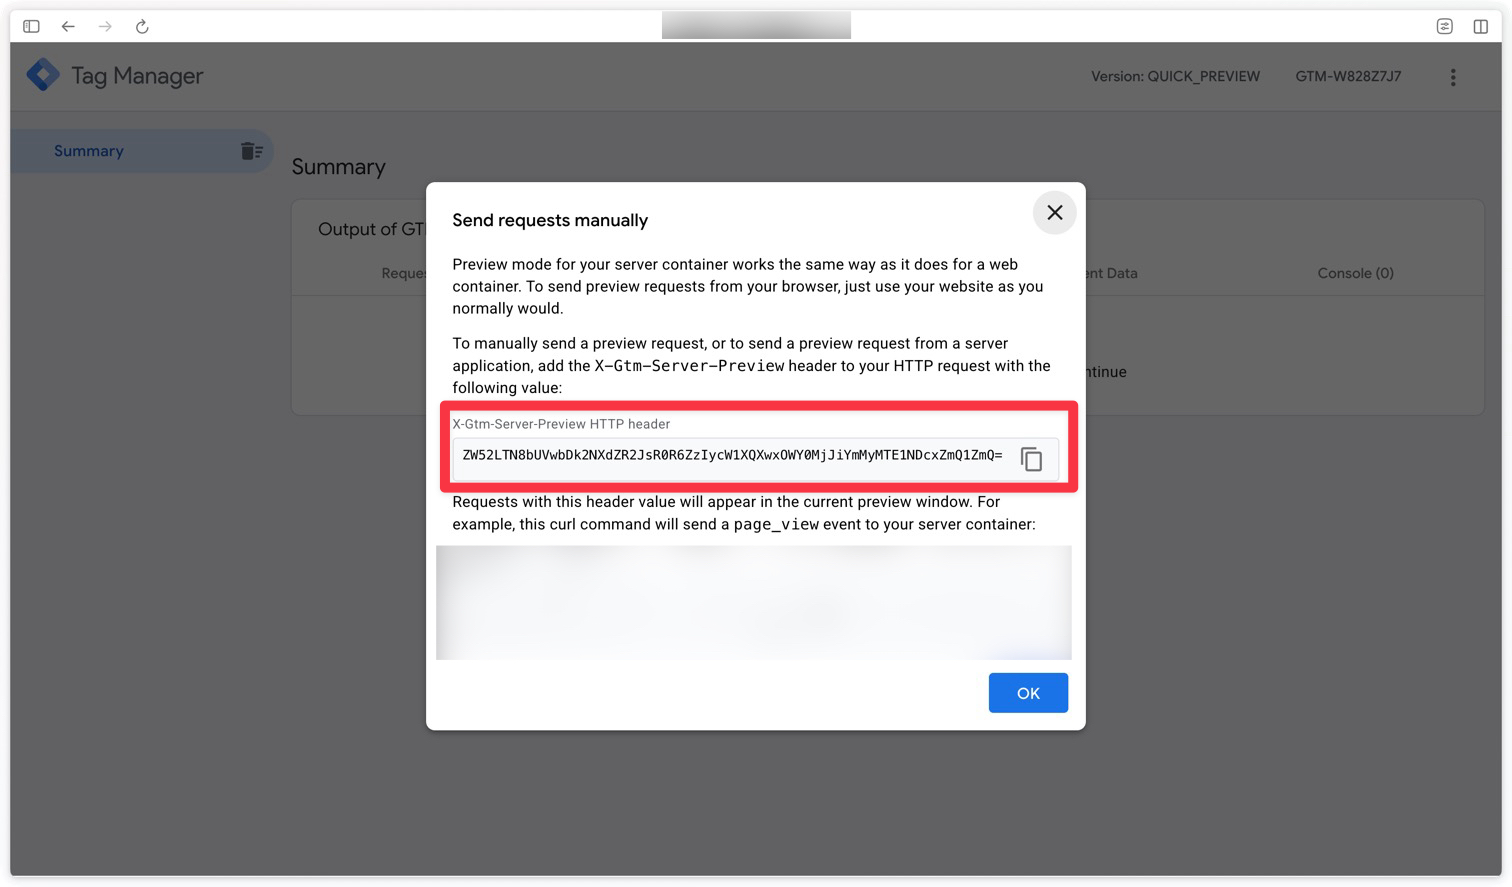
Then copy the preview token.
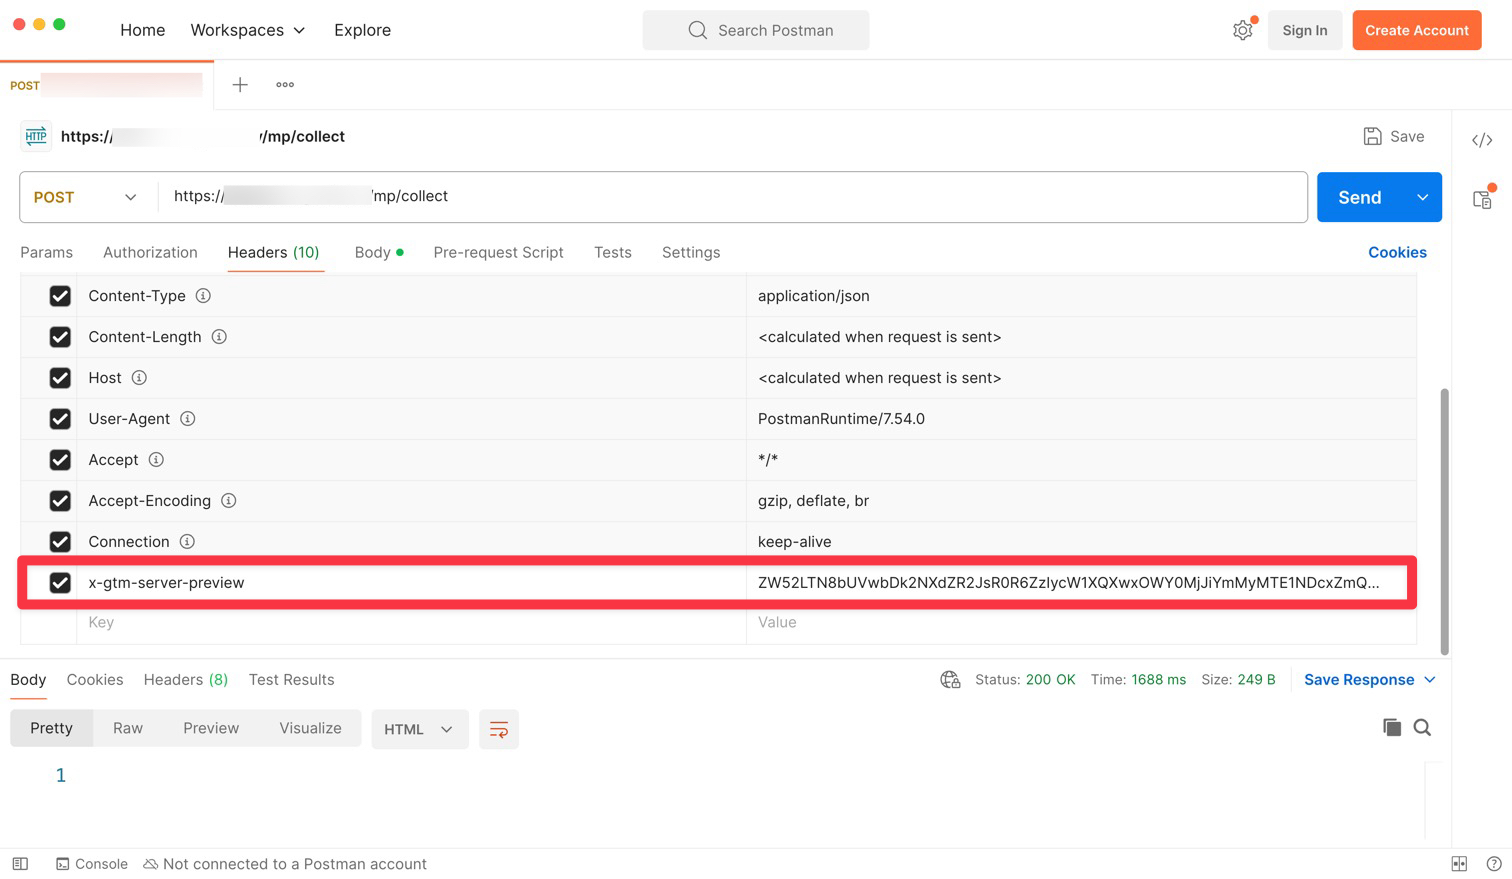
Add the preview token to the Headers tab in Postman with the key x-gtm-server-preview.
This token links your Postman request to your debug session: it’s what allows your event to appear in the preview window instead of being processed silently as production traffic. Without this header, you won’t see anything come through in the preview.
Verifying the data sent to Data Manager API
Now that you’ve configured your Data Manager API tag and sent a test conversion event to your GTM Server endpoint with Postman, it’s time to check that your data is received correctly — first in the GTM Server preview, and then in the platforms (Google Ads, Google Analytics 4).
In the GTM Server preview
To check that your conversion events are correctly sent to Data Manager API, you can use the preview mode of Google Tag Manager Server. Make sure to set the Validate Only option to true so you don’t send real data to Google Ads during your tests.
The first thing to check is that your event is properly received in the GTM Server preview. Then, click the purchase event in the list of received events and check that the Data Manager API tag fires successfully.
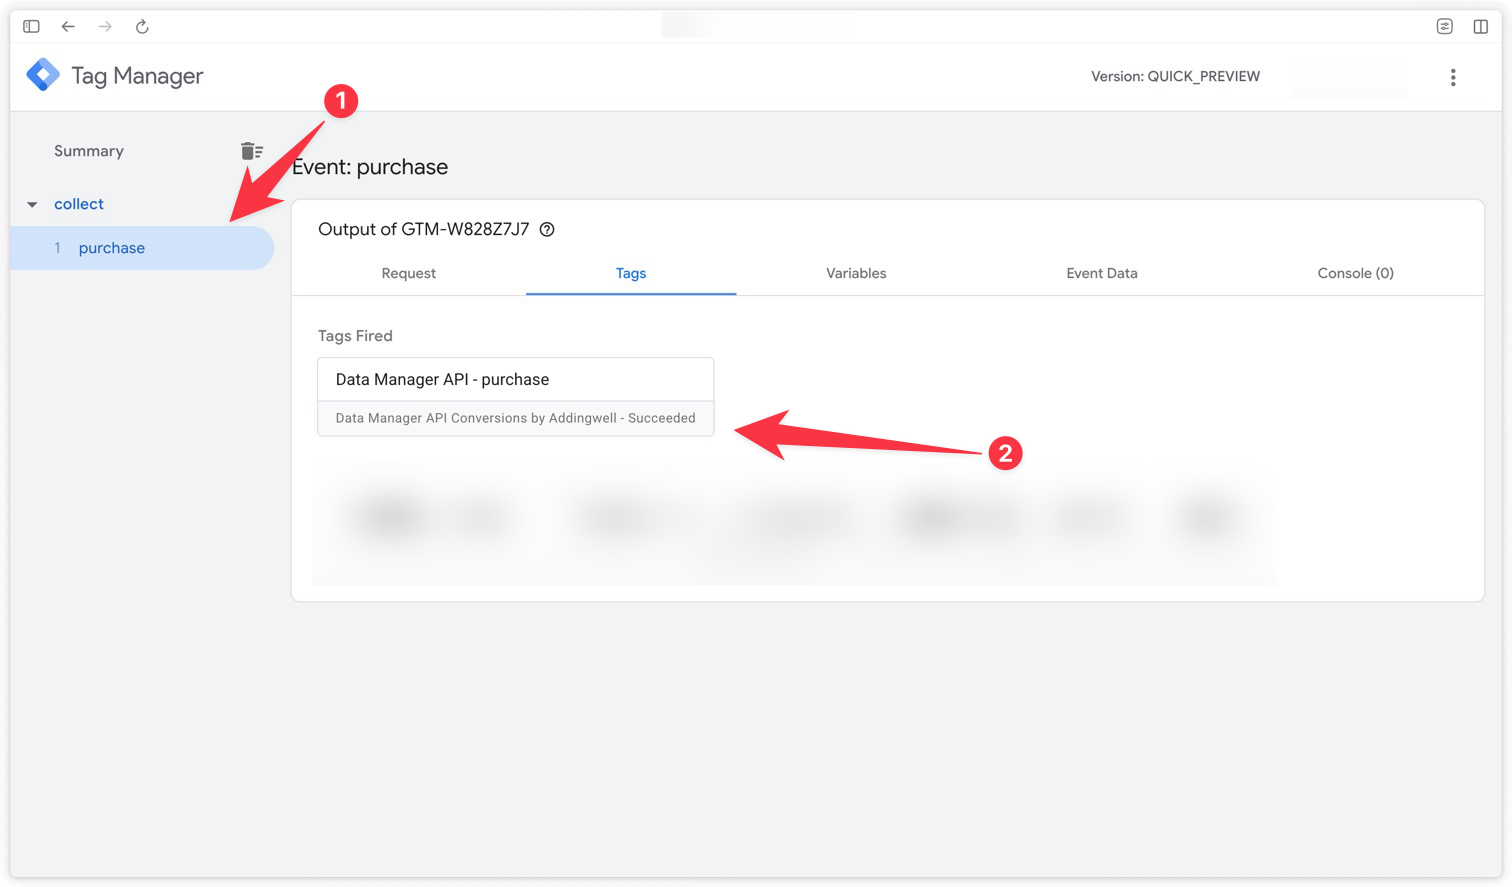
Then click the Data Manager API tag to check that it does send a request to Data Manager API.
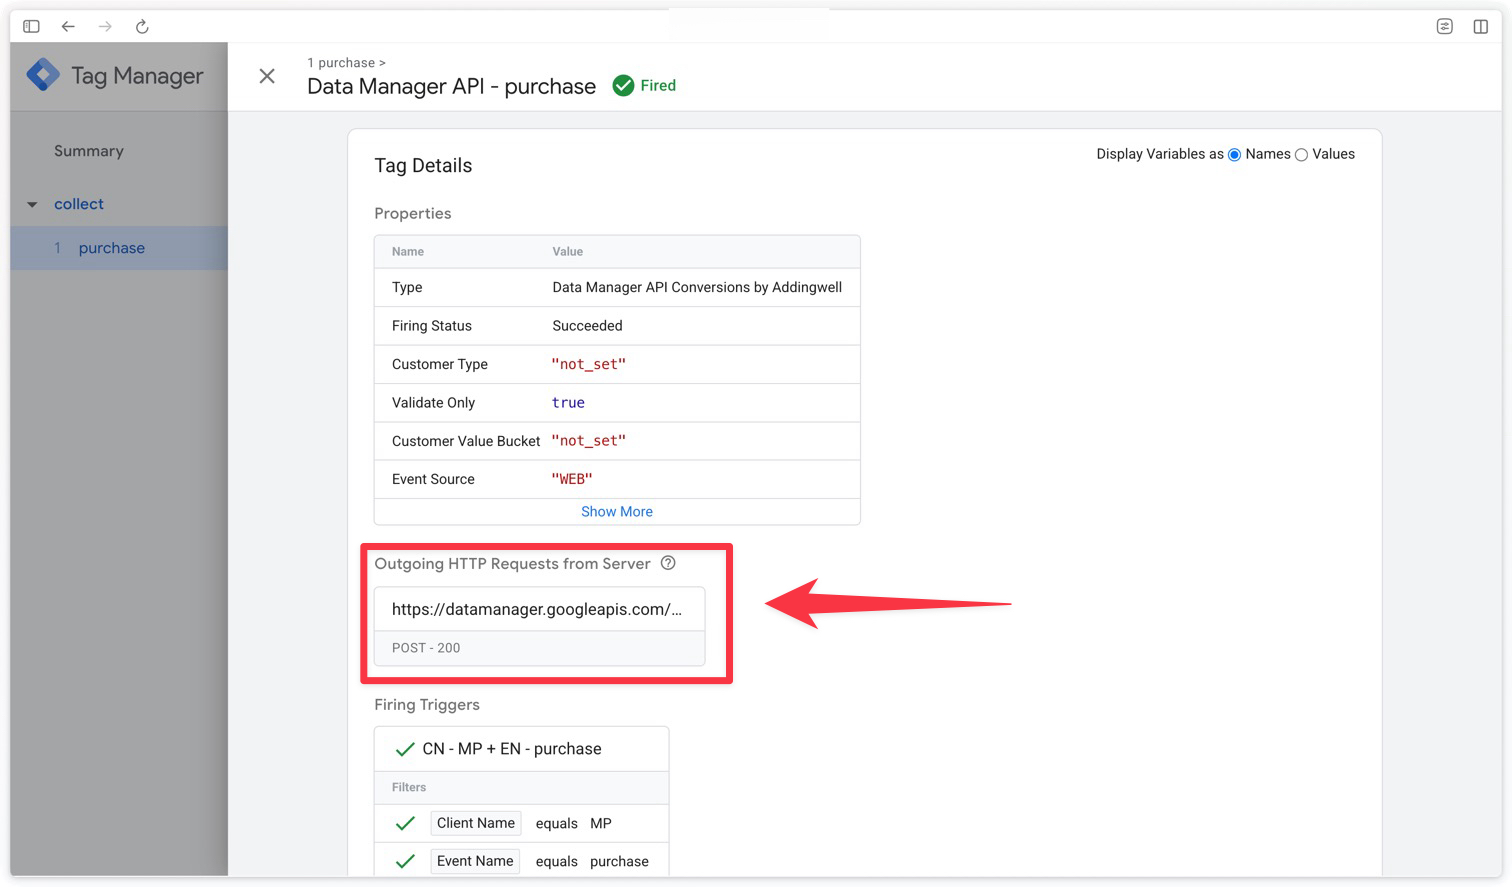
Then click the request sent to Data Manager API to check that the data sent matches your expectations.
In particular, you can check that the destination identifiers (Google Ads and/or GA4) are correct, that the GCLID is present, that the transaction_id is correct, and that the user data is correctly hashed.
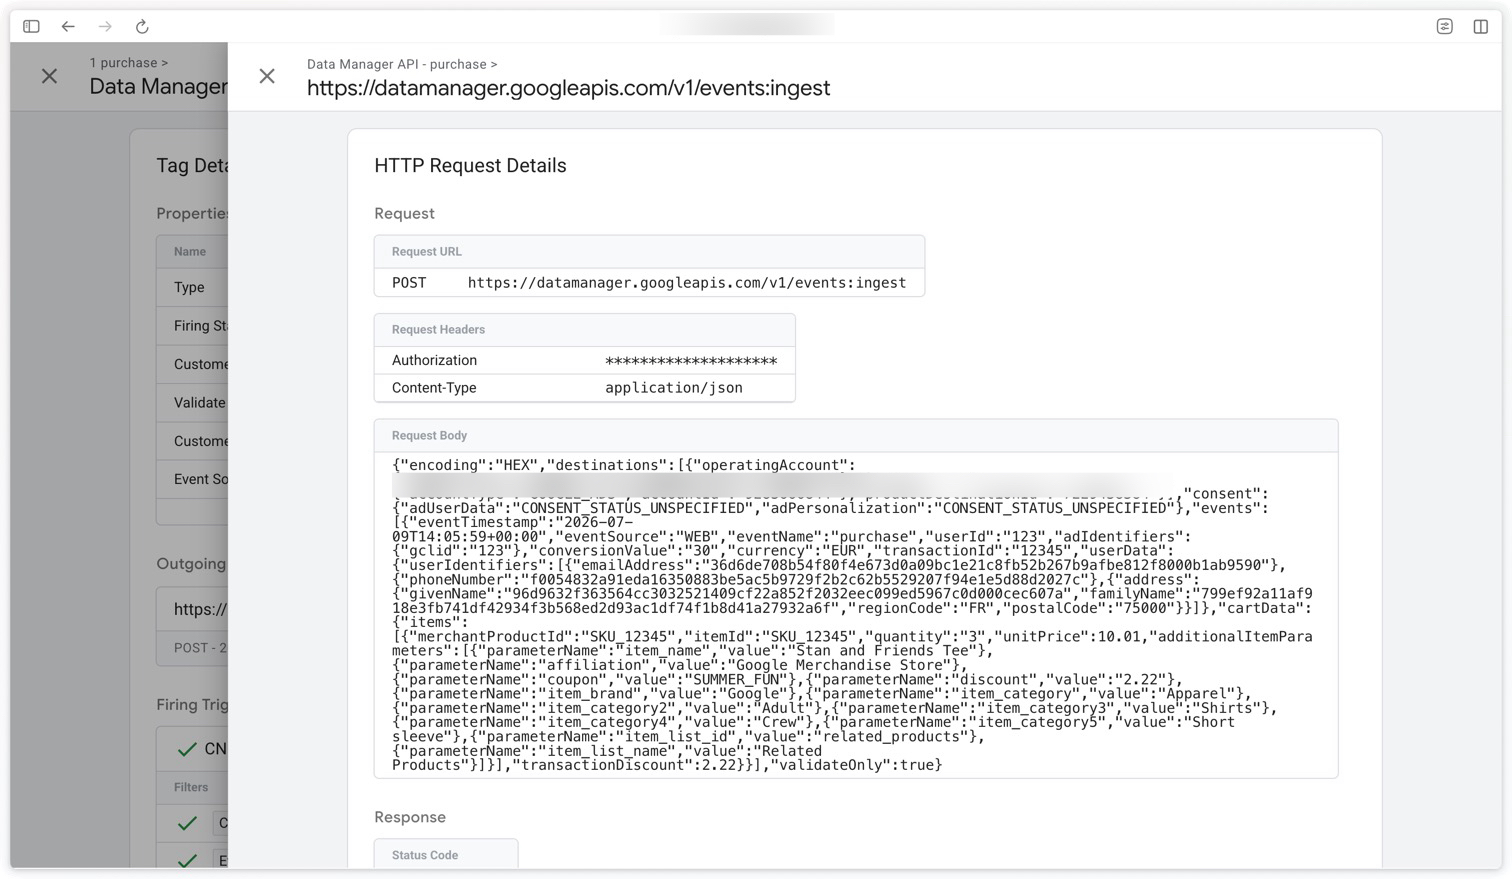
Here is the body of the request formatted correctly:
{
  "encoding": "HEX",
  "destinations": [
    {
      "operatingAccount": {
        "accountType": "GOOGLE_ADS",
        "accountId": "1234567890"
      },
      "loginAccount": {
        "accountType": "GOOGLE_ADS",
        "accountId": "1234567890"
      },
      "productDestinationId": "1234567890"
    }
  ],
  "consent": {
    "adUserData": "CONSENT_STATUS_UNSPECIFIED",
    "adPersonalization": "CONSENT_STATUS_UNSPECIFIED"
  },
  "events": [
    {
      "eventTimestamp": "2026-07-09T14:05:59+00:00",
      "eventSource": "WEB",
      "eventName": "purchase",
      "userId": "123",
      "adIdentifiers": {
        "gclid": "123"
      },
      "clientId": "1234567890.1234567890",
      "conversionValue": "30",
      "currency": "EUR",
      "transactionId": "12345",
      "userData": {
        "userIdentifiers": [
          {
            "emailAddress": "36d6de708b54f80f4e673d0a09bc1e21c8fb52b267b9afbe812f8000b1ab9590"
          },
          {
            "phoneNumber": "f0054832a91eda16350883be5ac5b9729f2b2c62b5529207f94e1e5d88d2027c"
          },
          {
            "address": {
              "givenName": "96d9632f363564cc3032521409cf22a852f2032eec099ed5967c0d000cec607a",
              "familyName": "799ef92a11af918e3fb741df42934f3b568ed2d93ac1df74f1b8d41a27932a6f",
              "regionCode": "FR",
              "postalCode": "75000"
            }
          }
        ]
      },
      "cartData": {
        "items": [
          {
            "merchantProductId": "SKU_12345",
            "itemId": "SKU_12345",
            "quantity": "3",
            "unitPrice": 10.01,
            "additionalItemParameters": [
              {
                "parameterName": "item_name",
                "value": "Stan and Friends Tee"
              },
              {
                "parameterName": "affiliation",
                "value": "Google Merchandise Store"
              },
              {
                "parameterName": "coupon",
                "value": "SUMMER_FUN"
              },
              {
                "parameterName": "discount",
                "value": "2.22"
              },
              {
                "parameterName": "item_brand",
                "value": "Google"
              },
              {
                "parameterName": "item_category",
                "value": "Apparel"
              },
              {
                "parameterName": "item_category2",
                "value": "Adult"
              },
              {
                "parameterName": "item_category3",
                "value": "Shirts"
              },
              {
                "parameterName": "item_category4",
                "value": "Crew"
              },
              {
                "parameterName": "item_category5",
                "value": "Short sleeve"
              },
              {
                "parameterName": "item_list_id",
                "value": "related_products"
              },
              {
                "parameterName": "item_list_name",
                "value": "Related Products"
              }
            ]
          }
        ],
        "transactionDiscount": 2.22
      }
    }
  ],
  "validateOnly": true
}
Verifying in Google Ads
Once you’re satisfied with the requests sent to Data Manager API, you can set the validateOnly parameter to false. This will actually count the conversions in Google Ads.
Once your requests are sent with validateOnly set to false, you can check in Google Ads that the data is received correctly.
Note that if you’ve just created your conversion action in Google Ads, you’ll need to wait several hours before you see your conversion action switch to the Active status.
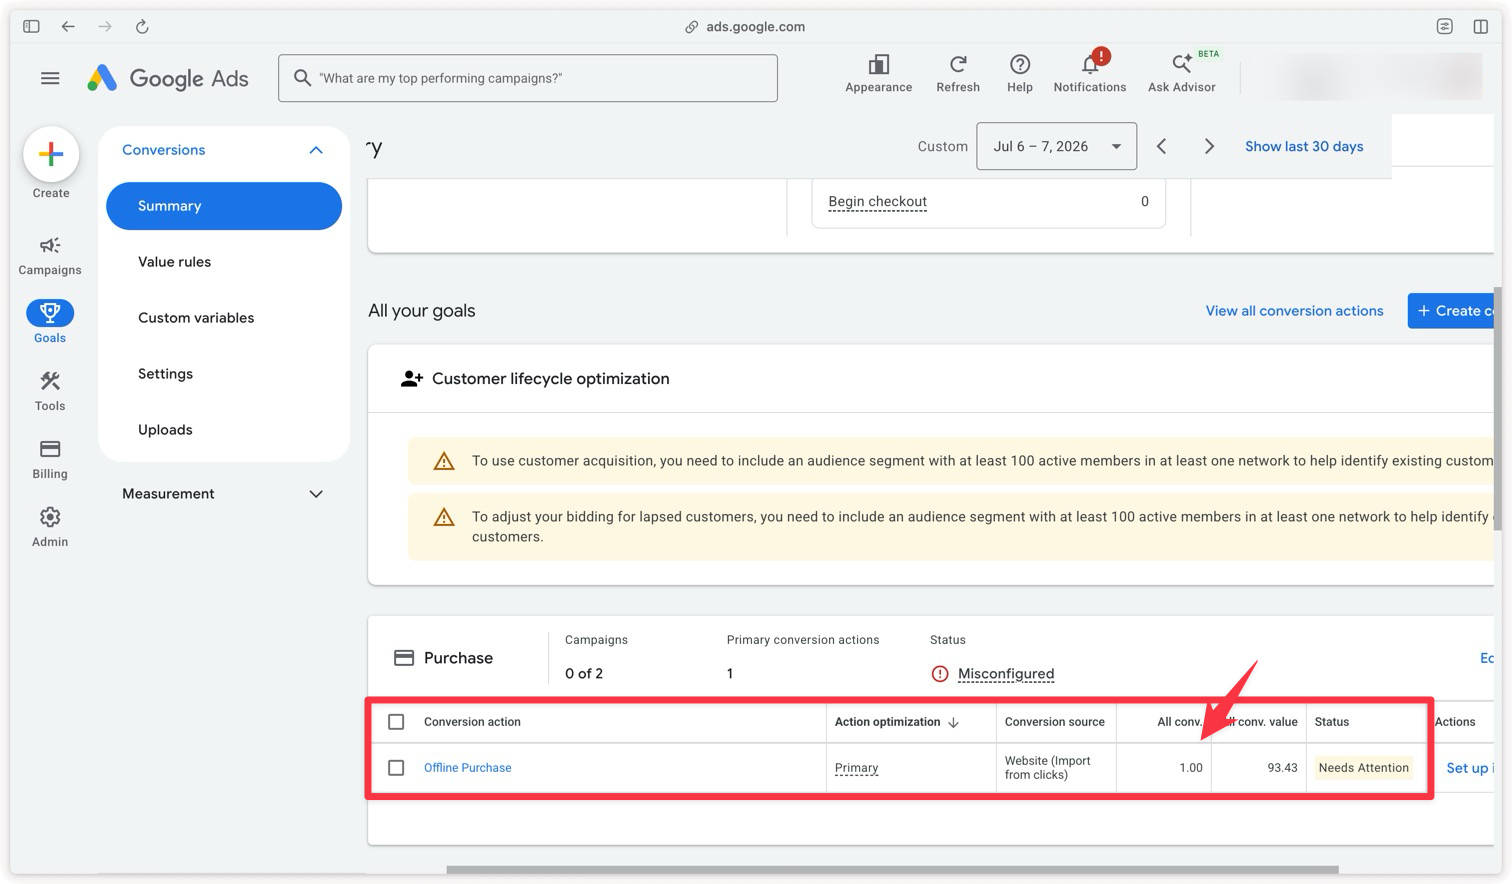
Verifying in Google Analytics 4
Based on our tests, there is no way to see Data Manager API events in GA4’s DebugView to check the reception and content of the events. The only way to verify that the events are received by GA4 is to wait a few hours and check in the reports that the events are being counted.
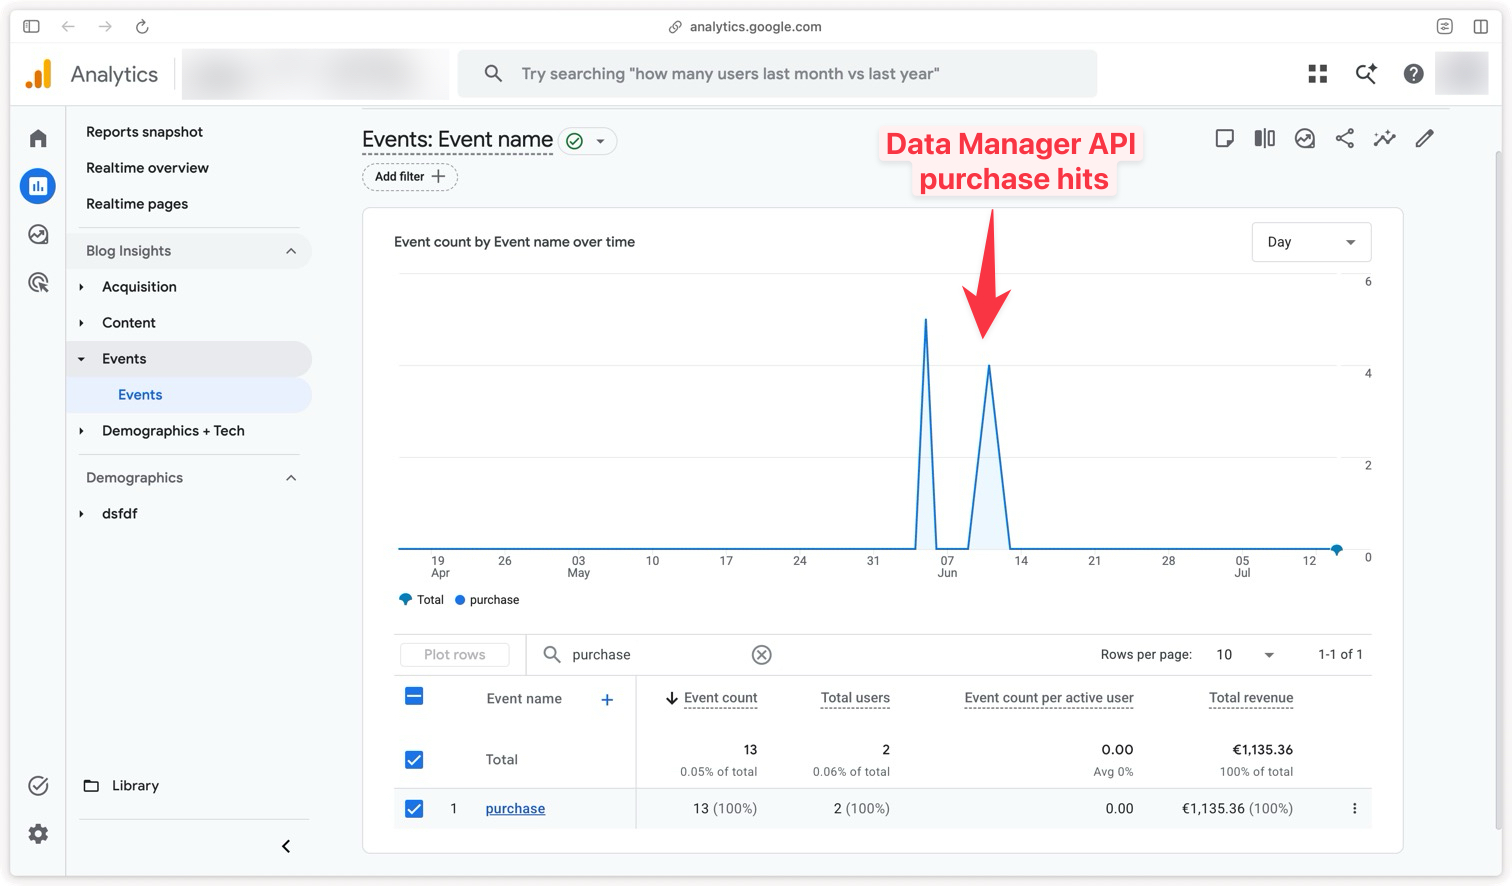
Congratulations!
Congratulations! You now have everything you need to send your conversions to Google Ads and GA4 via Data Manager API from your GTM Server container. To recap, the setup takes place in a few main steps: configure authentication with the Addingwell service account, import and configure the Data Manager API tag, set up the Measurement Protocol (GA4) client to receive your offline requests, fire the tag on the right event, then test everything with Postman before setting validateOnly to false.
Beyond the technical setup, keep in mind that the success of your project depends above all on the quality of the data you send: a transaction_id that’s consistent between your online and offline flows to avoid duplicates, a GCLID or good-quality first-party data to tie the conversion back to the original click, and reliable sending from your source system (CRM, POS, e-commerce). It’s this rigor upfront that will let you achieve complete measurement and effective optimization of your campaigns.
If you have a question or run into a blocker during your implementation, don’t hesitate to email our support team.