How to Implement User Consent in Server-Side Tracking?
The GDPR (General Data Protection Regulation), enforced in May 2018, aims to protect citizens’ privacy, ensure ethical use of personal data, and hold companies accountable for data processing. It is crucial for safeguarding individuals’ rights.
Make no mistake: Server-Side tracking is not a way to bypass GDPR obligations. Even after migrating your tracking to a Server-Side setup, you must still:
- Collect user consent via your website’s CMP (Consent Management Platform).
- Respect the user’s choice by triggering or blocking different tags (Analytics and Media) based on their decision.
How to Manage Consent with Server-Side Tracking? What should be done about Google Consent Mode v2? Should it be implemented in basic or advanced mode? How can you transmit consent information to your server container?
Consent management remains a complex topic since implementations vary across CMP solutions like Axeptio, Didomi, and OneTrust.
This article is meant to provide guidance, but it does not constitute legal advice. Make sure to consult your DPO (Data Protection Officer) before proceeding with implementation.
To implement Server-Side consent management, you need:
- A CMP (Consent Management Platform) such as Axeptio, Didomi, or OneTrust, either directly integrated into your website or via GTM Web.
- A Google Tag Manager Web container.
- A Google Tag Manager Server container.
For better clarity, we’ll divide our explanation into two steps:
- Managing consent for Google-related tags (Google Ads, Google Analytics 4, Floodlight).
- Triggering other tags (Facebook, Pinterest, LinkedIn, etc.)
Step 1: Configuring Consent Mode V2 for Google Tags
Consent Mode V2 allows you to collect user consent and send it to Google so it can process data across its various tools (Google Analytics, Google Ads, Floodlight).
How It Works:
- The consent banner on your website gathers user consent preferences and transmits them to the Google tag inside your GTM WEB container.
- This Google tag then communicates the user’s preferences to the GTM Server container by including consent parameters in the HTTP request.
User Consent Preferences Are Sent to Google via 4 Key Parameters:
- analytics_storage : controls data storage for audience measurement (e.g., in Google Analytics 4).
- ad_storage : allows storage of information for advertising purposes.
- ad_personalization : defines whether the user consents to personalized ads.
- ad_user_data : determines if the user allows data sharing with Google for ad targeting.
Lastly, Consent Mode V2 has two versions: Basic and Advanced. Below, we’ll explain the differences between these versions so you can choose the one that best fits your needs.
Basic Consent Mode
In this version of Consent Mode, tags are blocked if the user refuses consent. In such cases, no data is sent to partner platforms. Only the data explicitly consented to by the user is transmitted.
To better understand the impact on data transmission, refer to the example below:
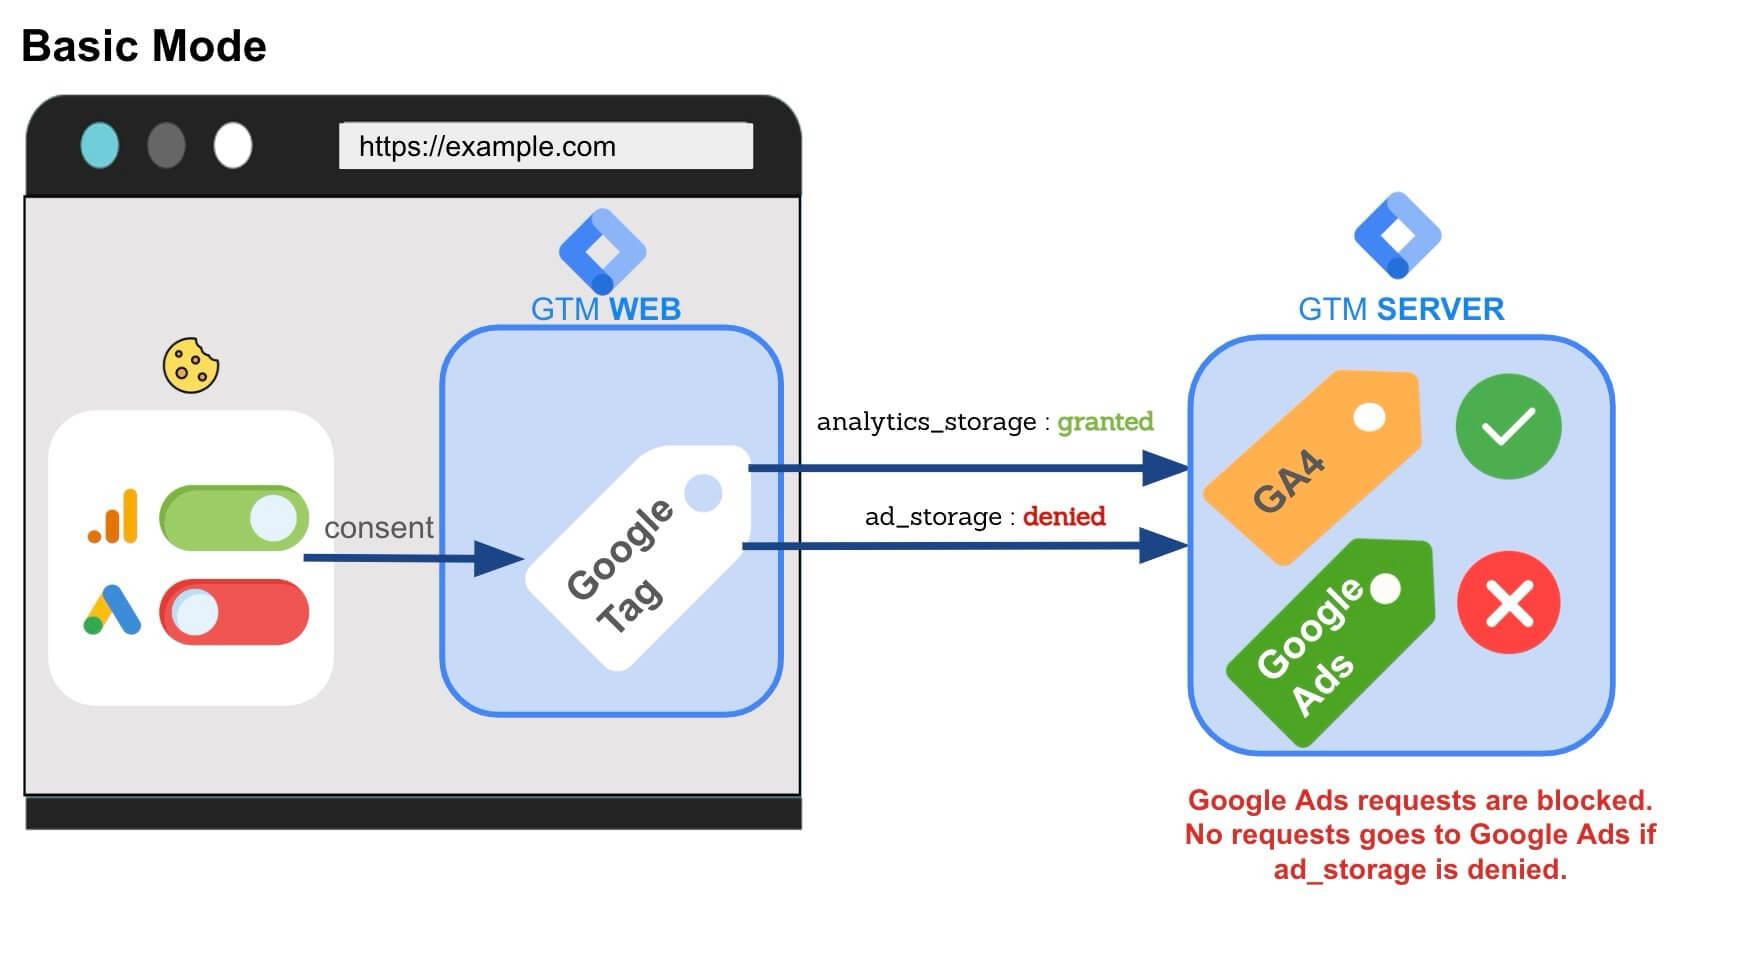
With Basic mode, restrictions must be added in GTM SERVER to control the triggering of Google Ads and Google Analytics tags. In our example, the user does not consent to advertising (meaning the ad_storage parameter is set to “denied”) but gives consent to analytics_storage . Thanks to blocking triggers, no data is sent to Google Ads due to the applied restriction.
Advanced Consent Mode
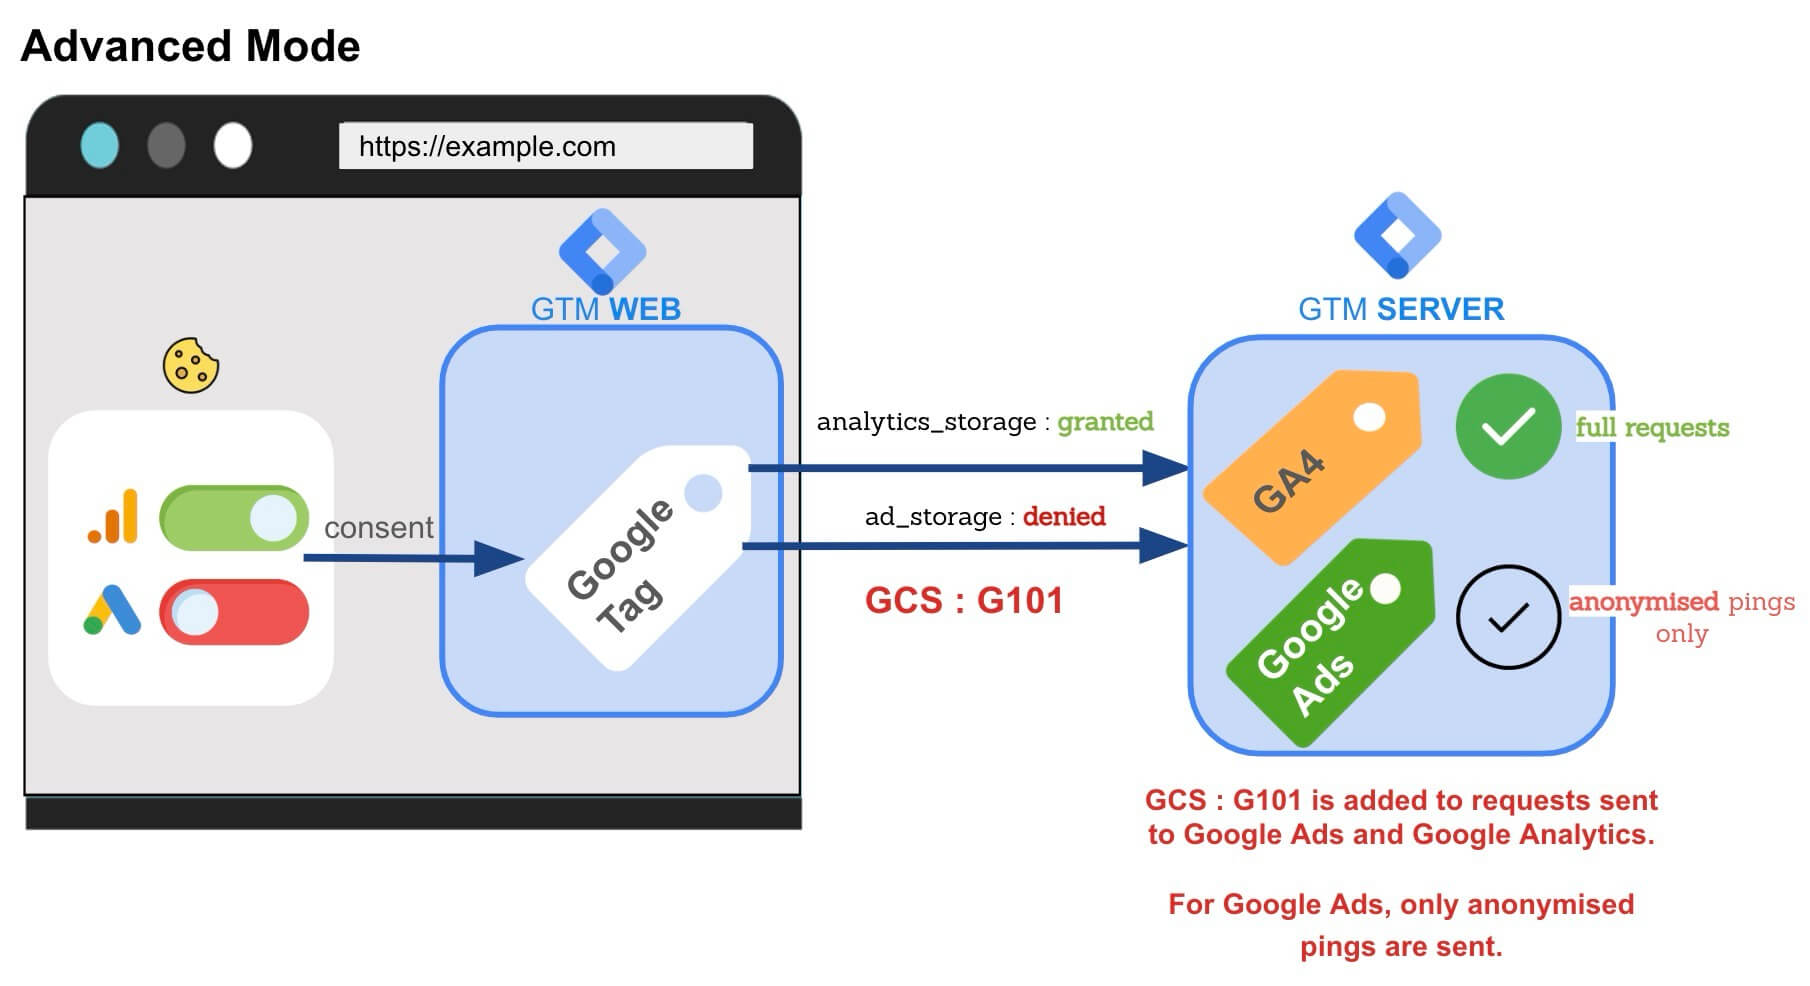
In this version of Consent Mode V2, Google tags fire regardless of user consent, both on the Web and Server-Side. However, if the user does not give consent, the tags still send data, but it is anonymized and does not rely on cookies.
Once Consent Mode V2 is implemented, an additional parameter (GSC) is included in your requests, informing Google whether the data should be anonymized. The table below helps you interpret the GSC parameter to determine whether marketing and/or analytics cookies have been consented to:
| GSC | Marketing Cookies | Analytics Cookies |
|---|---|---|
| G100 | No | No |
| G101 | No | Yes |
| G110 | Yes | No |
| G111 | Yes | Yes |
With Advanced Consent Mode:
- No additional configuration is needed in GTM Server.
- No Google tags are manually blocked.
- Google autonomously handles data processing based on the received GSC parameter.
For example, if
ad_storageis set to “denied” (no marketing consent), data is still sent to Google Ads, but Google anonymizes it before processing.
Step 2: Managing Consent for Non-Google Tags
For non-Google tags (Facebook, Pinterest, LinkedIn, etc.), you must always:
- Collect user consent for non-Google products on your website via your CMP banner. This consent collection happens on the Web side.
- Send consent parameters to your GTM Server via your Google tag.
- Respect the user’s choice by triggering or blocking tags Server-Side based on their decision.
1. Collecting User Choices in GTM WEB
There are multiple methods to collect user consent, depending on how your CMP banner is configured. You can either:
- Collect individual consent for each provider in your tracking setup (e.g., separate consent for Meta, Pinterest Ads, etc.).
- Collect global consent, where users agree to categories of cookies (e.g., marketing, analytics) instead of specific providers.
Once user consent is obtained, a CMP typically stores the list of accepted or rejected vendors using either:
- a first-party cookie set by the CMP (e.g., Axeptio stores the list of accepted partners in the cookie
axeptio_authorized_vendors). - a data layer event (e.g., in Didomi, the “didomi-consent” event contains the variable
Didomi Vendors Enabledlisting the vendors the user has approved).
In this example, we will focus on accepting cookies for Meta and Pinterest for clarity. However, make sure to configure this for all your non-Google tags.
Let’s look at a concrete example using Axeptio as the CMP.
Axeptio stores a axeptio_authorized_vendors cookie that contains the list of vendors the user has consented to.
For example, if this cookie contains “facebook”, it means the user has consented to Meta. If it does not contain “pinterest”, it means the user has refused Pinterest cookies. (Note: This is just an example, you should verify how your CMP functions).
In GTM WEB, you can create a “1st Party Cookie” variable to retrieve all the vendors for which the user has given consent:
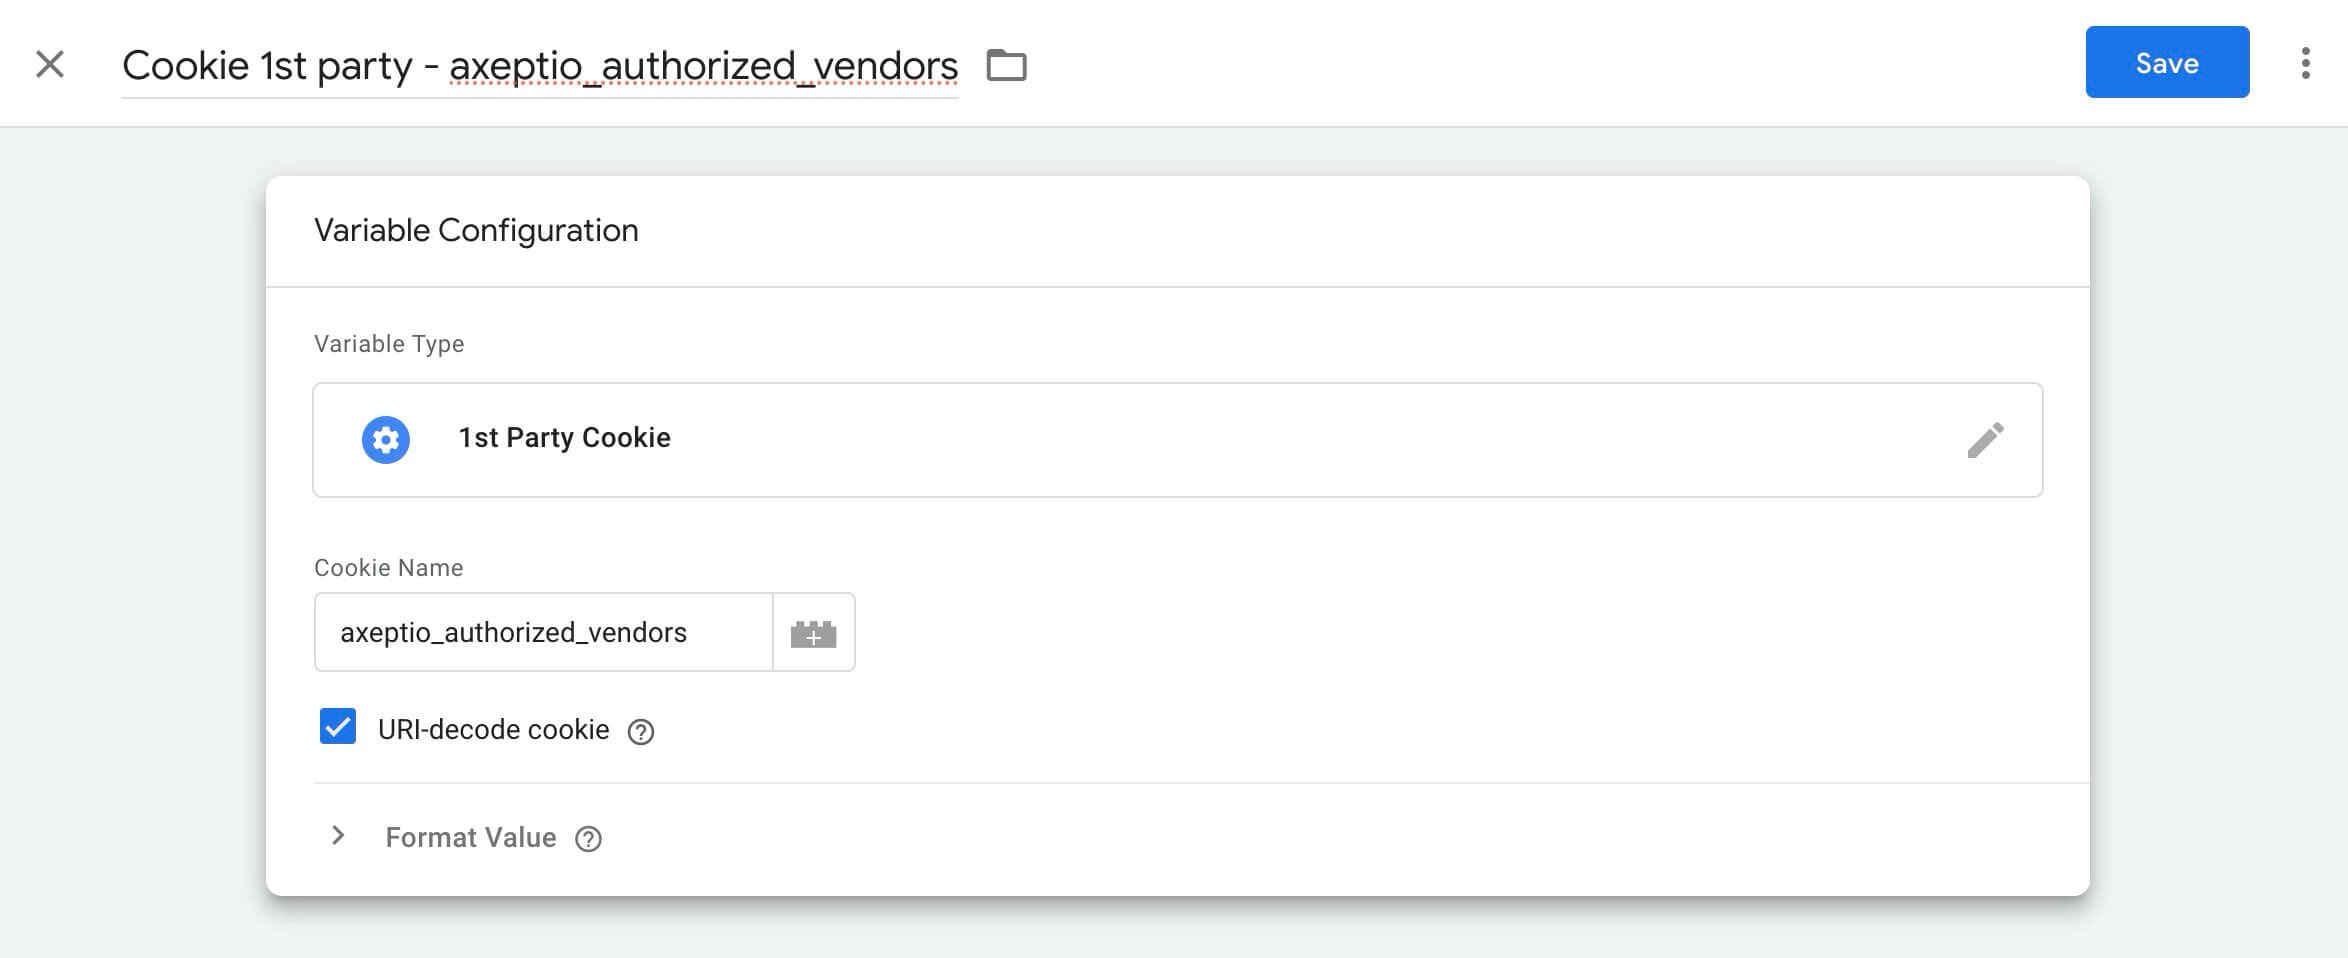
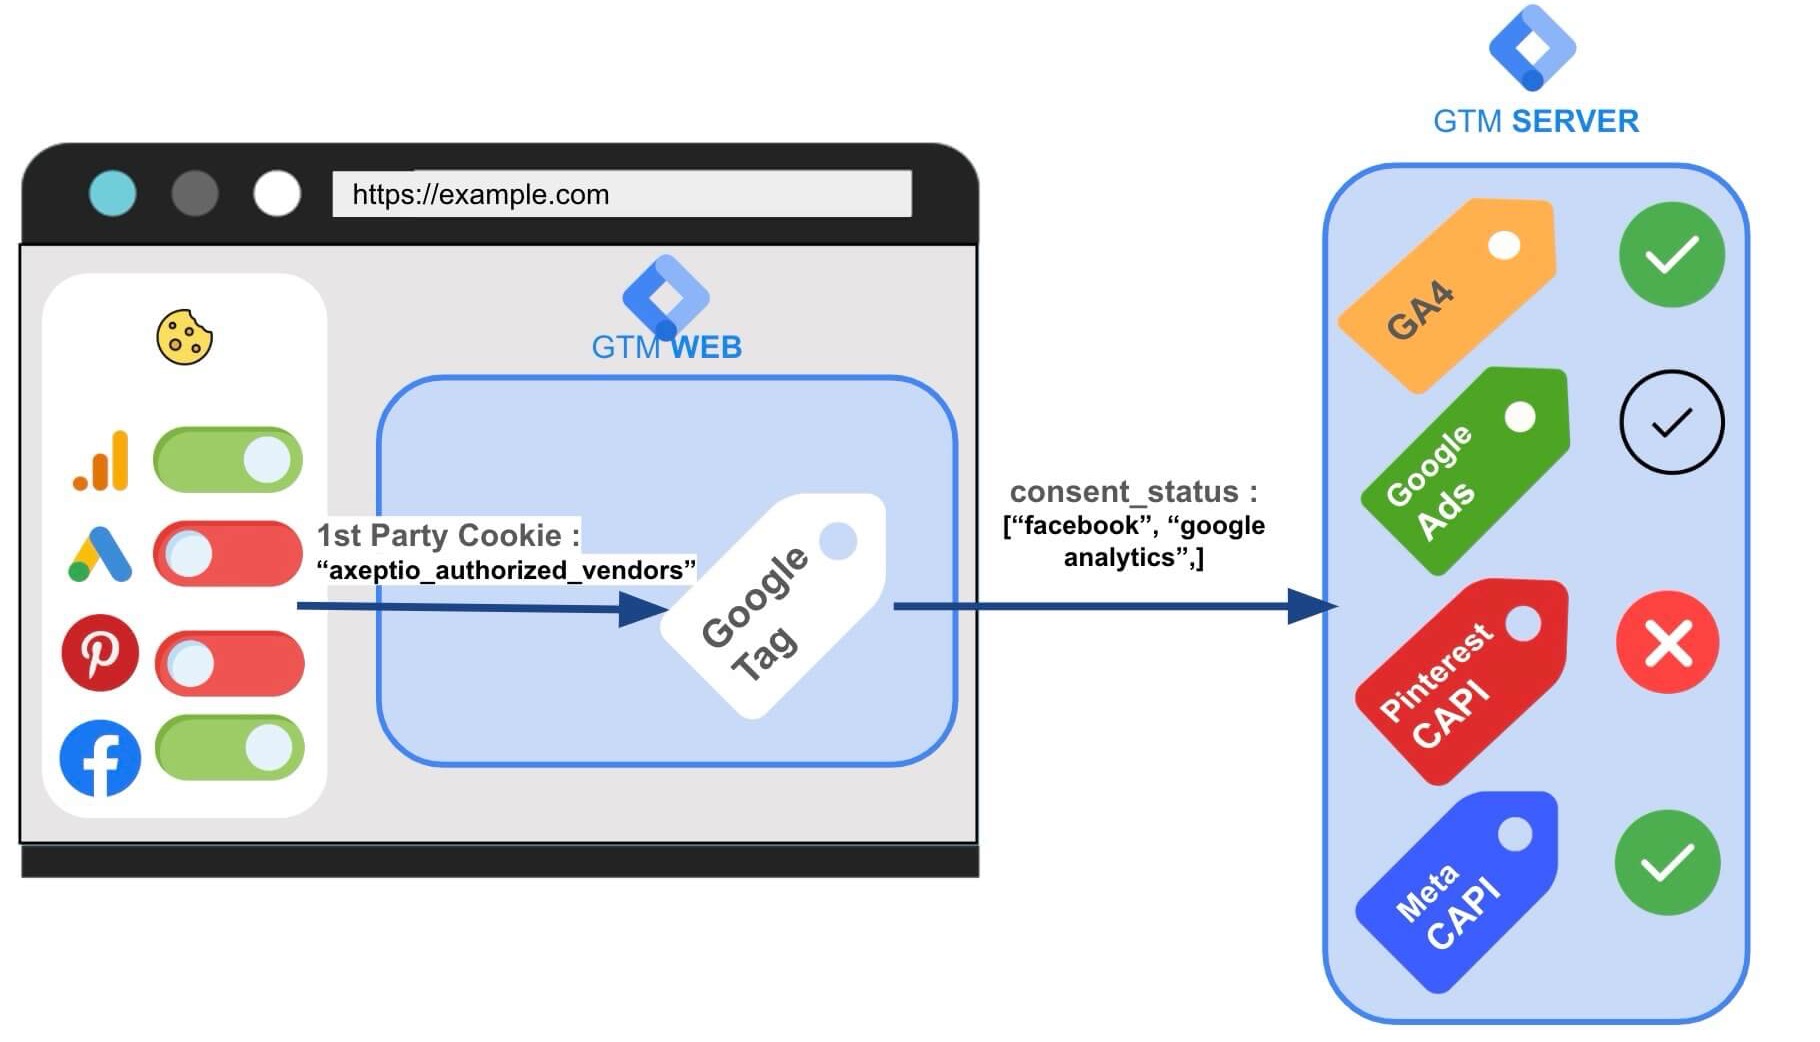
2. Sending Consent Status to Your GTM SERVER
Once consent data has been collected, you must ensure that the consent status for each provider (or each cookie category) is sent from GTM WEB to your Server container.
This can be done via your Google tag for GA4 configuration on the WEB side, which transmits consent information to your server.
To achieve this, simply add an additional parameter (e.g., consent_status) to your Google tag, which will send the consent status to your server:
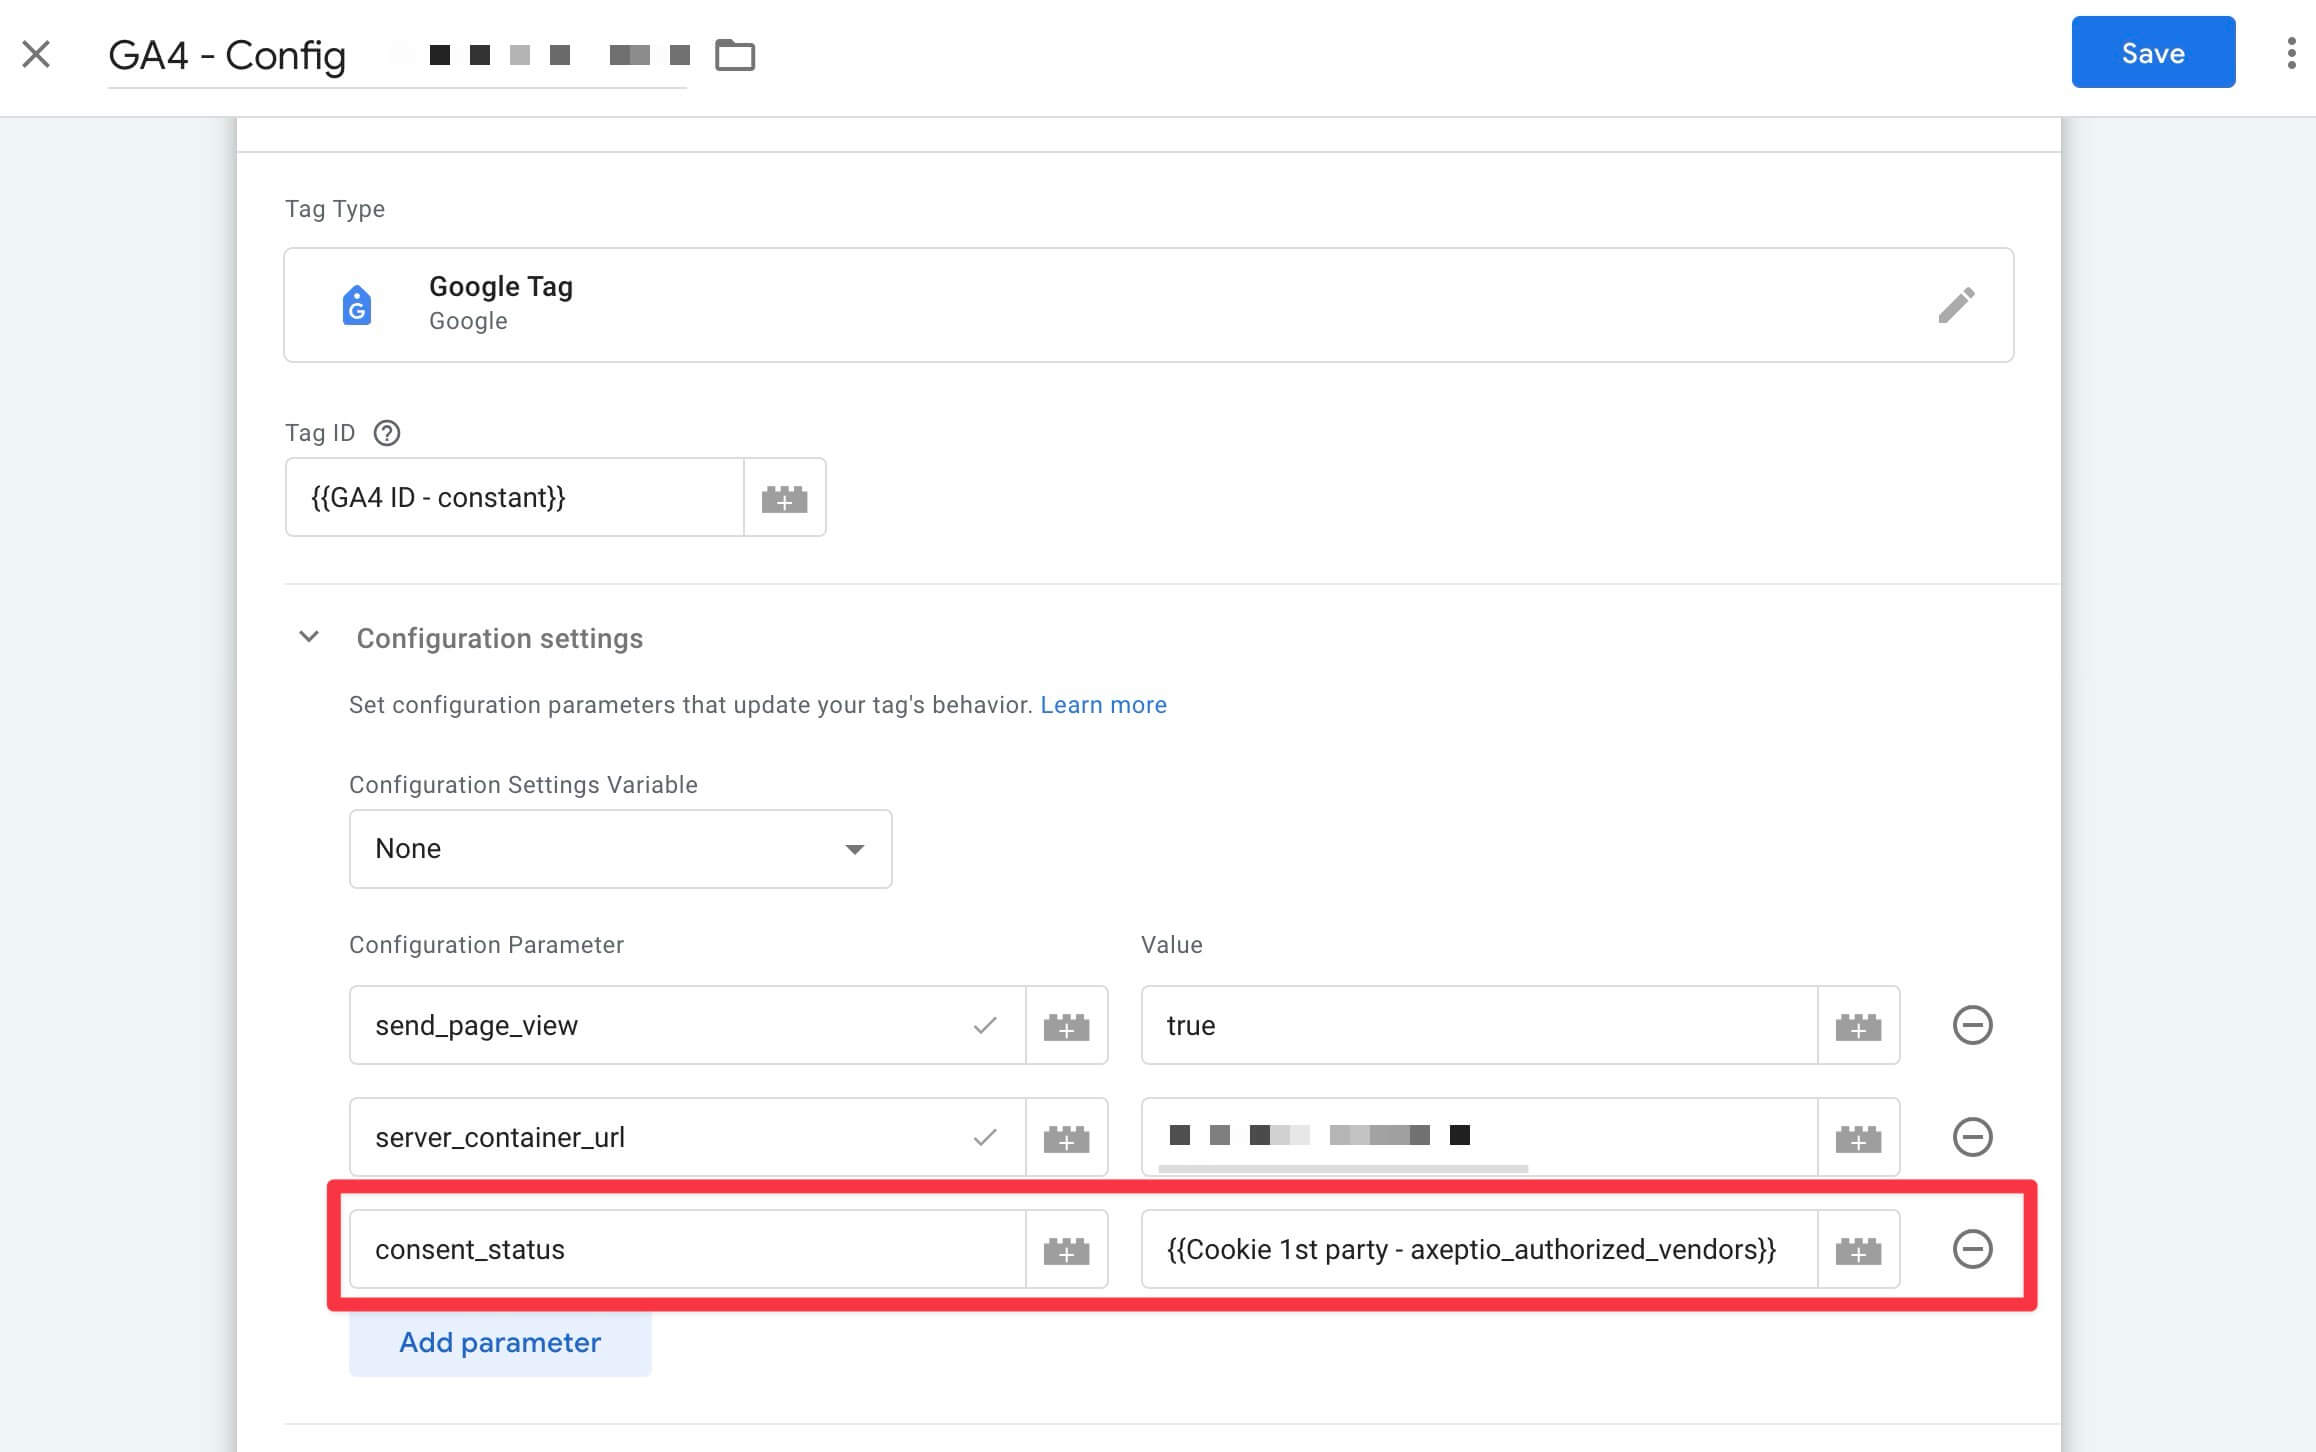
In this example, the consent_status parameter sends a list of all accepted providers based on user consent.
The previously created 1st Party Cookie variable is used here. In our case, it contains “facebook” (since the user consented to Meta) but does not include “pinterest” (as the user did not consent to Pinterest cookies)
3. Configuring Tag Triggers in GTM SERVER Based on Consent
On the Server side, you can retrieve the consent parameter (consent_status in this case) from the Event Data and trigger an event only if the user has given prior consent.
Continuing with our example, the triggers for the Meta and Pinterest tags must be modified so that they fire only if the user has previously consented.
First, create an Event Data variable to retrieve the consent_status parameter sent to the sGTM container and its value:
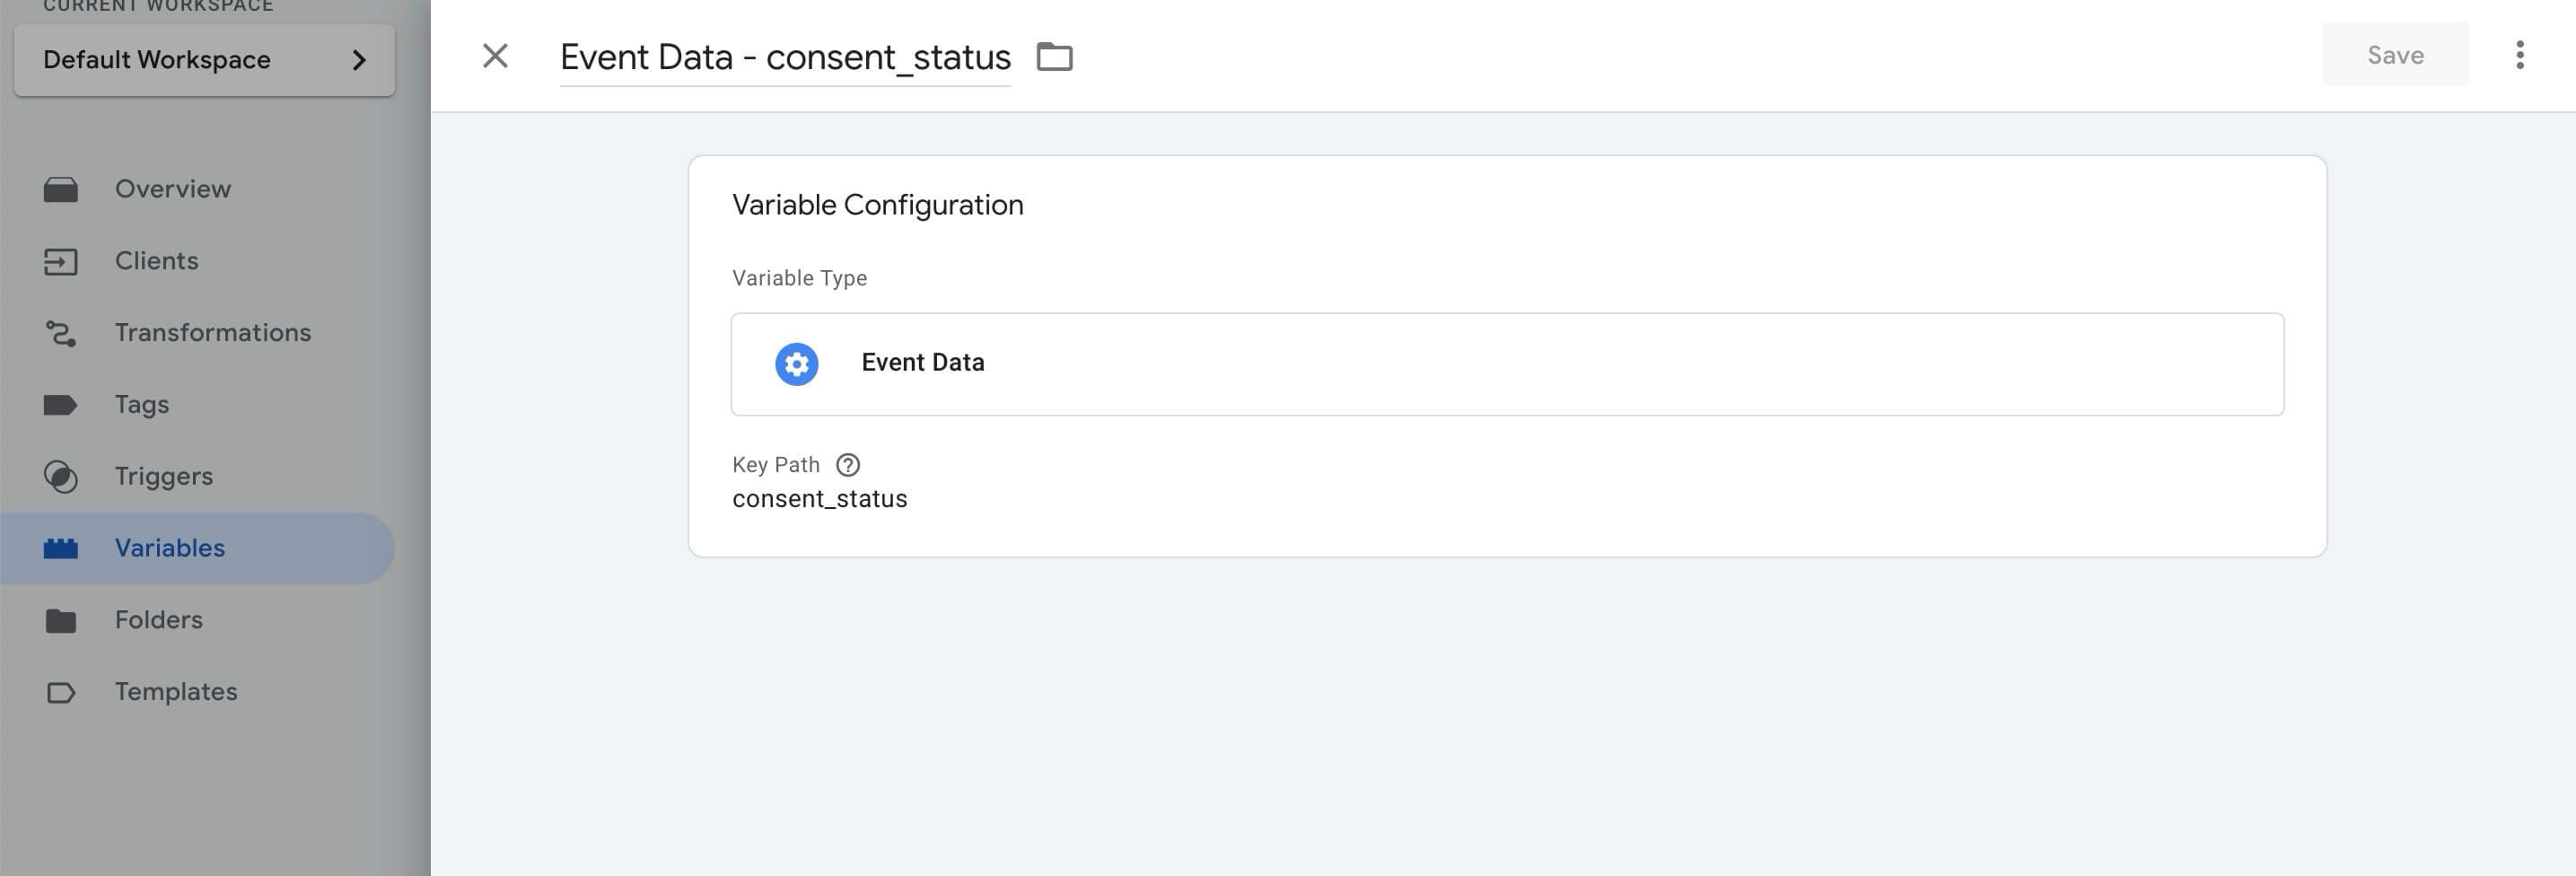
In our example, the consent_status variable contains “facebook” only if the user has consented to Meta. If the user has not given consent, “facebook” will not be included.
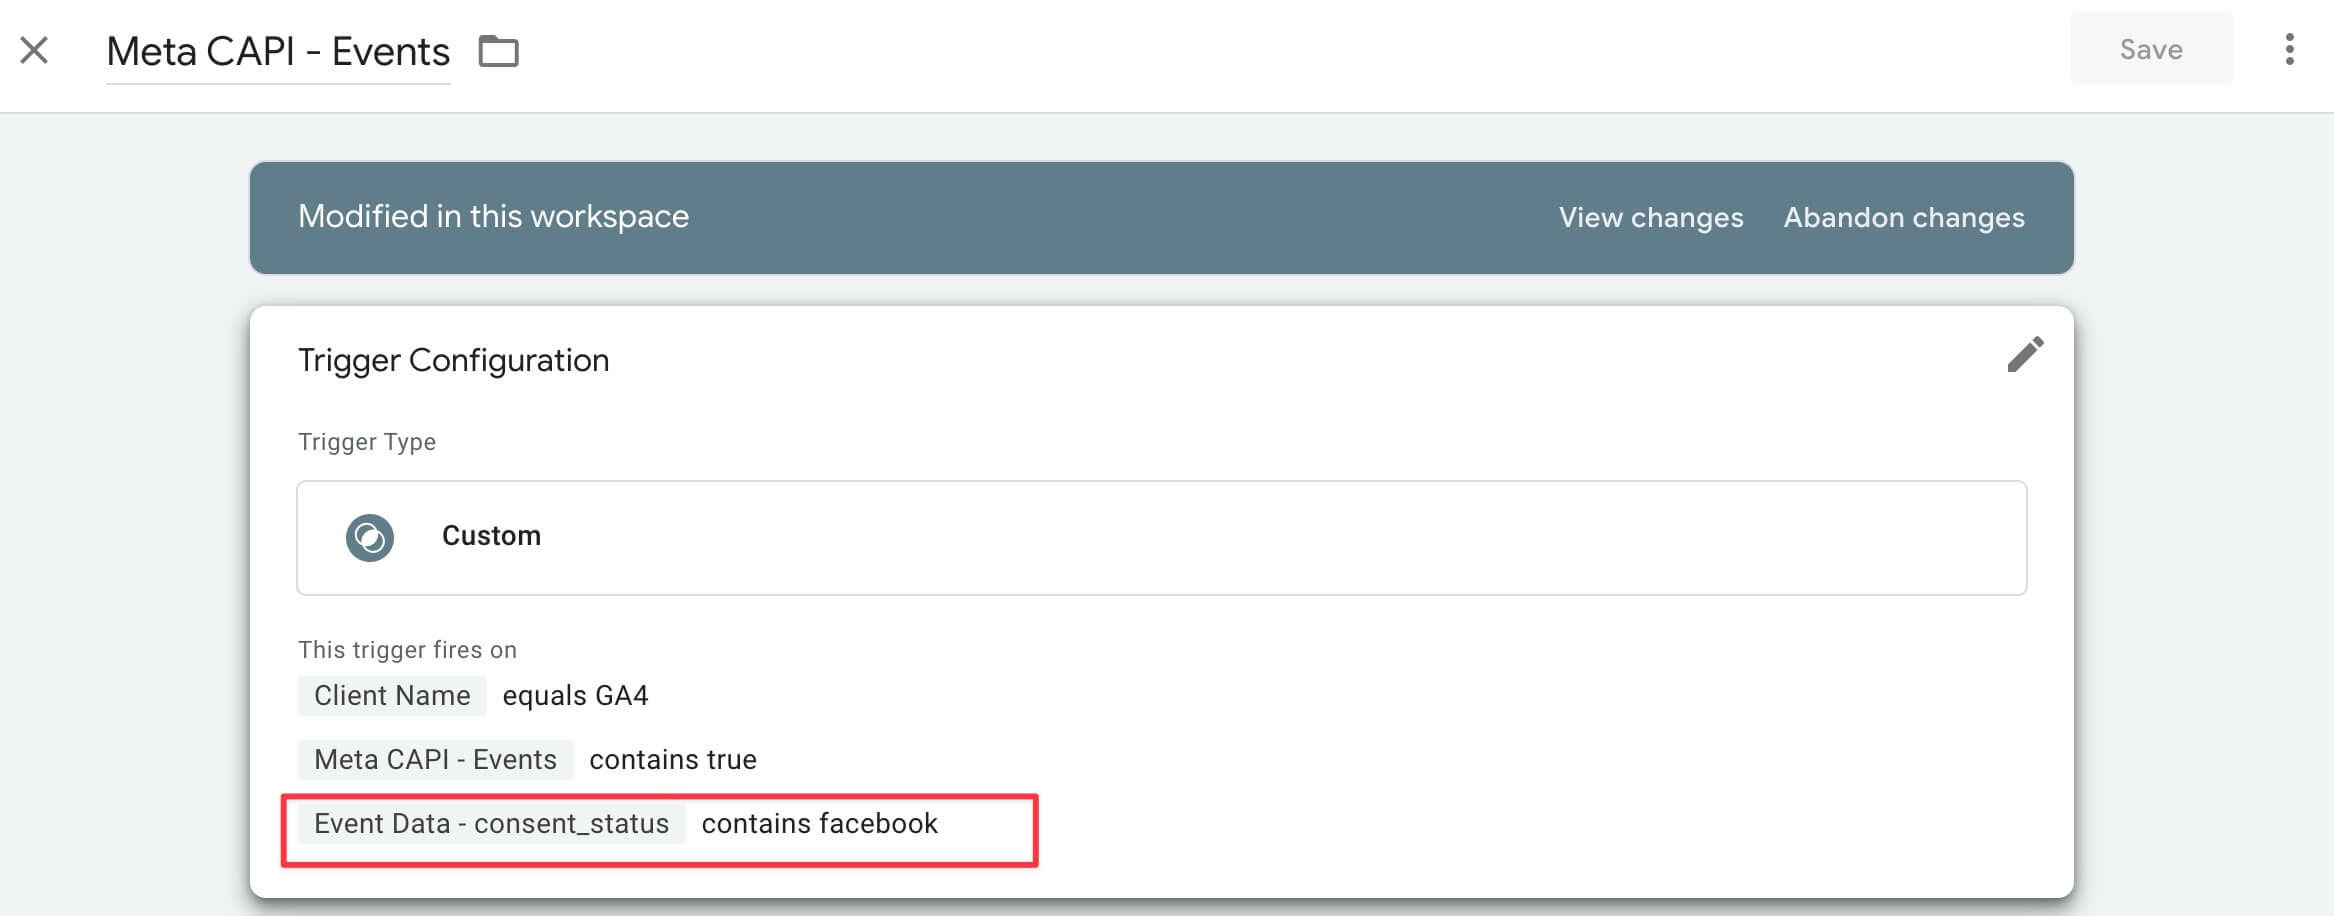
Modify the Meta tag trigger to add an extra trigger condition. If the previously created Event Data variable contains “facebook”, then the Meta tag will fire—otherwise, it will not.
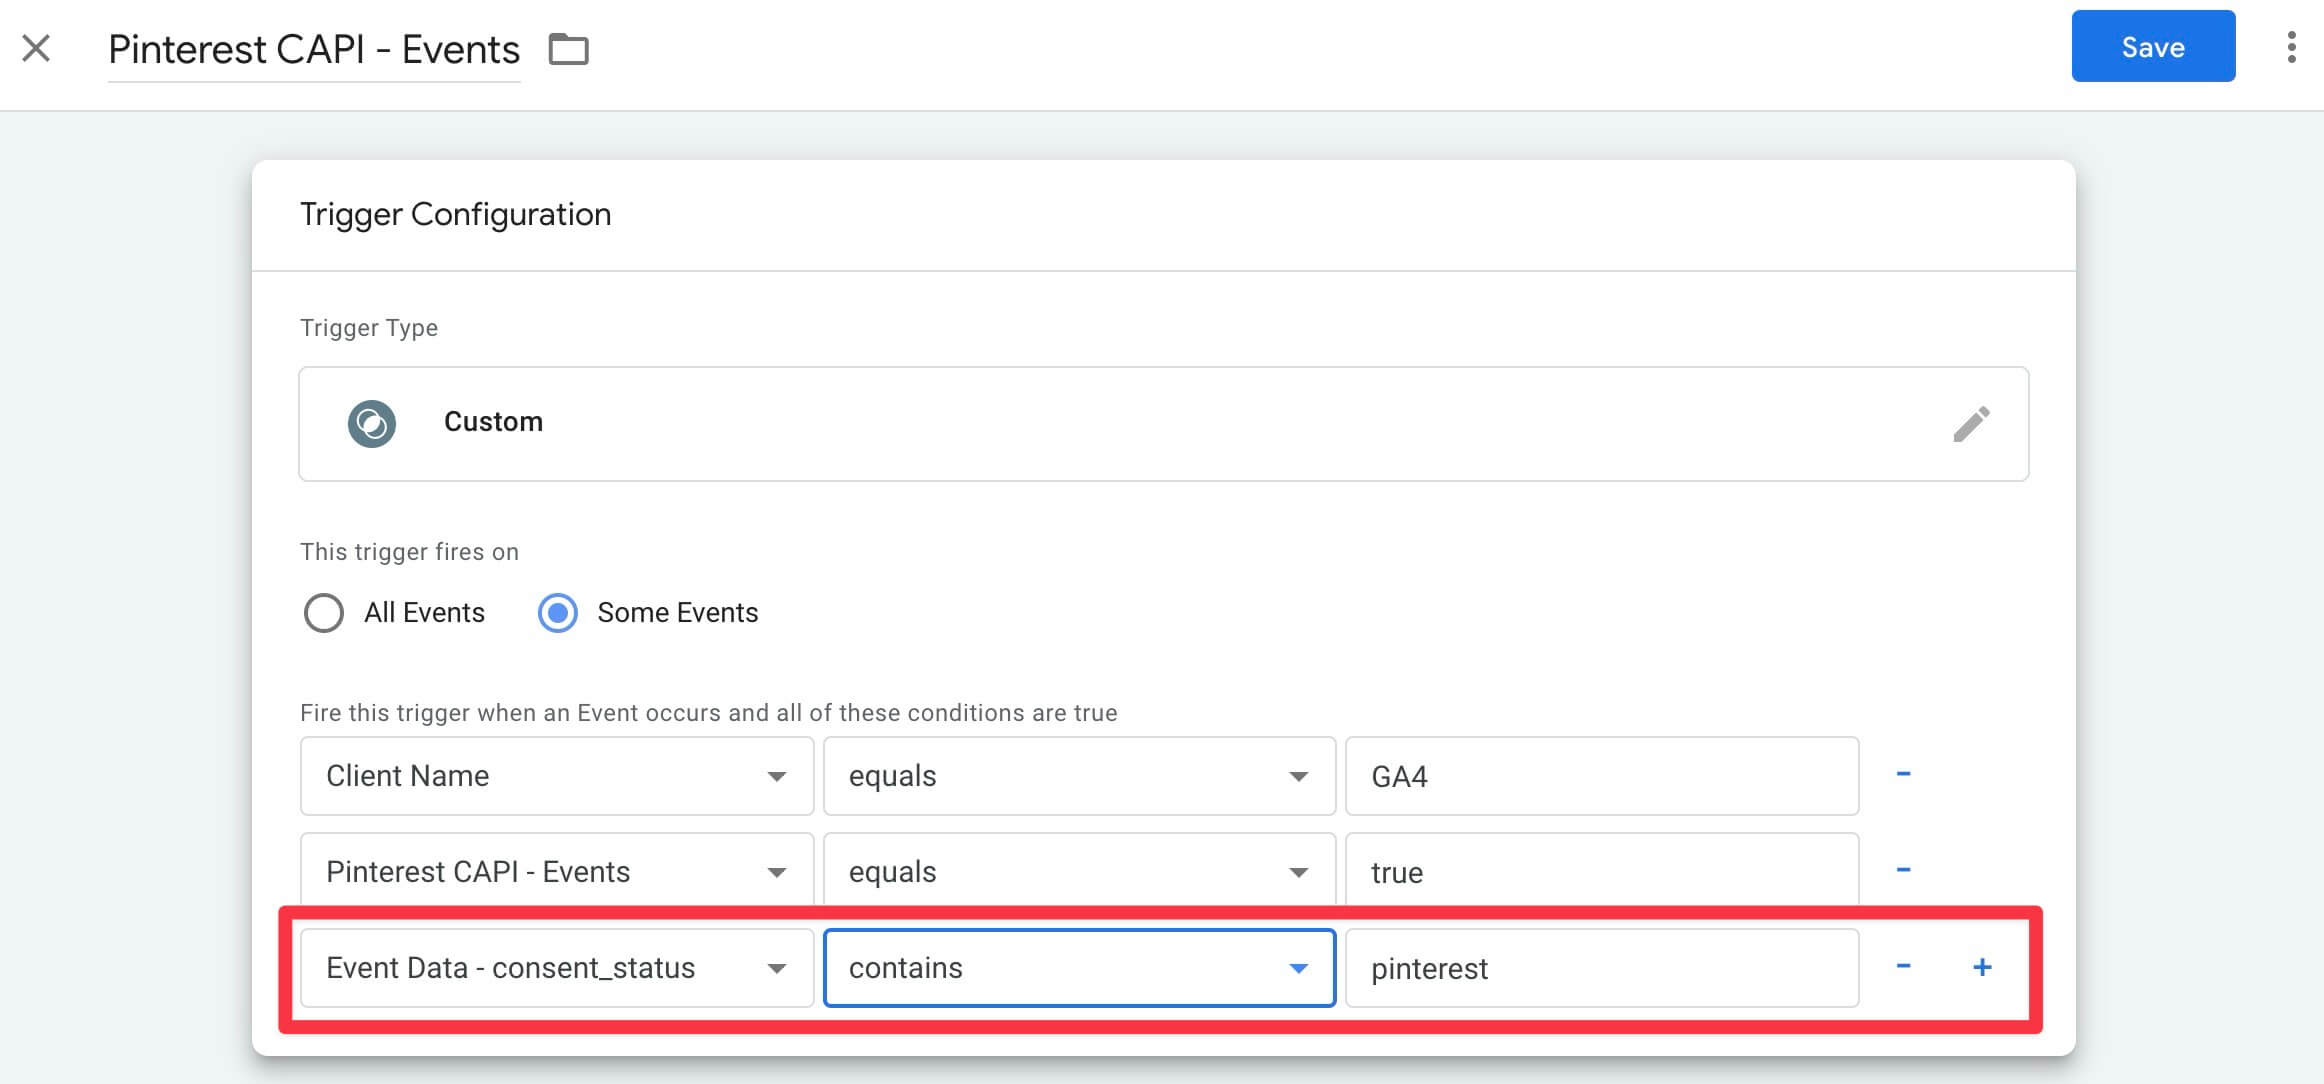
Similarly, modify the Pinterest tag trigger to include a condition using the Event Data variable, this time checking for “pinterest” (which is sent by the CMP when the user consents to Pinterest cookies).
By following these steps, your Meta CAPI and Pinterest CAPI tags will only fire if the user has accepted cookies for each service.
Don’t forget to apply the same restrictions to all your server-side tags!
If you encounter any issues during these steps, feel free to contact our support team.