Meta CAPI Conversion Tracking with Google Tag Manager
Meta CAPI: the solution to improve your advertising performance
New tracking obstacles, underperforming Facebook Pixel
The tracking landscape is constantly evolving, bringing a new range of obstacles to data collection: ad blockers, the end of third-party cookies, and browser restrictions such as those from Safari. As a result, the Facebook Pixel is now significantly less effective on its own and no longer provides optimal conversion tracking on Facebook and Instagram. To overcome these challenges and enable advertisers to continue collecting reliable data, the Meta Conversion API (CAPI) has become essential. Read on to understand why implementing Meta CAPI is crucial for your advertising campaigns, along with our recommendations for an effective setup.
Meta Conversion API + Facebook Pixel, and deduplication:
Facebook CAPI and the traditional Facebook Pixel do not collect data in the same way. Unlike the Facebook Pixel, which gathers data directly within the browser and relies heavily on third-party cookies (client-side tracking), Meta CAPI uses server-side tracking. This means Meta CAPI is not dependent on third-party cookies—it sends user data server-to-server, delivering more reliable data.
Currently, Meta recommends using both tracking methods in tandem, thereby enabling a dual setup: Pixel + CAPI. Indeed, the Facebook Pixel remains the most effective source when third-party cookies are present (as in browsers like Chrome). Conversely, Meta CAPI is more effective in browsers that have already eliminated third-party cookies (such as Safari and Firefox). By implementing dual tracking, you achieve the most effective solution currently available to collect robust data for your Meta campaigns, regardless of the user’s browser.
Once both tracking sources are configured, Meta must deduplicate any events received in duplicate.
For this to work, you need to send the same event ID via each tracking method, and Facebook will then deduplicate incoming events, counting each event only once. If an event is missed by the pixel but delivered via the server, Facebook will count that server-side event instead.
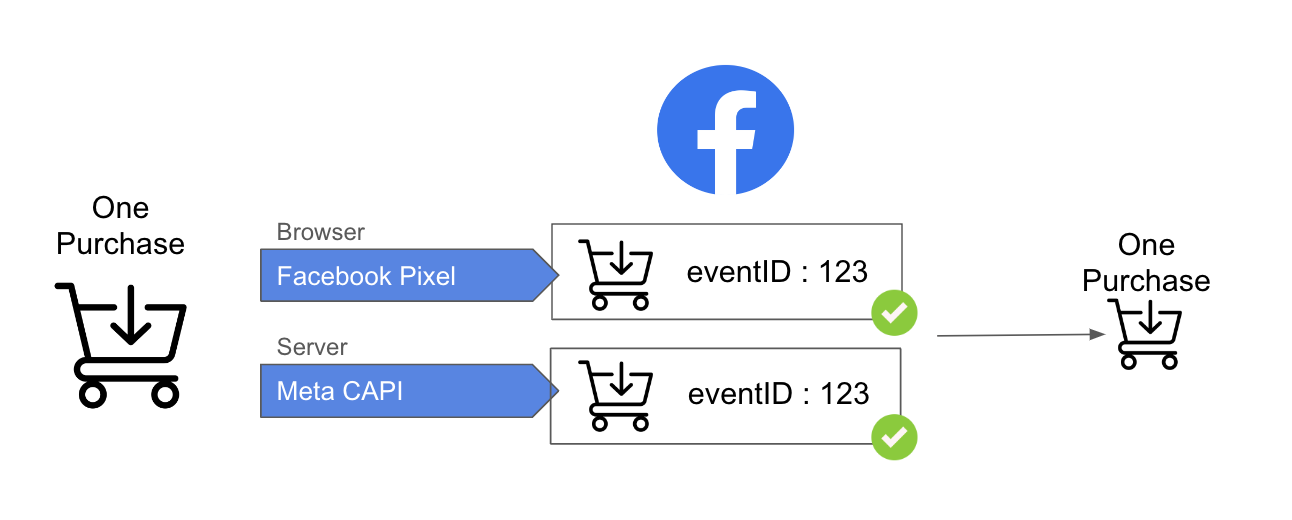
This setup ensures optimal data tracking—both the volume of conversions and the quality of data are maximized!
Addingwell Meta CAPI Tag: single server‑side tag, deduplication assured
That Meta recommendation to use both implementations, however, has downsides and doesn’t fully exploit the benefits of server‑side tracking:
- no improvement in web performance: you still need to trigger the pixel from the browser, so site load times are unaffected.
- no enhancement in data governance: you keep the Facebook SDK in the browser and don’t fully control the data being sent to Meta.
Finally, deduplication remains a concern, requiring you to manage the same event ID across both Pixel and CAPI, which complicates the setup.
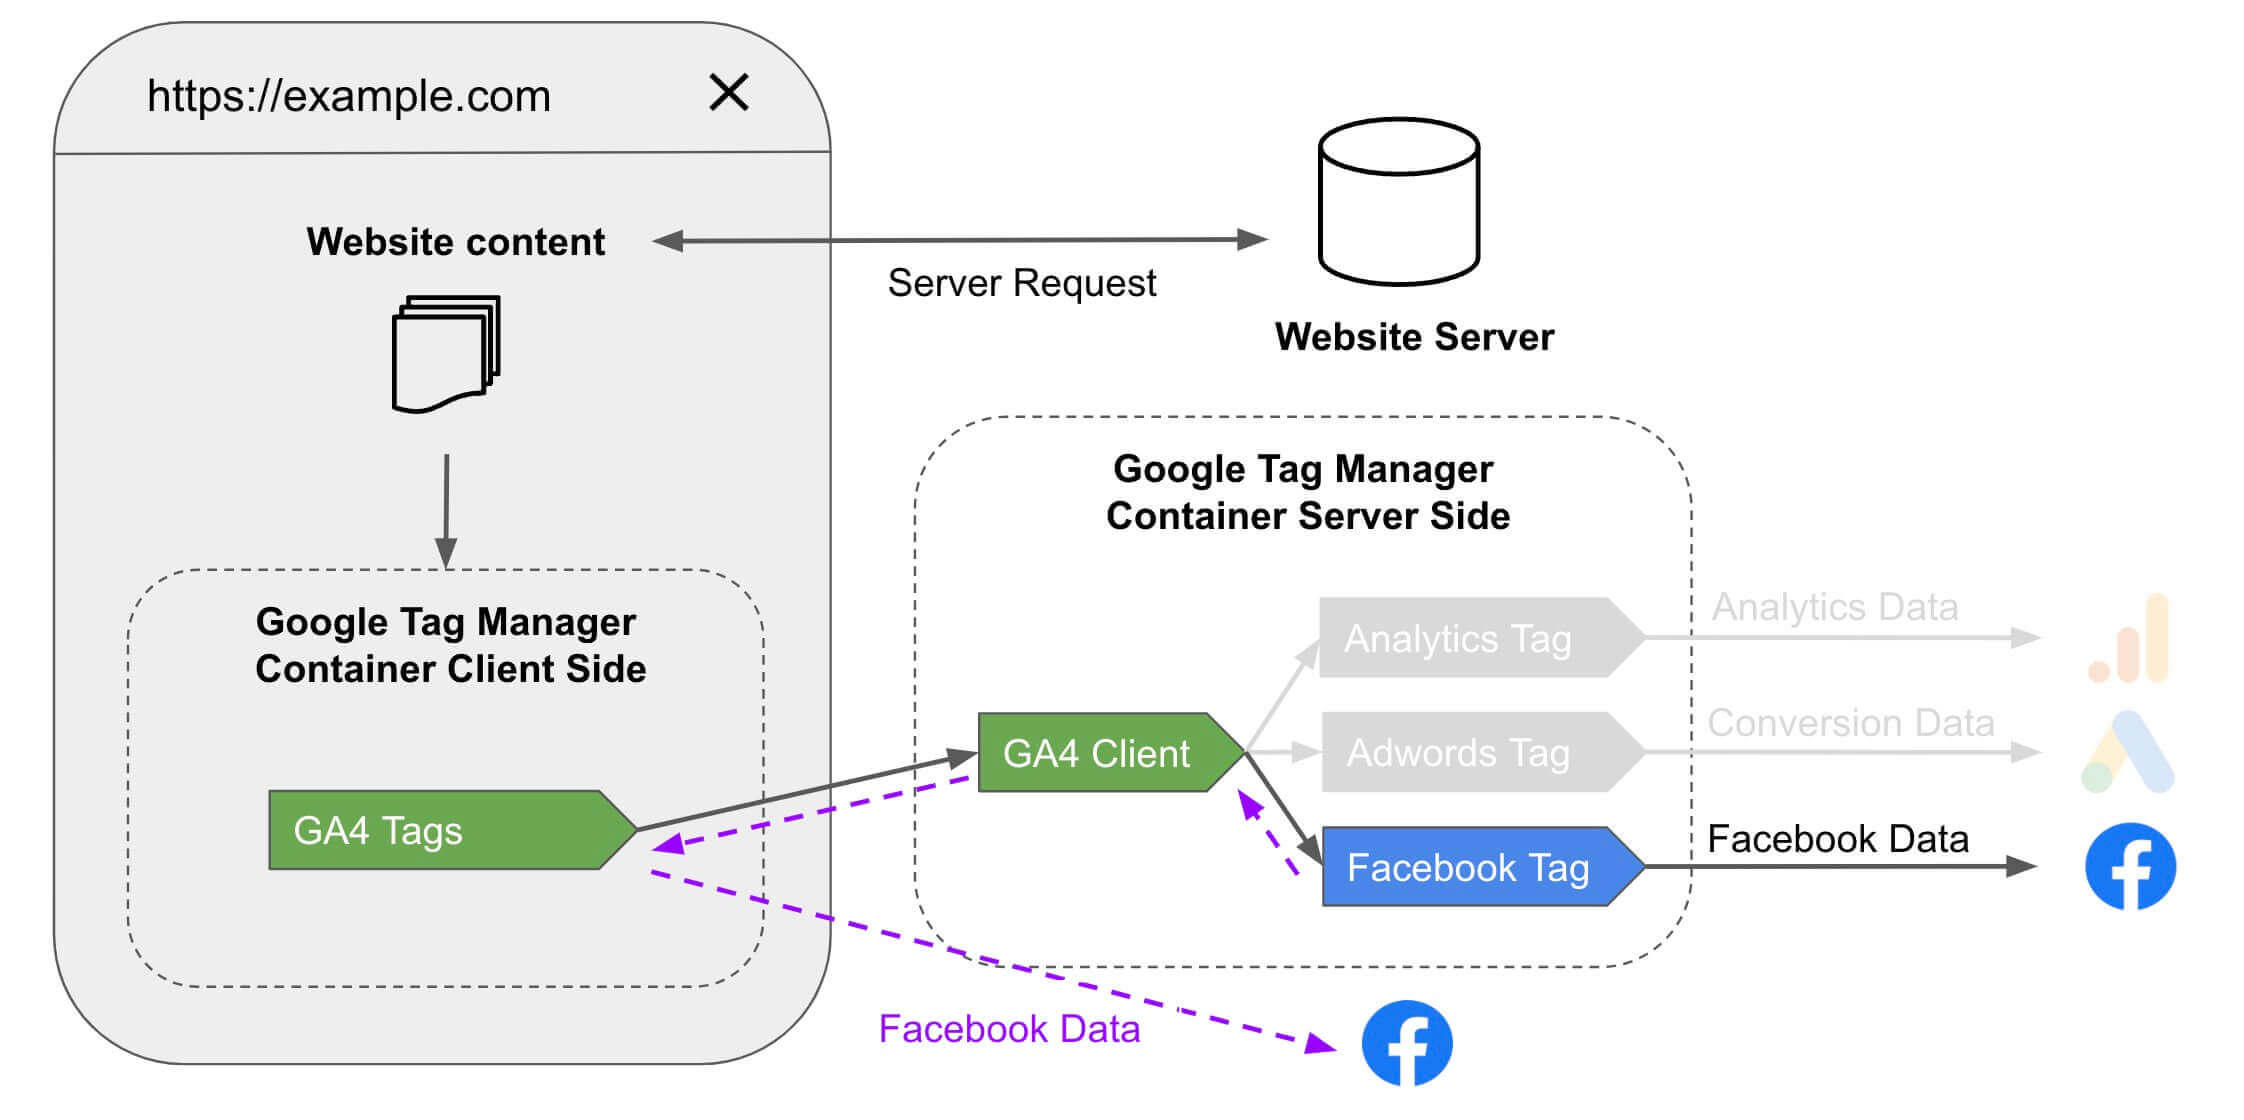
To address these issues, the Addingwell Meta CAPI tag was designed to unify dual tracking: via the pixel and via the Meta Conversion API, from a single server‑side tag! This tag simplifies your implementation by allowing you to:
- trigger both CAPI and the Pixel from a single server‑side tag, removing the need for Facebook SDK in the browser—thus improving web performance and data governance.
- automatically send identical event IDs for both tracking methods, eliminating the need for manual deduplication setup.
Configuring the Addingwell Meta CAPI Tag
Import the Tag into GTM Server
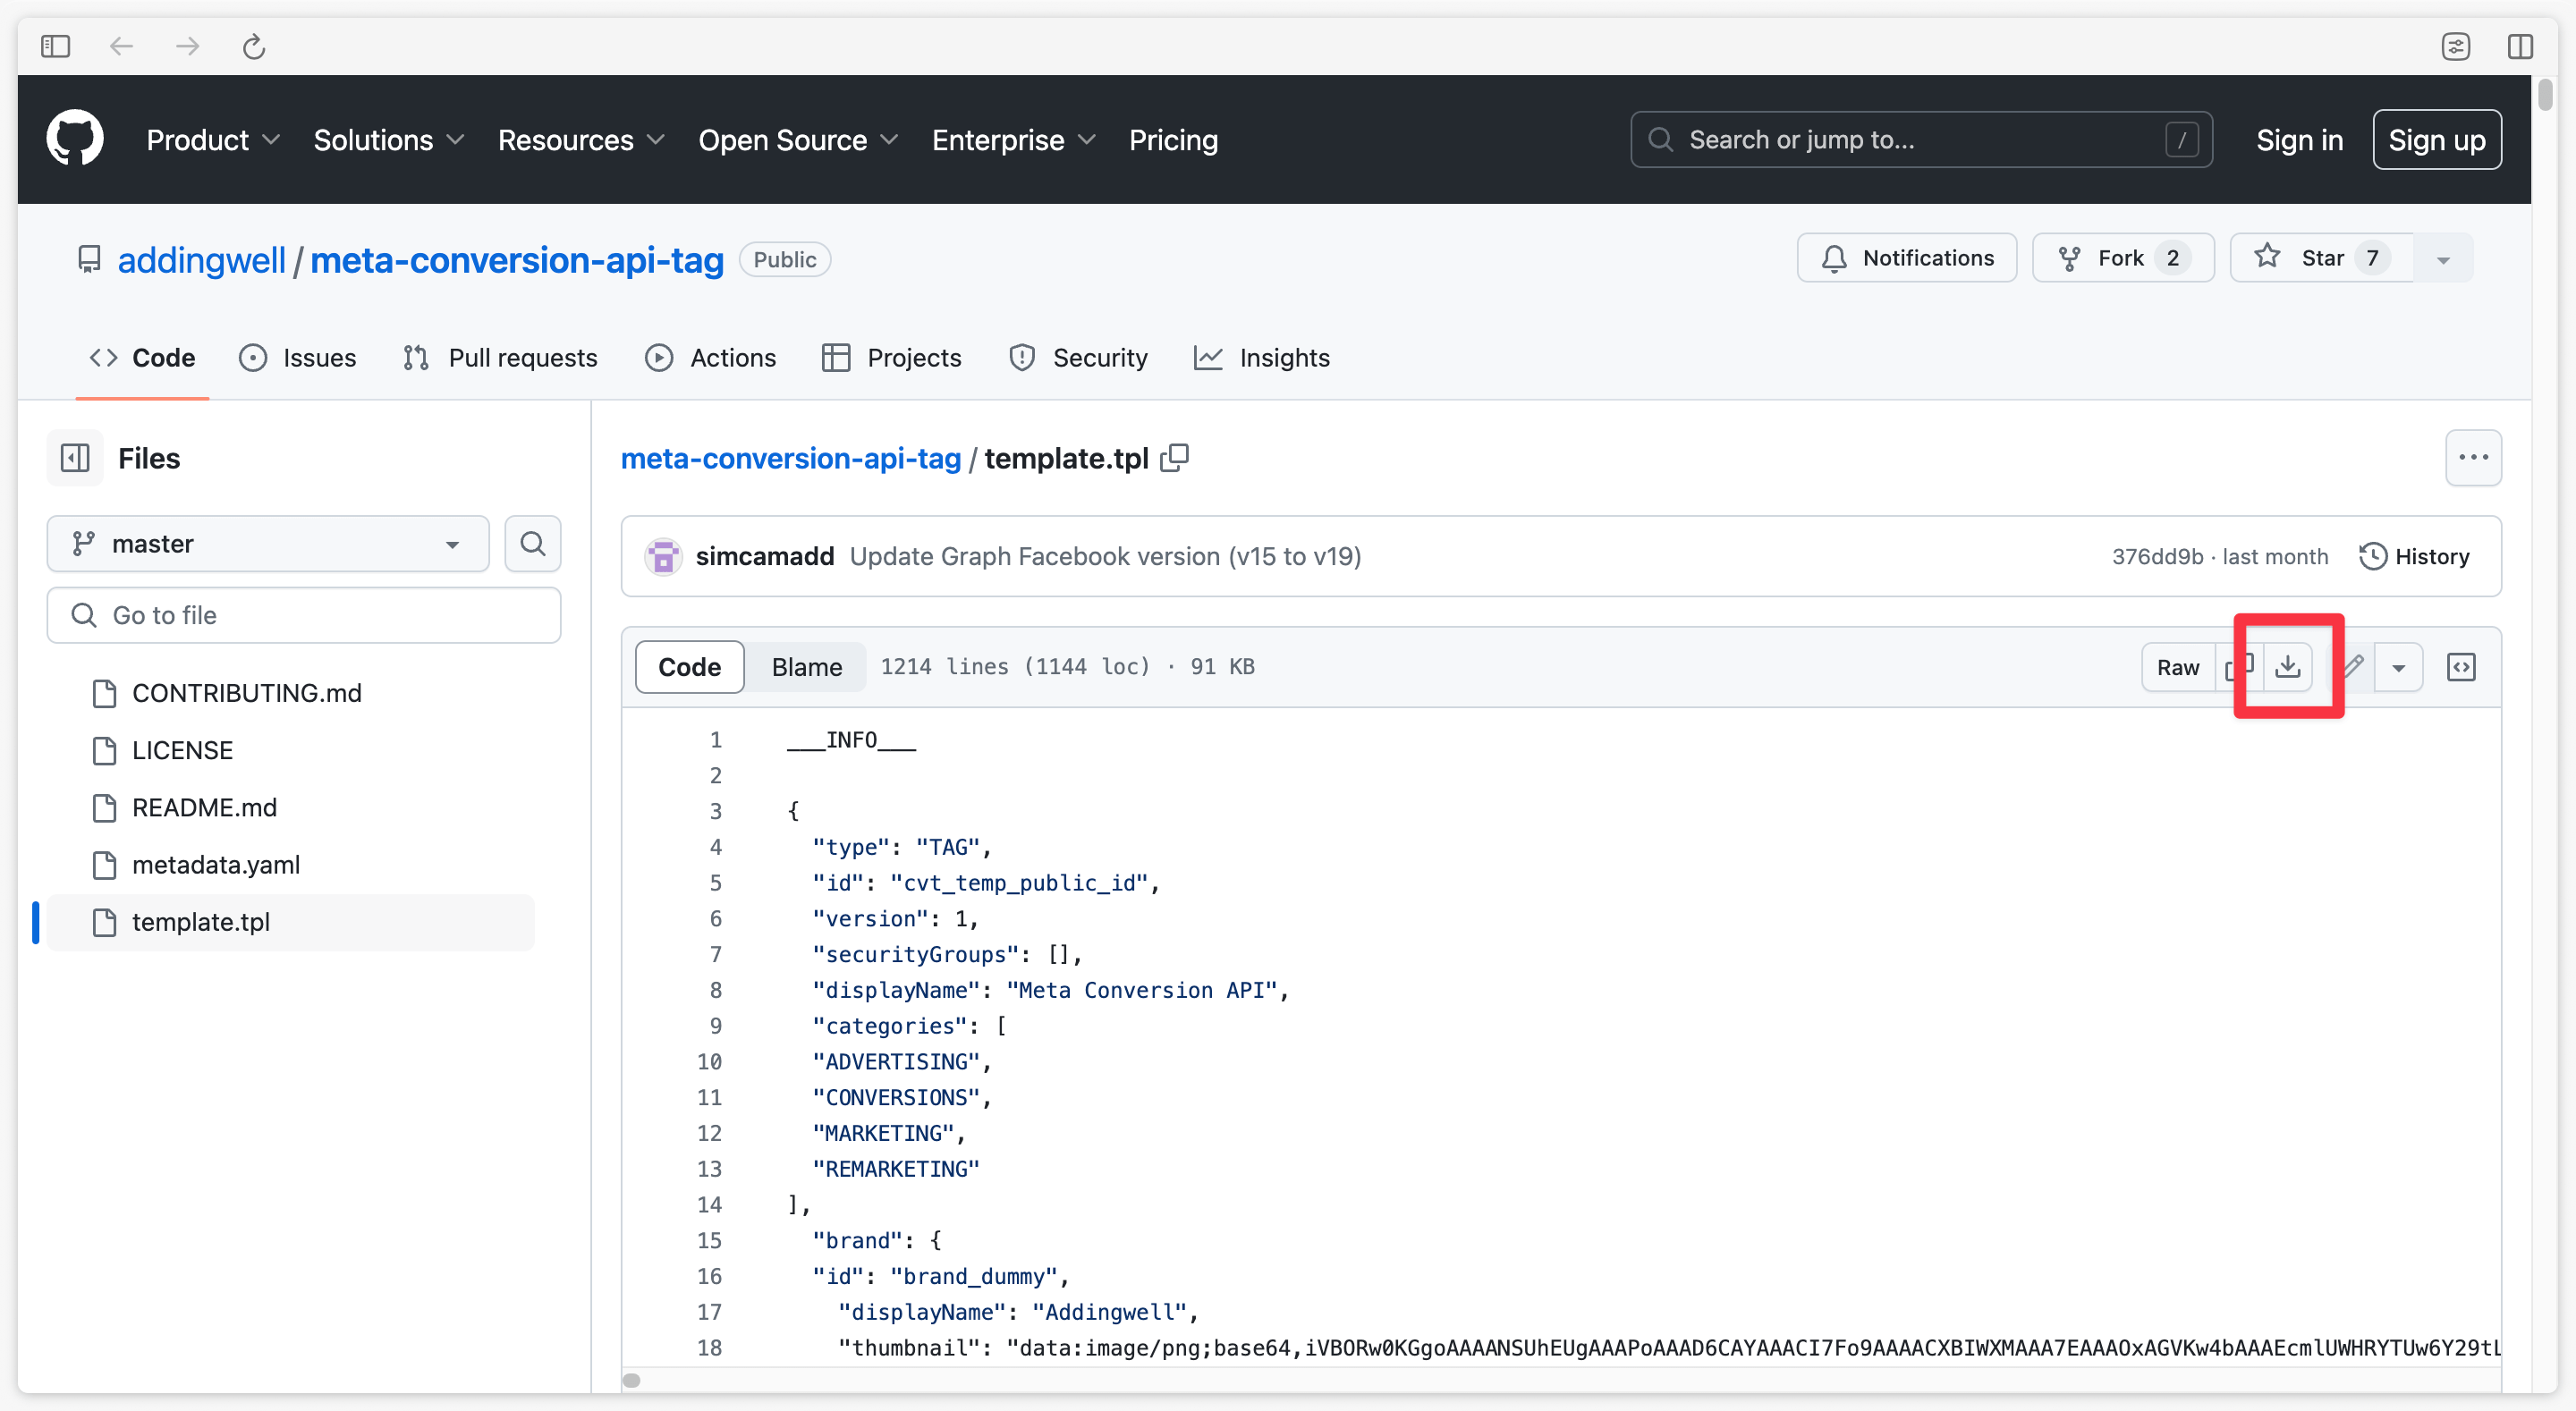
Click here to download the Meta Conversion API tag, then click the download icon to obtain the file.
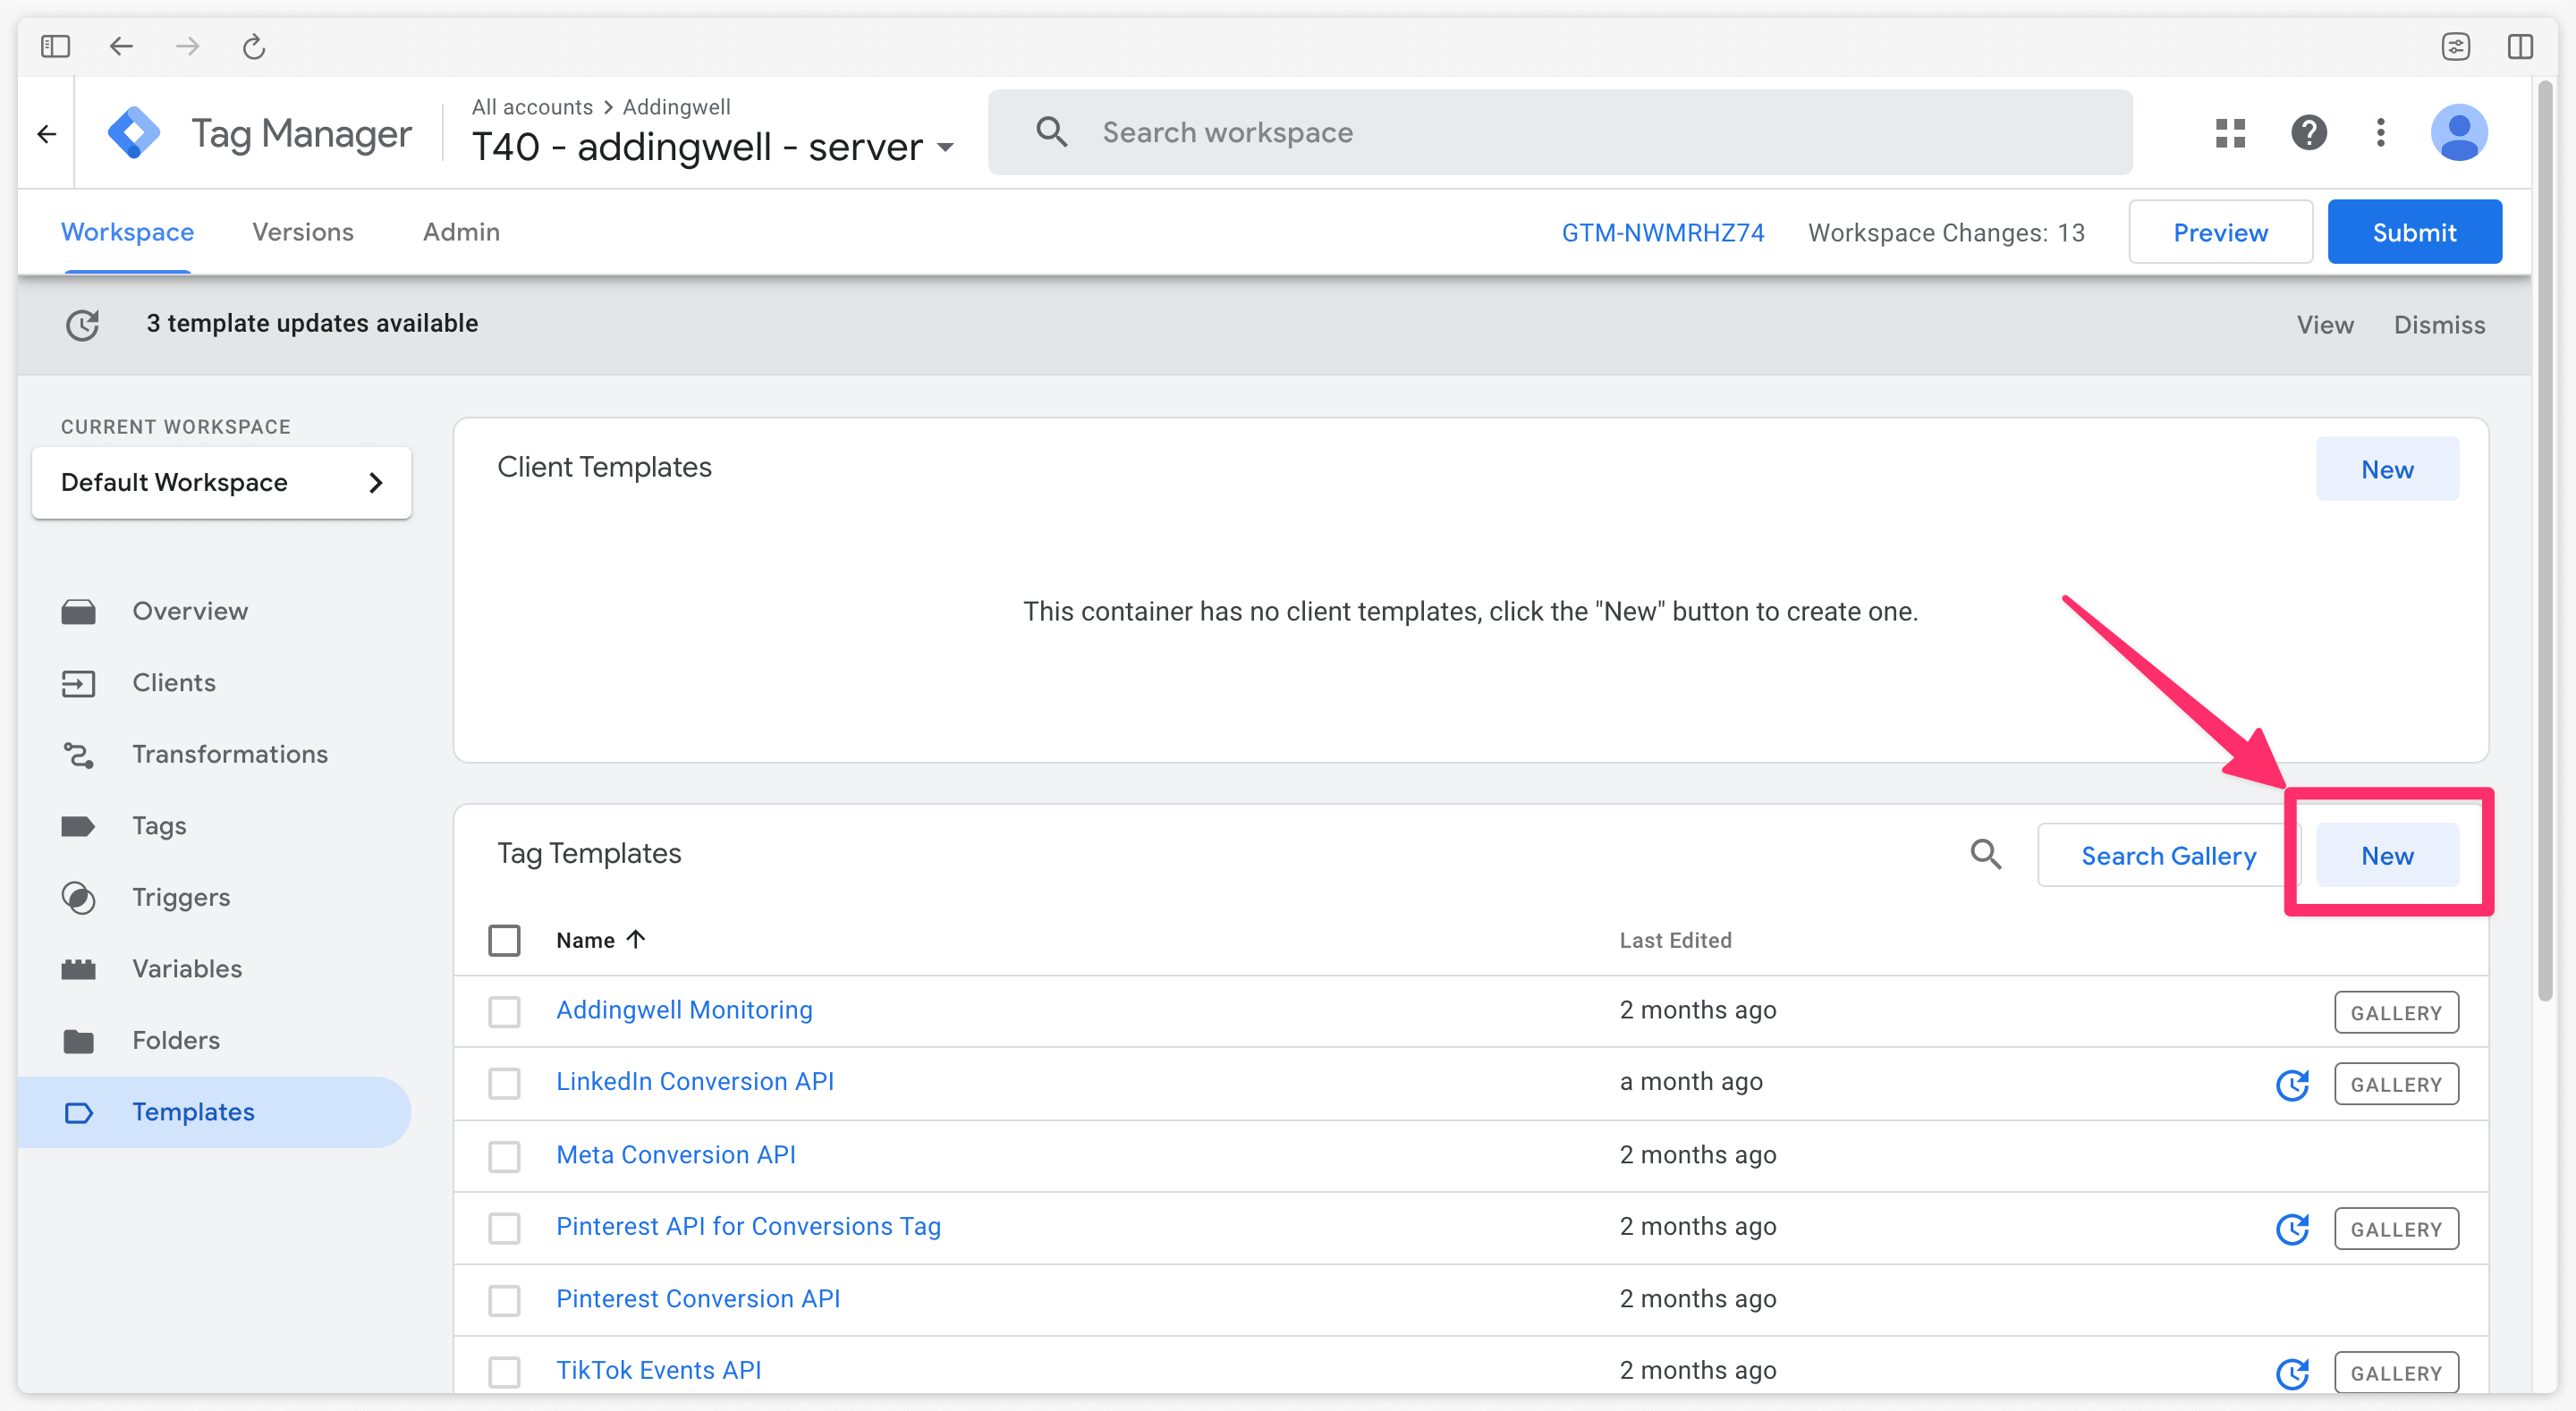
Next, go to the Templates section of your server container, and under Tag templates, click New.
Then click the three-dot menu in the top right and select Import.
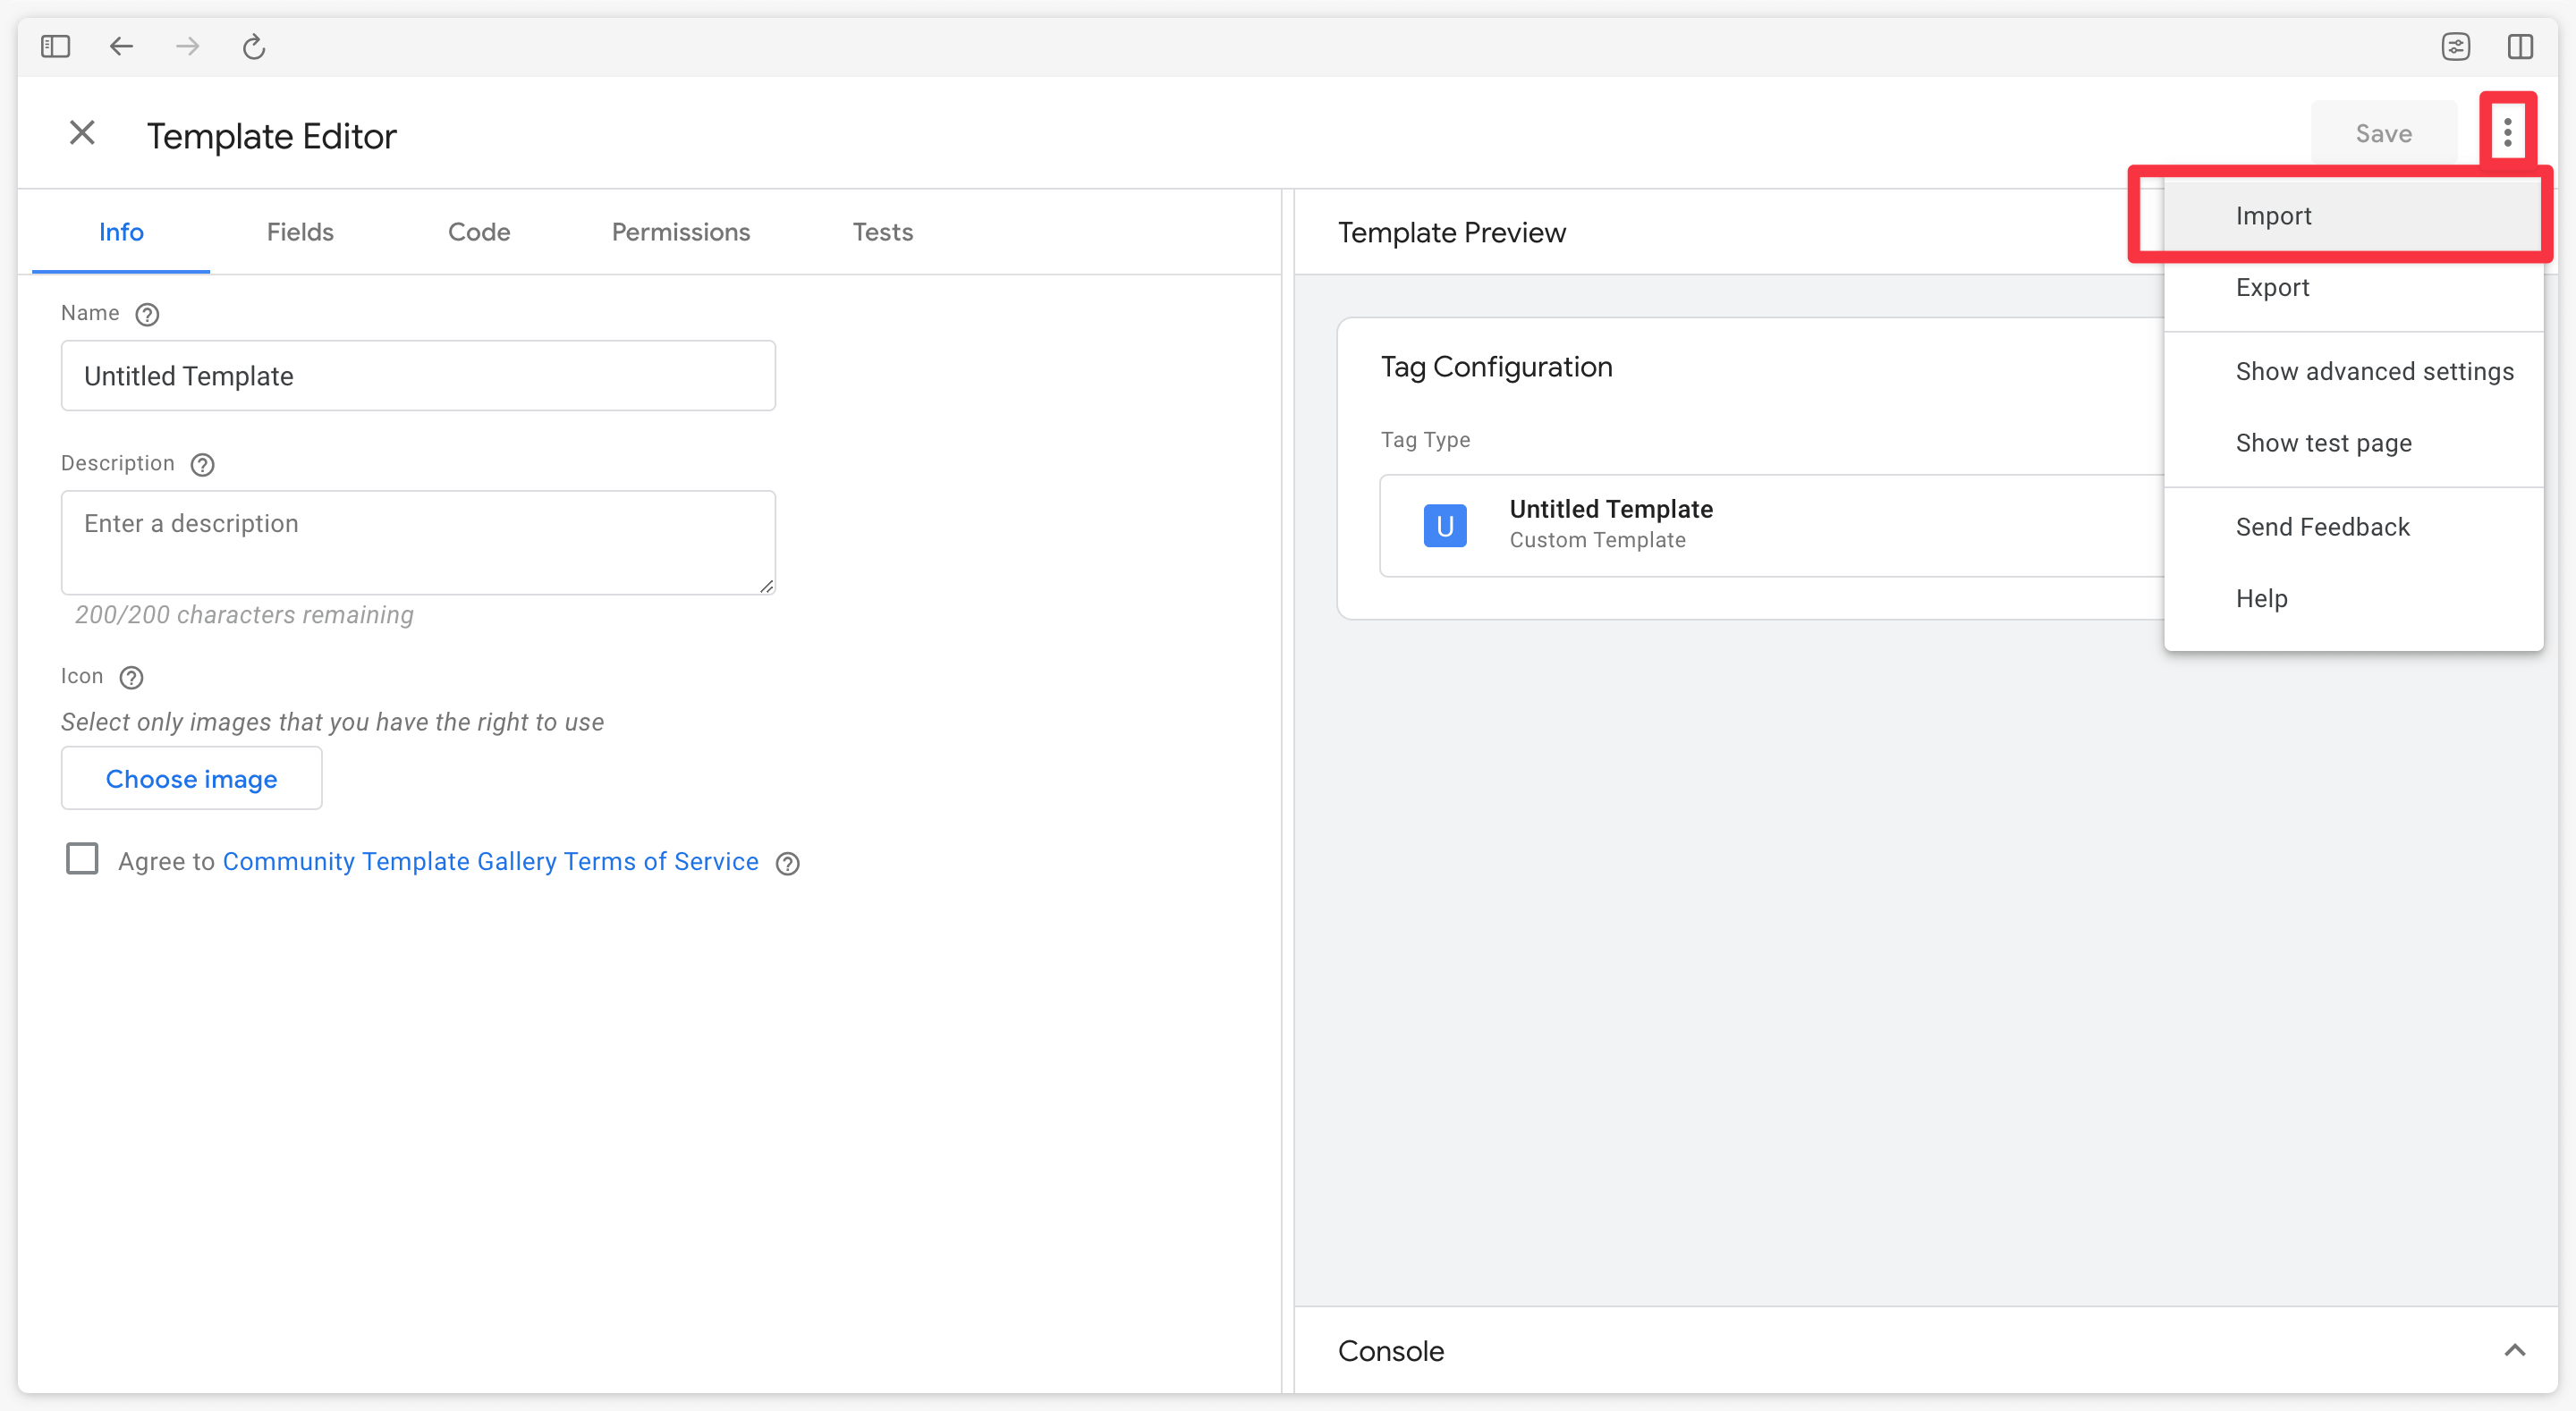
Select the template.tpl file you just downloaded, then click Save.
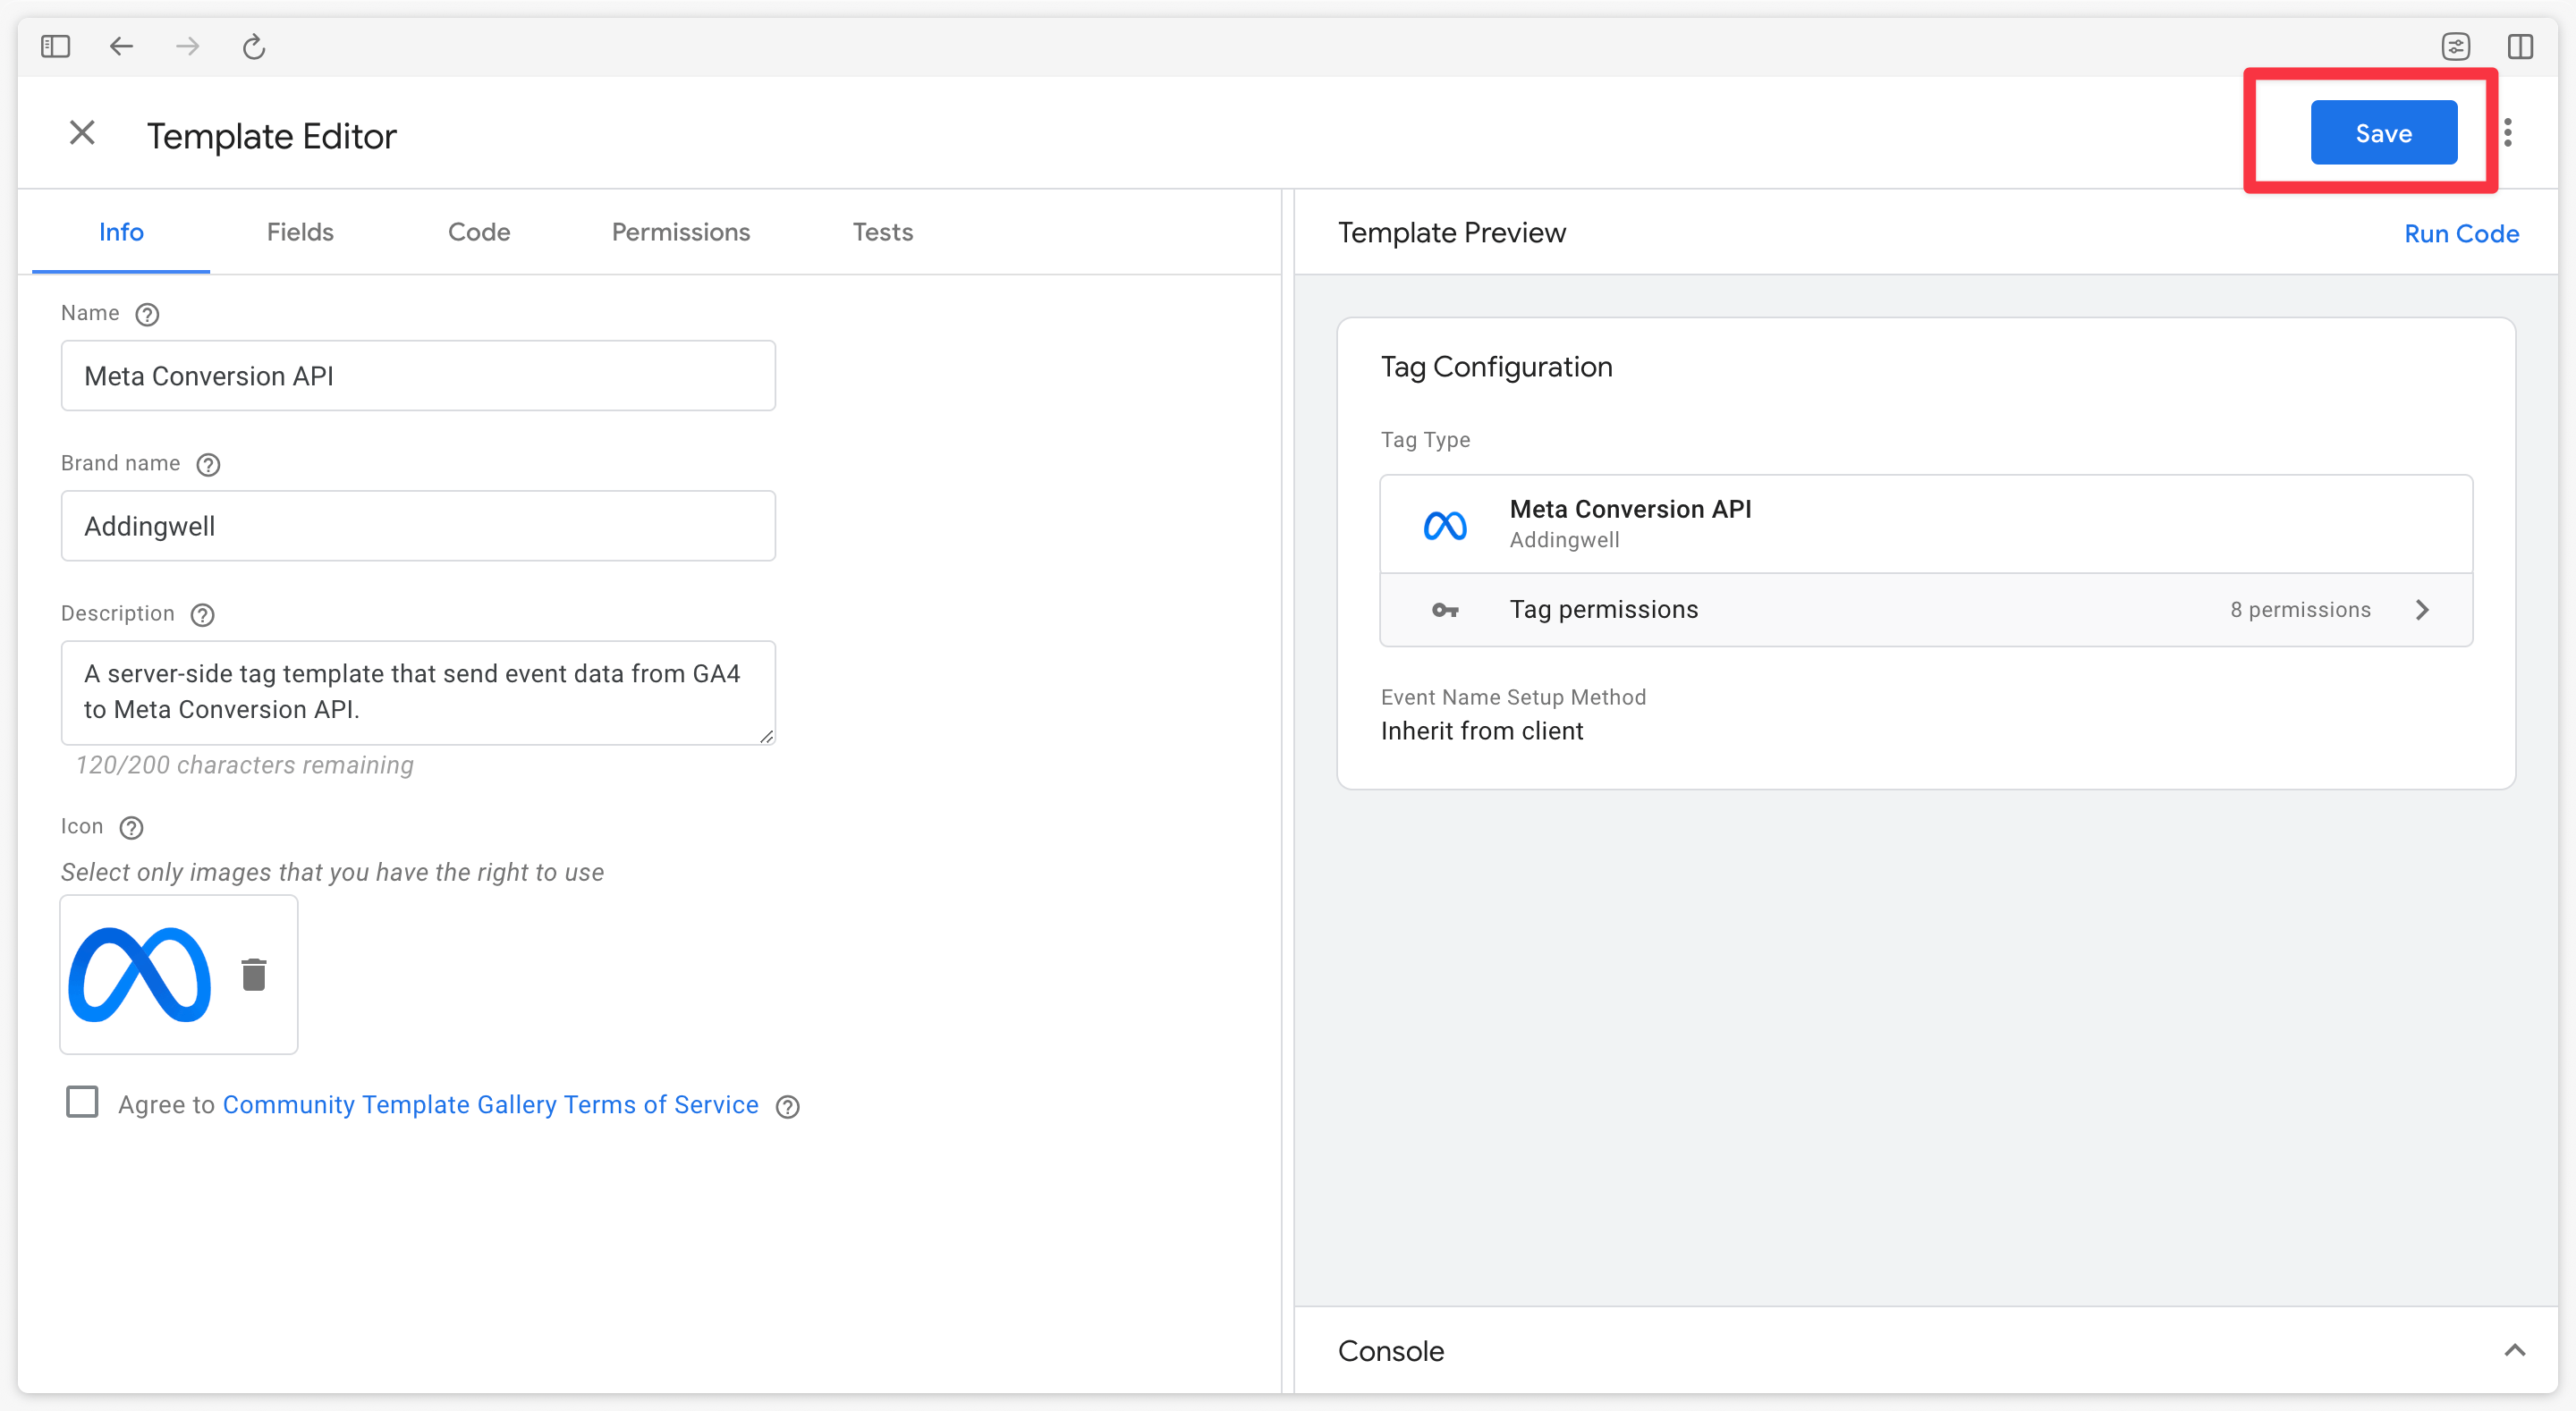
Configure the Tag
Create a new tag in Google Tag Manager Server‑Side and select the newly added Meta CAPI tag. You’ll need two pieces of information to configure it:
- the Meta Pixel ID to which you’ll send data
- the Access Token required to communicate with the Meta Conversion API
Once you’ve retrieved the pixel ID and access token, configure the Meta CAPI tag accordingly.
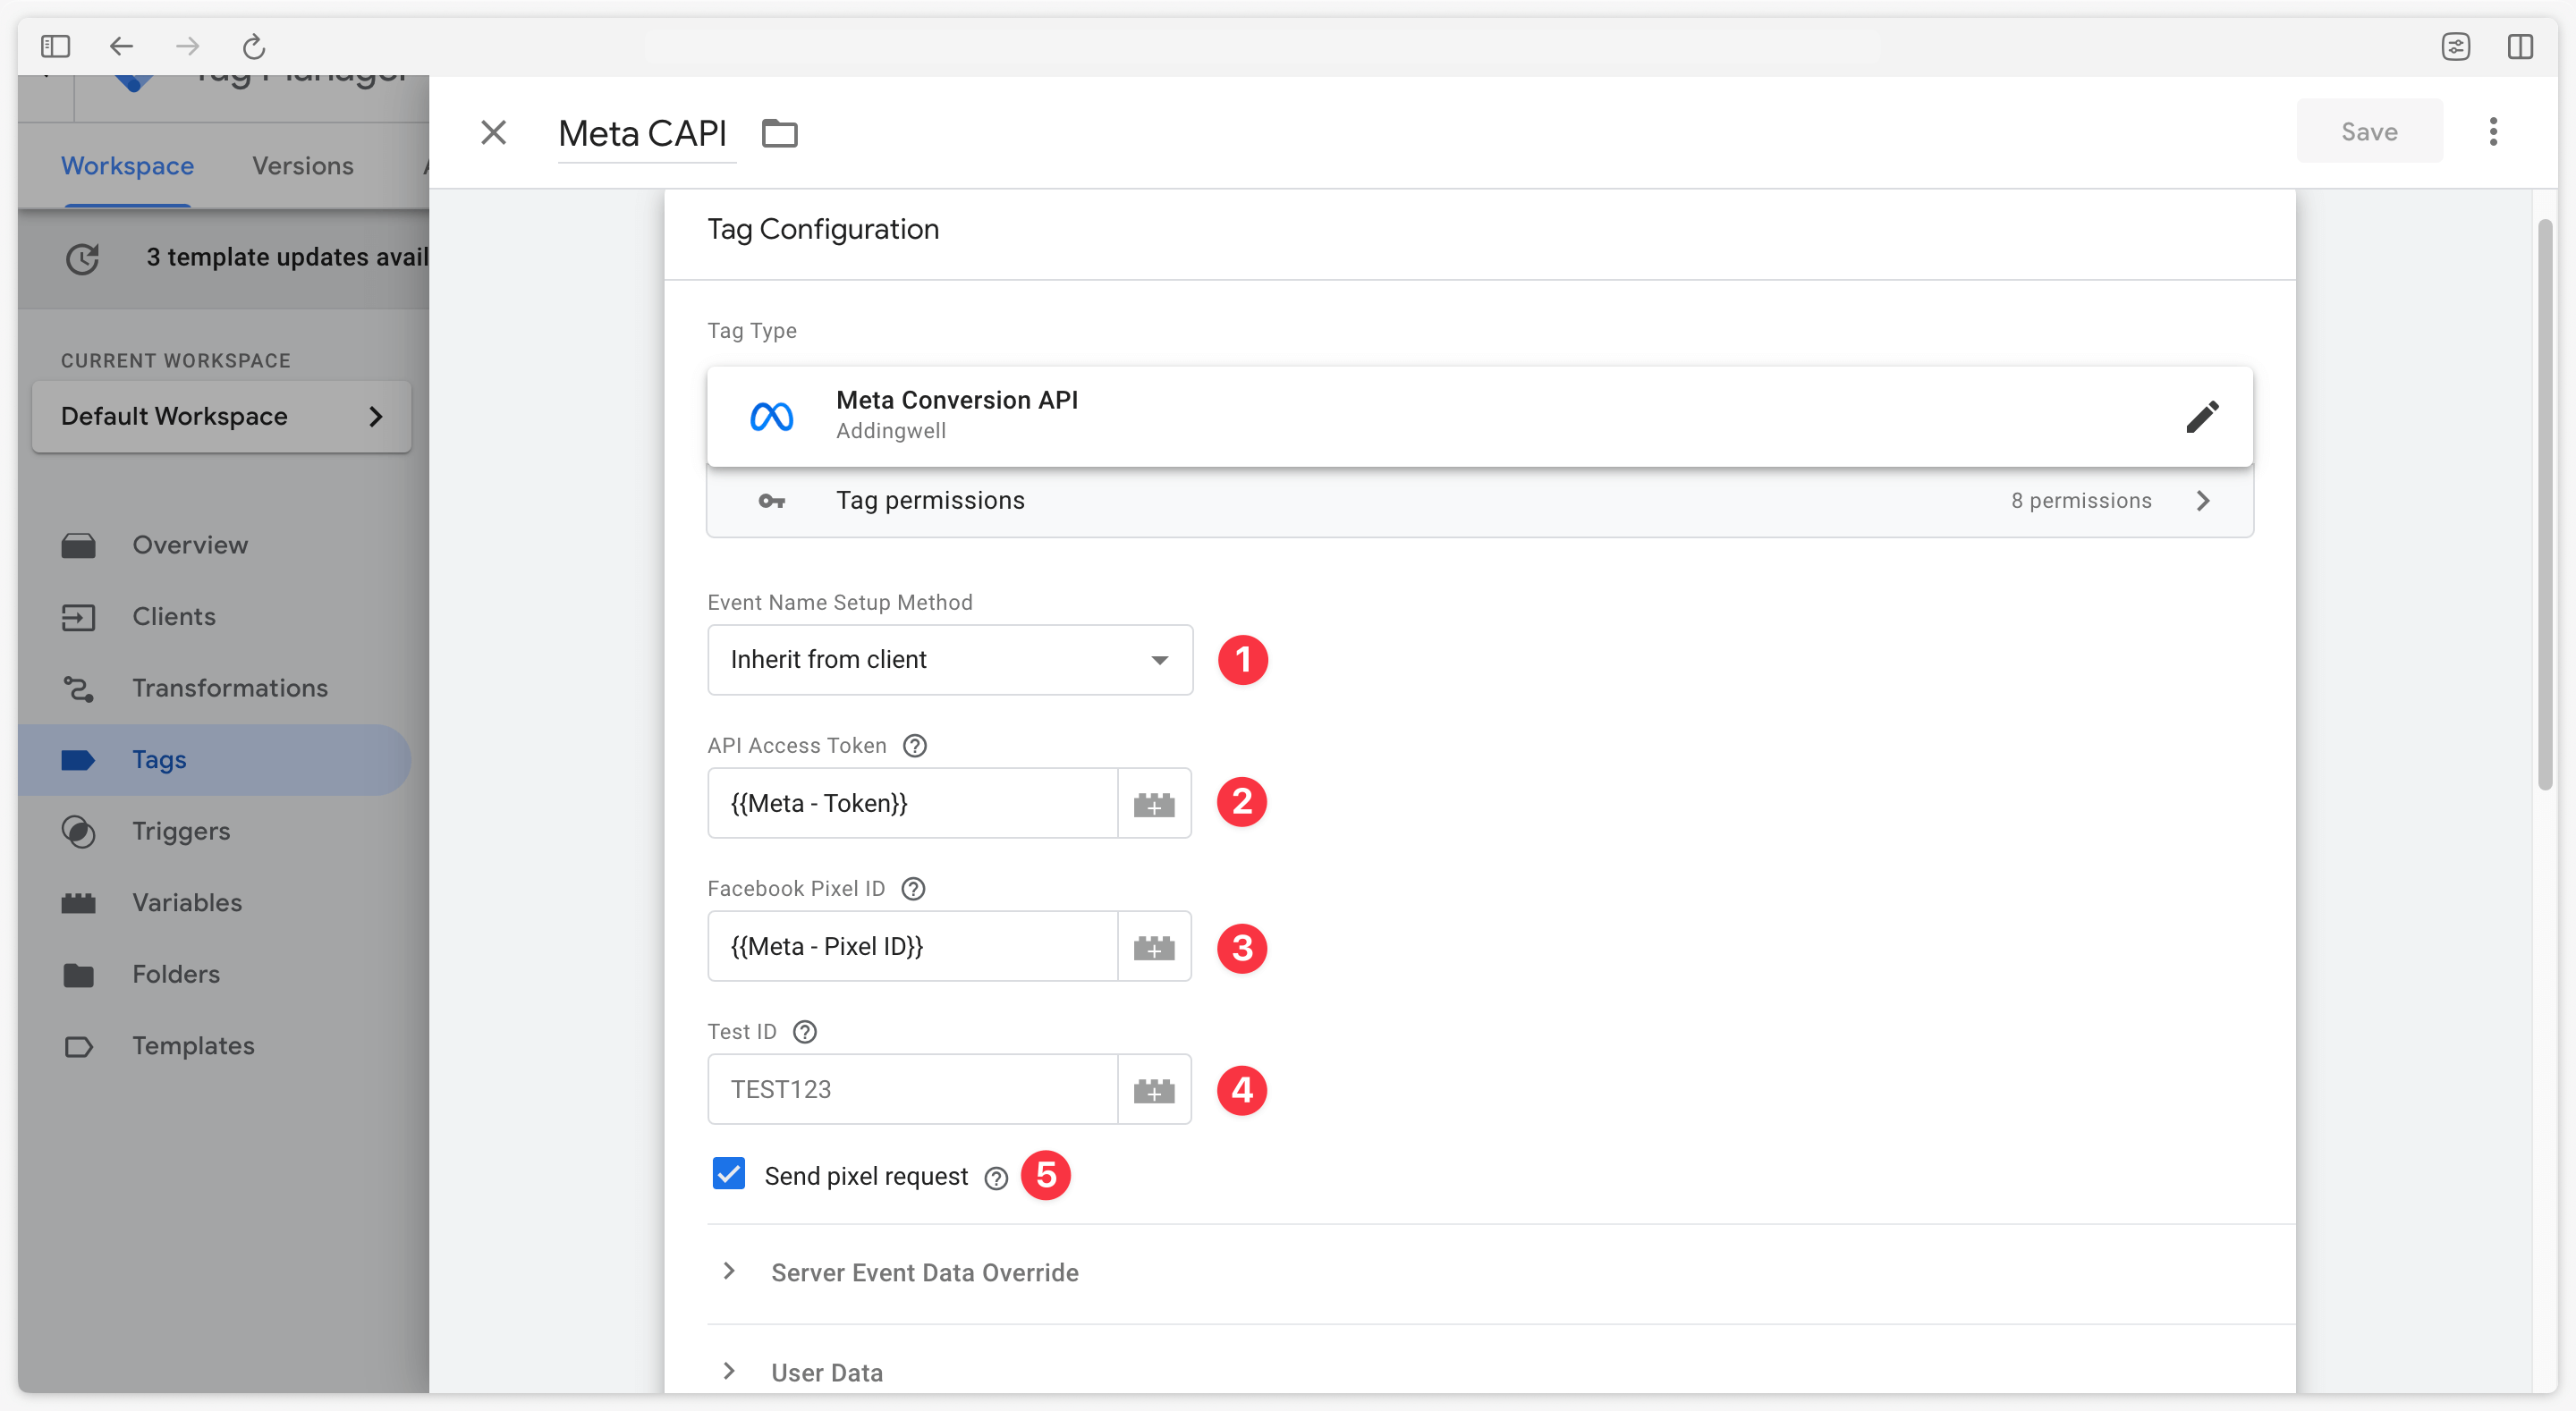
Event Name Setup Method
| Setup method | Description |
|---|---|
| Inherit from client | Sets the tag to match GA4 events received from the client container to Meta’s standard events. Any GA4 event not listed in the mapping table will be sent as a custom event to Meta. |
| Override | Allows you to create your own mapping between GA4 events and Meta events. You can choose to send a standard event or a custom event. |
API Access Token
Enter the access token obtained from the pixel settings.
Facebook Pixel ID
Enter the pixel ID retrieved from the Event Manager.
Test Event ID
You may input your test code from the Event Manager, solely to test event delivery to Meta.
It is not recommended to keep the Test Event ID in the Meta Conversion API tag in production. Remember to remove it before publishing your server container.
Send pixel request
Check this option to send a request to the pixel (the violet arrow in the diagram below) using the same event_id as the request sent to the Conversion API, enabling proper deduplication. This aligns with Meta’s advertising tracking guidelines.
With this Addingwell tag, you no longer need separate Meta tags in your client container — only the server container tag is necessary.

If you enable Send pixel request in the server‑side tag, make sure to remove or at least pause any Facebook Pixel tags in the GTM client container, or events will be sent twice (once from server, once from client). Similarly, if the Facebook Pixel was hardcoded on the site, ask developers to disable the pixel in the site code. Otherwise, duplicate events will occur!
Trigger the Tag
Finally, trigger the Meta CAPI tag on relevant GA4 events using the mapping table.
Common events for an e-commerce site include:
| Event Name |
|---|
| page_view |
| view_item |
| add_to_cart |
| begin_checkout |
| add_payment_info |
| purchase |
This list is illustrative and should be adapted to your use case.
For optimal organization, create a Lookup Table variable as follows:
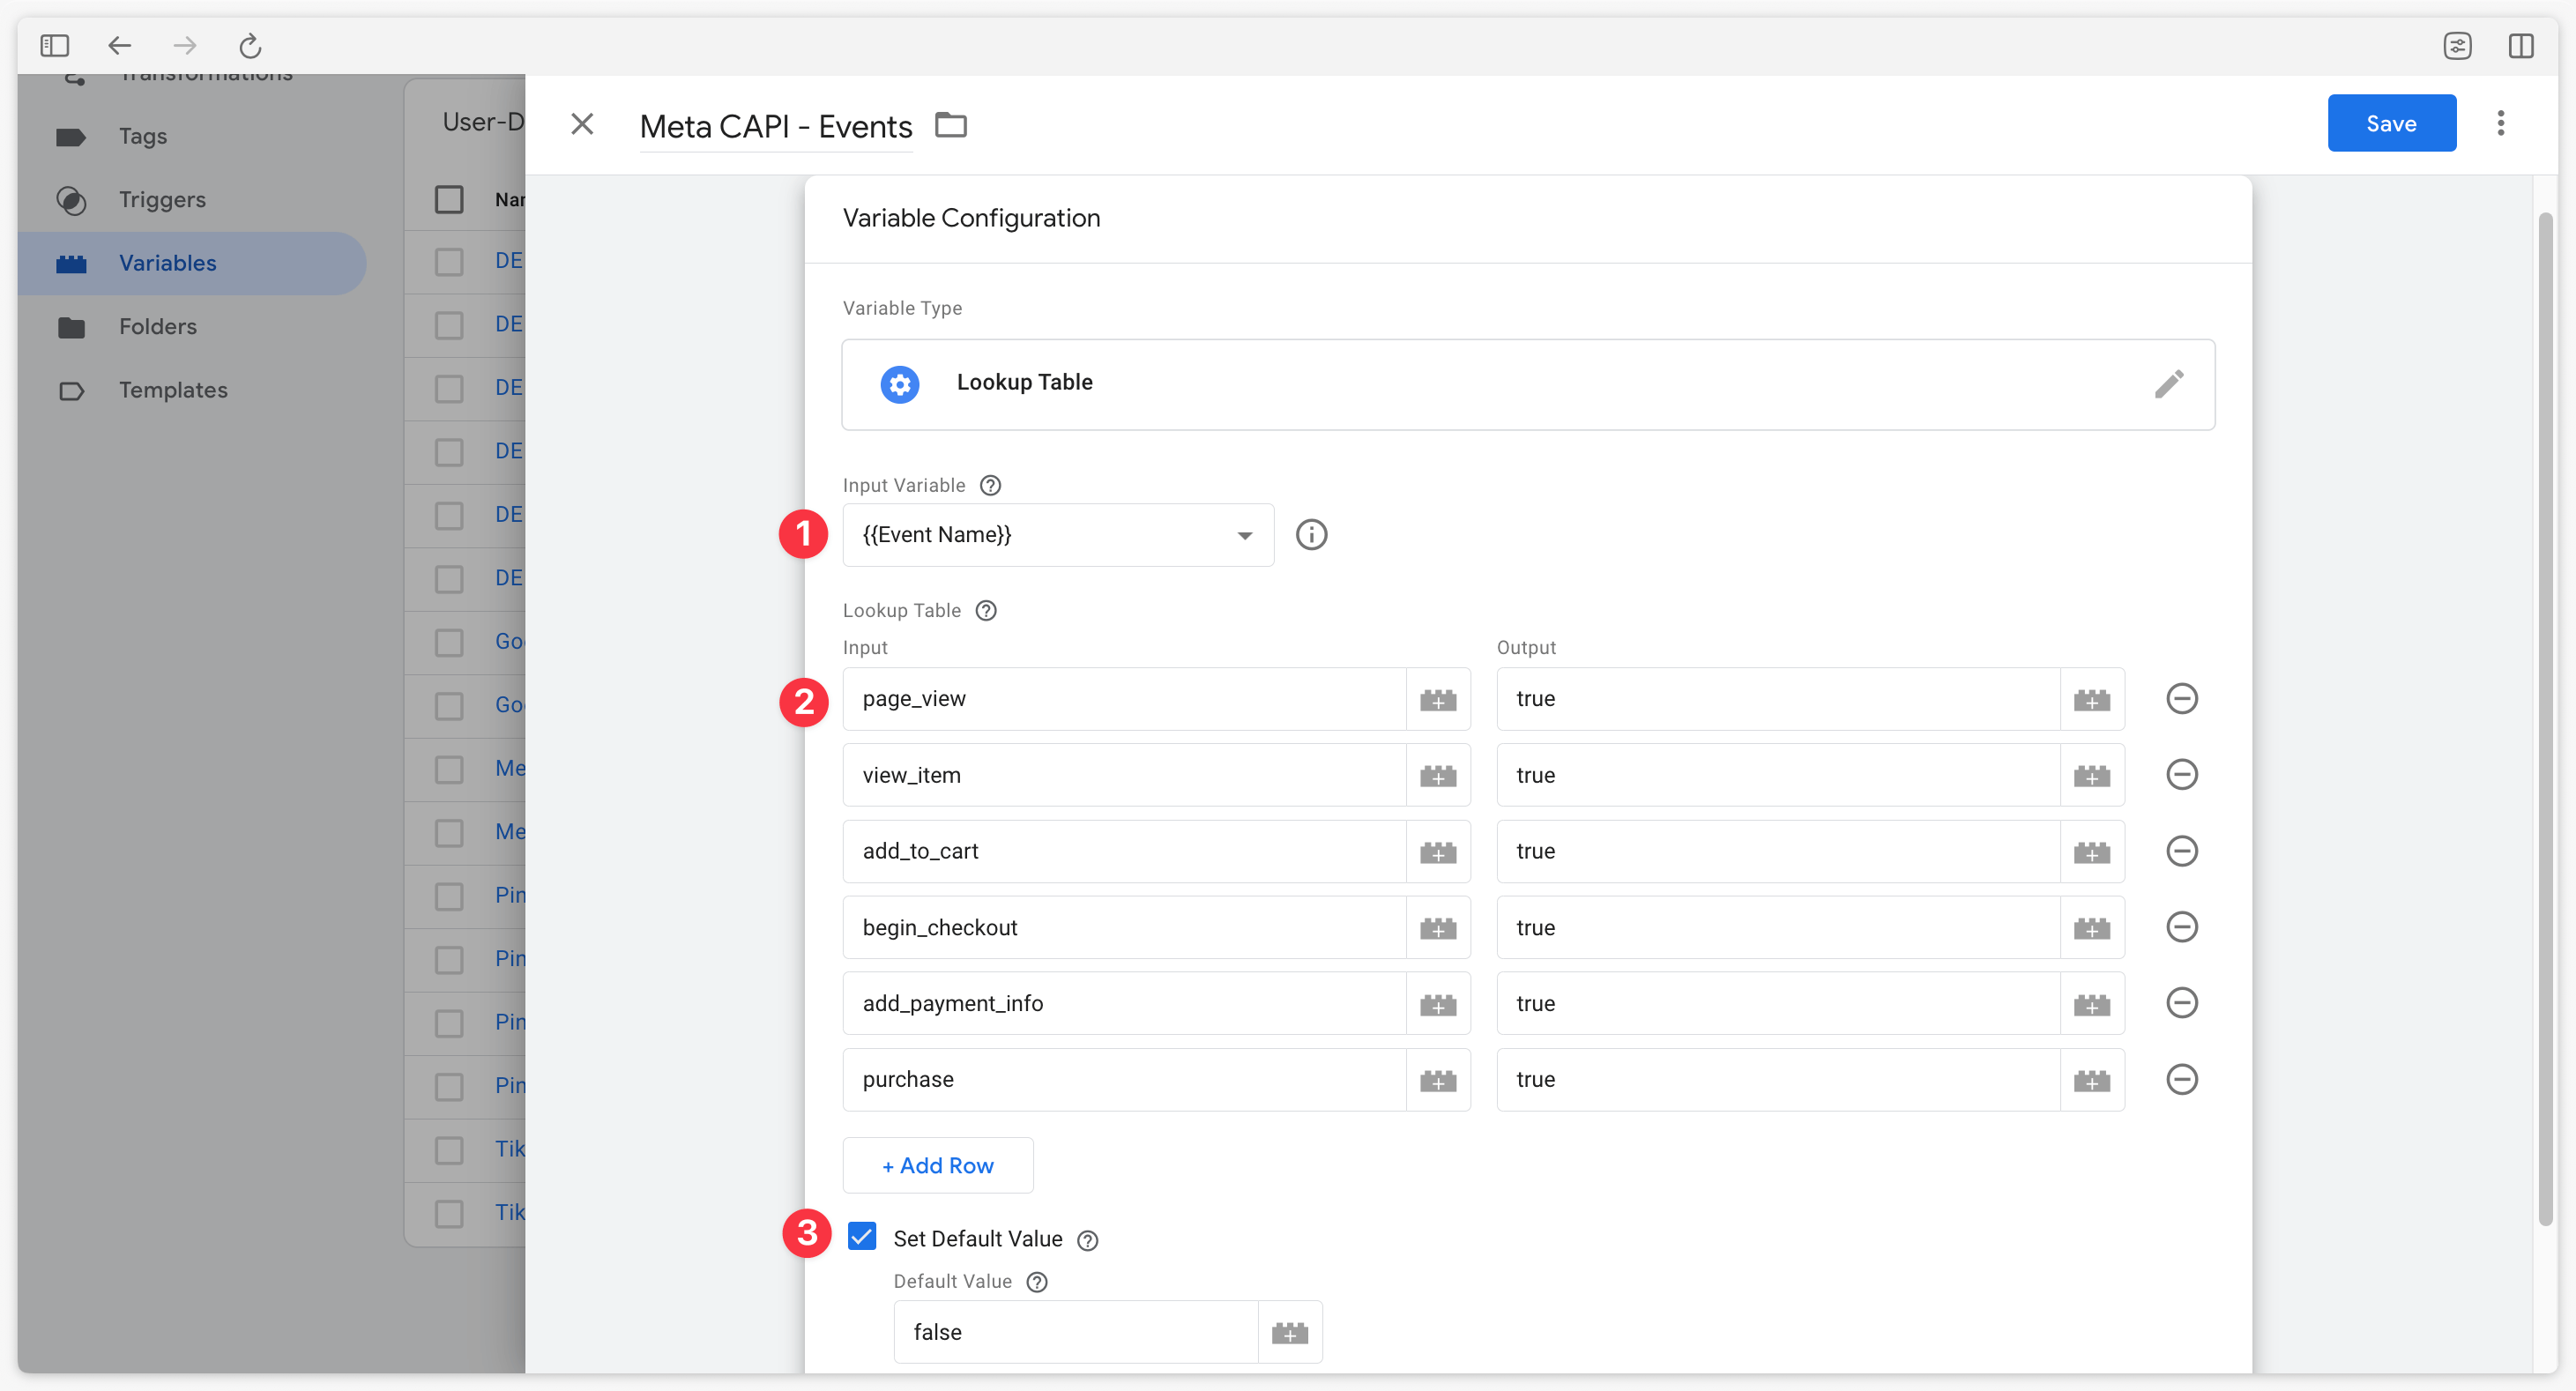
In the Meta CAPI tag, set up a custom trigger that checks for events from GA4 (Client Name = GA4) and verifies that your conversion table returns true.
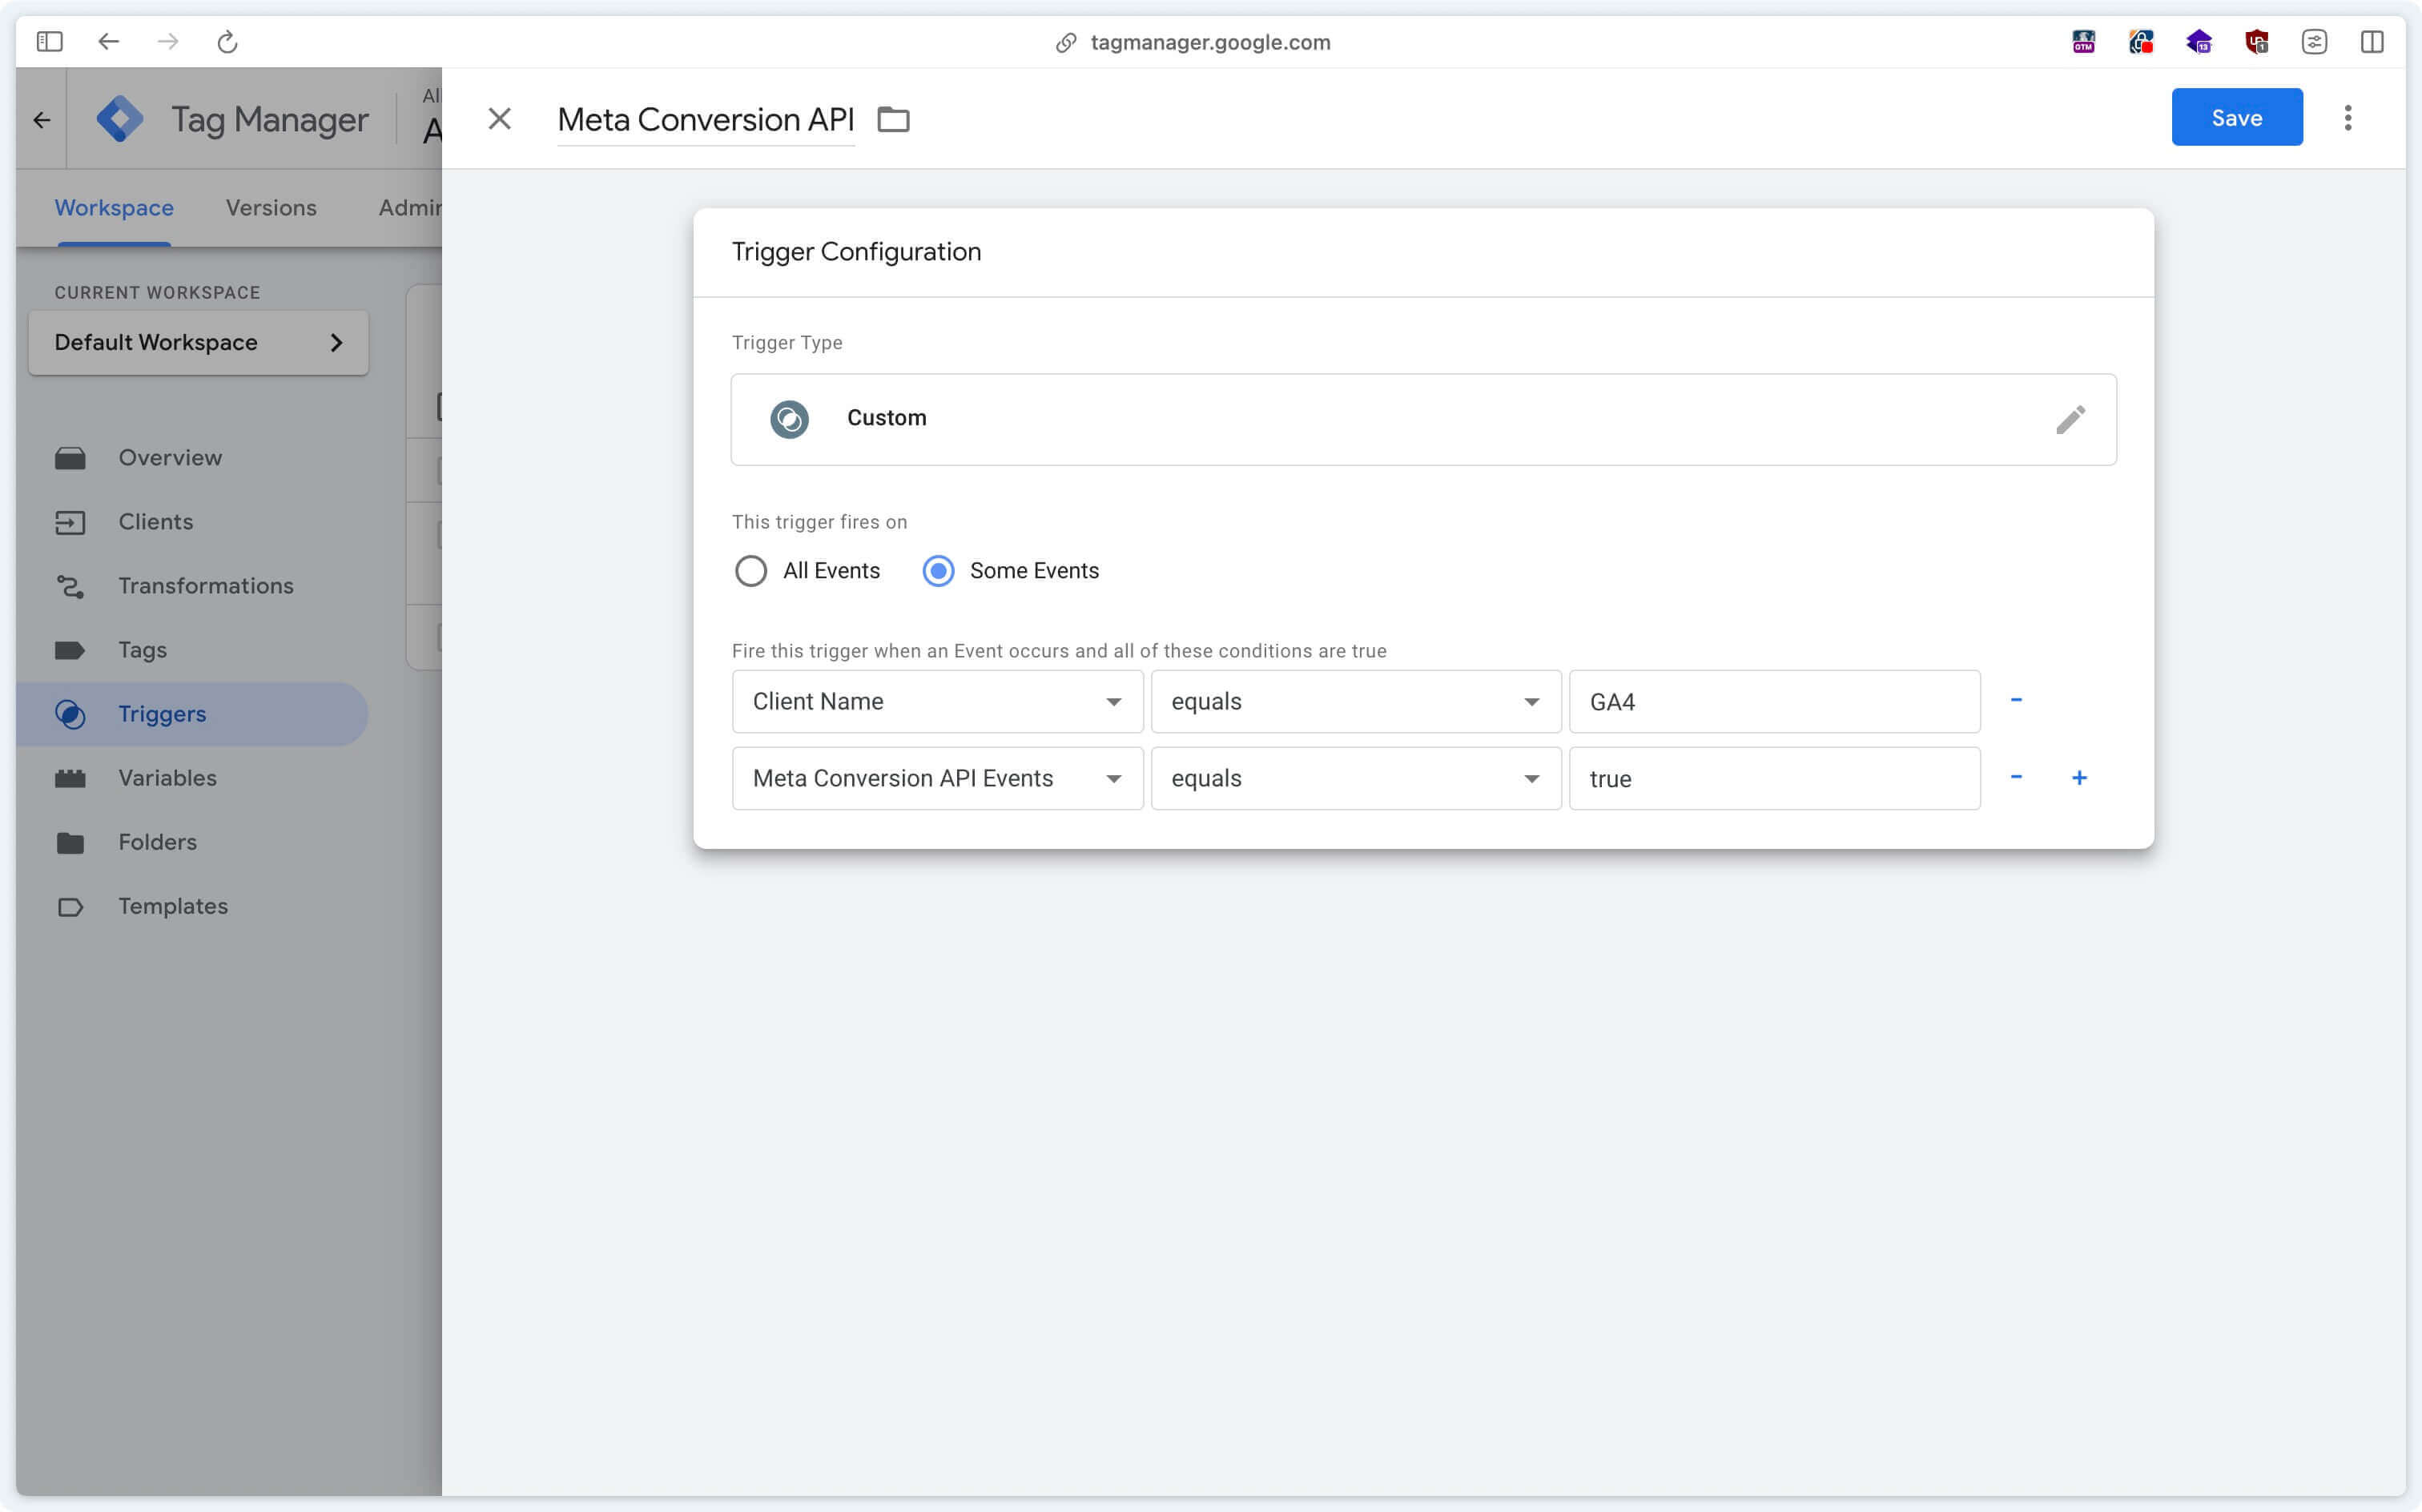
If you’ve followed our recommendations and are triggering the Facebook Pixel from the Meta CAPI server‑side tag, you must remove or pause Facebook Pixel tags in the client container. Also, if the pixel is hardcoded in the site, ask developers to disable it. Otherwise, duplicate data will be sent — both from server and client!
Verify Received Data
Once your Meta CAPI tag is configured, it’s essential to ensure that:
- your server container correctly sends events to META, both via pixel and CAPI,
- the volume of events received by Facebook is consistent and deduplication works (the same event from both sources should be counted only once),
- and data quality is solid, ensuring Facebook can match your key events to actual META users. To facilitate this, include user_data with your events.
Event Volume
Event delivery
First, verify that the Meta CAPI tag triggers correctly for your specified events in the server preview. Confirm the tag appears under Tags fired with a Succeeded status.
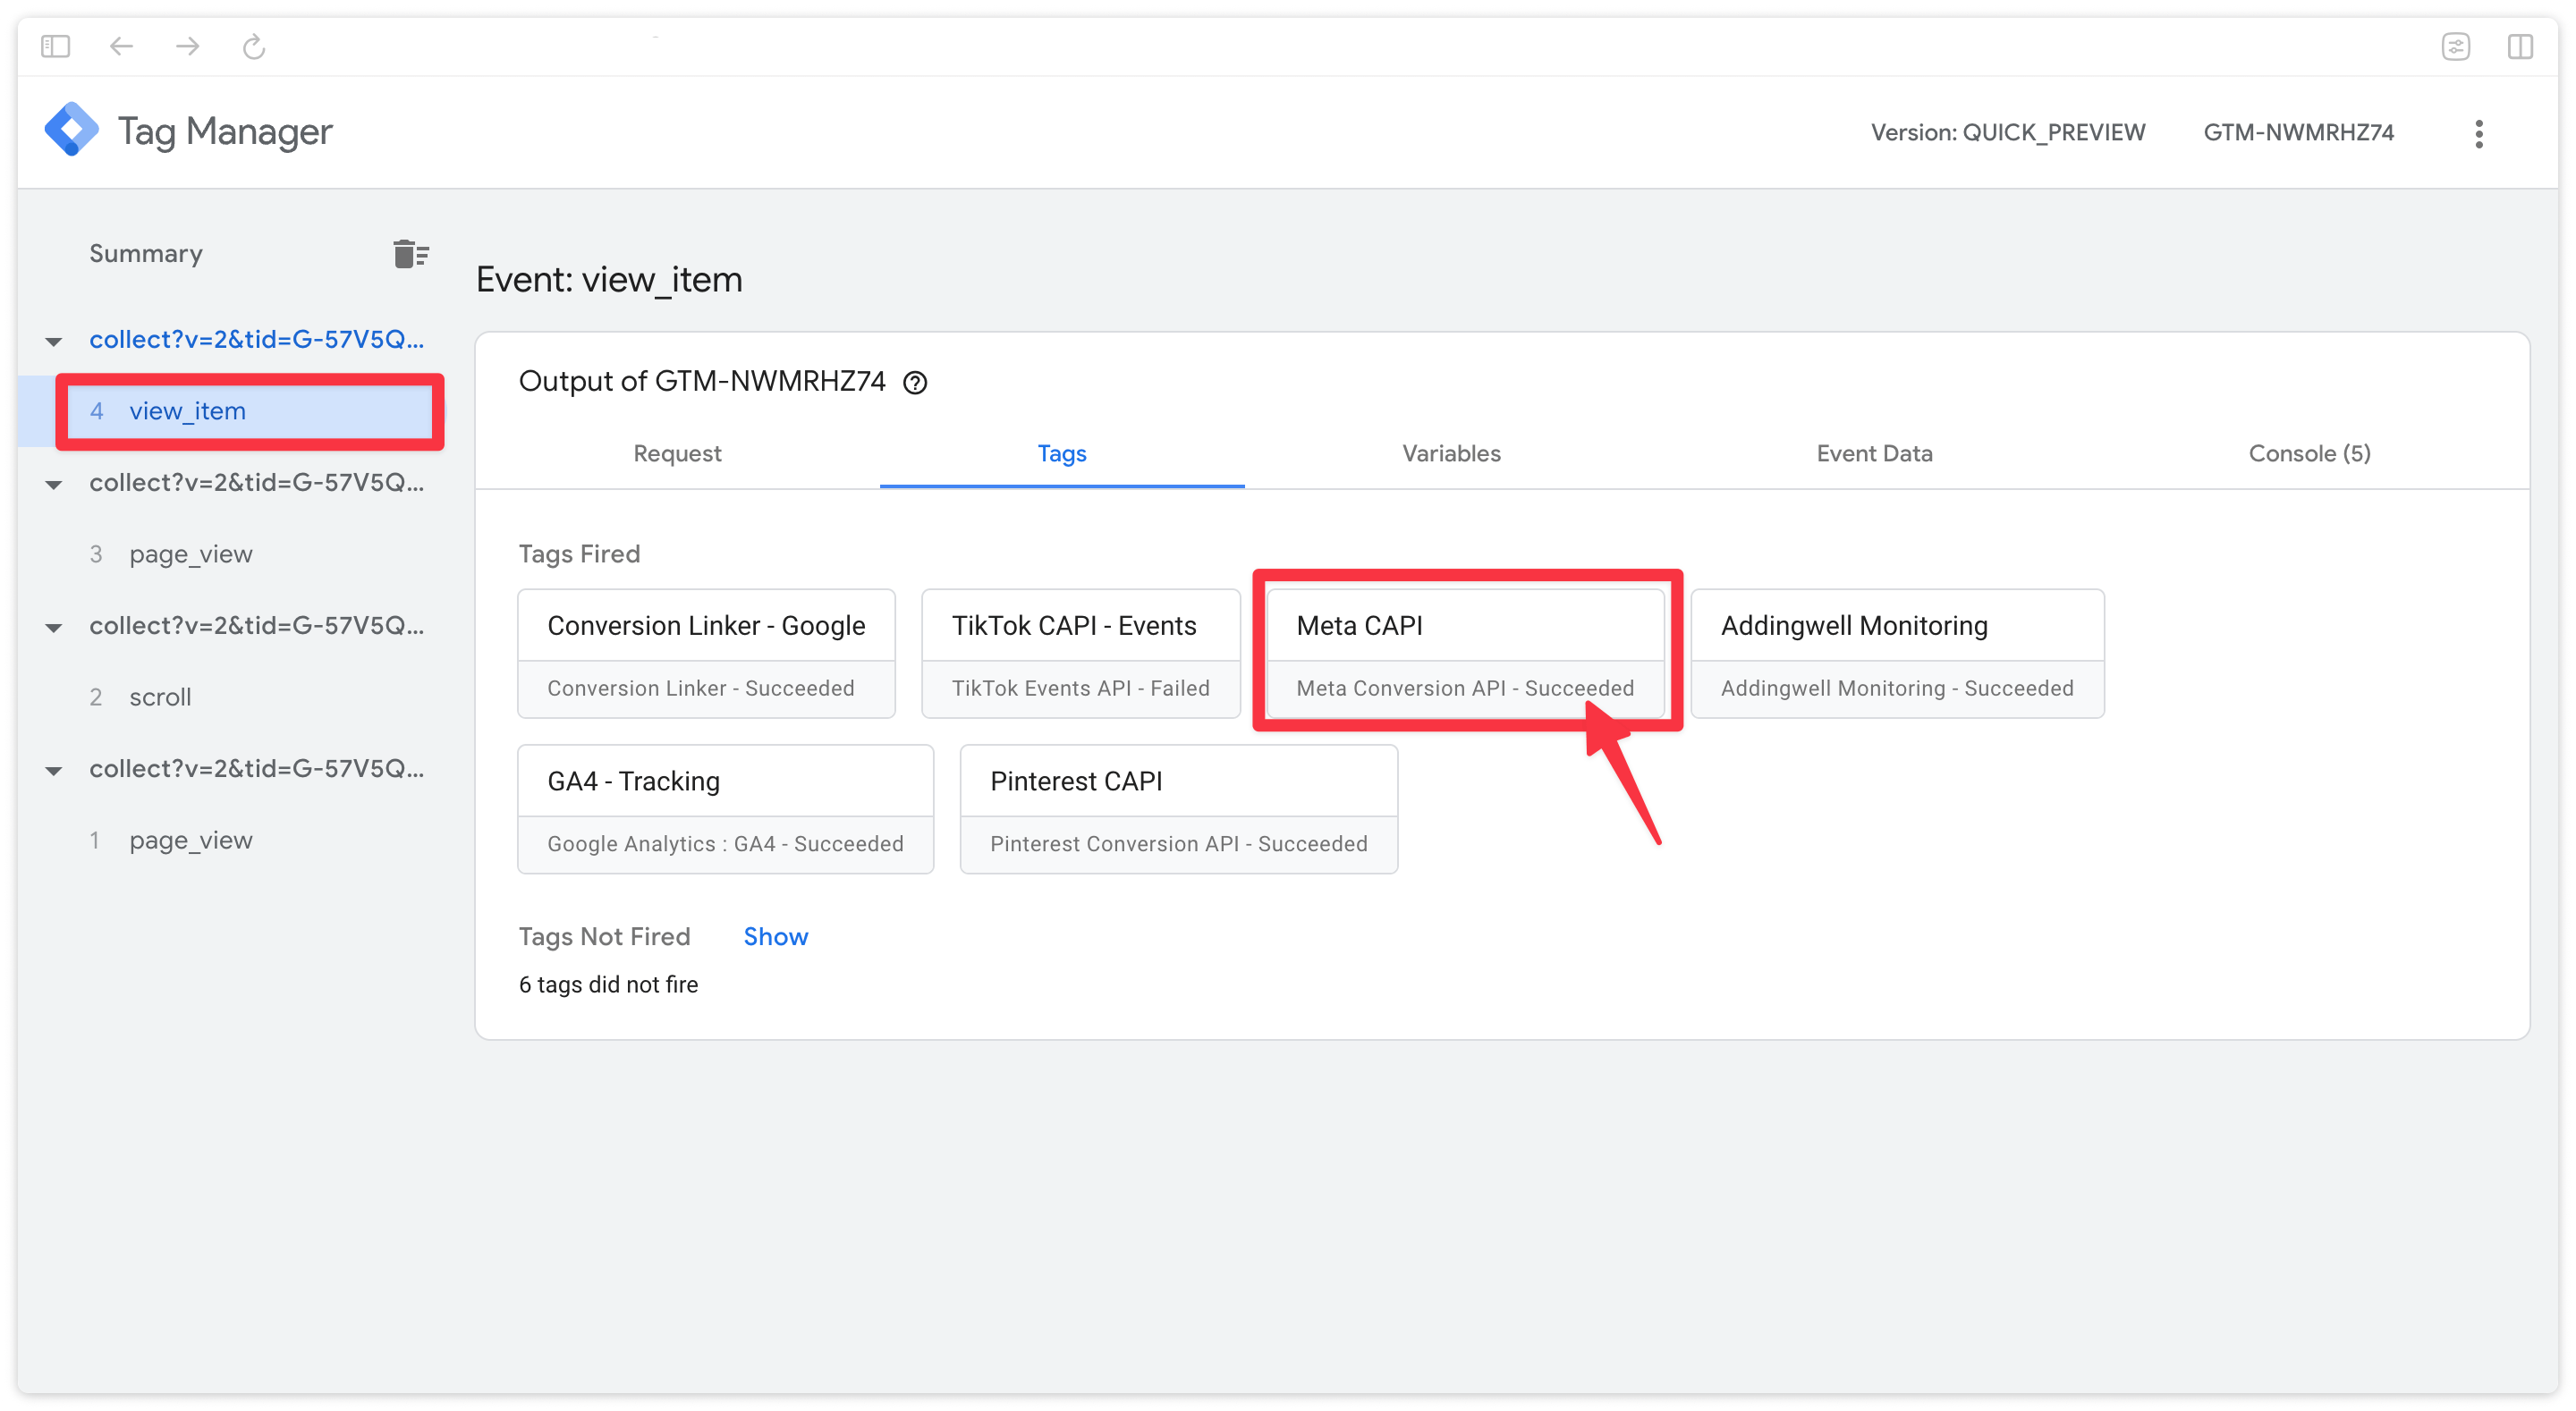
Click the Meta CAPI tag in preview to check that requests were sent to Meta via both the Conversion API and the Pixel. A pixel request will only appear if Send pixel request was checked during configuration.
Event volume received by Meta, deduplication
Open your Facebook Events Manager and go to the Overview tab.
Events received through both Pixel and CAPI sources will be displayed here.
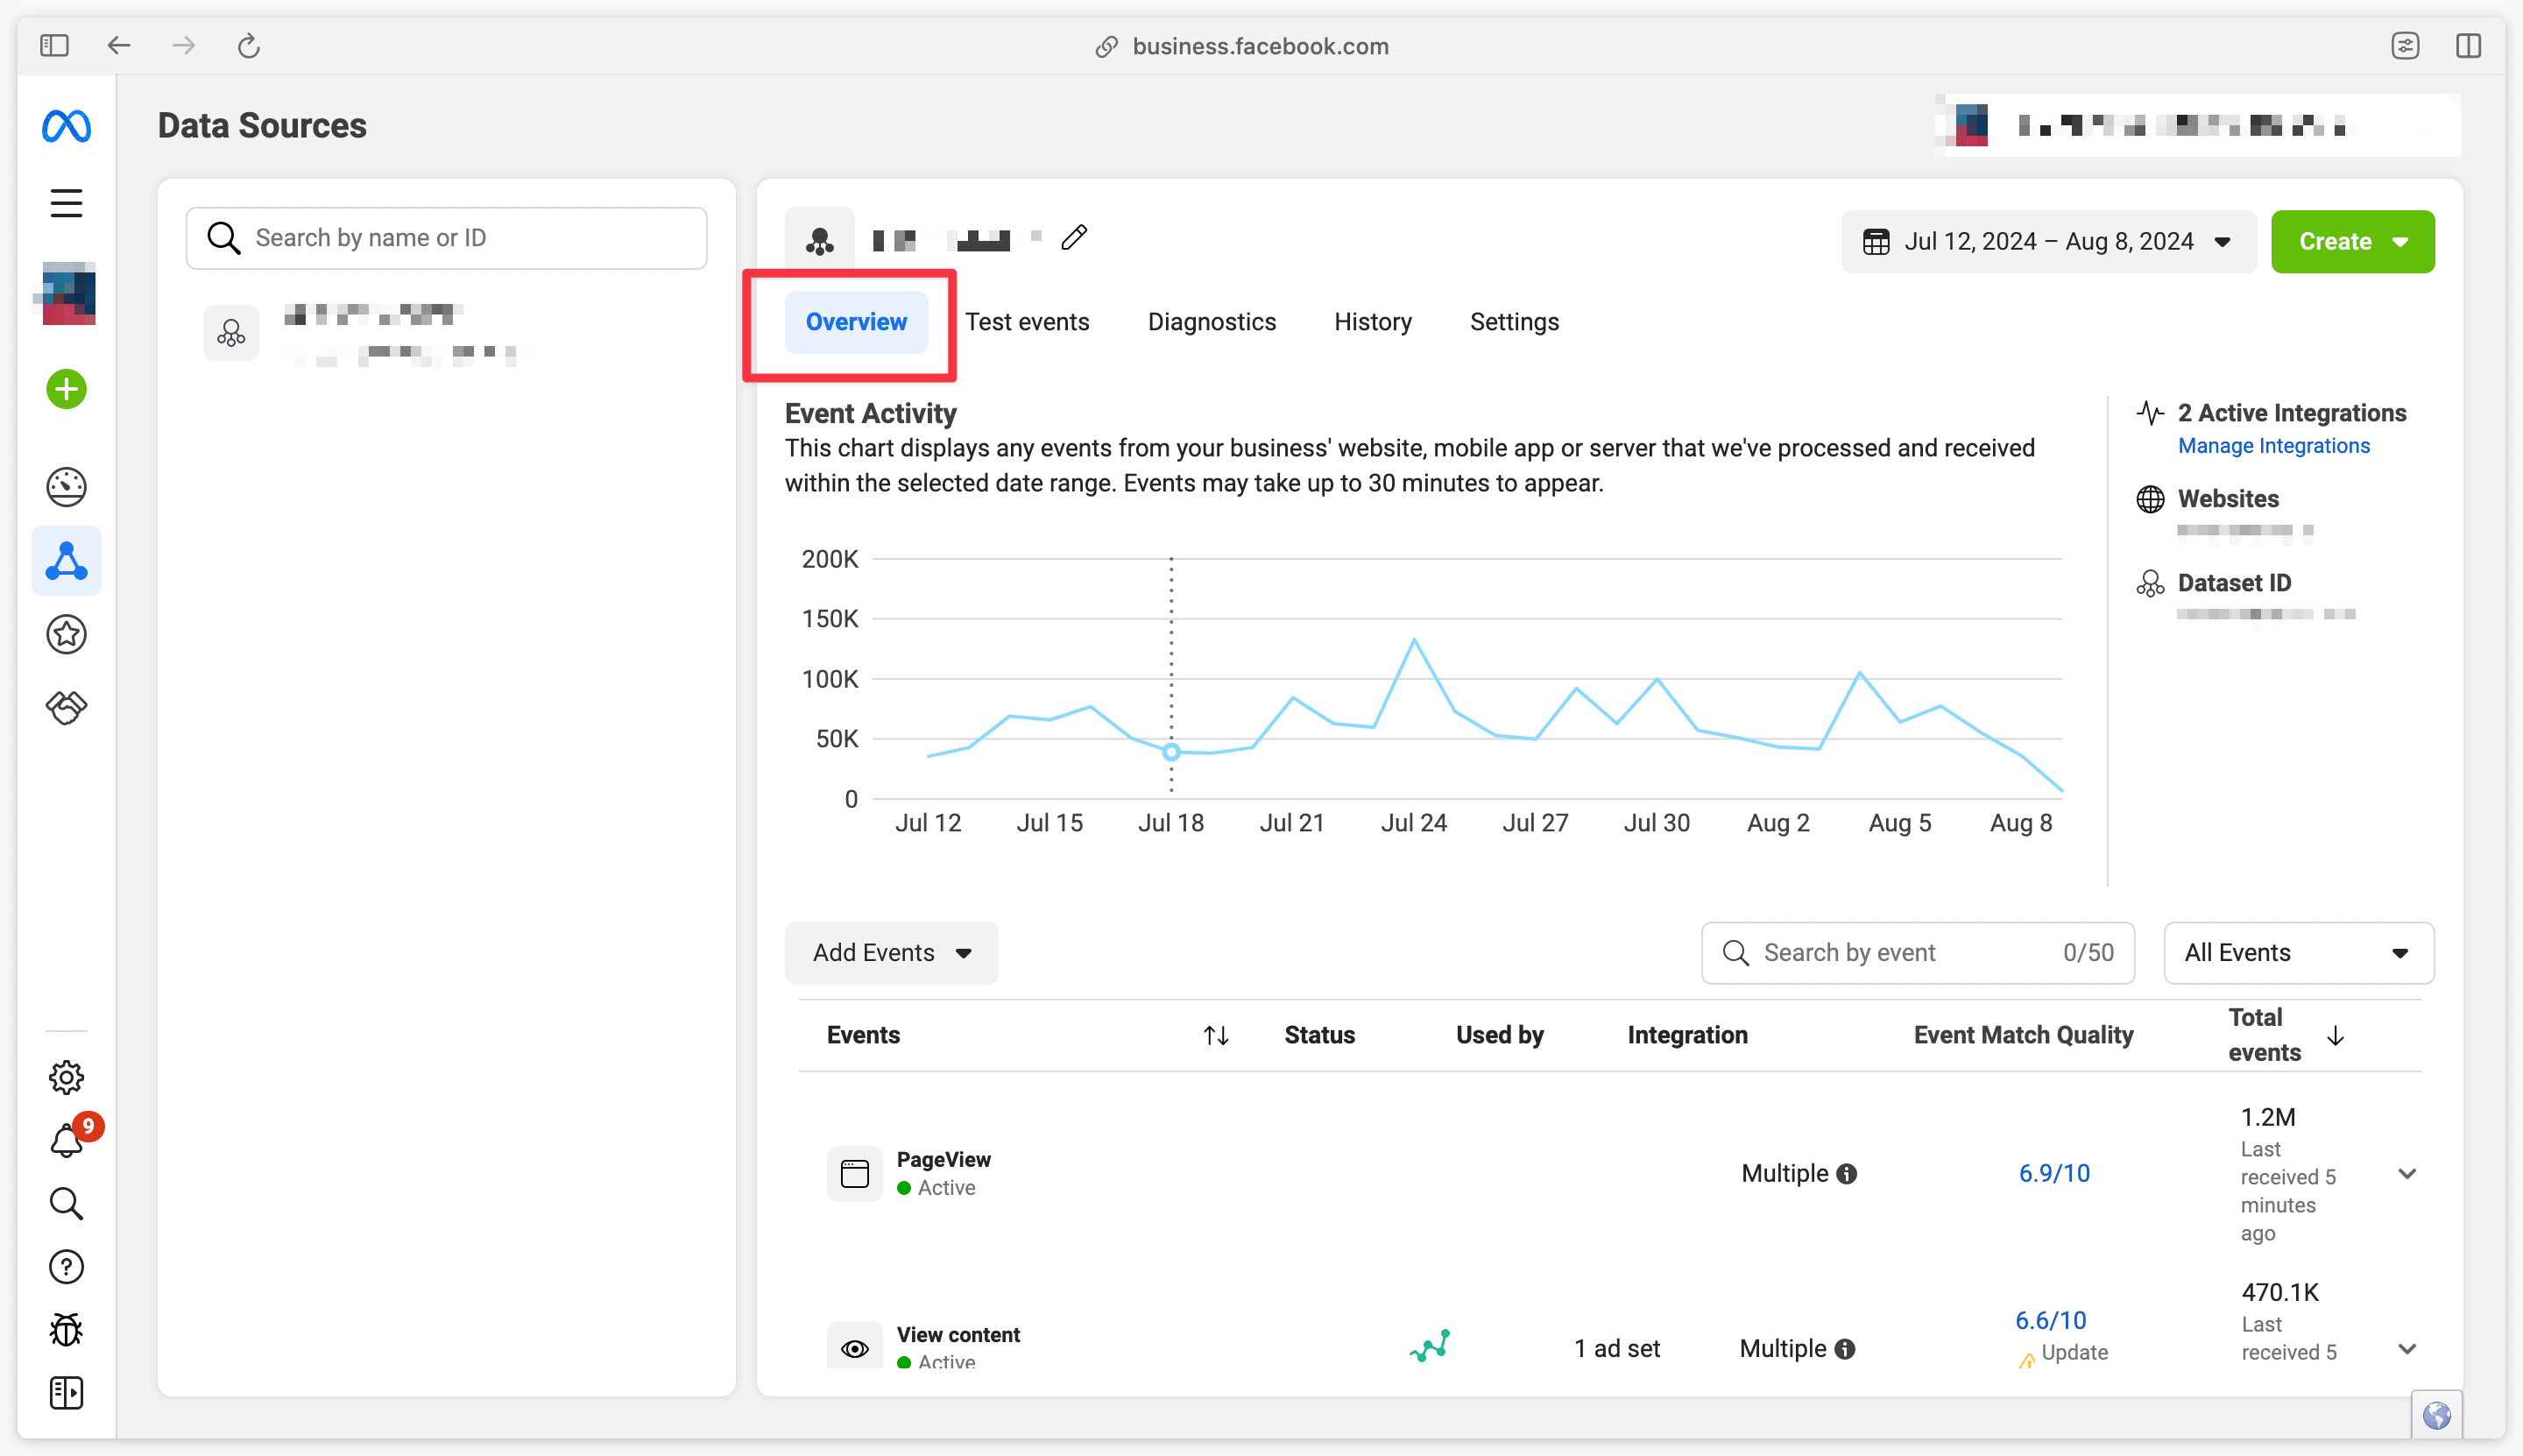
Since you’ve implemented dual tracking, ensure that:
- events are coming from both sources (Pixel and CAPI),
- they are deduplicated, meaning Facebook recognizes and counts only one event if received from both.
Click on a specific event in Overview, for example Purchase, to review details.
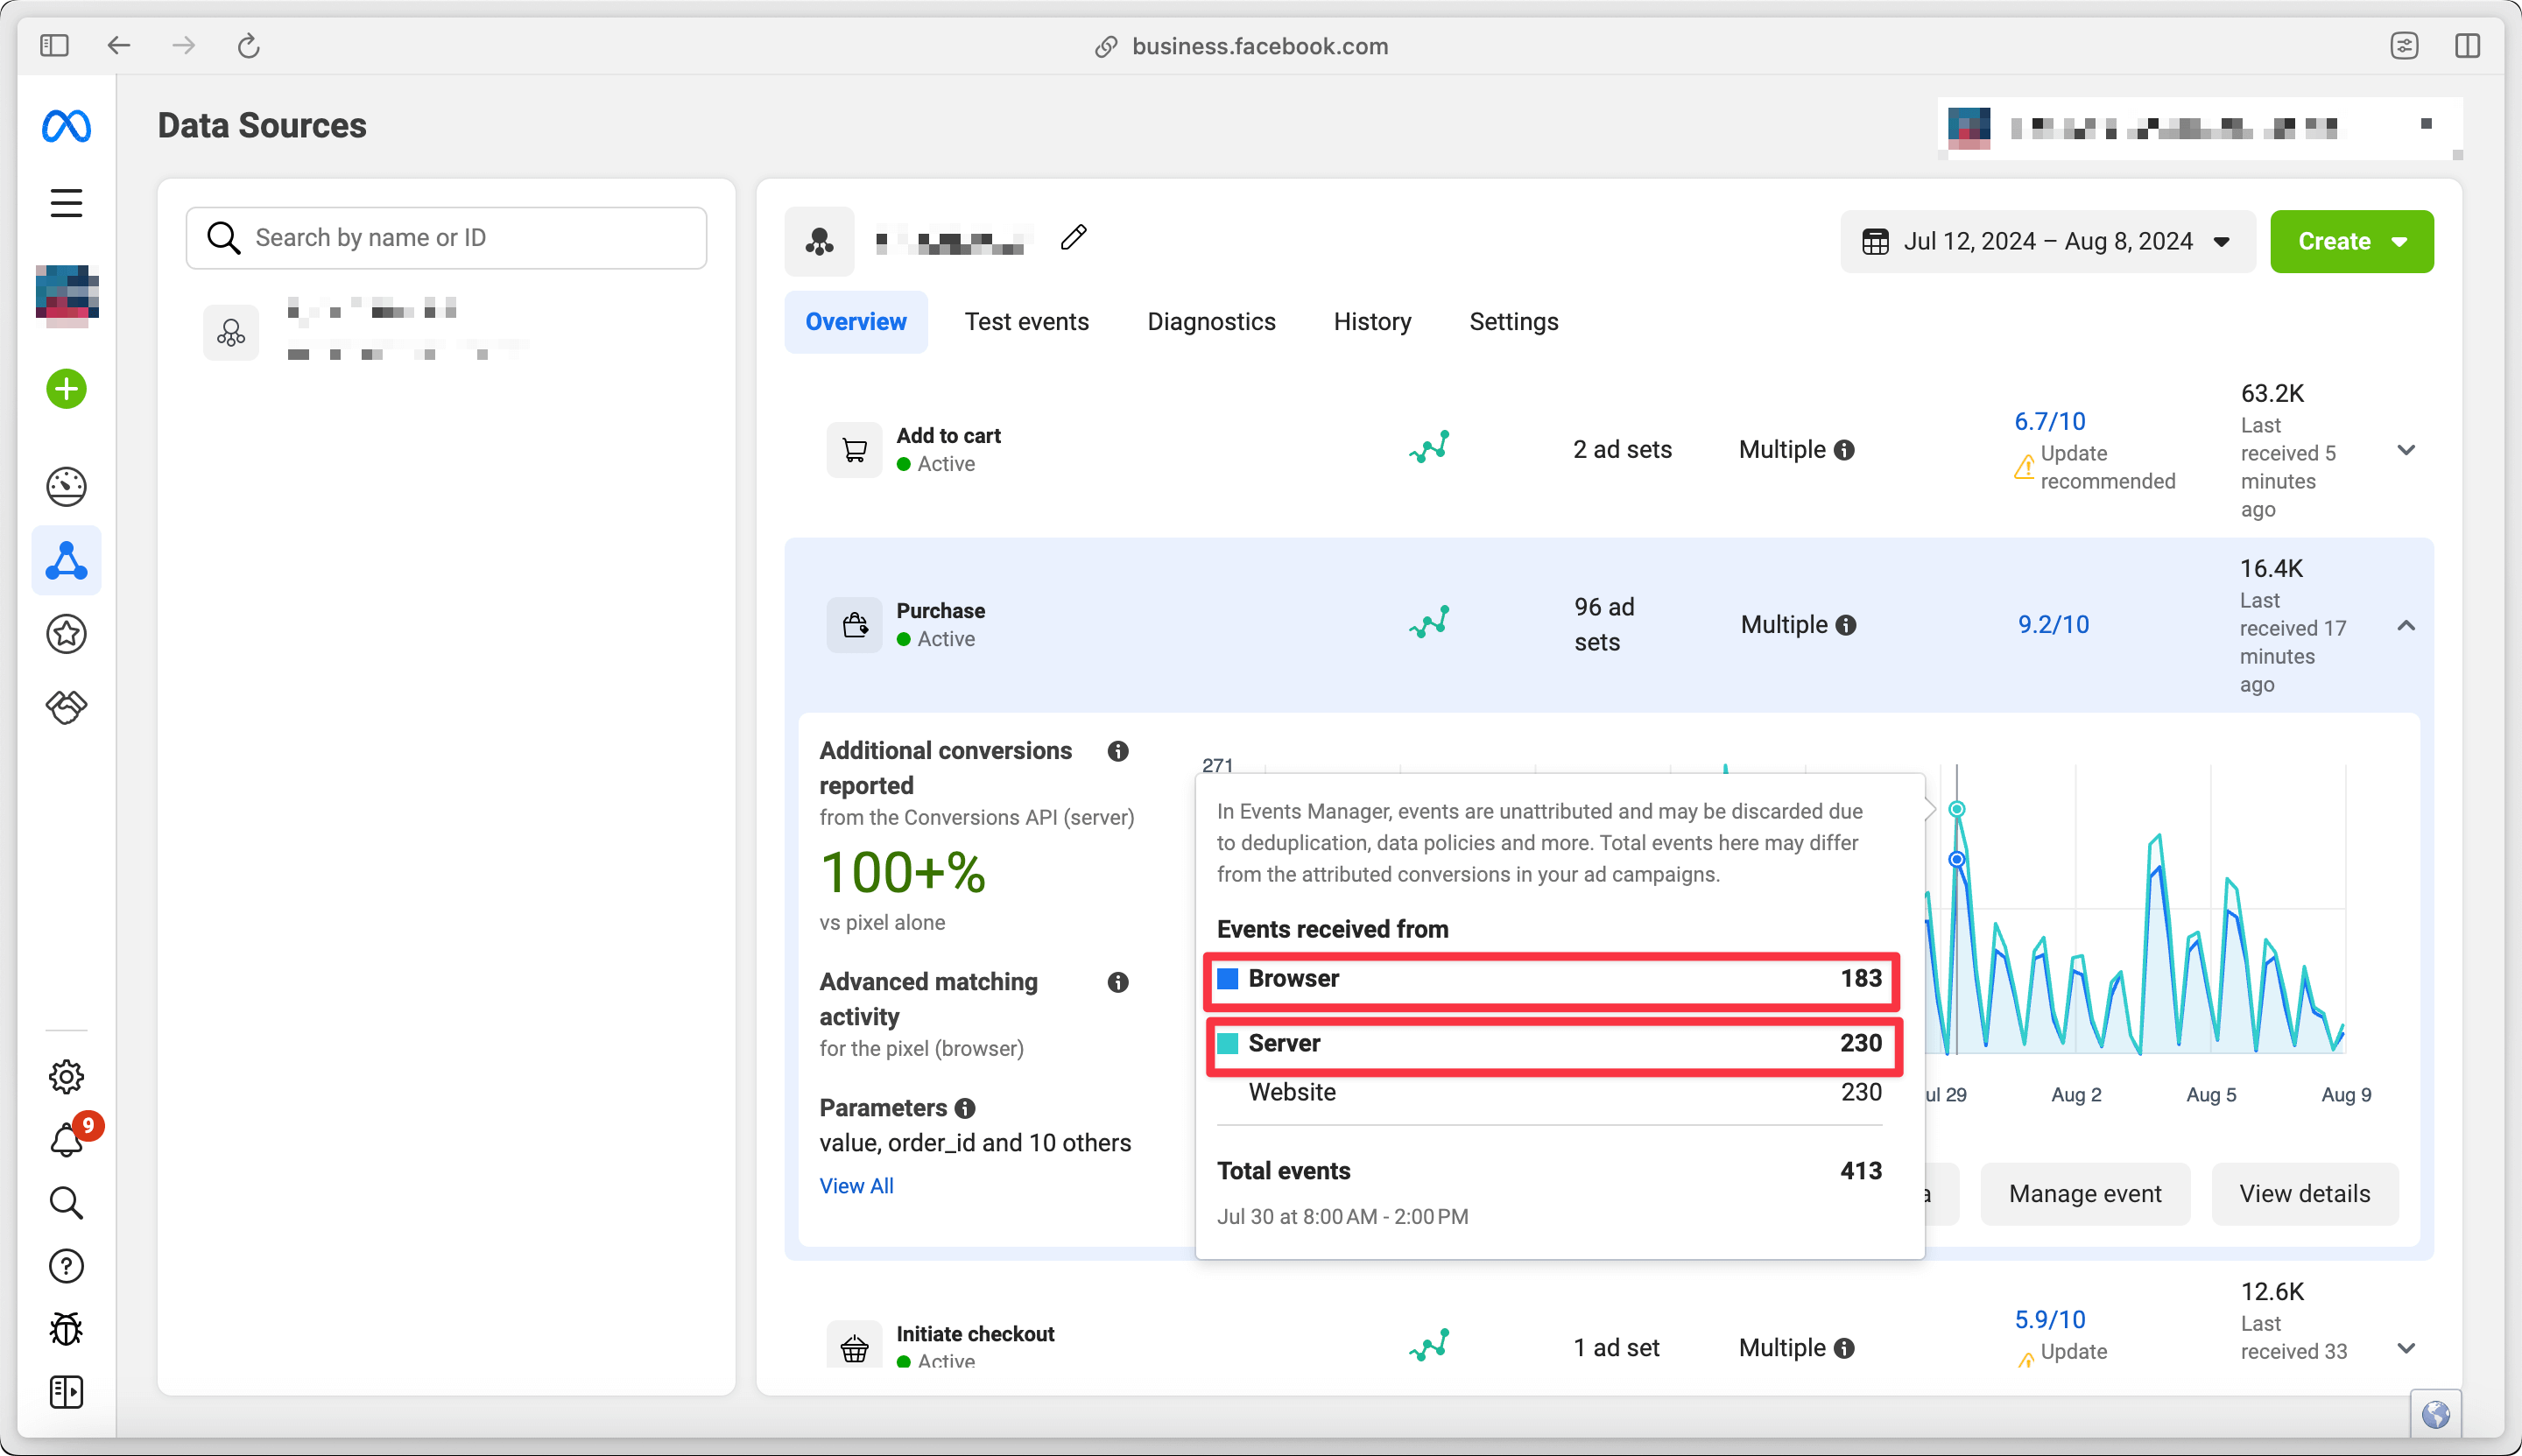
You should see both sources active, with events from the Pixel (Browser) and CAPI (Server).
Event volume via Pixel (browser) should remain stable—CAPI should not negatively impact it.
Server-side CAPI events should exceed Pixel events. An additional 5–20% through CAPI indicates a good setup. If the server volume is significantly higher, investigate your setup further.
If Pixel event volume exceeds CAPI, another Pixel implementation may still be active (e.g., in client GTM or hardcoded on the site). Check with your team and remove duplicates.
Then click View Details and go to Event Deduplication.
You should see 100% event ID delivery from both Pixel and CAPI, confirming perfect deduplication.
The Overlap metric shows what percentage of events had matching deduplication keys from both sources (e.g., Event ID and FBP).
Event volume in Addingwell via Events Monitoring
In your Addingwell container, go to Events Monitoring. Select your timeframe and click on the Meta CAPI tag.
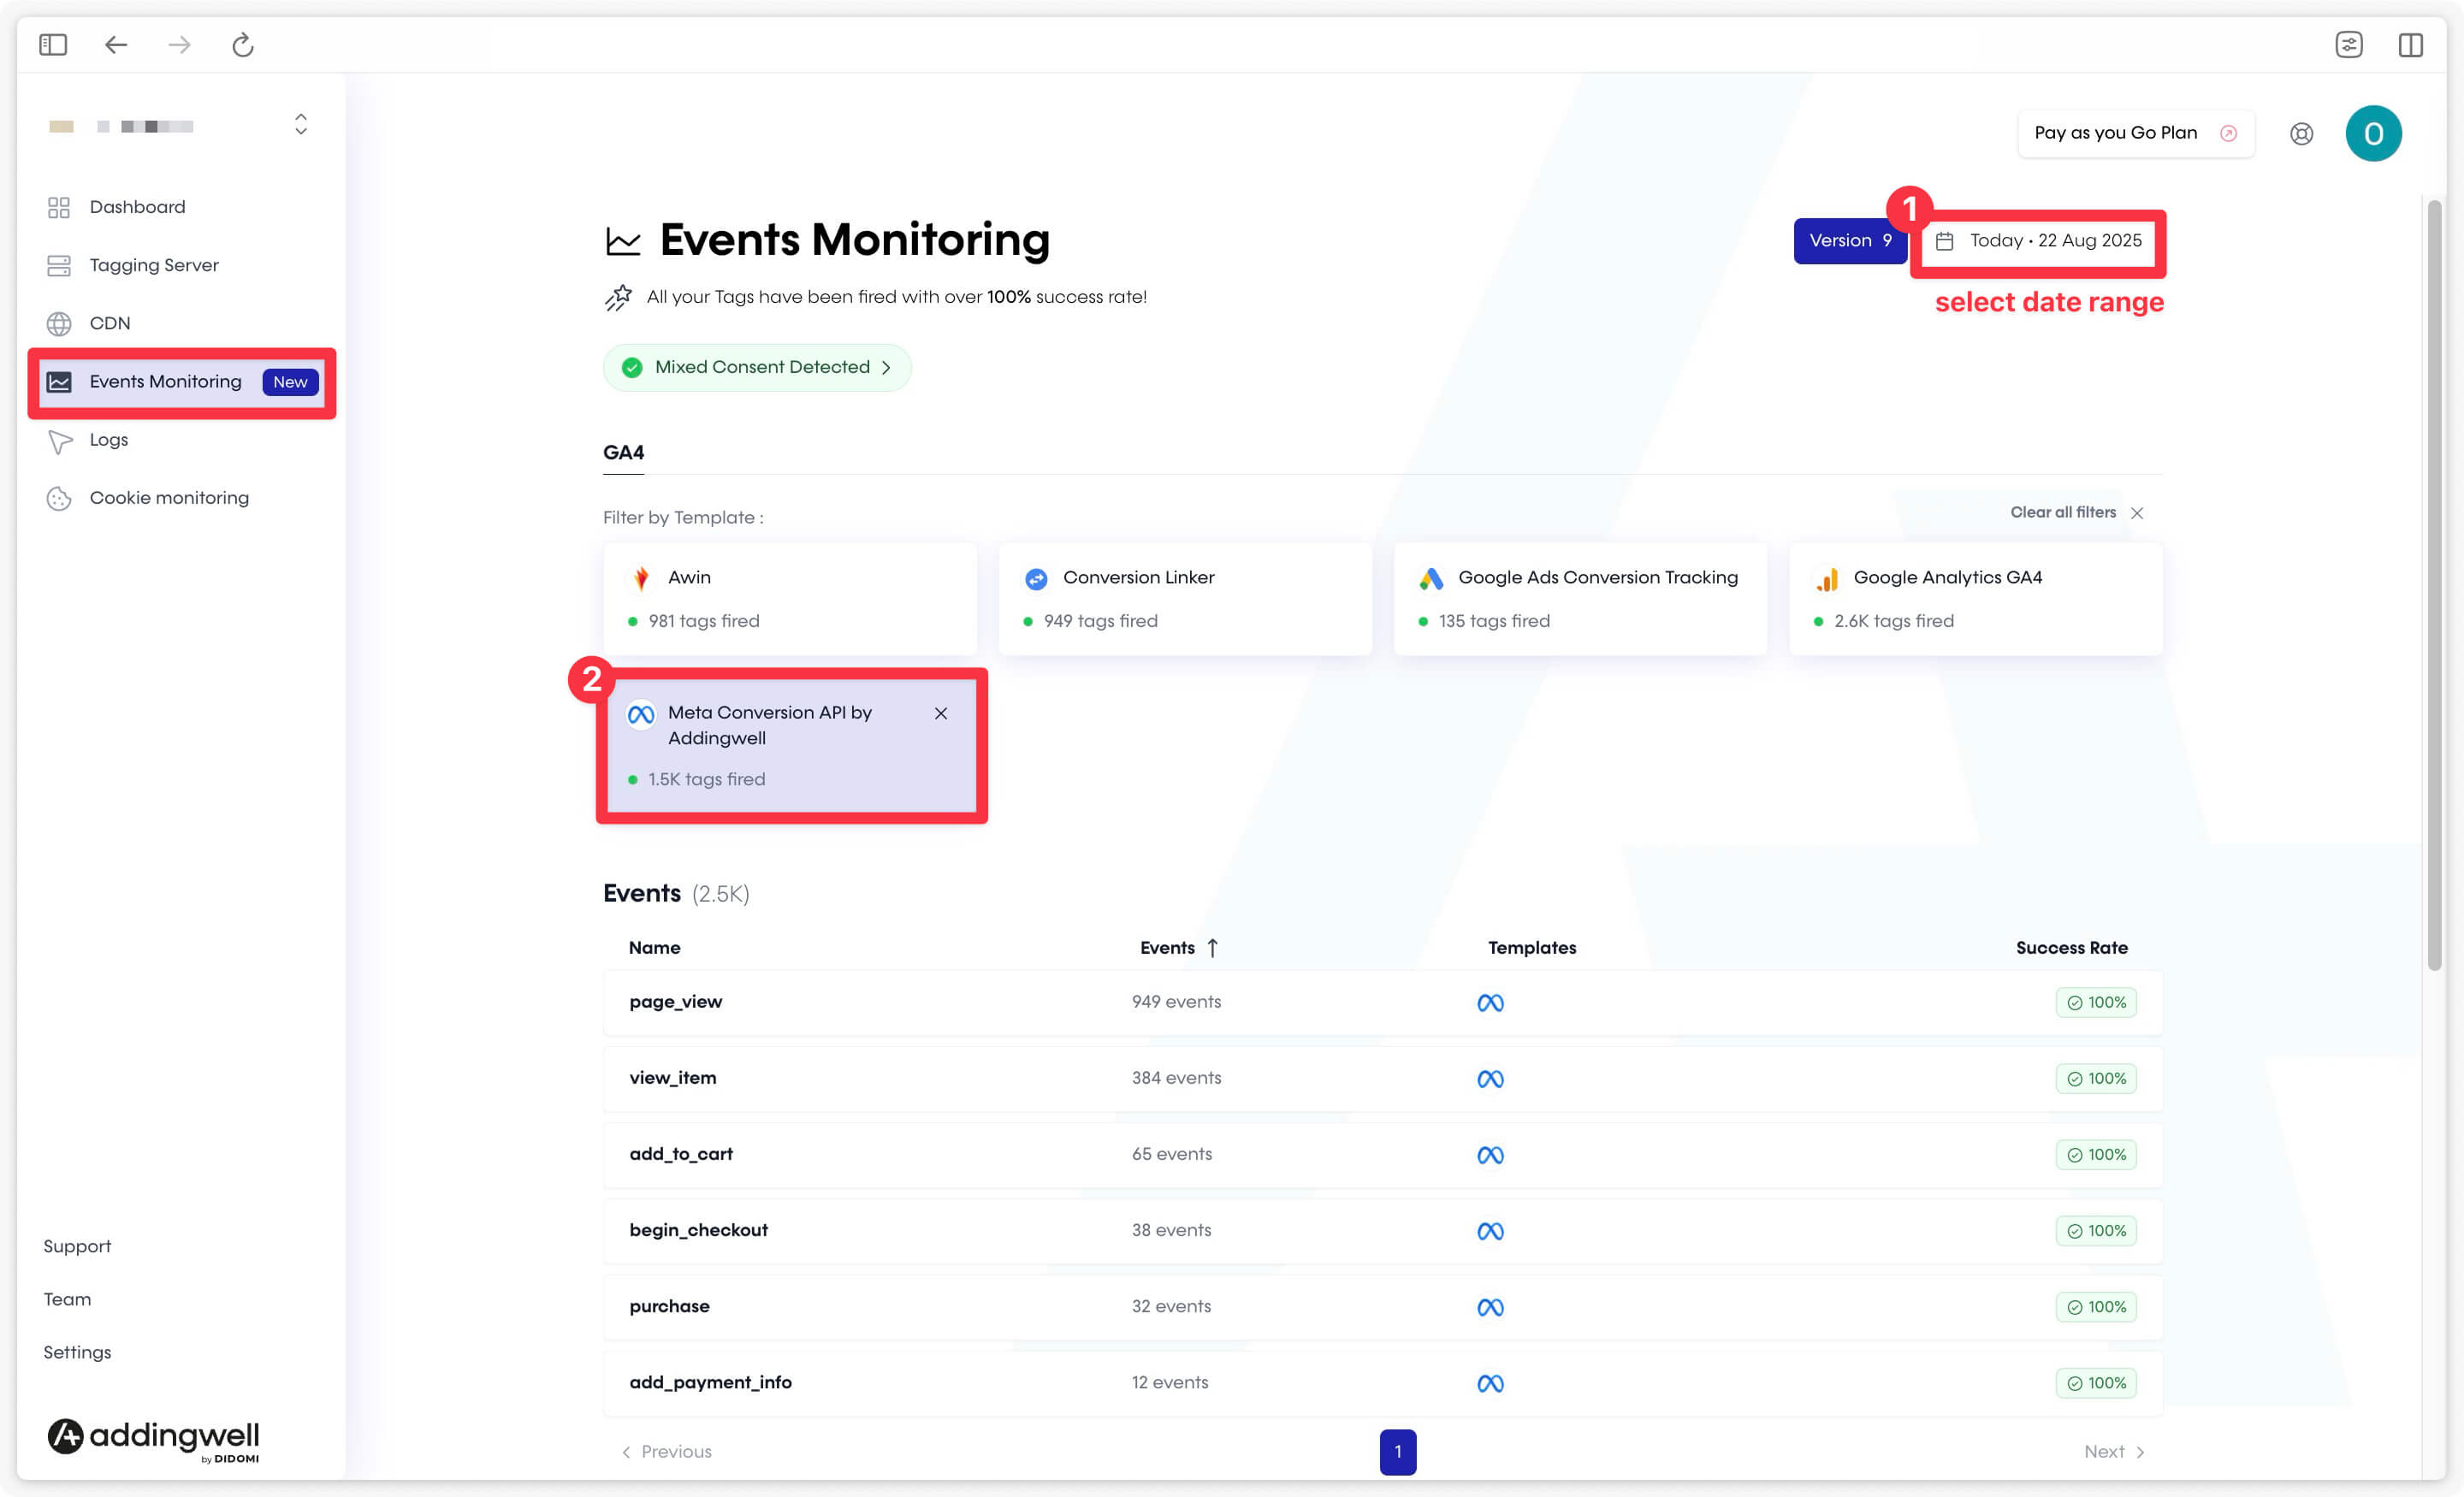
This view shows event details sent from your server to the Meta Conversion API, including success rates (100% in our example).
If not all requests succeeded, investigate errors in Logs by selecting Meta API logs.
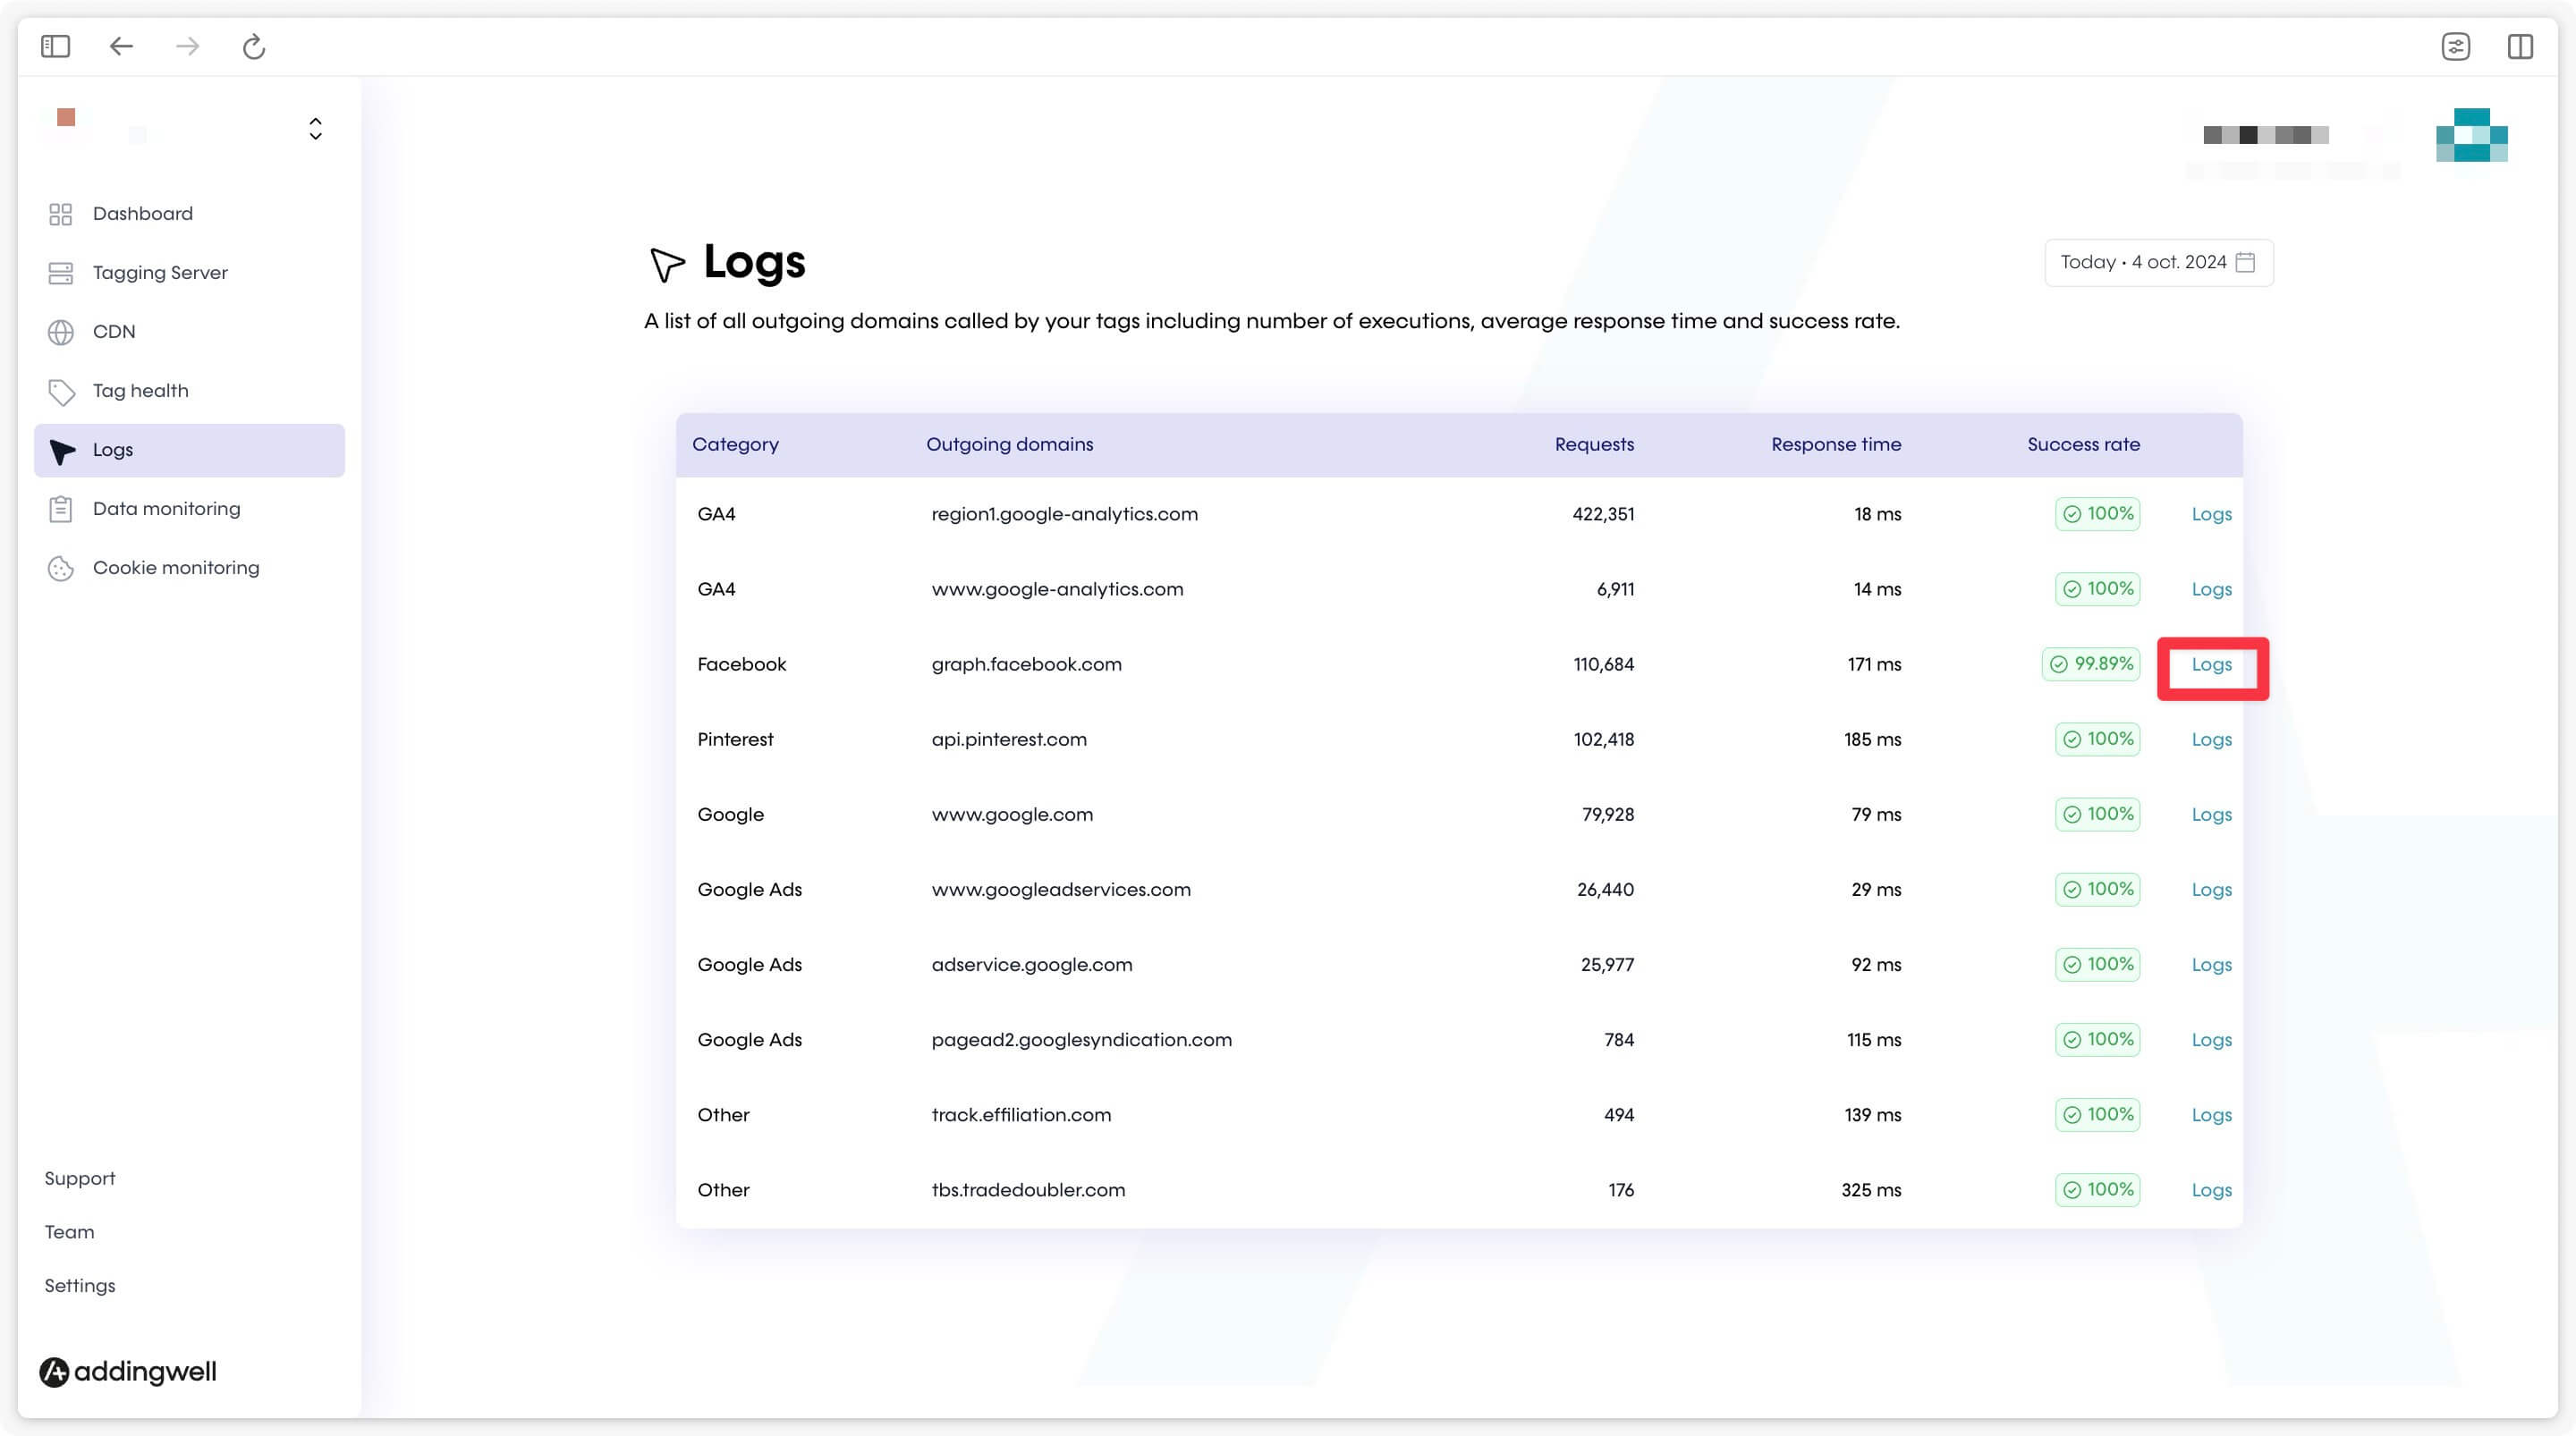
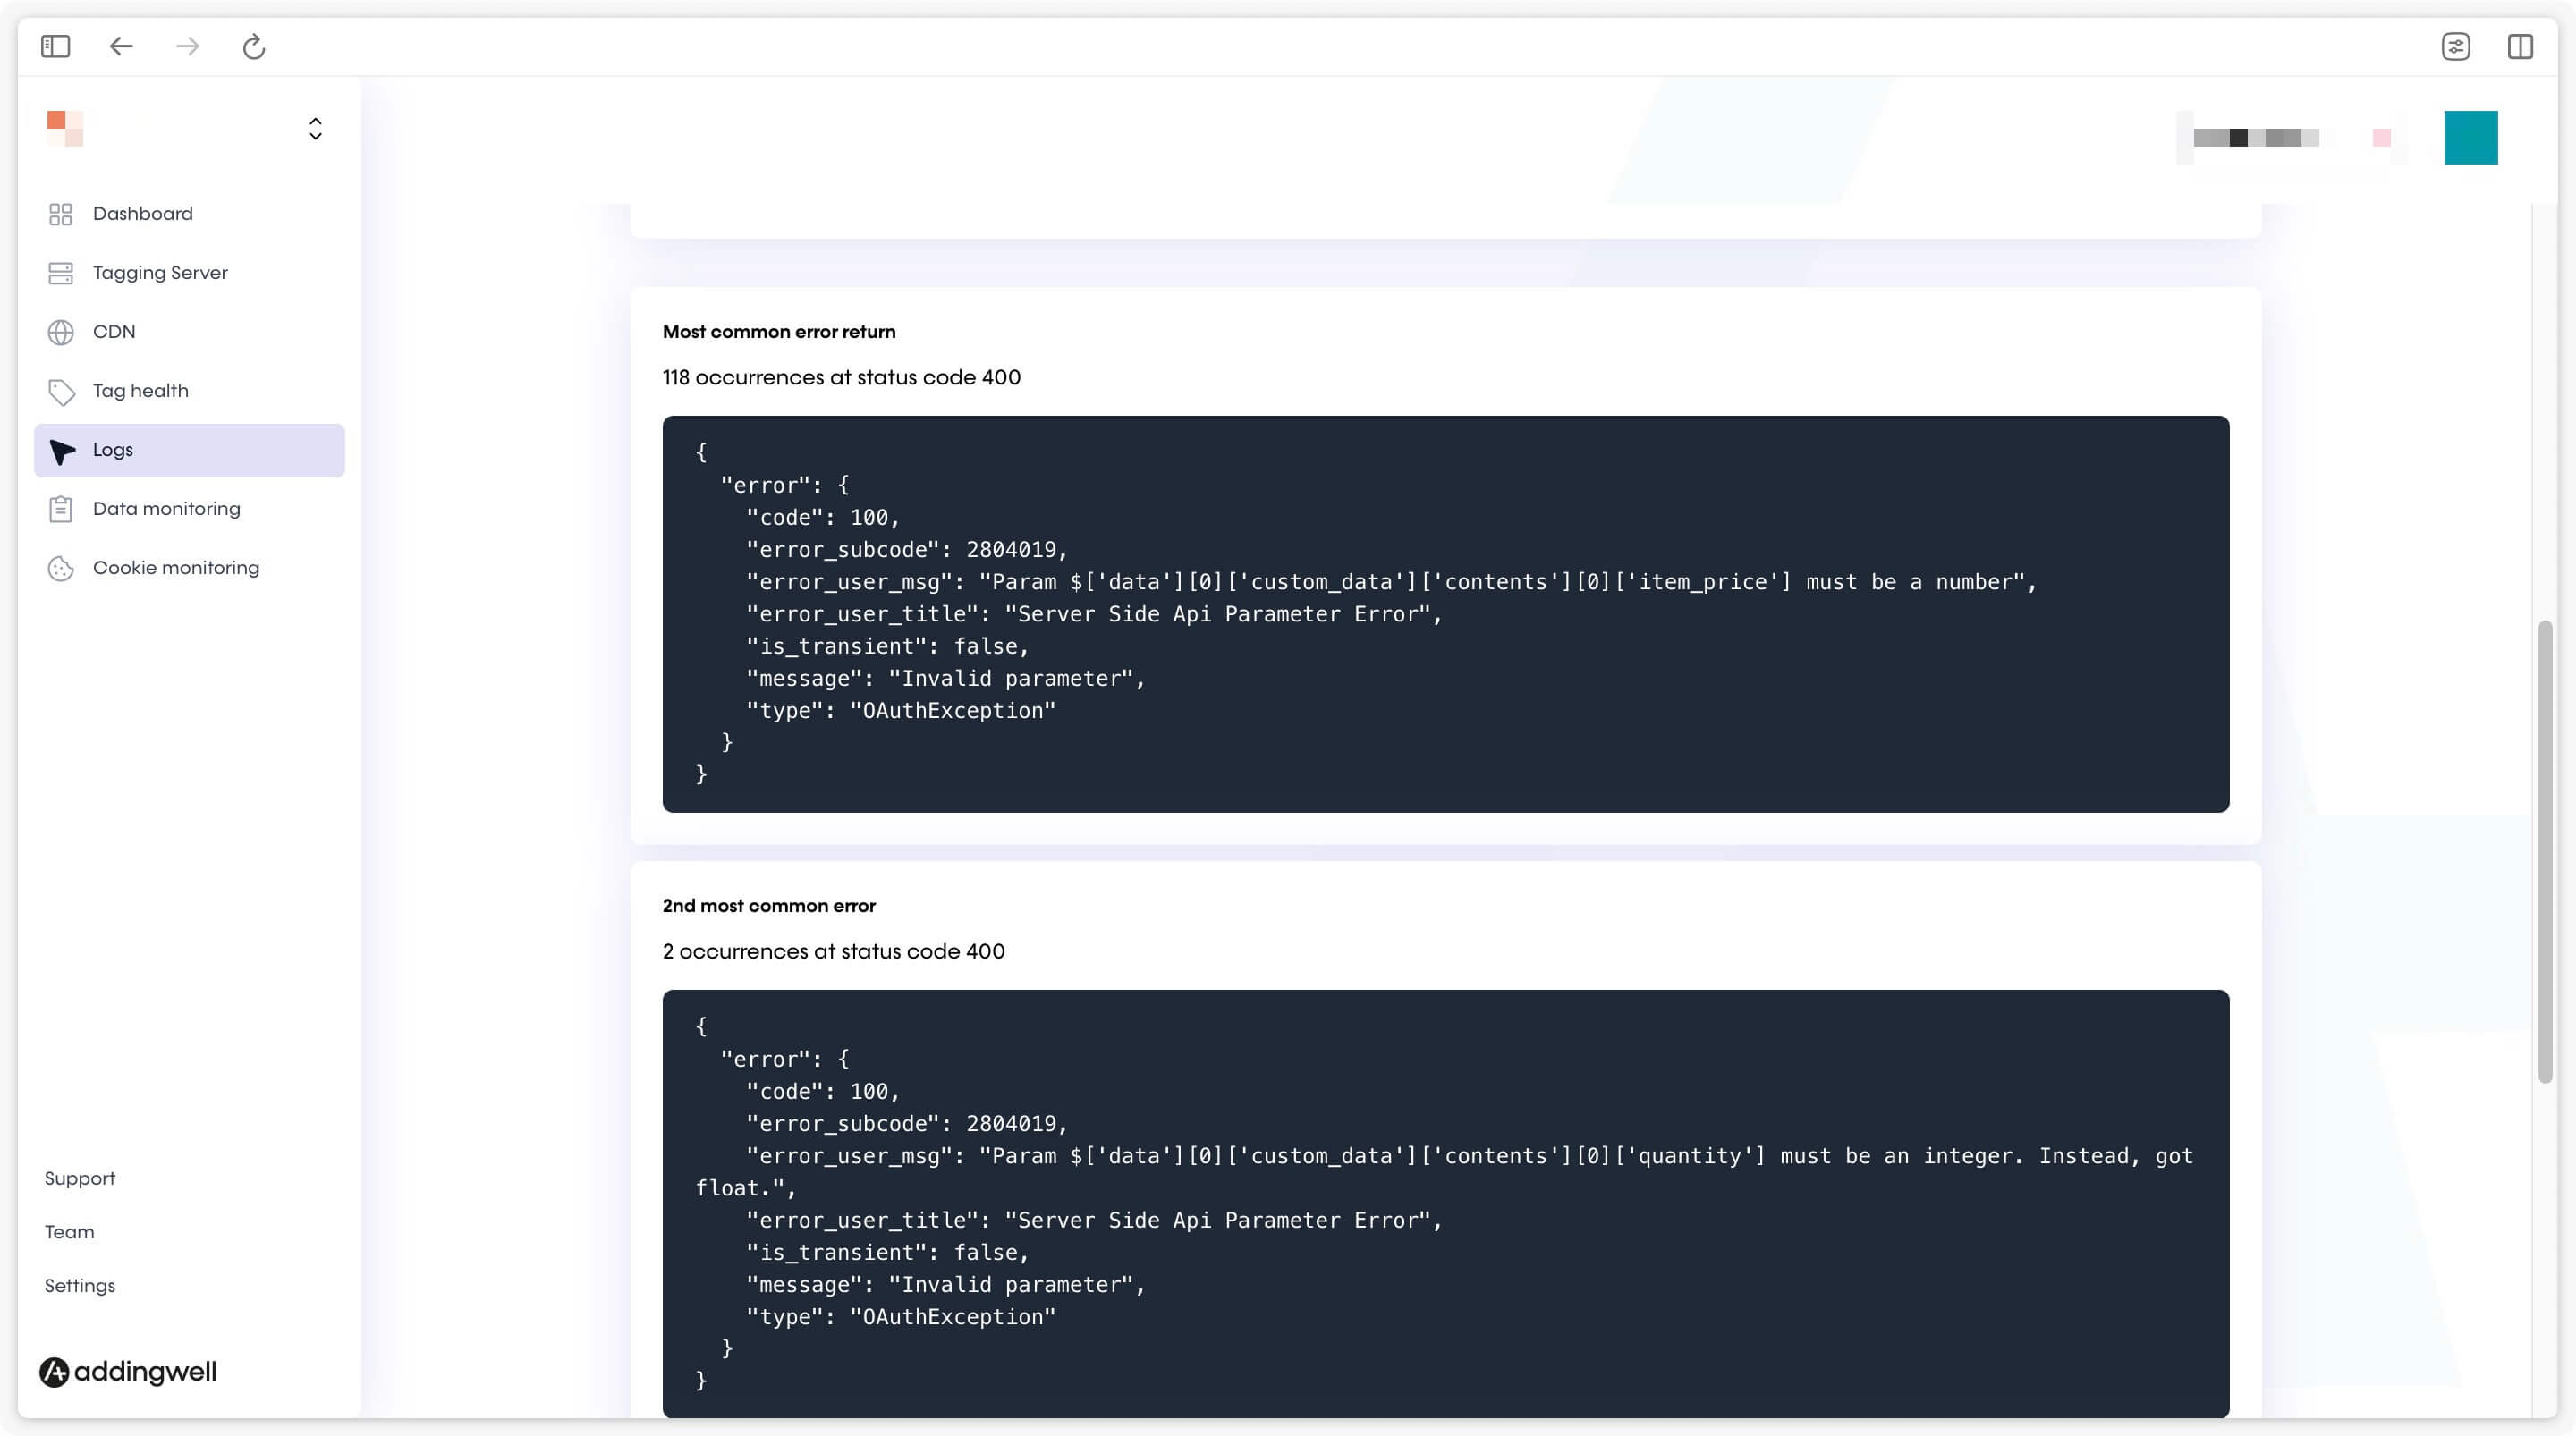
For example, our most common error (118 cases) involved a non-numeric product price. Update the dataLayer accordingly and review your logs for corrections.
Data Quality
Sending conversion events to Meta is a good start—but you can go further by attaching user data (e.g. email, phone, name) to your events. This helps Meta match events to real users, enhancing attribution and campaign performance.
For server-side implementation best practices, see our documentation on user data.
In Addingwell via Events Monitoring
In your Addingwell container, open Events Monitoring. This shows all user data parameters processed by your GA4 client and available to server‑side events.
For example, select a purchase event to view parameter availability.
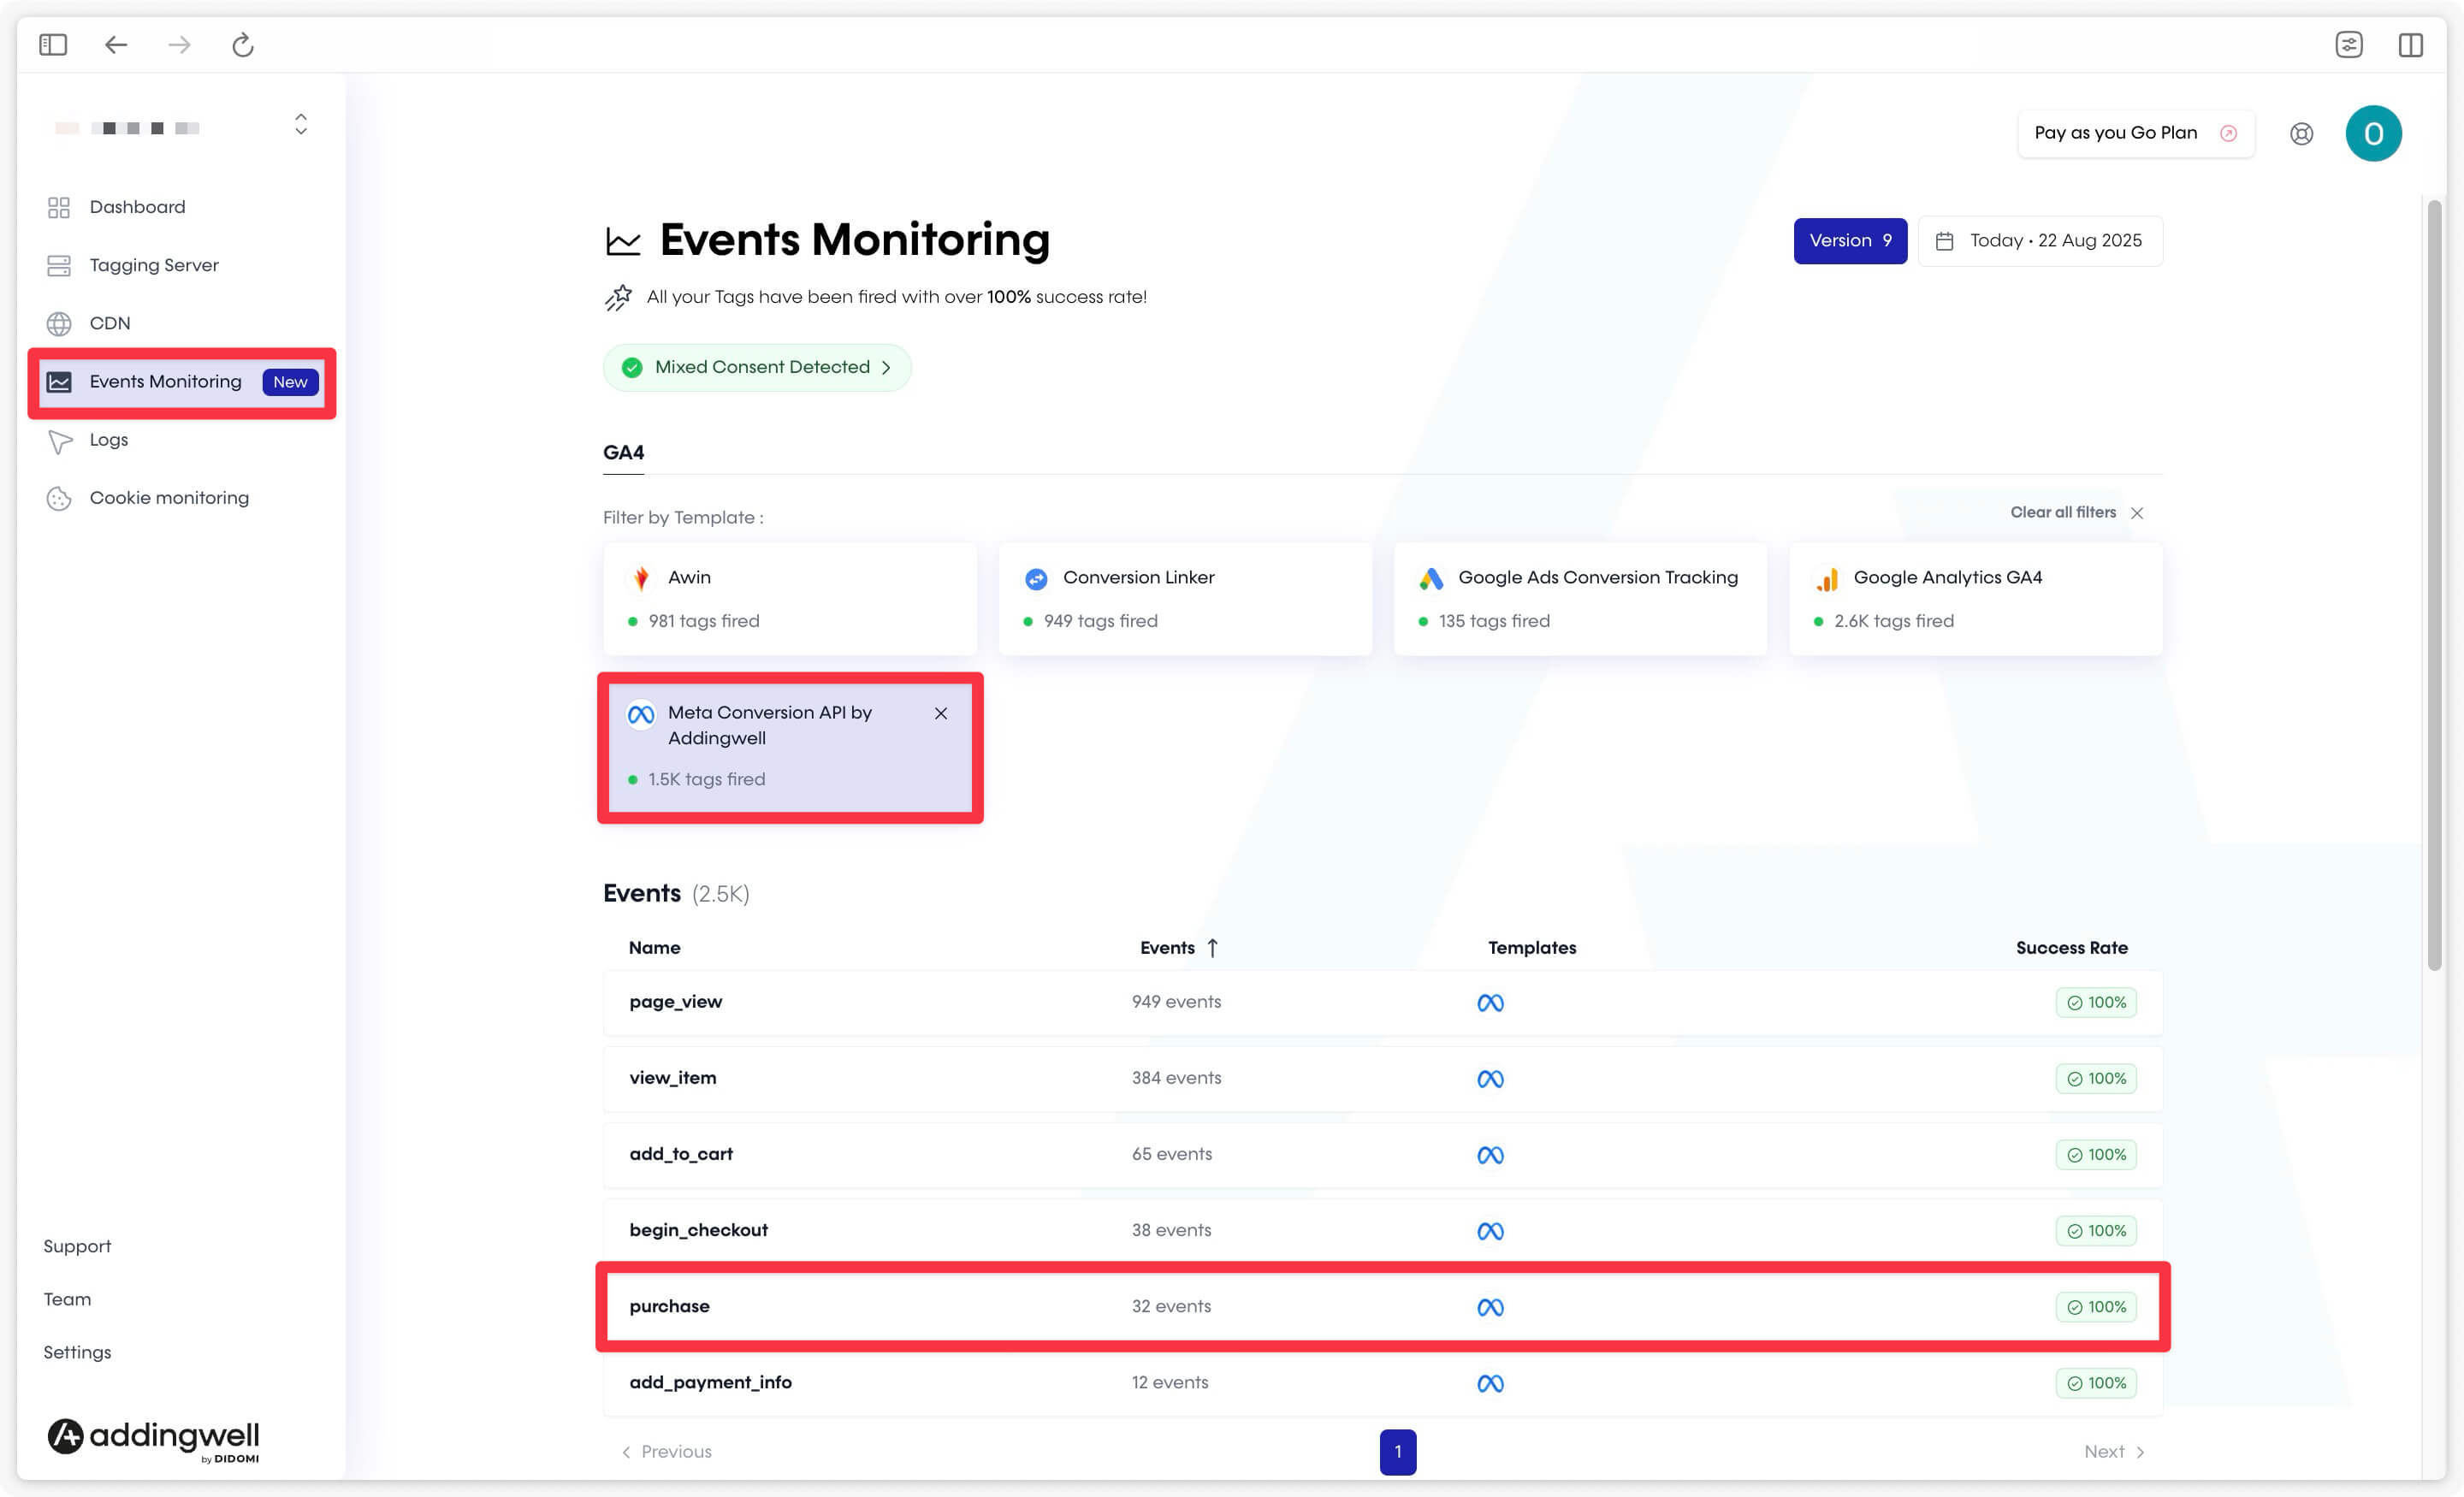
You’ll see what percentage of events include user data such as email, and the coverage rate of each parameter.
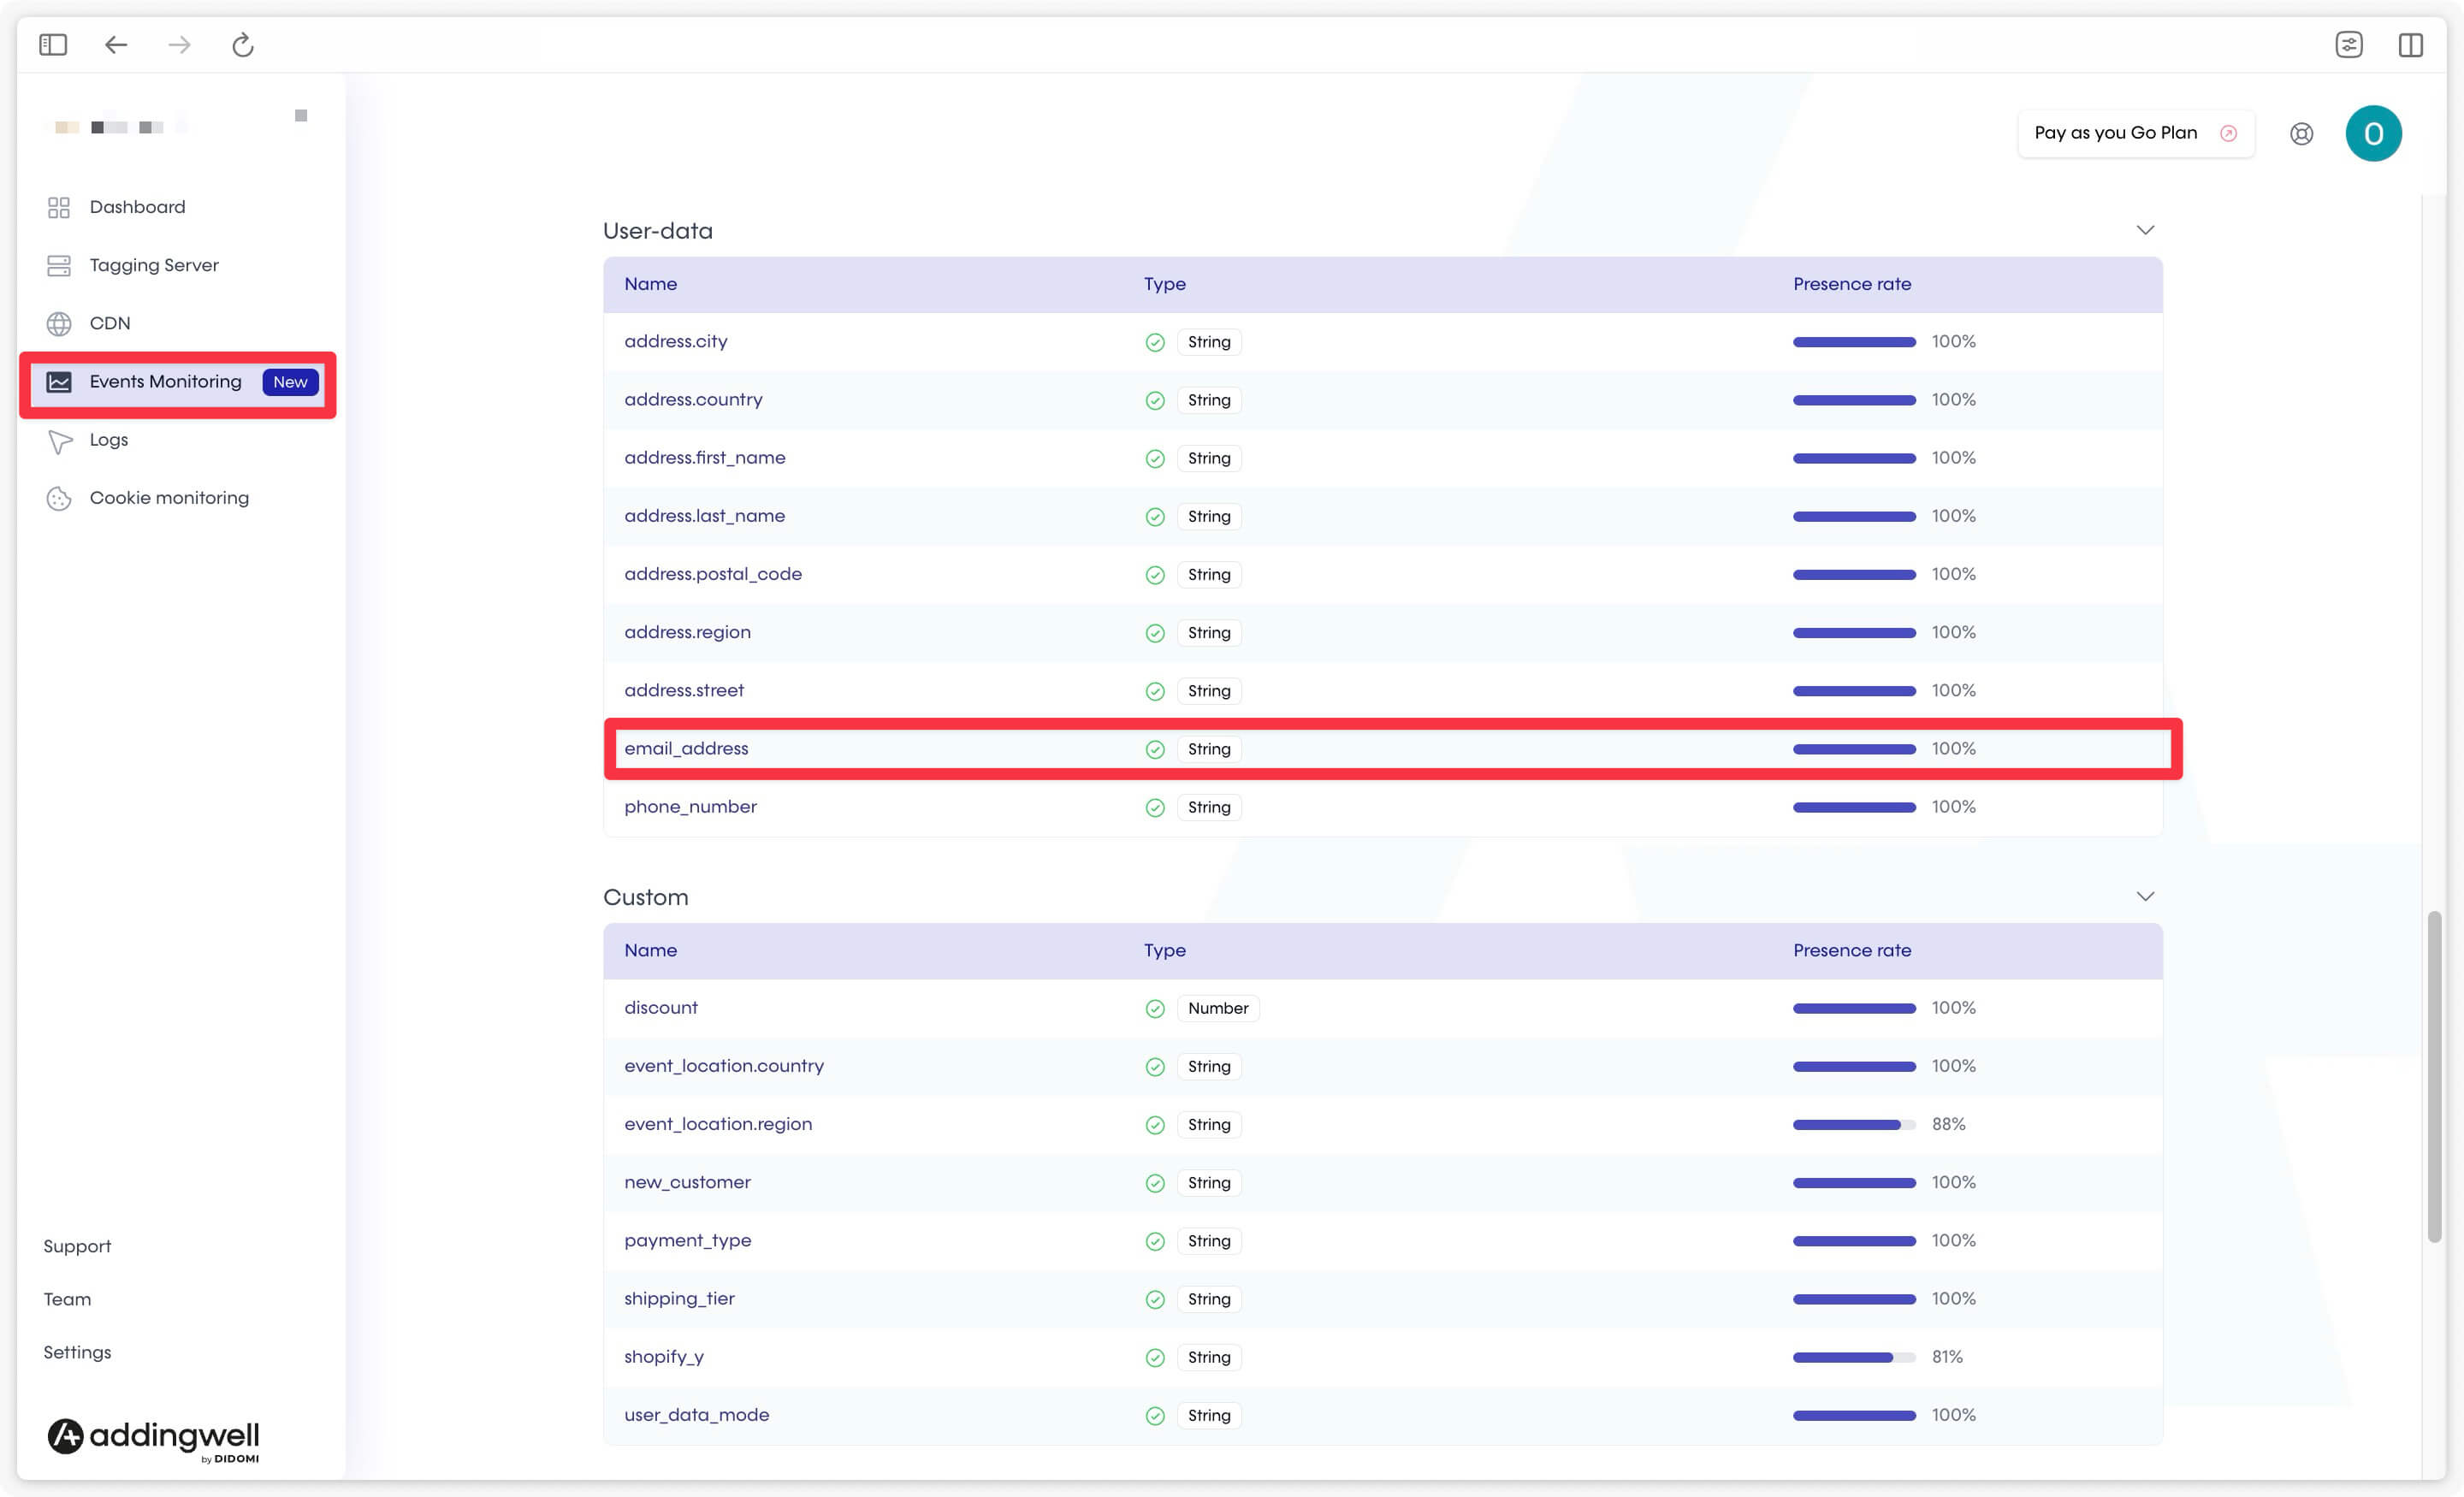
In our example, email is present in 100% of purchase events—indicating high data quality.
In Meta: verifying Match Quality
Meta displays a Match Quality score (0–10) per event, which reflects how complete your user data parameters are. More user-data leads to a higher score.
High-quality data on Purchase yields good scores, while PageView events (with less user data) score lower. The goal isn’t a perfect 10/10 but to identify opportunities to enrich your events with user data to improve matching.
You can check shared parameters (e.g., email, phone) on PageView to see where to improve Match Quality.
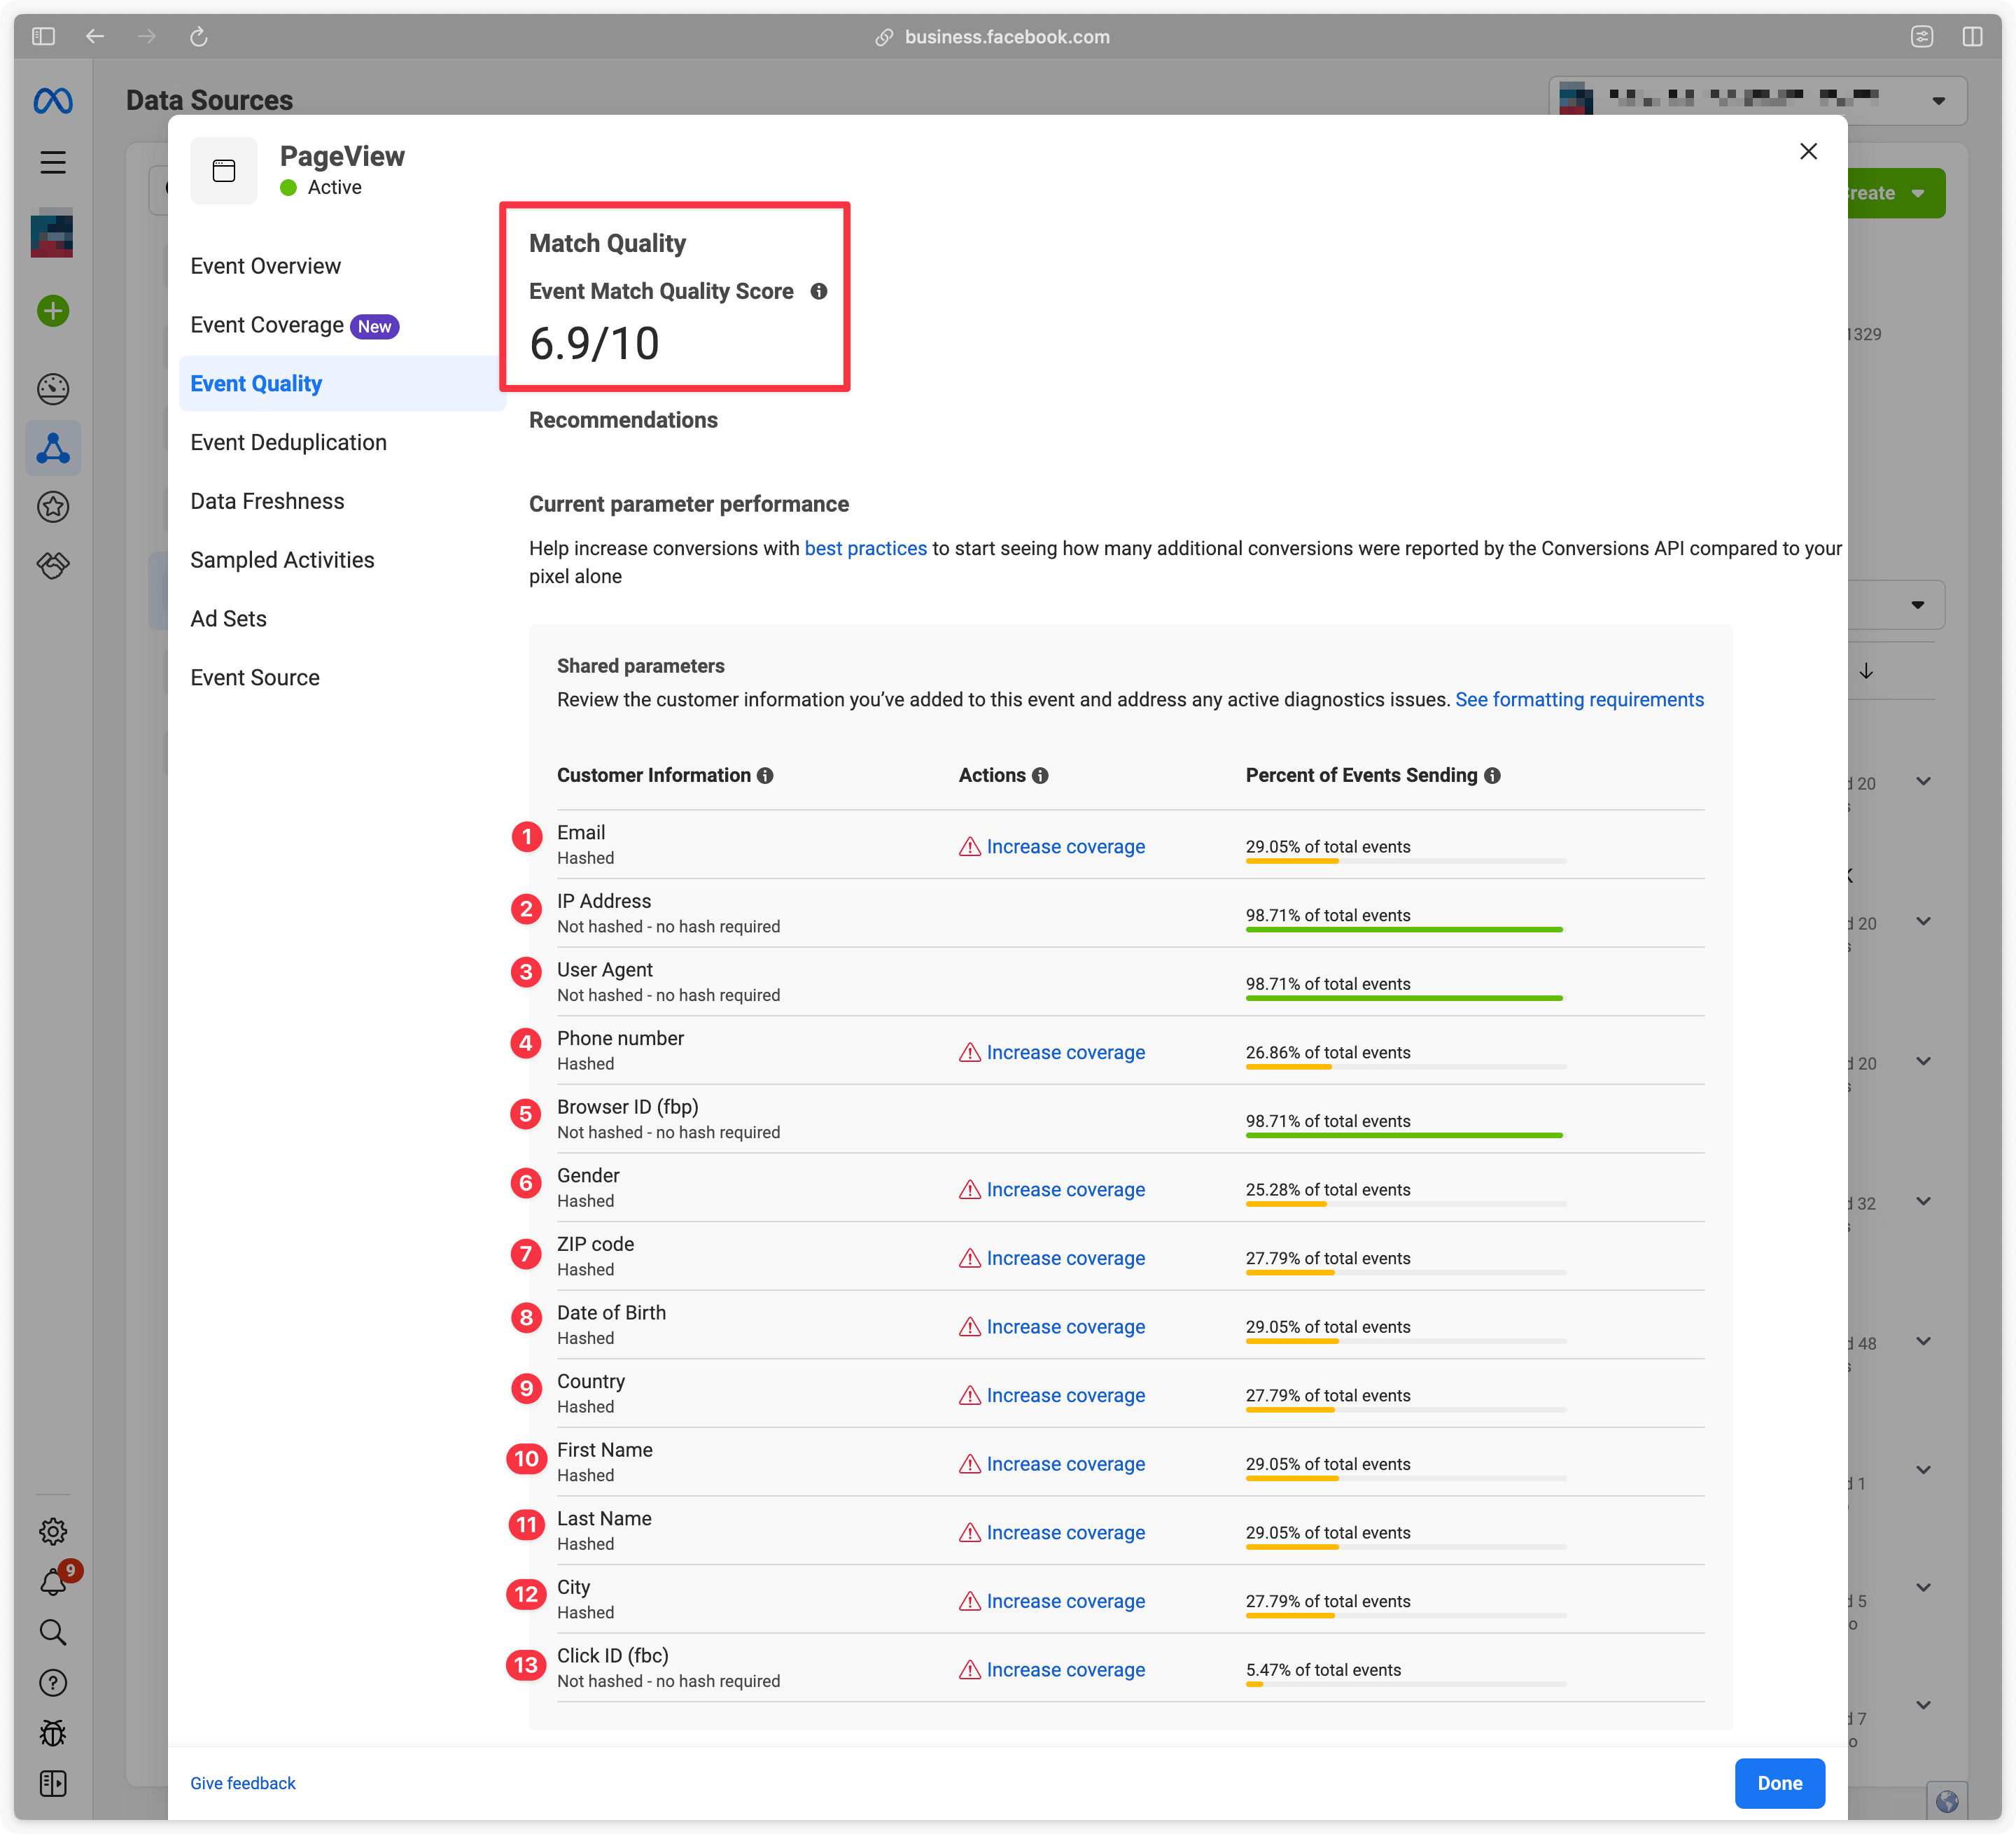
Here’s how to interpret the previous screenshot:
| Parameter | Interpretation |
|---|---|
Present in 29.05% of PageView events—expected since only logged‑in users have their email sent. | |
| IP Address | Automatically included in HTTP requests. |
| User-Agent | Sent automatically. |
| Phone Number | Sent when user is logged in—expected. |
| FB Browser ID (fbp) | Sent automatically when _fbp cookie is available. |
| Gender | Present in 25.28% of PageView events—normal if only available when logged in. |
| Postal Code | Sent when user is logged in—expected. |
| Birth Date | Sent when user is logged in—expected. |
| Country | Sent when user is logged in—expected. |
| First Name | Sent when user is logged in—expected. |
| Last Name | Sent when user is logged in—expected. |
| City | Sent when user is logged in—expected. |
| Click ID (fbc) | Sent when user comes from an ad (when _fbc exists)—hence low coverage. |
Congratulations
You have completed the Meta CAPI configuration, verified that data is correctly sent to Meta, and ensured high data quality.
If you encountered any issues during this process, feel free to contact our support team.