OpenAI CAPI Conversion Tracking with Google Tag Manager
OpenAI CAPI: measure your ChatGPT Ads campaigns reliably
The OpenAI pixel alone is not enough
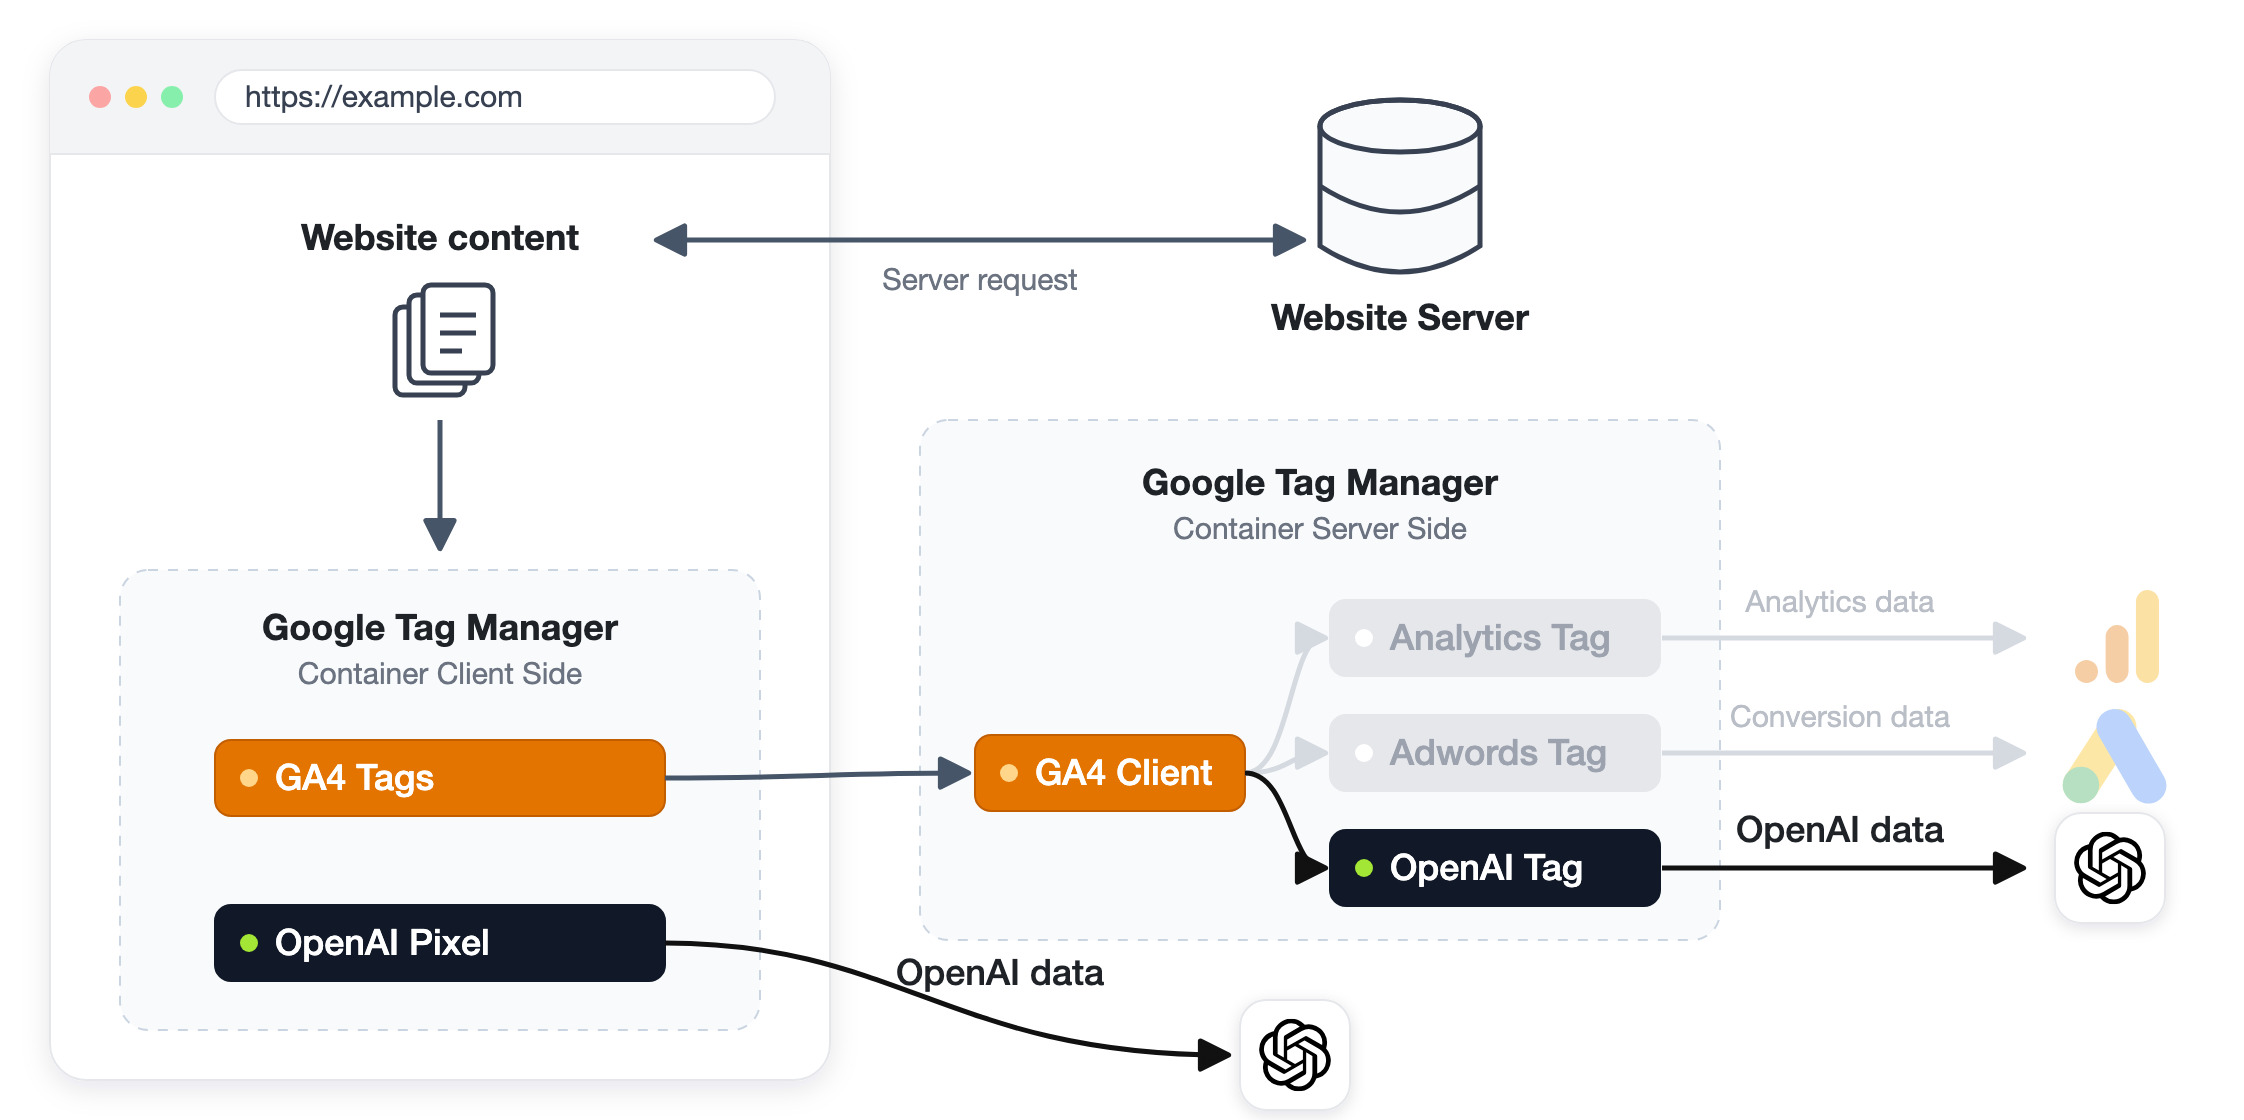
OpenAI offers two ways to measure conversions from your advertising campaigns in ChatGPT: the OpenAI pixel, a script loaded in the browser, and the Conversions API (CAPI), a server-to-server communication. As with other advertising platforms, the pixel is exposed to ad blockers, browser restrictions such as Safari’s, and the limited lifetime of cookies set from the browser. OpenAI itself states that the Conversions API is a more reliable measurement source than the pixel alone and recommends using it whenever possible.
OpenAI Conversions API + OpenAI pixel, and deduplication:
The OpenAI pixel and the Conversions API do not collect data the same way. The pixel collects data directly in the browser, while the Conversions API sends events from your server, without depending on the visitor’s browser. Both methods can be used in parallel to maximize the volume of measured events.
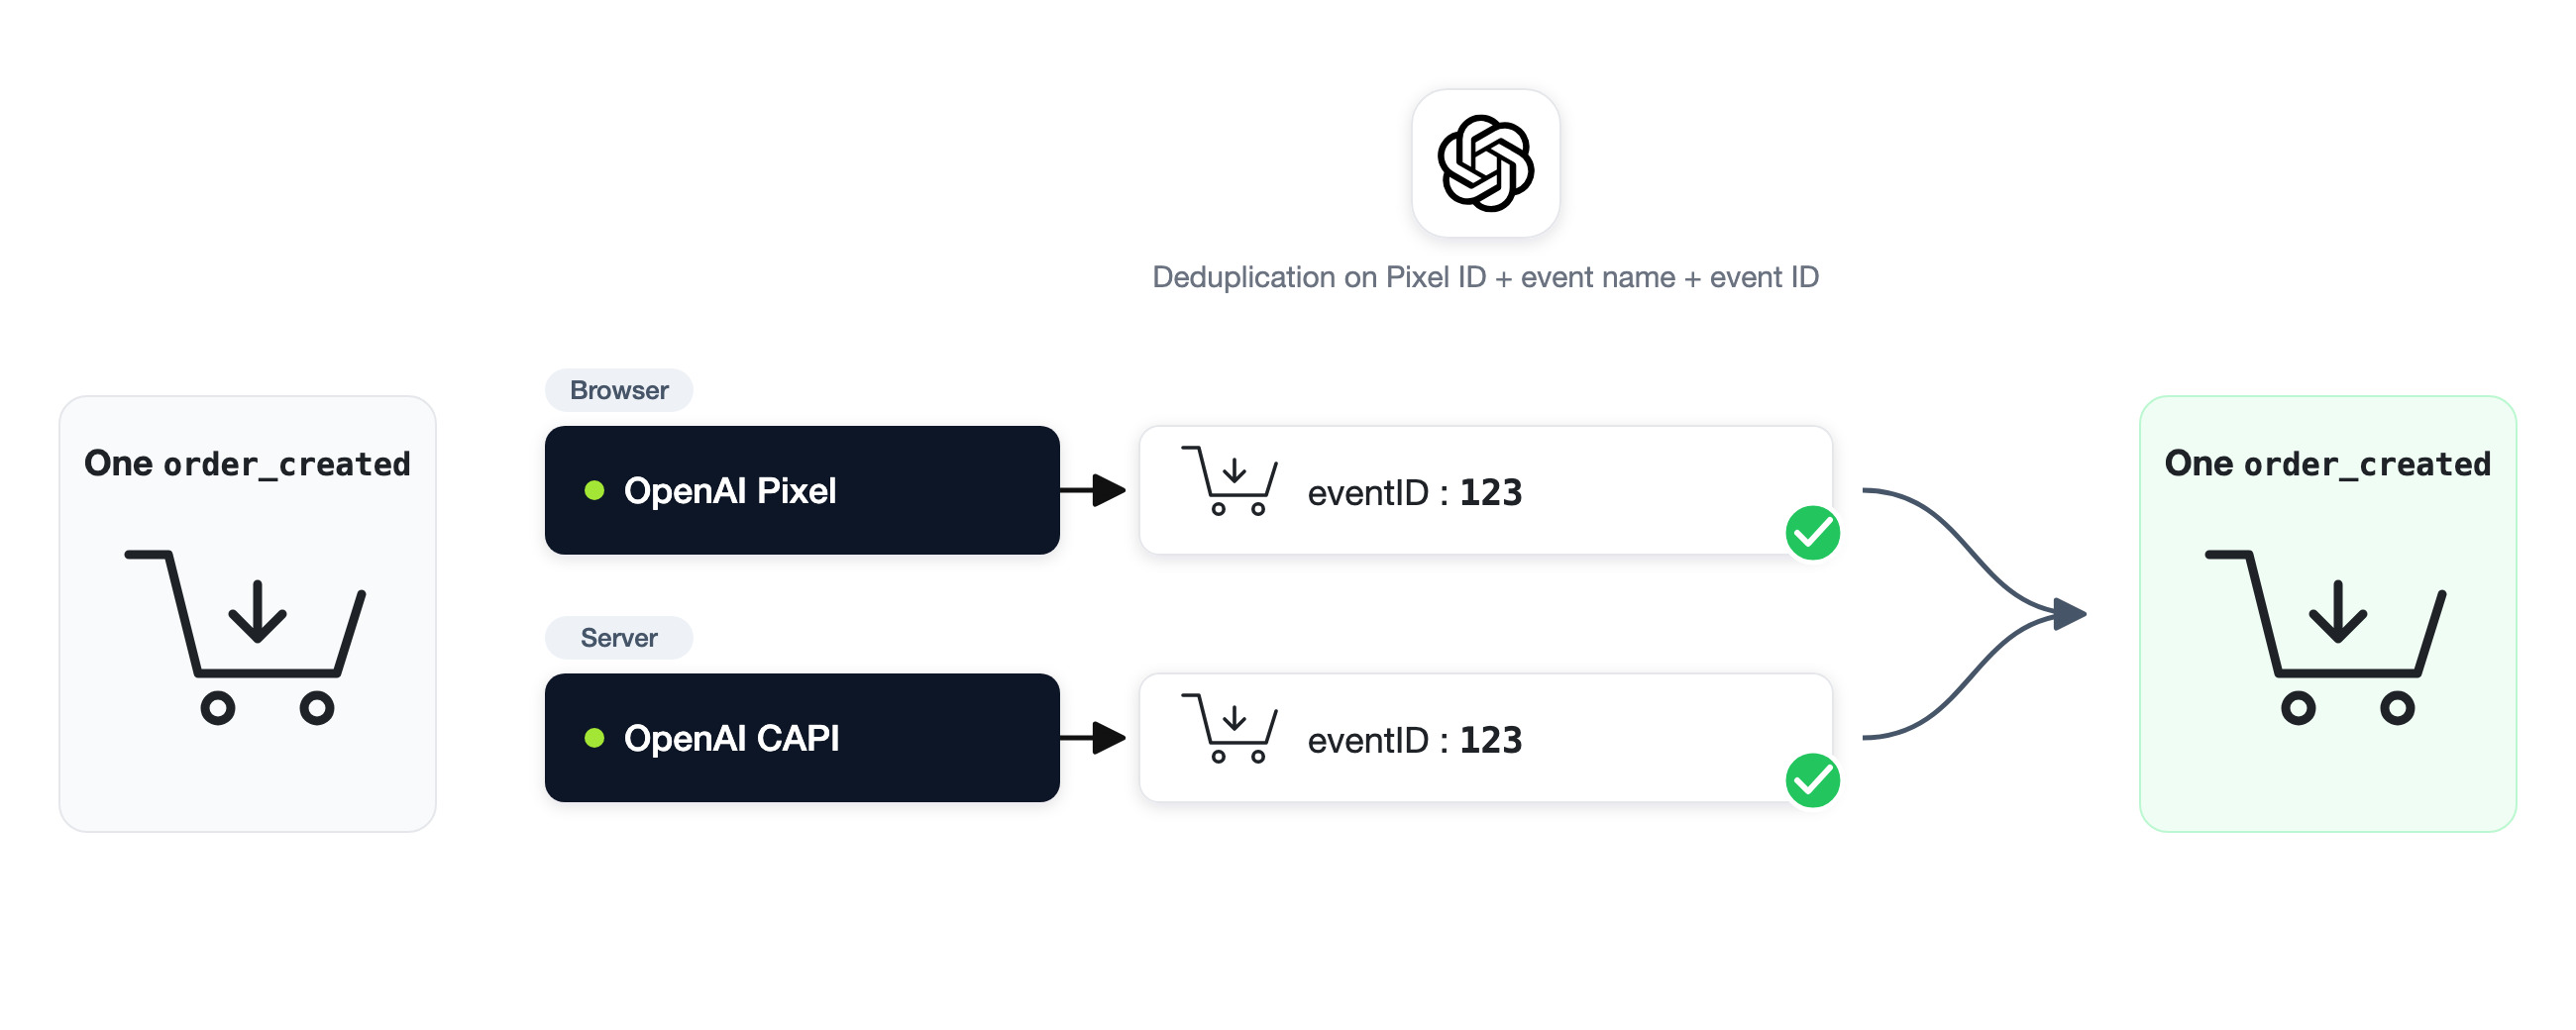
When both sources are active, OpenAI must deduplicate events received twice. To do so, the same event identifier must be sent through each method: the event_id parameter on the pixel side and the id field on the API side. OpenAI keeps the first event received for a given key (Pixel ID, event name and event identifier) and ignores duplicates. If an event is missed by the pixel but delivered by the server, OpenAI records it, so the collection is exhaustive.
Addingwell OpenAI CAPI tag: one server-side tag, cookies that last
The Addingwell OpenAI CAPI tag reads the GA4 events received by your server container, converts them into the format expected by OpenAI and sends them to the Conversions API. It handles for you:
- the automatic mapping between GA4 events and OpenAI standard events (
purchasebecomesorder_created,page_viewbecomespage_viewed, and so on); - the normalization and hashing of user data (email, phone, first name, last name, external ID) following OpenAI’s rules;
- the capture of the
opprefclick identifier present in the landing URL after a ChatGPT ad click, and its transmission with every event; - the extended lifetime of cookies: the
oppref(click) andobref(browser) identifiers are rewritten server-side into theFPOPPREFandFPOBREFcookies for 365 days. If noobrefexists yet, the tag generates one in the same format as the pixel, which enables server-side measurement even without the pixel. The pixel sets them in JavaScript for 30 and 365 days, but Safari caps these cookies at 7 days.
Unlike our Meta CAPI tag, the OpenAI CAPI tag does not trigger the pixel from the server. If you want to keep the OpenAI pixel in parallel, see the OpenAI pixel setup section.
Configuring the Addingwell OpenAI CAPI tag
Import the tag into GTM Server
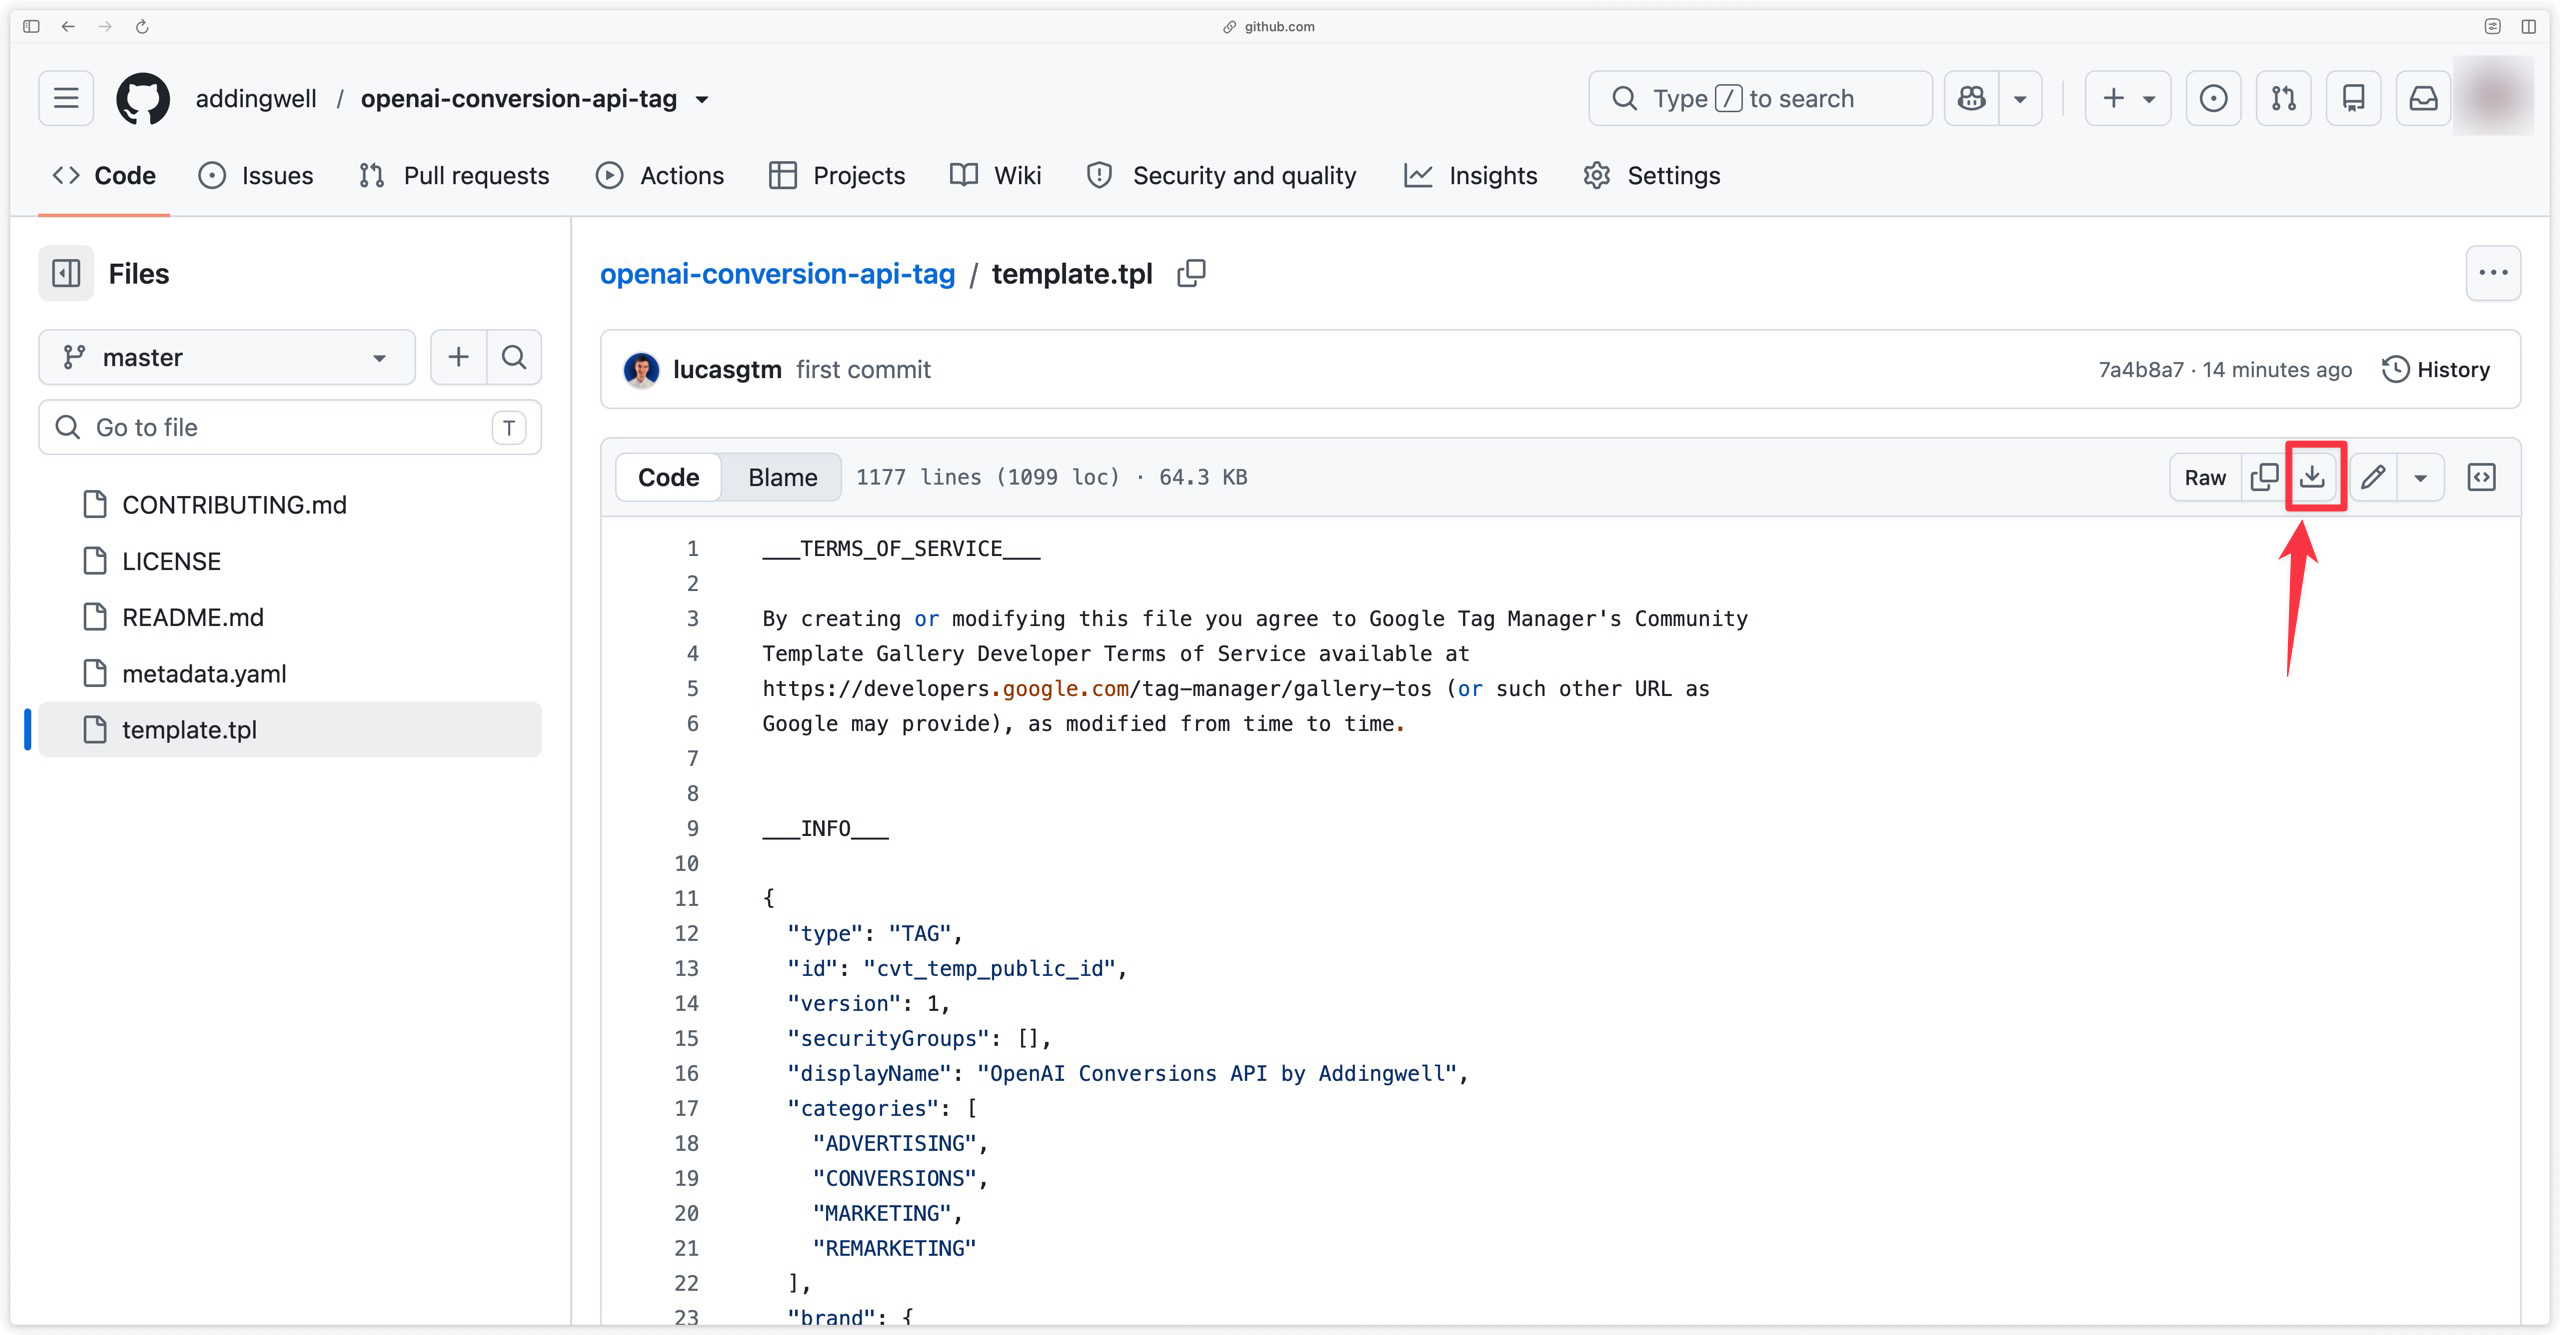
Click here to download the OpenAI Conversions API tag, then click the download icon to get the file.
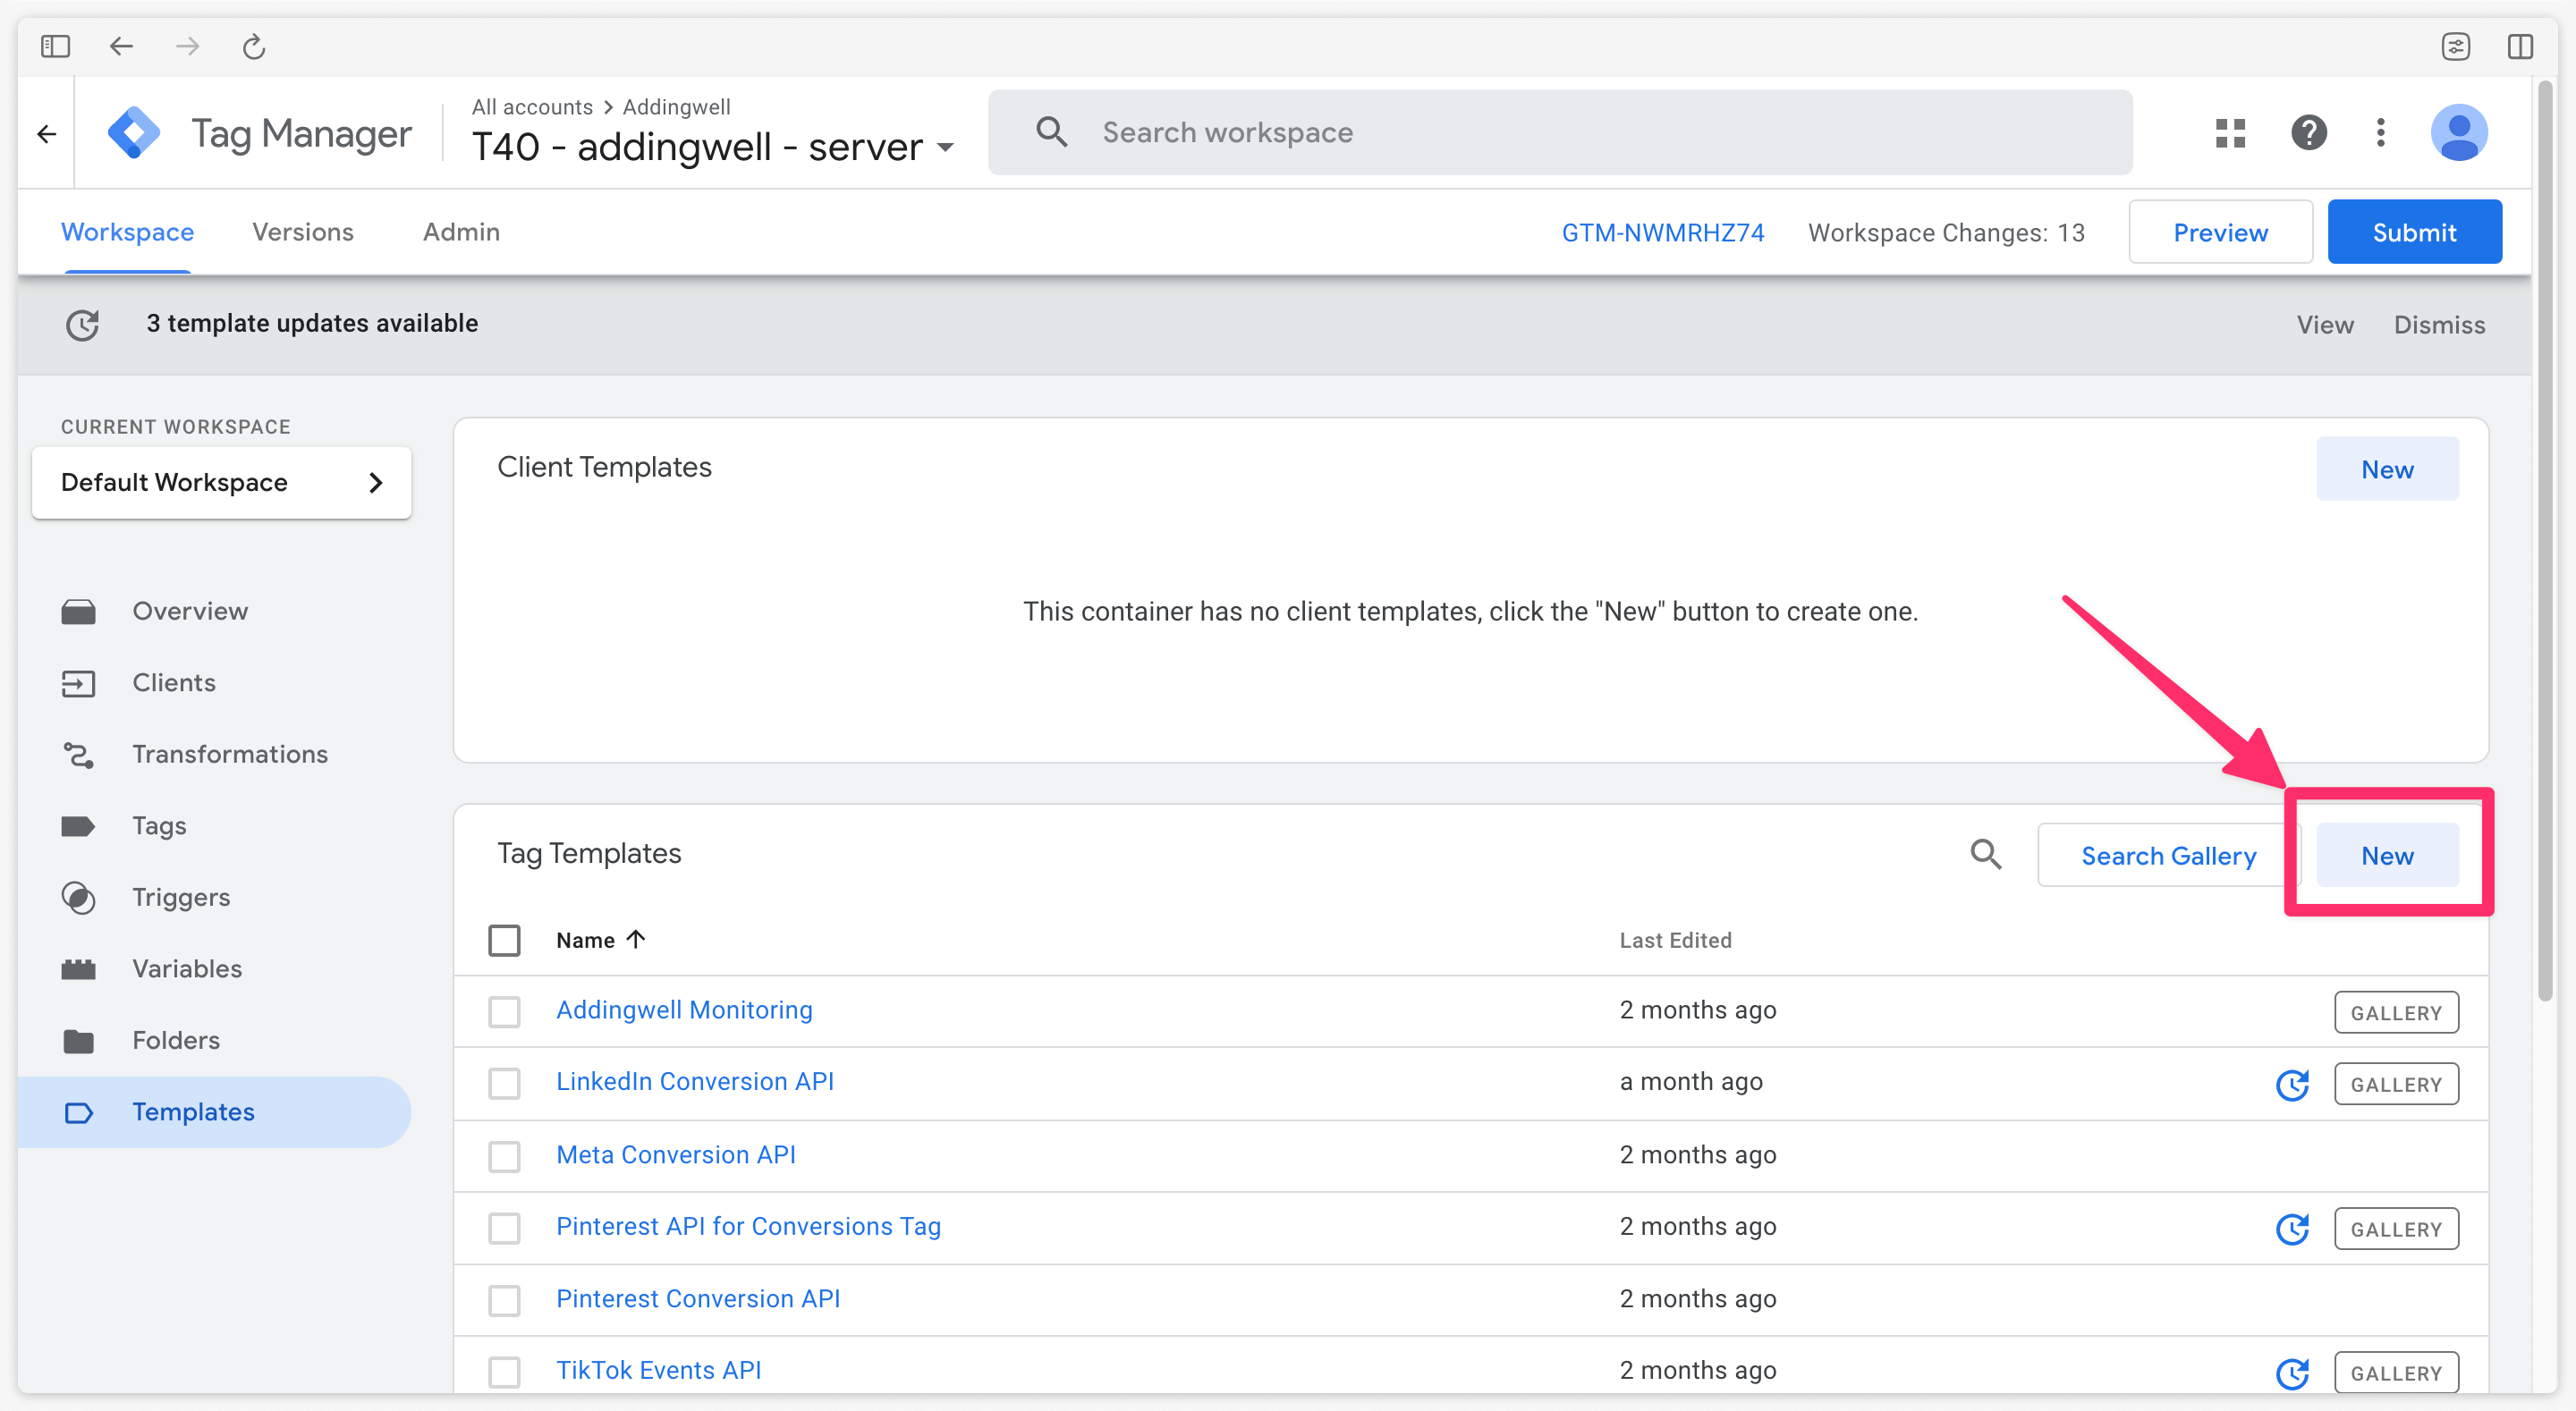
Next, go to the Templates section of your server container, and under Tag templates, click New.
Then click the three-dot menu in the top right and select Import.
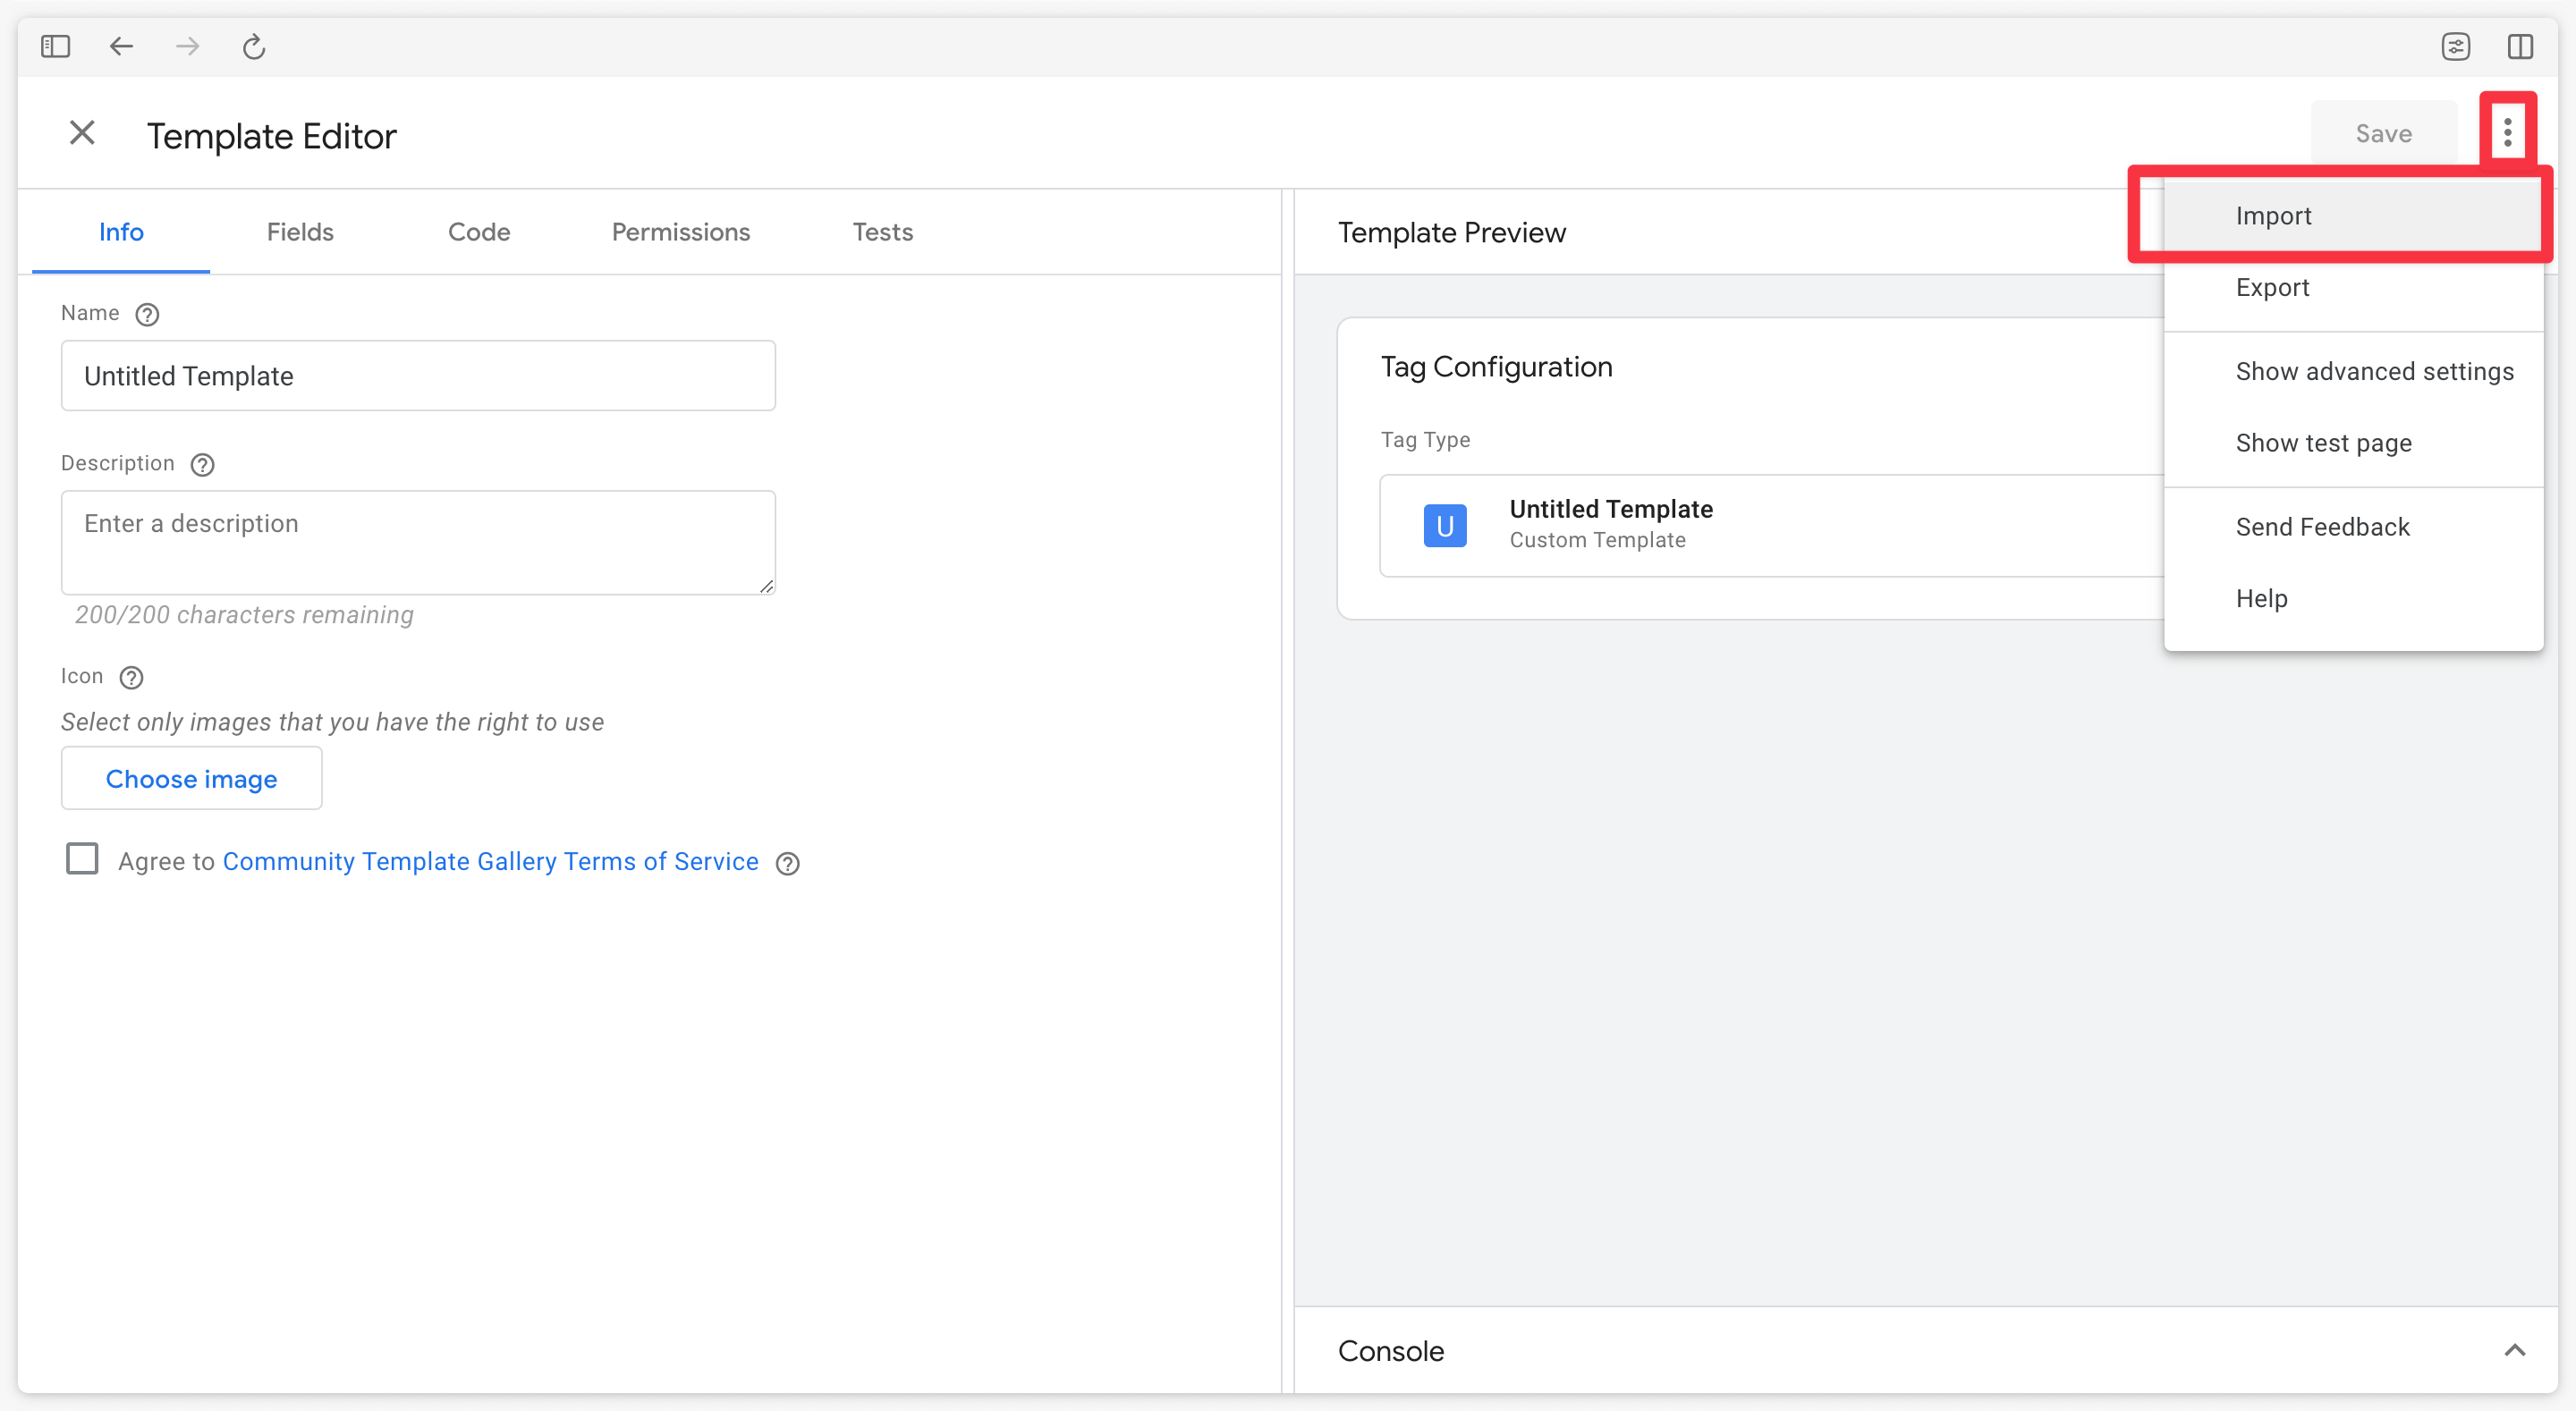
Select the template.tpl file you just downloaded, then click Save.
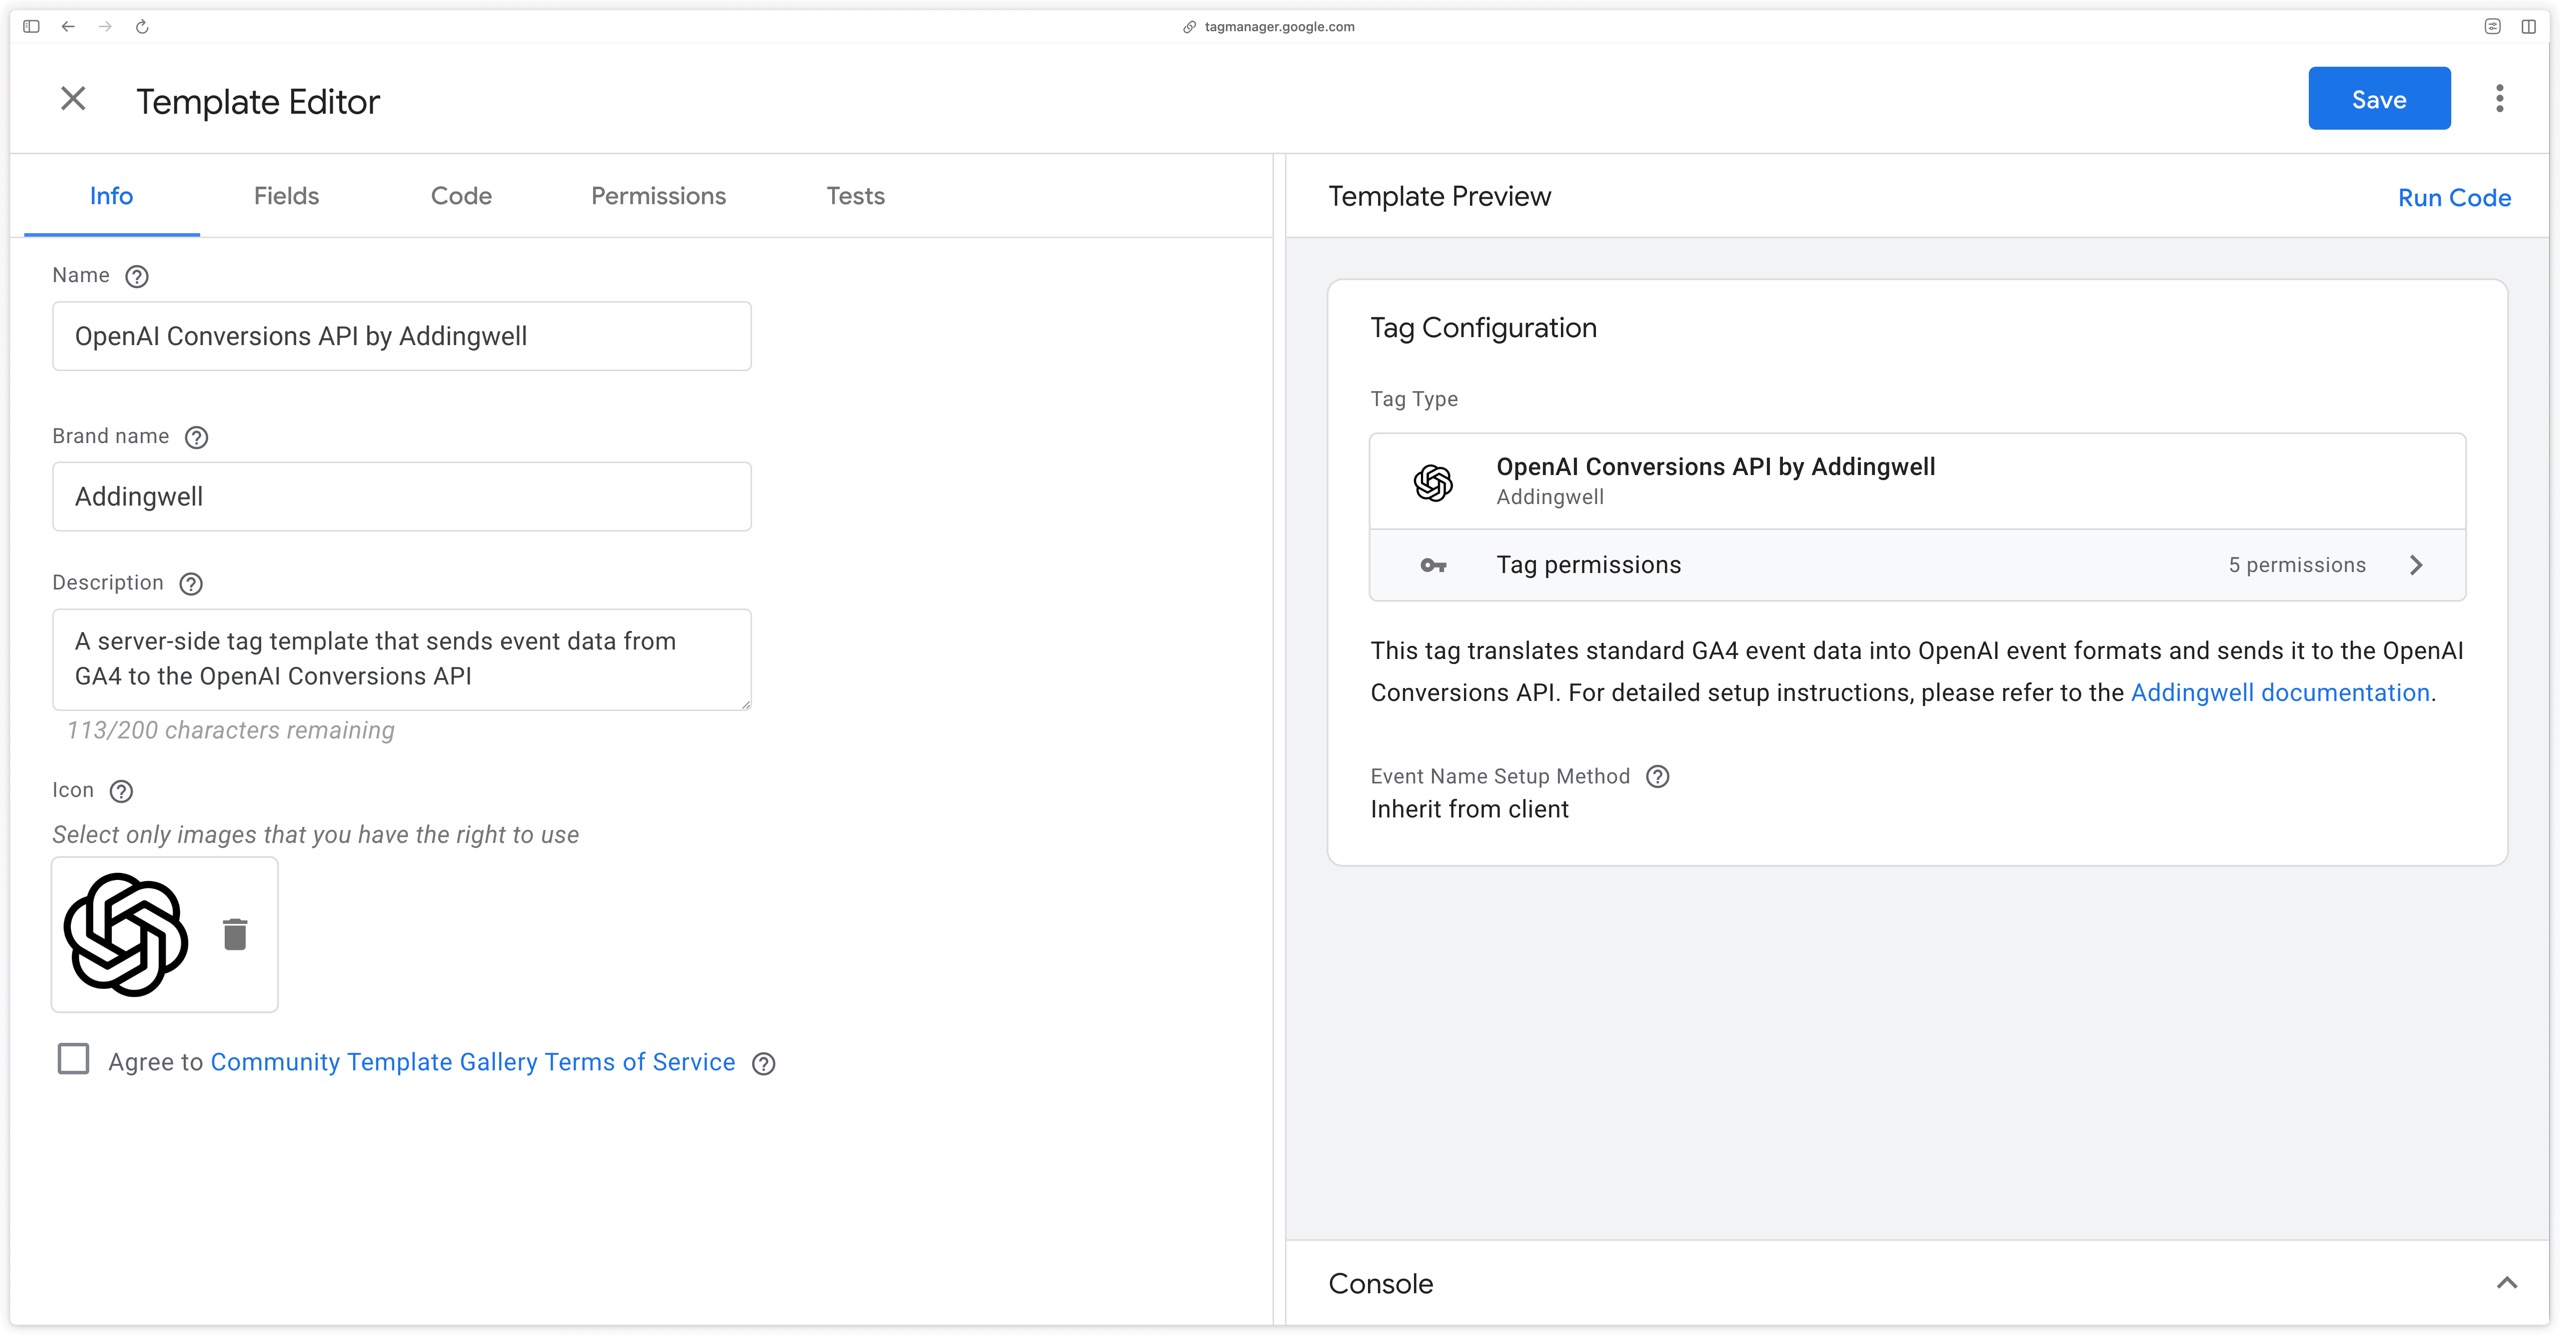
Configure the tag
Create a new tag in Google Tag Manager Server-Side and select the newly imported OpenAI CAPI tag. Two pieces of information are required to configure the tag:
- The OpenAI Pixel ID to which the data will be sent
- The Conversions API key allowing communication with OpenAI
Both are available in the Conversions tab of your OpenAI Ads Manager account. Once you have retrieved the key and the Pixel ID, configure the OpenAI CAPI tag.
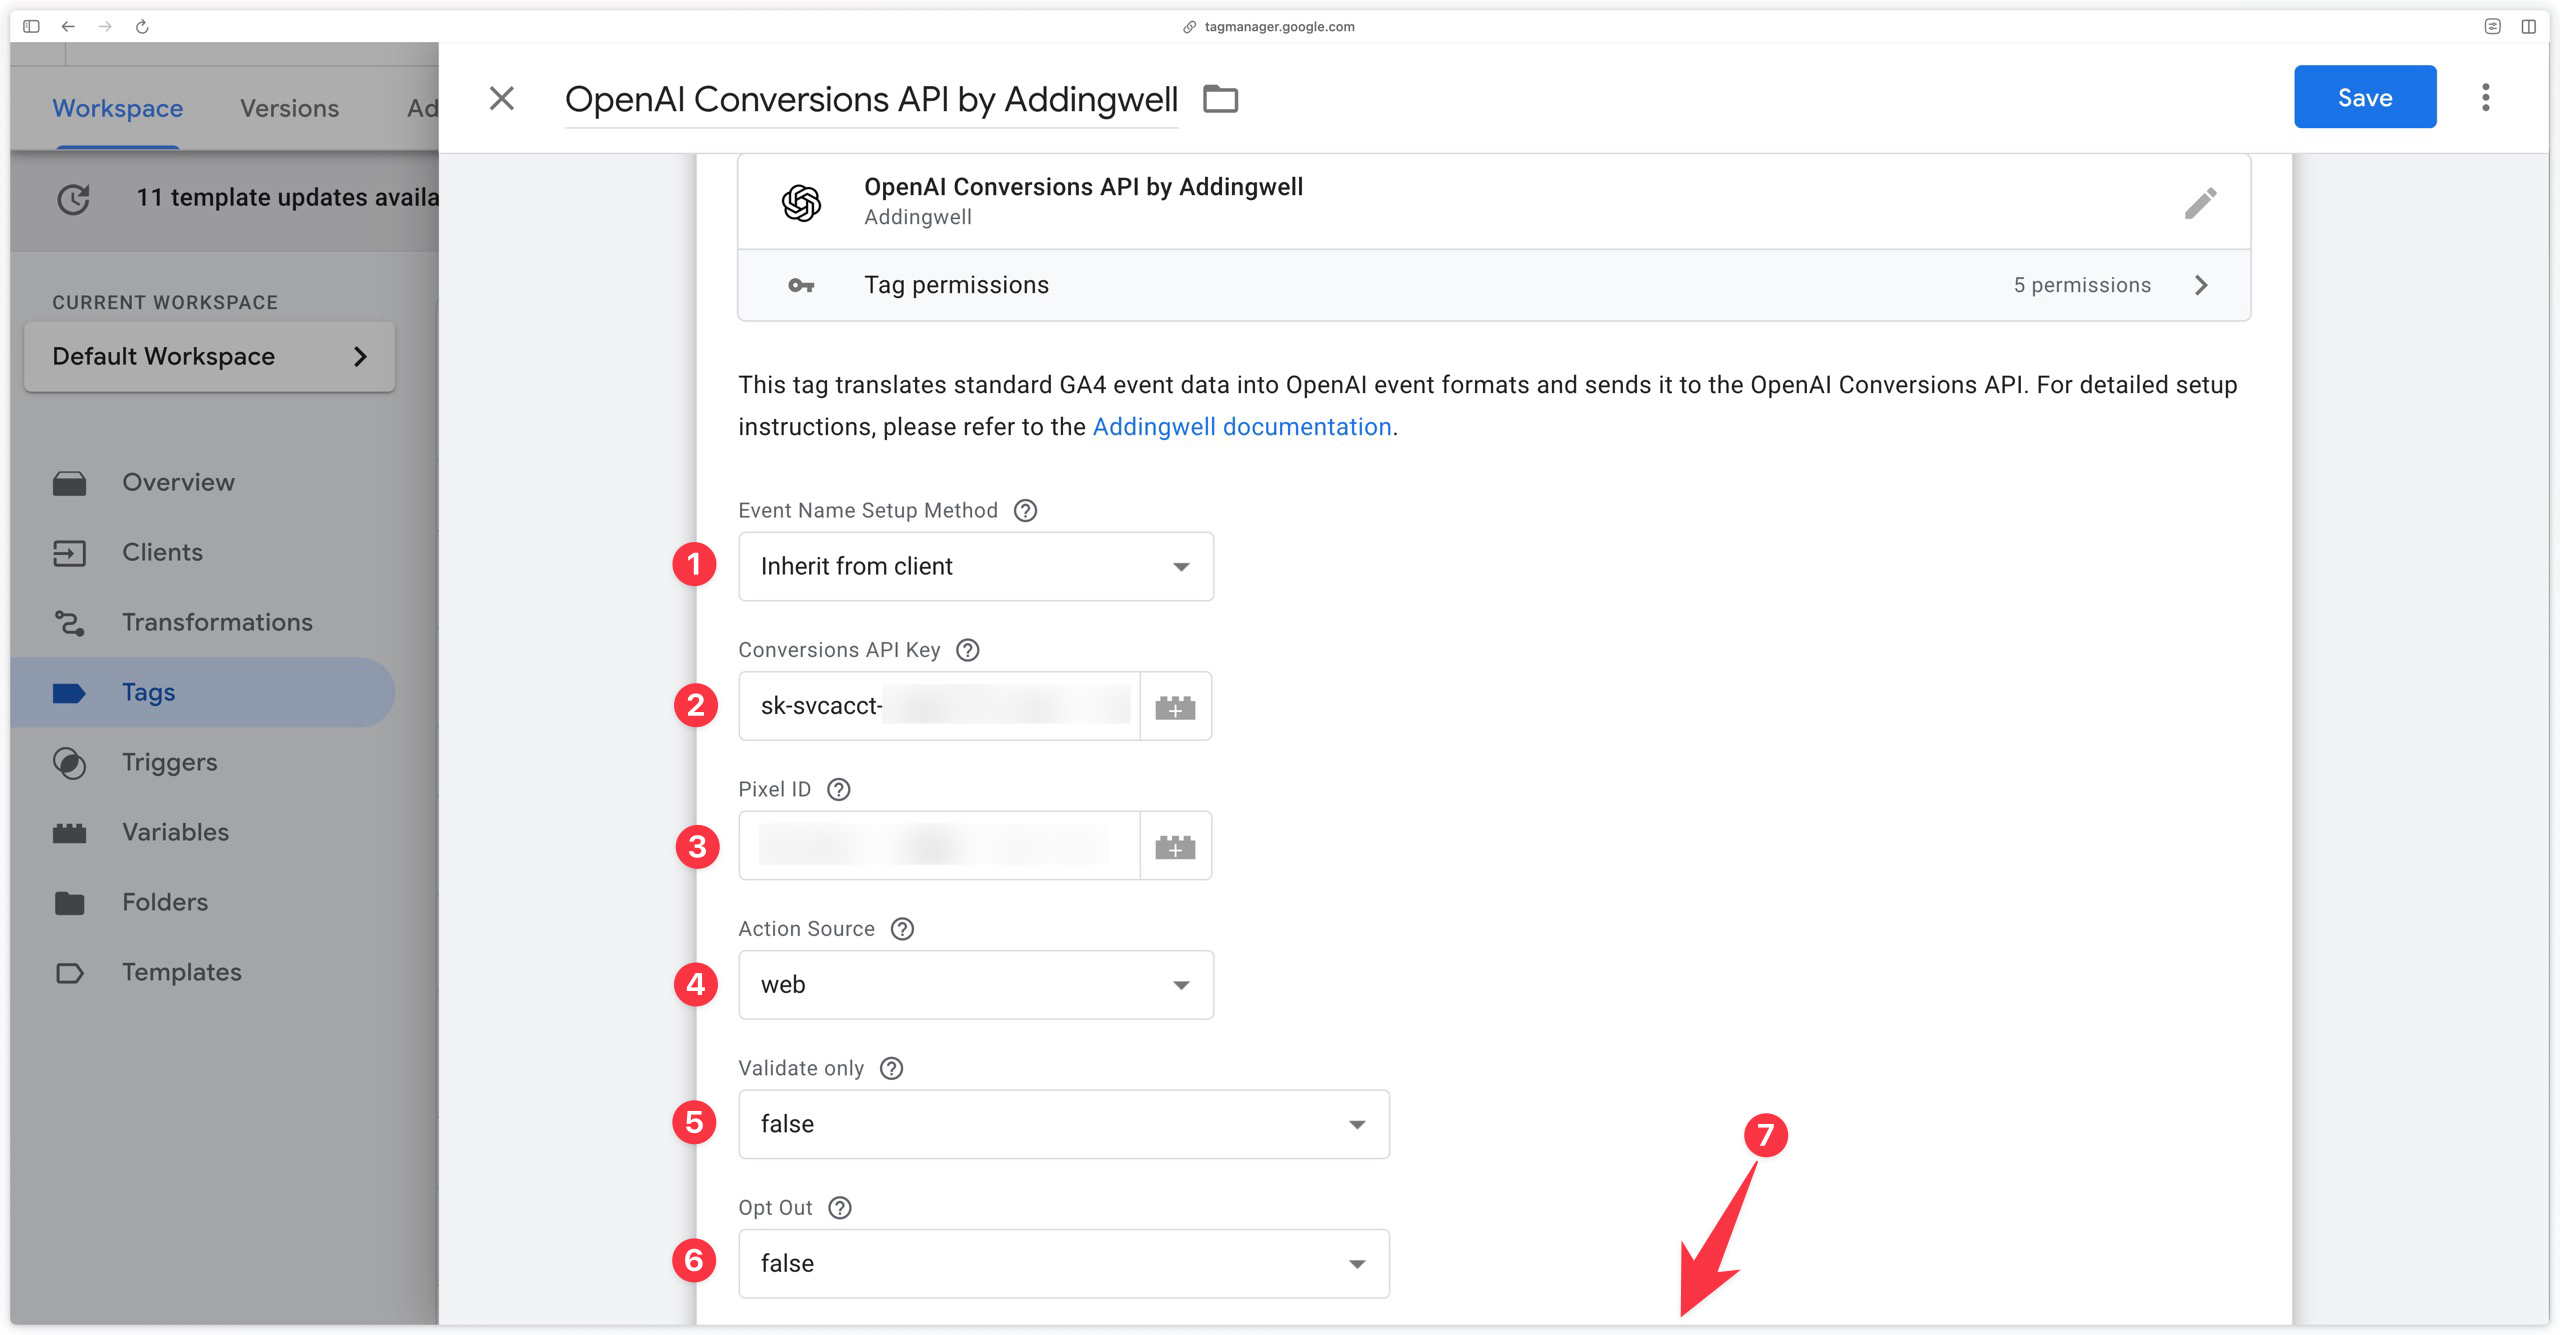
Event Name Setup Method
| Setup method | Description |
|---|---|
| Inherit from client | Instructs the tag to map GA4 events received from the client-side container to OpenAI standard events. Any GA4 event not listed in the mapping table is sent to OpenAI as a custom event. |
| Override | Map GA4 events yourself to what should be sent to OpenAI. Choose to send either a standard event or a custom event. |
Conversions API Key
Enter the API key generated in the Conversions tab of OpenAI Ads Manager.
Pixel ID
Enter the Pixel ID retrieved in the Conversions tab of OpenAI Ads Manager. Use the same identifier as your OpenAI pixel in the browser: deduplication depends on it.
Action Source
Tells OpenAI where the conversion occurred. Keep the default web value for events coming from your website. The other values (offline, physical_store, phone_call, email, other, mobile_app) are reserved for conversions that do not originate from the browser.
Validate only
Set this field to true only to test sending events to OpenAI: OpenAI then validates the event structure without recording it.
It is not recommended to keep Validate only set to true in the OpenAI Conversions API tag in production, as no conversion would be counted. Remember to set it back to false before publishing your server container.
Opt Out
Keep the default false value. Set it to true to exclude the event from user-level personalization at OpenAI. This field accepts a variable, for example to reflect a consent choice.
Override sections (optional)
The collapsed sections at the bottom of the tag let you adjust the data sent, without changing your web container:
| Section | Purpose |
|---|---|
| Server Event Data Override | Force the timestamp, the source URL or the oppref click identifier. |
| User Data Override | Provide or replace user data (email, phone, first name, last name, city, postal code, country, external ID, IP address, user agent). Plain values are normalized and hashed by the tag; values already hashed with SHA-256 are forwarded as-is. |
| Event ID Deduplication | Force the event identifier sent to OpenAI. By default, the tag uses the GA4 event_id parameter, otherwise it generates a unique identifier. |
| Custom Data Override | Force the amount (amount, in the currency’s minor unit), the currency, the plan_id, or add custom fields. |
| Items Data Override | Choose which fields of the GA4 items array are used to build the contents sent to OpenAI. |
Trigger the tag
Finally, trigger the OpenAI CAPI tag on the relevant GA4 events using the tag mapping table.
For example, for an e-commerce site, the following events are generally used:
| Event name |
|---|
| page_view |
| view_item |
| add_to_cart |
| begin_checkout |
| purchase |
For a lead generation or subscription site: generate_lead, sign_up, subscribe, start_trial.
This list of events is of course not exhaustive and depends on your situation.
For optimal organization, create a Lookup Table variable configured as follows:
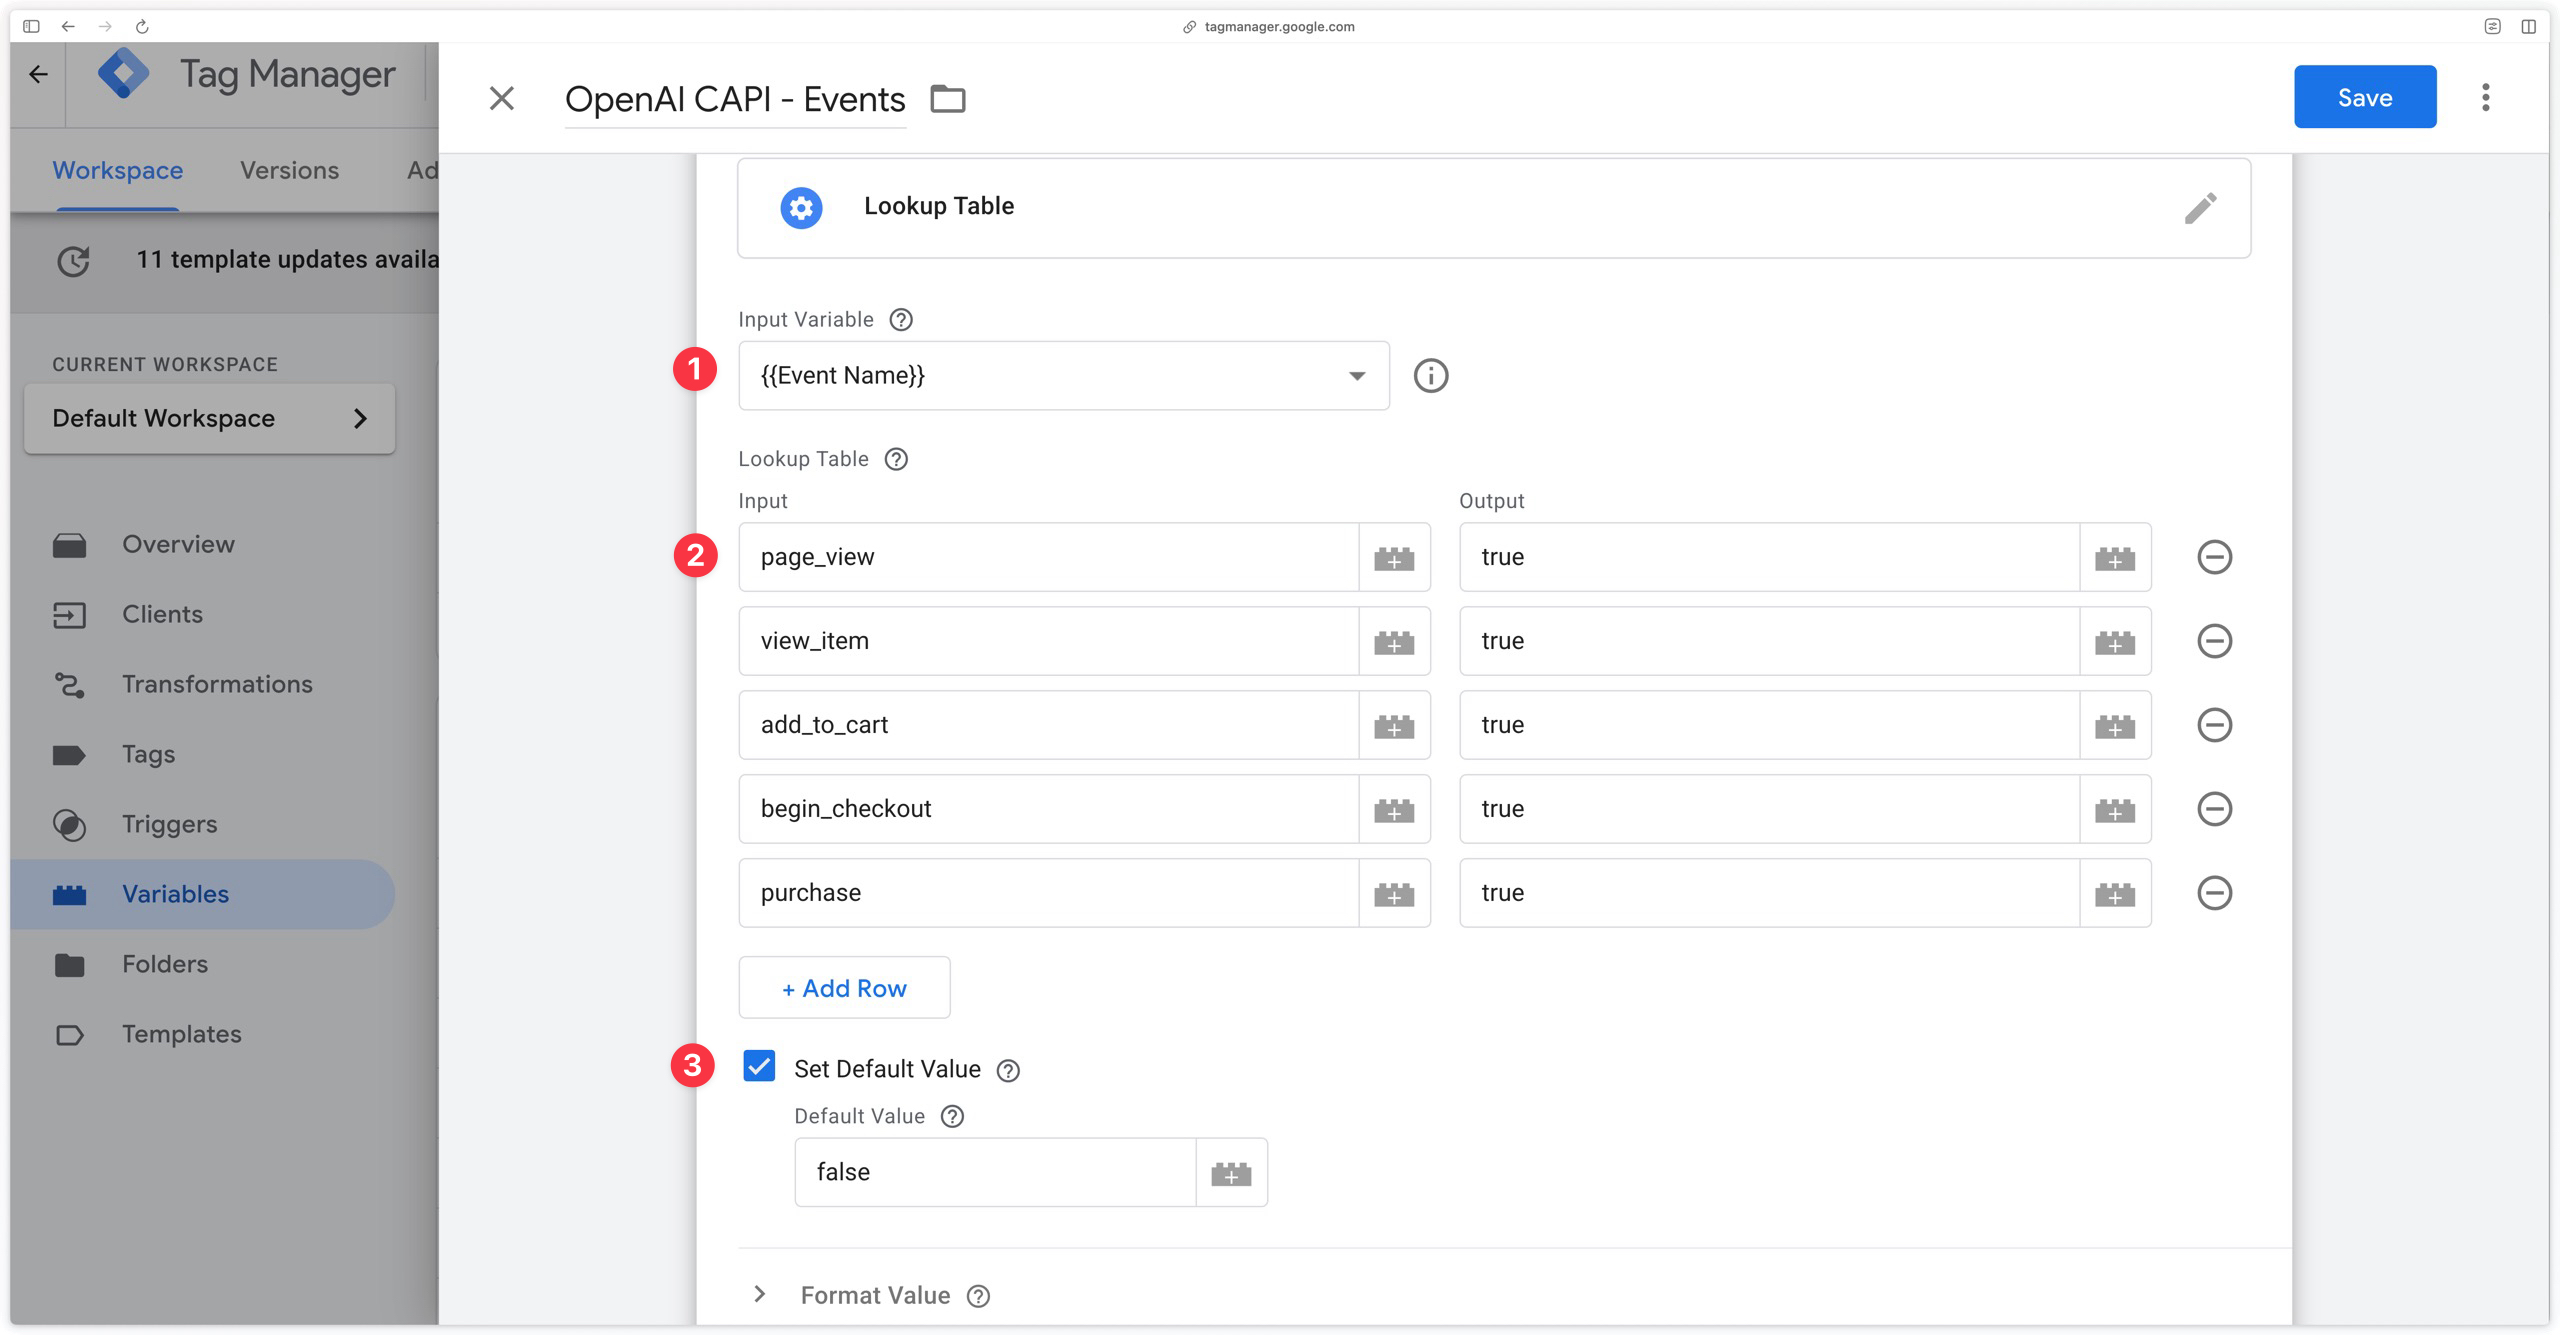
In the OpenAI CAPI tag, create a custom trigger checking that events come from GA4 (Client Name = GA4) and that the previously configured Lookup Table returns true.
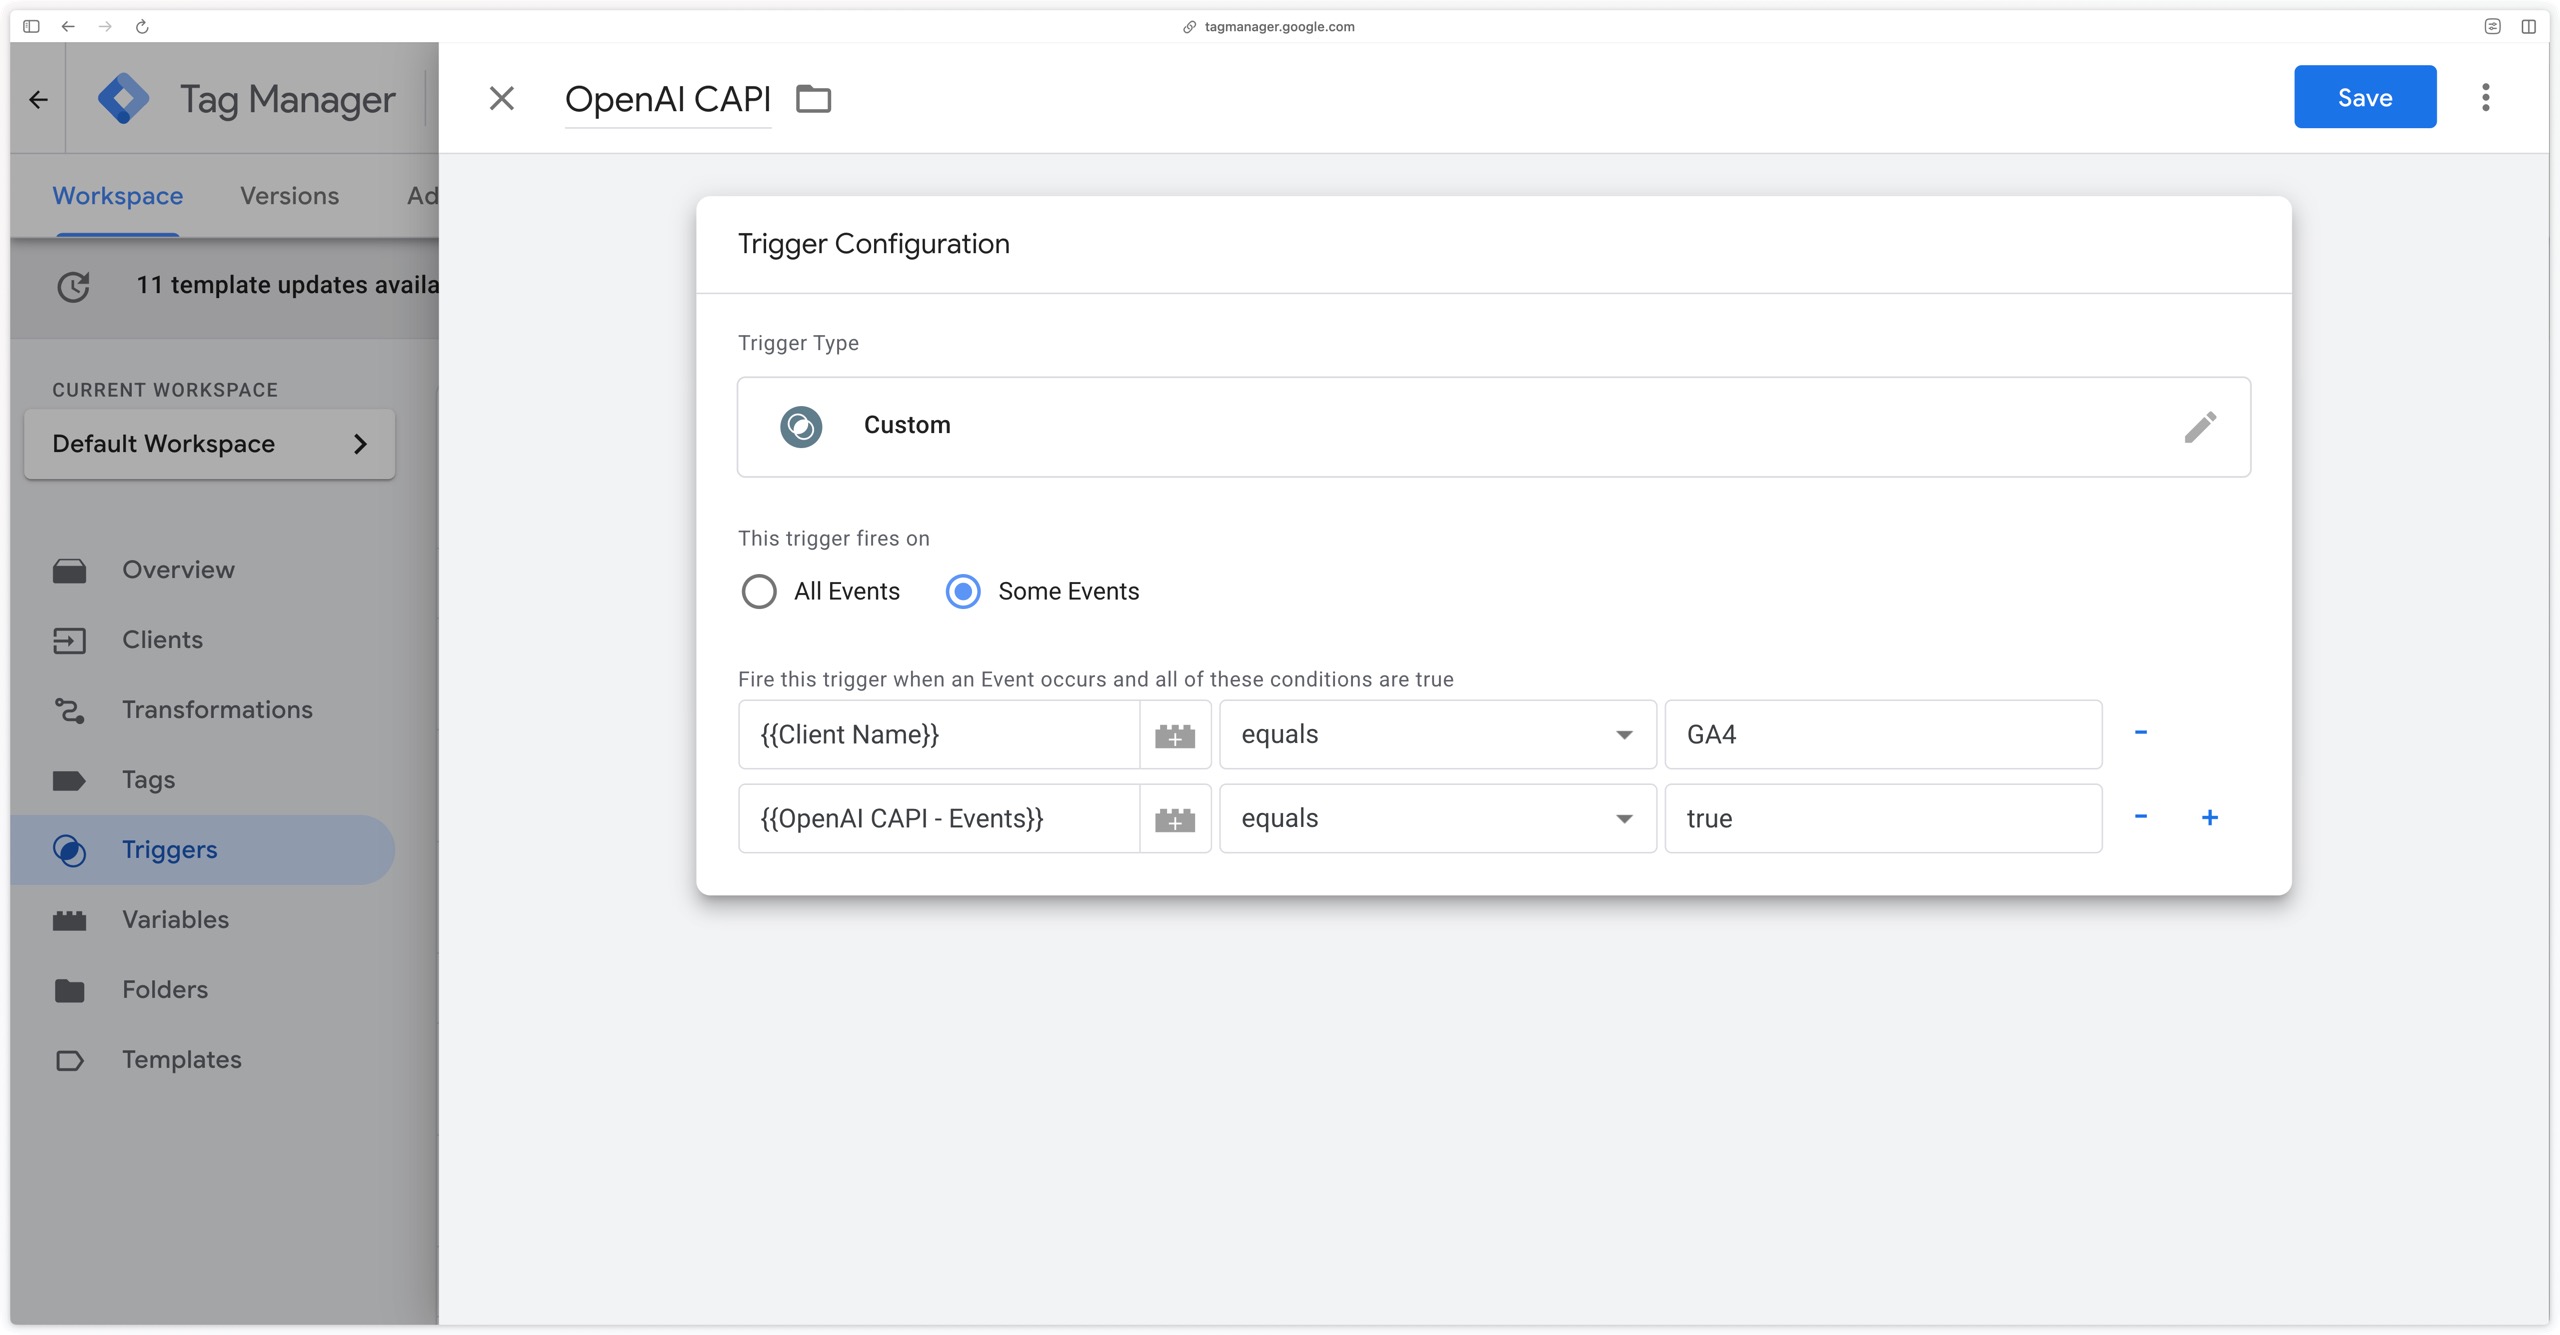
Depending on the country in which your website operates and the regulations in force regarding data collection (GDPR in Europe, CCPA in California, Law 25 in Quebec, etc.), it is imperative to configure the tag trigger based on user consent.
Ensure that the tag is triggered only when the appropriate consent has been obtained, in accordance with applicable legal requirements. The tag notably forwards the oppref and obref identifiers read from cookies: OpenAI asks you to stop sending them if the user withdraws consent.
OpenAI pixel setup (recommended)
We recommend deploying the OpenAI pixel alongside the Conversions API: it complements server-side measurement. Its setup is not detailed in this documentation: to make your implementation easier, we suggest following this article written by a partner , which provides an OpenAI pixel tag.
Make sure to send the same event identifier from the pixel and from GA4: that is what allows OpenAI to deduplicate events received from both sources. To do so, trigger your pixel tags with the same triggers as your GA4 tags, so that a given event is sent to both sources.
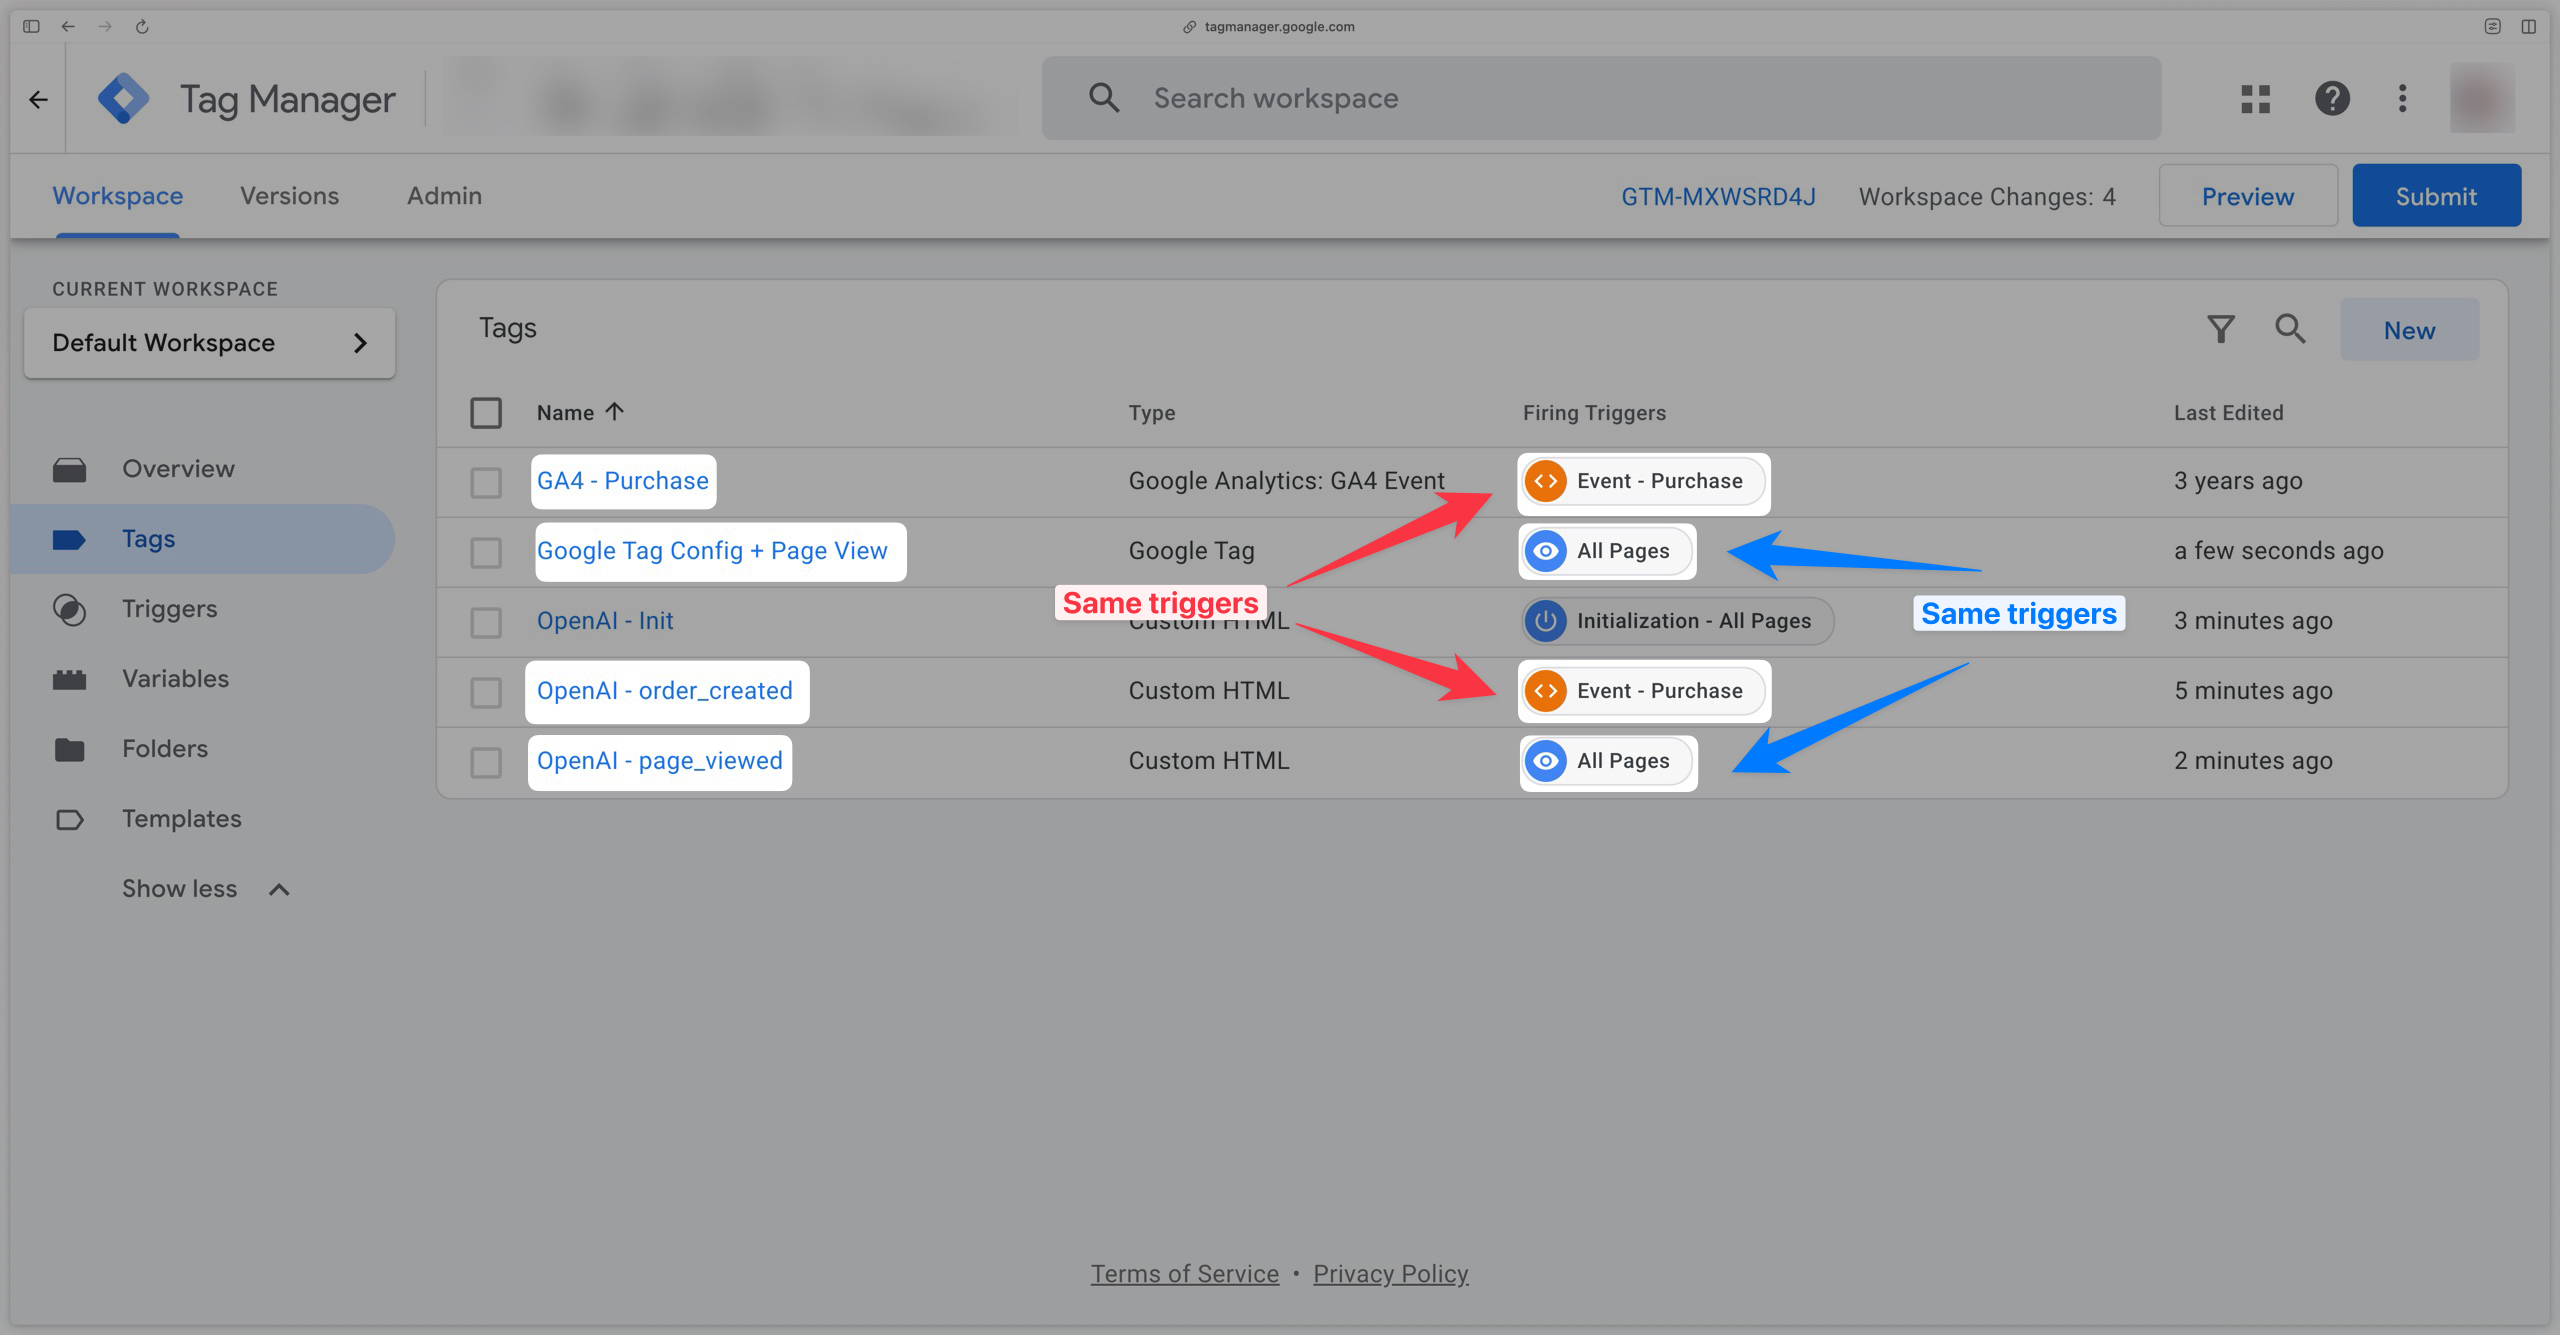
Verifying received data
After configuring your OpenAI Conversions API tag, it is essential to verify the following:
- your server container successfully sends events to OpenAI;
- the volume of events received by OpenAI is consistent and deduplication works if you also use the pixel;
- the data quality is sufficient for OpenAI to match your key events to a ChatGPT user.
Verifying event transmission
GTM Server-Side preview
The first step is to verify that the OpenAI Conversions API tag fires correctly for the events defined in the trigger.
In the server container preview, make sure the tag fires for a specific event (in our example, we check its activation on the purchase event). Confirm it appears in the Tags Fired section with the status Succeeded.
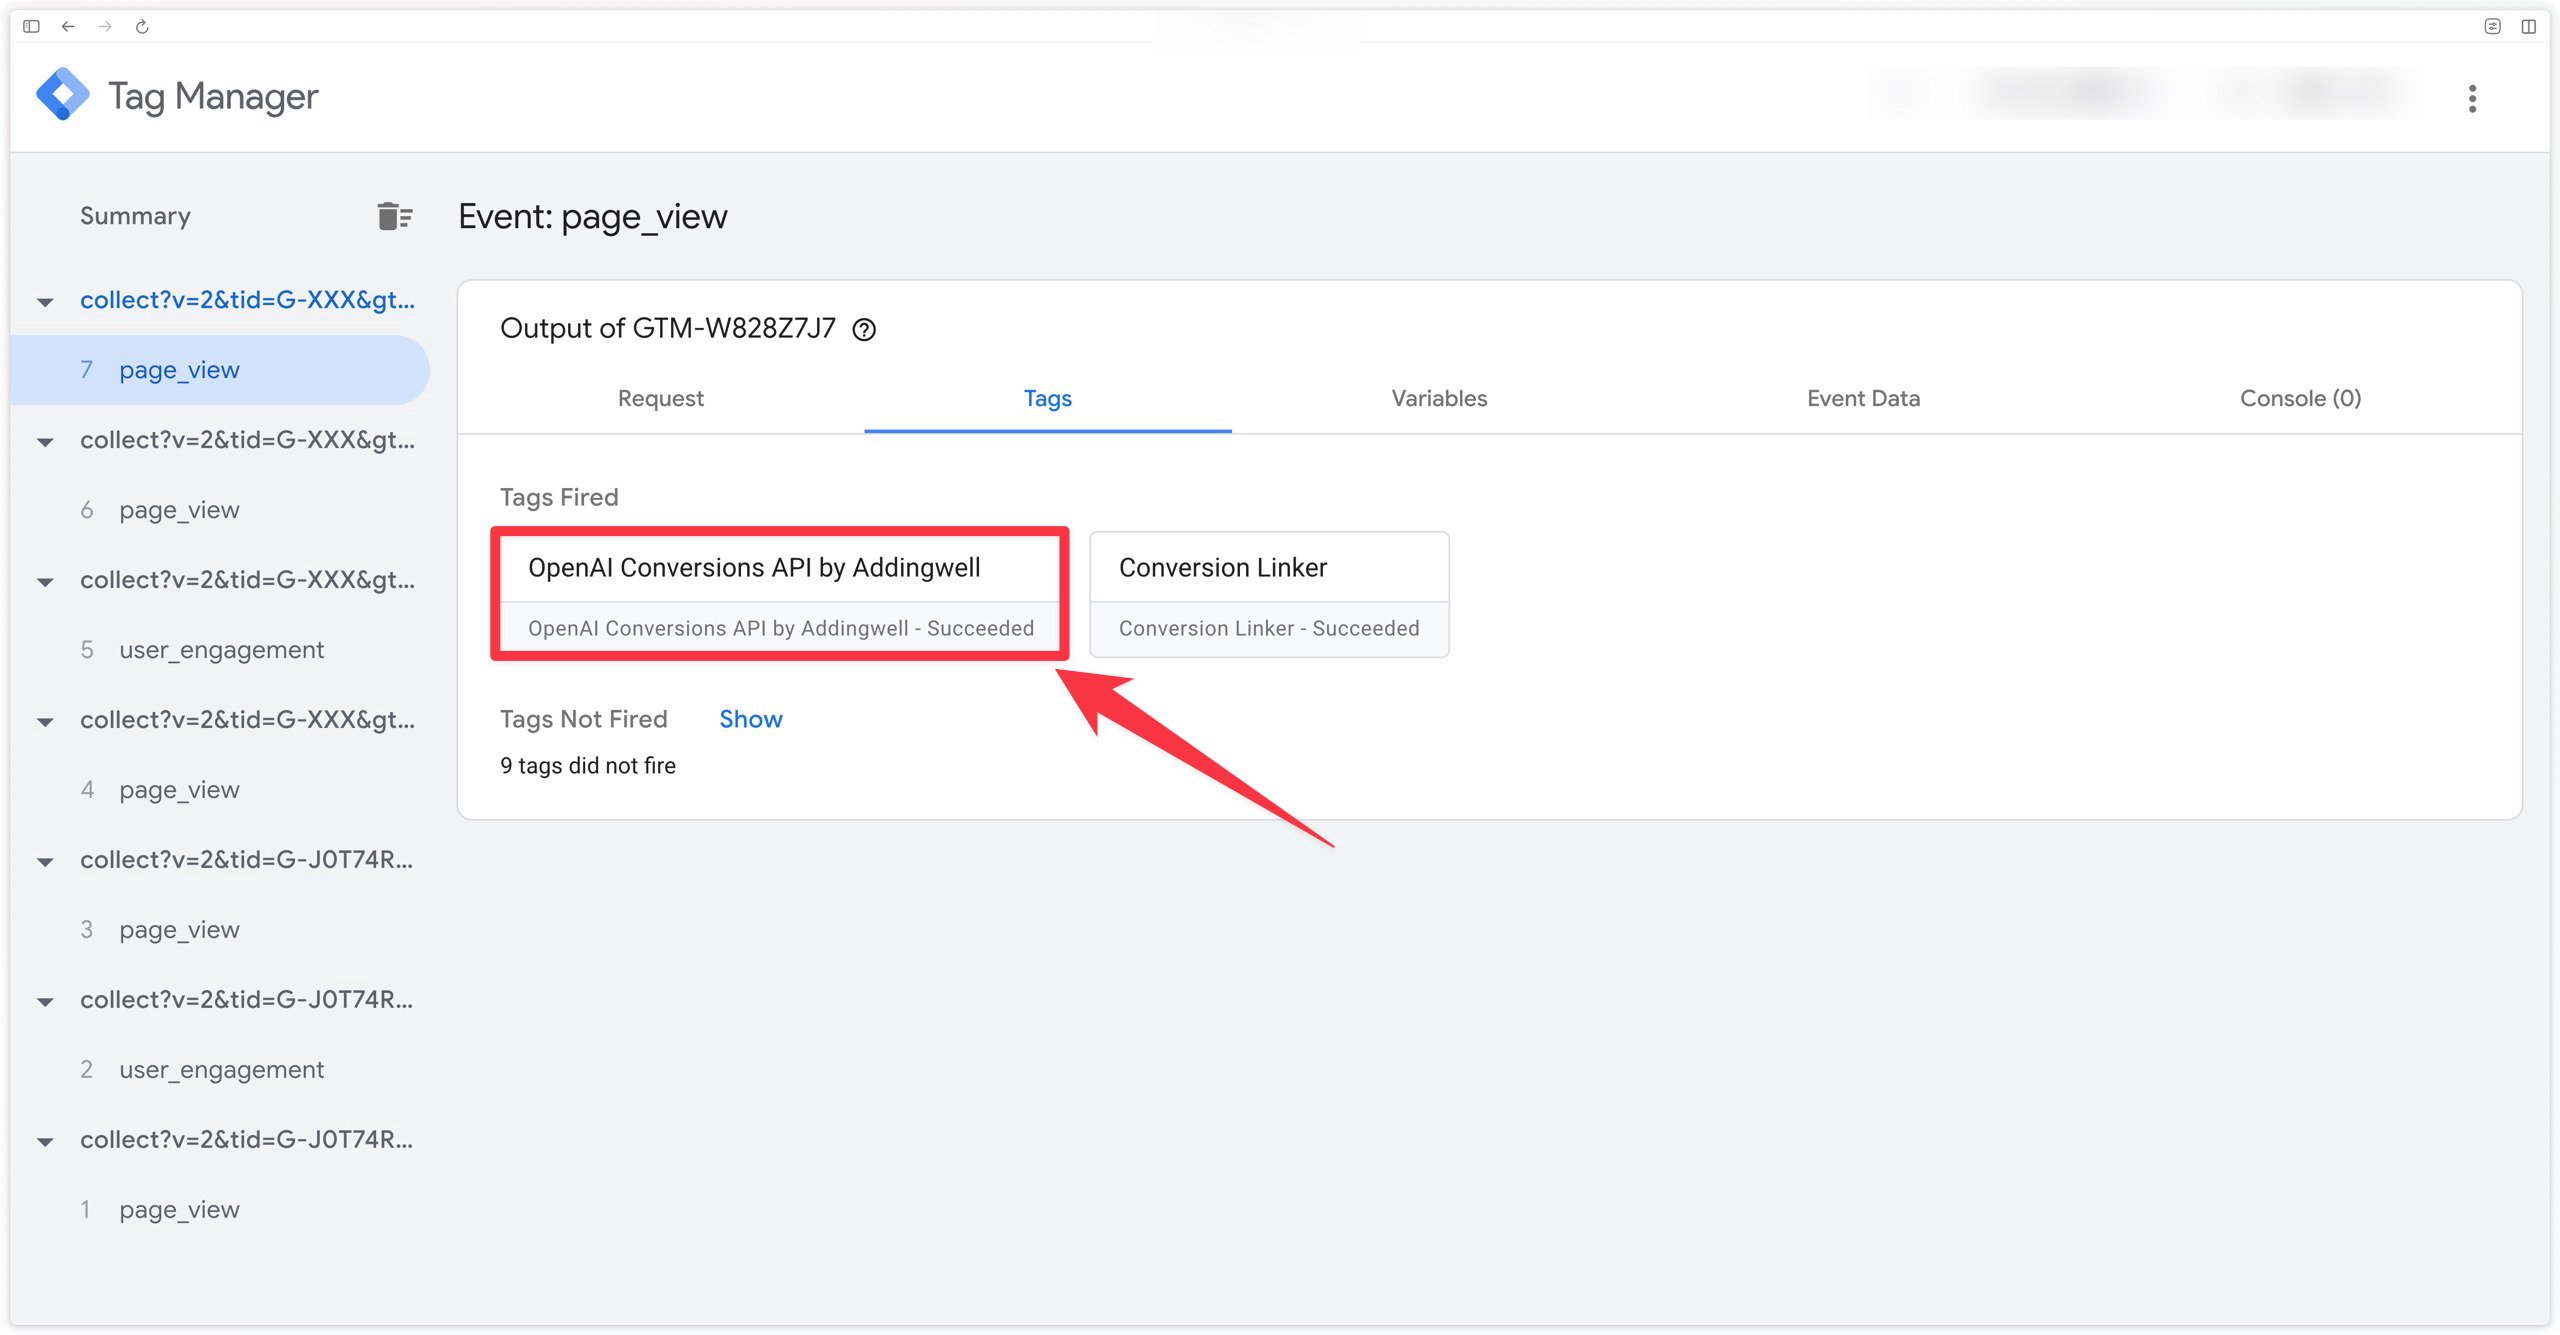
In the preview, click the OpenAI Conversions API tag to check that the request was sent to bzr.openai.com. You can inspect the event content there: event type, identifier, amount in cents, hashed user data, and the oppref and obref identifiers when available.
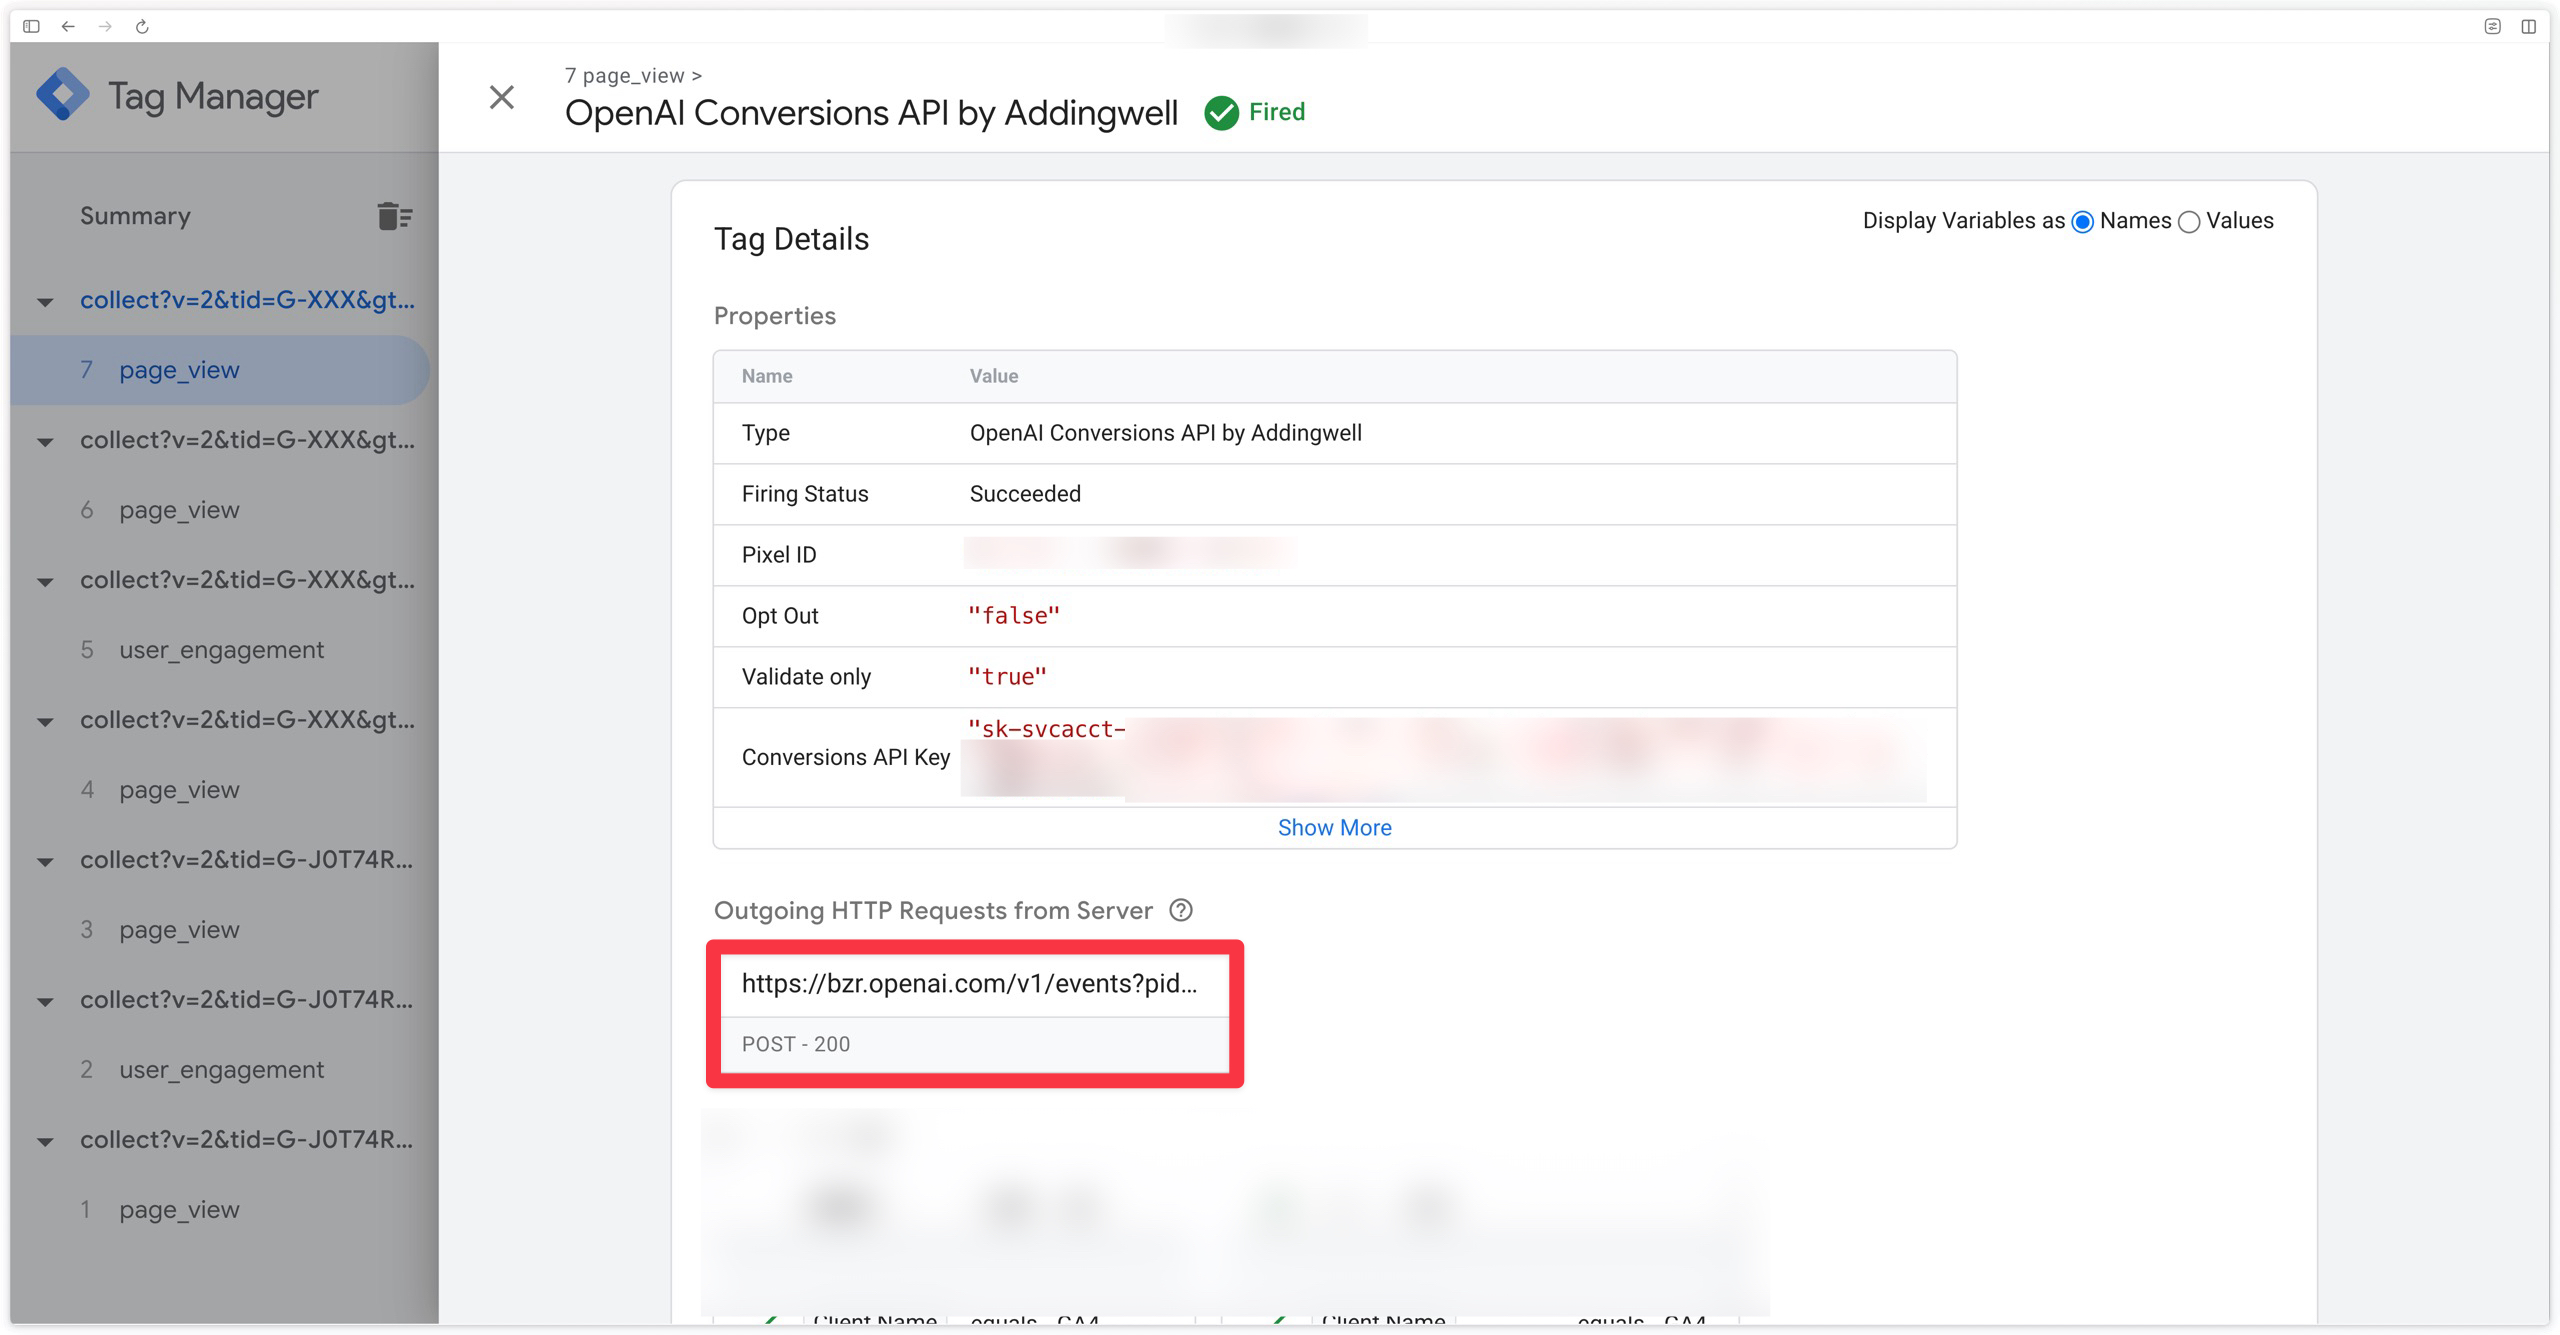
If the request fails, OpenAI’s response indicates the field at fault. The most frequent errors are a missing currency when an amount is sent, and an invalid custom event name. See the testing events page to validate your configuration without recording conversions.
Checking event volume
OpenAI side: received events and deduplication
Go to the Conversions tab of your OpenAI Ads Manager account, then click Start polling events to display in real time the events arriving at OpenAI.
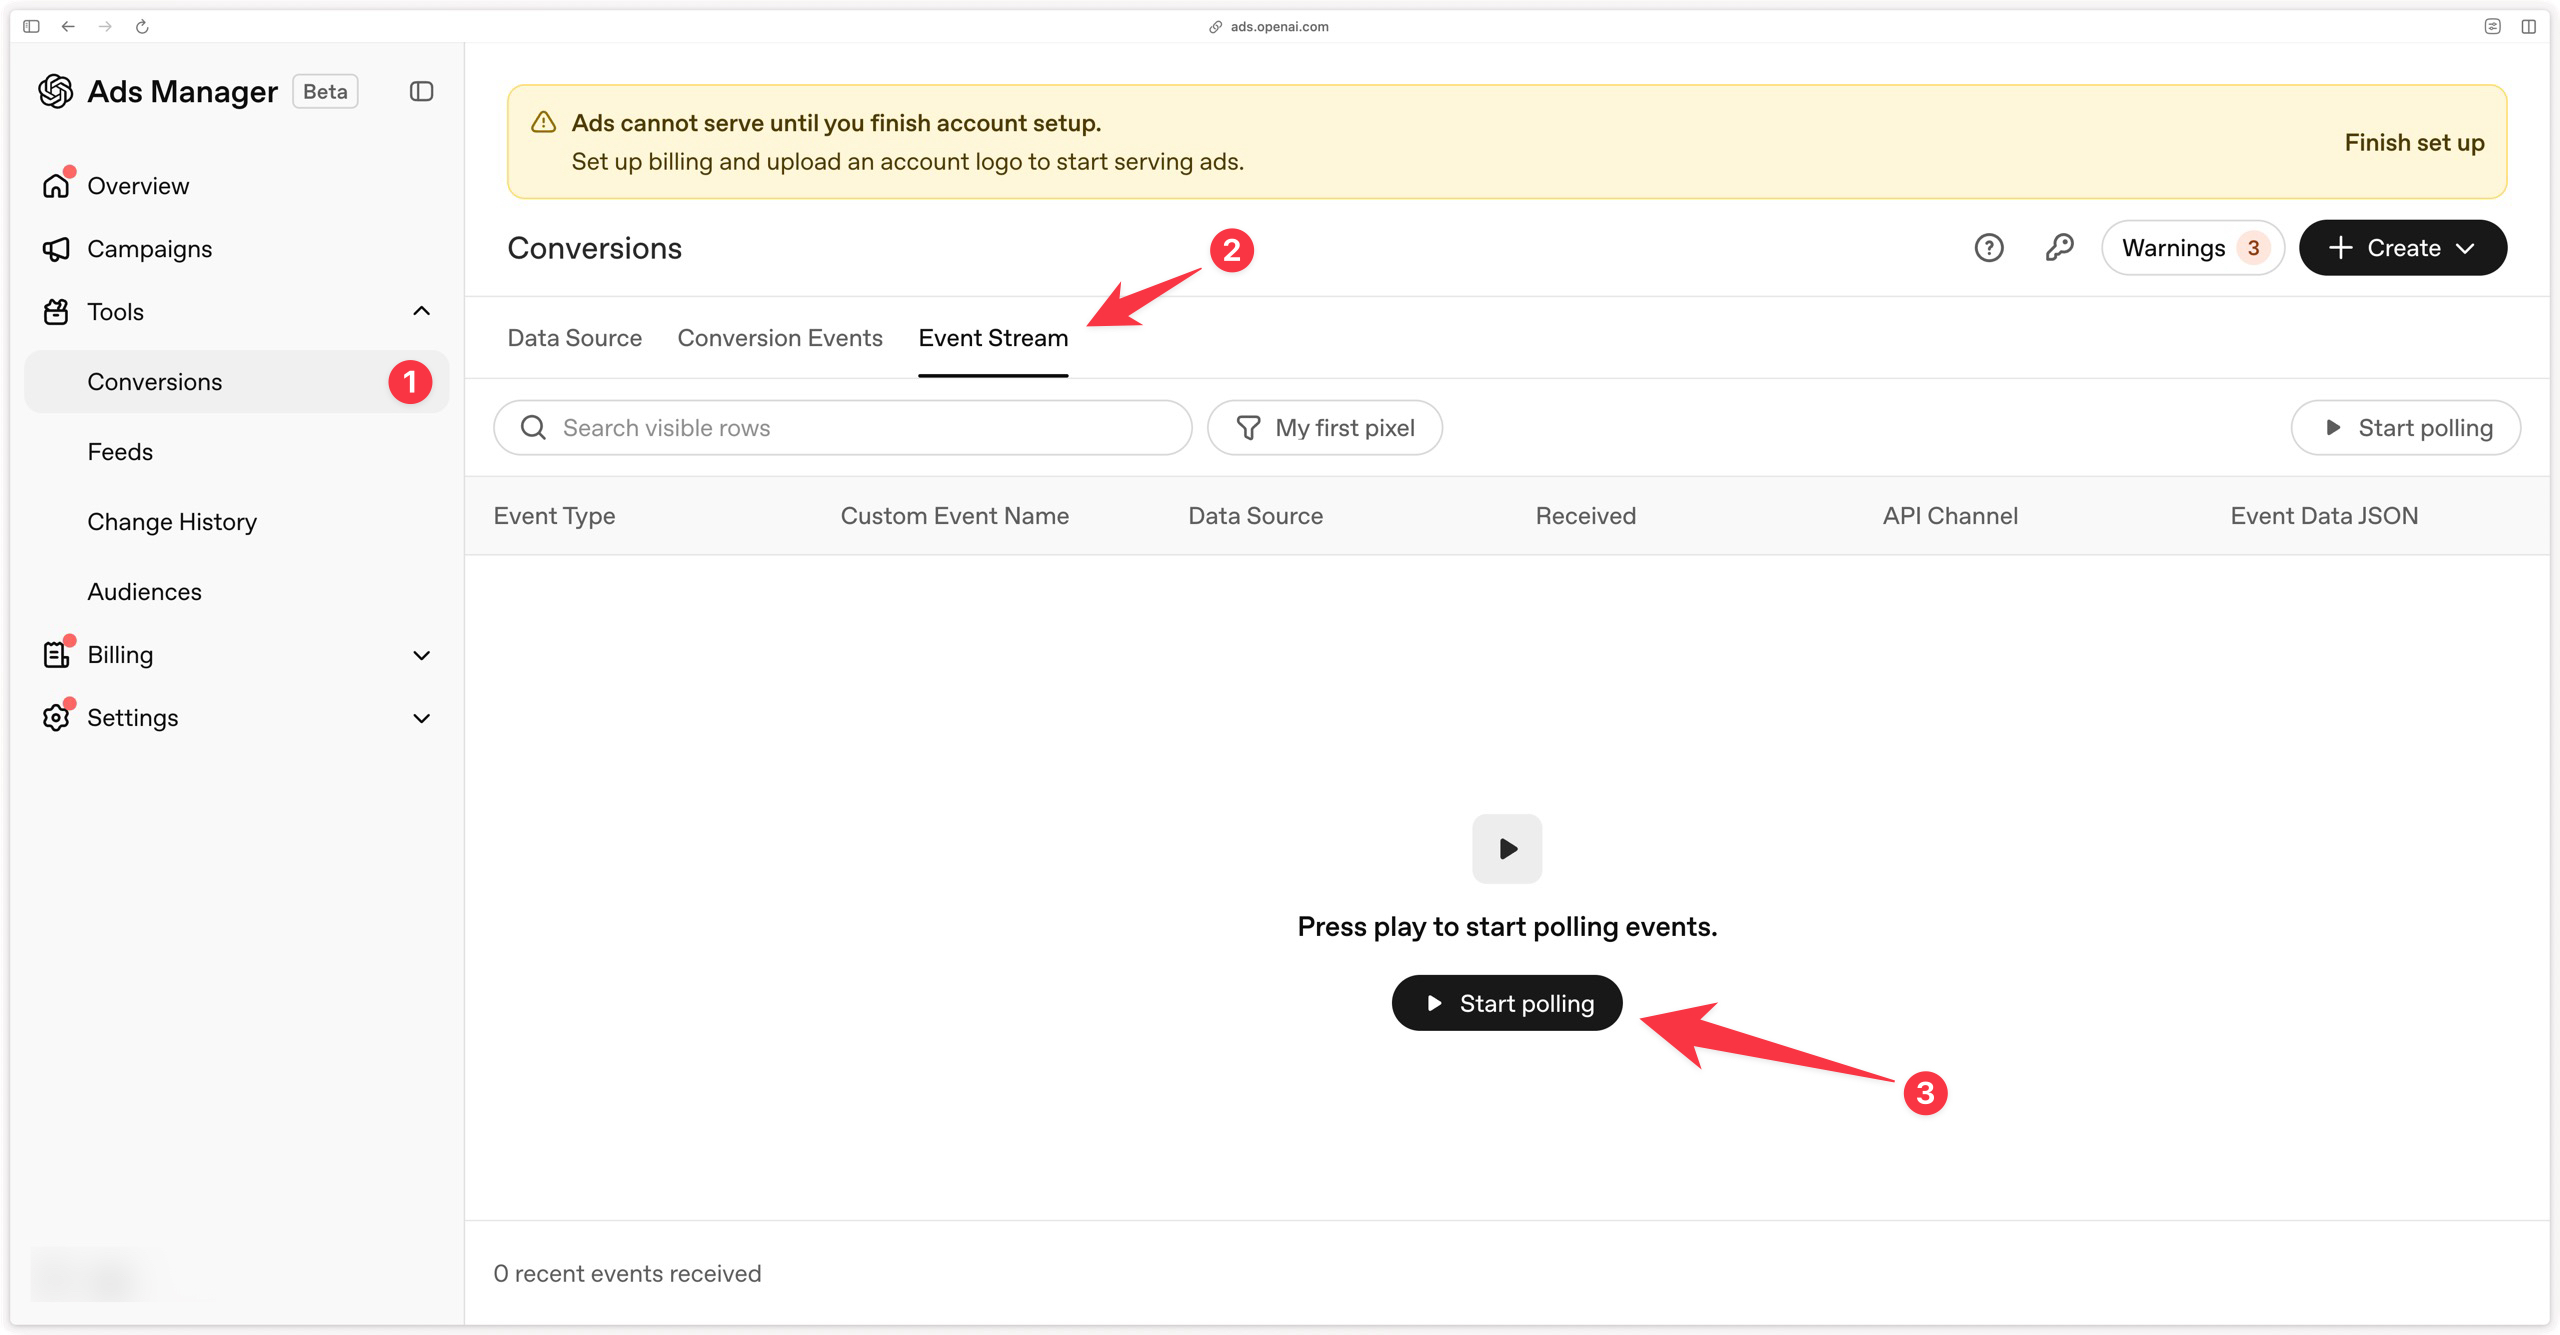
The events received by OpenAI are displayed by data source: pixel and Conversions API.
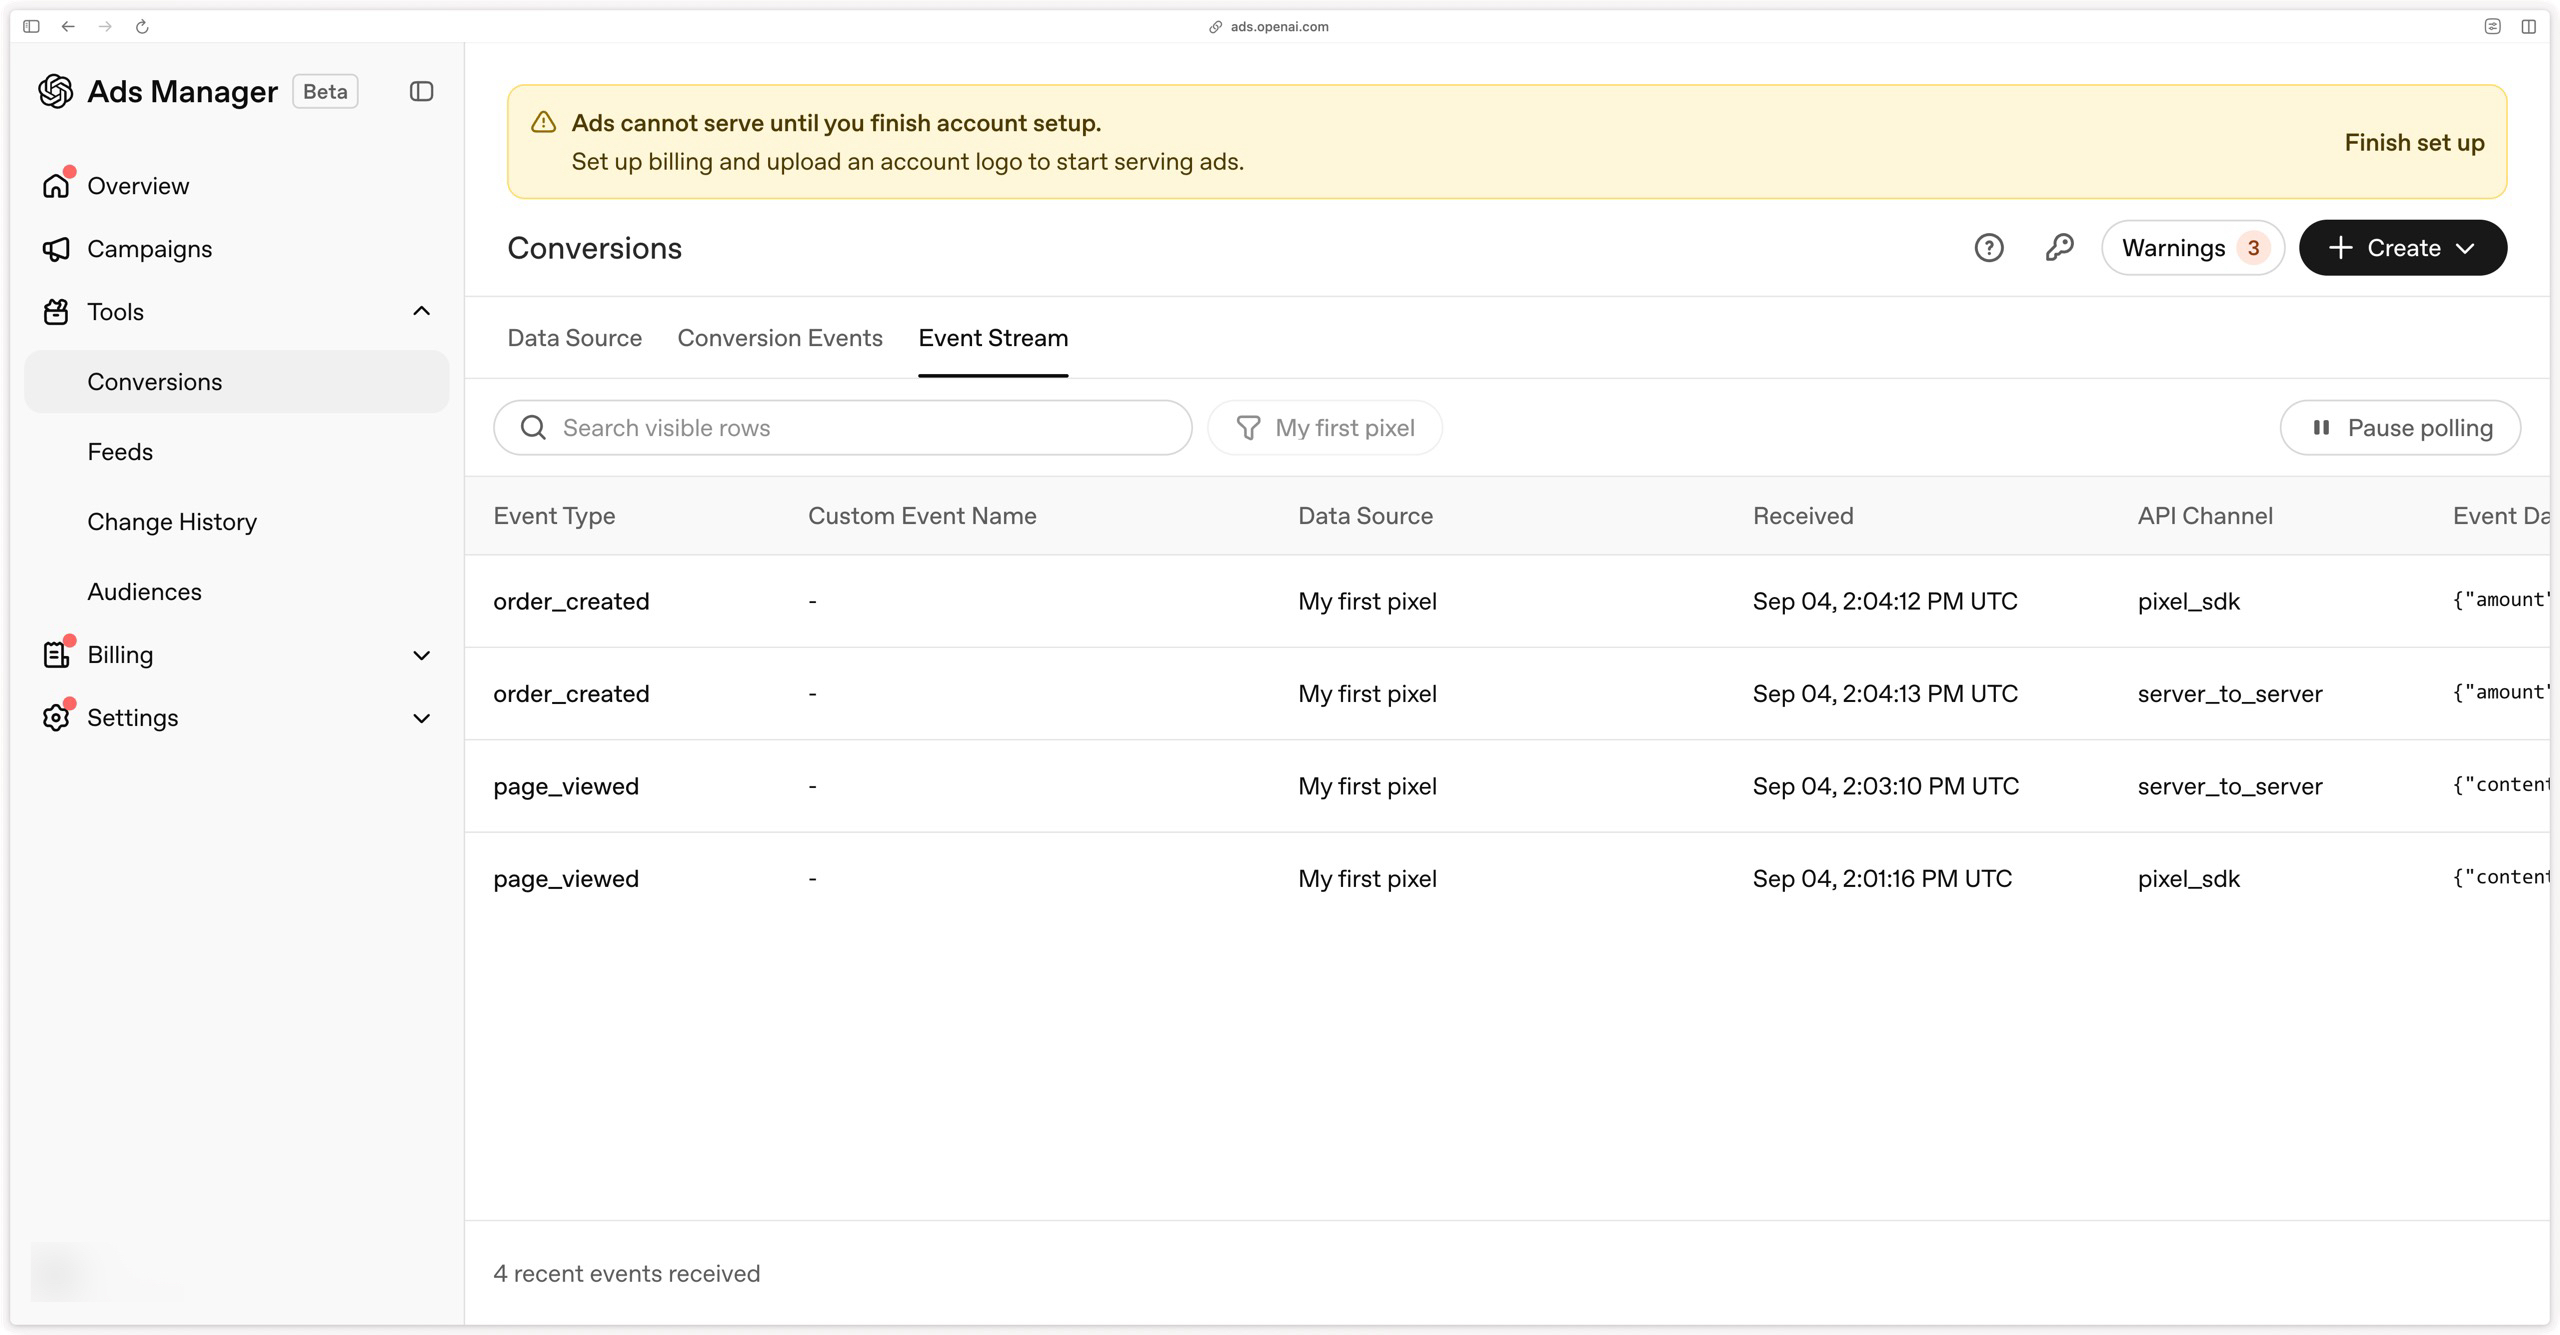
If you implemented dual tracking of your events via the pixel and OpenAI CAPI, make sure that events:
- come from both data sources, from the pixel and from the Conversions API;
- are properly deduplicated: the same event received from both sources carries the same Event ID.
The number of events received from the pixel should remain fairly stable after adding OpenAI CAPI. However, the number of events received from the server must be higher than the pixel’s: a 5 to 20% surplus for the Conversions API indicates a good setup.
If you see a higher volume of events from the pixel than from the Conversions API, you probably still have a pixel implementation without event_id, or a pixel hardcoded on the site (check with your development team).
Addingwell side via Events Monitoring
Click the Events Monitoring tab in your Addingwell container. Select the desired time range, then click the OpenAI Conversions API tag card.
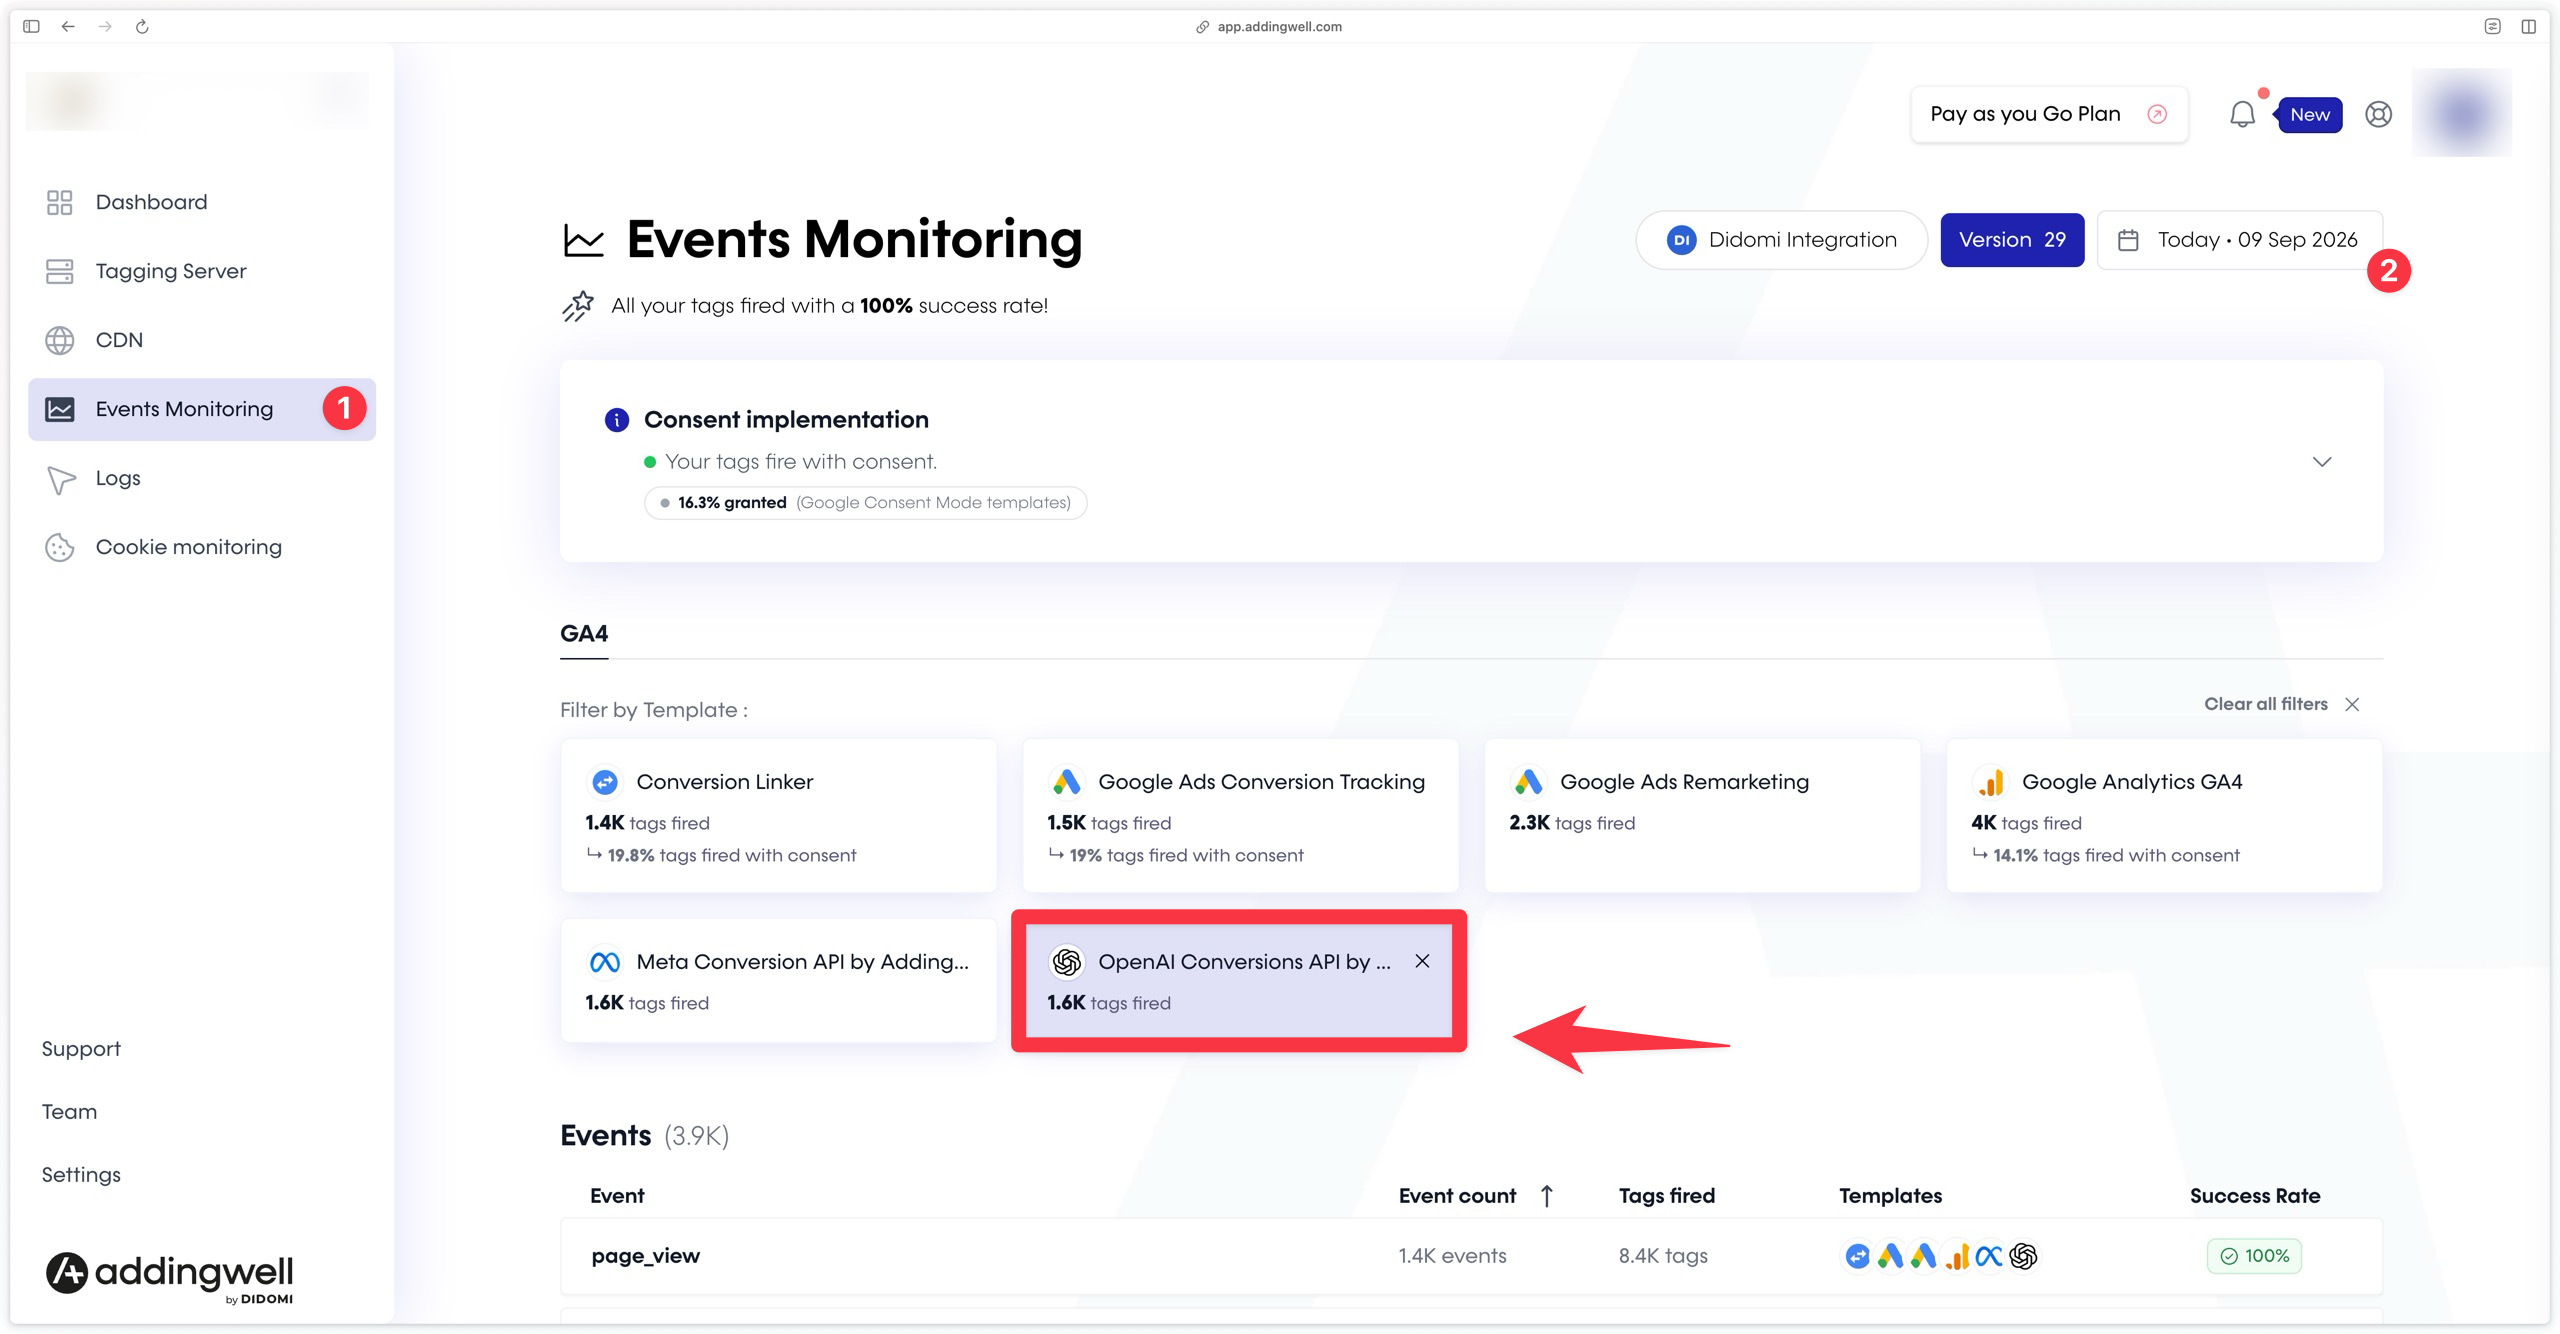
This screen provides the details of the events sent by your server to the OpenAI Conversions API, along with the success rate of each event.
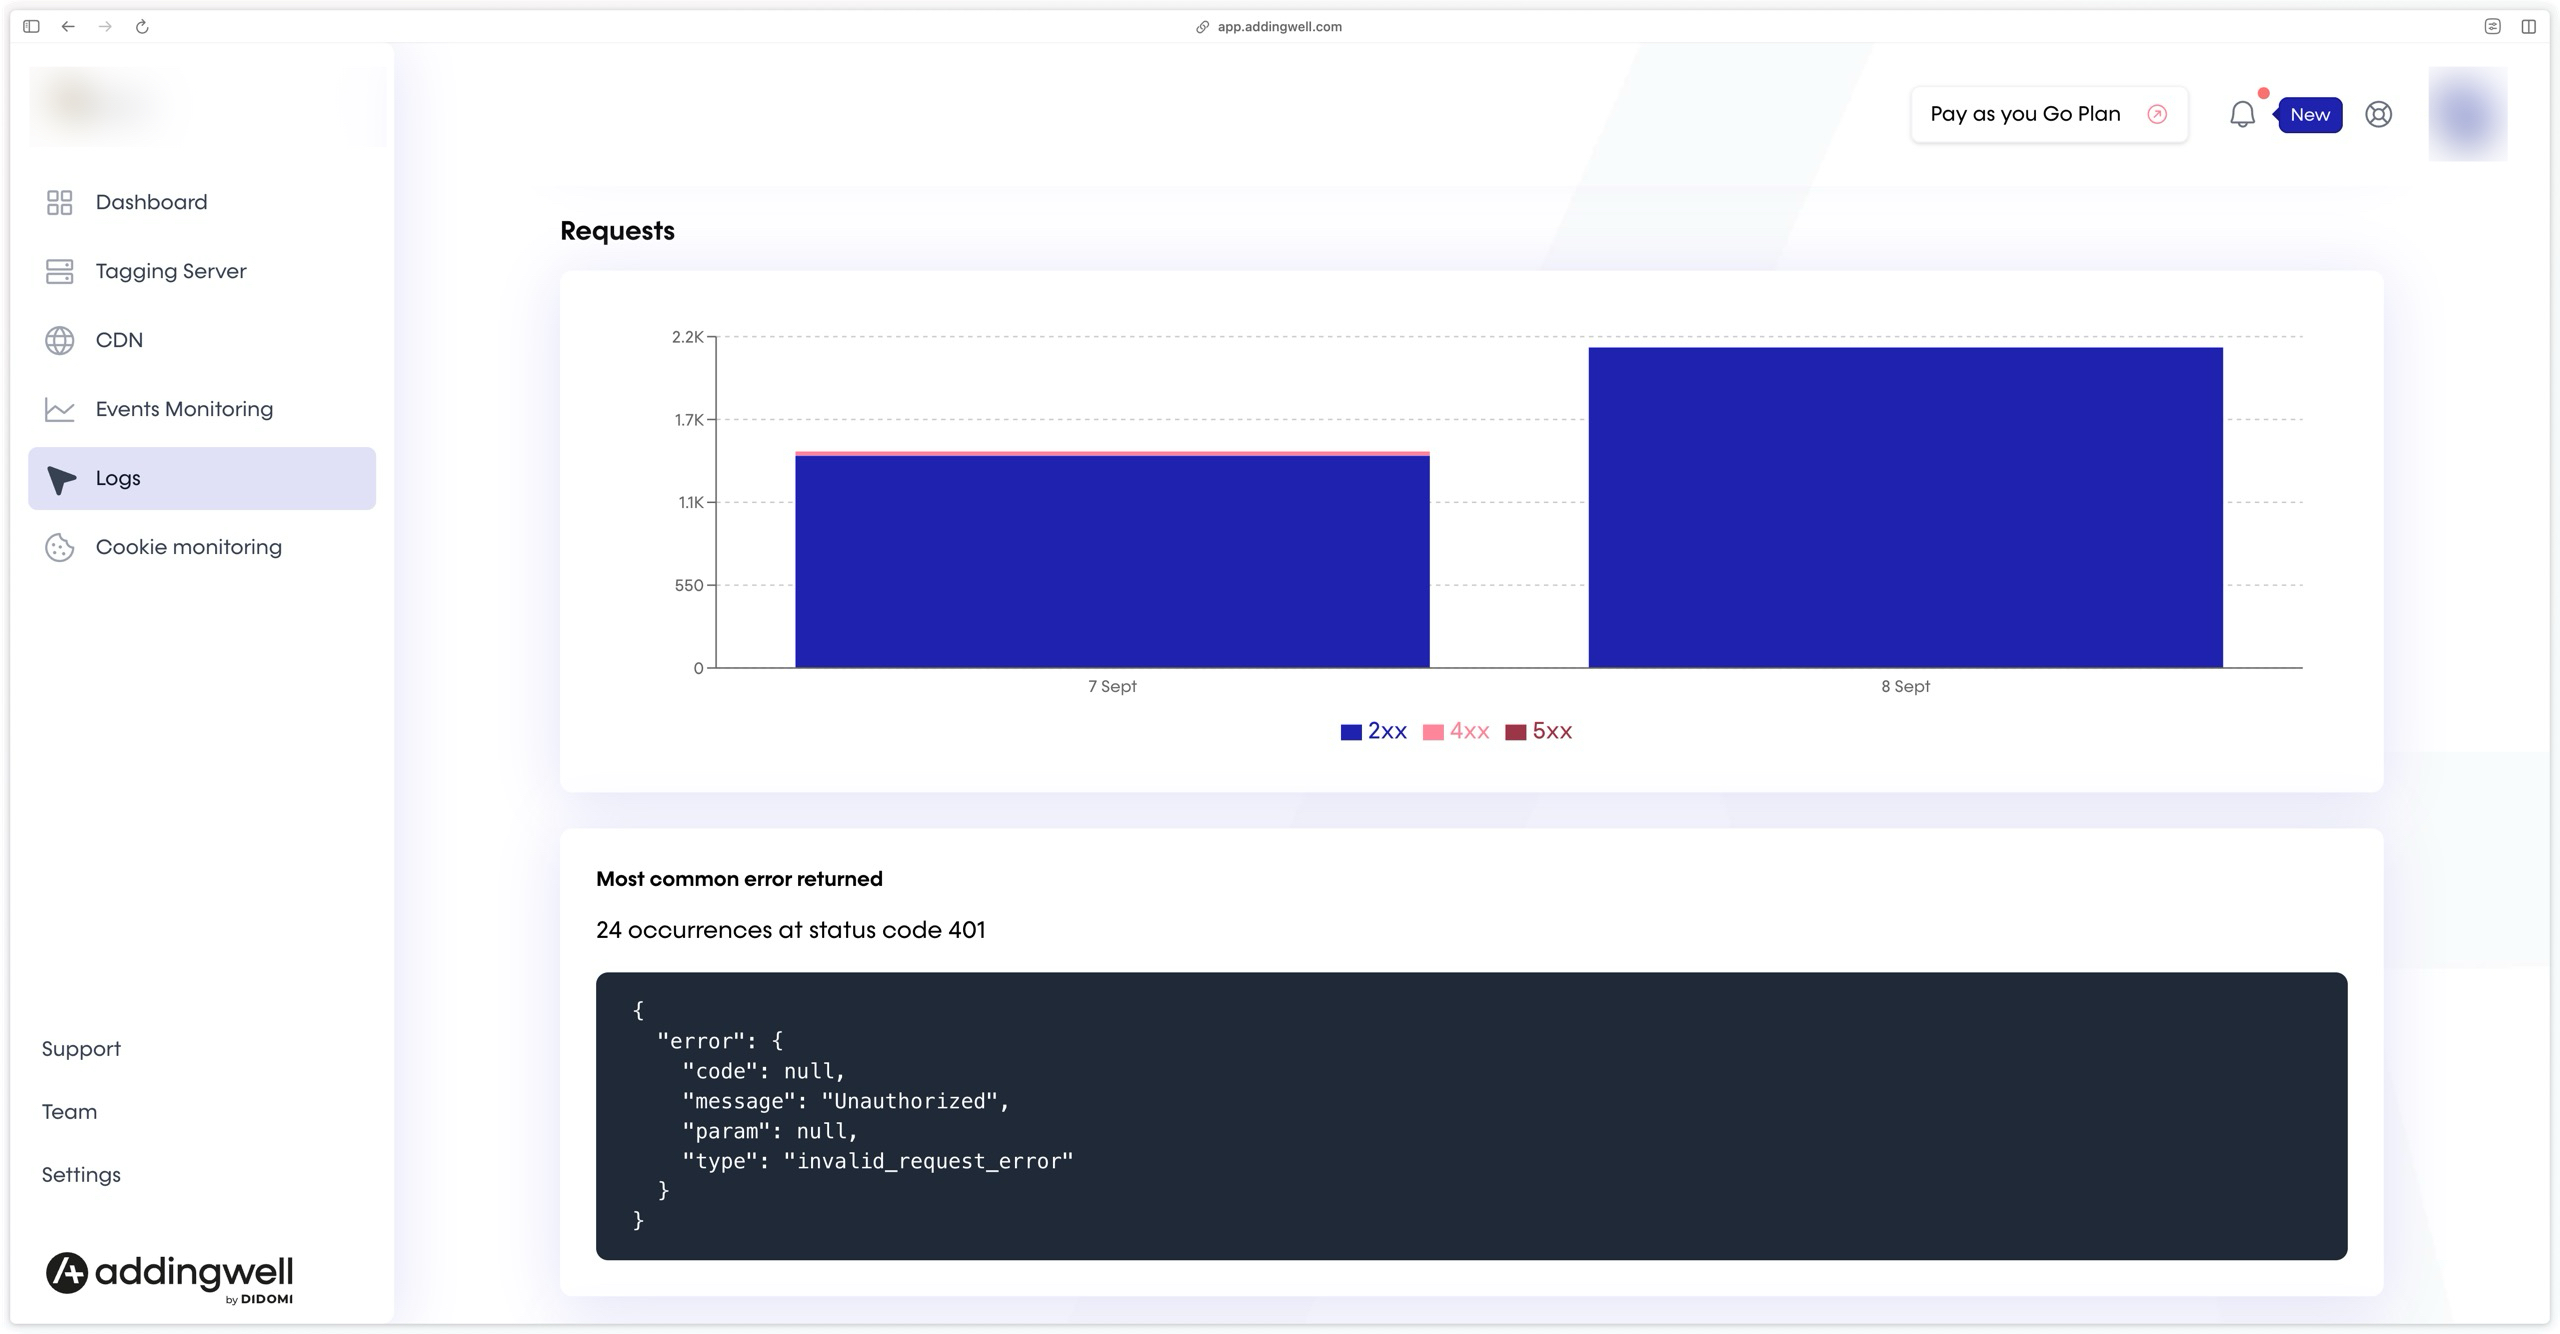
If your requests do not show a 100% success rate, analyze the errors in the logs. Click the Logs tab, then select the OpenAI API logs.
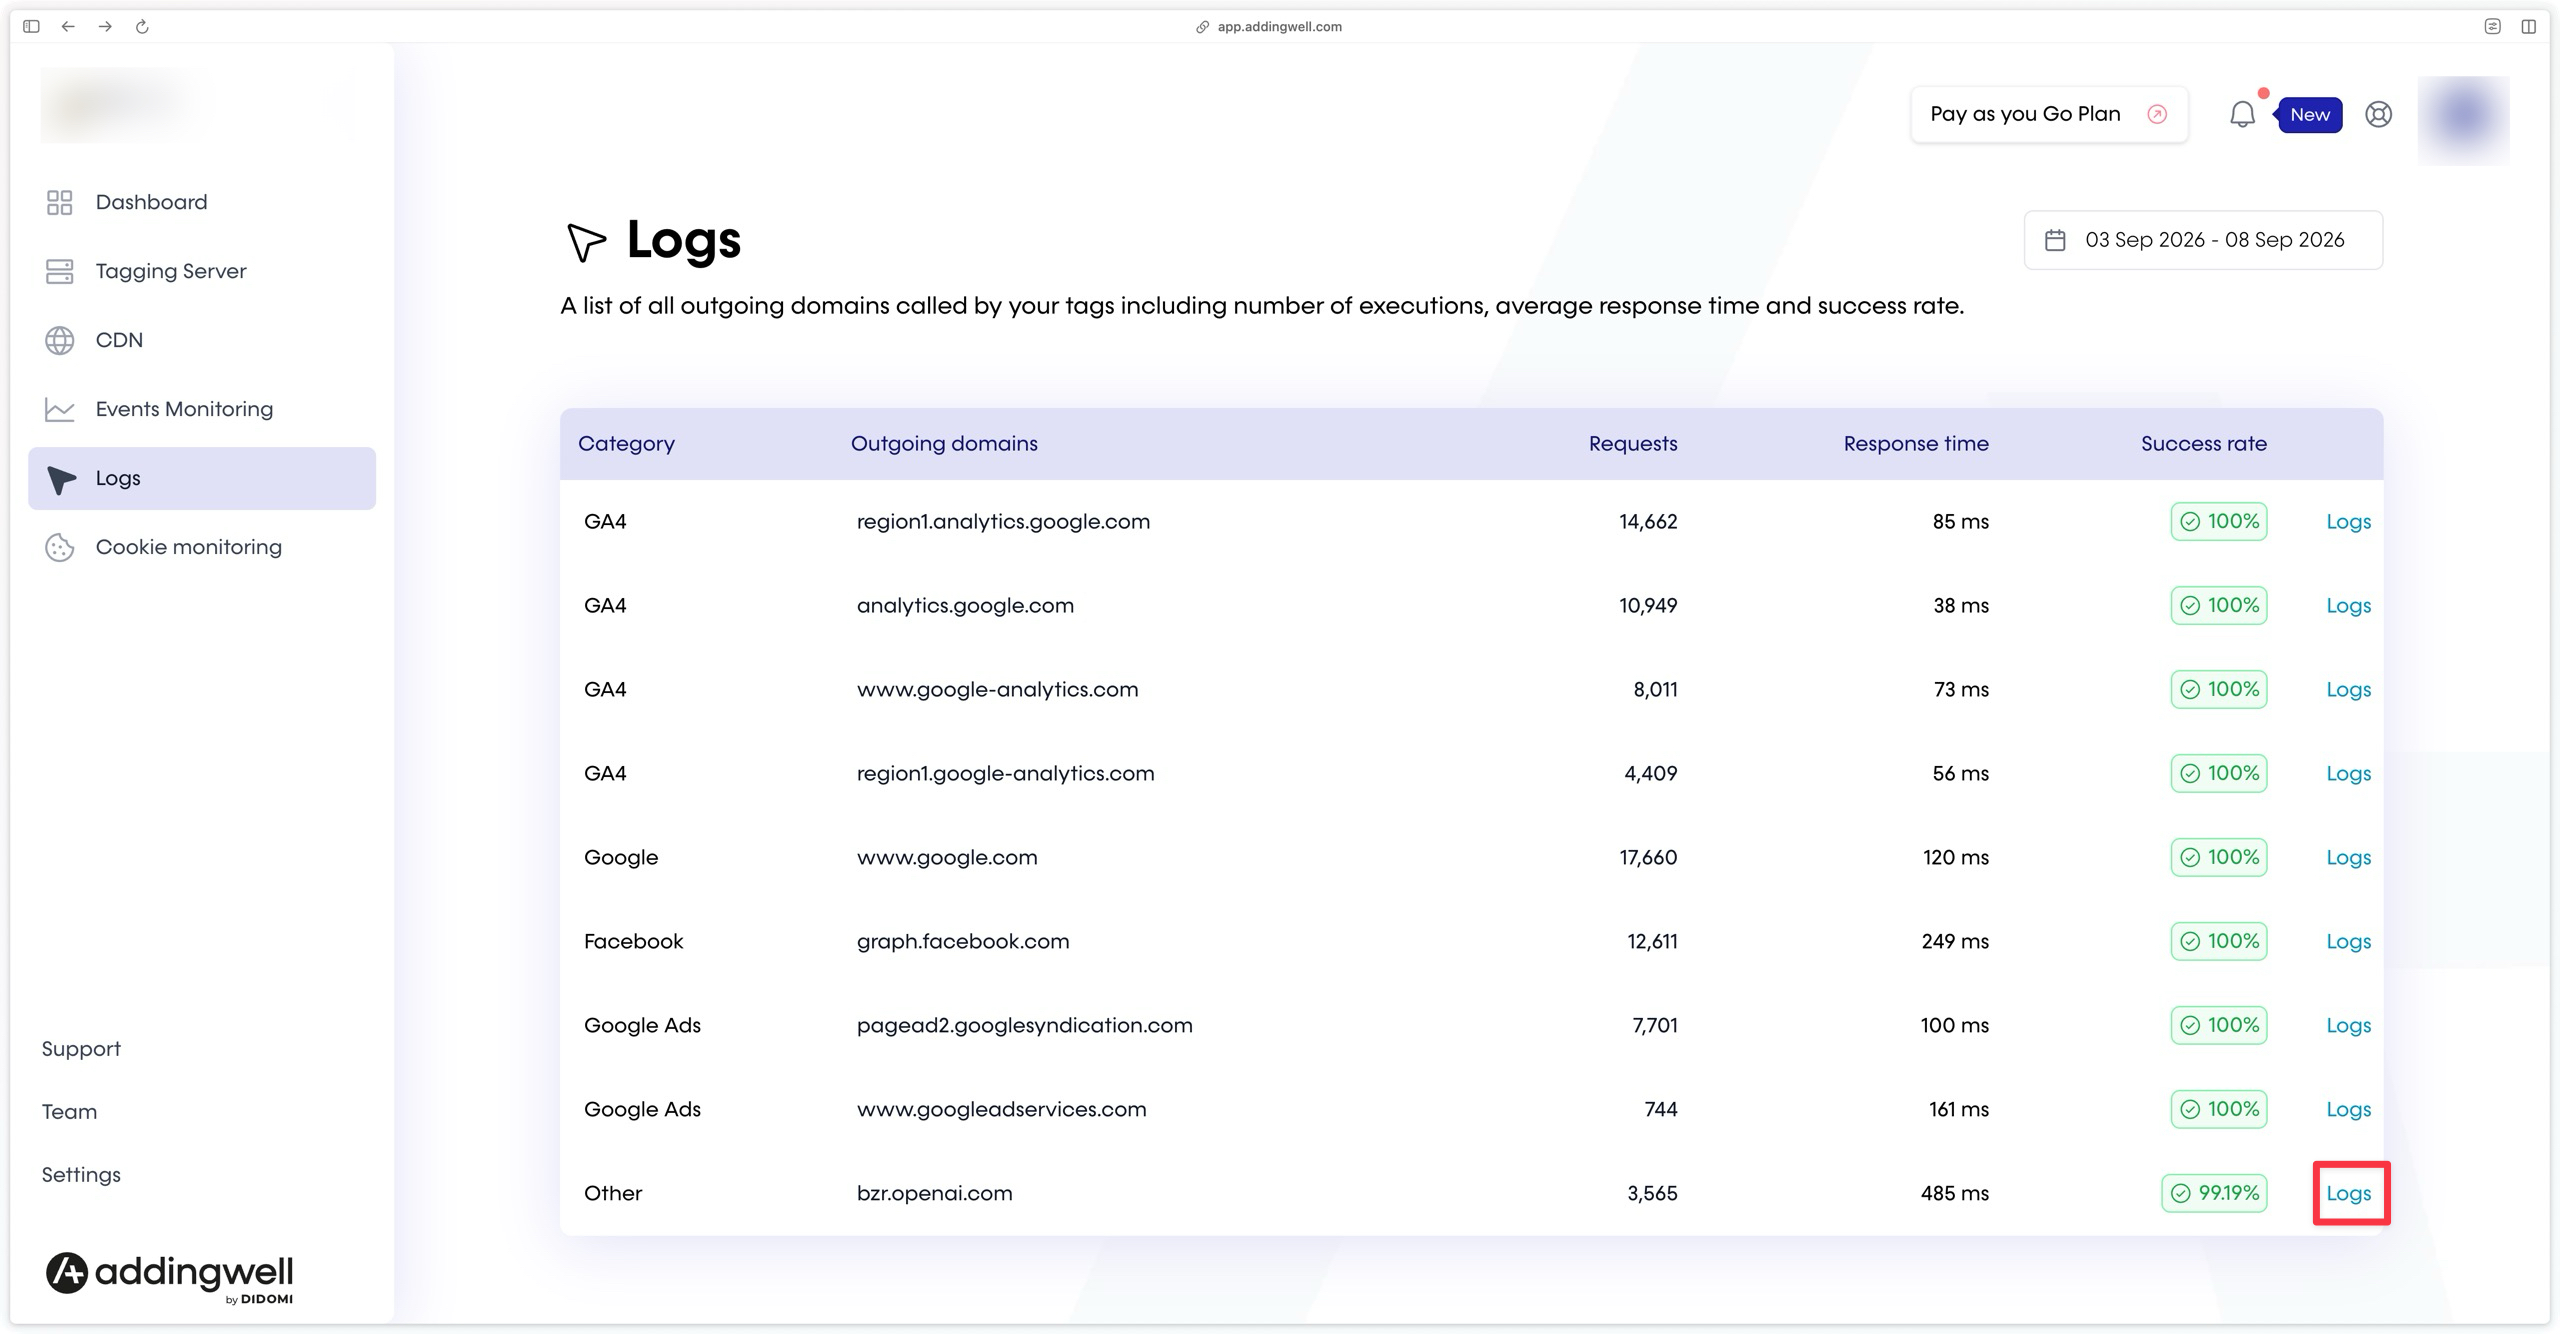
You will then see the failed requests, with the detail of the error message returned by OpenAI. The most frequent errors are a missing currency when an amount is sent, an invalid custom event name, or an authentication problem with the API key (which is the case here).
Checking data quality
Sending your conversion events to OpenAI is an important first step. You can go further by adding user data (email, phone number, first and last name, city, postal code, country) to these events. The tag normalizes and hashes them following OpenAI’s rules before sending, which allows OpenAI to match the received events to a real ChatGPT user.
This allows OpenAI to:
- Better attribute received conversions, by identifying those that would otherwise not have been linked to your ChatGPT Ads campaigns.
- Optimize your campaign performance, thanks to higher-quality user signals.
To follow our methodology on reliably sending user data server-side, see our dedicated documentation.
Addingwell side via Events Monitoring
Click the Events Monitoring menu in your Addingwell container. This screen displays all user data processed by your GA4 client and made available to your server-side events.
Take the purchase event as an example: by clicking the event name, you can check the parameters available for this specific event.
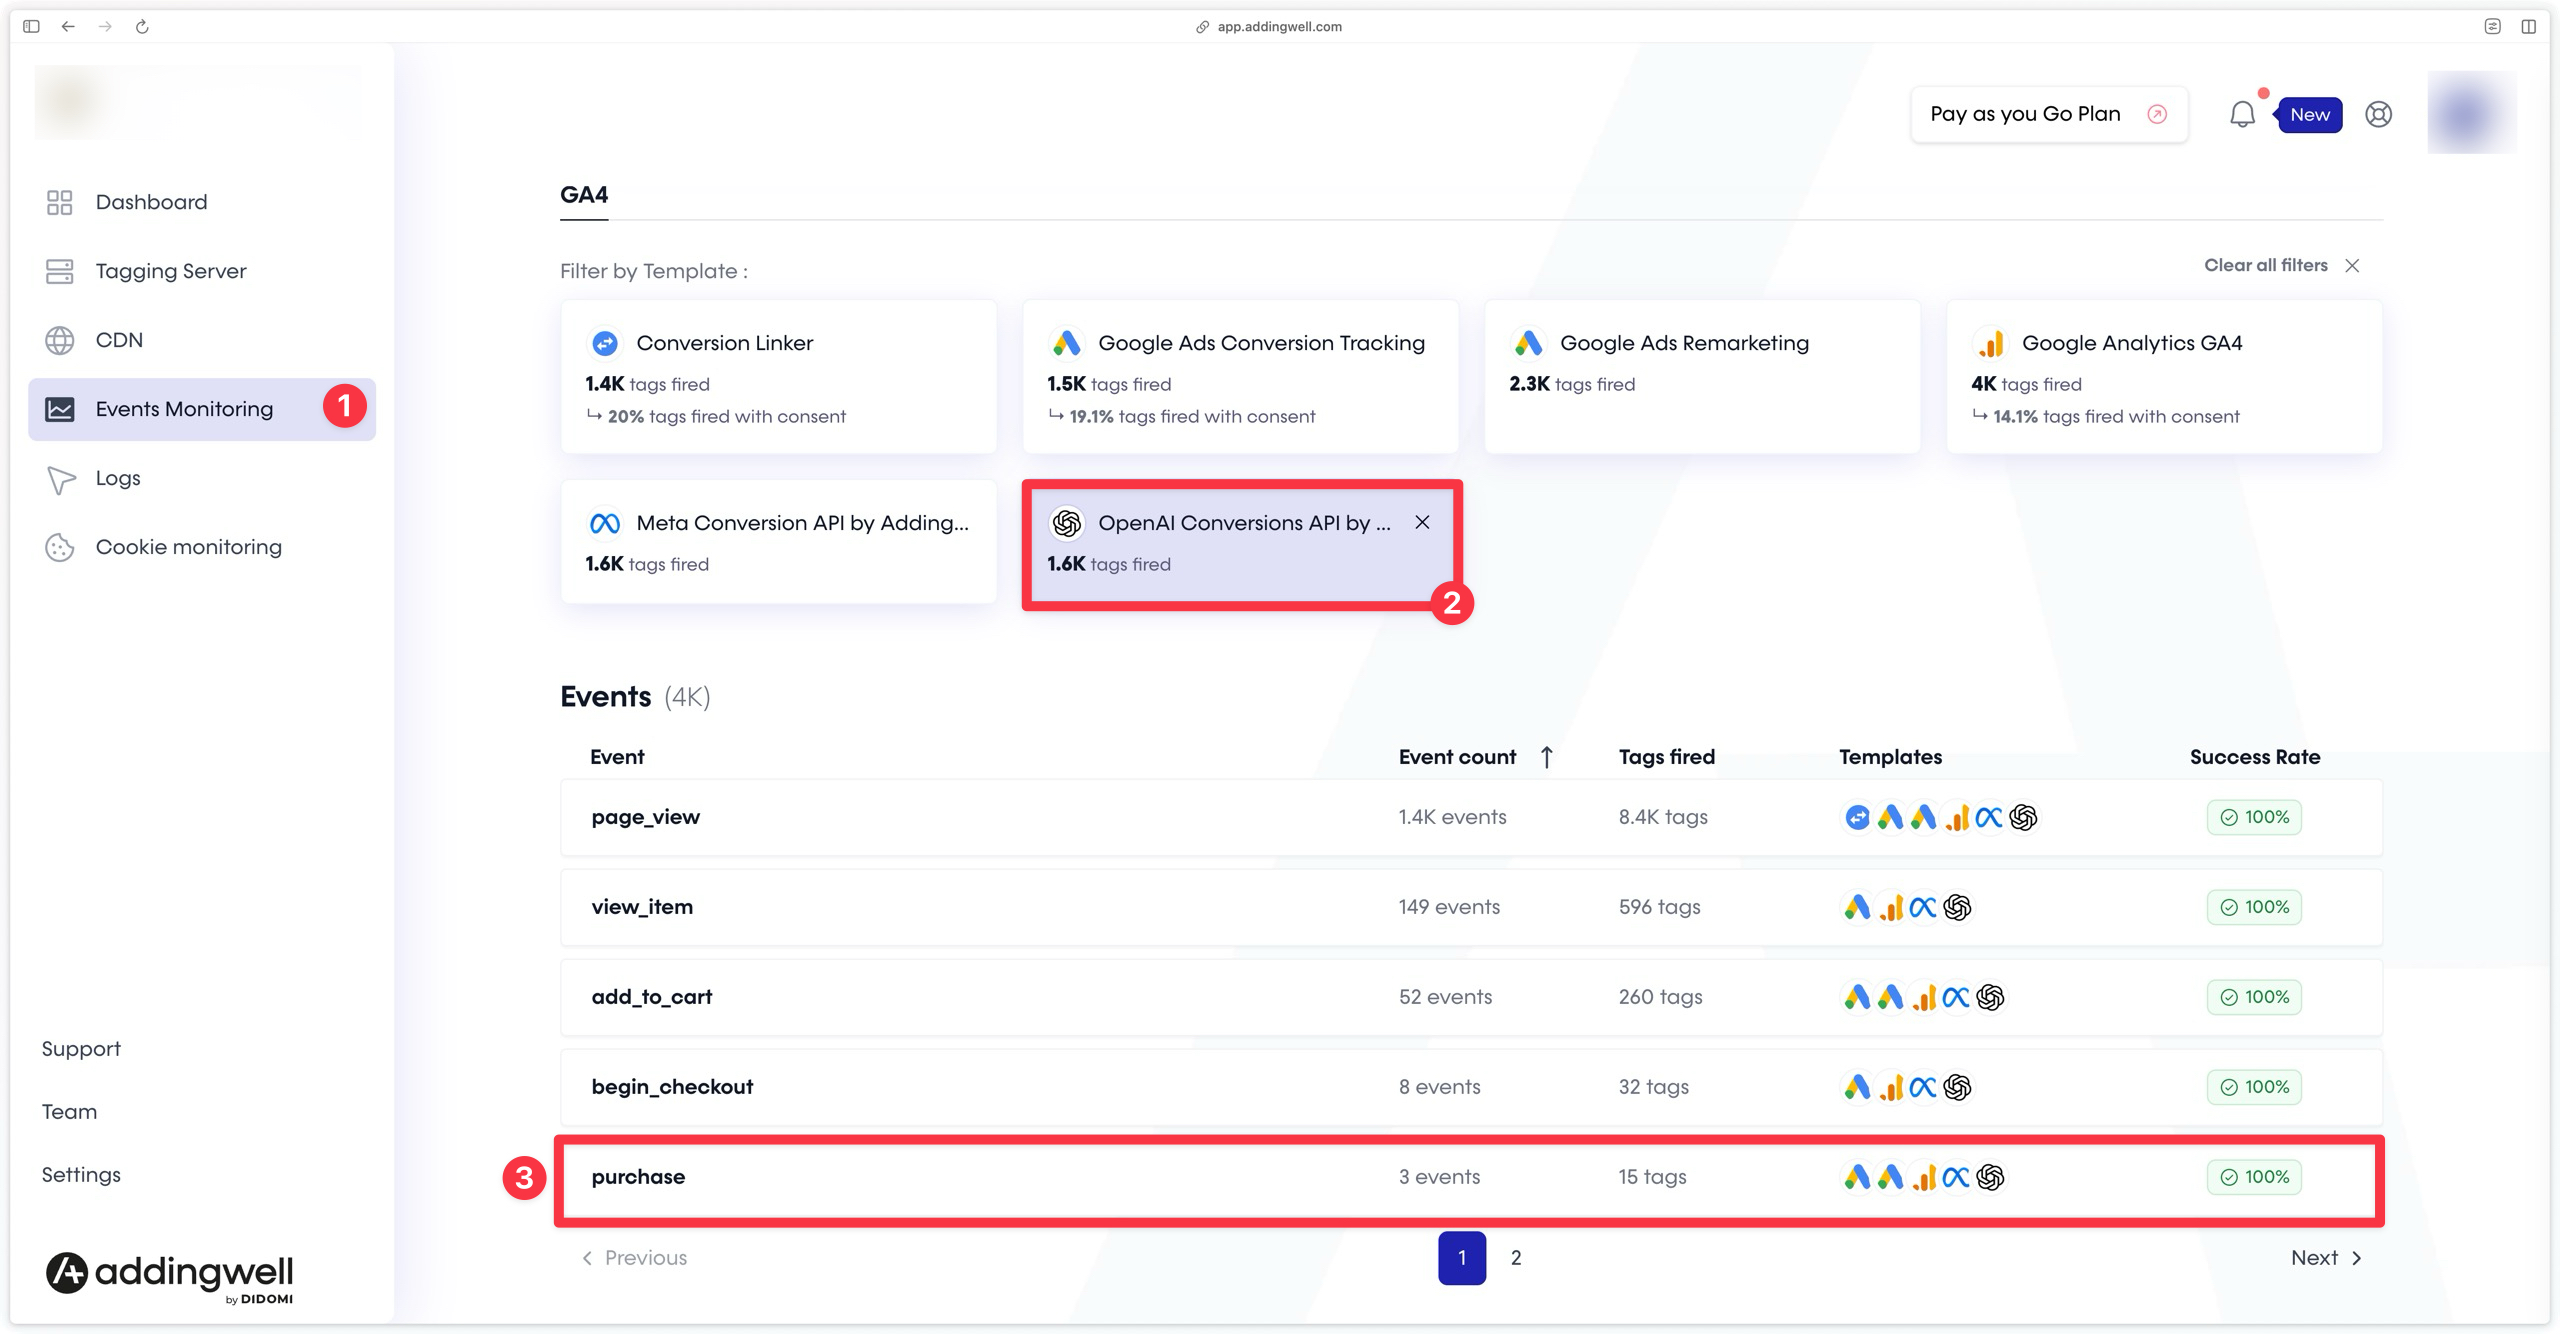
On this screen, you can see the presence rate of user data such as email in your purchase events, as well as the coverage rate of each parameter.
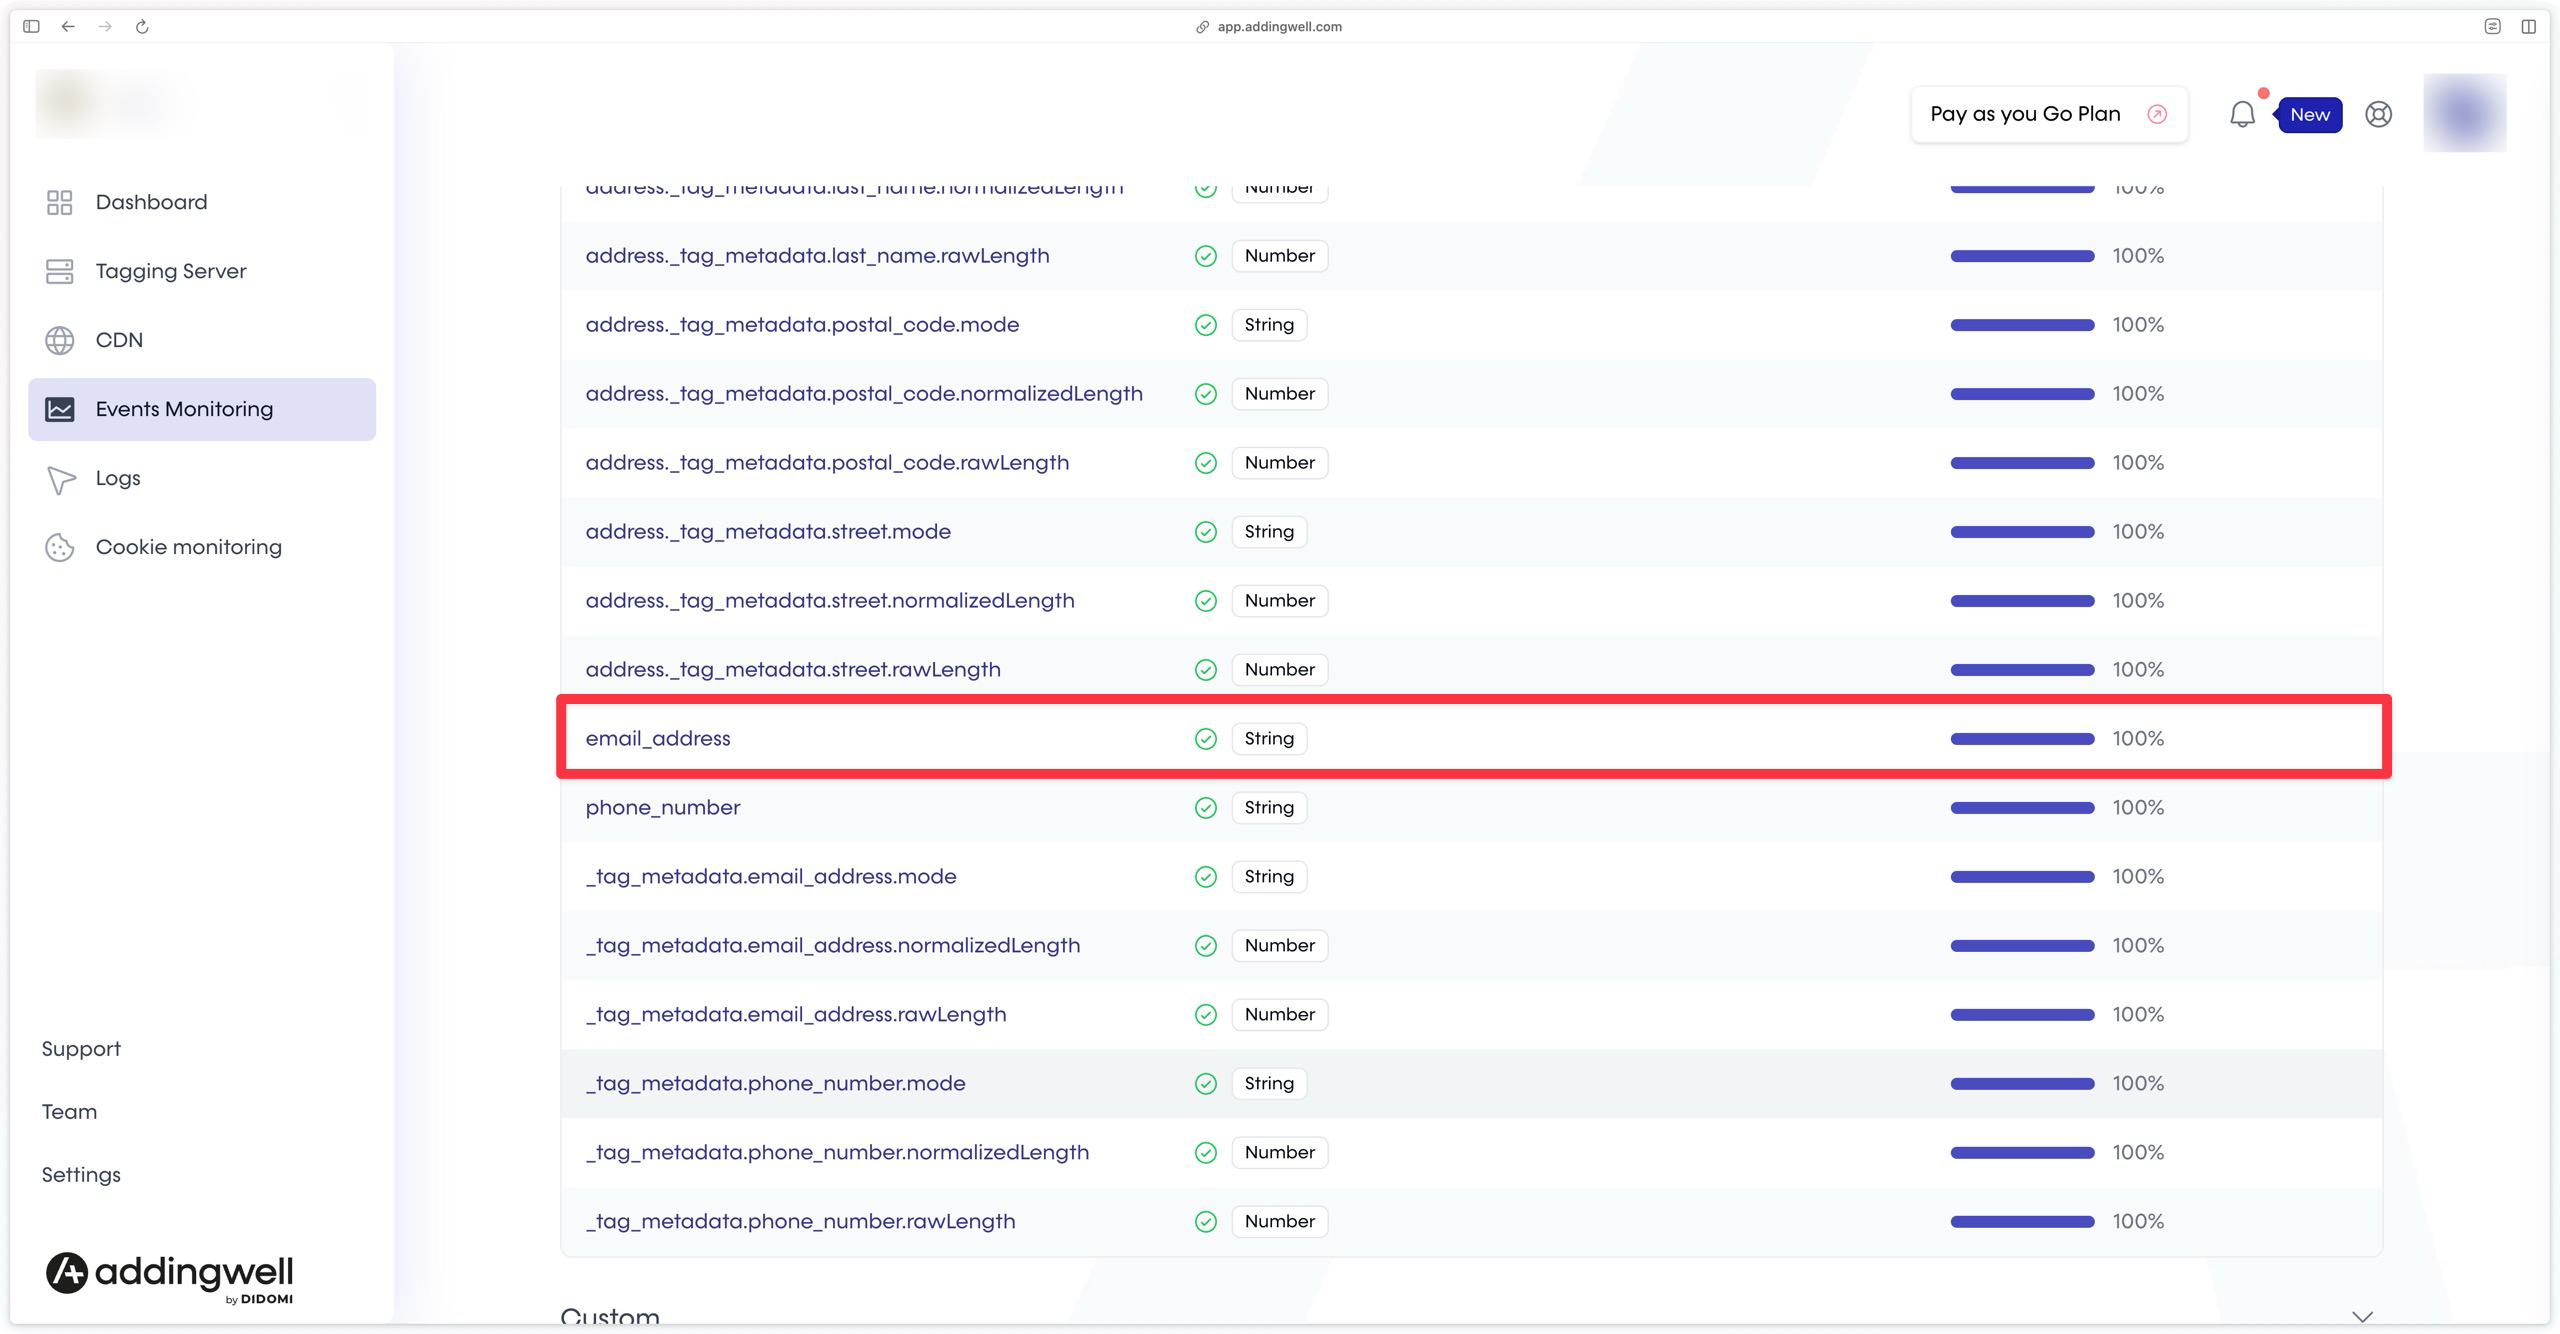
The data sent is of good quality when events contain the user information expected and available at this stage of the customer journey.
Congratulations
You have completed the OpenAI Conversions API configuration and verified that your events are properly sent to OpenAI and correctly deduplicated.
If you encountered any issues during these steps, feel free to contact our support team.