Google Ads & DV360 Customer Match audiences with Data Manager API
What is Data Manager API?
Data Manager API is a unified API created by Google to help advertisers connect and leverage their first-party data (CRM, point of sale, internal database, etc.) across all of Google’s advertising products.
You may already know this API for sending offline conversions. It also lets you feed your customer lists (Customer Lists, the Customer Match feature) in Google Ads and Display & Video 360, server-to-server, directly from your GTM Server container.
In practice, the Data Manager API Audiences by Addingwell tag lets you add or remove members from a customer list using first-party identifiers (email, phone, postal address, user ID, mobile ID).
What you will do in this tutorial
Here are the 6 main steps you will follow to feed your audiences through Data Manager API from your GTM Server container:
- Authentication: add the Addingwell service account to Google Ads and/or Display & Video 360
- Tag import: import the Addingwell Data Manager API Audiences template into GTM Server
- Tag configuration: set up the destination customer lists (Google Ads and/or DV360)
- Measurement Protocol client: receive offline requests on the server side
- Trigger: fire the tag on the right client/event
- Verify the data: check that the data flows into GTM Server, then into Google Ads/DV360
Why use Data Manager API for your audiences?
Feeding your Customer Match lists through Data Manager API brings several major benefits:
- Always up-to-date audiences: your lists are synchronized automatically from your CRM or your CDP, in real time or in batch, without manually exporting and importing CSV files in the Google Ads interface.
- Targeting based on your first-party data: Customer Match lets you retarget your existing customers, build similar audiences, exclude your customers from acquisition campaigns, or customize your bids for your most strategic segments.
- A single API for several destinations: one request can feed a Google Ads list and a Display & Video 360 list at the same time.
- List removal management: the tag also handles the removal of members, which is essential to honor unsubscribes and erasure requests from your users (GDPR).
- Privacy compliance: personal data (PII) is hashed (SHA-256) before sending, and the server-side architecture gives you full control over what is passed to Google.
To feed your customer lists, you may currently be using the Customer Match feature of the Google Ads API (offline user data jobs ). Data Manager API is the successor to that approach, and we strongly recommend migrating to this new solution.
Use cases
Implementing the Data Manager API Audiences tag from your GTM Server container addresses 3 main use cases.
1. Sync your CRM segments with your customer lists
This is the historical Customer Match use case: your CRM or your Customer Data Platform (CDP) segments your contacts (VIP customers, abandoned carts, customers inactive for 12 months, etc.) and sends those segments to the GTM Server container, in real time or in batch (once a day, for example).
The Data Manager API Audiences tag then adds the members to the matching customer lists in Google Ads and/or DV360. Thanks to the tag’s batch mode, a single request can contain up to 10,000 members.
2. Add a user to a list when an event occurs
You can also feed your lists in real time, at the moment an event occurs: a newsletter sign-up, an account creation, a first purchase, and so on.
Your source system (website, back end, CRM) sends the event to the GTM Server container, and the tag immediately adds the user to the configured customer list.
3. Remove users from a list
The tag offers a Remove from Customer List action that removes a member from a list: unsubscribe, advertising opt-out, GDPR deletion request, or simply leaving a segment (for example a customer who becomes active again and leaves the “inactive” list).
Preparing the Data Manager API Audiences project
The technical setup on the server side is relatively simple, there is only one tag to configure in your GTM Server container. The real complexity of the project lies in getting the data to your server endpoint through the measurement protocol standard for building requests.
Here is a (non-exhaustive) list of questions to ask yourself upfront to prepare your project and make it successful:
- Is the system that hosts the data (CRM, CDP, database, etc.) able to send an HTTP request to the GTM Server container?
- Do I want to feed my lists in real time (member by member) or in batch (up to 10,000 members per request)? Is my source system able to do one, the other, or both?
- Which identifiers are available for each member (email, phone, full postal address, user ID, mobile ID)? The more numerous and the better quality the identifiers, the better the match rate of your lists.
- How do I handle my users’ consent and the acceptance of the Customer Match terms of service ?
- How do I handle list removals (unsubscribes, GDPR requests)?
Prerequisites
Before implementing the Data Manager API Audiences tag, make sure you have:
- A GTM Server container configured and running (on Addingwell or on your own infrastructure).
- A Google Ads account eligible for Customer Match and/or a Display & Video 360 advertiser.
- A customer list created in Google Ads (Tools → Shared library → Audience manager → Your data segments) and/or in DV360 (Audiences).
- Accepted the Customer Match terms of service in your advertising account.
Authentication with Data Manager API
To let your GTM Server container communicate with Data Manager API, you need to configure authentication with your Addingwell service account.
Retrieve the service account in Addingwell
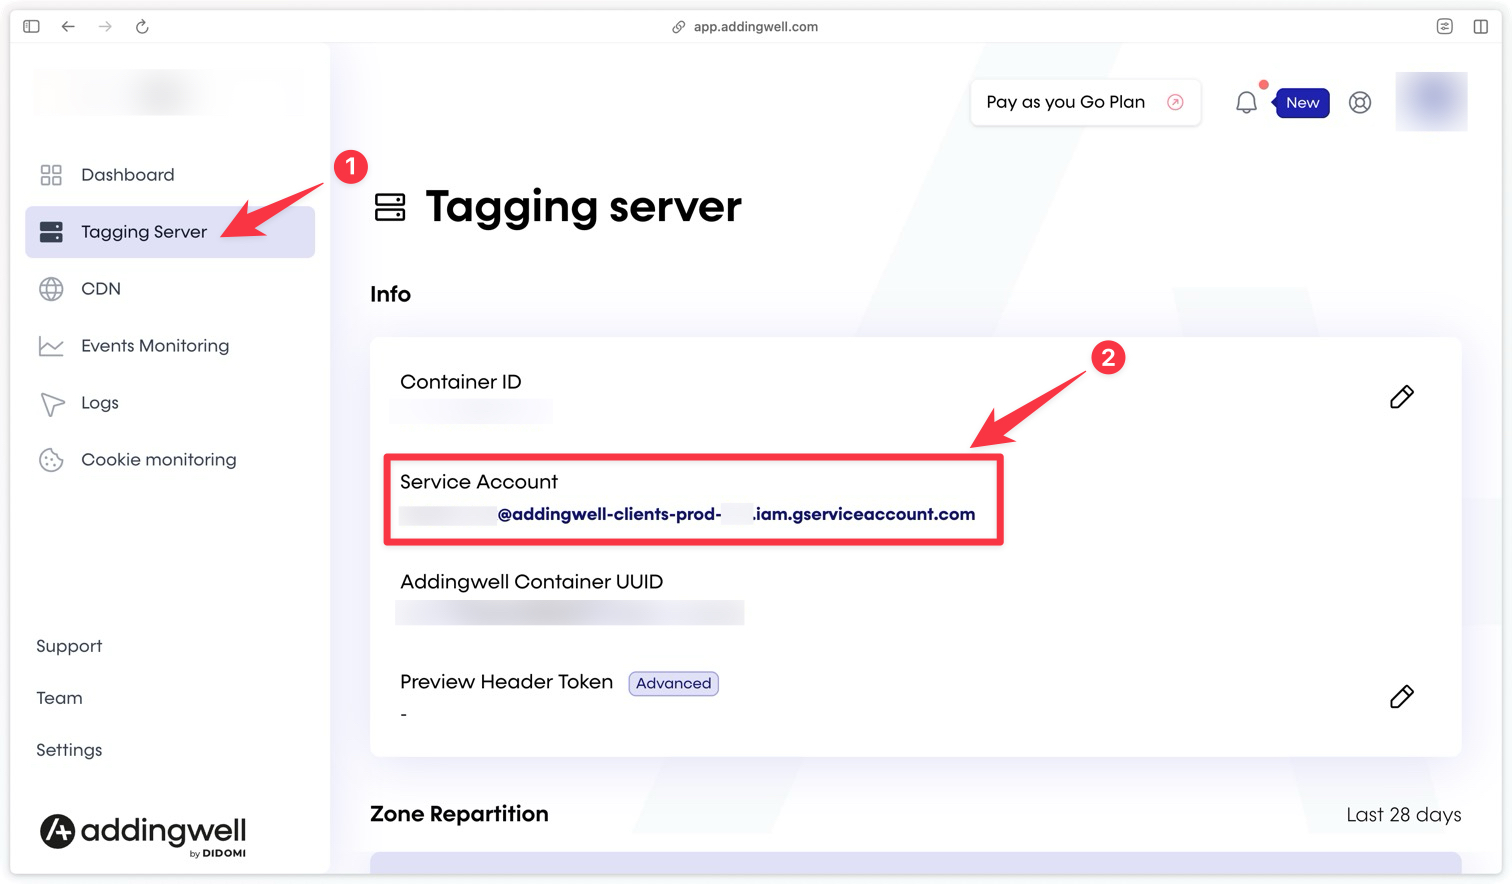
Go to your Addingwell container, click the Tagging Server menu, then copy the service account.
The service account is a technical account (an email address of the form …@….iam.gserviceaccount.com) that your GTM Server container uses to authenticate with Google. It is this identity, and not your personal account, that will feed your customer lists: you therefore need to authorize it explicitly in your account.
Add the service account to Google Ads
This step is only required if you want to feed Google Ads customer lists.
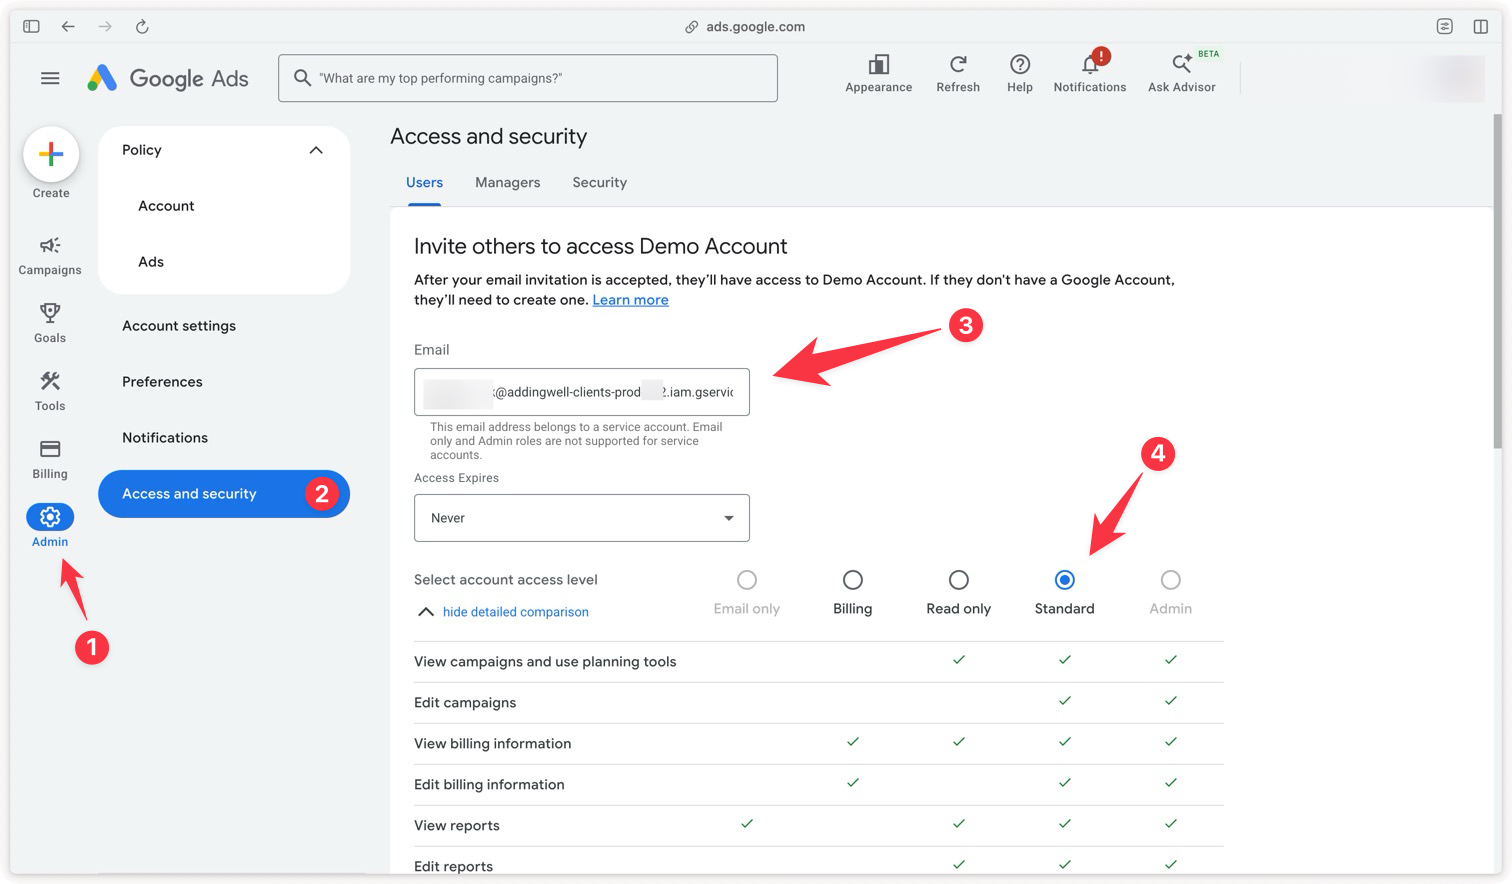
Once you have the service account email address, go to Admin → Access and security in your Google Ads account, click the + button, paste the service account address and give it the Standard role. This role is required to authorize customer list changes; read-only access would not be enough. Access is effective immediately, no email validation is required on the service account side.
Add the service account to Display & Video 360
This step is only required if you want to feed Display & Video 360 customer lists.
Once you have the service account email address, go to the user access settings of your DV360 advertiser (Settings → Users), add the service account address and give it a Standard role on the advertiser that owns the customer list.
Setting up Data Manager API Audiences
Import the tag into GTM Server
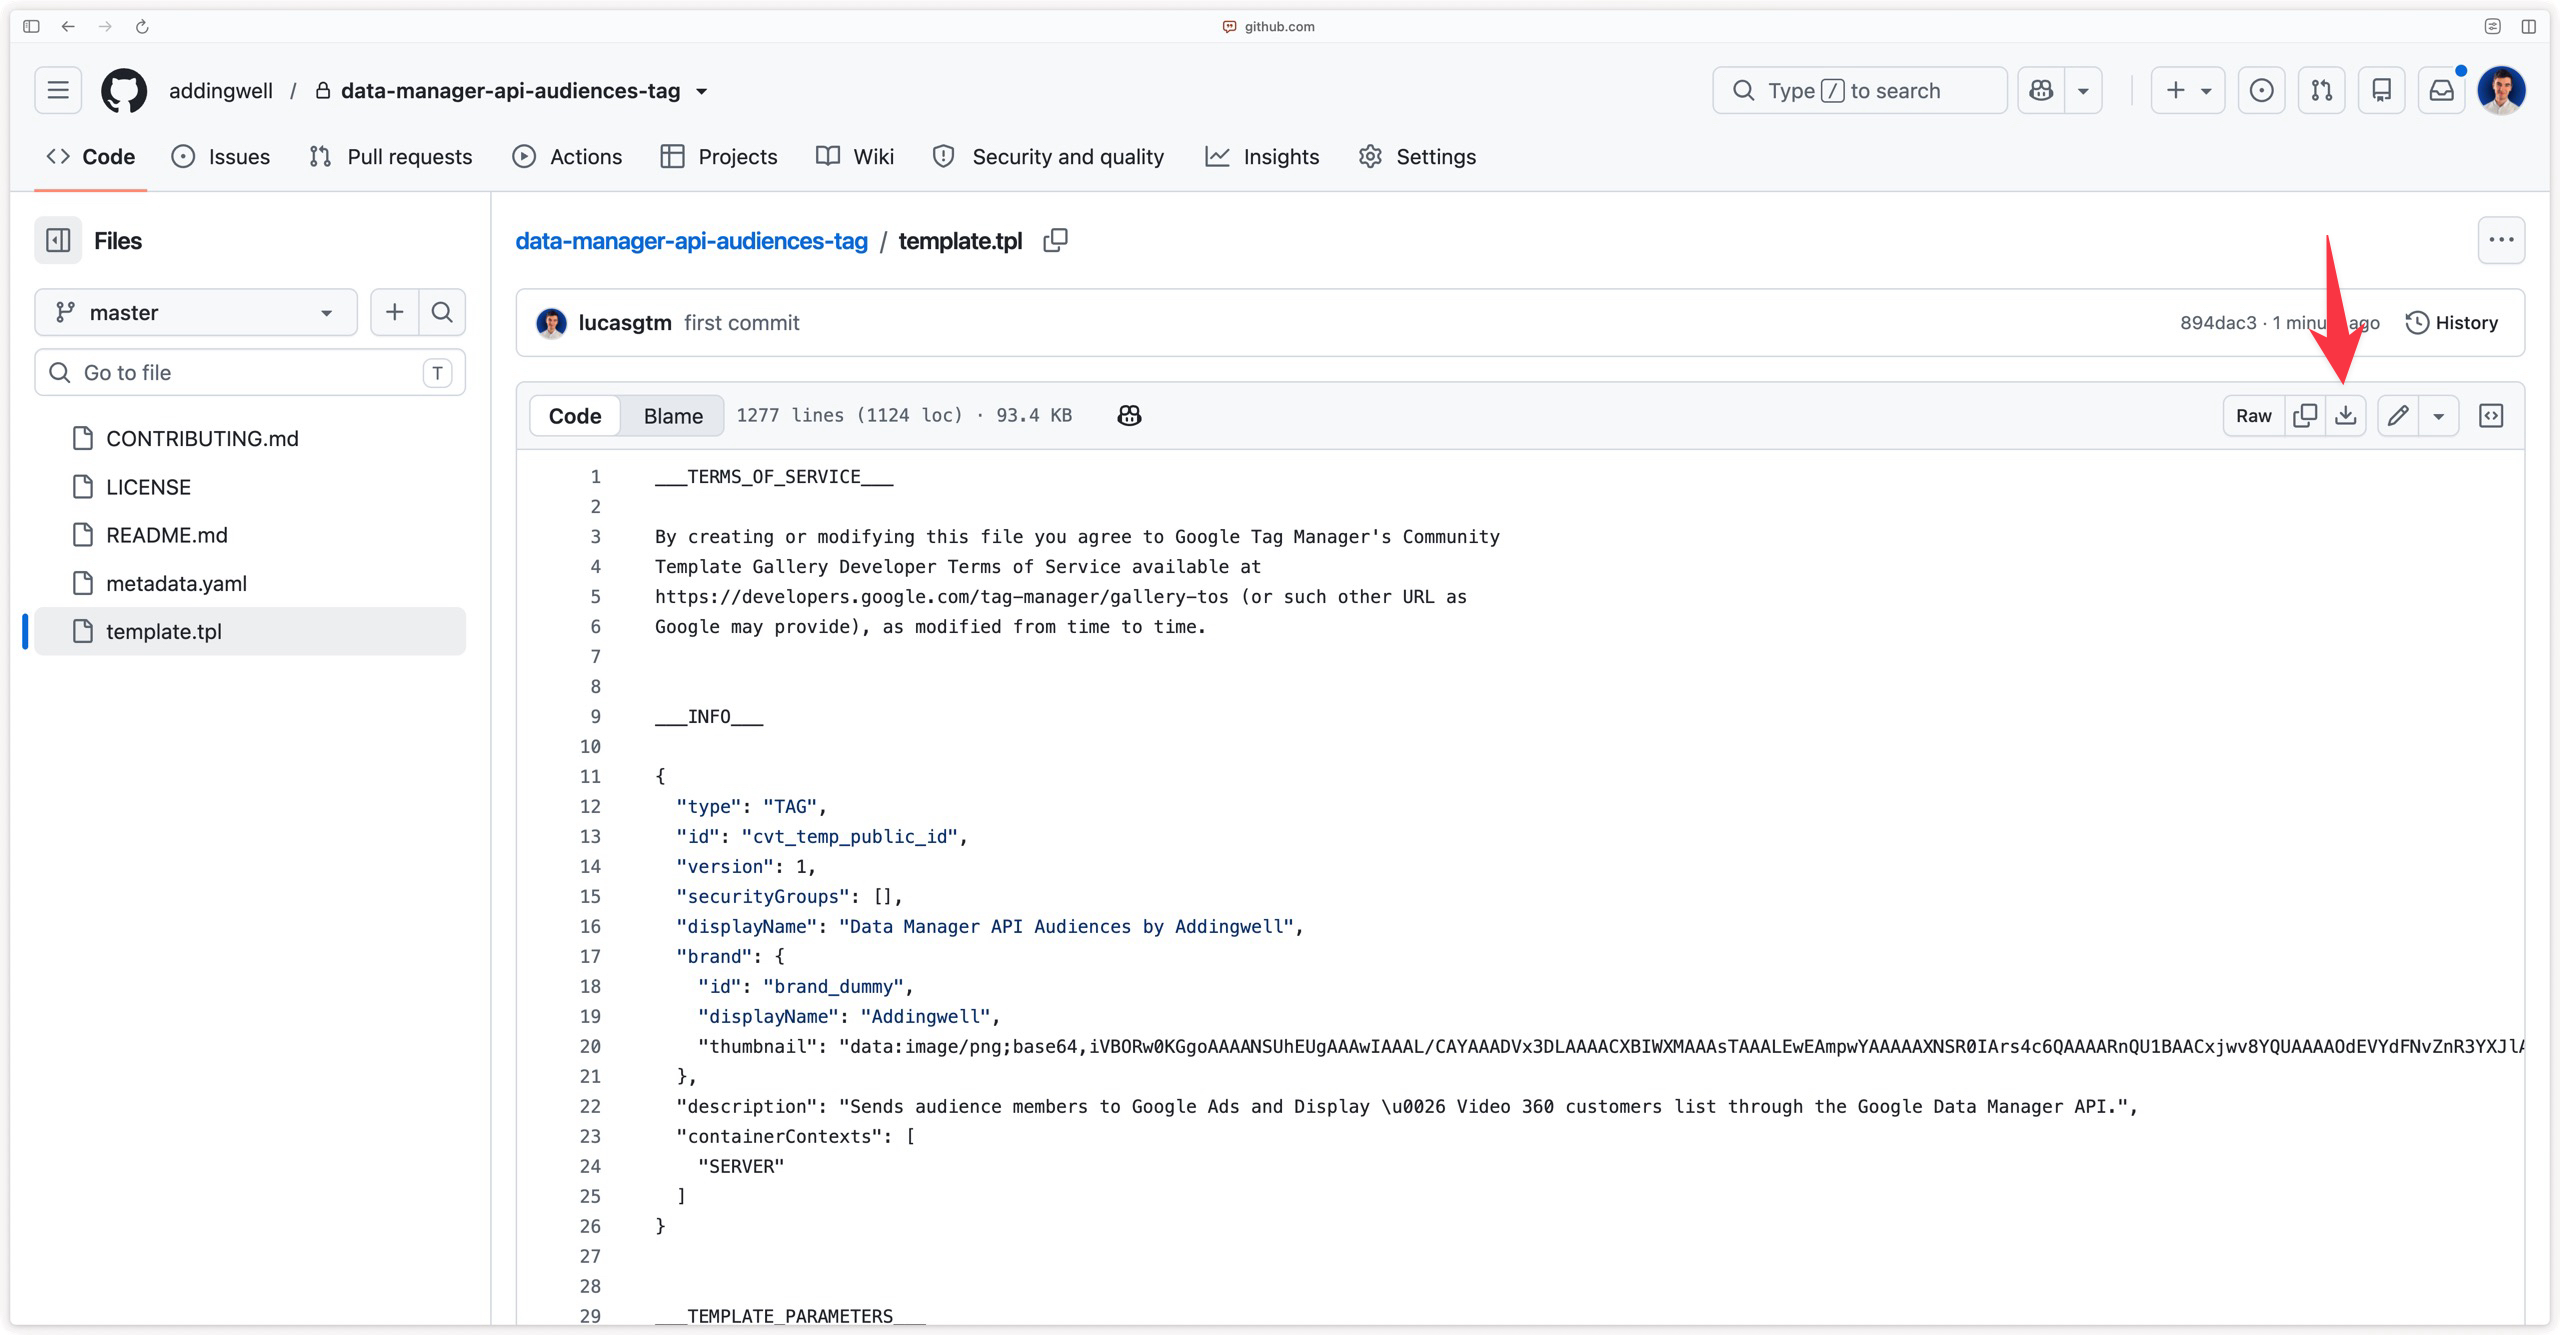
Click here to download the Data Manager API Audiences tag, then click the download icon to get the file.
The Data Manager API Audiences tag is not available in the GTM template gallery for now: it is a template maintained by Addingwell that you need to import manually into your container. The template.tpl file you download contains the entire tag, both the configuration interface you will see in GTM and the logic that sends the data to Data Manager API.
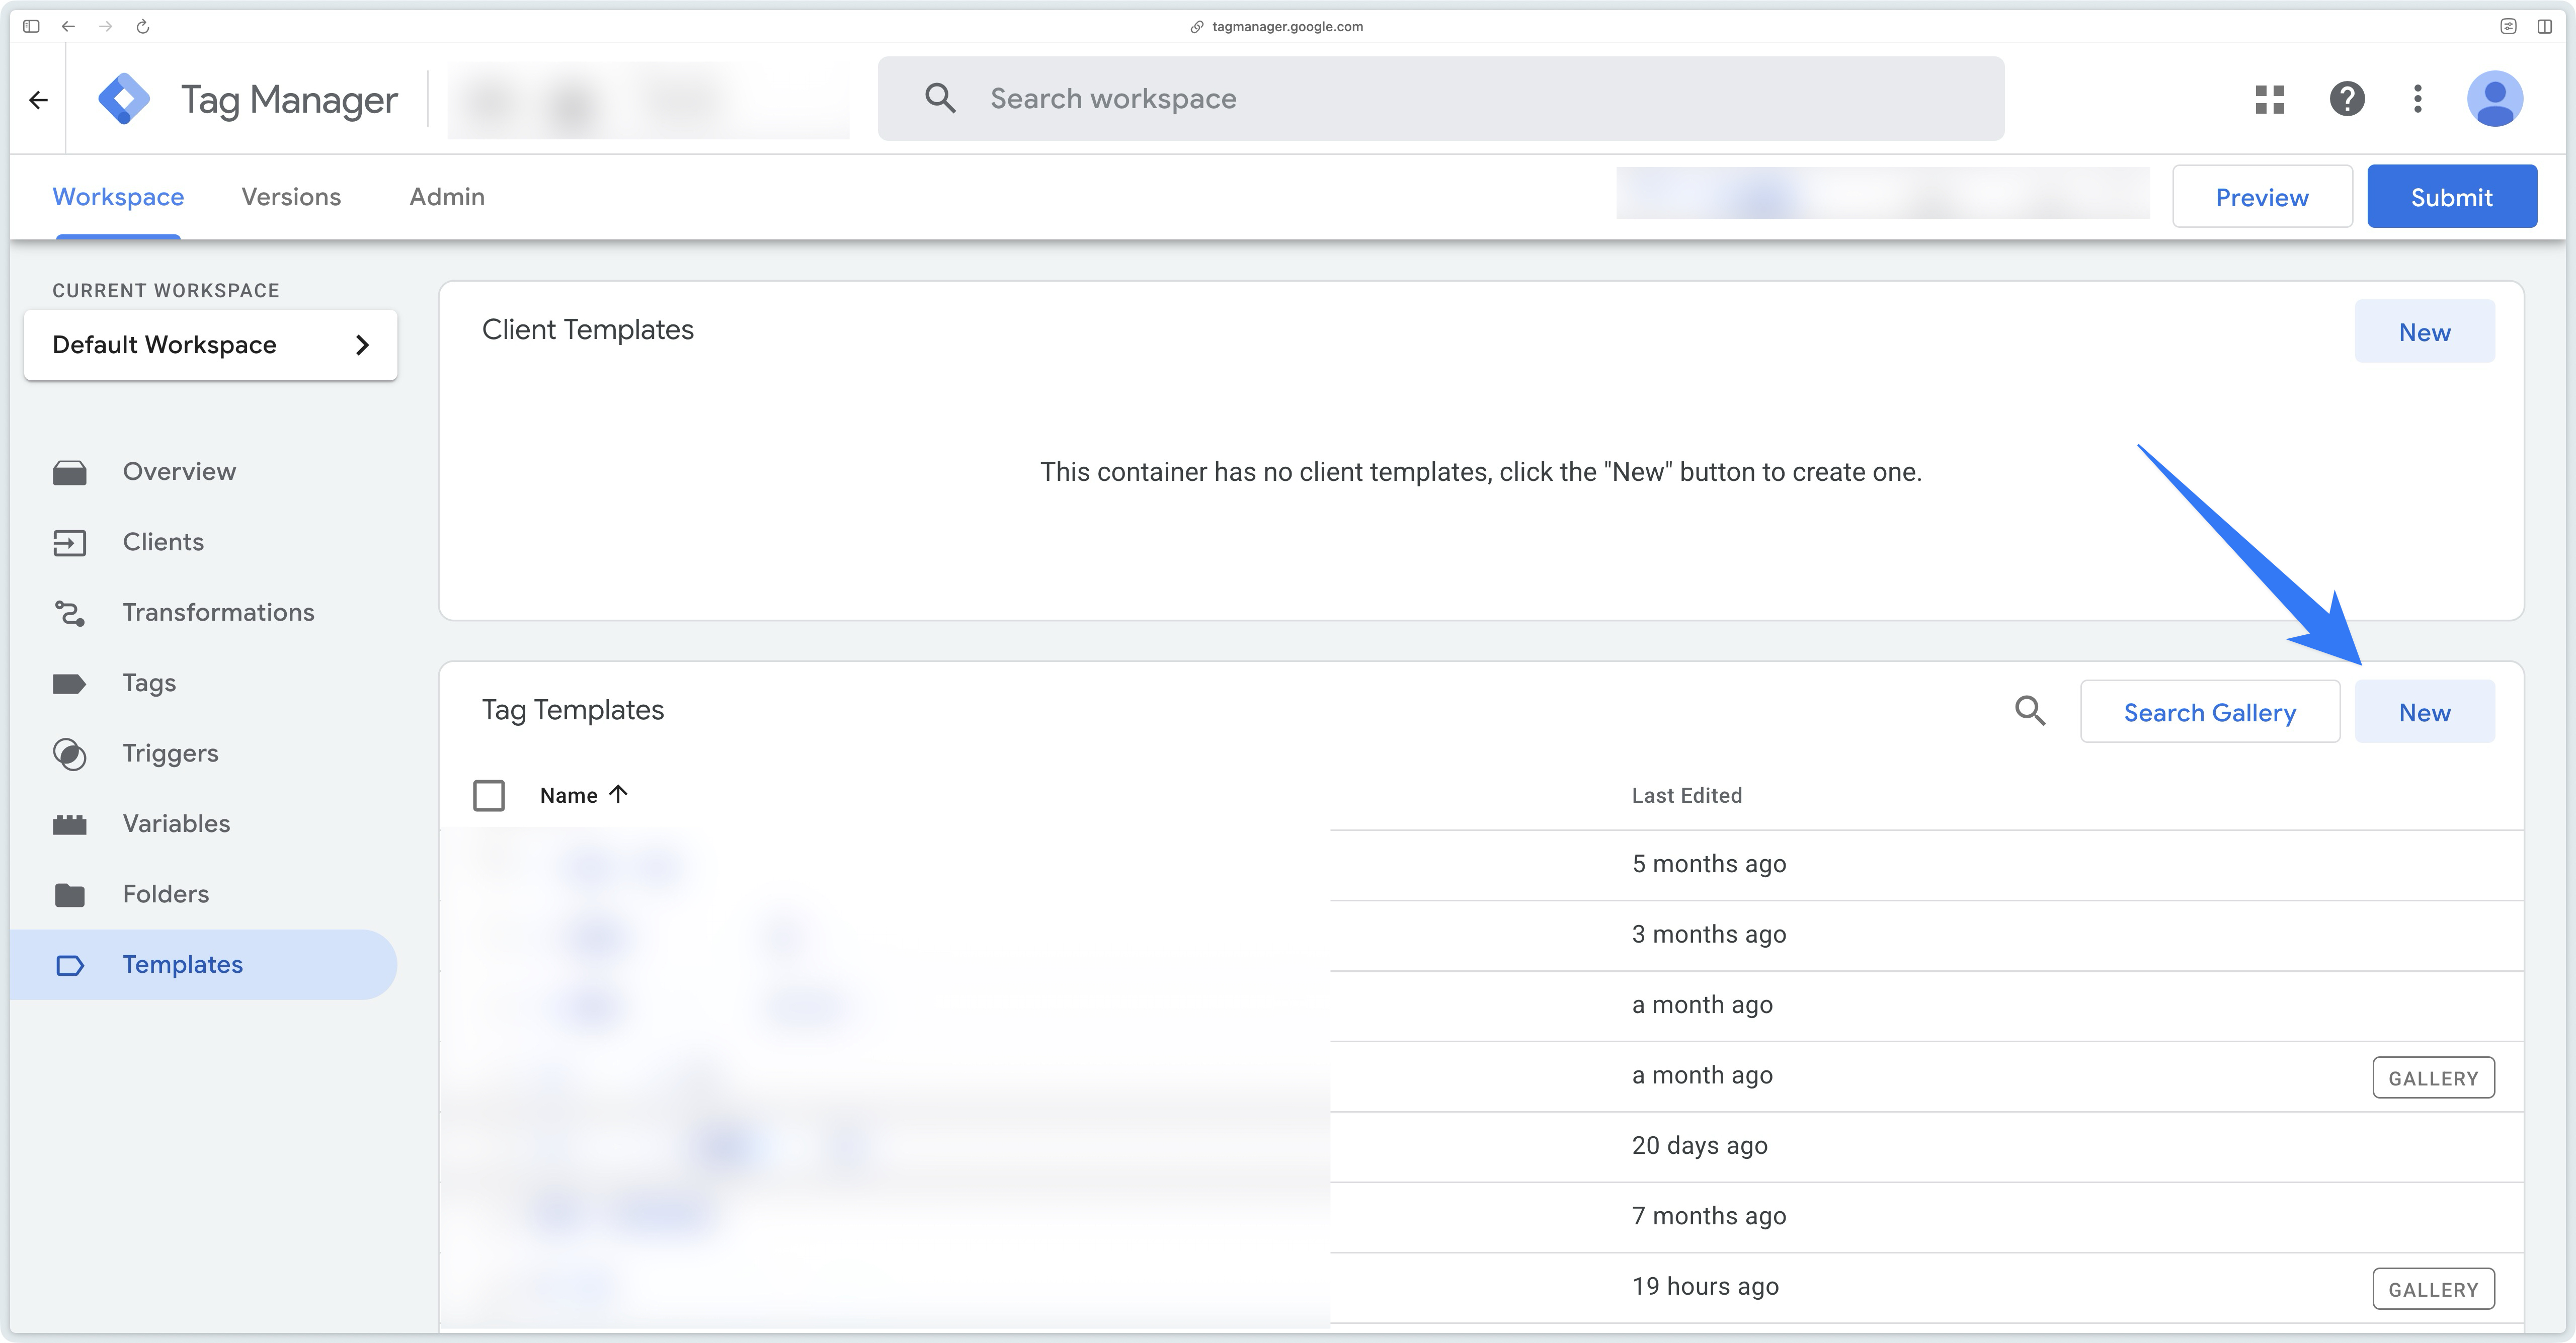
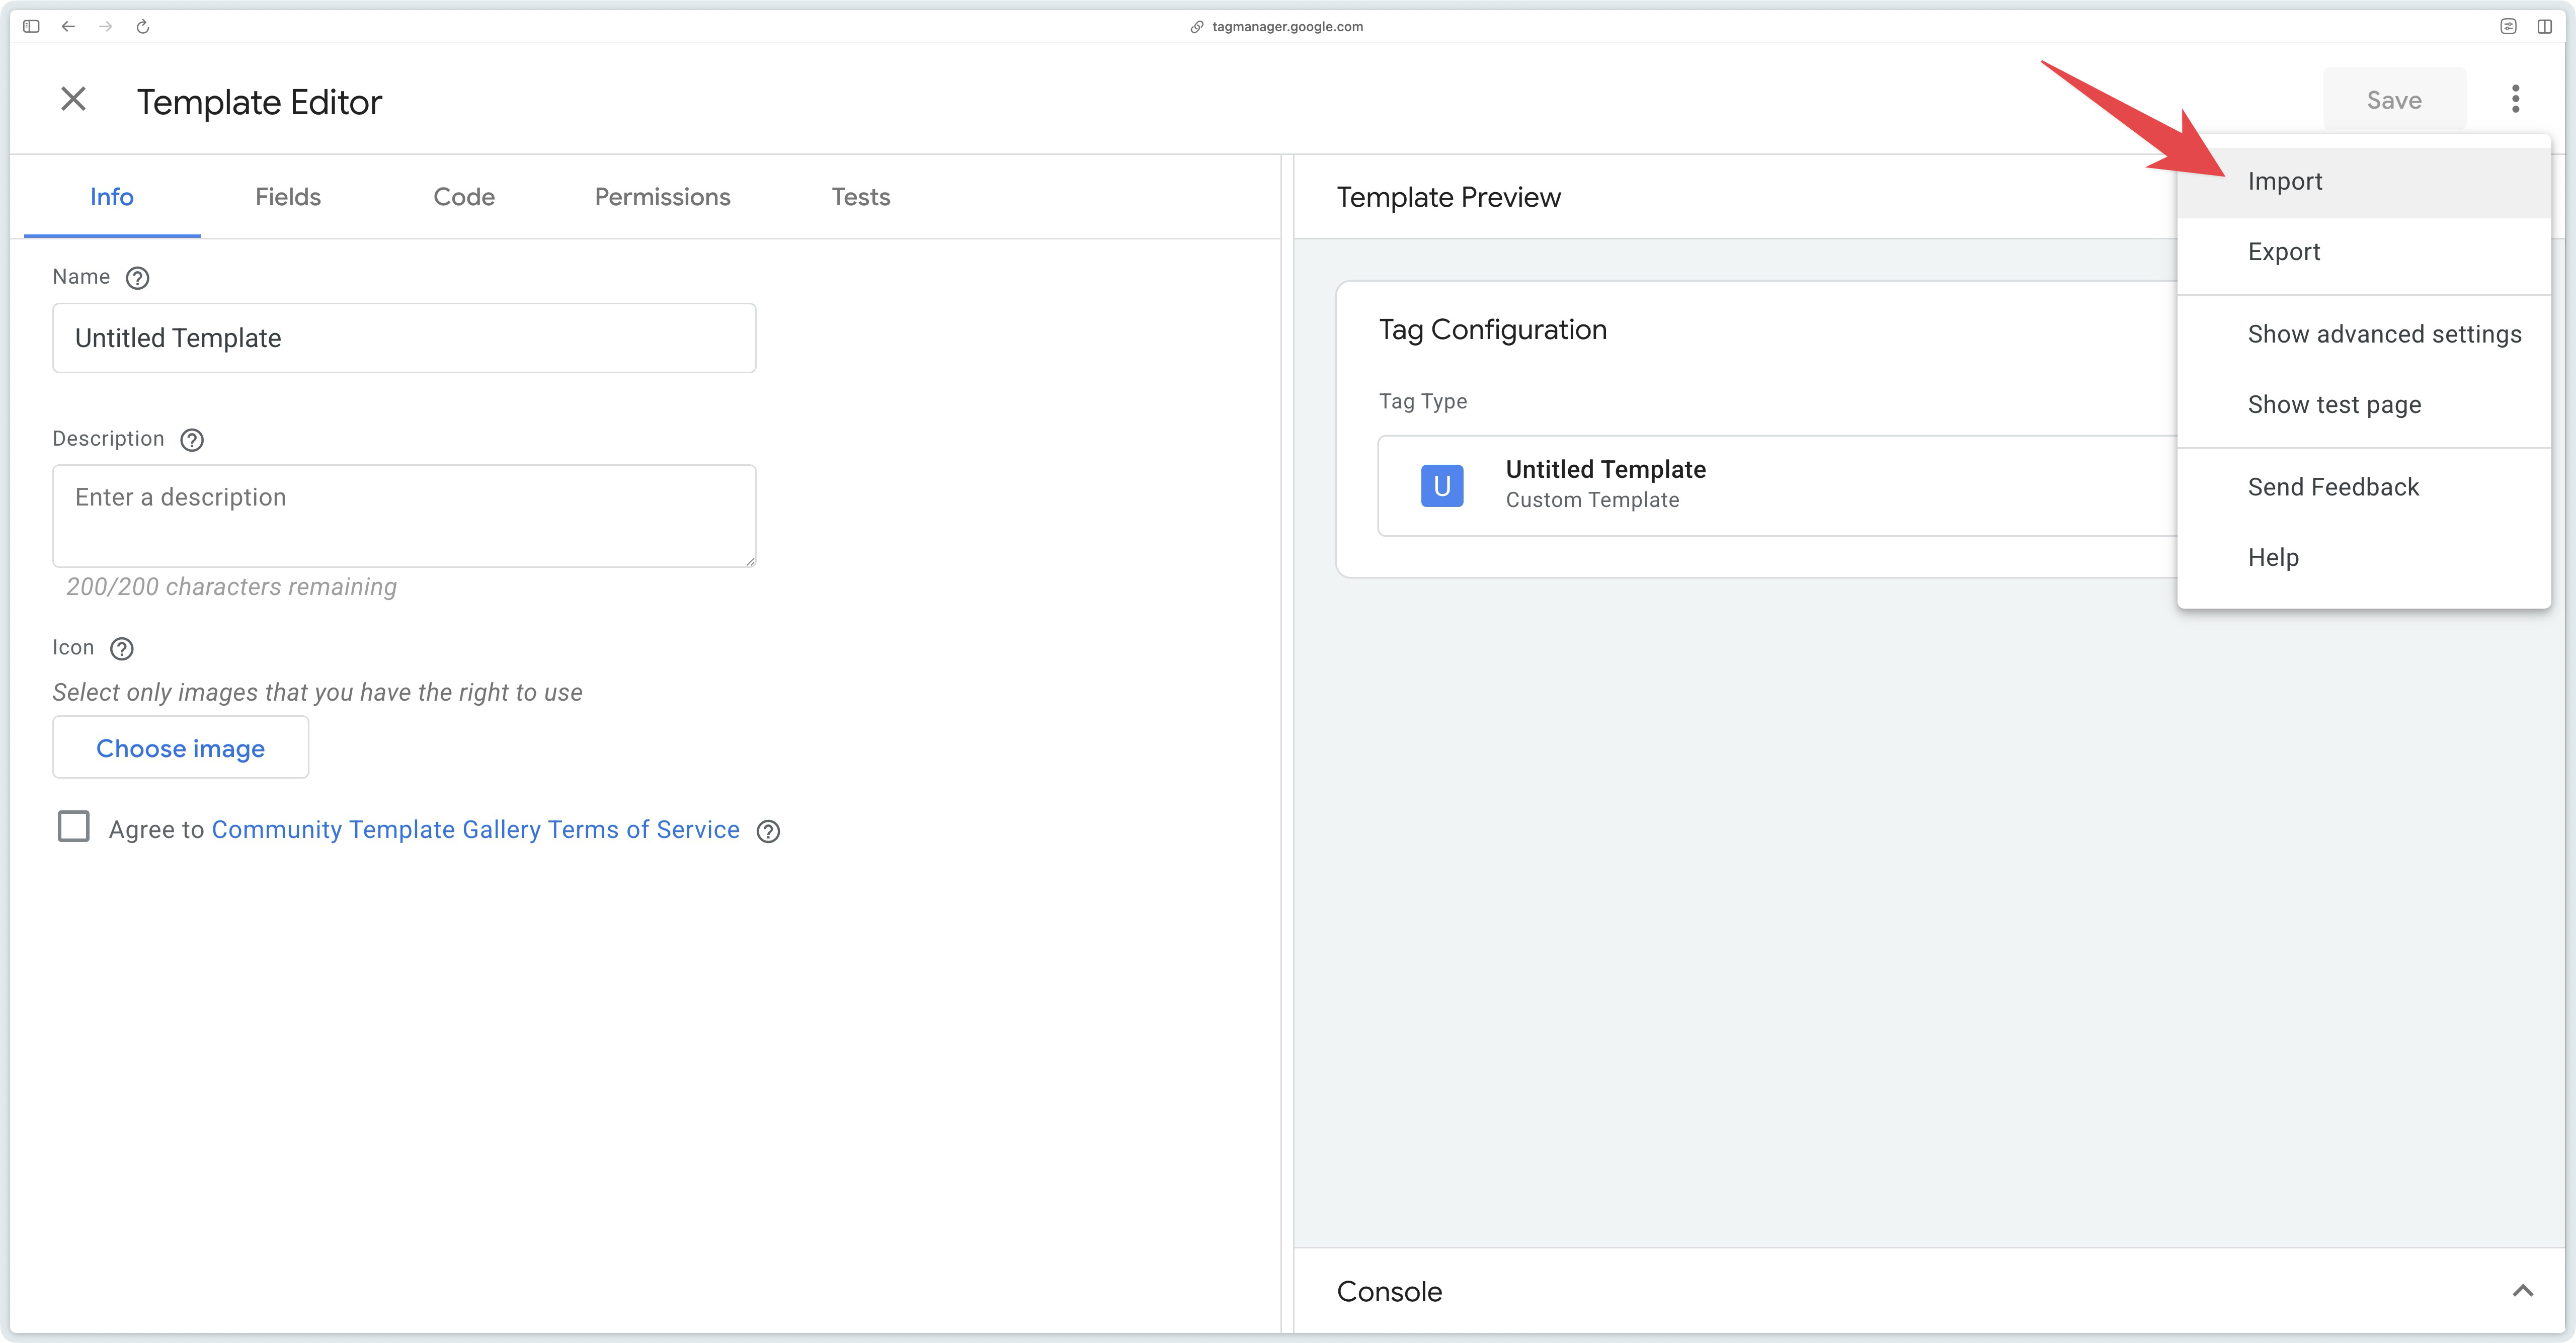
Next, go to the Templates section of your server container, and under Tag templates, click New.
Then click the three-dot menu in the top right and select Import.
Select the template.tpl file you just downloaded, then click Save.
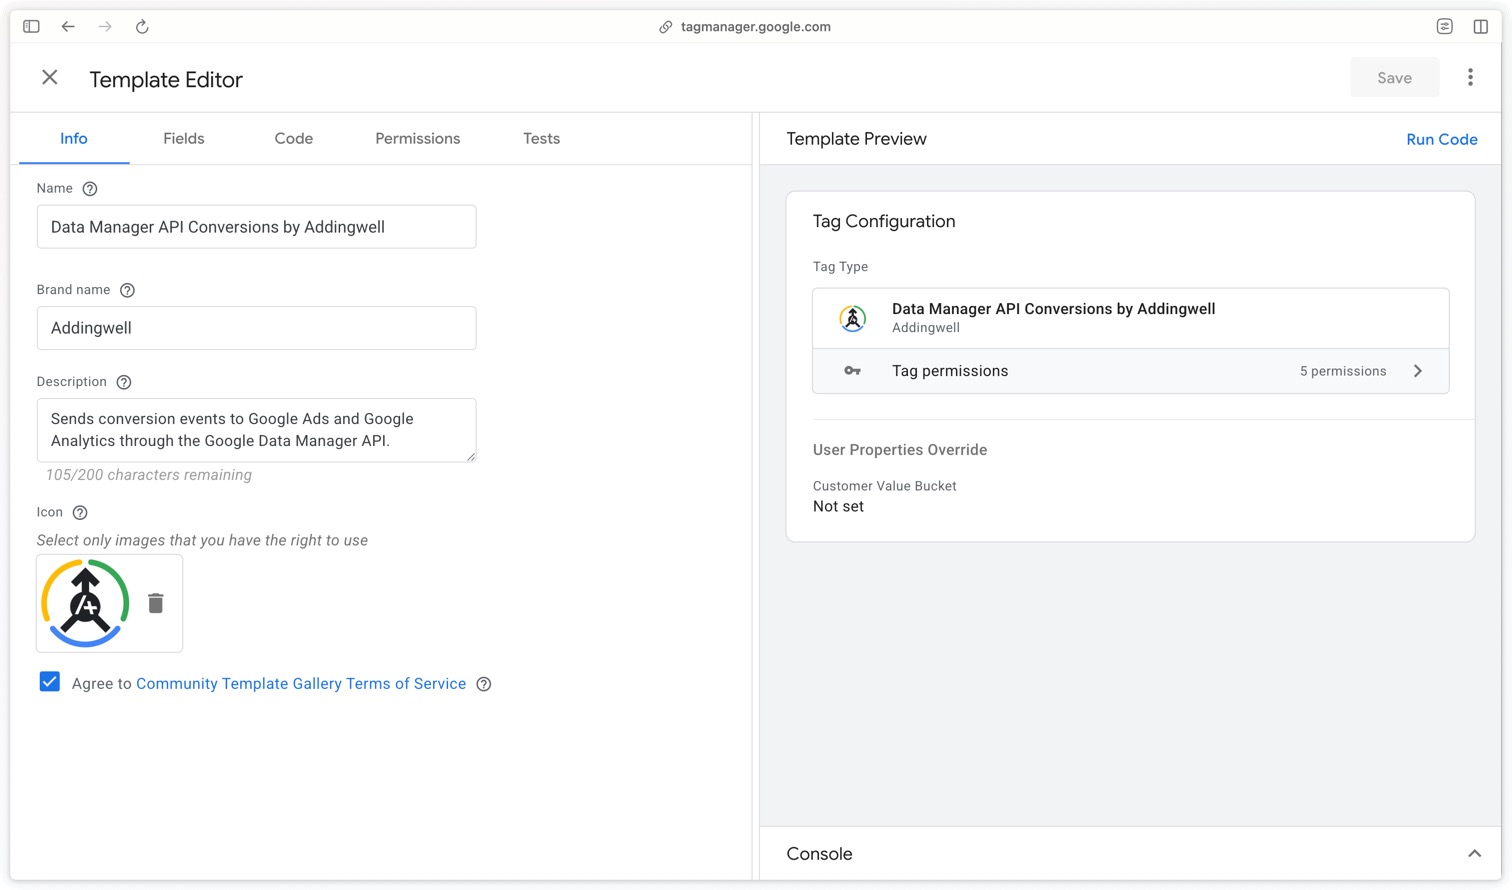
Configure the Data Manager API Audiences tag
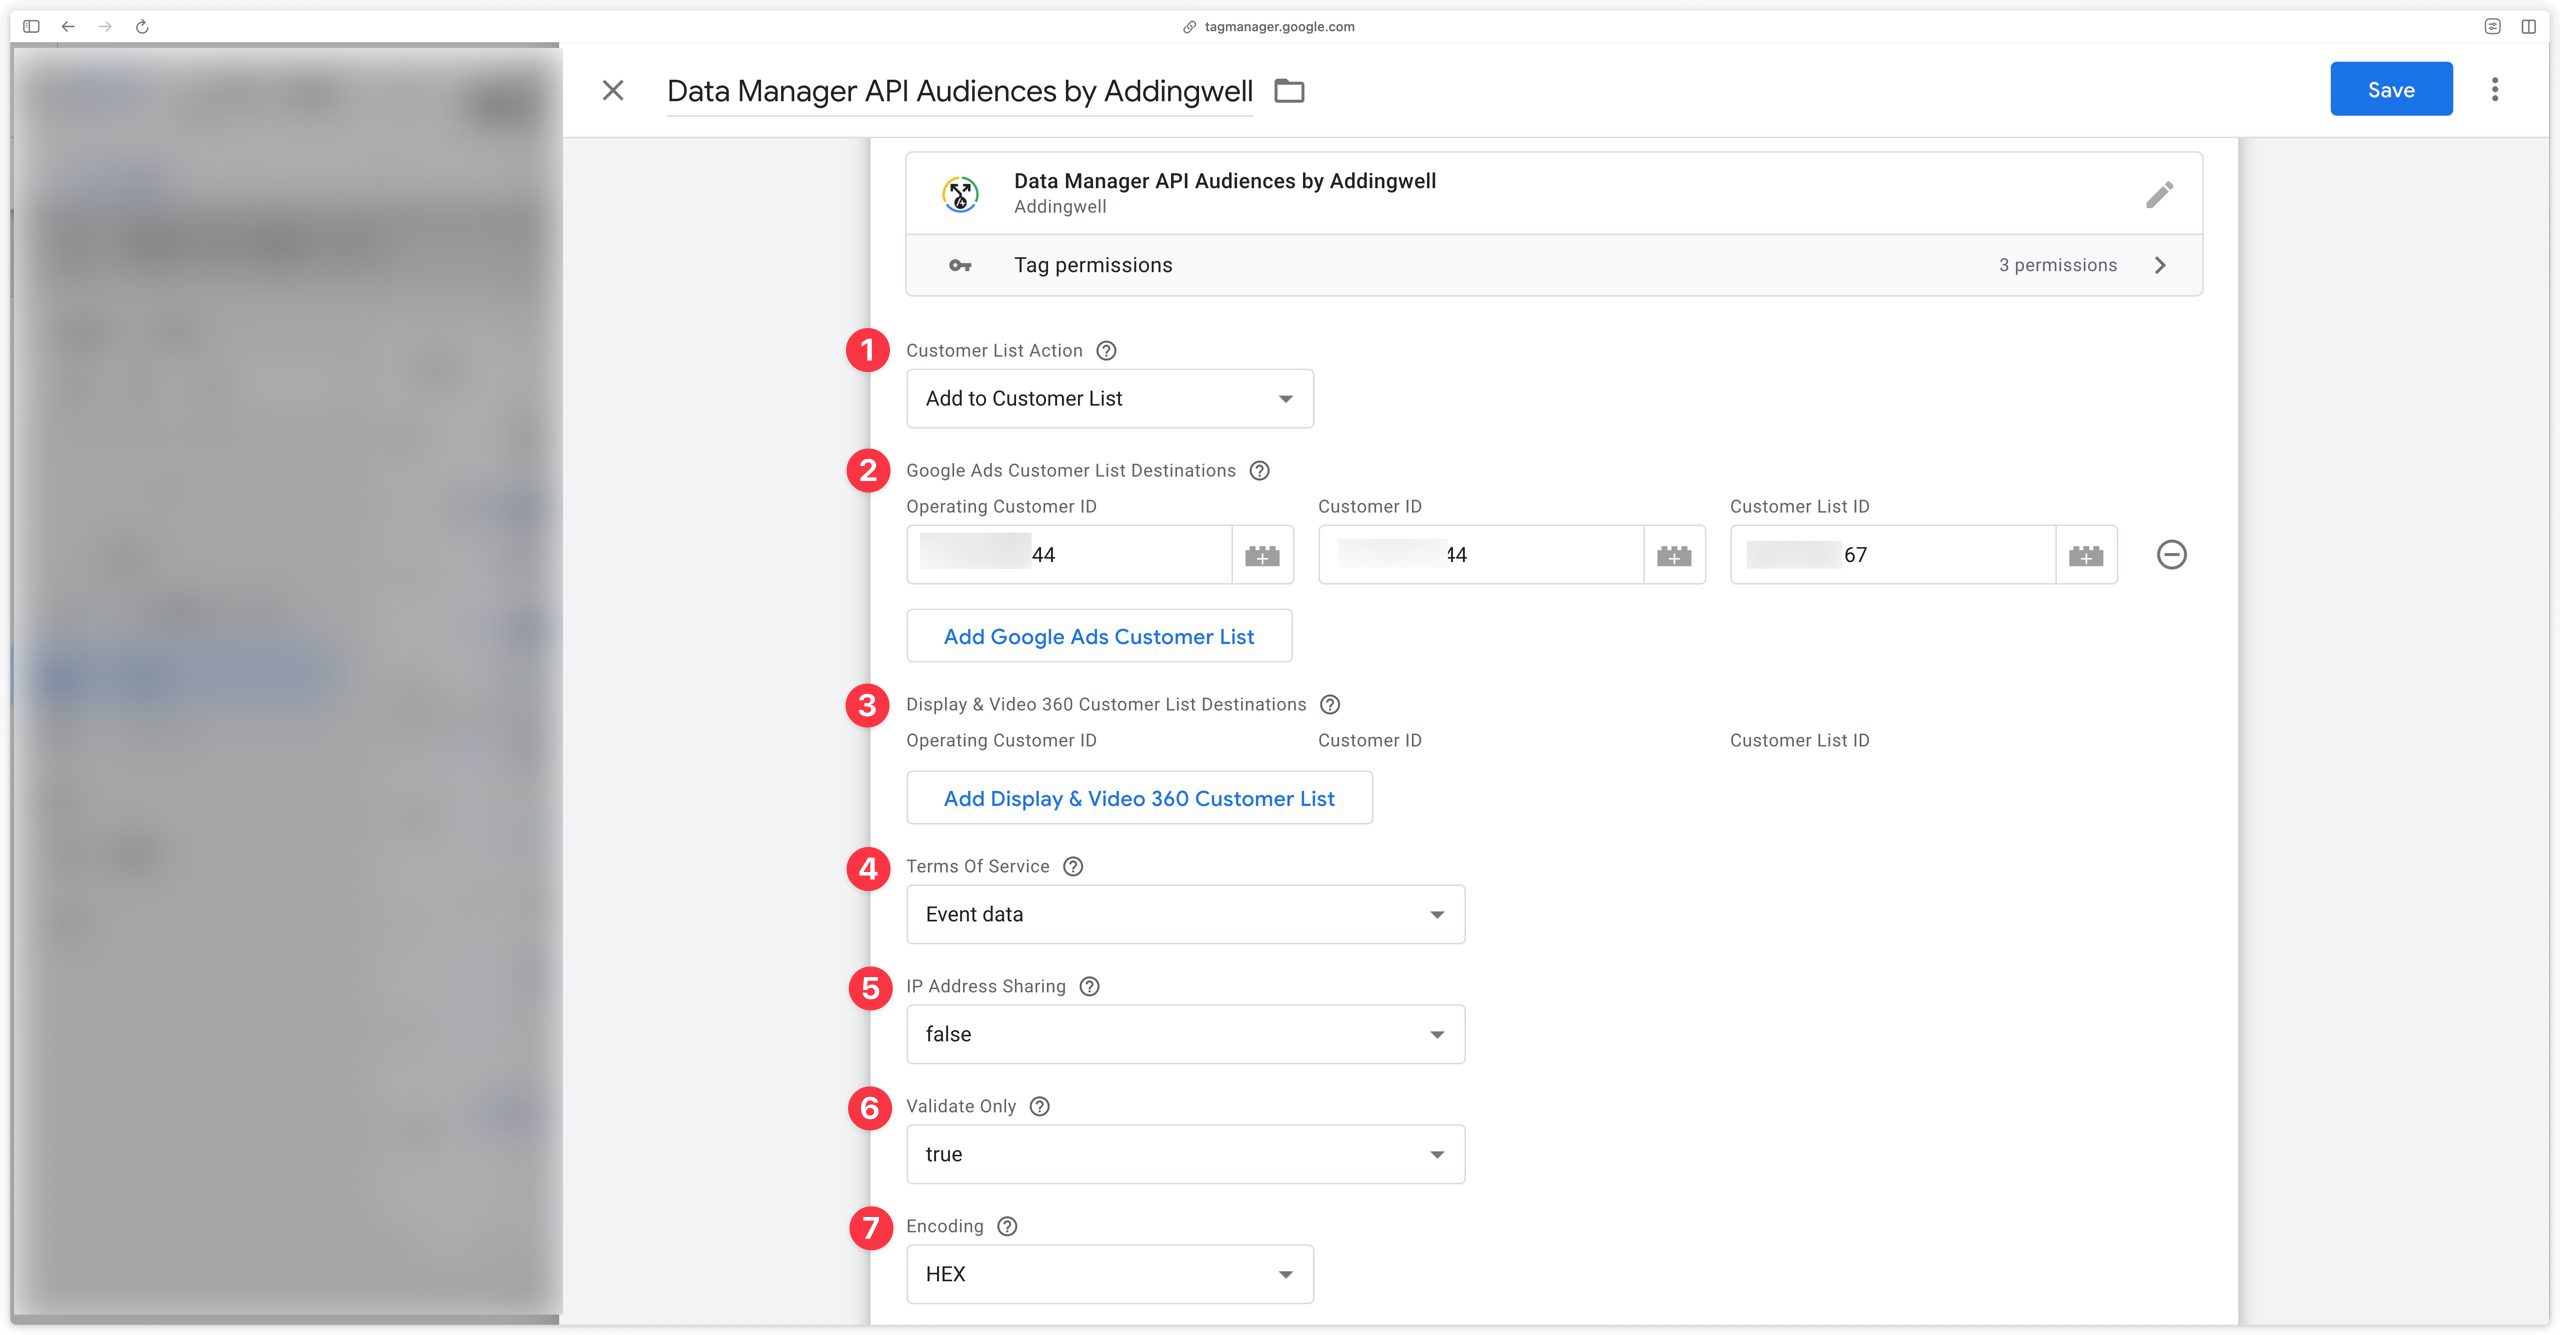
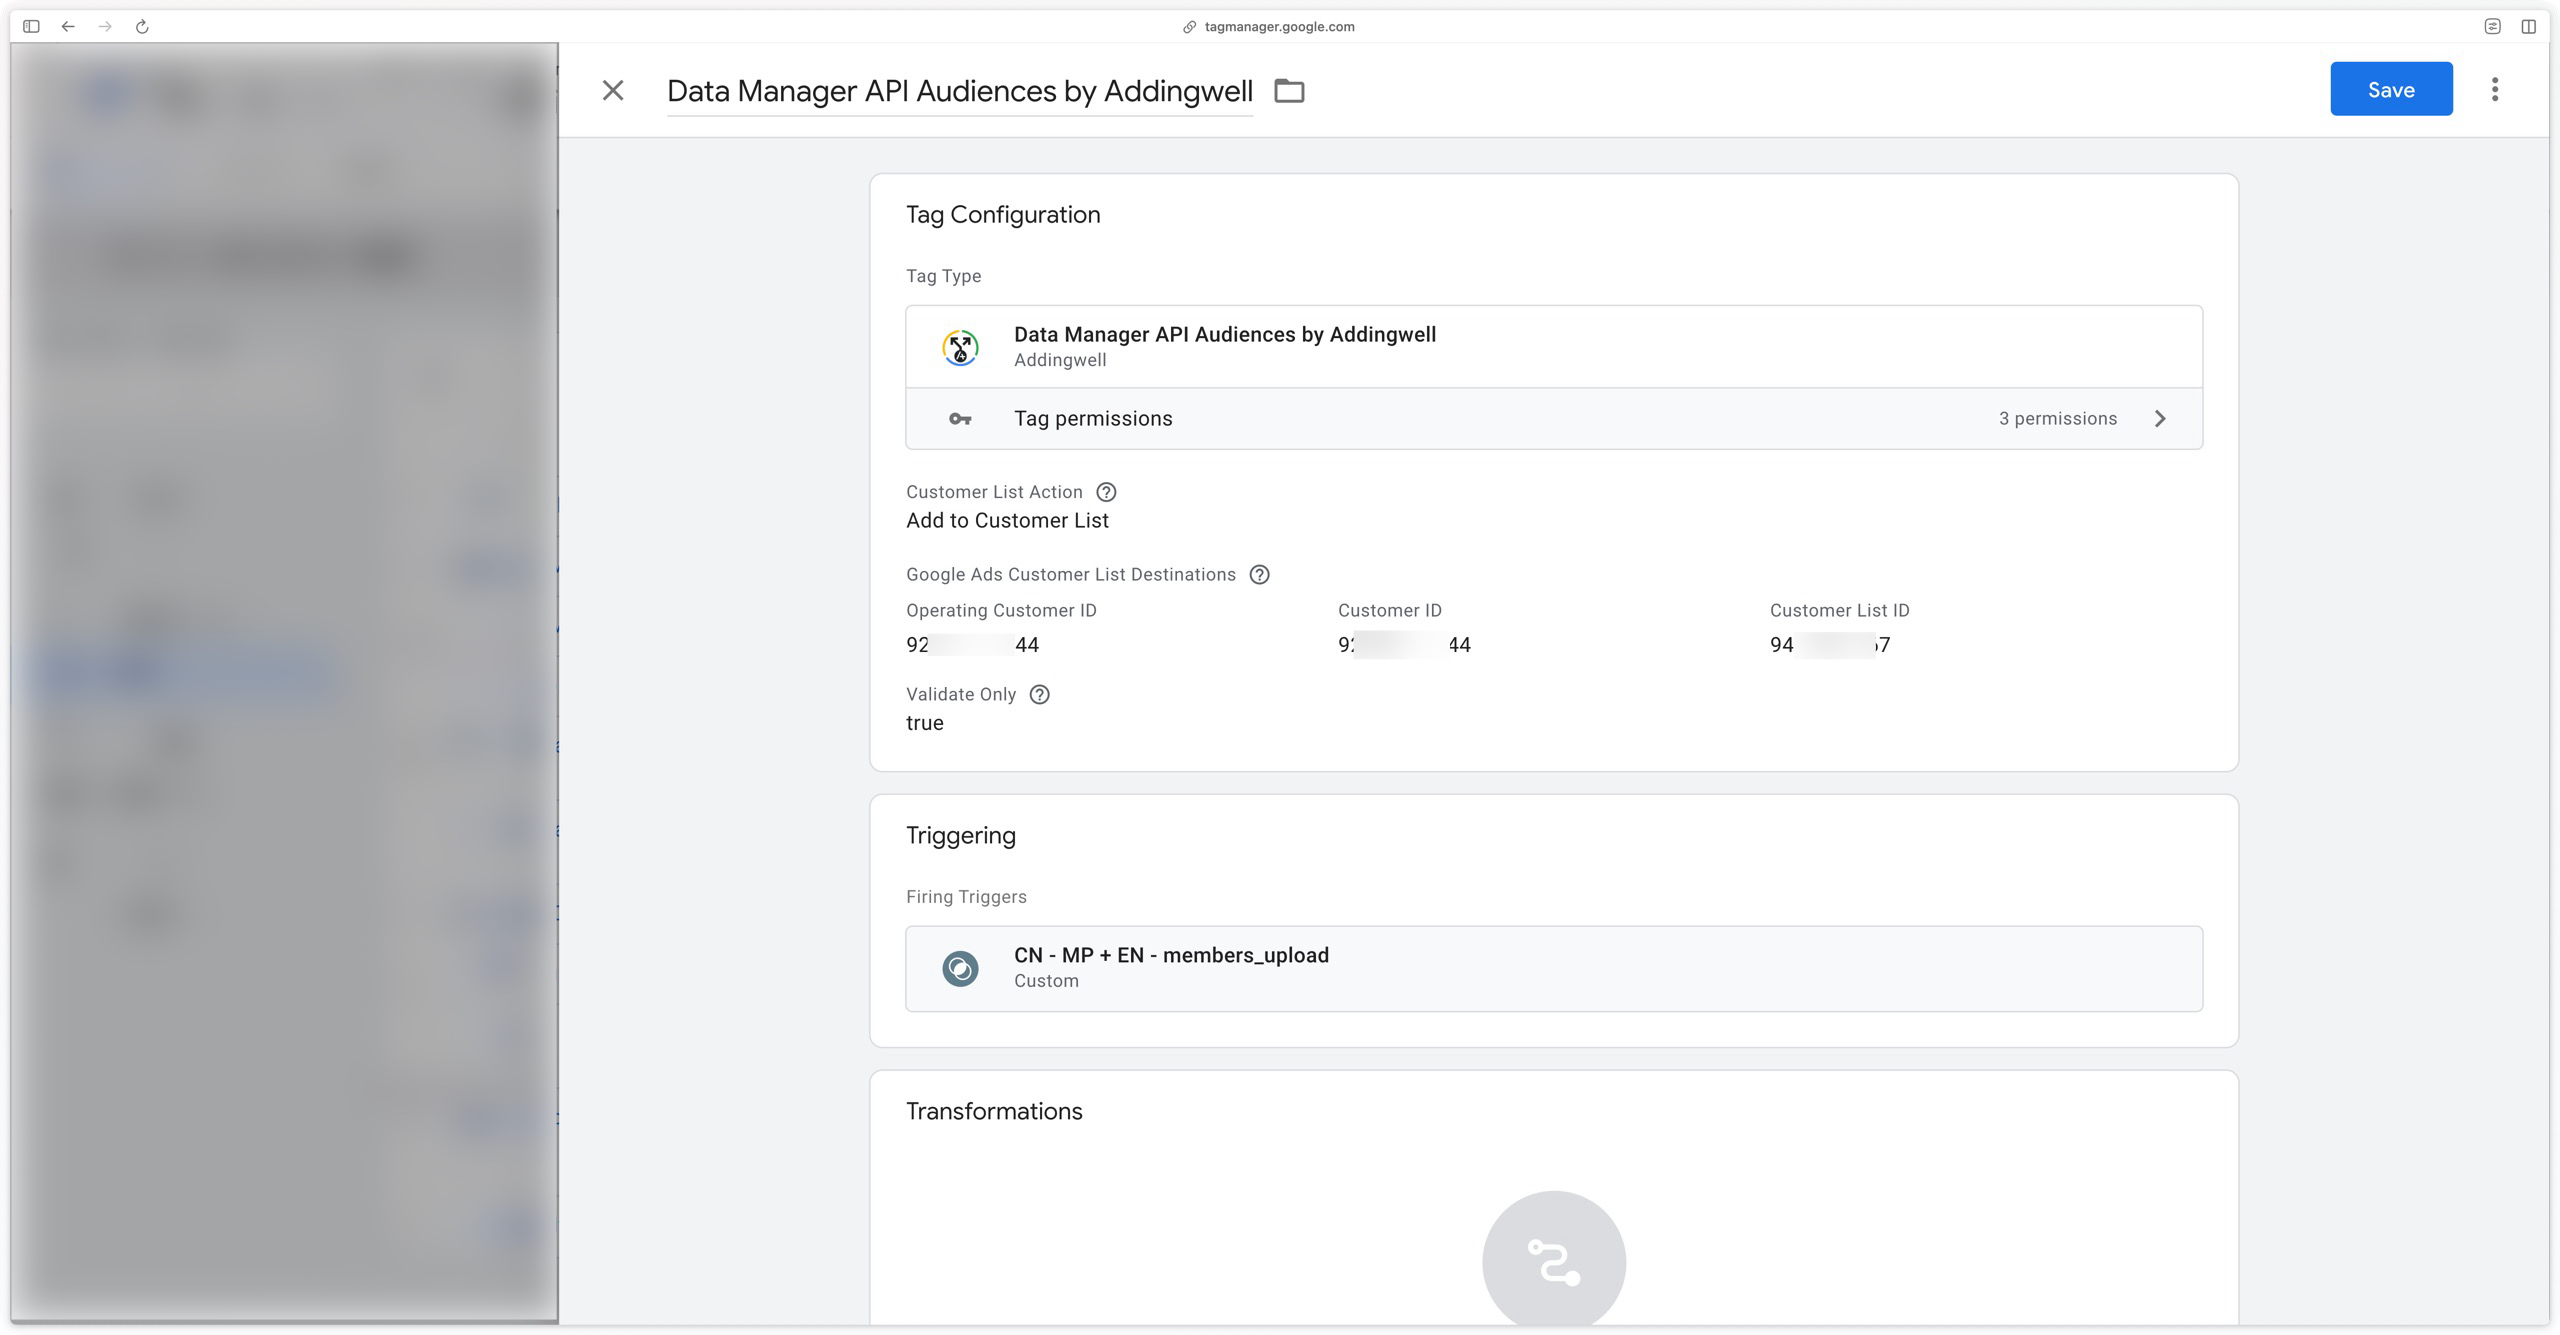
Create a new tag in Google Tag Manager Server-Side and select the Data Manager API Audiences template you just imported.
The principle: one API, several destinations
As with conversions, the idea behind Data Manager API is to provide a single entry point to send an audience member to several Google products at once.
A destination is the description of a place where the member must be added (or removed). In practice, it answers the question: “in which account and in which customer list should this member be added?”
A single request can contain several destinations. That is what lets you, for example, add a member to a Google Ads list and to a Display & Video 360 list in one API call.
Customer List Action
Choose the action to perform on the customer list:
- Add to Customer List (
ingest): adds the members to the list - Remove from Customer List (
remove): removes the members from the list
In Remove from Customer List mode, the Terms Of Service and Request-Level Consent Settings parameters disappear from the interface: the API only requires them when adding members.
Google Ads Customer List Destinations
Only fill in this section if you want to feed Google Ads customer lists. You can add several rows to feed several lists at once.
Operating Customer ID: the ID of the Google Ads account that owns the customer list. (example: 342-654-7582)
Customer ID: the ID of the Google Ads account used for authentication, either the same account as the Operating Customer ID, or your MCC account if the service account was added at the MCC level. (example: 643-683-1588)
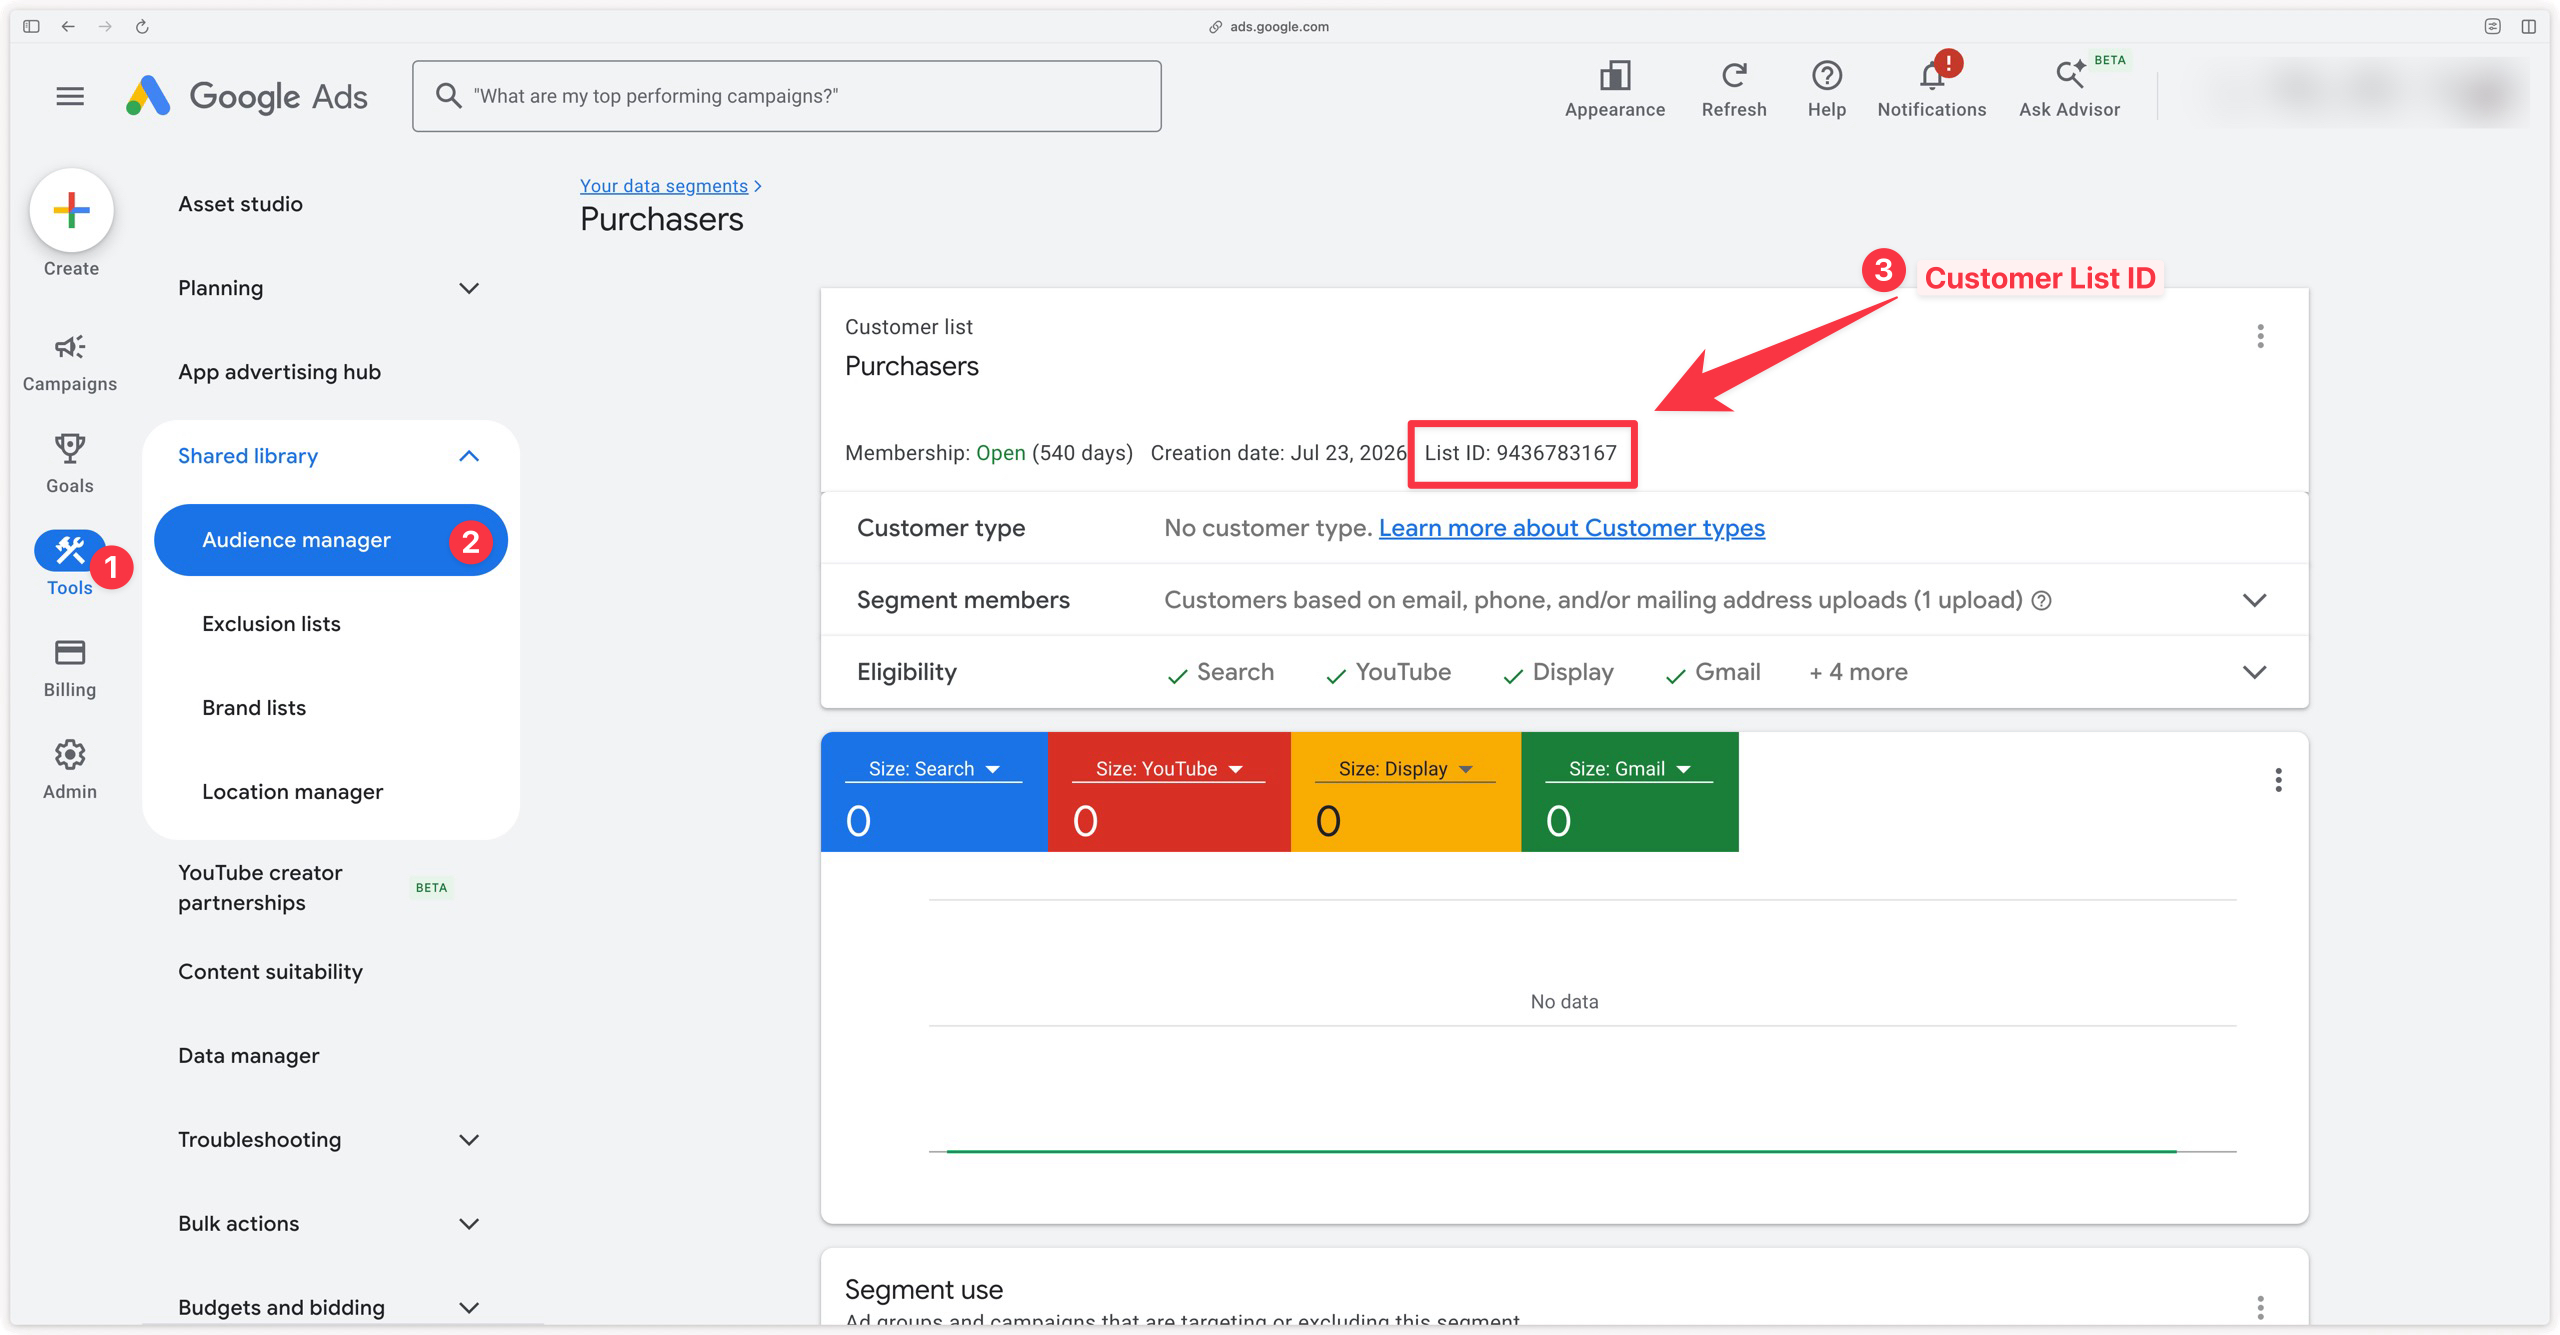
Customer List ID: the ID of the customer list. Go to Tools → Shared library → Audience manager → Your data segments, open your customer list (or create it) and find the List ID displayed on the page, or the &userListId= parameter in your browser URL. (example: 6328279871)
Display & Video 360 Customer List Destinations
Only fill in this section if you want to feed Display & Video 360 customer lists.
Operating Customer ID: the ID of the DV360 account that owns the customer list.
Customer ID: the ID of the DV360 account used for authentication (the same account as the Operating Customer ID, or your parent account).
Customer List ID: the ID of the customer list. Go to Audiences, open your list and find the List ID displayed on the page.
Sending IP addresses is not supported for Display & Video 360 Customer Match lists. If a DV360 destination is configured, the tag will not send IP addresses, even if the IP Address Sharing option is enabled.
Terms Of Service
The Customer Match terms of service must be accepted in order to add members identified by user data (email, phone, address) or by mobile IDs.
Event data(default value): the tag automatically reads the value in the incoming event (eventData.terms_of_service)TERMS_OF_SERVICE_STATUS_UNSPECIFIED: the status is not providedACCEPTED: the terms of service are acceptedREJECTED: the terms of service are rejected
As with consent, if your source system sends other values (true / false, granted / denied, accepted / rejected), the tag will understand them automatically and map them to ACCEPTED / REJECTED.
IP Address Sharing
Define here whether the tag should send the IP address alongside the member’s user data (true / false, false by default). The IP address can help Google improve the match rate of your lists.
Note that:
- Google Ads does not support IP address matching for users in the European Economic Area (EEA), the United Kingdom (UK) and Switzerland (CH).
- Sending IP addresses is not supported for Display & Video 360 Customer Match lists.
Validate Only (Test Mode)
Set this value to true if you only want to validate your requests without members actually being added to or removed from your lists. This can be useful to test your configuration before you start sending real data. You will see the API errors if there are any, without affecting your customer lists if your request is valid.
Remember to set Validate Only back to false once you are ready to actually feed your lists, otherwise your members will not be taken into account.
Encoding
This one is slightly more technical: it is the encoding used by sha256 when hashing user data.
If you are not sure what to use, leave the default HEX value.
Managing Google Consent Mode
This section only applies to the Add to Customer List action. No consent signal is sent when removing a member.
Data Manager API lets you pass the user’s consent status for each member added to a list. This matters in particular in the European Economic Area: without consent, Google will not be able to use the member’s data for ad personalization.
The tag exposes two consent parameters in the Request-Level Consent Settings group:
- Ad User Data → mapped to
consent.adUserDatain the Data Manager API payload - Ad Personalization → mapped to
consent.adPersonalizationin the Data Manager API payload
Each parameter accepts one of the following values:
Event Data(default value): the tag automatically reads the consent status from the incoming event (eventData.consent.ad_user_dataandeventData.consent.ad_personalization)CONSENT_STATUS_UNSPECIFIED: consent is not providedCONSENT_GRANTED: the user granted consentCONSENT_DENIED: the user denied consent
These values can be set statically in the tag (for example CONSENT_GRANTED if all your members come from consenting users), or dynamically through the Event Data option that reads the consent sent in the payload. It is this second, more reliable approach that we detail below.
Sending the Consent Mode signals in the payload
Add a consent object in the params of your event, with the user’s consent status:
"consent": {
    "ad_user_data": "CONSENT_GRANTED",
    "ad_personalization": "CONSENT_DENIED"
}
You can send the values expected by the tag directly (CONSENT_GRANTED, CONSENT_DENIED). If your source system sends other values (for example granted / denied or true / false), the tag will understand them automatically and map them to the expected values.
| Source value | Target value |
|---|---|
granted | CONSENT_GRANTED |
denied | CONSENT_DENIED |
true | CONSENT_GRANTED |
false | CONSENT_DENIED |
CONSENT_GRANTED | CONSENT_GRANTED |
CONSENT_DENIED | CONSENT_DENIED |
The granted / denied / true / false values are accepted either as strings or as booleans, regardless of case. Any other value (or a missing value) is converted to CONSENT_STATUS_UNSPECIFIED.
If you do not provide these fields, consent stays at CONSENT_STATUS_UNSPECIFIED. In the European Economic Area, we recommend always passing an explicit value (CONSENT_GRANTED or CONSENT_DENIED) to stay compliant and let Google make the most of your audiences.
Choosing between single mode and batch mode
The tag offers two ways to build audience members:
- Single mode (default): one member is built per incoming event, from the event’s user data (and/or from the fields in the User Data Override section of the tag). This is the mode suited to the real-time use case.
- Batch mode: the tag builds one audience member per entry of a
membersarray, with a maximum of 10,000 members per request. This is the mode suited to syncing CRM segments.
Batch mode in detail
To enable batch mode, check Enable Batch Mode in the tag’s Batch Mode Settings group.
By default, the tag reads the array of members in eventData.members. You can also provide your own array through the Audience Members Array Override field (with a GTM variable, for example).
Each entry of the array accepts the following keys:
sha256_email_address/email_address/email: one or more email addresses (single value or array)sha256_phone_number/phone_number/phone: one or more phone numbers (single value or array)address: a postal address (object or array of objects withfirst_name,last_name,country,postal_code)user_id: the user identifier defined by the advertisermobile_id: one or more mobile advertising identifiers (advertising ID / IDFA, 10 maximum per member)ip_override: one or more IP addresses
Values that are already hashed (SHA-256) are not hashed again. Entries without any usable identifier are ignored.
Single mode overrides
In single mode, the tag reads the user data from the incoming event by default (eventData.user_data, eventData.user_id, etc., see the mapping table below). Two groups of fields let you override those values directly in the tag configuration:
- User Data Override: User ID, Email Address, Phone Number and Address (First Name, Last Name, Country, Postal Code)
- Mobile IDs Override: the list of mobile advertising identifiers (10 maximum per member)
For the fields in the User Data Override group, a value set in the tag takes precedence over the one present in the eventData. For Mobile IDs, it is the opposite: the identifier present in the event (eventData["x-ga-resettable_device_id"]) takes precedence over the value set in the tag.
Configure the Measurement Protocol client
This part is an excerpt from our full documentation on offline events.
To receive offline requests on the GTM Server side, you need to configure a Measurement Protocol client. To do so, create a new client in your GTM Server container and select the Measurement Protocol (GA4) client.
Even though the Measurement Protocol API is now deprecated, note that we use the Measurement Protocol here as a standard to build the request sent to GTM Server. The Measurement Protocol (GA4) client is therefore required for GTM Server to understand the request correctly.
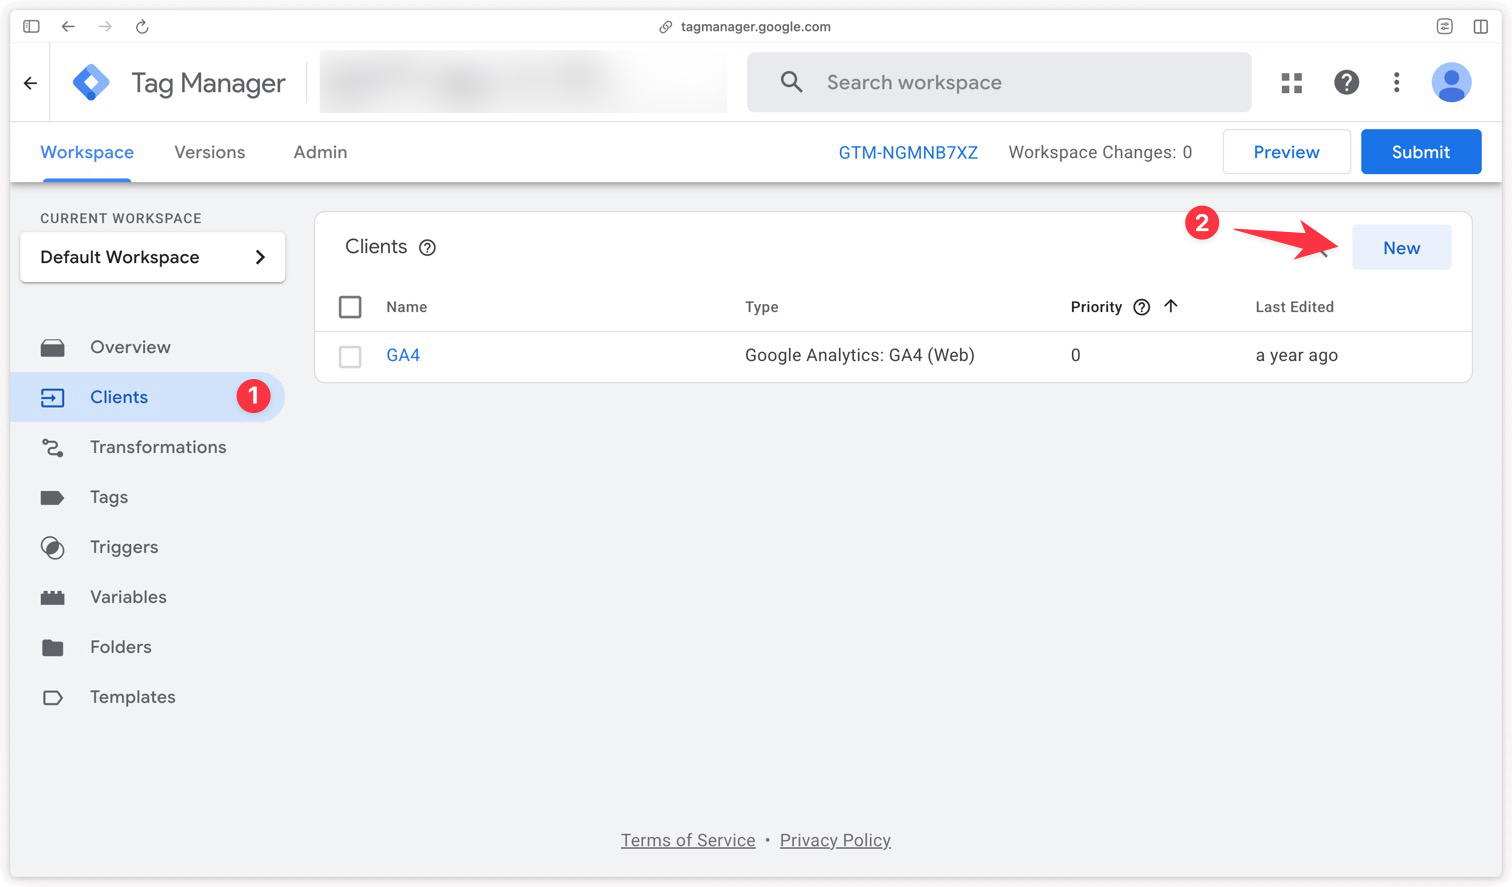
Then select the Measurement Protocol (GA4) client.
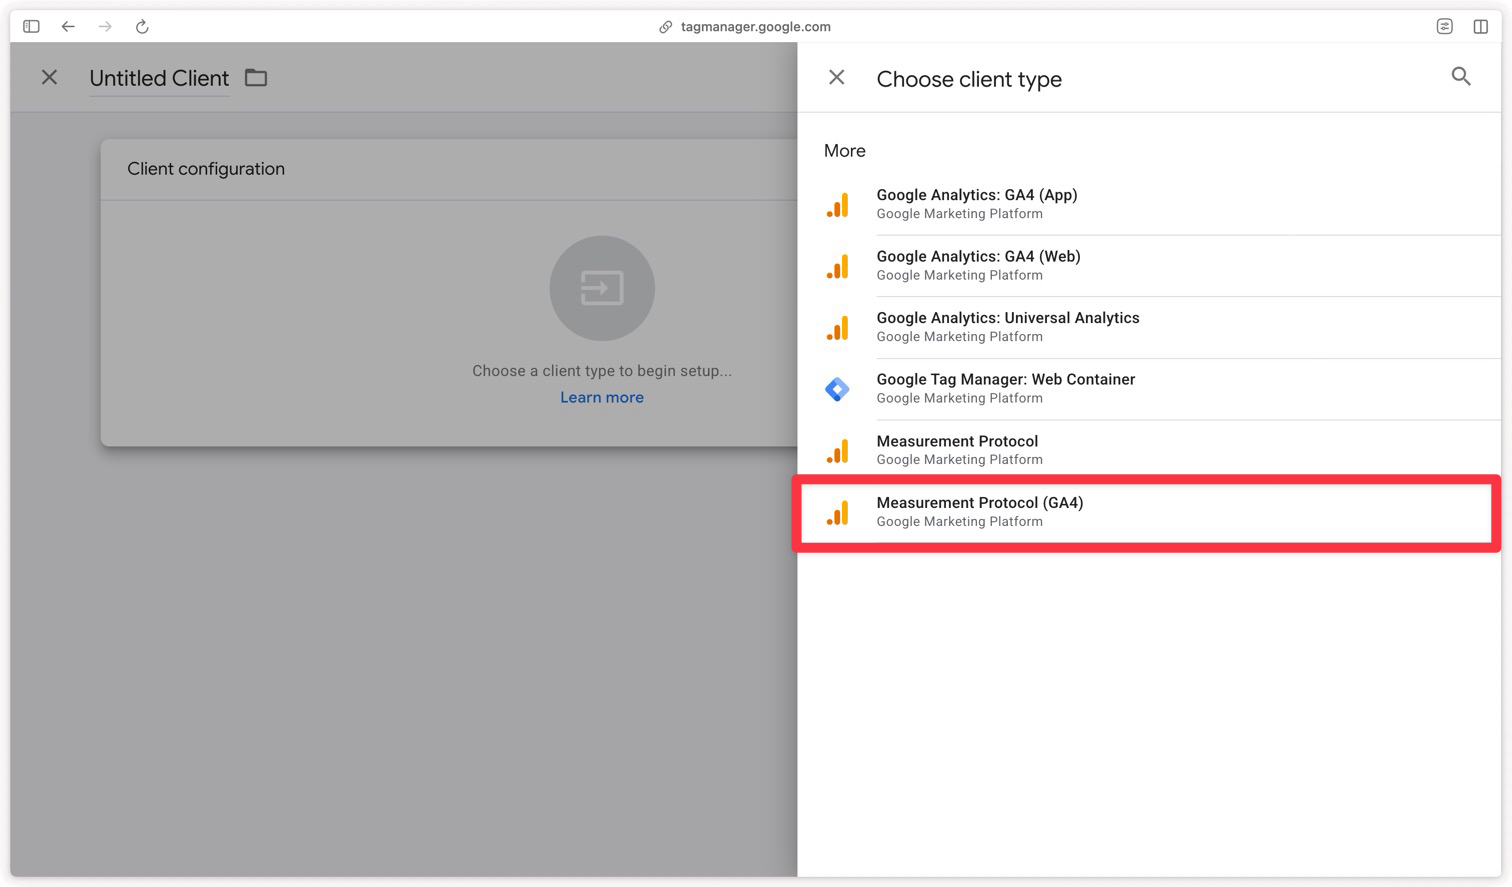
Once the client is added, configure it with the /mp/collect activation path. The choice of activation path is arbitrary, but it must be consistent with the URL you will use to send your audience members to GTM Server.
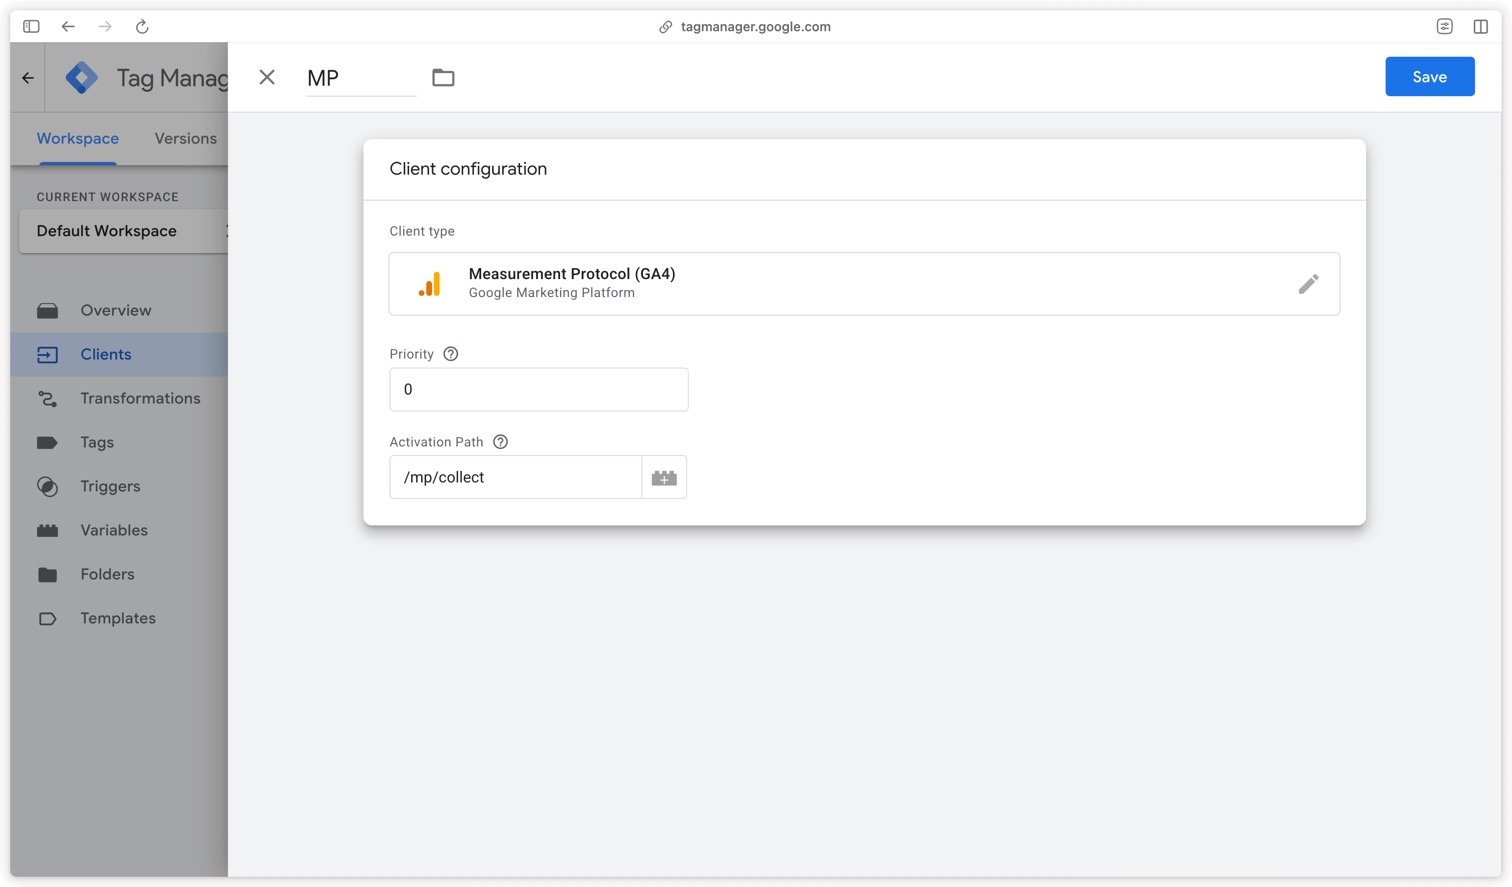
Trigger the Data Manager API Audiences tag
Once the Measurement Protocol (GA4) client is configured, you can create a trigger for your Data Manager API Audiences tag. To do so, create a new Custom trigger and enter the name of the event you want to use to fire the tag (in this example, we chose members_upload) and the name of the client used (in this example, we chose MP).
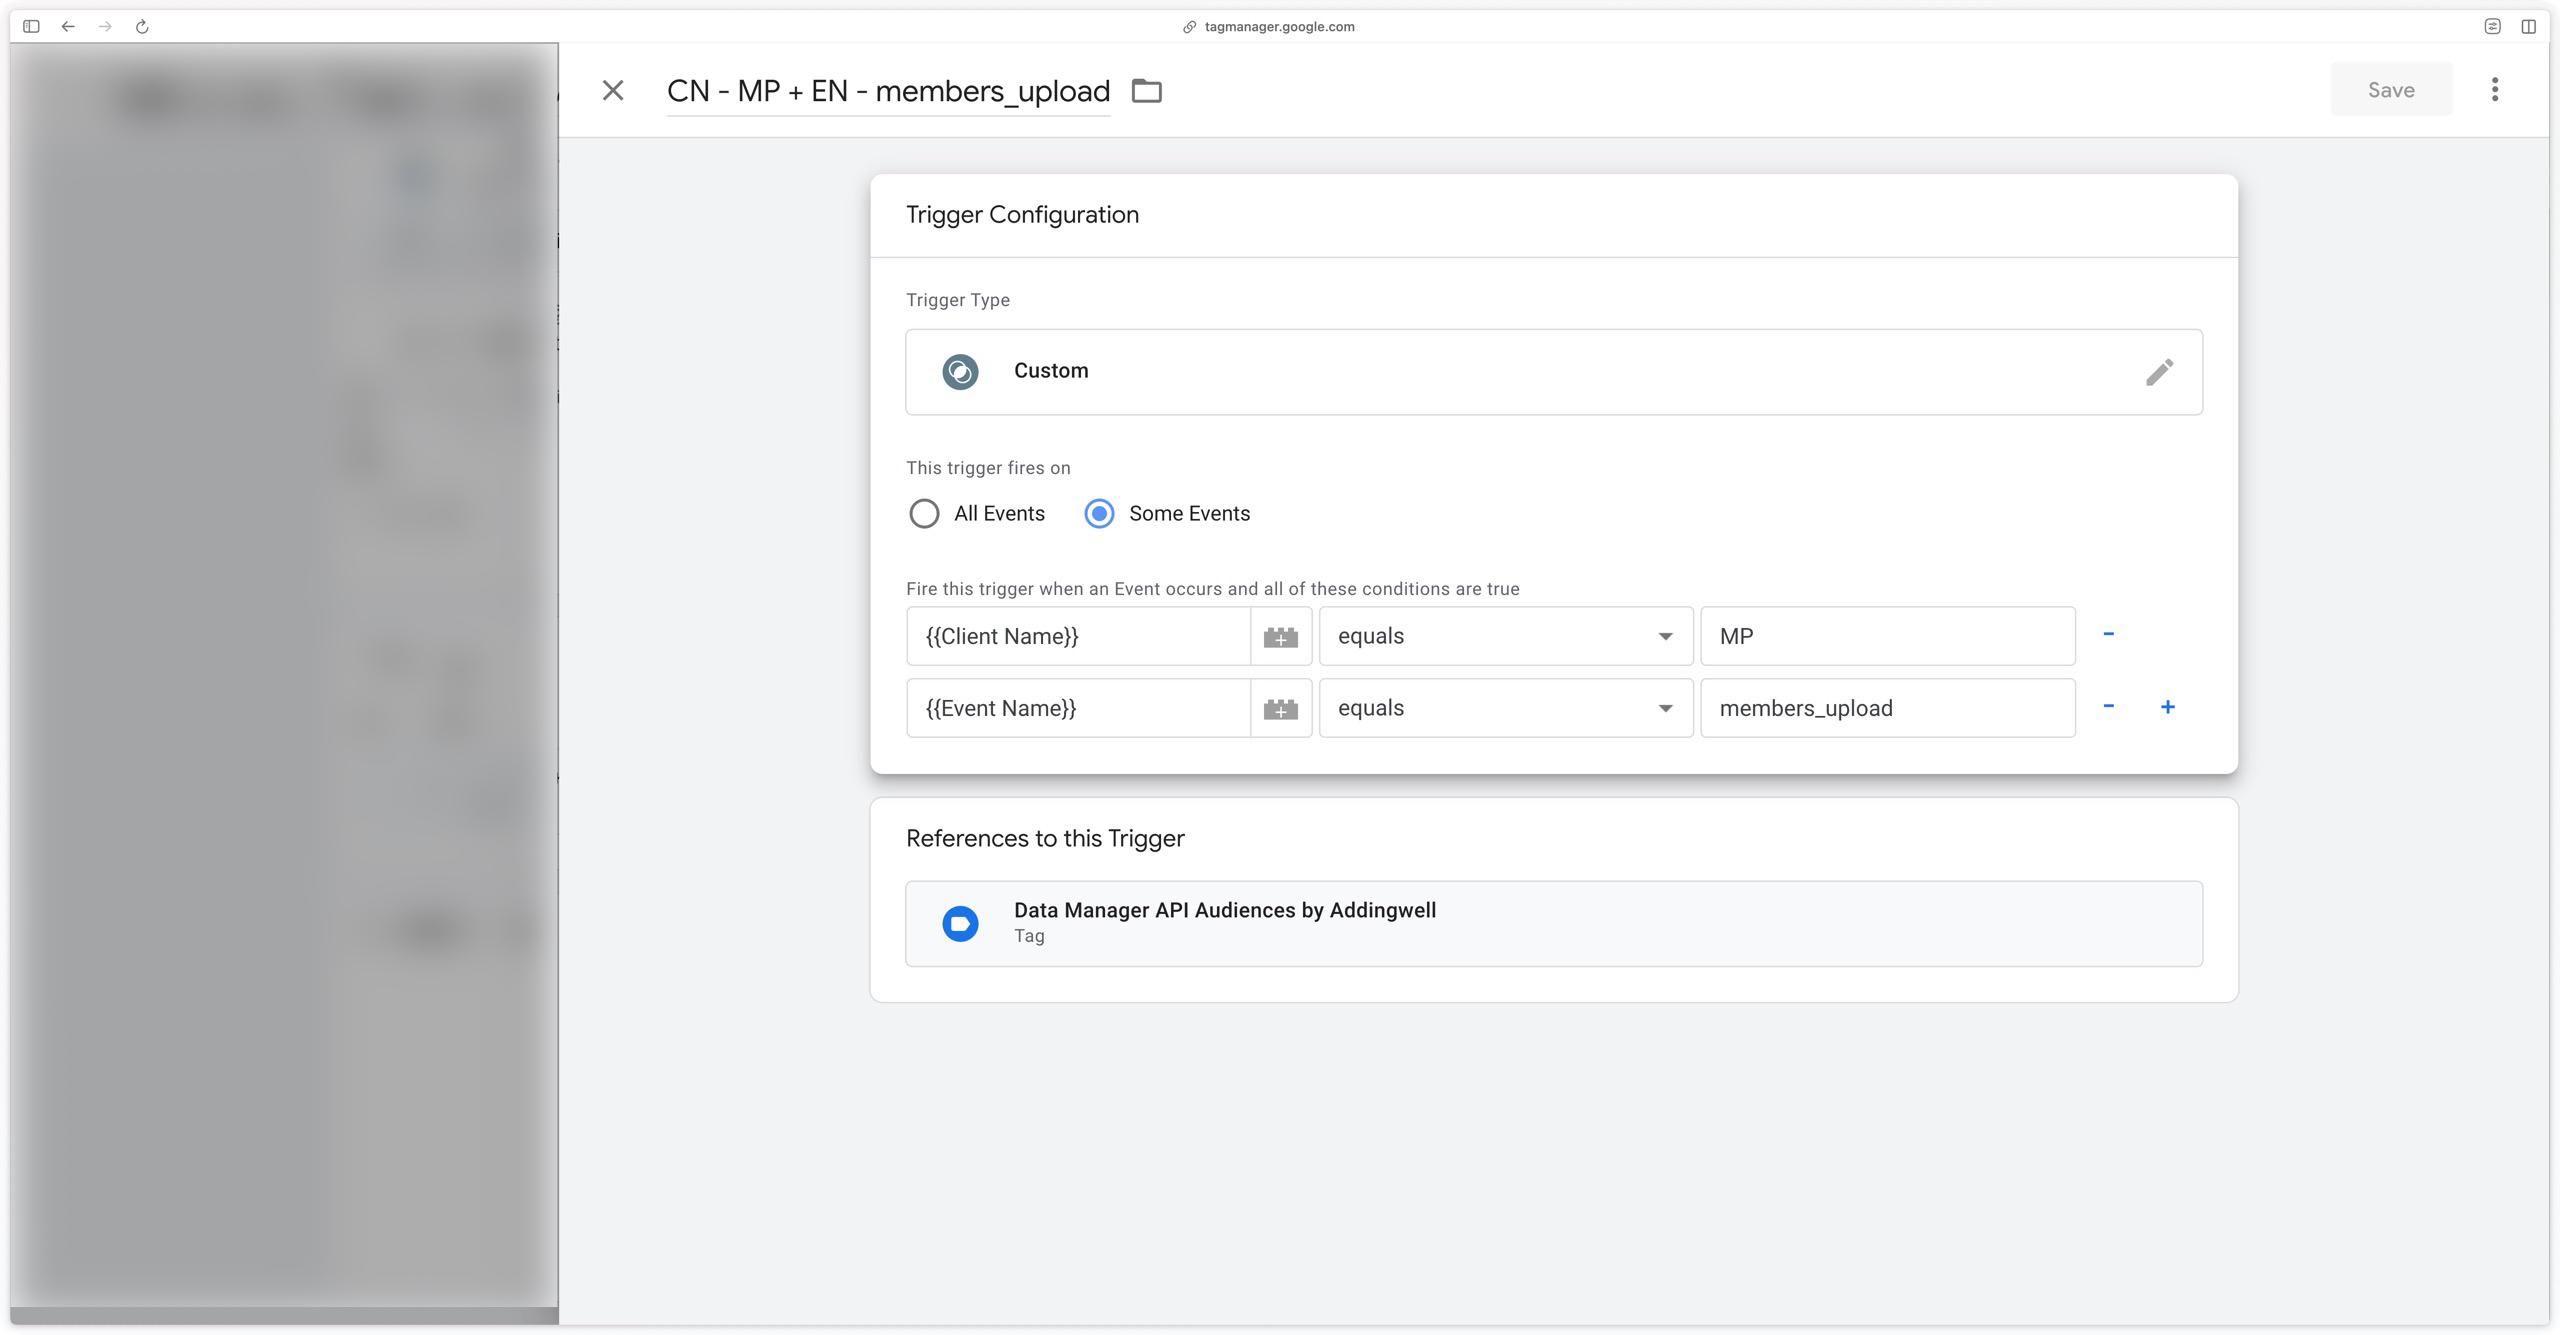
Then add this trigger to your Data Manager API Audiences tag.
If you use both the Add to Customer List action and the Remove from Customer List action, create two tags (one per action) with two separate triggers (for example on the members_upload and members_remove events).
Example payload to send to your GTM Server endpoint
This part is an excerpt from our full documentation on offline events.
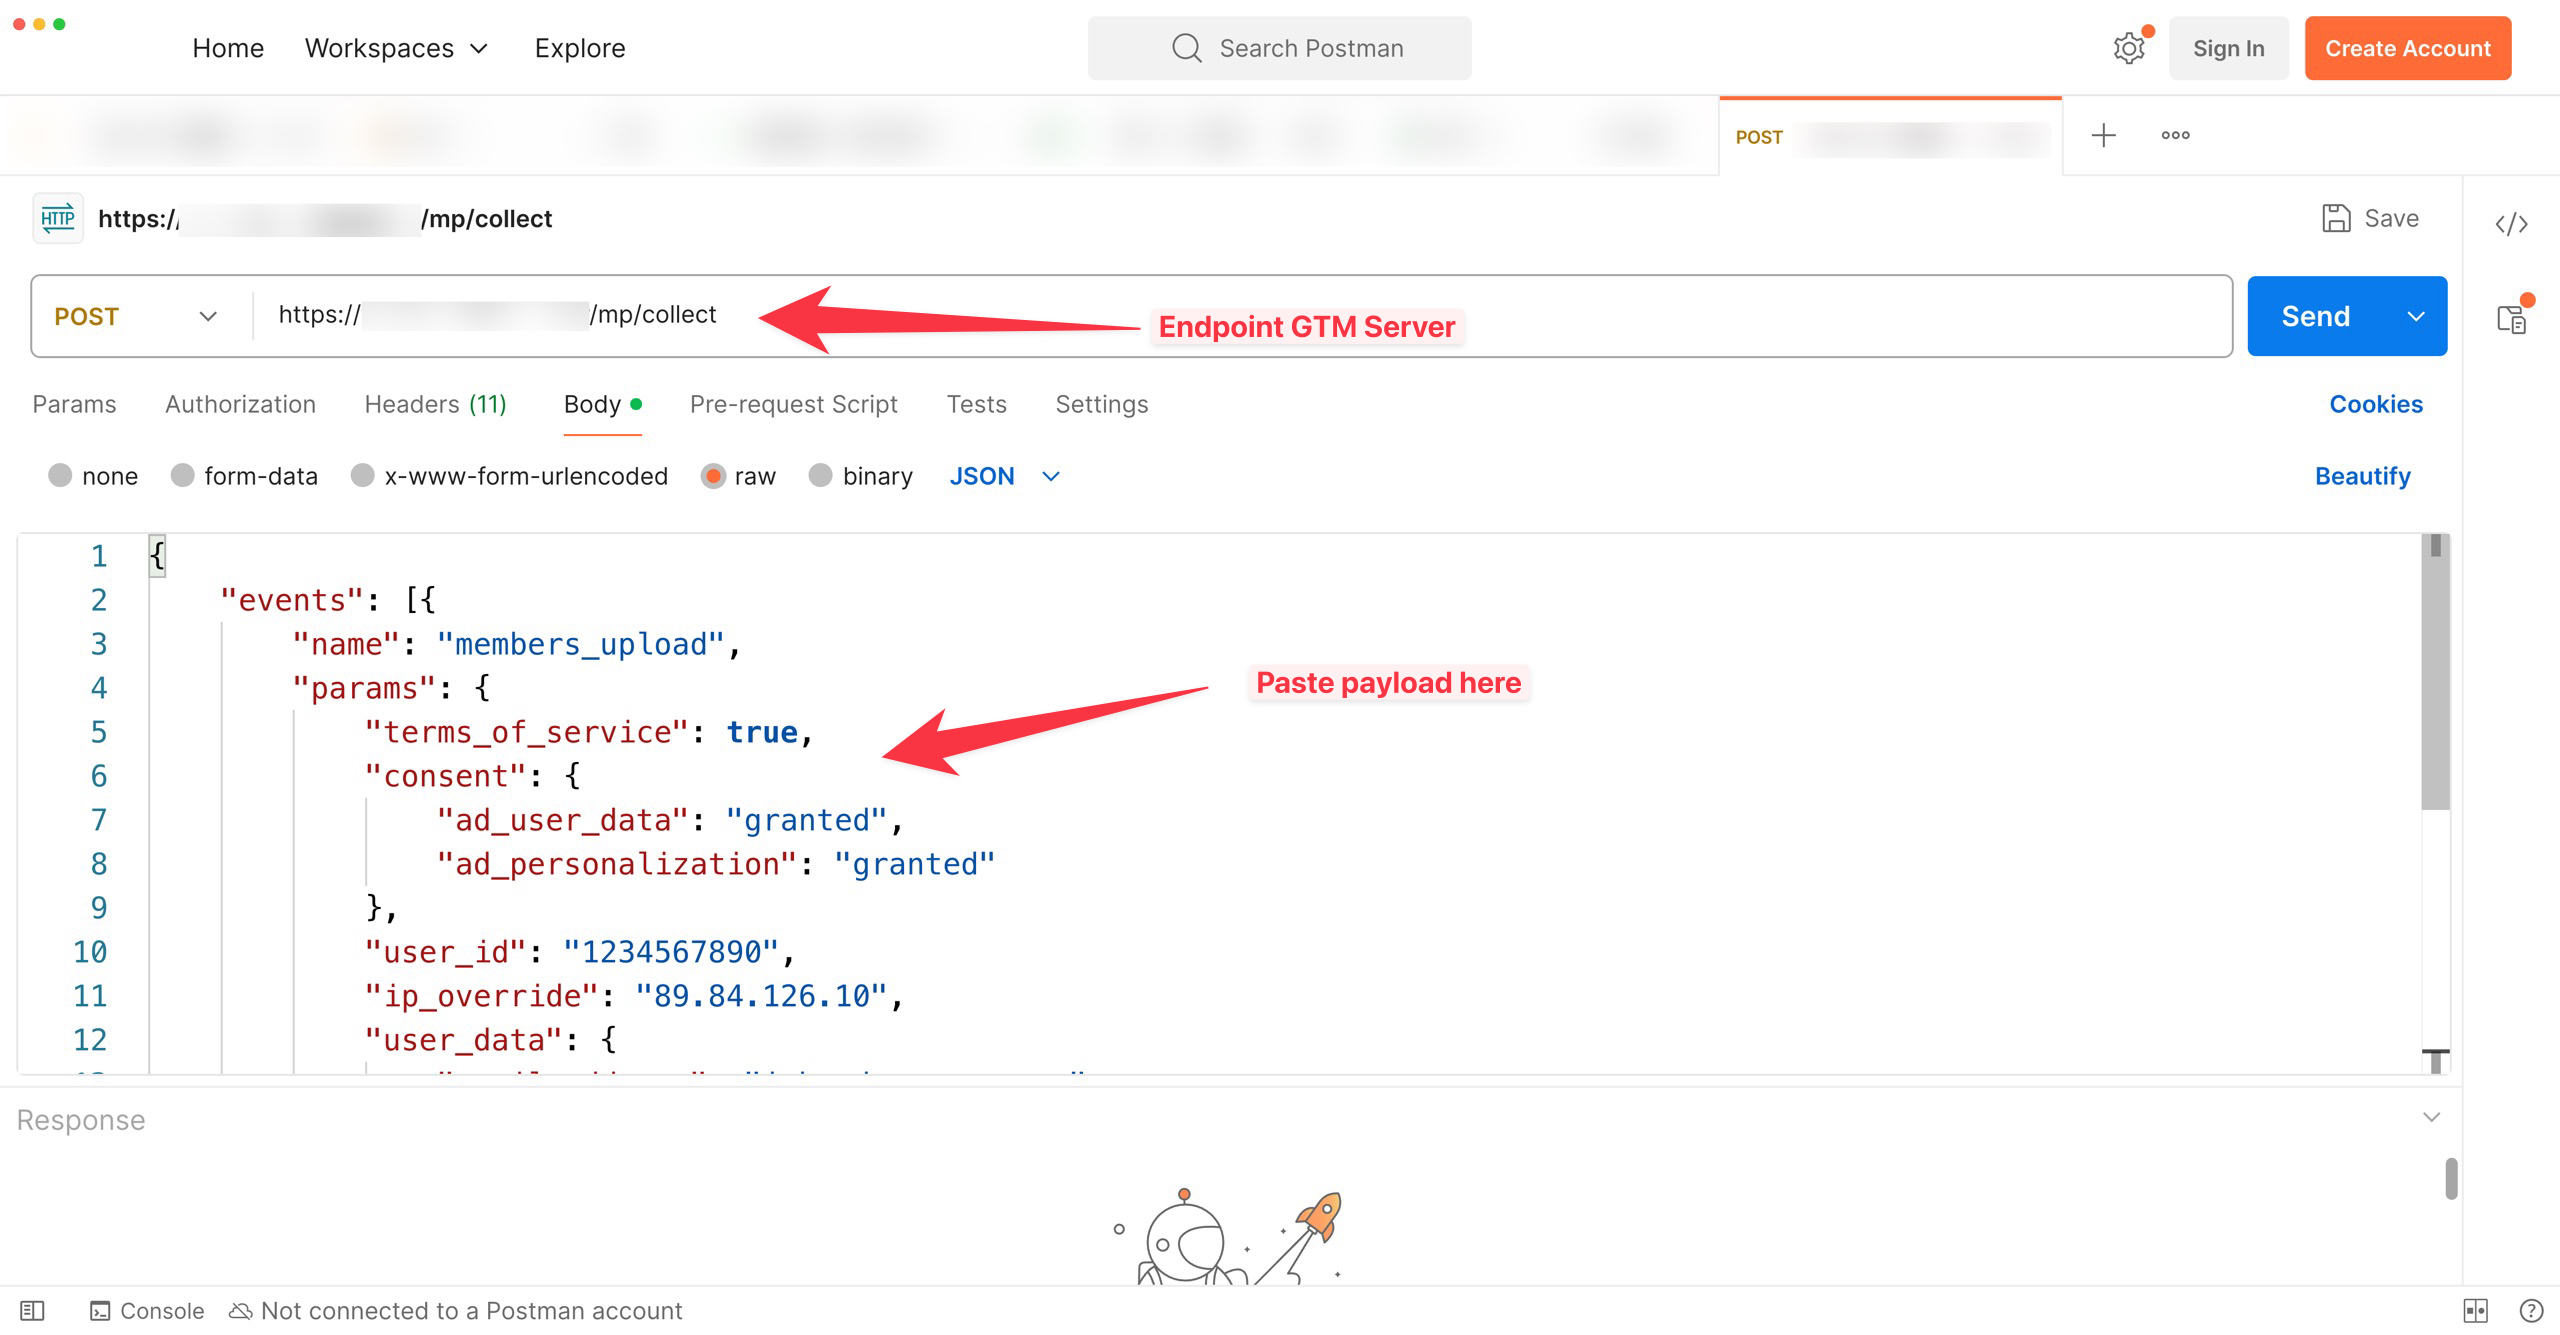
To test the configuration of the Data Manager API Audiences tag, you can send a test event to your GTM Server endpoint. Here are two example JSON payloads, depending on the mode you chose.
It is important here to use the same activation path as the one configured in the Measurement Protocol (GA4) client of your GTM Server container. In this example, we chose /mp/collect.
POST https://<your-gtm-server-endpoint>/mp/collectSingle mode
A single member is built from the event’s user data:
{
    "events": [{
        "name": "members_upload",
        "params": {
            "terms_of_service": true,
            "consent": {
                "ad_user_data": "granted",
                "ad_personalization": "granted"
            },
            "user_id": "1234567890",
            "ip_override": "89.84.126.10",
            "user_data": {
                "email_address": "[email protected]",
                "phone_number": "+33627362122",
                "address": {
                    "first_name": "John",
                    "last_name": "Doe",
                    "postal_code": "75000",
                    "country": "FR"
                }
            }
        }
    }]
}Mapping between the eventData and the Data Manager API payload
You do not send the format expected by Data Manager API directly: you send an event in the Measurement Protocol / GA4 format (the eventData above), and the tag takes care of turning it into a Data Manager API request. The table below details that mapping, field by field, to help you build your own requests.
Personal data (email, phone, first name, last name) is automatically normalized then hashed with SHA-256 by the tag: you send it in clear text in your eventData, and it comes out hashed in the Data Manager API payload. You can also send values that are already hashed, in which case they will not be hashed again.
User data
user_data.sha256_email_addressoruser_data.email_addressoruser_data.email→audienceMembers[].compositeData.userData.userIdentifiers[].emailAddressuser_data.sha256_phone_numberoruser_data.phone_numberoruser_data.phone→audienceMembers[].compositeData.userData.userIdentifiers[].phoneNumber+33627362122 — a number without an international prefix is ignored). Accepts a single value or an array.user_data.address.first_nameoruser_data.address[0].first_name→audienceMembers[].compositeData.userData.userIdentifiers[].address.givenNameuser_data.address.last_nameoruser_data.address[0].last_name→audienceMembers[].compositeData.userData.userIdentifiers[].address.familyNameuser_data.address.countryoruser_data.address[0].country→audienceMembers[].compositeData.userData.userIdentifiers[].address.regionCodeFR), not hashed.user_data.address.postal_codeoruser_data.address[0].postal_code→audienceMembers[].compositeData.userData.userIdentifiers[].address.postalCodeip_overrideoriporip_address→audienceMembers[].compositeData.ipData[].ipAddresstrue and no DV360 destination is configured. Accepts a single value or an array.Alternative identifiers
user_idoruser_data.user_id→audienceMembers[].userIdData.userIdx-ga-resettable_device_idormobile_id→audienceMembers[].mobileData.mobileIds[]user_id is available. In single mode, the tag reads x-ga-resettable_device_id (or the Mobile IDs Override field); the mobile_id key is used in batch mode entries.Terms of service
terms_of_service→termsOfService.customerMatchTermsOfServiceStatusACCEPTED / REJECTED (also accepts true/false, granted/denied, accepted/rejected). Only for the Add to Customer List action.Consent
consent.ad_user_data→consent.adUserDataCONSENT_GRANTED / CONSENT_DENIED (see the Consent Mode section). Only for the Add to Customer List action.consent.ad_personalization→consent.adPersonalizationCONSENT_GRANTED / CONSENT_DENIED (see the Consent Mode section). Only for the Add to Customer List action.One identifier type per member. Data Manager API only accepts one type of identifying data per audience member. The tag therefore applies the following order of priority: user data (email, phone, address, optionally completed by the IP address) first; failing that, the user_id; failing that, the mobile IDs.
The tag also normalizes the data before hashing, in line with the Data Manager API formatting requirements : emails lowercased and without spaces (removing dots and +alias suffixes for gmail.com / googlemail.com addresses), phone numbers converted to the E.164 format, first and last names lowercased and without extra spaces. The dashes in account identifiers (e.g. 342-654-7582) are removed automatically.
Sending the payload to GTM Server with Postman
We recommend using a tool such as Postman to test sending this request to your GTM Server endpoint. Make sure to replace the URL with the one of your GTM Server endpoint and to set the HTTP method to POST.
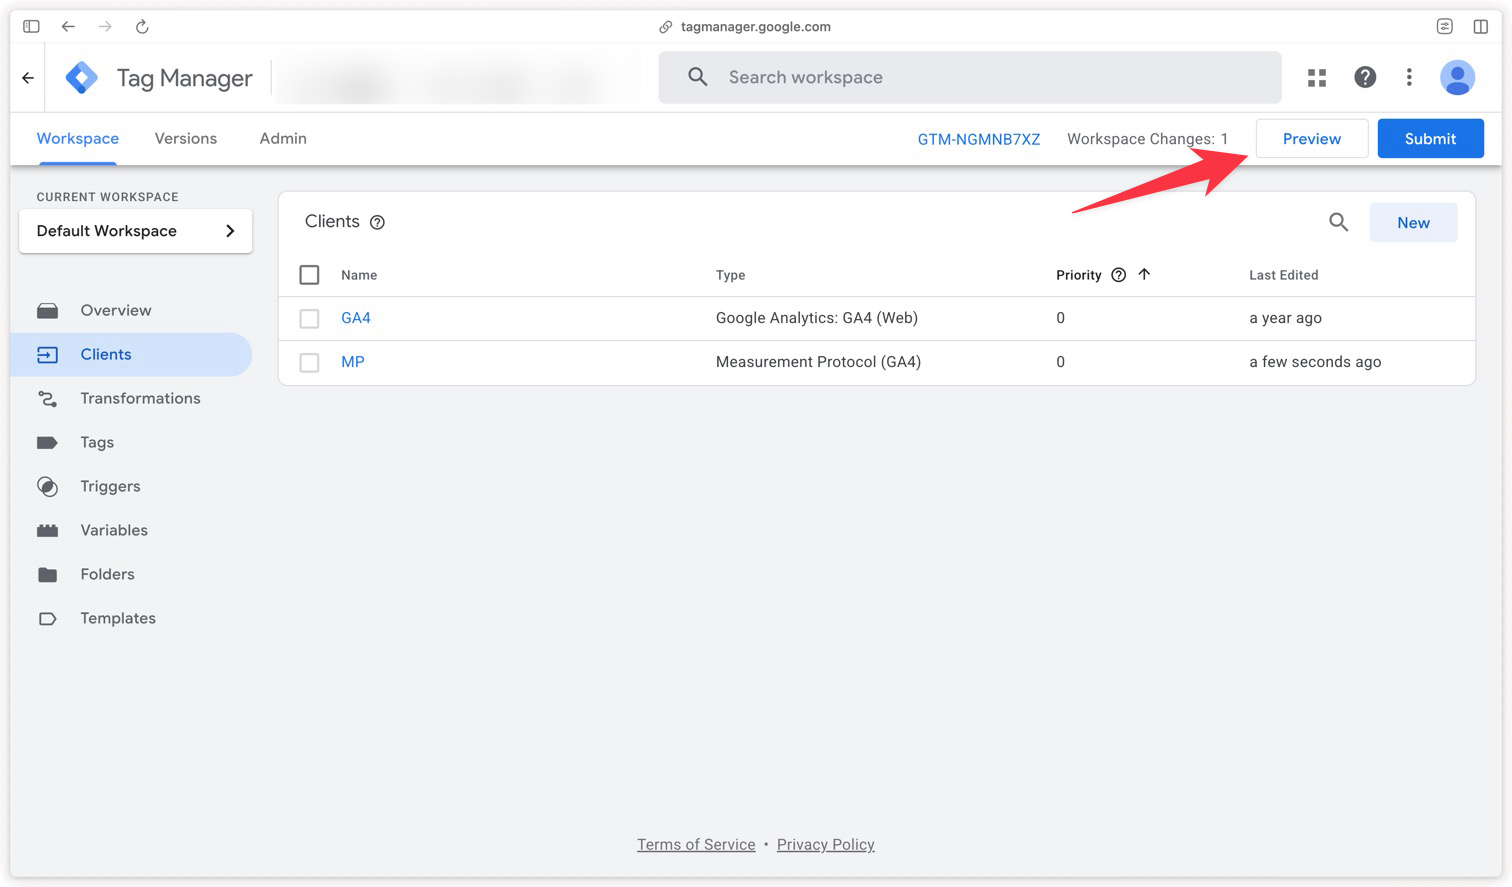
Then open your GTM Server preview by clicking Preview.
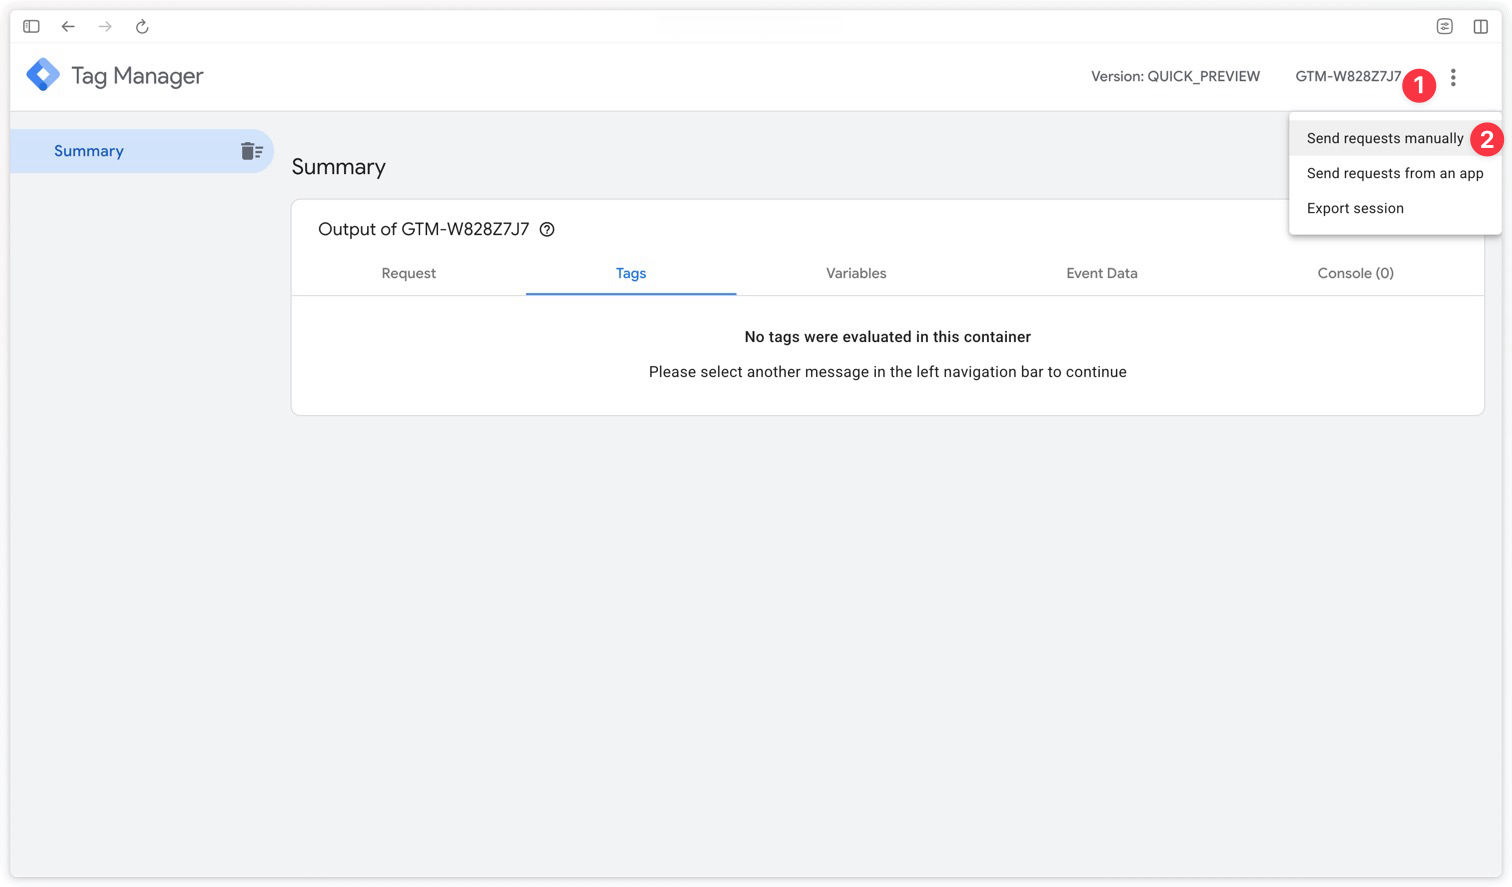
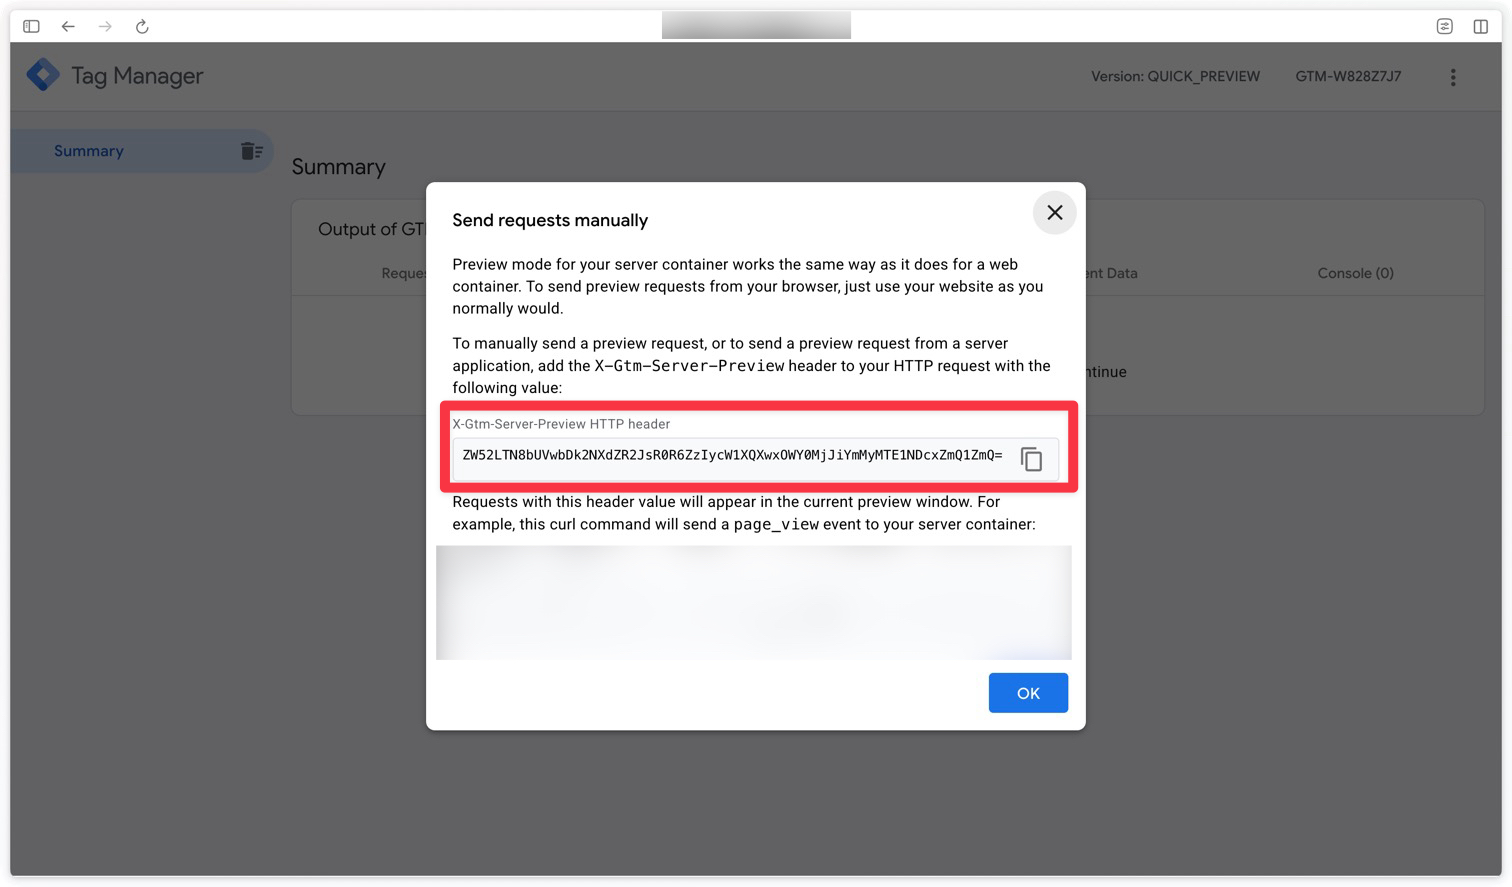
Then click the three dots in the top right of the preview window and select Send requests manually.
Then copy the preview token.
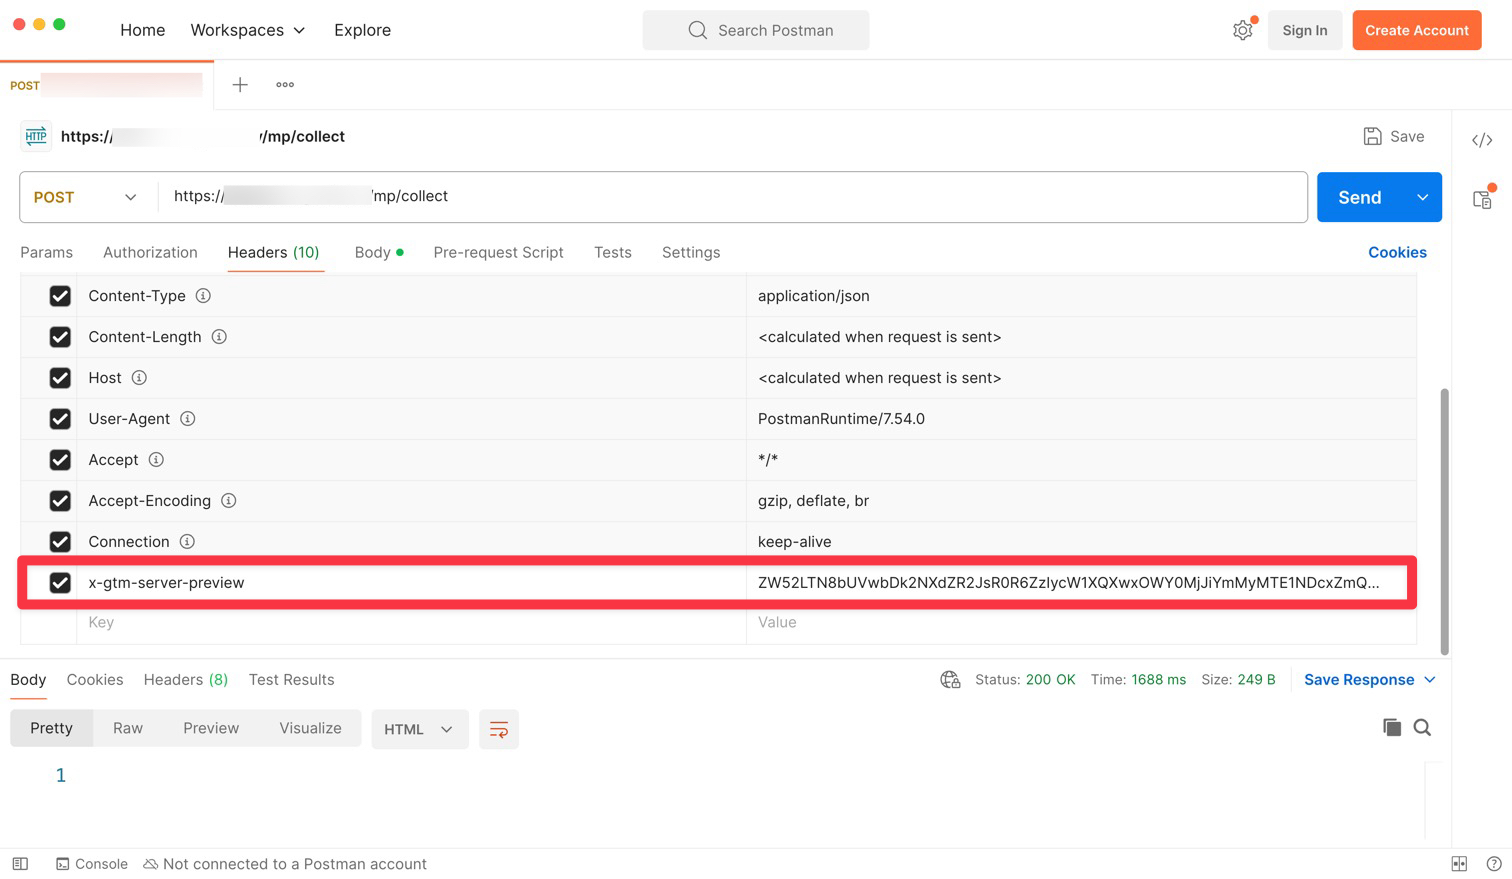
Add the preview token in the Headers tab of Postman with the x-gtm-server-preview key.
This token links your Postman request to your debug session: it is what makes your event appear in the preview window instead of being processed silently as production traffic. Without this header, you will not see anything show up in the preview.
Verifying the data sent to Data Manager API
Now that you have configured your Data Manager API Audiences tag and sent a test event to your GTM Server endpoint with Postman, it is time to check that your data is correctly received, first in the GTM Server preview and then in the platforms (Google Ads, Display & Video 360).
In the GTM Server preview
To check that your audience members are correctly sent to Data Manager API, you can use the Google Tag Manager Server preview mode. Make sure to set the Validate Only option to true so that you do not actually change your lists during your tests.
The first thing to check is that your event is properly received in the GTM Server preview. Then, click the members_upload event in the list of received events and check that the Data Manager API Audiences tag fired successfully.
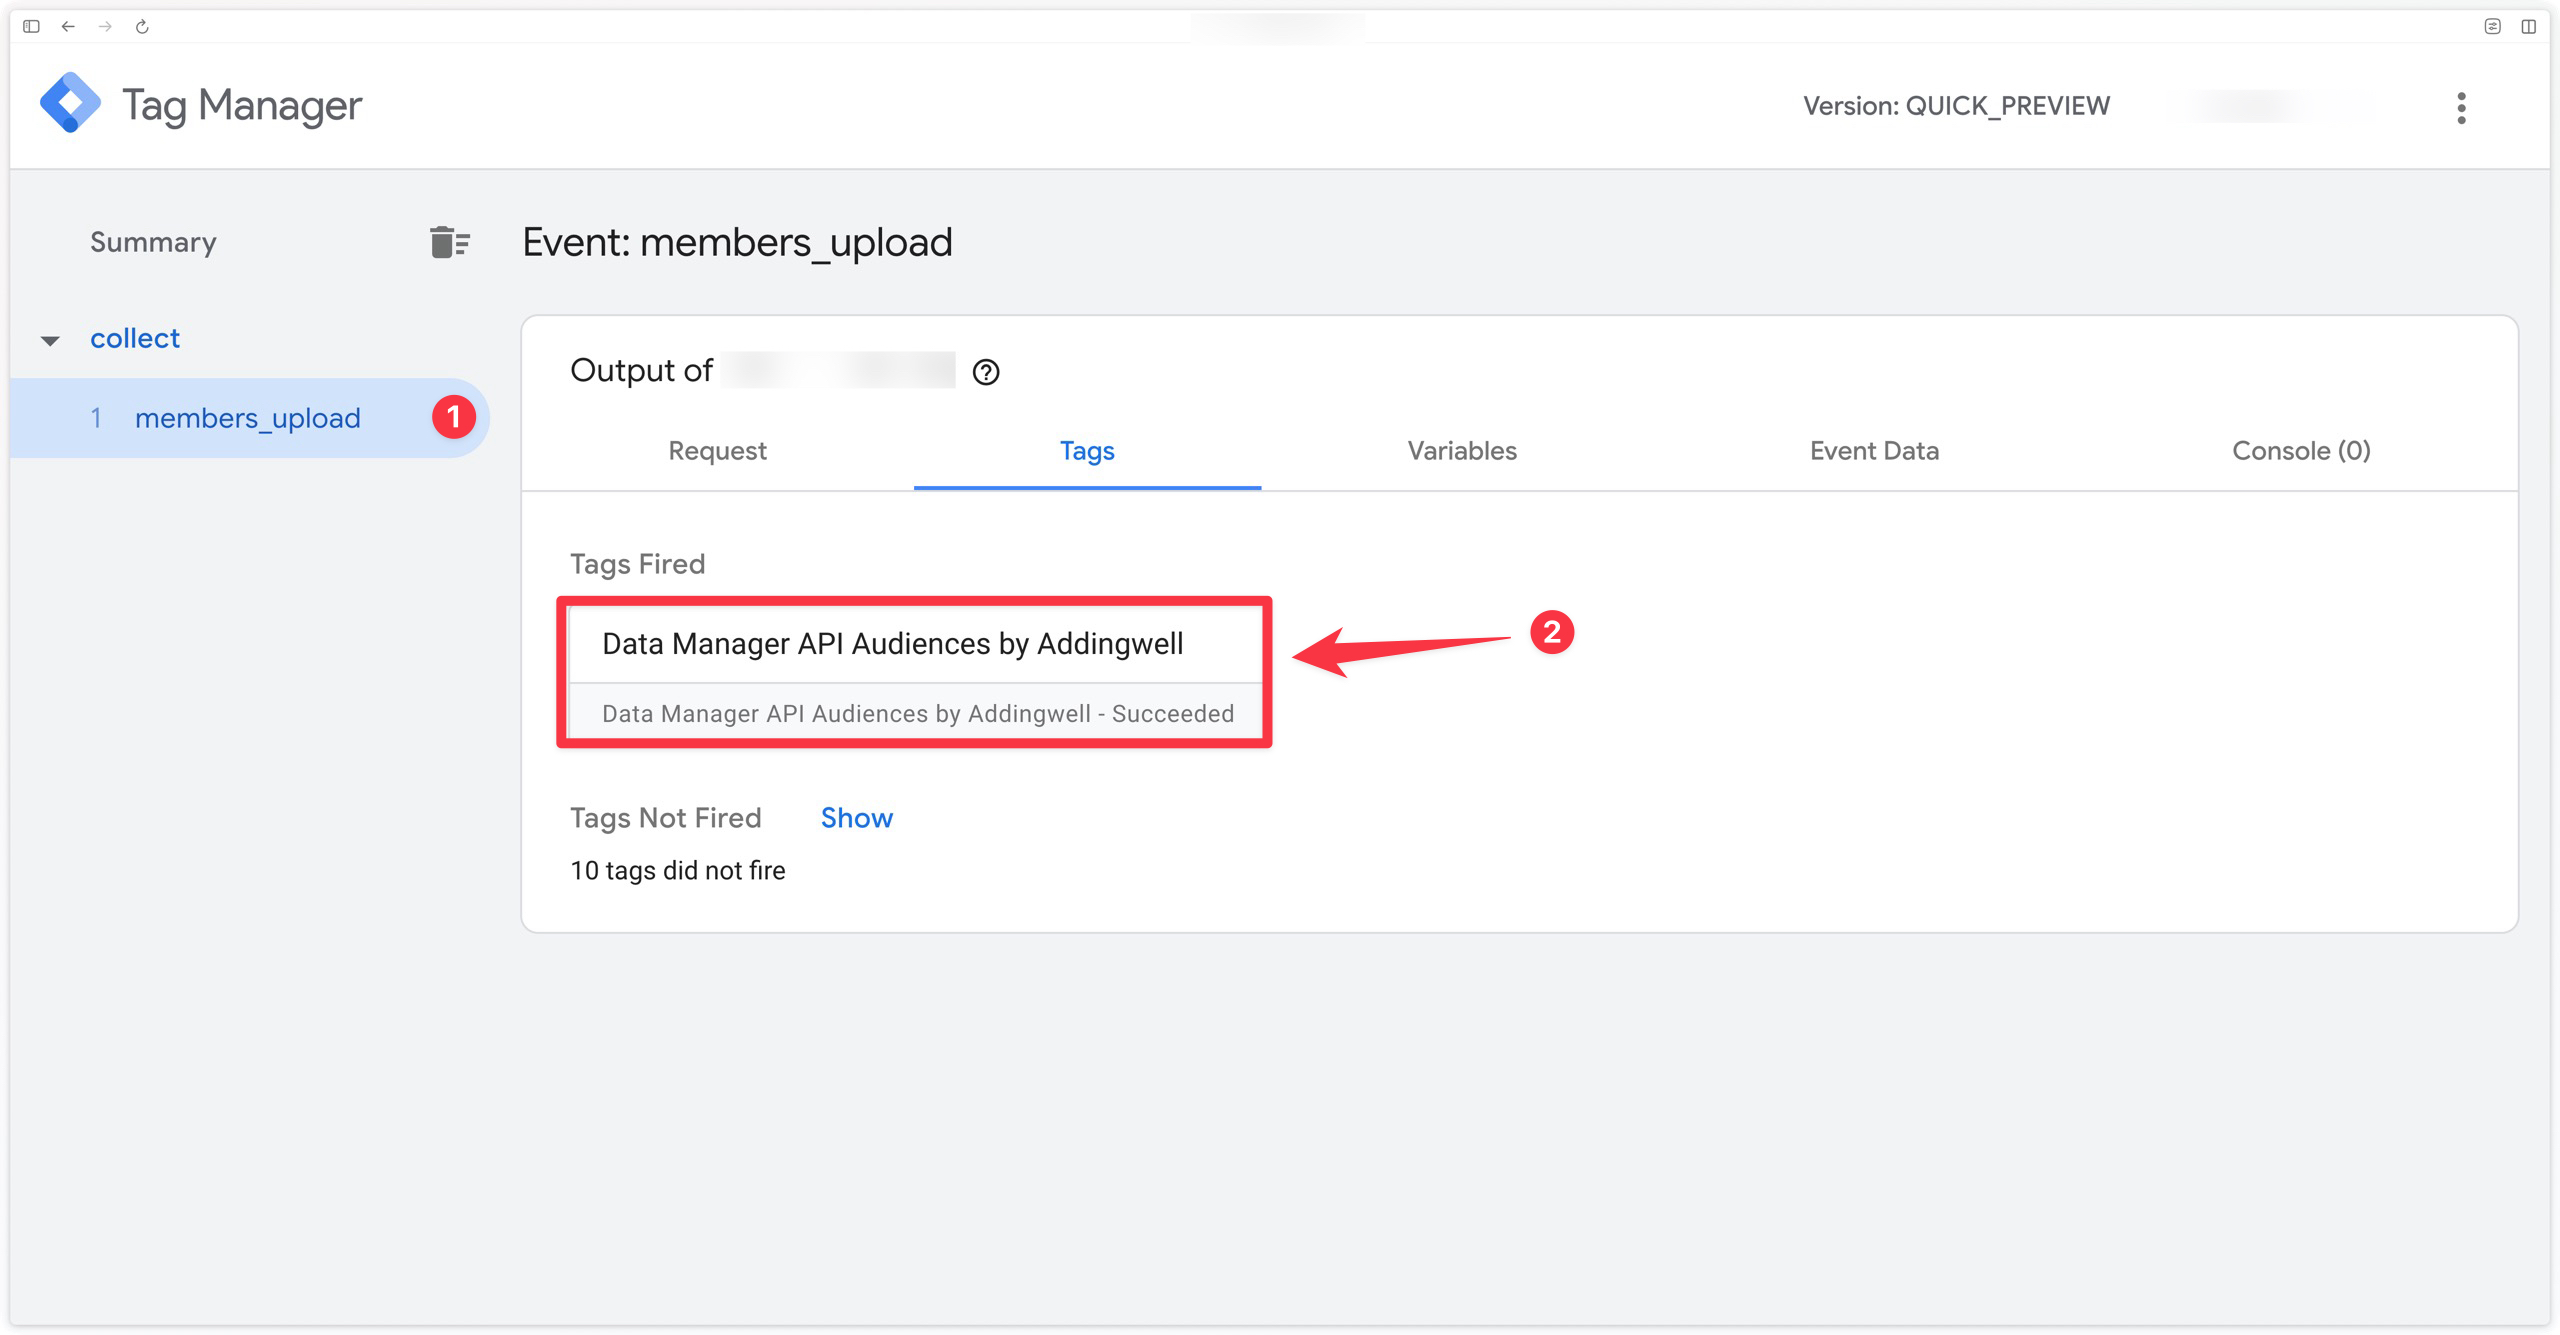
Then click the Data Manager API Audiences tag to check that the tag does send a request to Data Manager API.
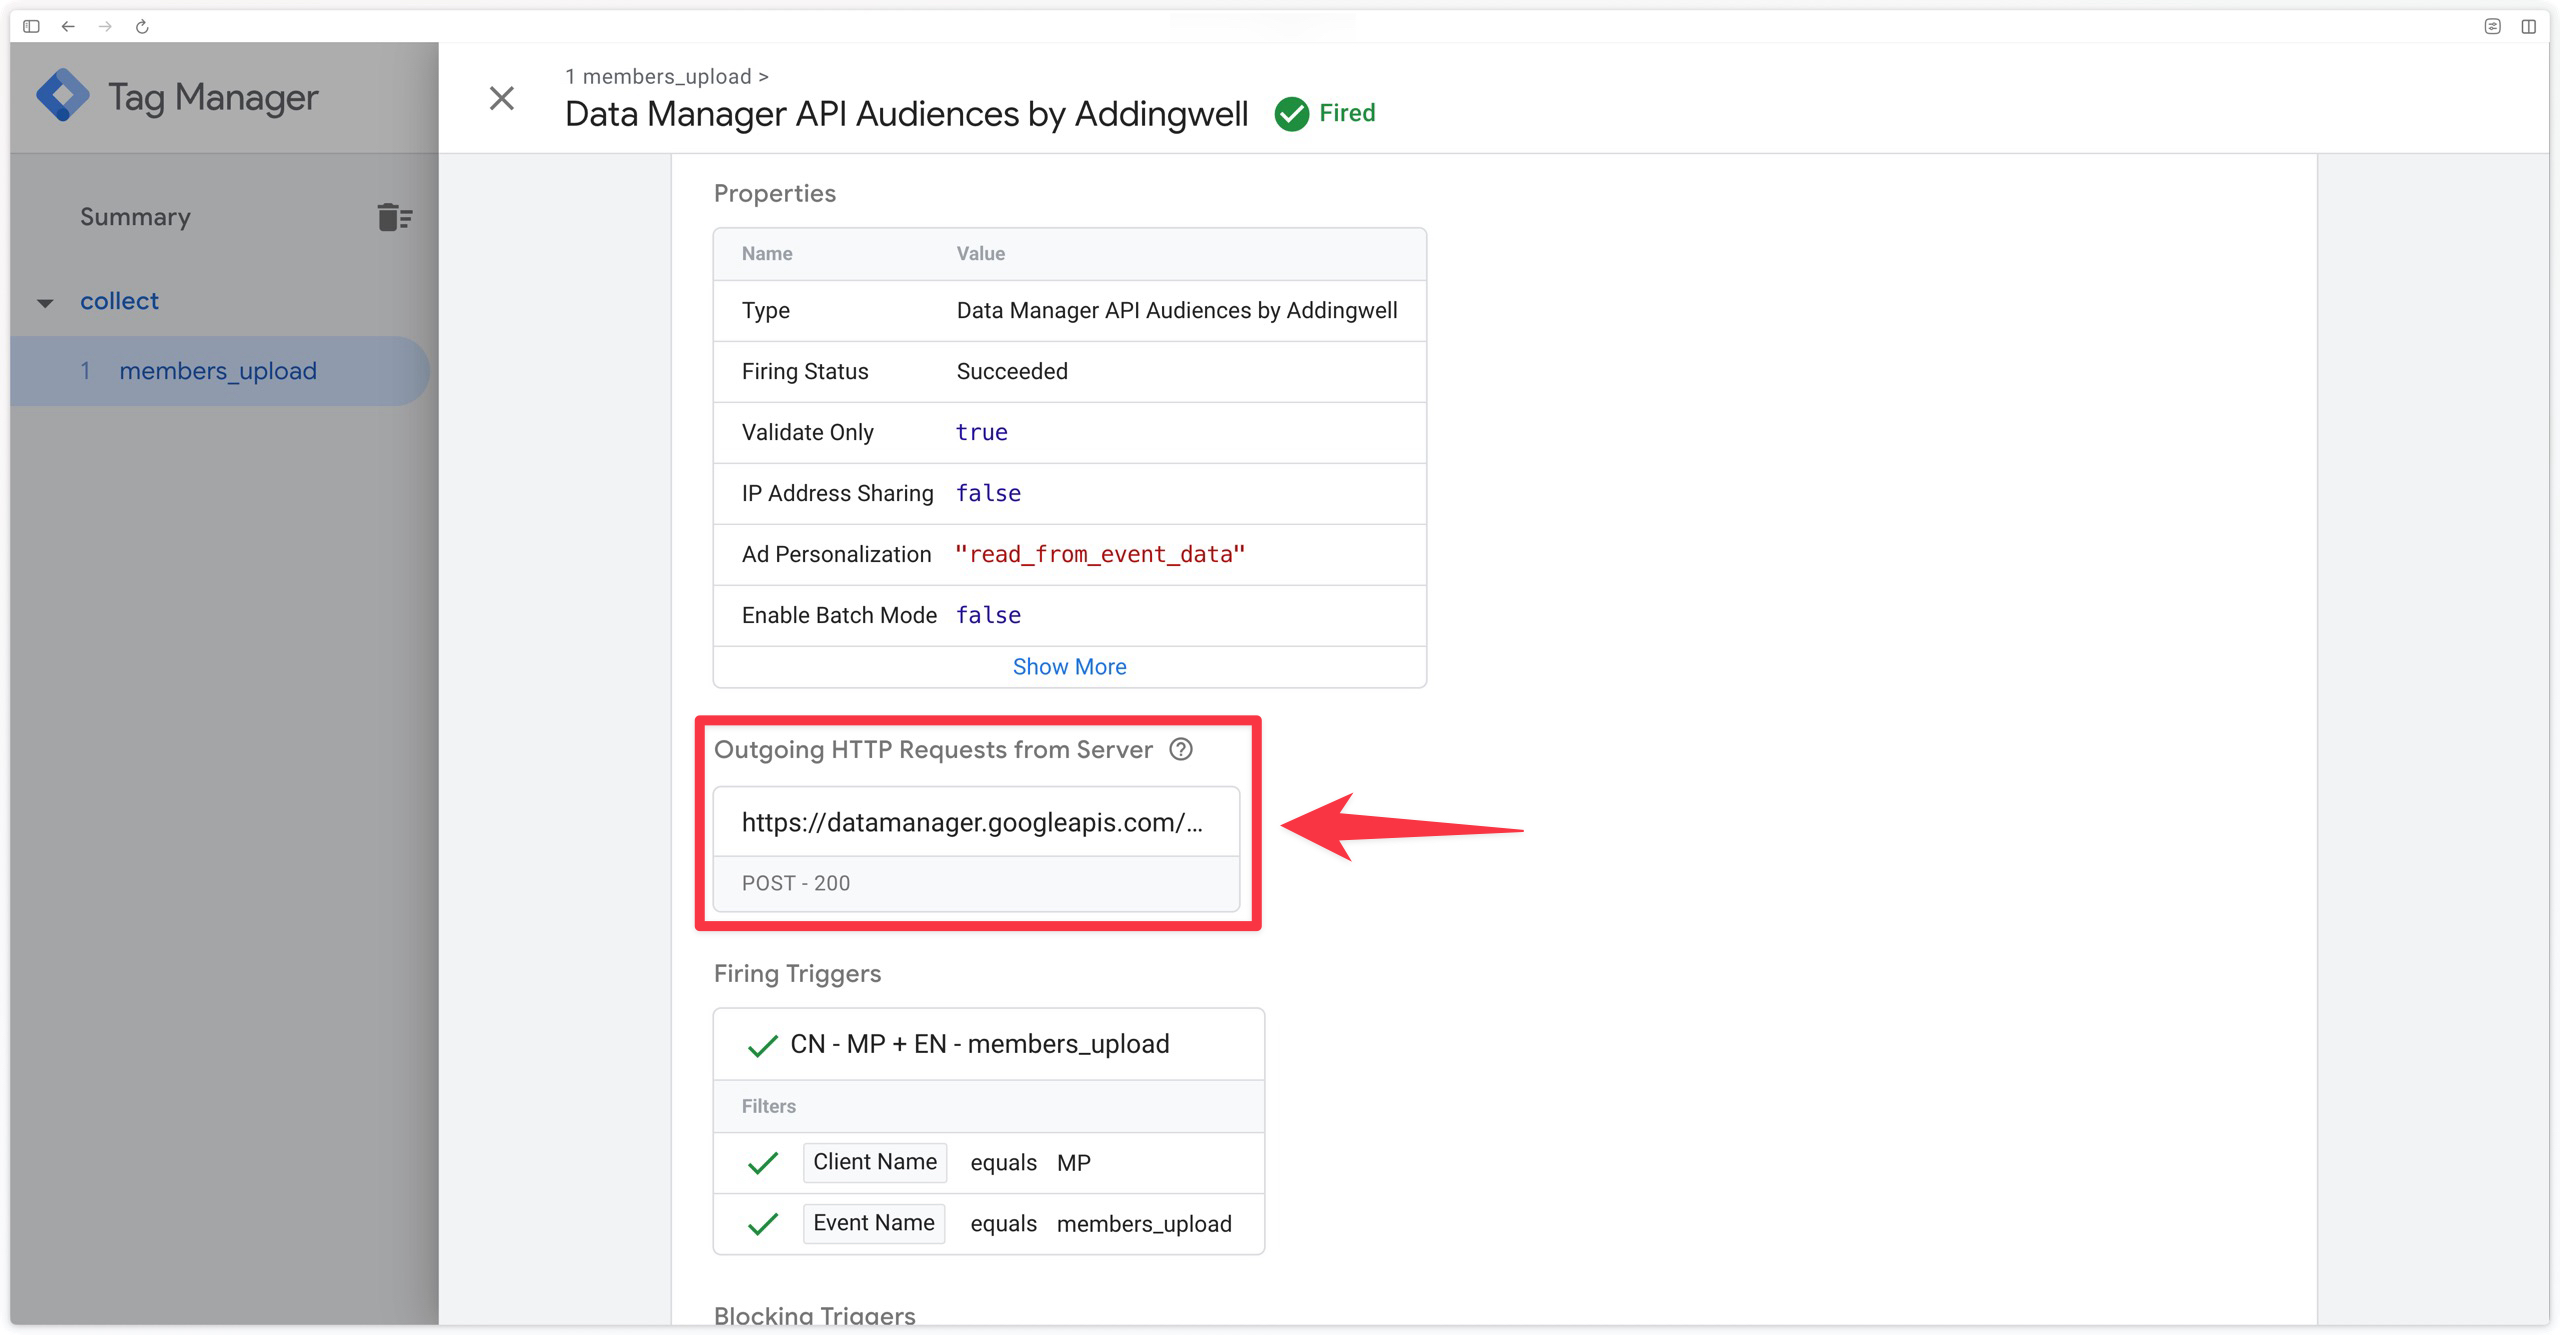
Then click the request sent to Data Manager API to check that the data sent matches your expectations.
In particular, you can check that the endpoint called is the right one (audienceMembers:ingest for an addition, audienceMembers:remove for a removal), that the destination identifiers (Operating Customer ID, Customer ID, Customer List ID) are correct, that the number of members matches what you sent, and that the user data is correctly hashed.
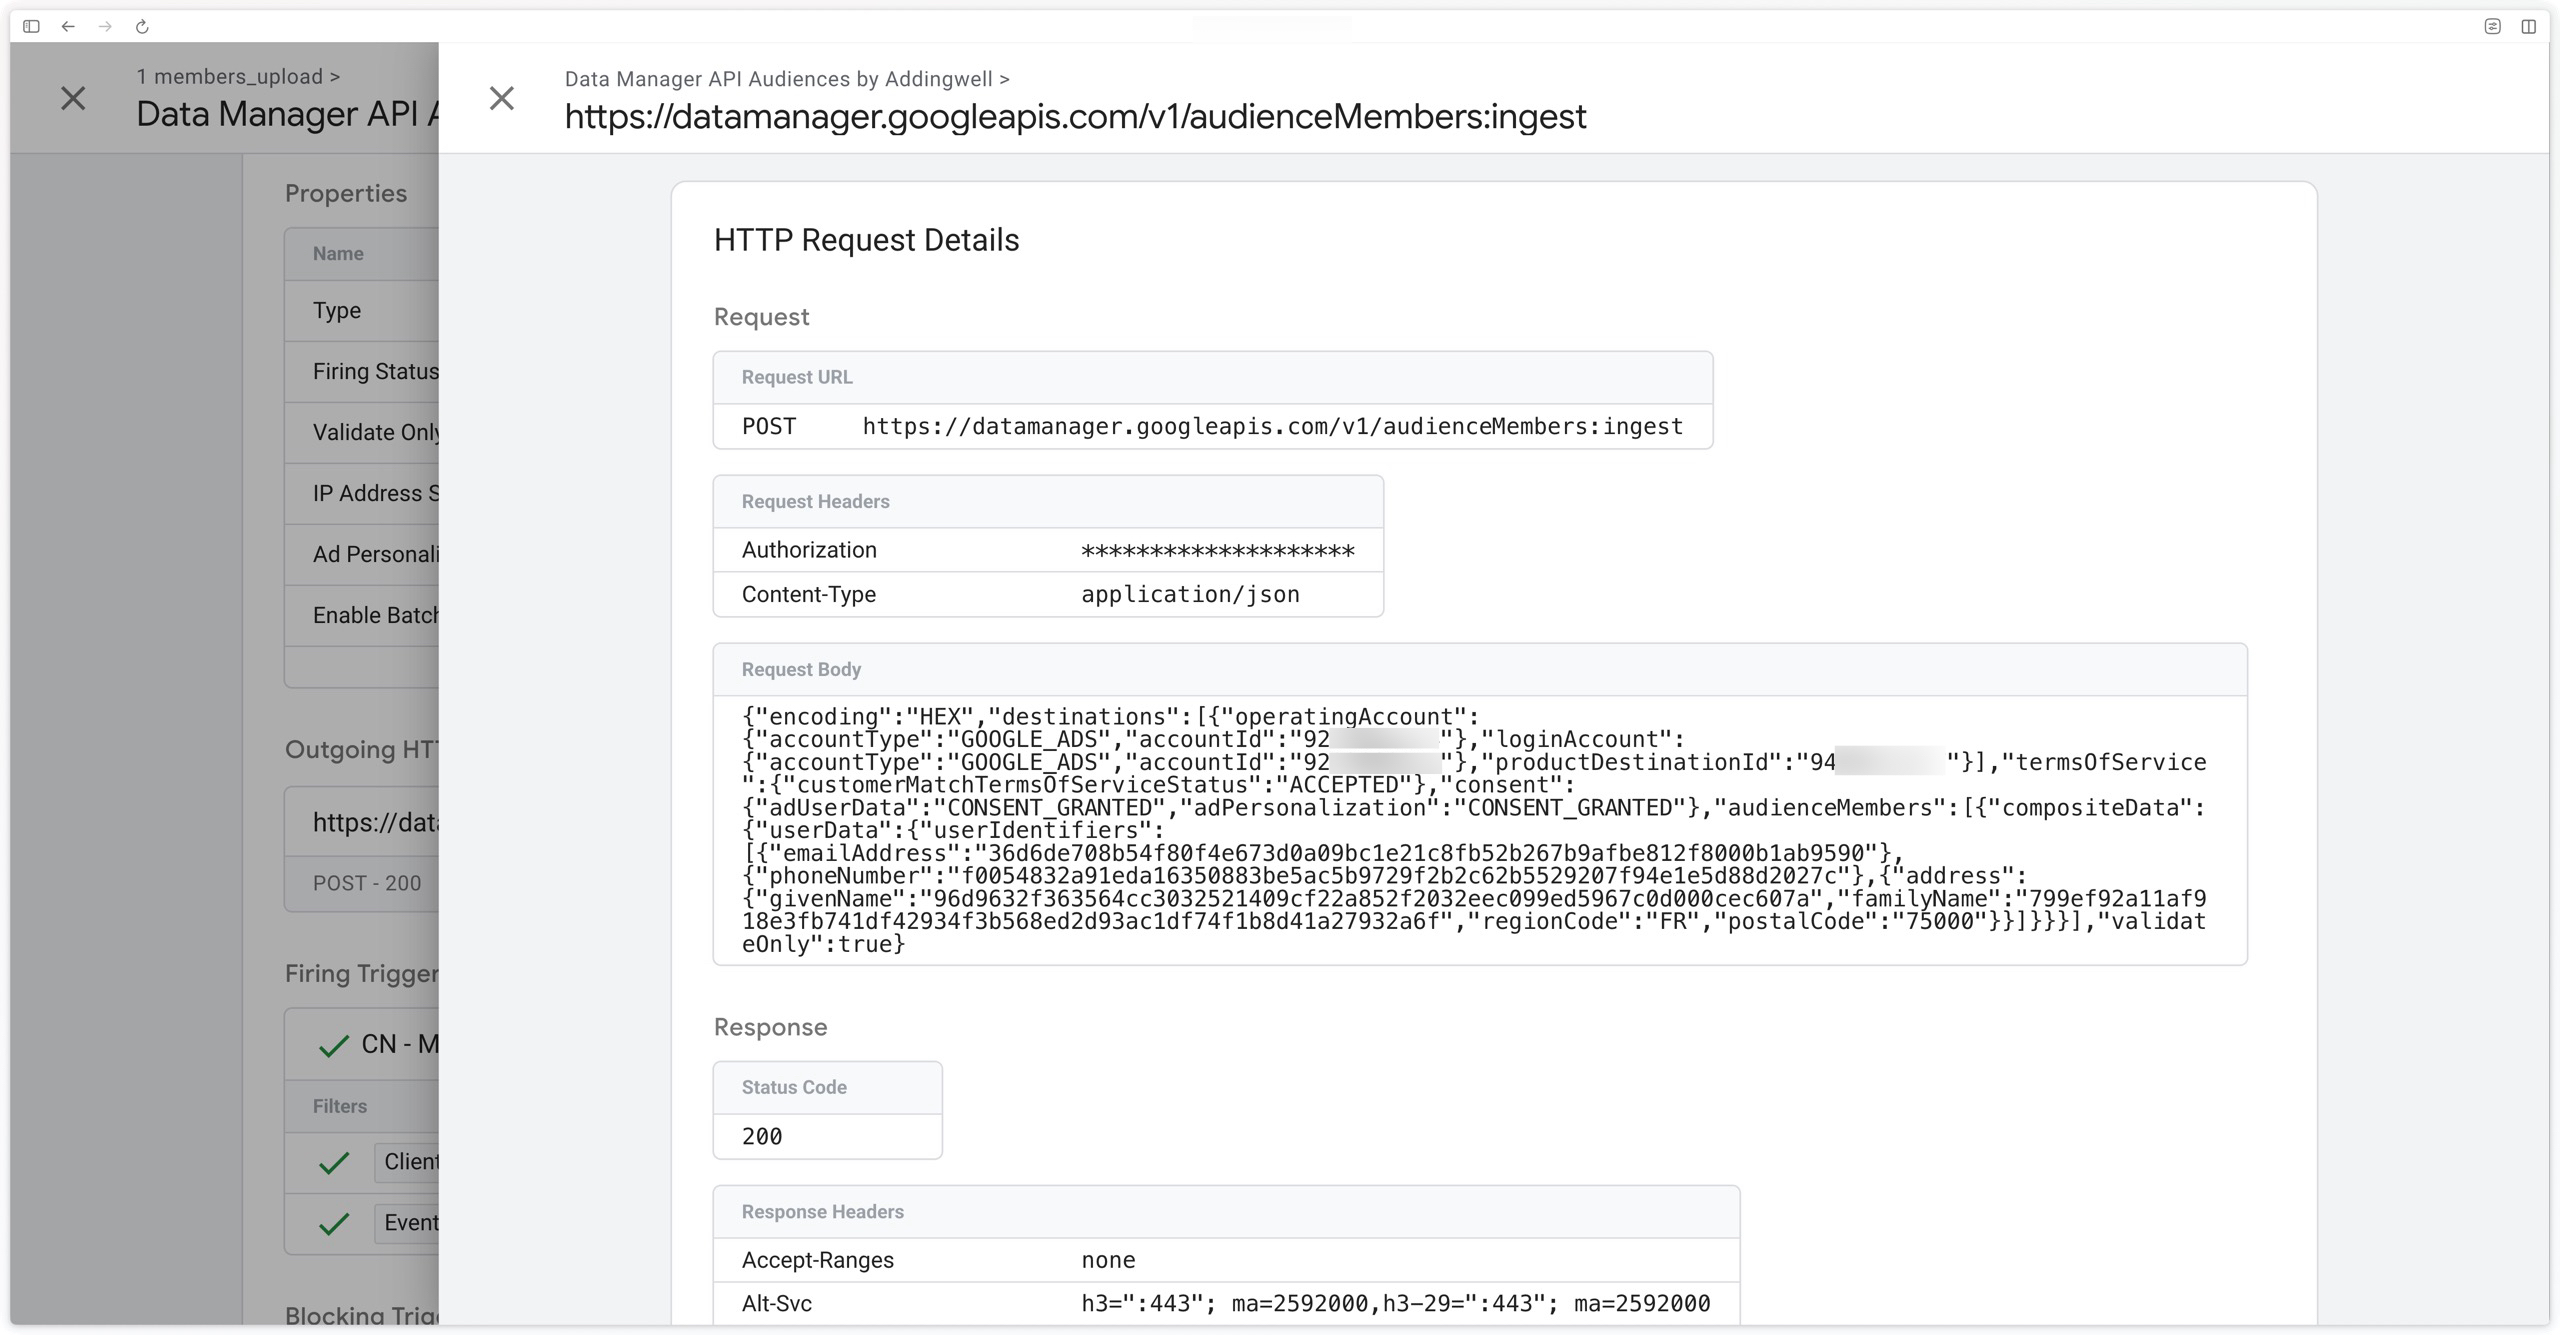
Here is the request body, properly formatted:
{
  "encoding": "HEX",
  "destinations": [
    {
      "operatingAccount": {
        "accountType": "GOOGLE_ADS",
        "accountId": "3426547582"
      },
      "loginAccount": {
        "accountType": "GOOGLE_ADS",
        "accountId": "6436831588"
      },
      "productDestinationId": "6328279871"
    }
  ],
  "termsOfService": {
    "customerMatchTermsOfServiceStatus": "ACCEPTED"
  },
  "consent": {
    "adUserData": "CONSENT_GRANTED",
    "adPersonalization": "CONSENT_GRANTED"
  },
  "audienceMembers": [
    {
      "compositeData": {
        "userData": {
          "userIdentifiers": [
            {
              "emailAddress": "36d6de708b54f80f4e673d0a09bc1e21c8fb52b267b9afbe812f8000b1ab9590"
            },
            {
              "phoneNumber": "f0054832a91eda16350883be5ac5b9729f2b2c62b5529207f94e1e5d88d2027c"
            },
            {
              "address": {
                "givenName": "96d9632f363564cc3032521409cf22a852f2032eec099ed5967c0d000cec607a",
                "familyName": "799ef92a11af918e3fb741df42934f3b568ed2d93ac1df74f1b8d41a27932a6f",
                "regionCode": "FR",
                "postalCode": "75000"
              }
            }
          ]
        }
      }
    }
  ],
  "validateOnly": true
}
Verifying in Google Ads
Once you are happy with the requests sent to Data Manager API, you can set the validateOnly parameter to false. This will actually add (or remove) the members from your customer lists.
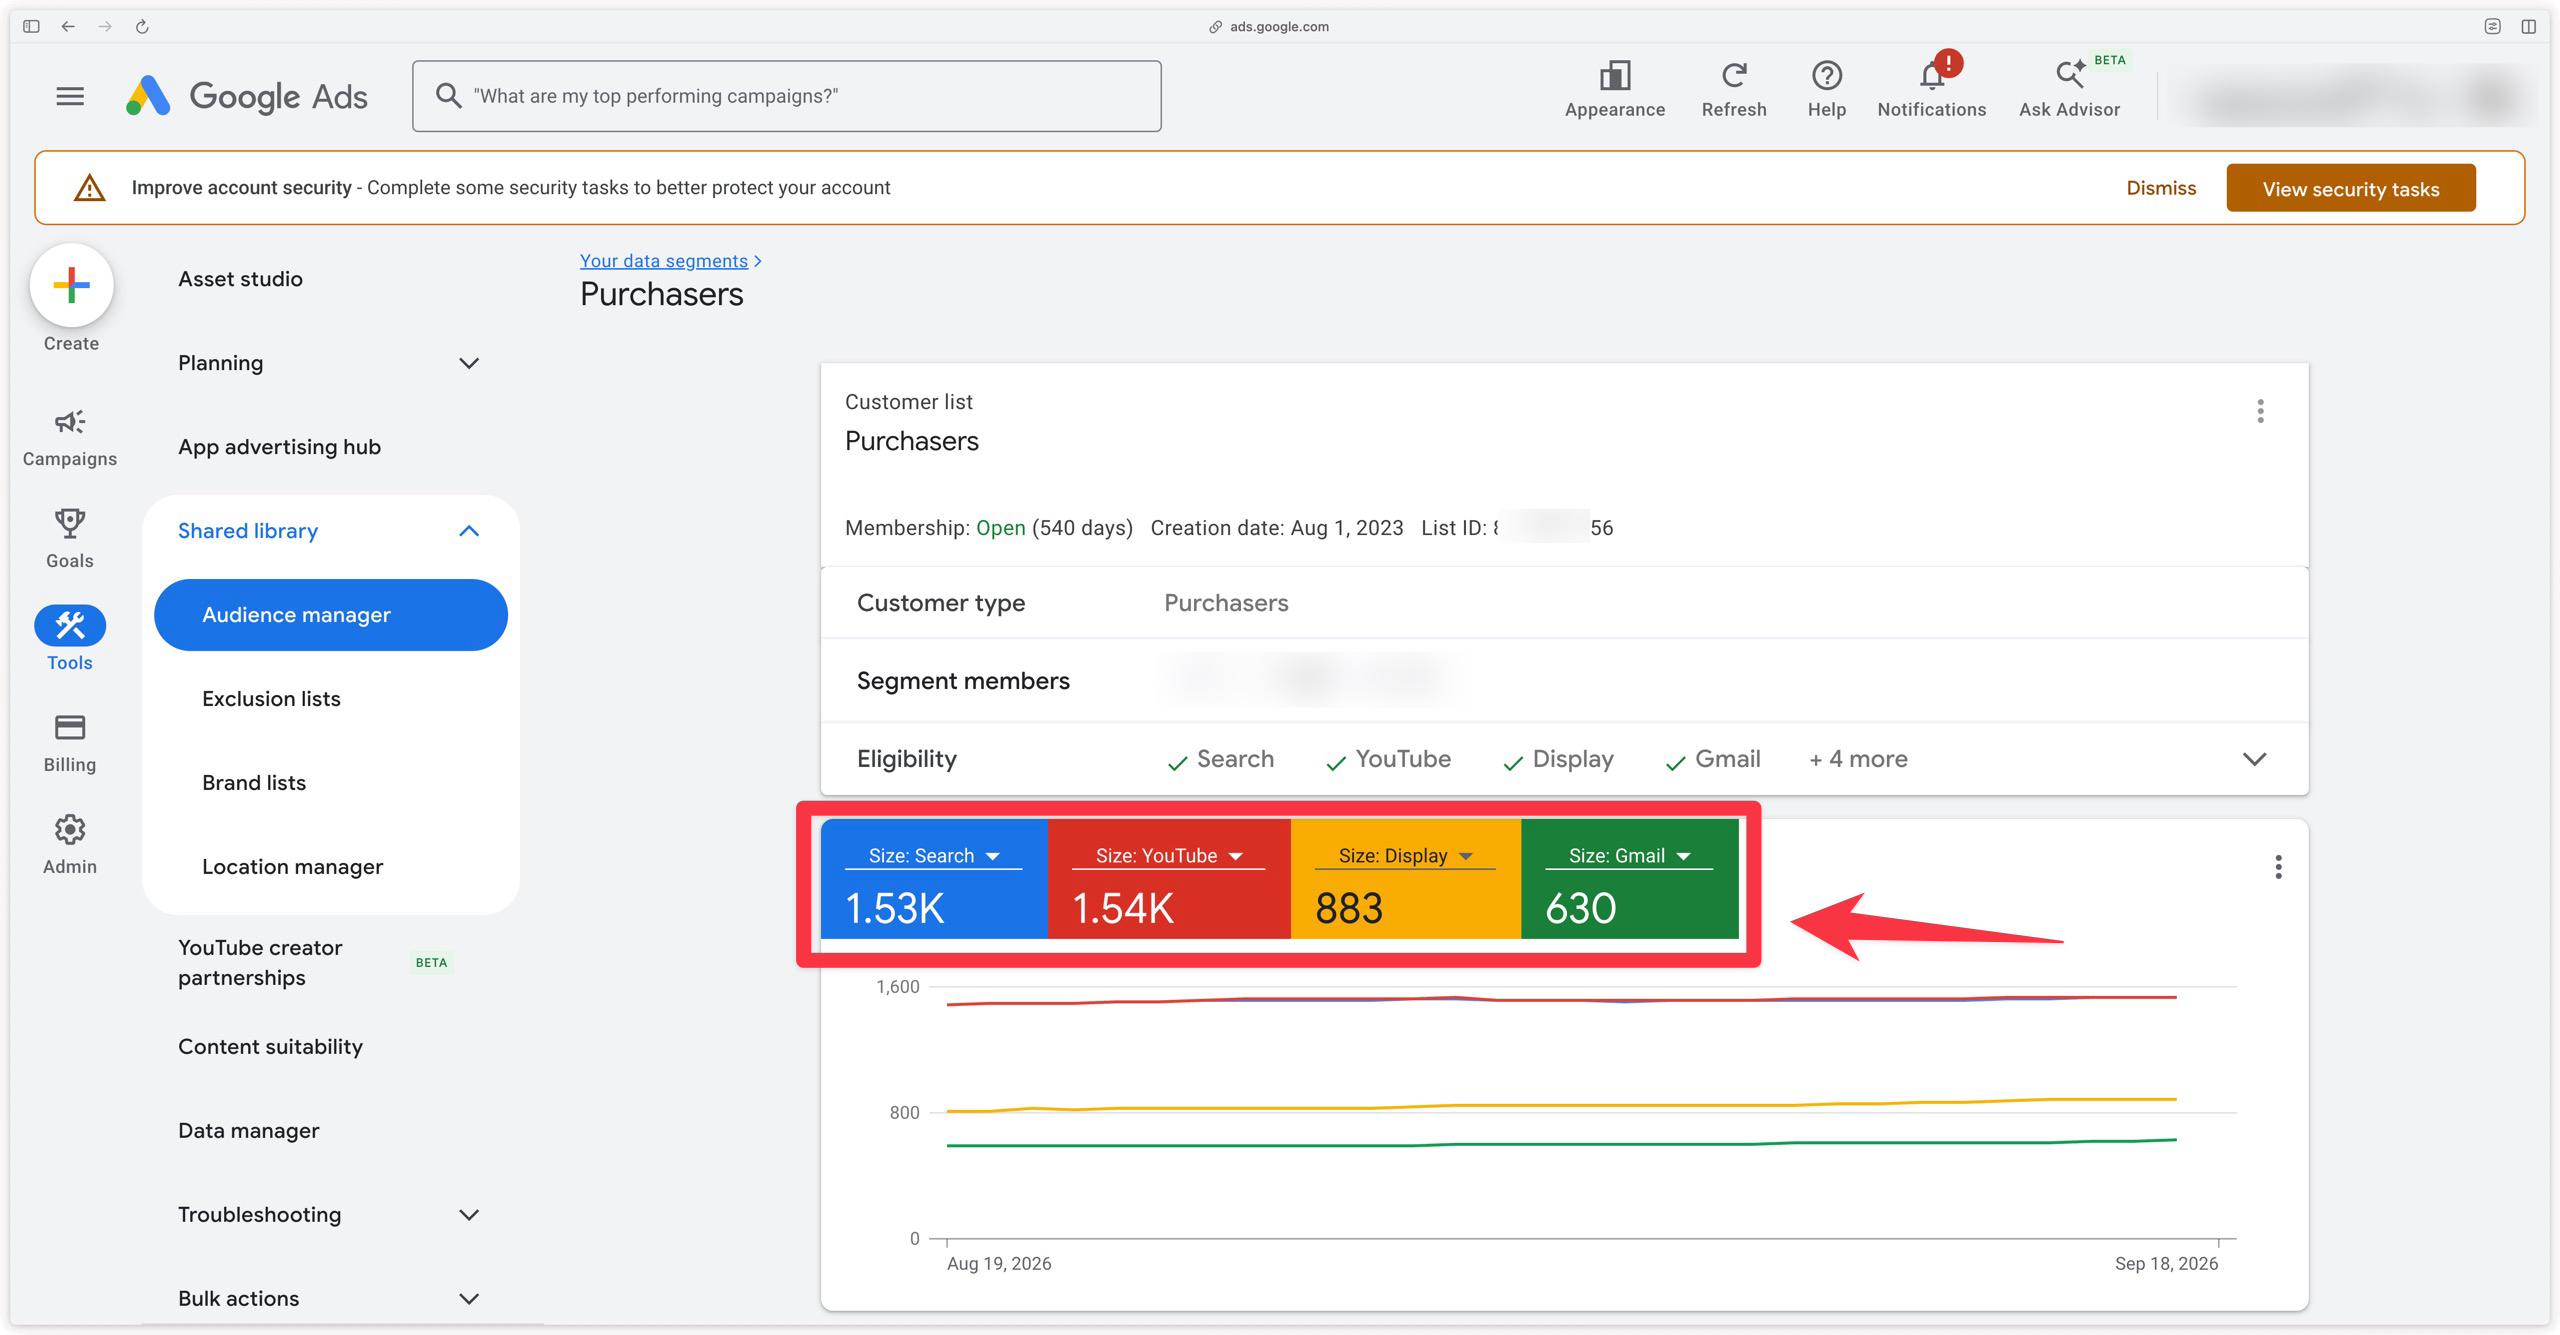
Then go to Tools → Shared library → Audience manager → Your data segments and open your customer list. There you can follow the evolution of the list size and the match rate of your uploads.
Google does not process members instantly: allow several hours (up to 24 to 48 hours) before your list size is updated. The size displayed per platform (Search, YouTube, Display) reflects the members actually matched, not the number of members sent.
Verifying in Display & Video 360
In the same way, go to the Audiences menu of your DV360 advertiser and open your customer list to follow the evolution of its size after your uploads.
Congratulations!
Congratulations! You now have everything you need to feed your Google Ads and Display & Video 360 Customer Match lists through Data Manager API from your GTM Server container. To sum up, the setup goes through a few main steps: configure authentication with the Addingwell service account, import and set up the Data Manager API Audiences tag, set up the Measurement Protocol (GA4) client to receive your requests, fire the tag on the right event, then test everything with Postman before setting validateOnly to false.
Beyond the technical configuration, keep in mind that the success of your project mostly relies on the quality of the data you send: complete and well-formatted first-party identifiers (email, phone in E.164 format, full postal address) to maximize the match rate, rigorous management of consent and of the Customer Match terms of service, and a reliable process to remove the members who request it. That upfront rigor is what will let you build audiences that are genuinely usable in your campaigns.
If you have a question or run into a blocker during your implementation, feel free to email our support team.