Consent Management with Axeptio and Google Tag Manager Server
Introduction
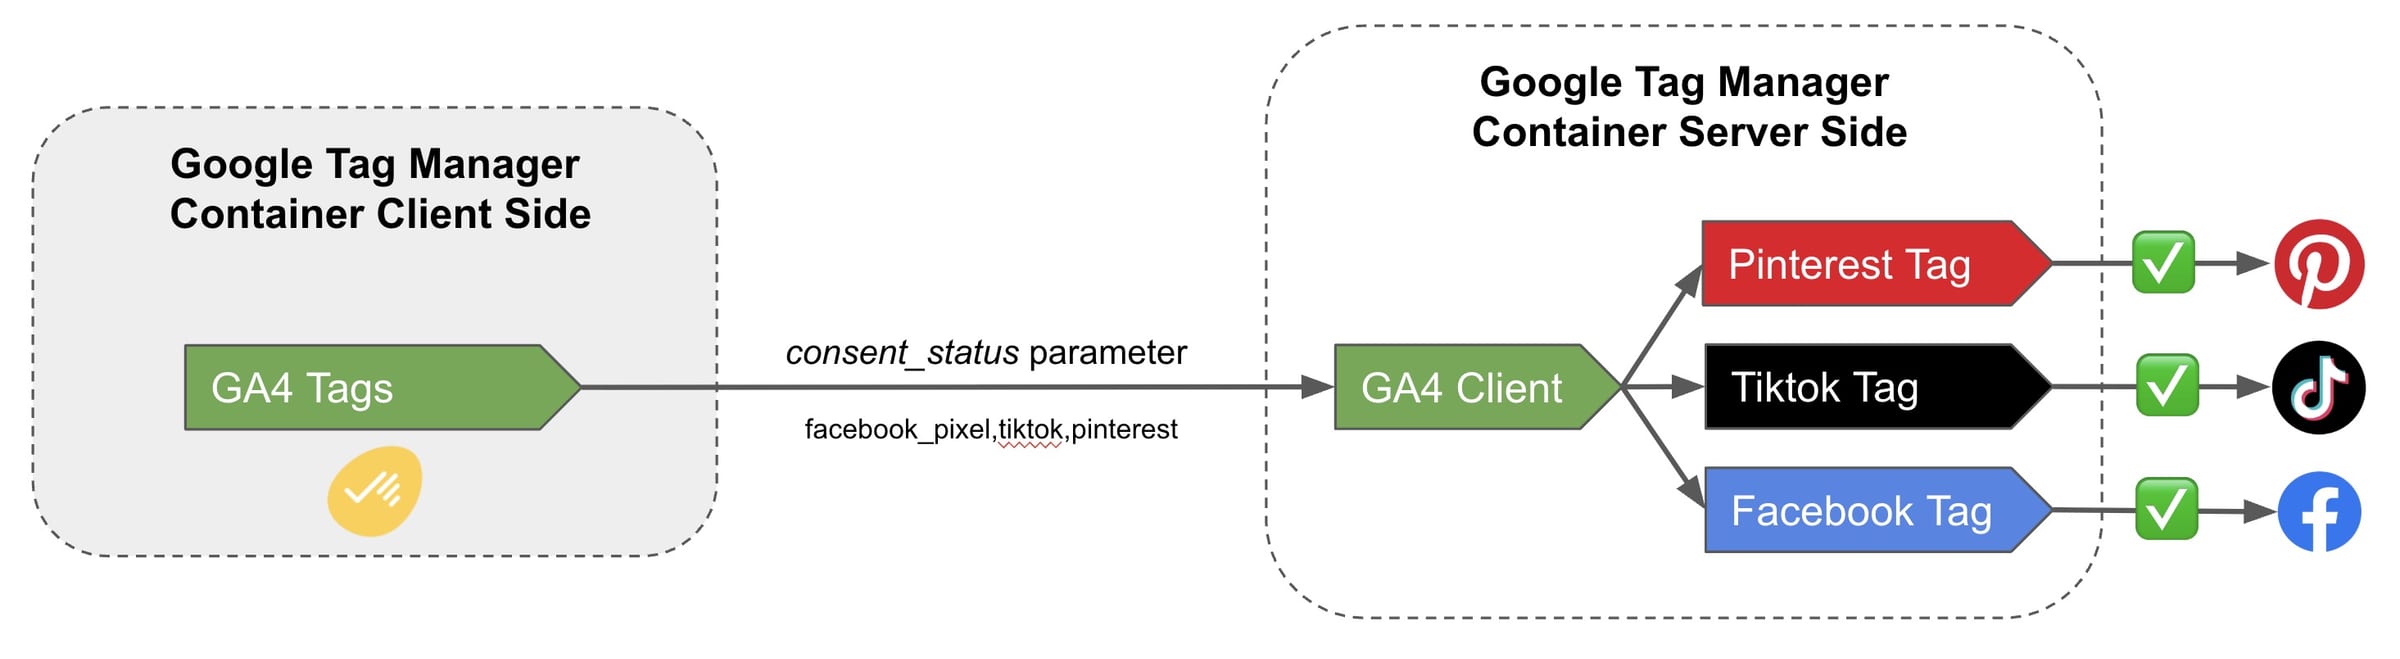
In this guide, we’ll show you how to manage consent with Axeptio and Google Tag Manager Server (GTM Server) within the framework of an Advanced Consent Mode V2. The goal is to condition your server-side tags based on the user’s consent given through Axeptio in the visitor’s browser.
For more context, see our general guide on server-side consent management.
Prerequisites
To follow this guide, you must have the following:
- An advanced Consent Mode V2 implementation in your GTM Web container
- A basic knowledge of Google Tag Manager Web and Server
- An active Axeptio account with a configured consent banner
- A Google Tag Manager Web container and a Google Tag Manager Server container set up
- Server-side tags already configured in your GTM Server container (for example, a GA4 tag or Meta Conversion API)
Configuring Axeptio on your website
Adding the Axeptio code to your website
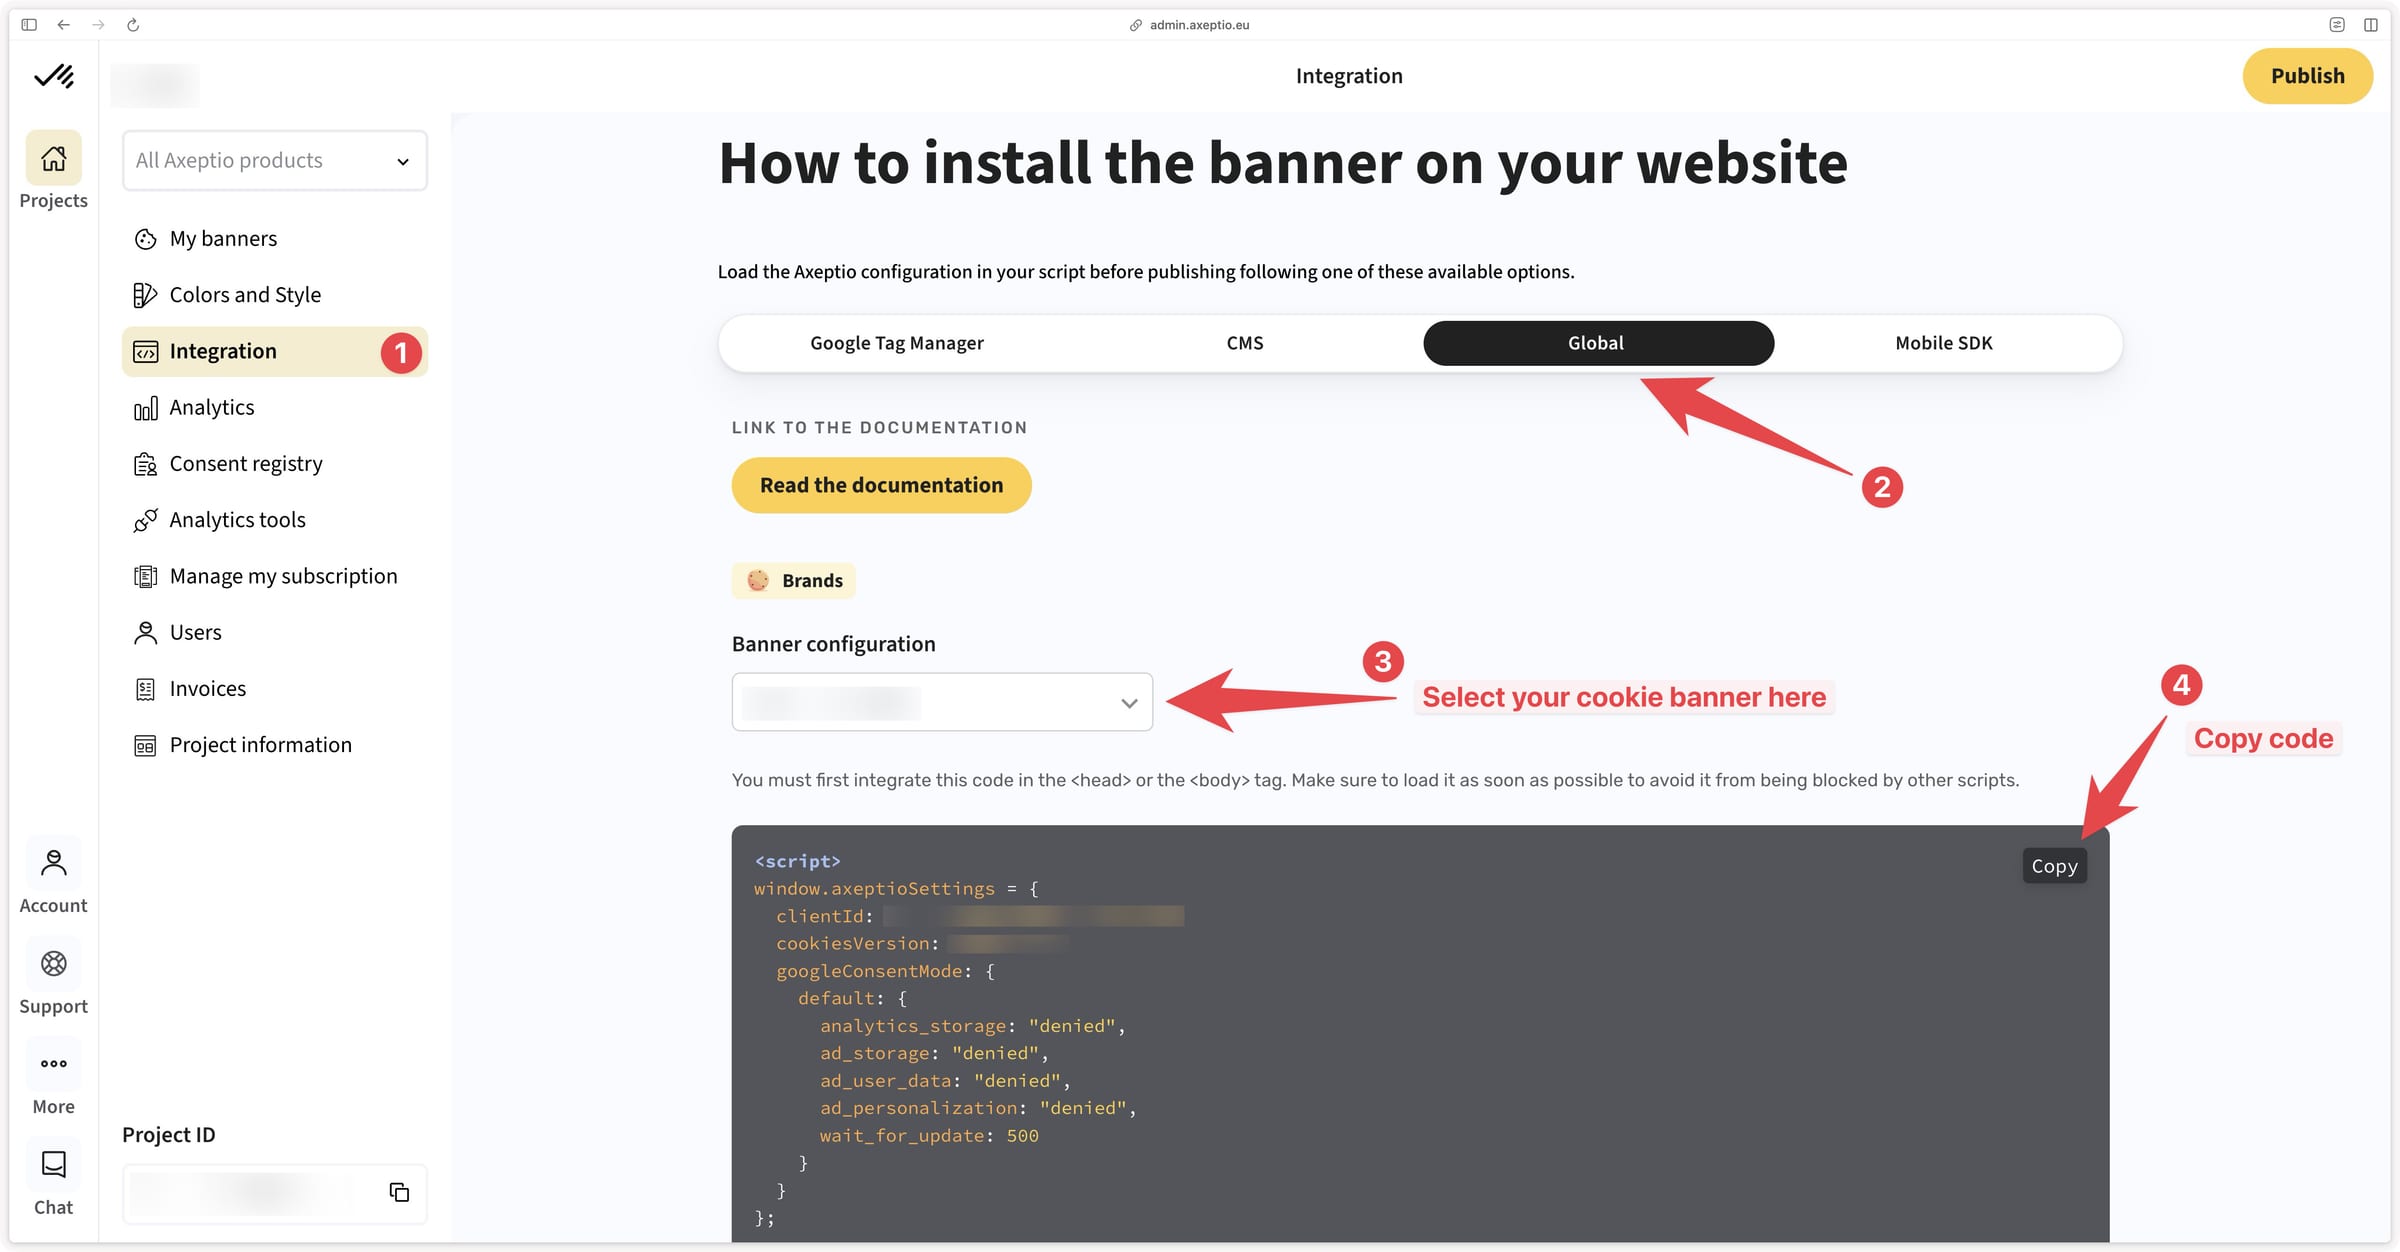
To get started, go to the Axeptio admin. Go to the Integration section.
Choose the Global integration type, then copy the consent banner code.
Google Consent Mode configuration
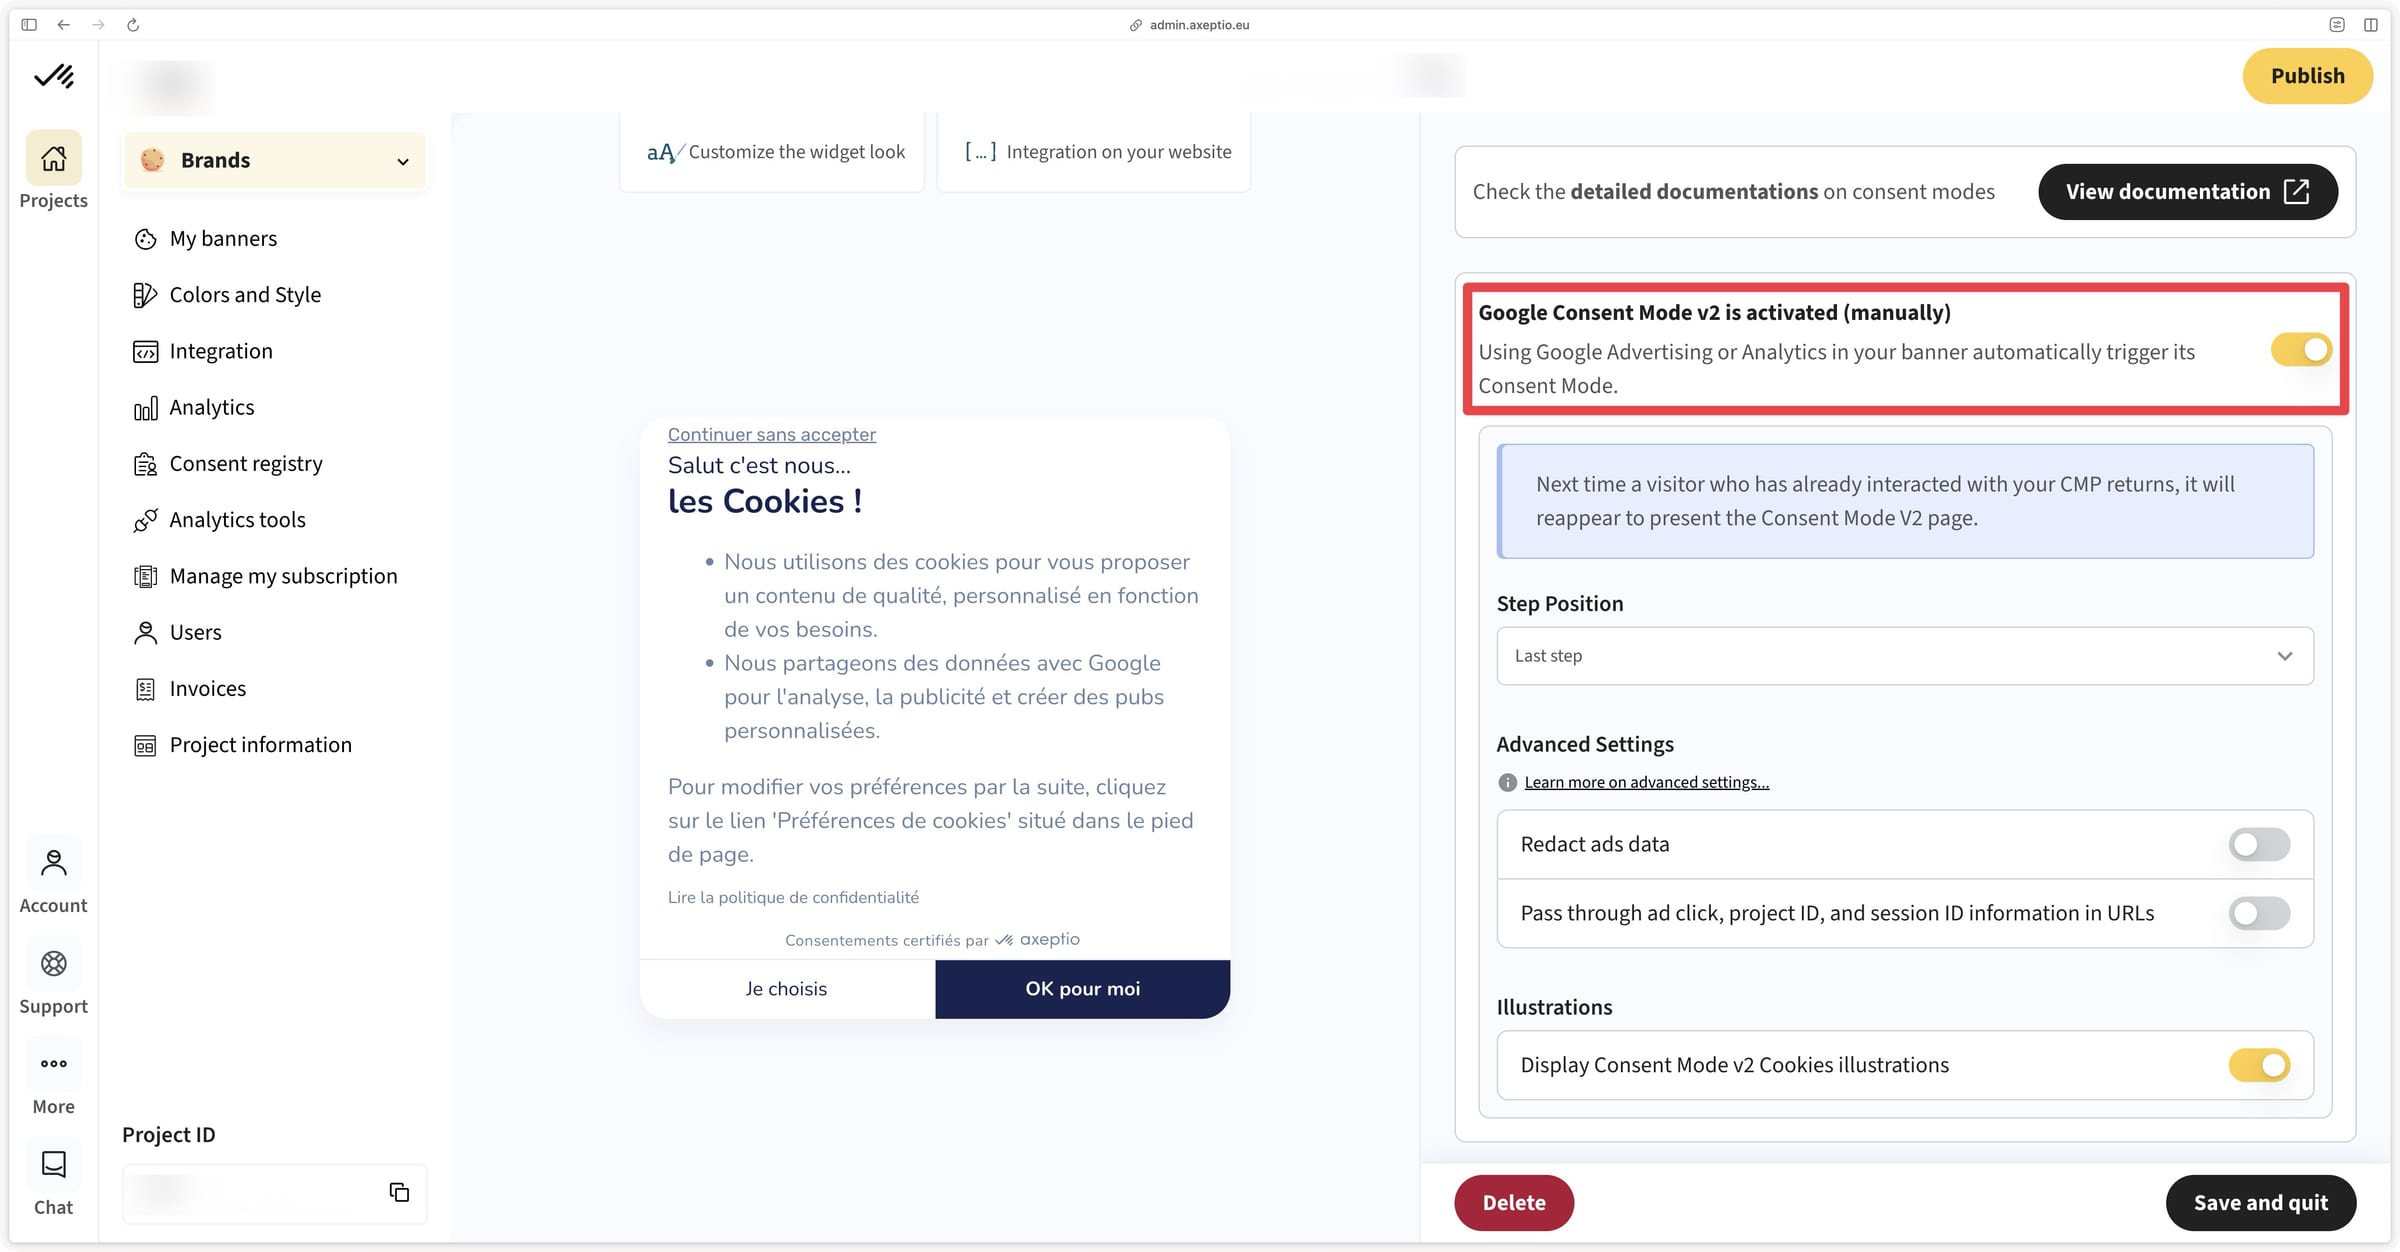
If you don’t see the googleConsentMode section in your Axeptio integration code, it means you haven’t enabled Google Consent Mode in your Axeptio banner settings.
If you send your data to Google Ads, Google Analytics, or Floodlight, you need to enable Consent Mode in your Axeptio banner. To do this, check the Enable Google Consent Mode box.
Note however that this Consent Mode configuration is generic, and some specifics of your implementation may require additional adjustments.
Then paste this code as high as possible in the <head> section of your website, ideally right after the opening <head> tag.
Important
Also make sure that Axeptio is loaded before the Google Tag Manager Web script.
<html>
    <head>
        <script>
            window.axeptioSettings = {
                clientId: "<yourclientid>", // replace with your Axeptio clientId (Project ID)
                cookiesVersion: "<yourcookiesversion>", // replace with your banner version (if you have several banner versions)
                googleConsentMode: {
                    default: {
                        analytics_storage:"denied",
                        ad_storage:"denied",
                        ad_user_data:"denied",
                        ad_personalization:"denied",
                        wait_for_update:500
                    }
                }
            };
            (function(d,s) {
            var t = d.getElementsByTagName(s)[0],e = d.createElement(s);
            e.async = true;e.src = "//static.axept.io/sdk.js";
            t.parentNode.insertBefore(e, t);
            })(document, "script");
        </script>
    </head>
    <body>
    </body>
</html>
Retrieving the Axeptio consent state
To retrieve the consent state, we’ll use the value of the axeptio_authorized_vendors cookie. This cookie contains the names of all the vendors that the user has authorized via the Axeptio banner.
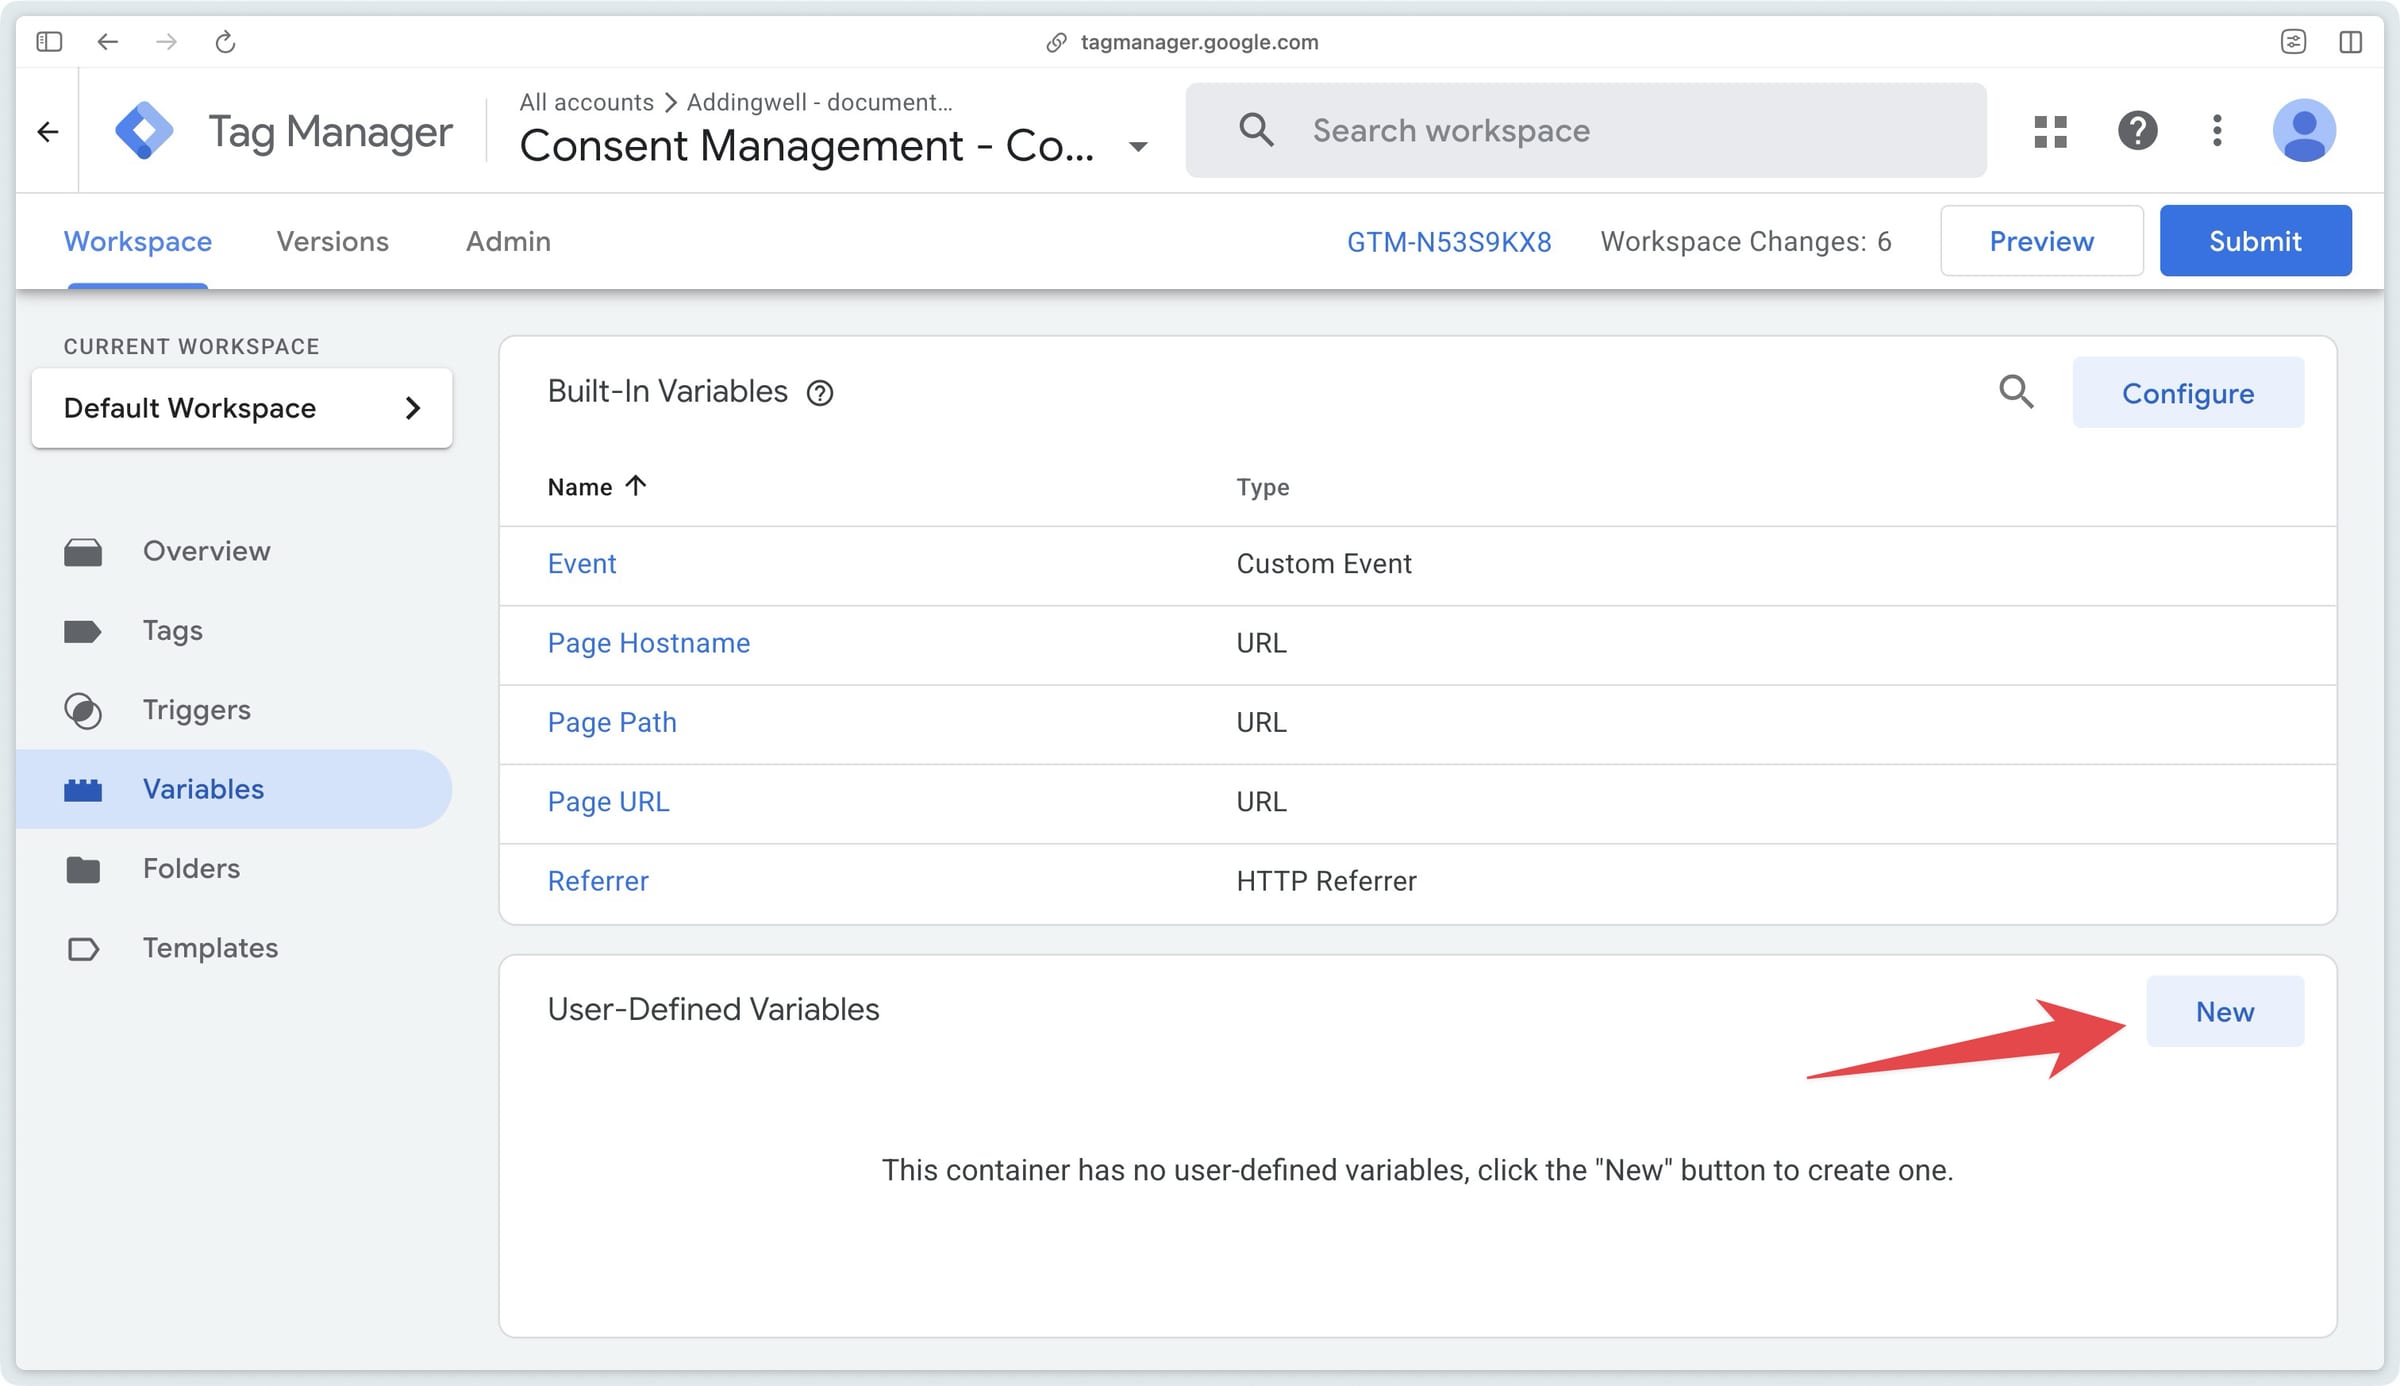
To do this, in GTM Web go to the Variables section, then click “New” to create a new variable in the User-Defined Variables section.
Then select the 1st Party Cookie variable type.
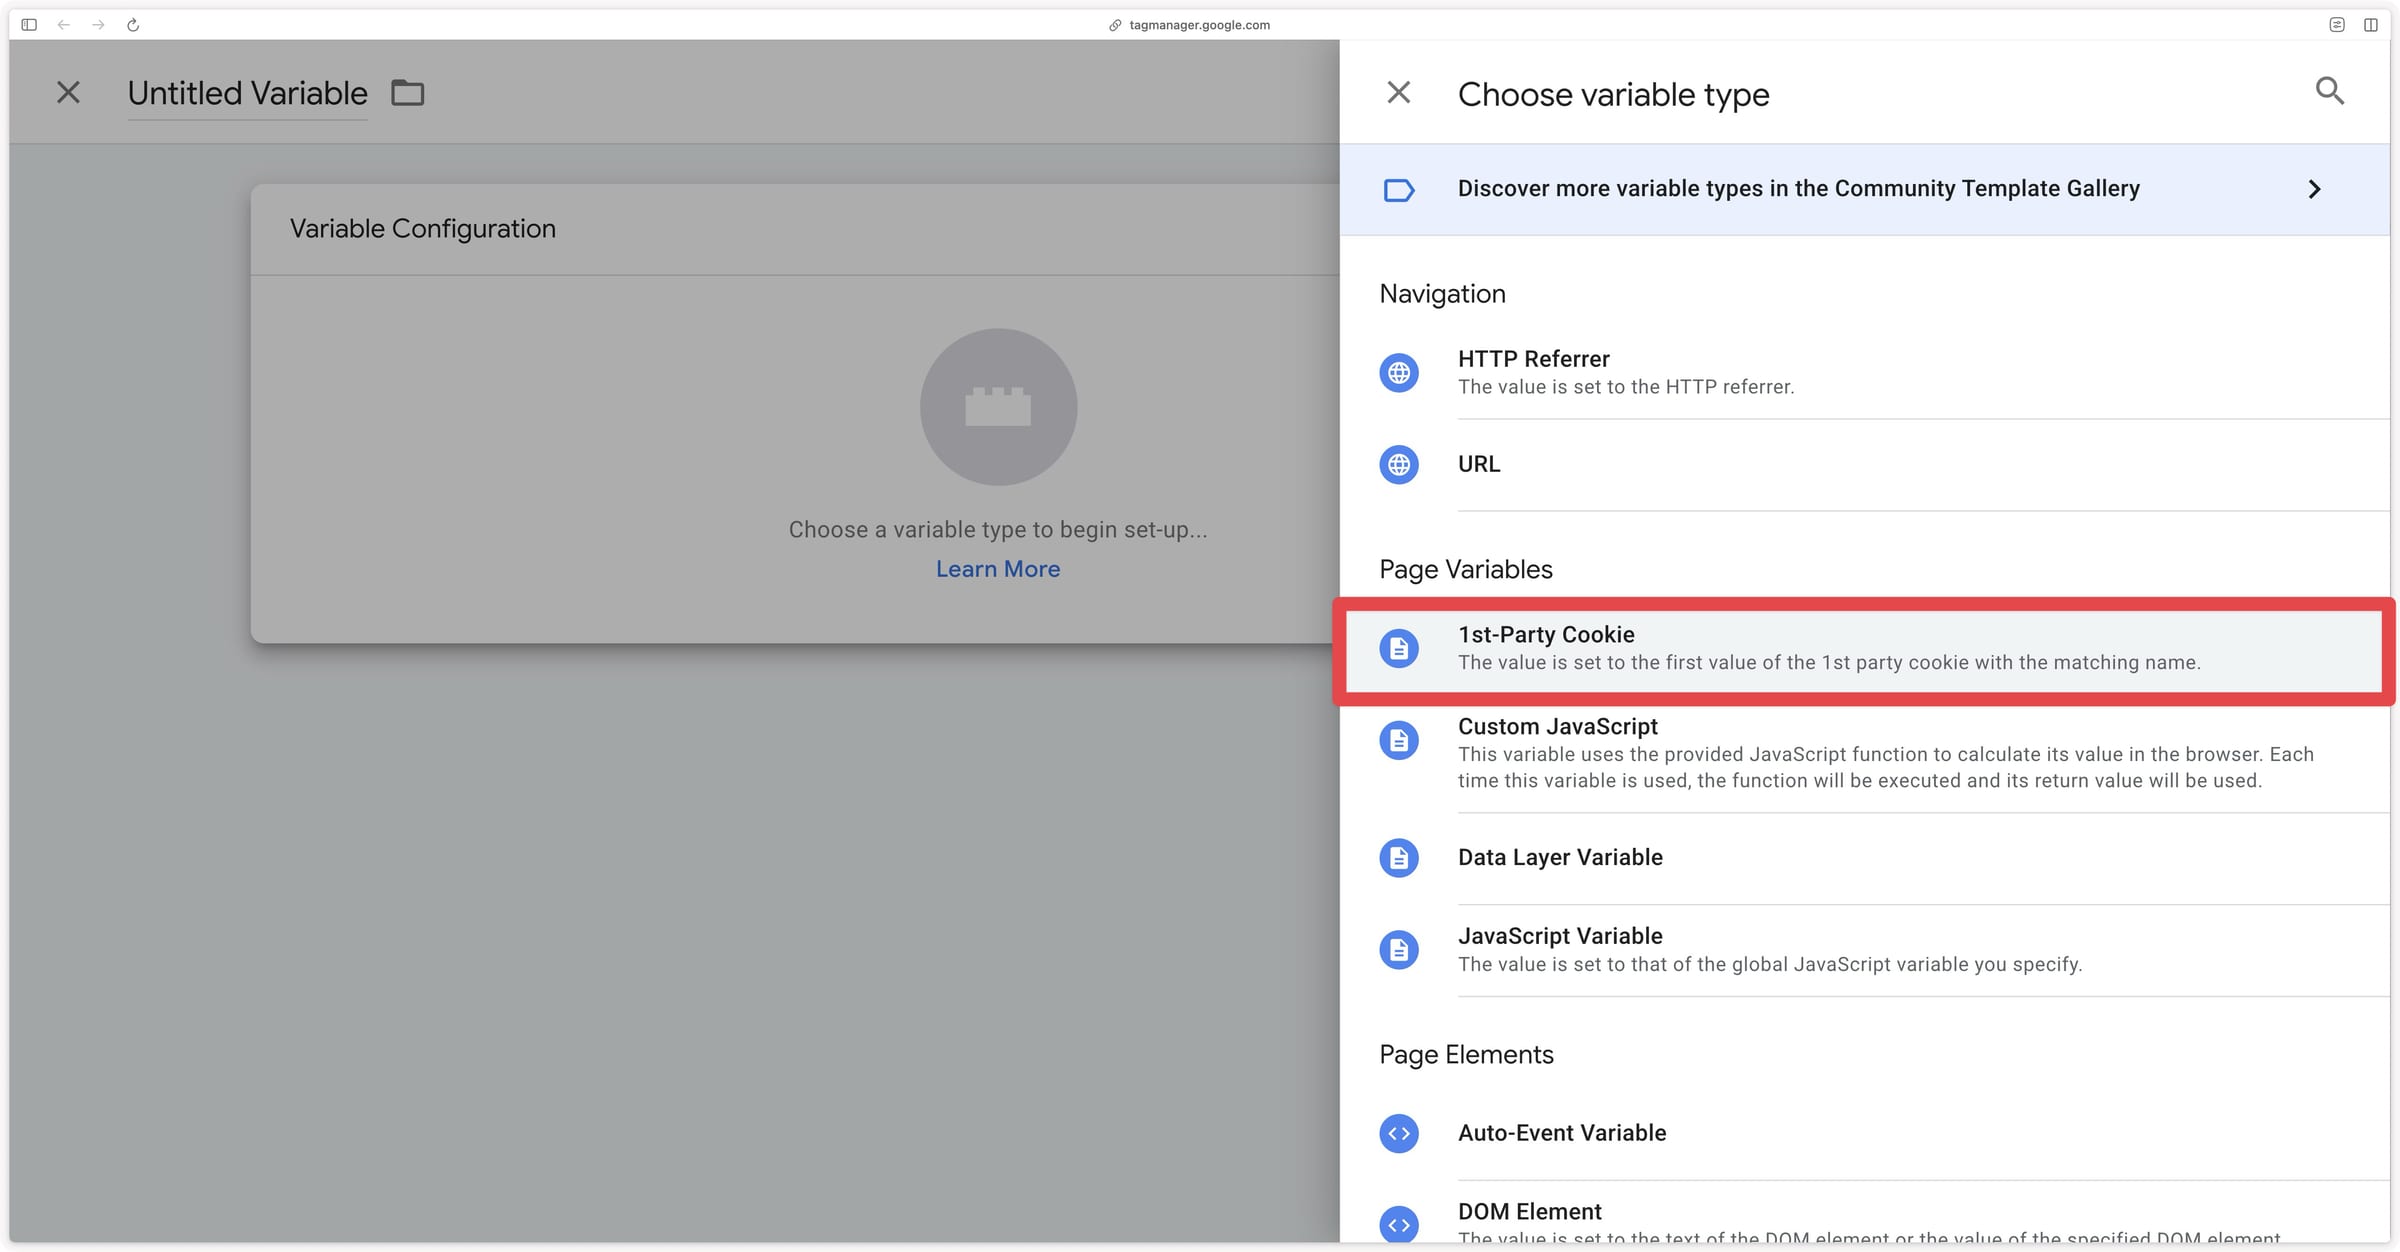
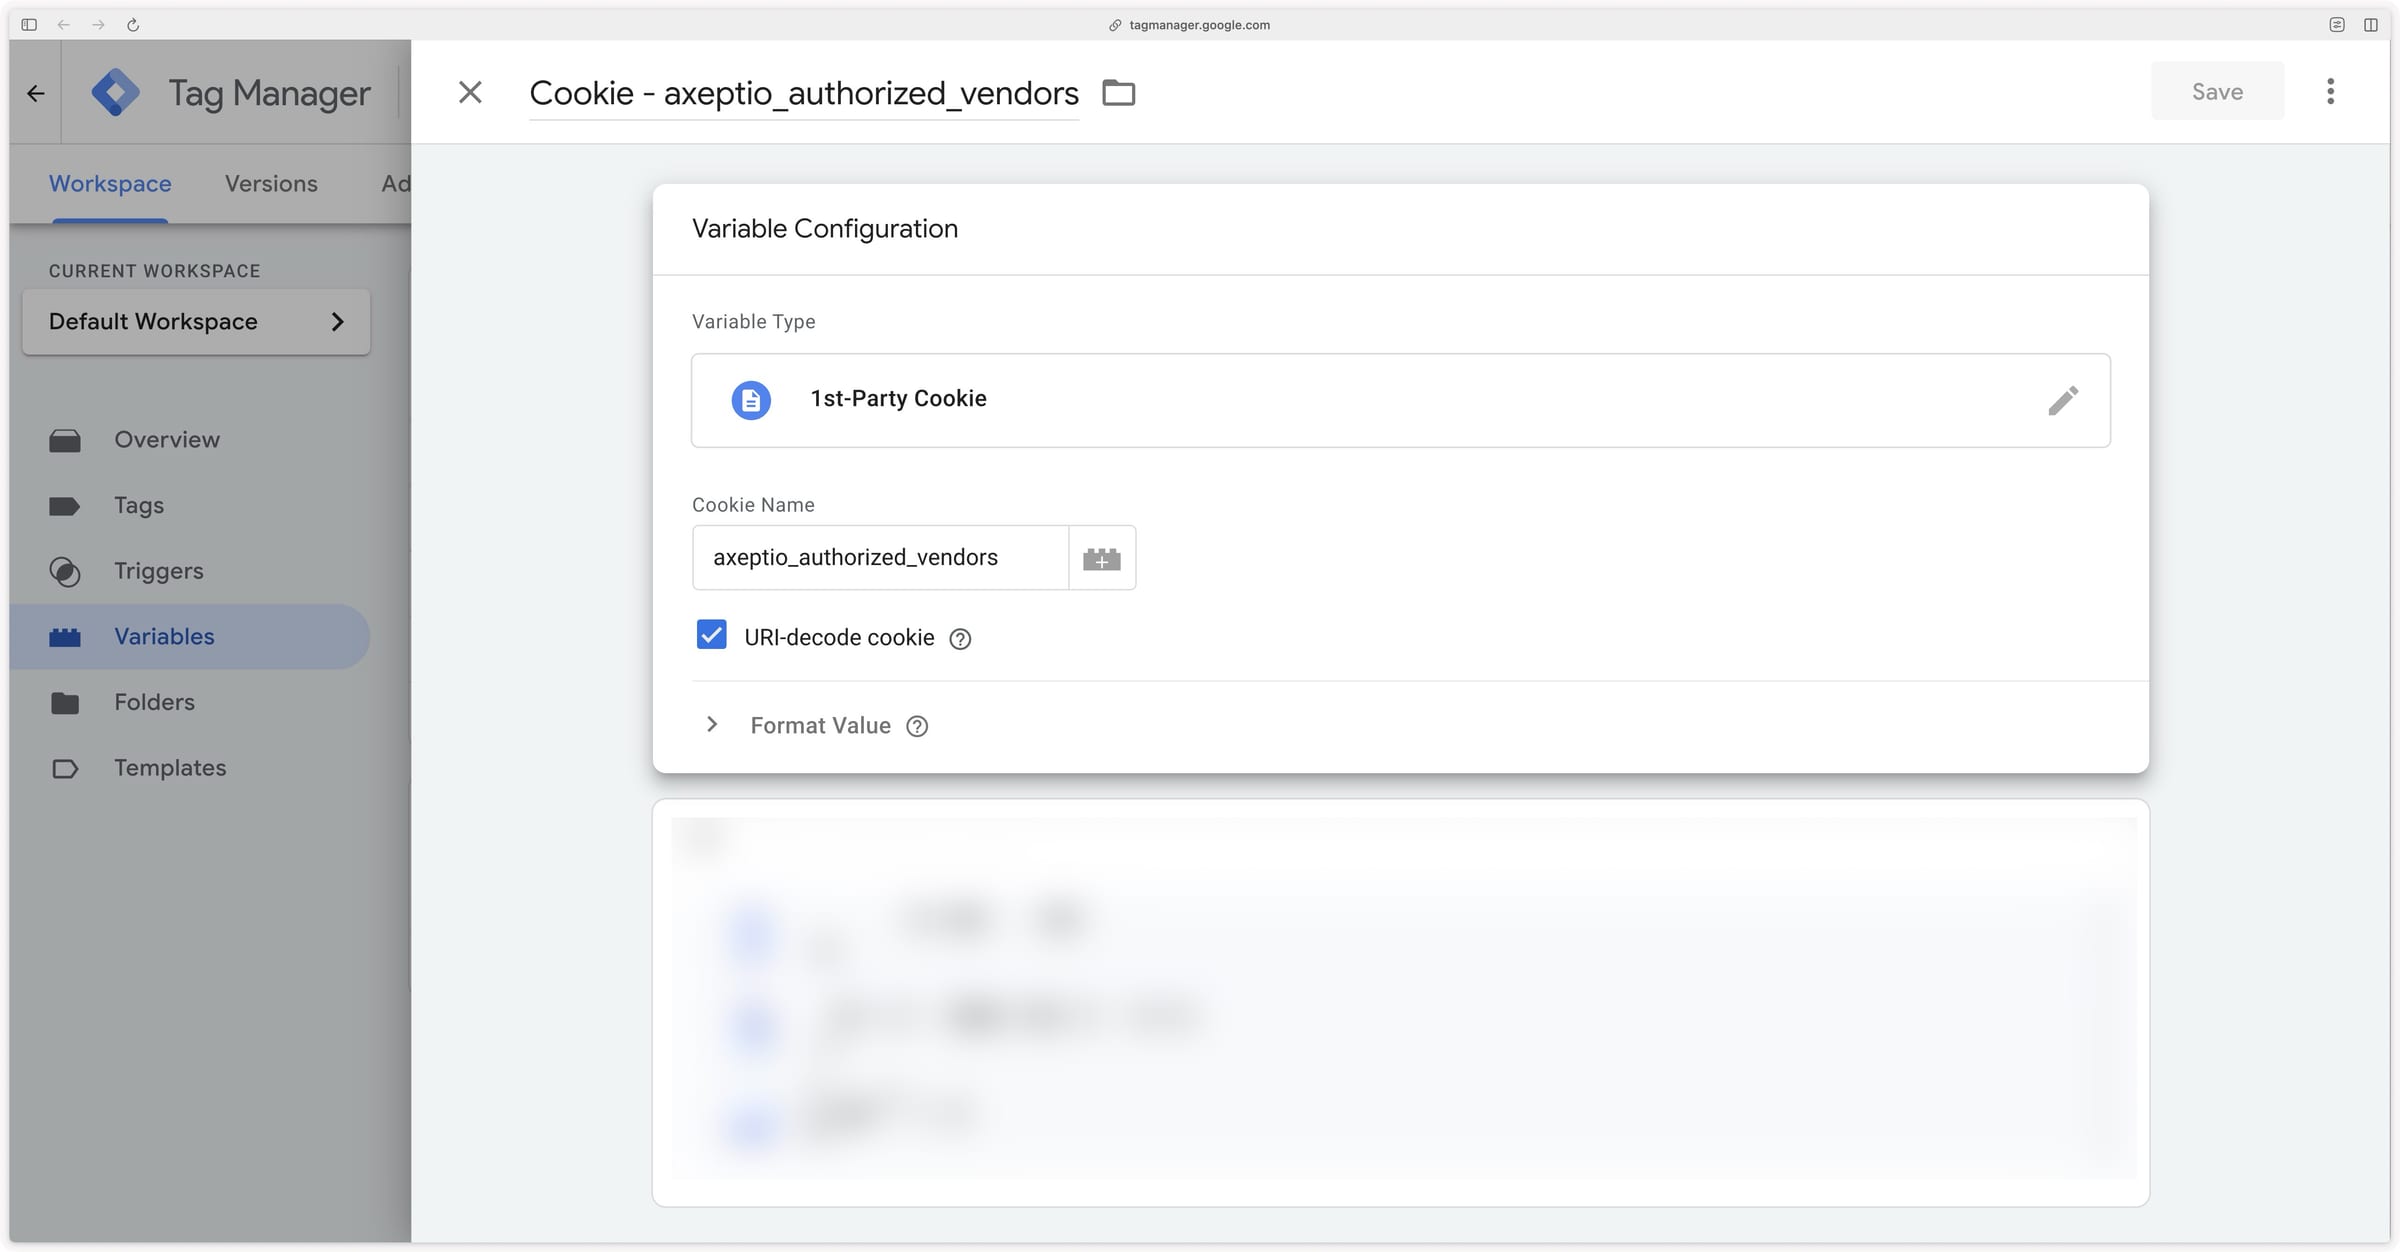
Then enter the cookie name axeptio_authorized_vendors to retrieve the value of this cookie, which contains the user’s consent state.
Values returned by the cookie
The Cookie - axeptio_authorized_vendors variable returns a text string containing the consent state for each vendor added in Axeptio.
Here is an example of the value returned by this variable:
facebook_pixel,tiktokIn this example, the user has consented to the facebook and tiktok vendors but not to pinterest.
Listening for the consent update
The goal here is to detect the user’s consent update via Axeptio and send an event to GTM Server to notify it of the new consent state. This way your server-side tags can be triggered as soon as the user gives their consent without having to wait for the next page load.
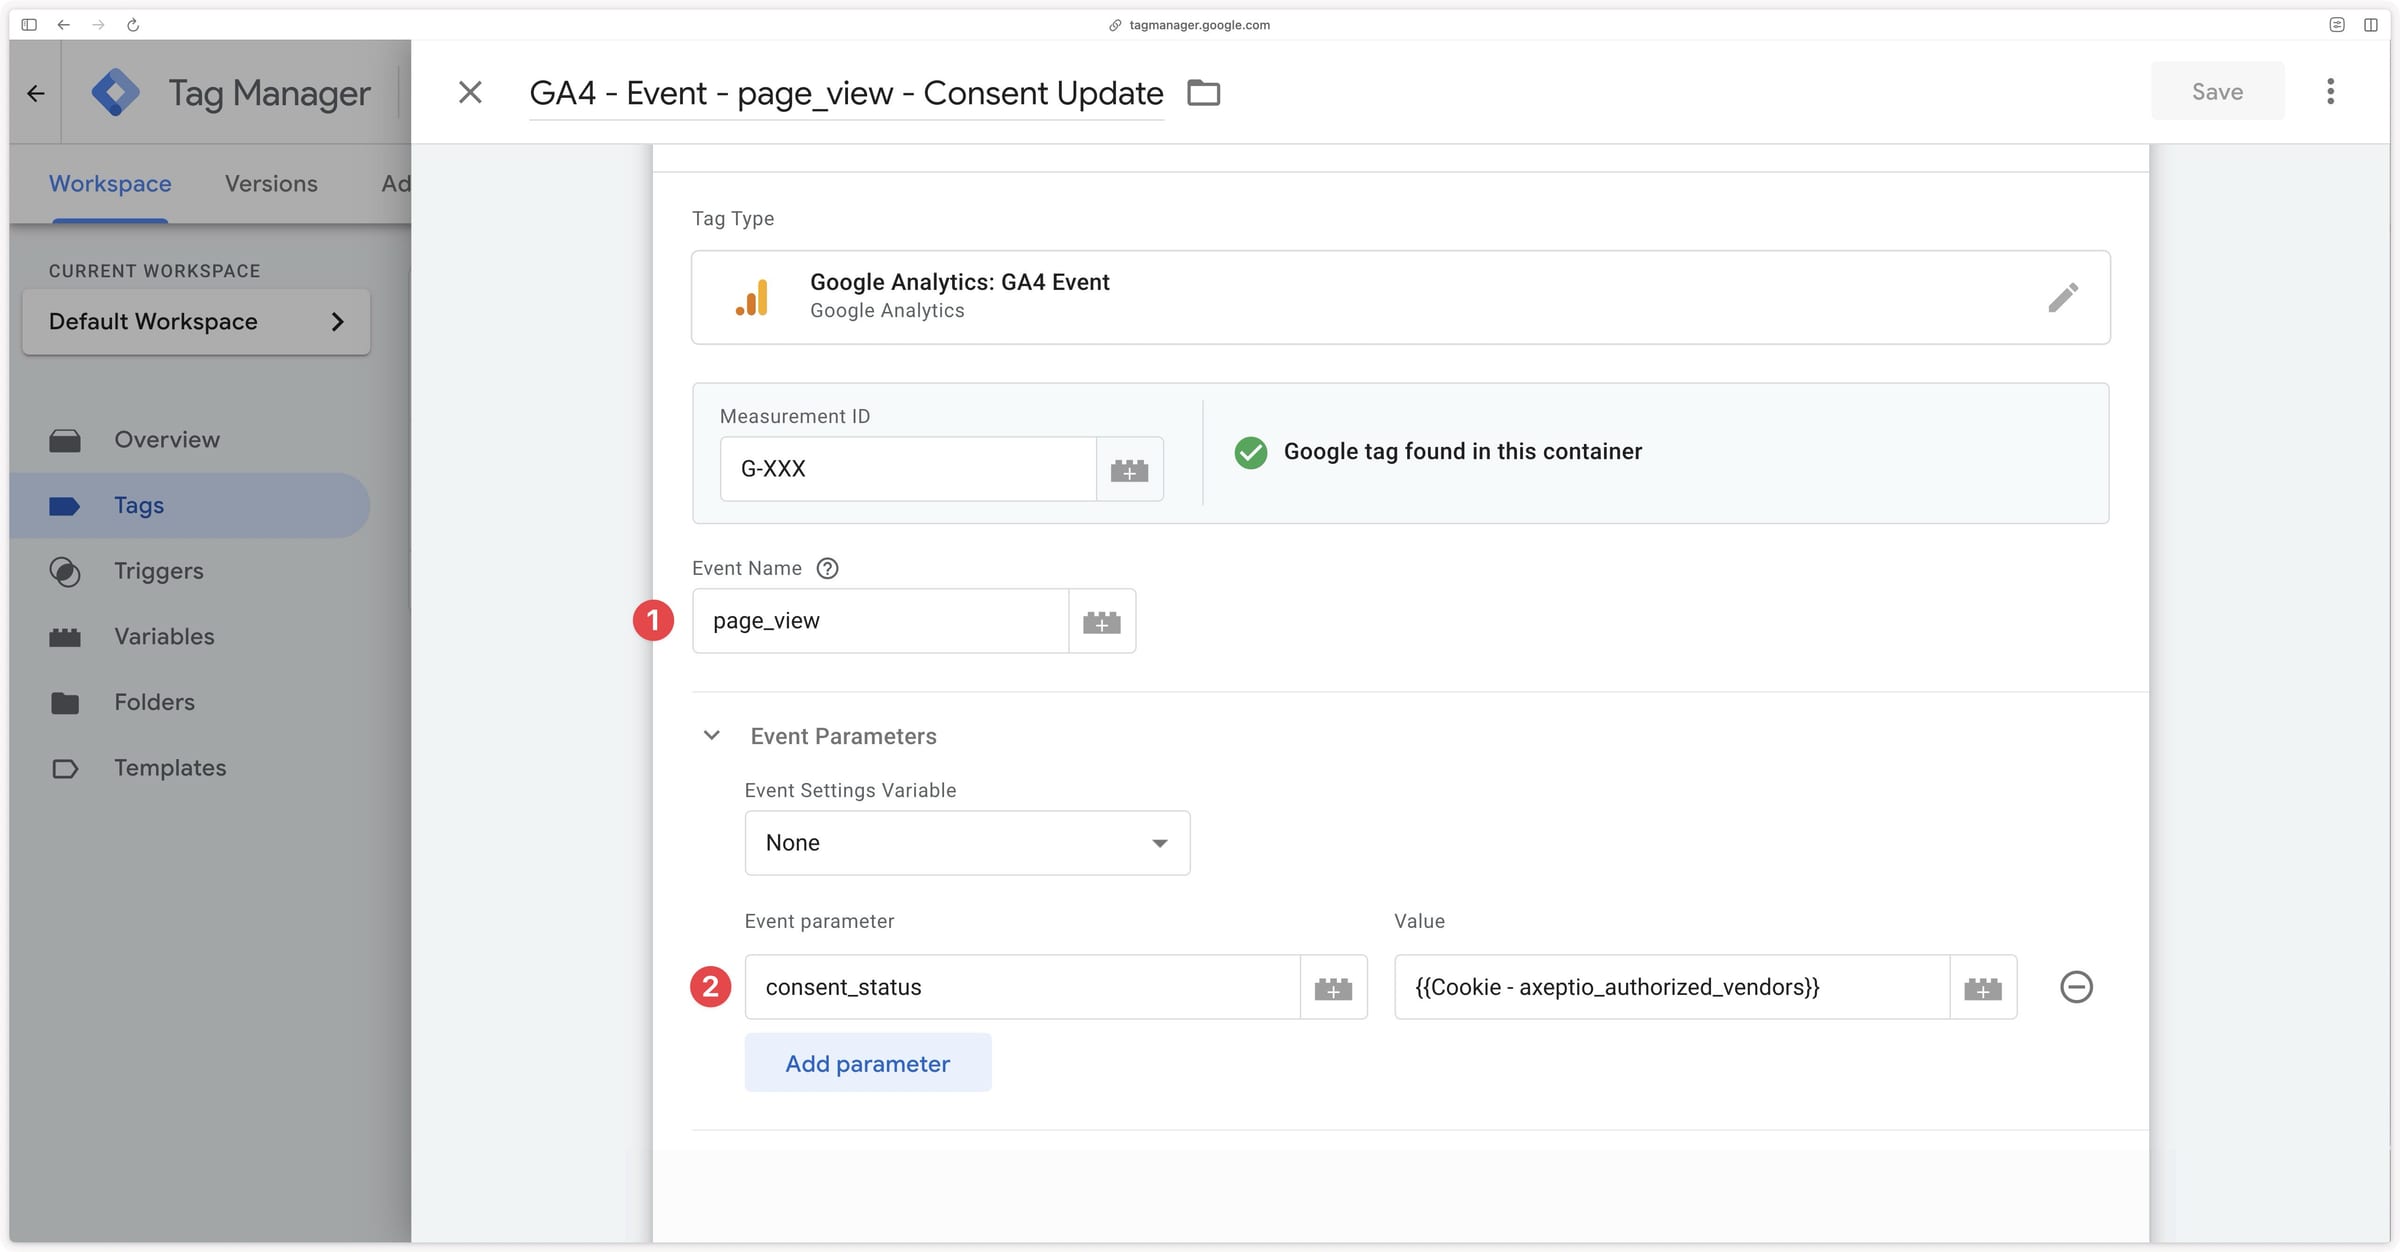
By default, Axeptio sends an axeptio_update_consent event to the dataLayer each time consent is updated.
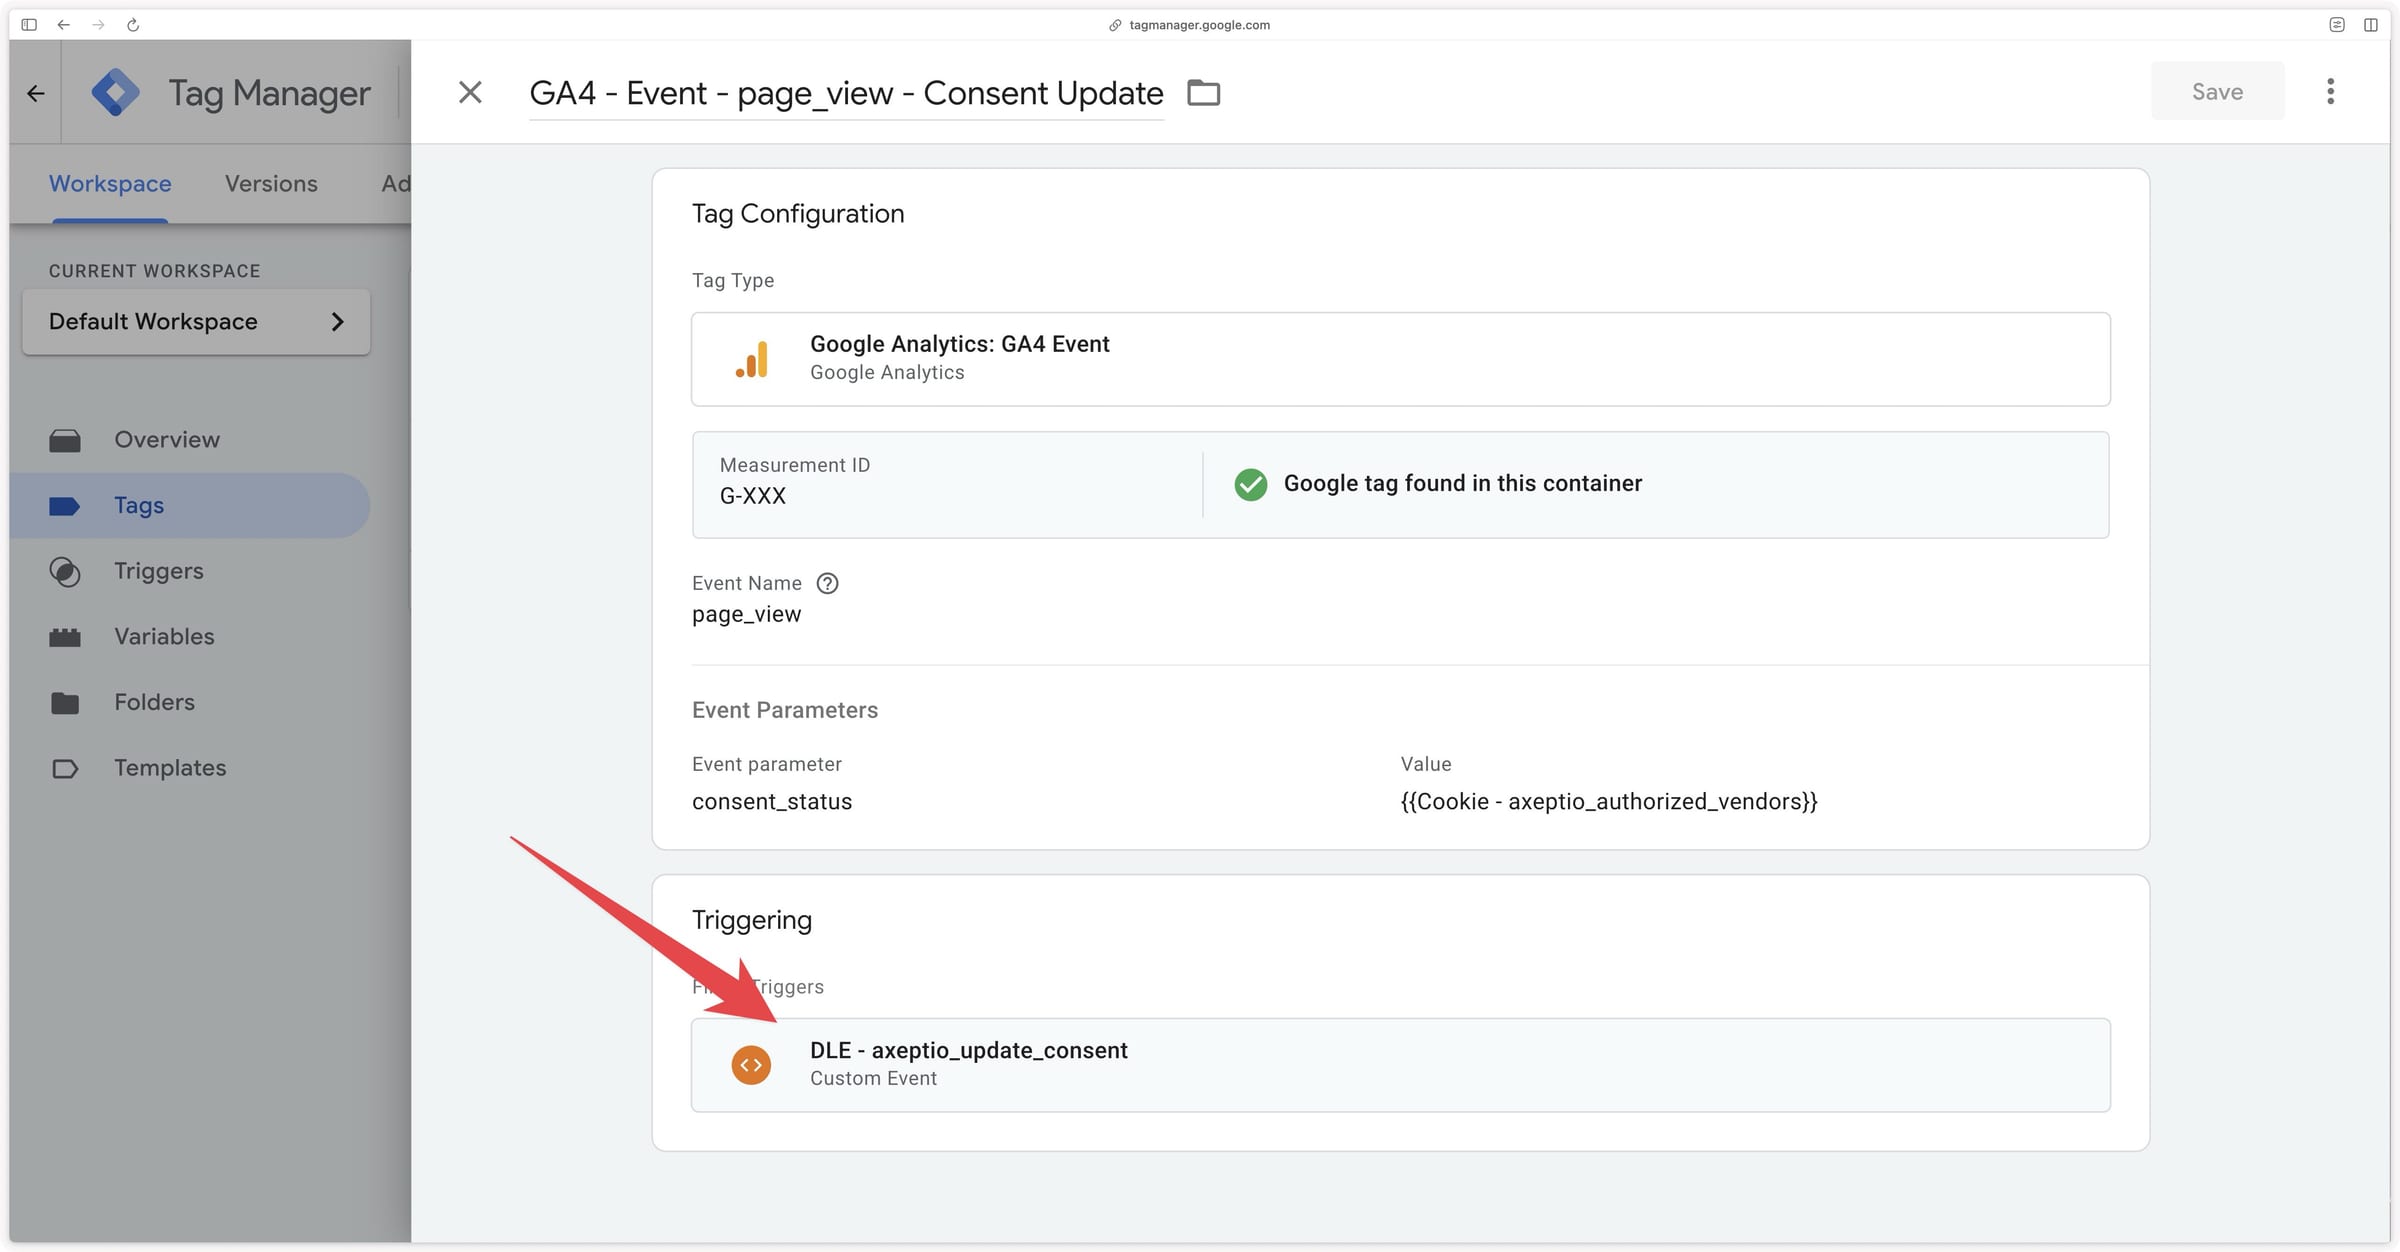
On this event, we will then trigger a GA4 event tag to send a page_view event to GTM Server with the updated consent information.
This page_view event contains the custom parameter consent_status, which contains the consent state retrieved via the Cookie - axeptio_authorized_vendors variable.
This GA4 event tag must be triggered on the axeptio_update_consent custom event.
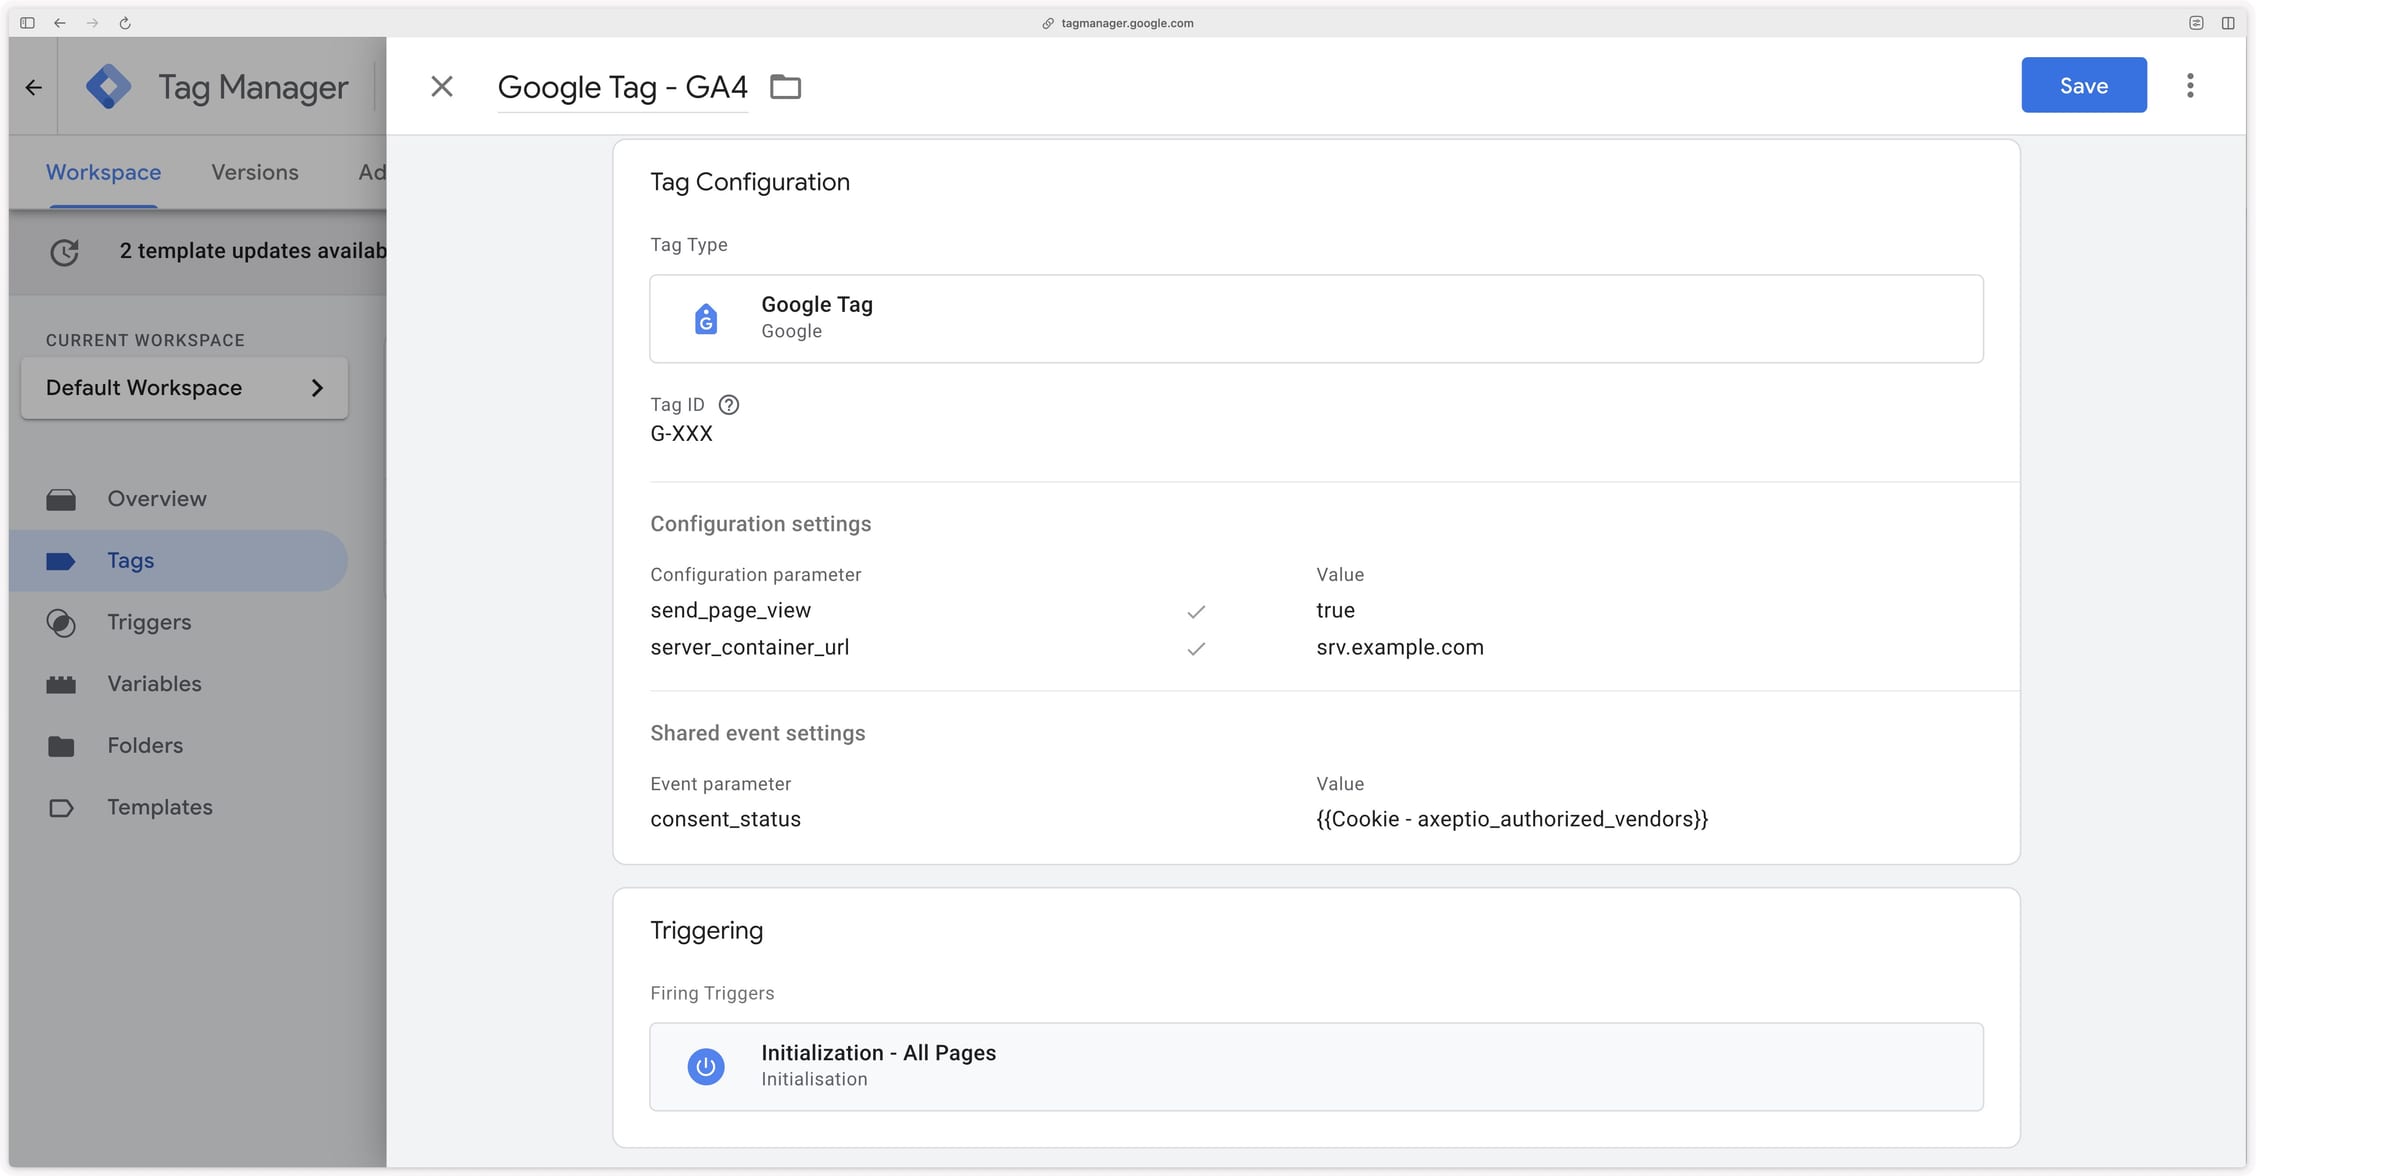
Configuring the GA4 Google Tag
The GA4 Google Tag must also send consent information to GTM Server. To do this, you need to add the consent_status event parameter.
Also note that this tag contains the configuration parameters send_page_view set to true and server_container_url with the URL of your server container.
Configuring other GA4 events
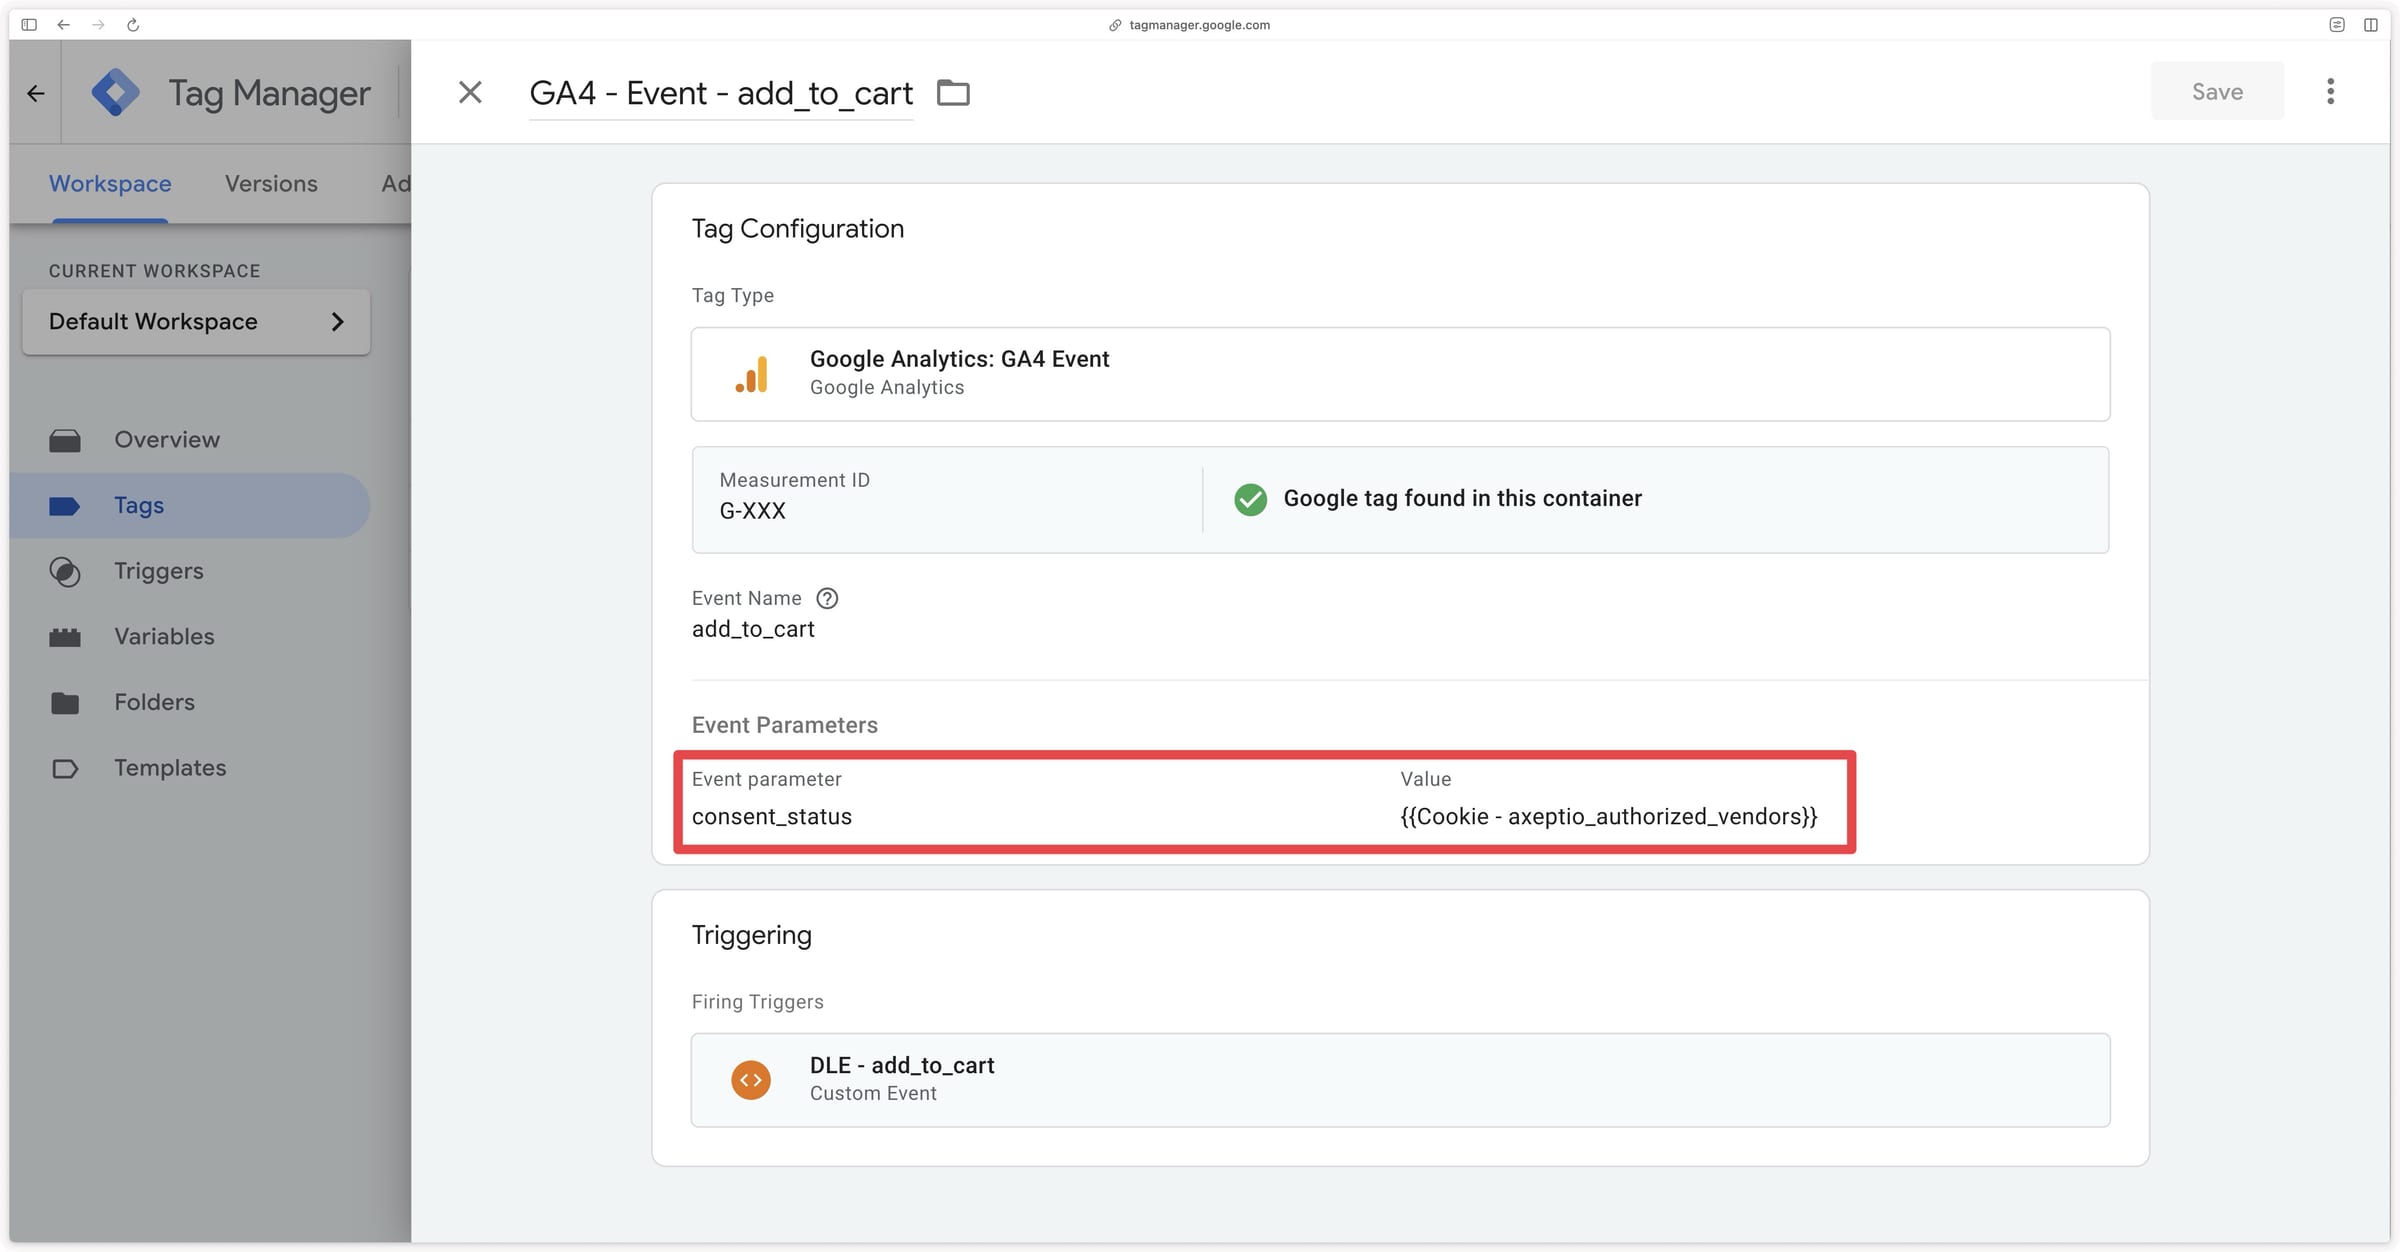
With the configuration done in the previous step, all your GA4 events should contain the consent_status parameter that lets you know the user’s consent state. However, it is important to add this parameter to all your GA4 event tags to ensure consent information is always present.
Here is an example of the add_to_cart GA4 event tag with the consent_status parameter added:
Configuration in GTM Server
Retrieving the Axeptio consent state
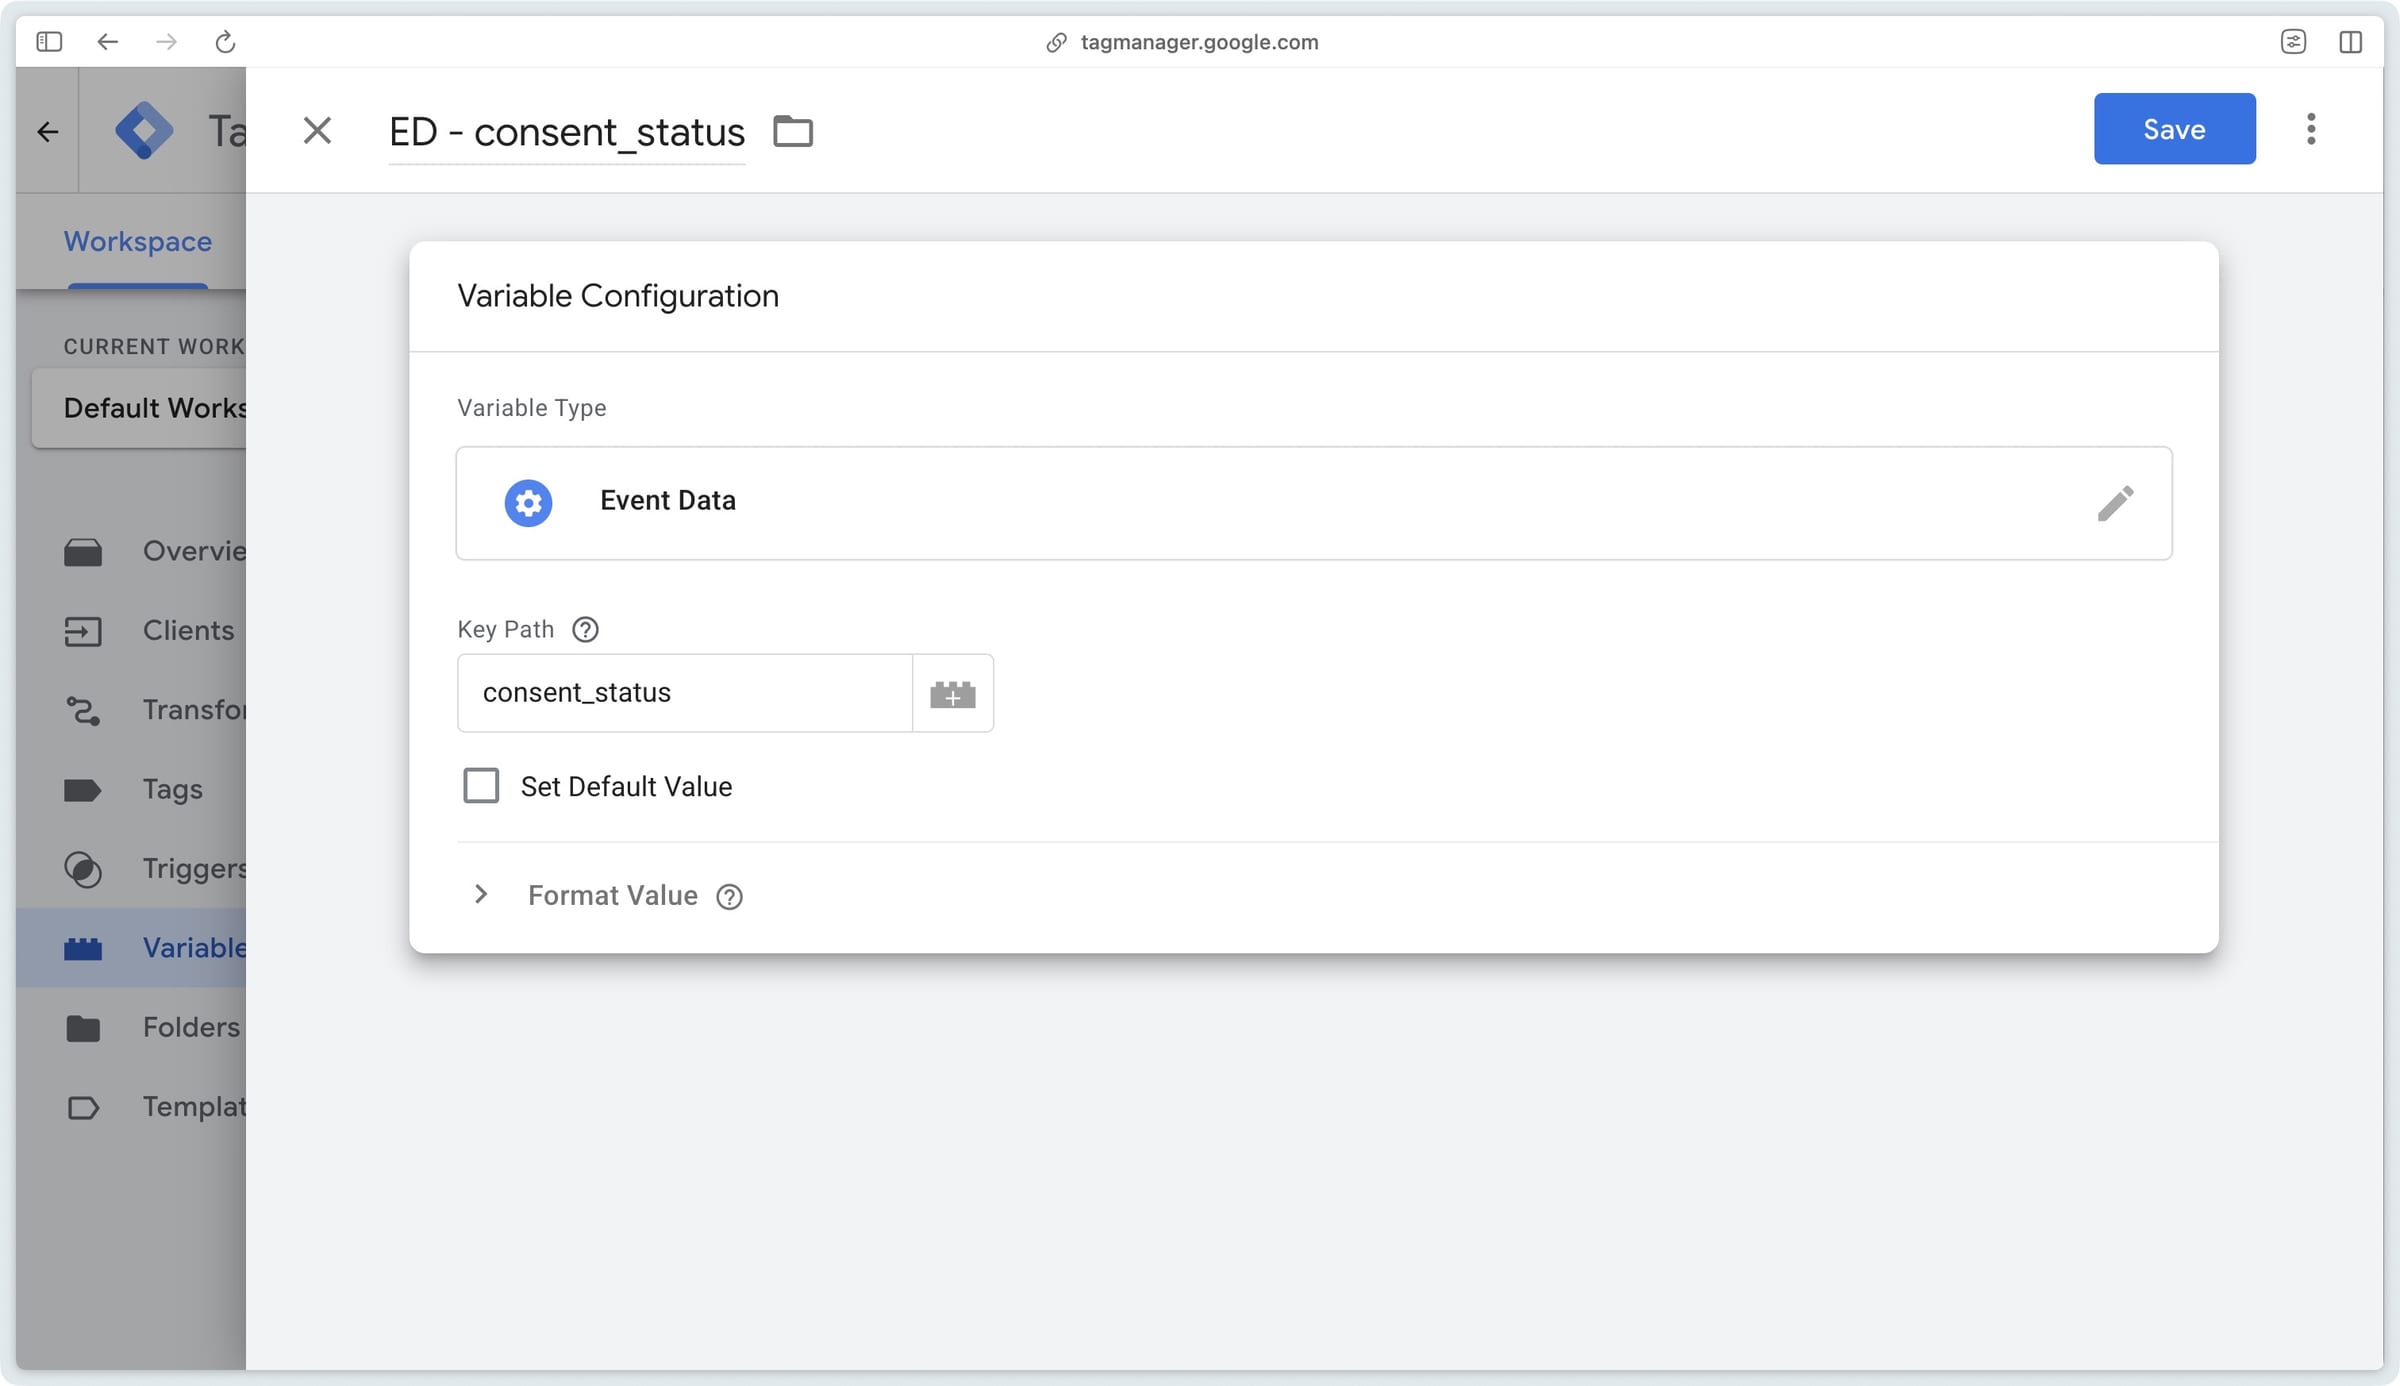
To retrieve the consent state in GTM Server, we will create an Event Data type variable that will extract the value of the consent_status parameter sent from GTM Web.
Go to your GTM Server container, then in the Variables section, click New to create a new variable in the User-Defined Variables section.
Then select the Event Data variable type.
Conditioning a server tag on Axeptio consent
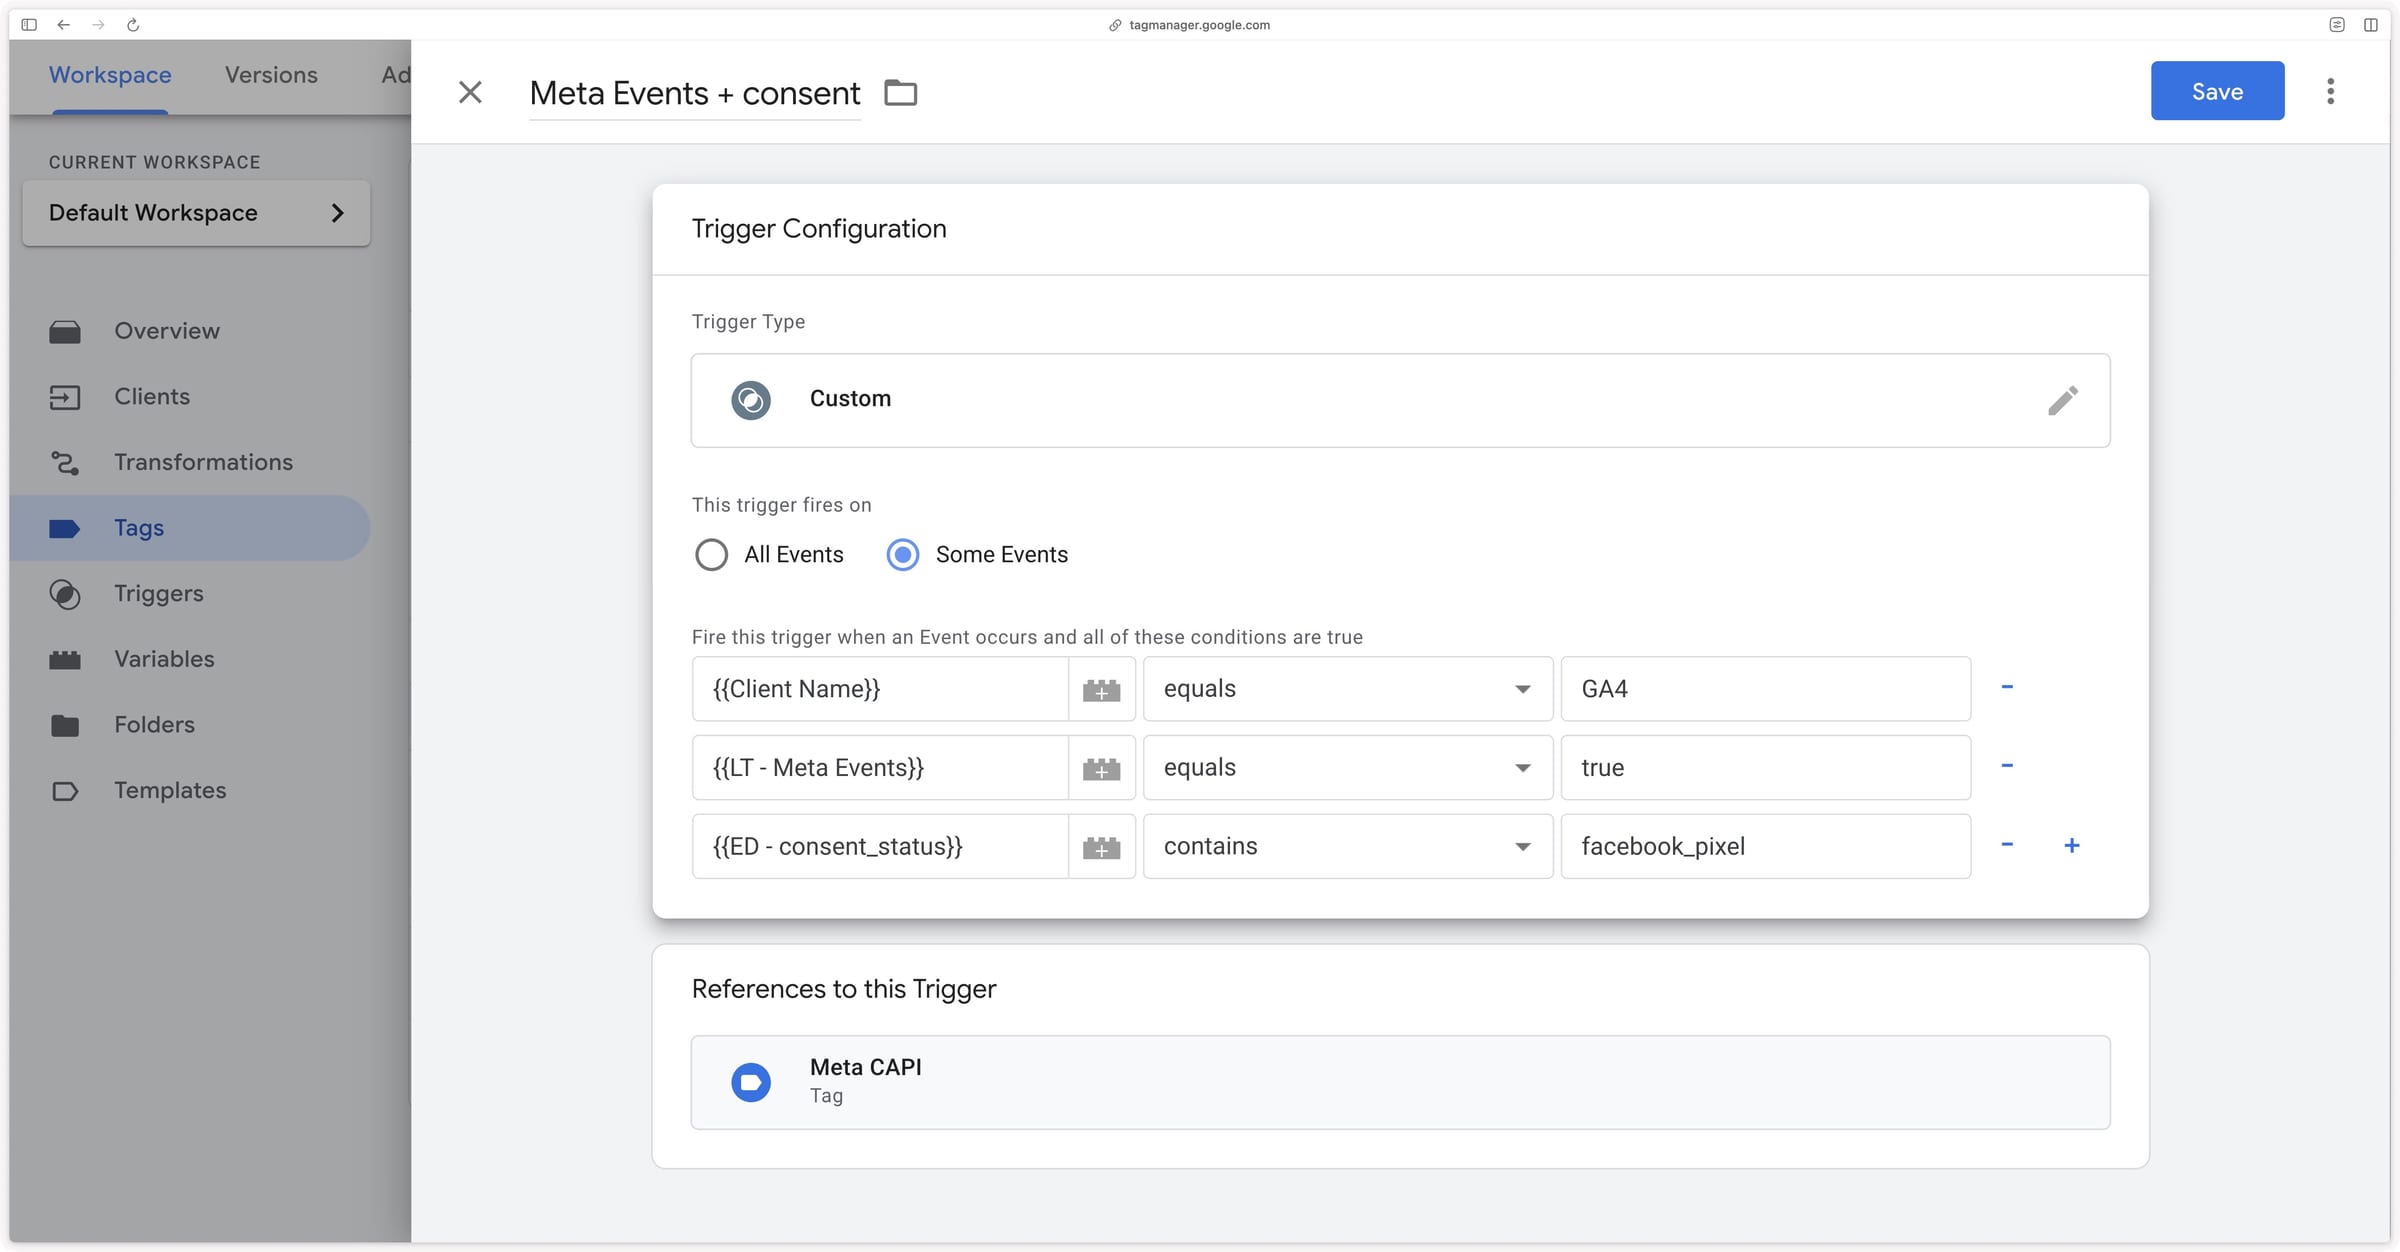
We will condition the Meta Conversion API by Addingwell tag on Axeptio consent. To do this, we will only trigger the tag when the consent_status Event Data variable contains the facebook_pixel vendor, which corresponds to the Meta platform.
To know whether you should condition a tag on user consent, refer to your DPO or your legal department.
In the trigger below, we check if the consent_status variable contains the value facebook_pixel, which indicates that the user has consented to the Facebook Pixel (Meta) vendor.
Then add this trigger to your Meta Conversion API by Addingwell tag.
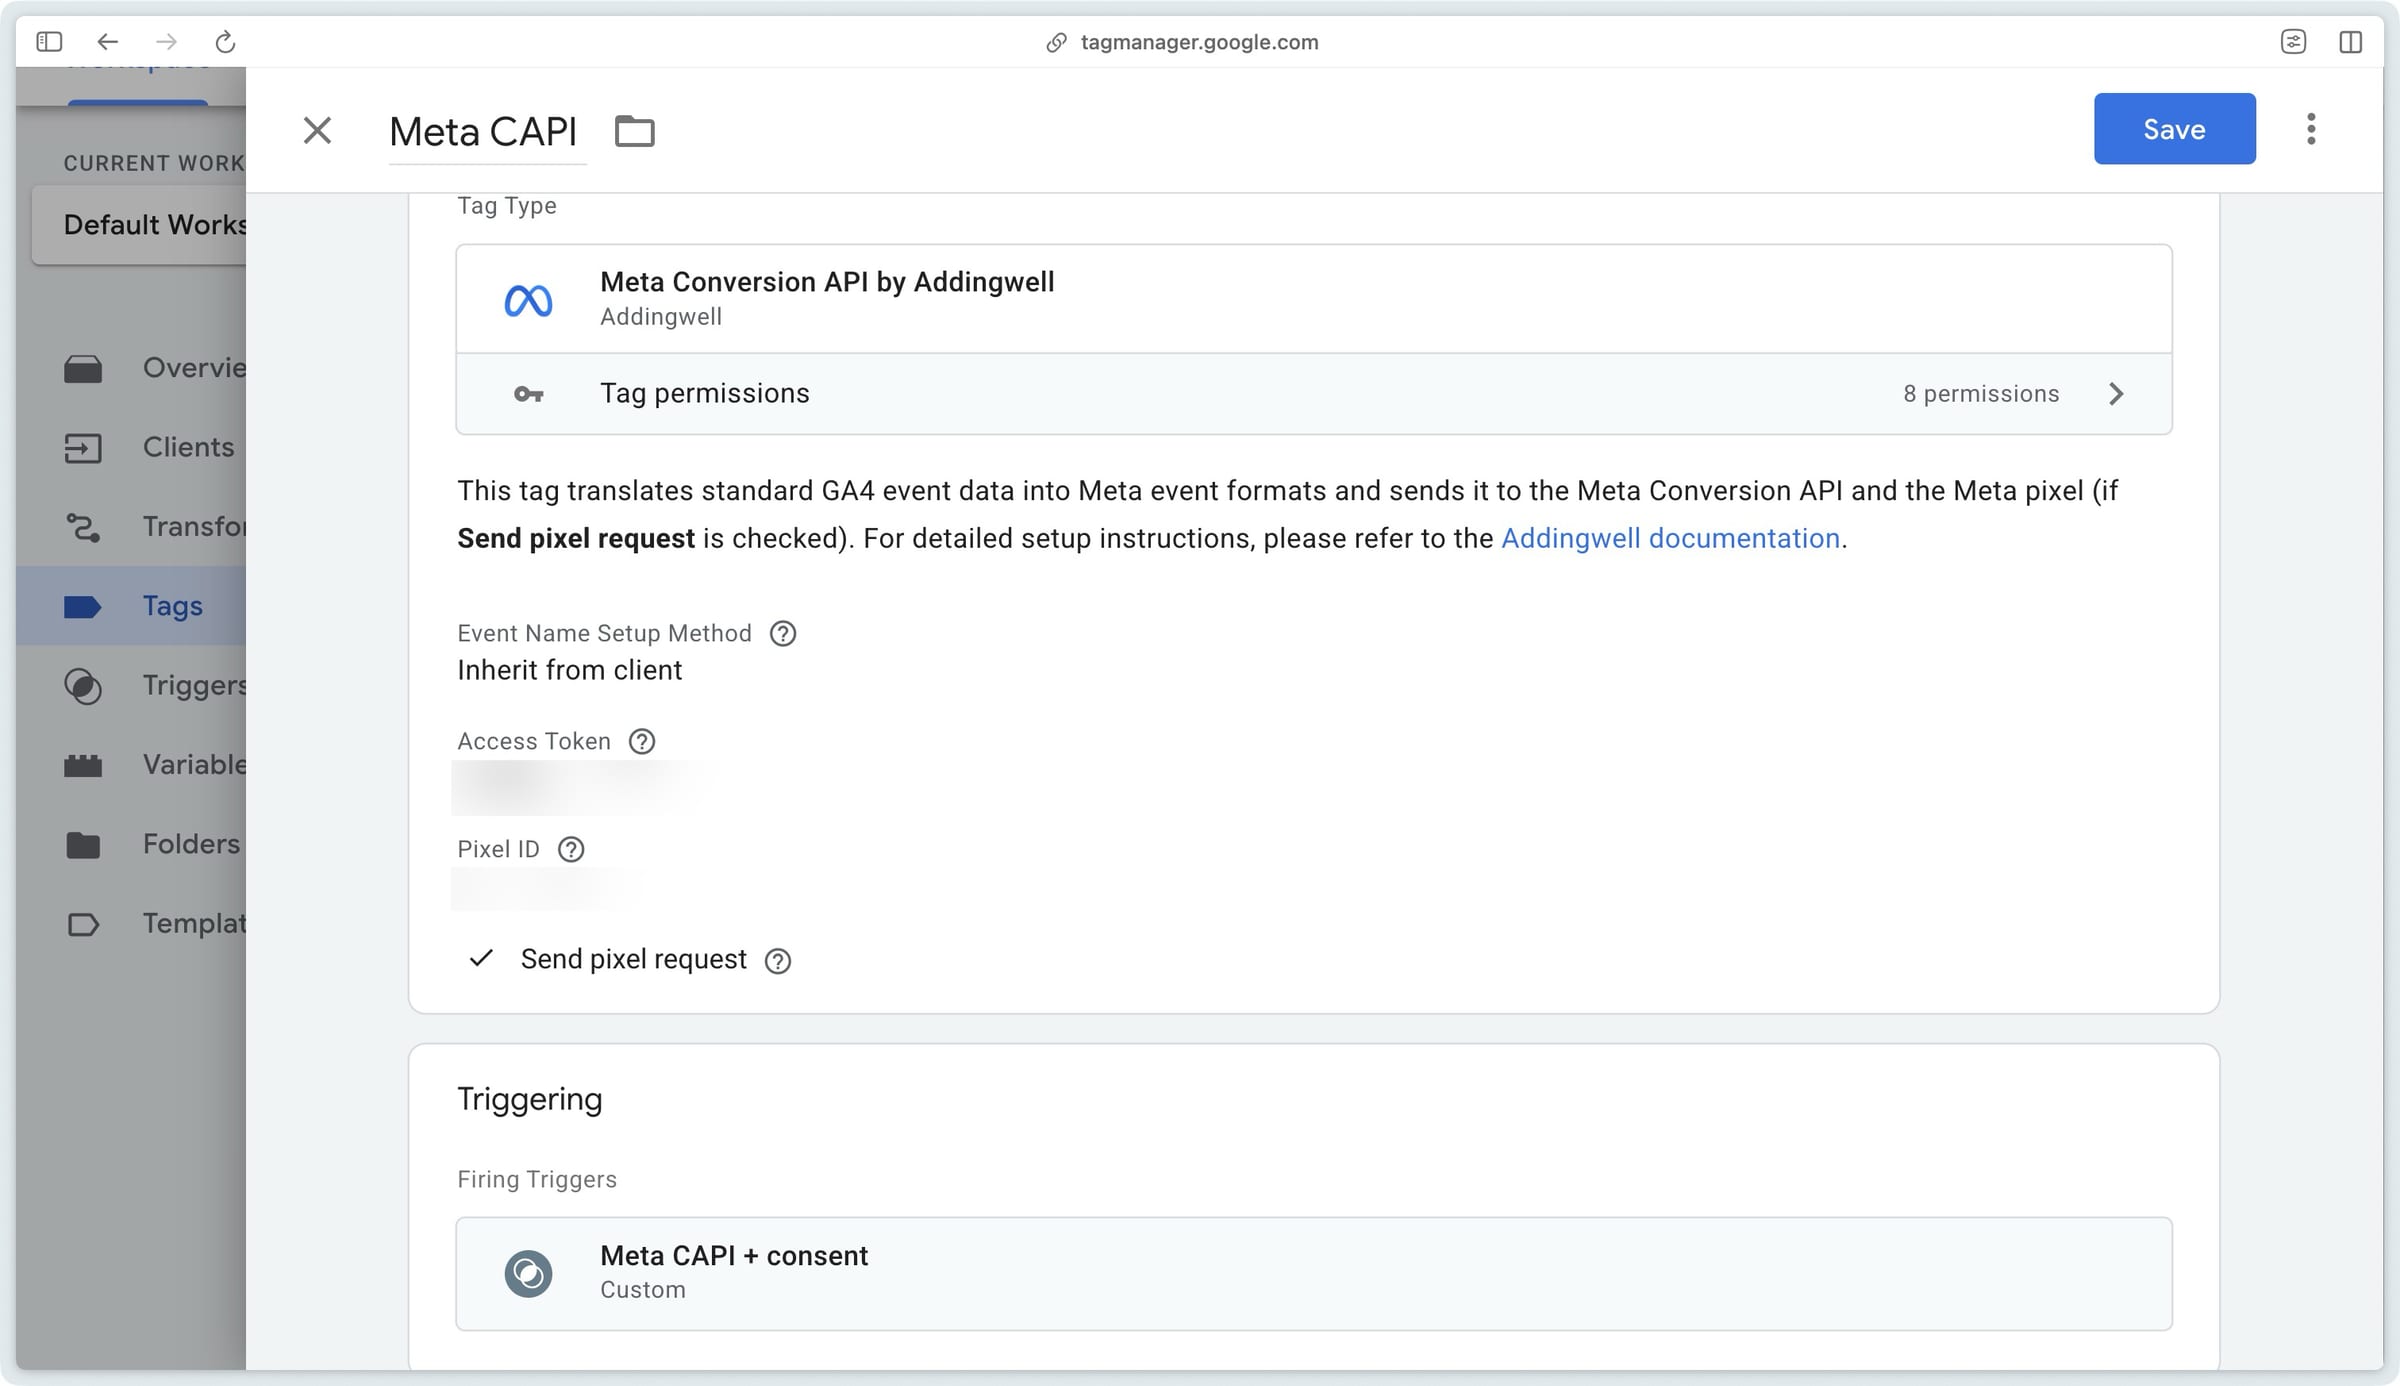
You have now conditioned the Meta Conversion API tag on Axeptio consent. You can apply the same logic to condition other tags based on the appropriate vendors.
Watch out for tags already fired before consent
If a user gives vendor consent after browsing several pages, previous events (such as page_view) will not be sent retroactively to Meta. Only events following consent acceptance will be transmitted.
Verifying your implementation
Tag Assistant in Google Tag Manager Web
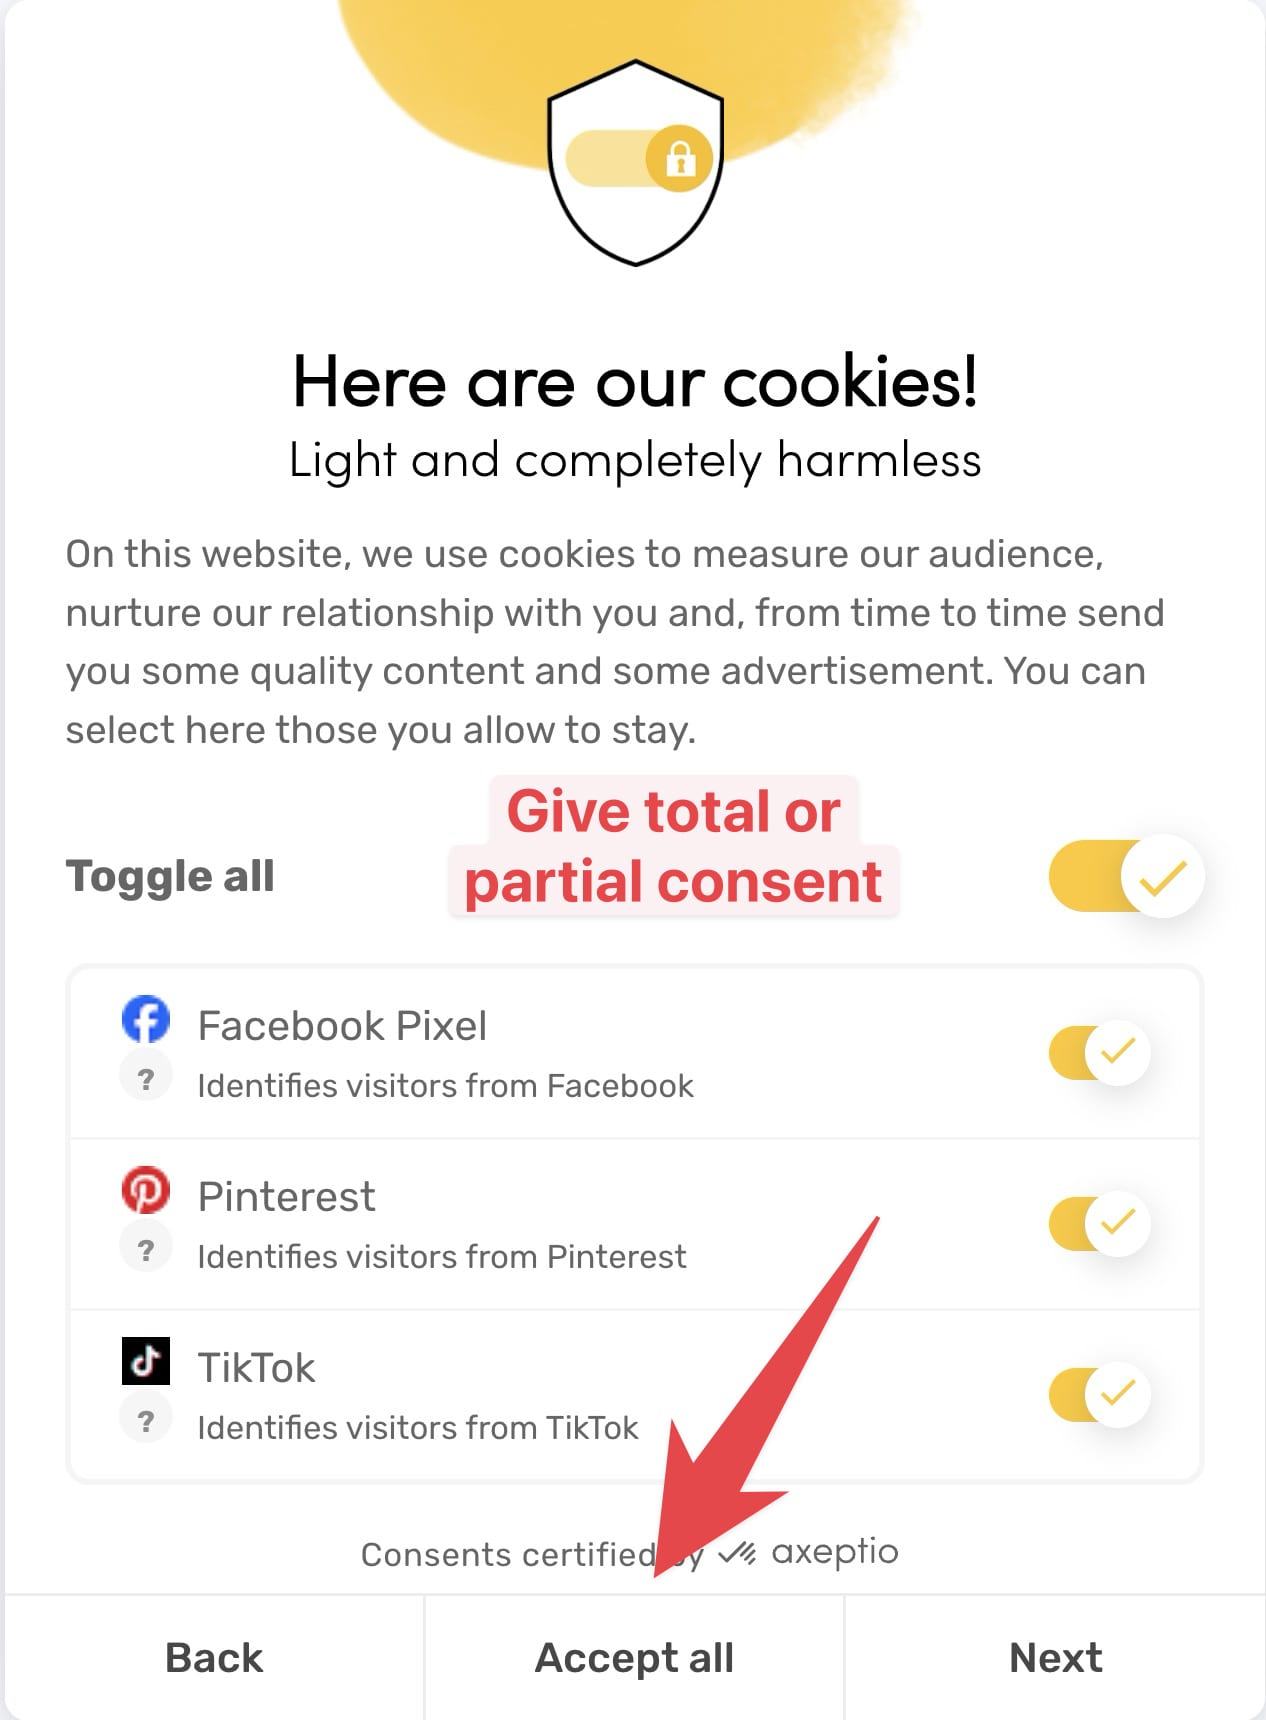
Interact with the Axeptio banner to give your partial consent (one or more vendors) or full consent (all vendors).
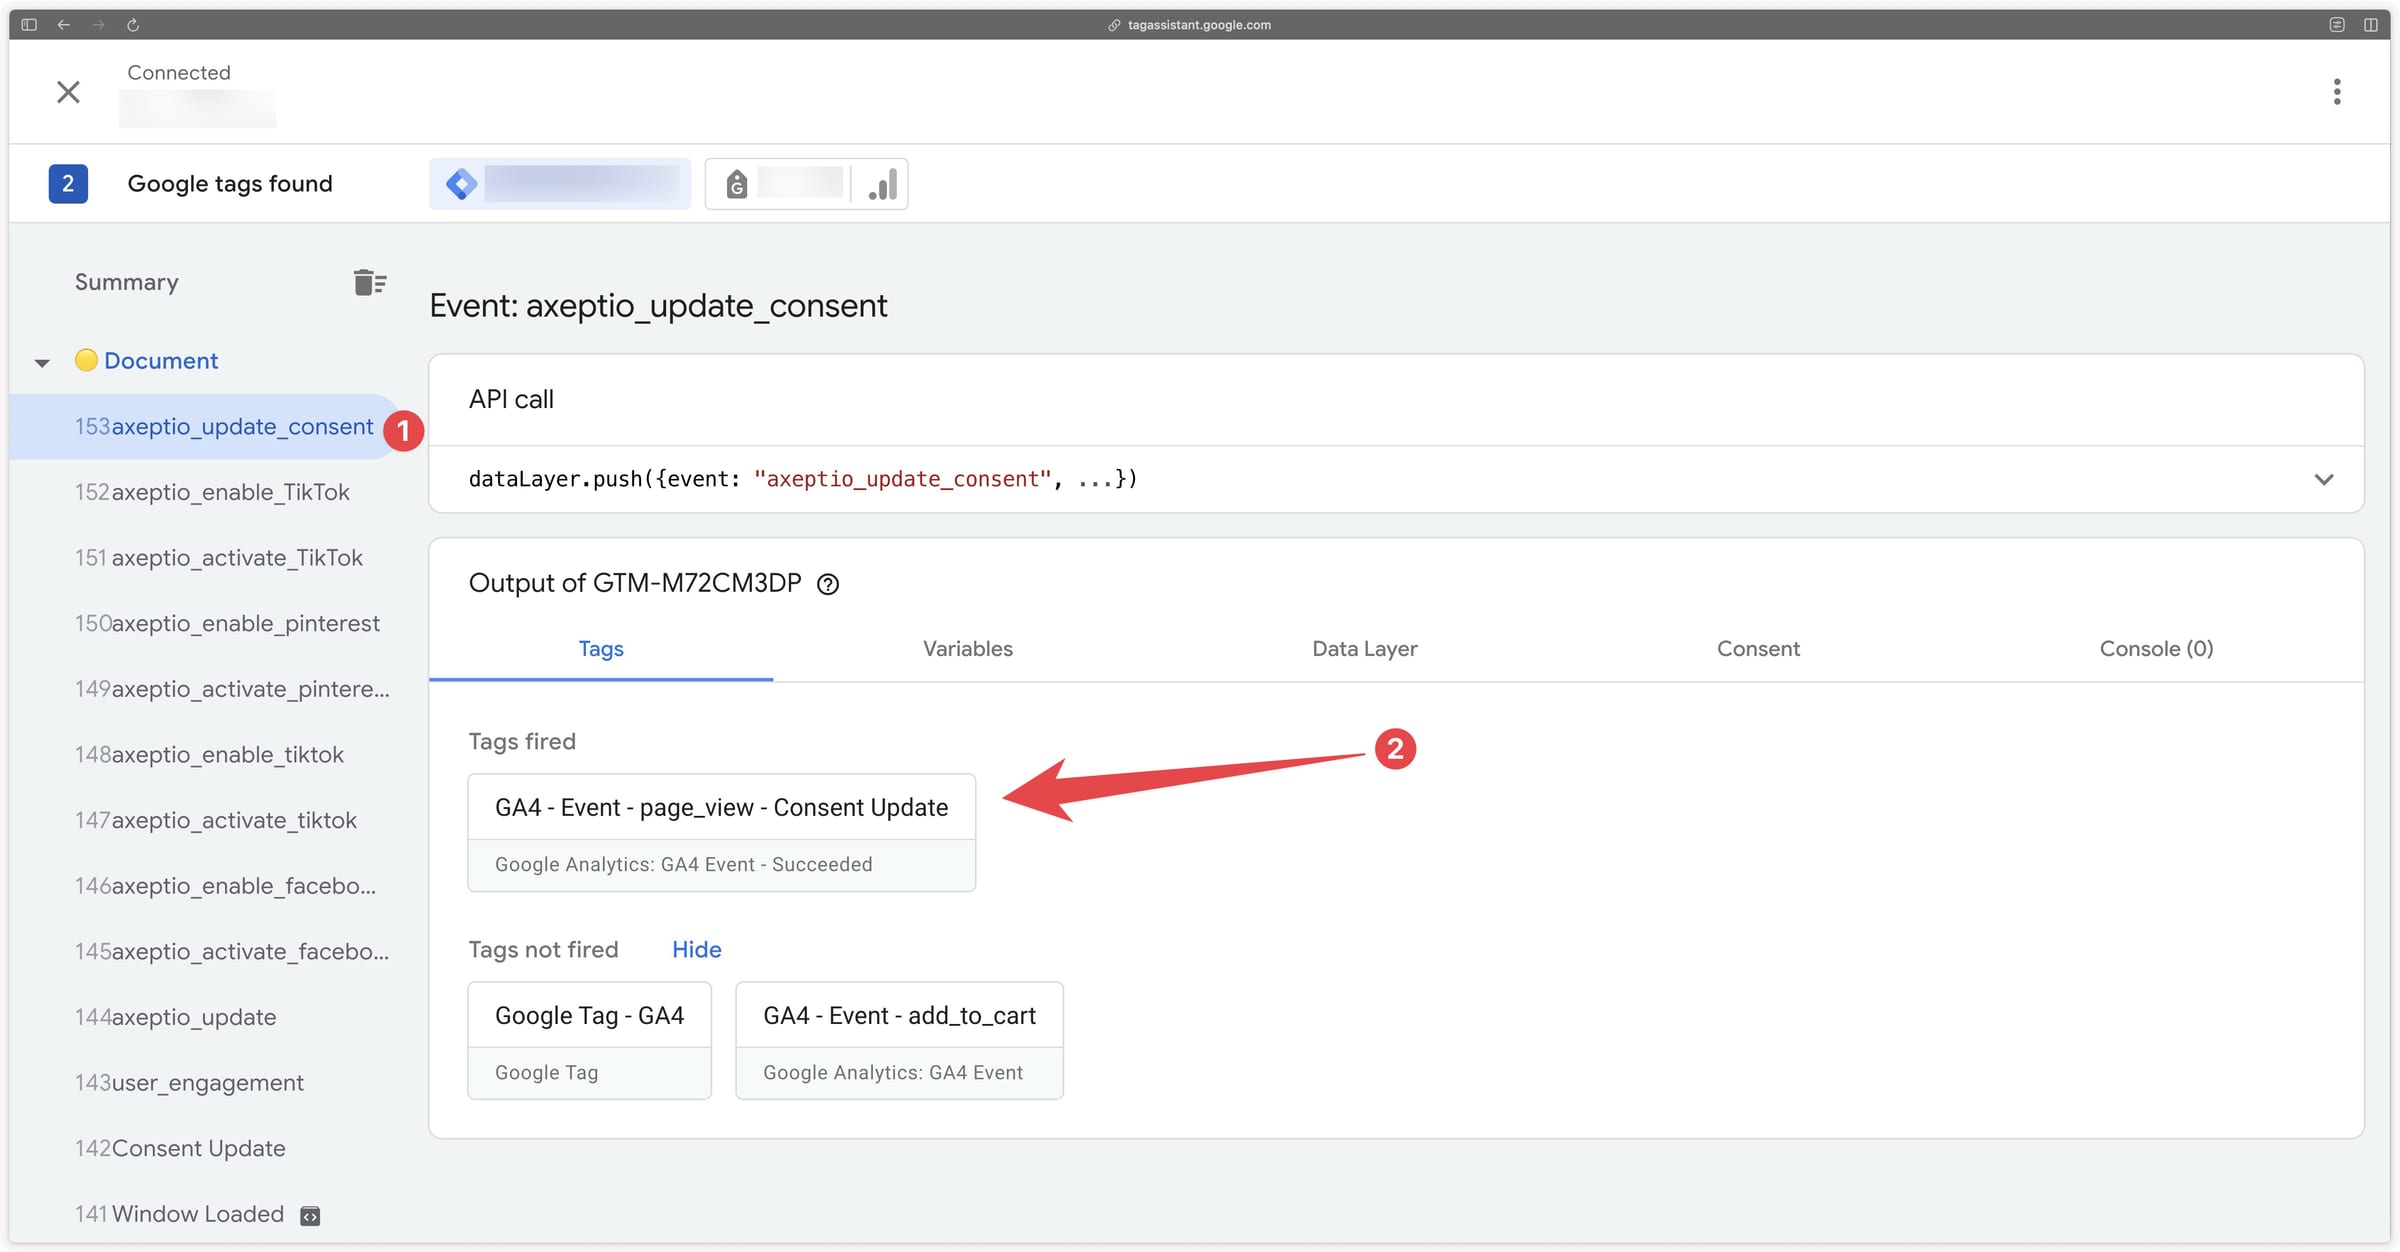
Check that the GA4 event tag fires correctly on the axeptio_update_consent event.
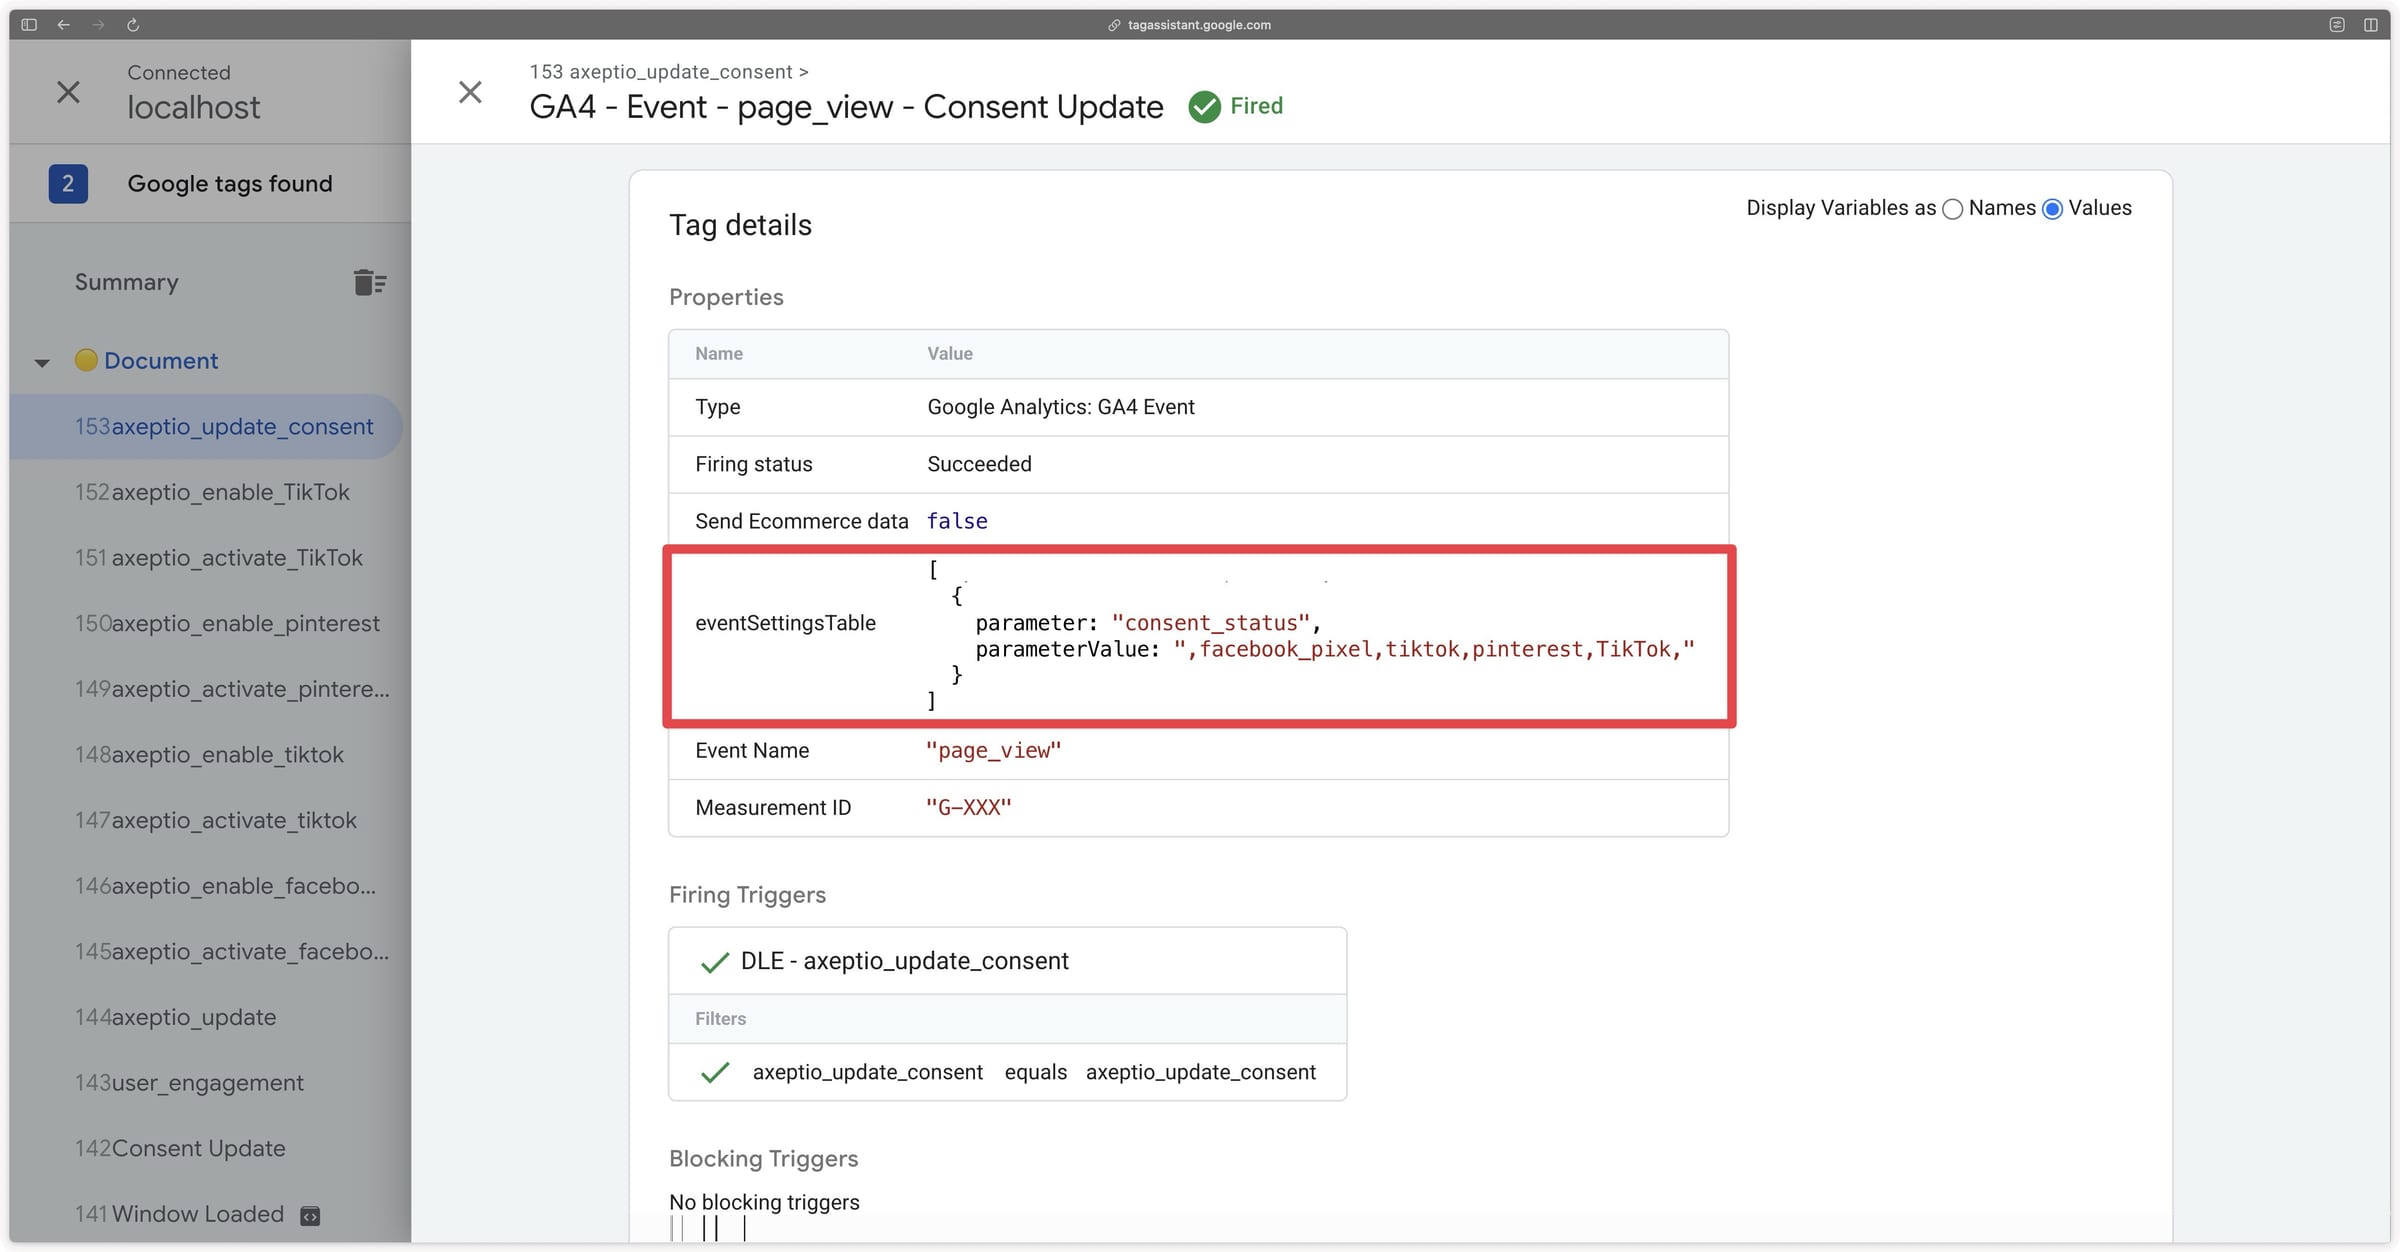
And also that the consent_status parameter is present in this tag.
Google Tag Manager Server preview
In the GTM Server preview, check that the consent_status Event Data variable returns the consent state sent from GTM Web correctly on all your events.
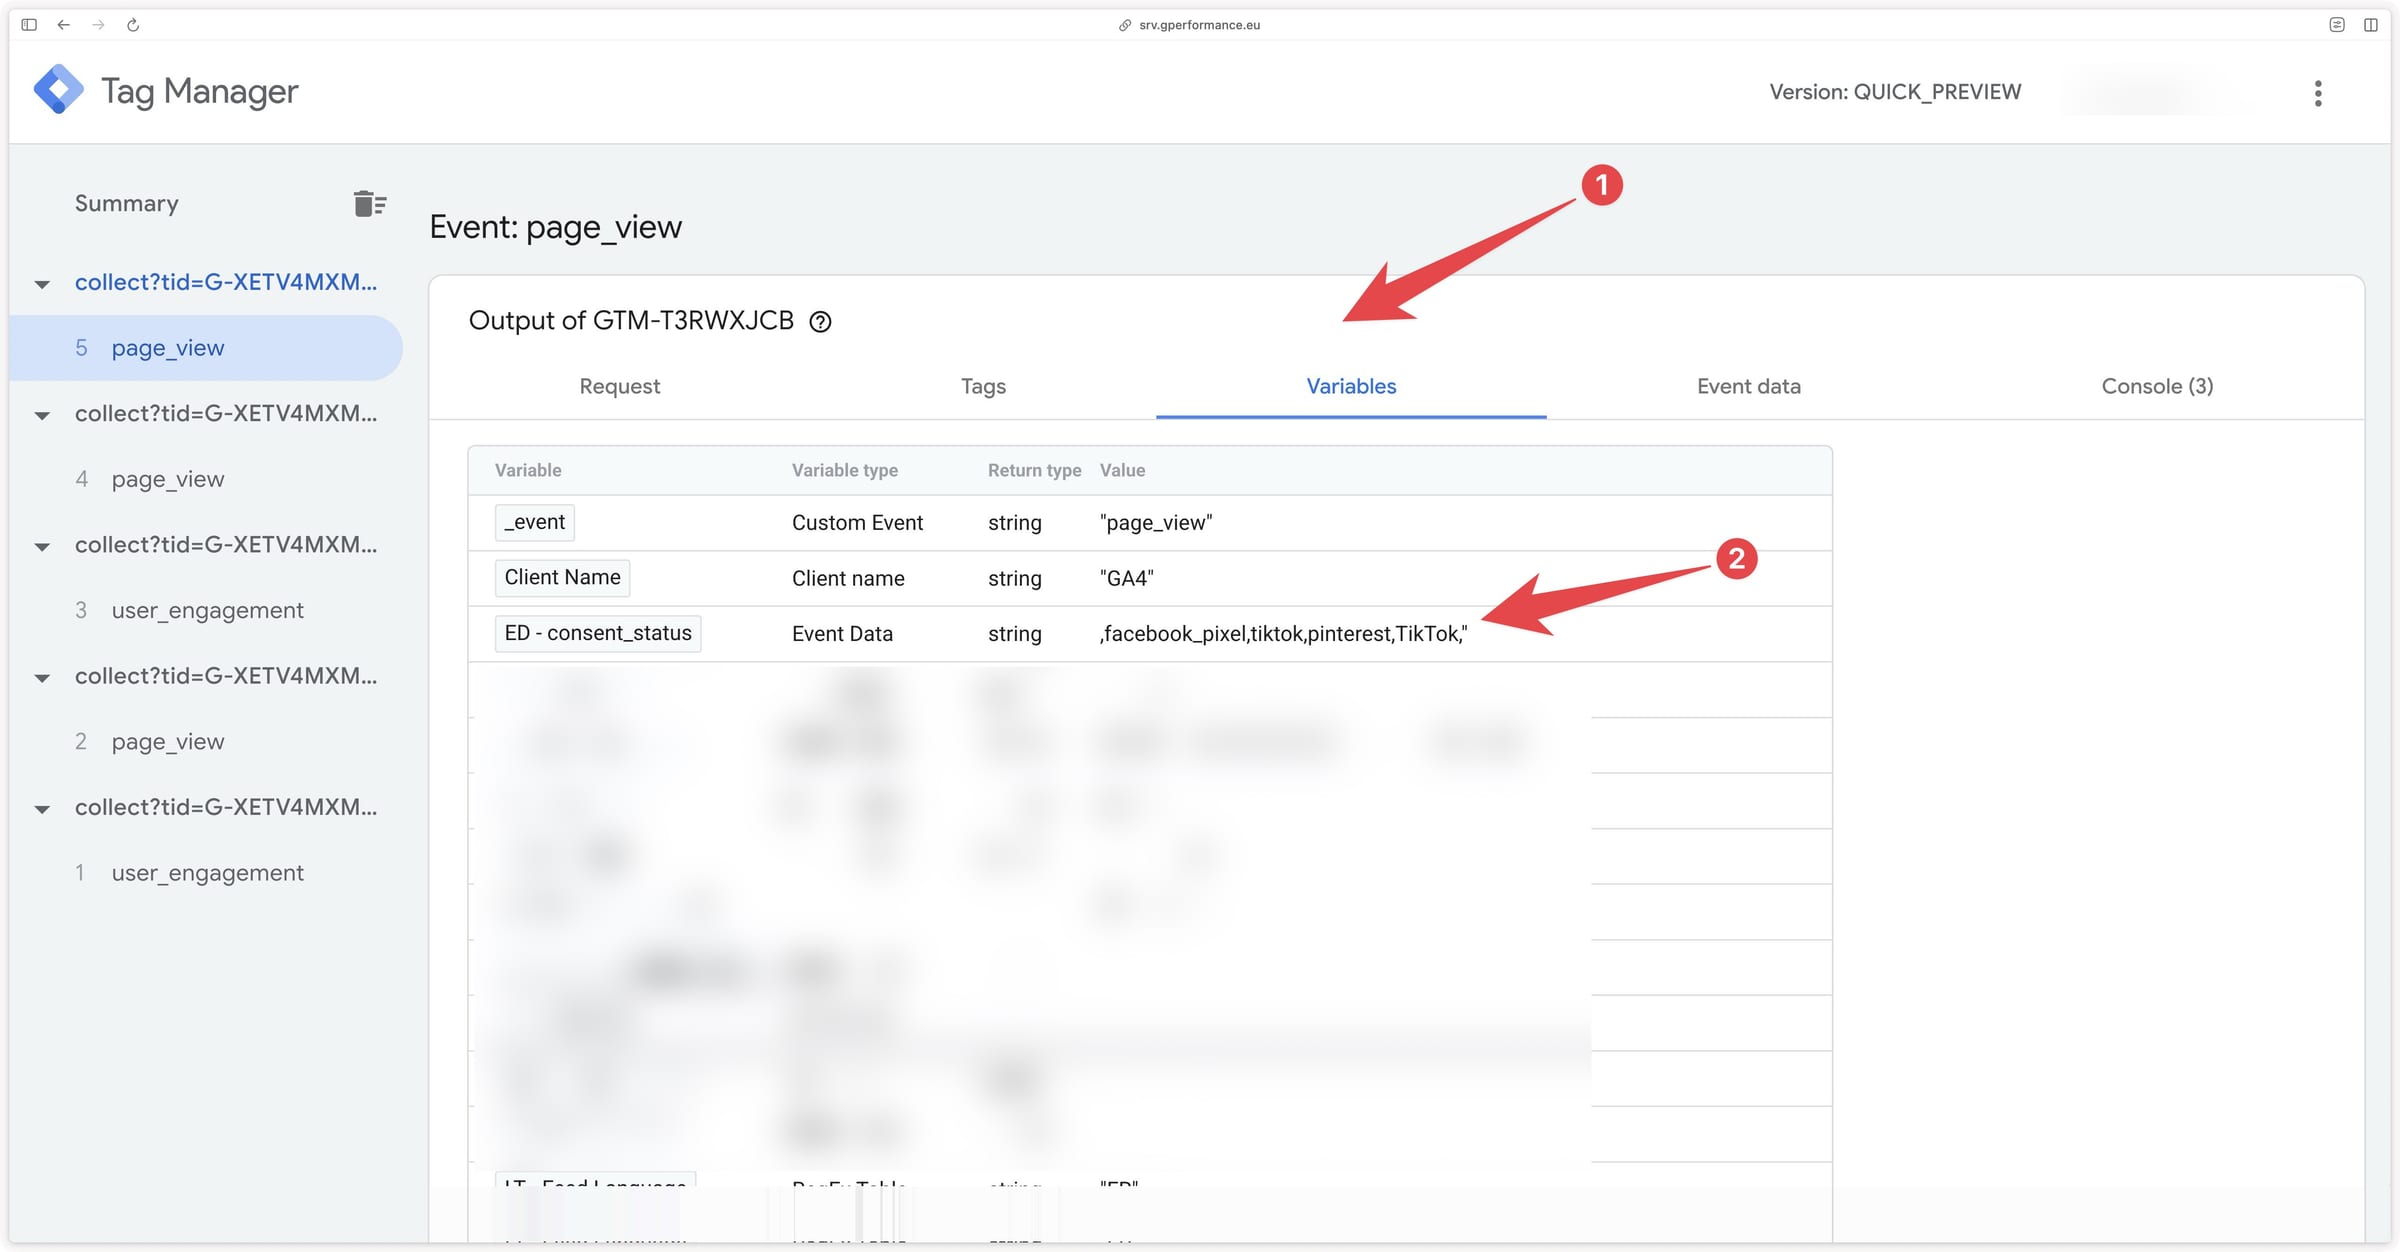
Verify the reception of consent update page_view events with the consent_status parameter set to the latest consent value after giving your partial or full consent on the banner.
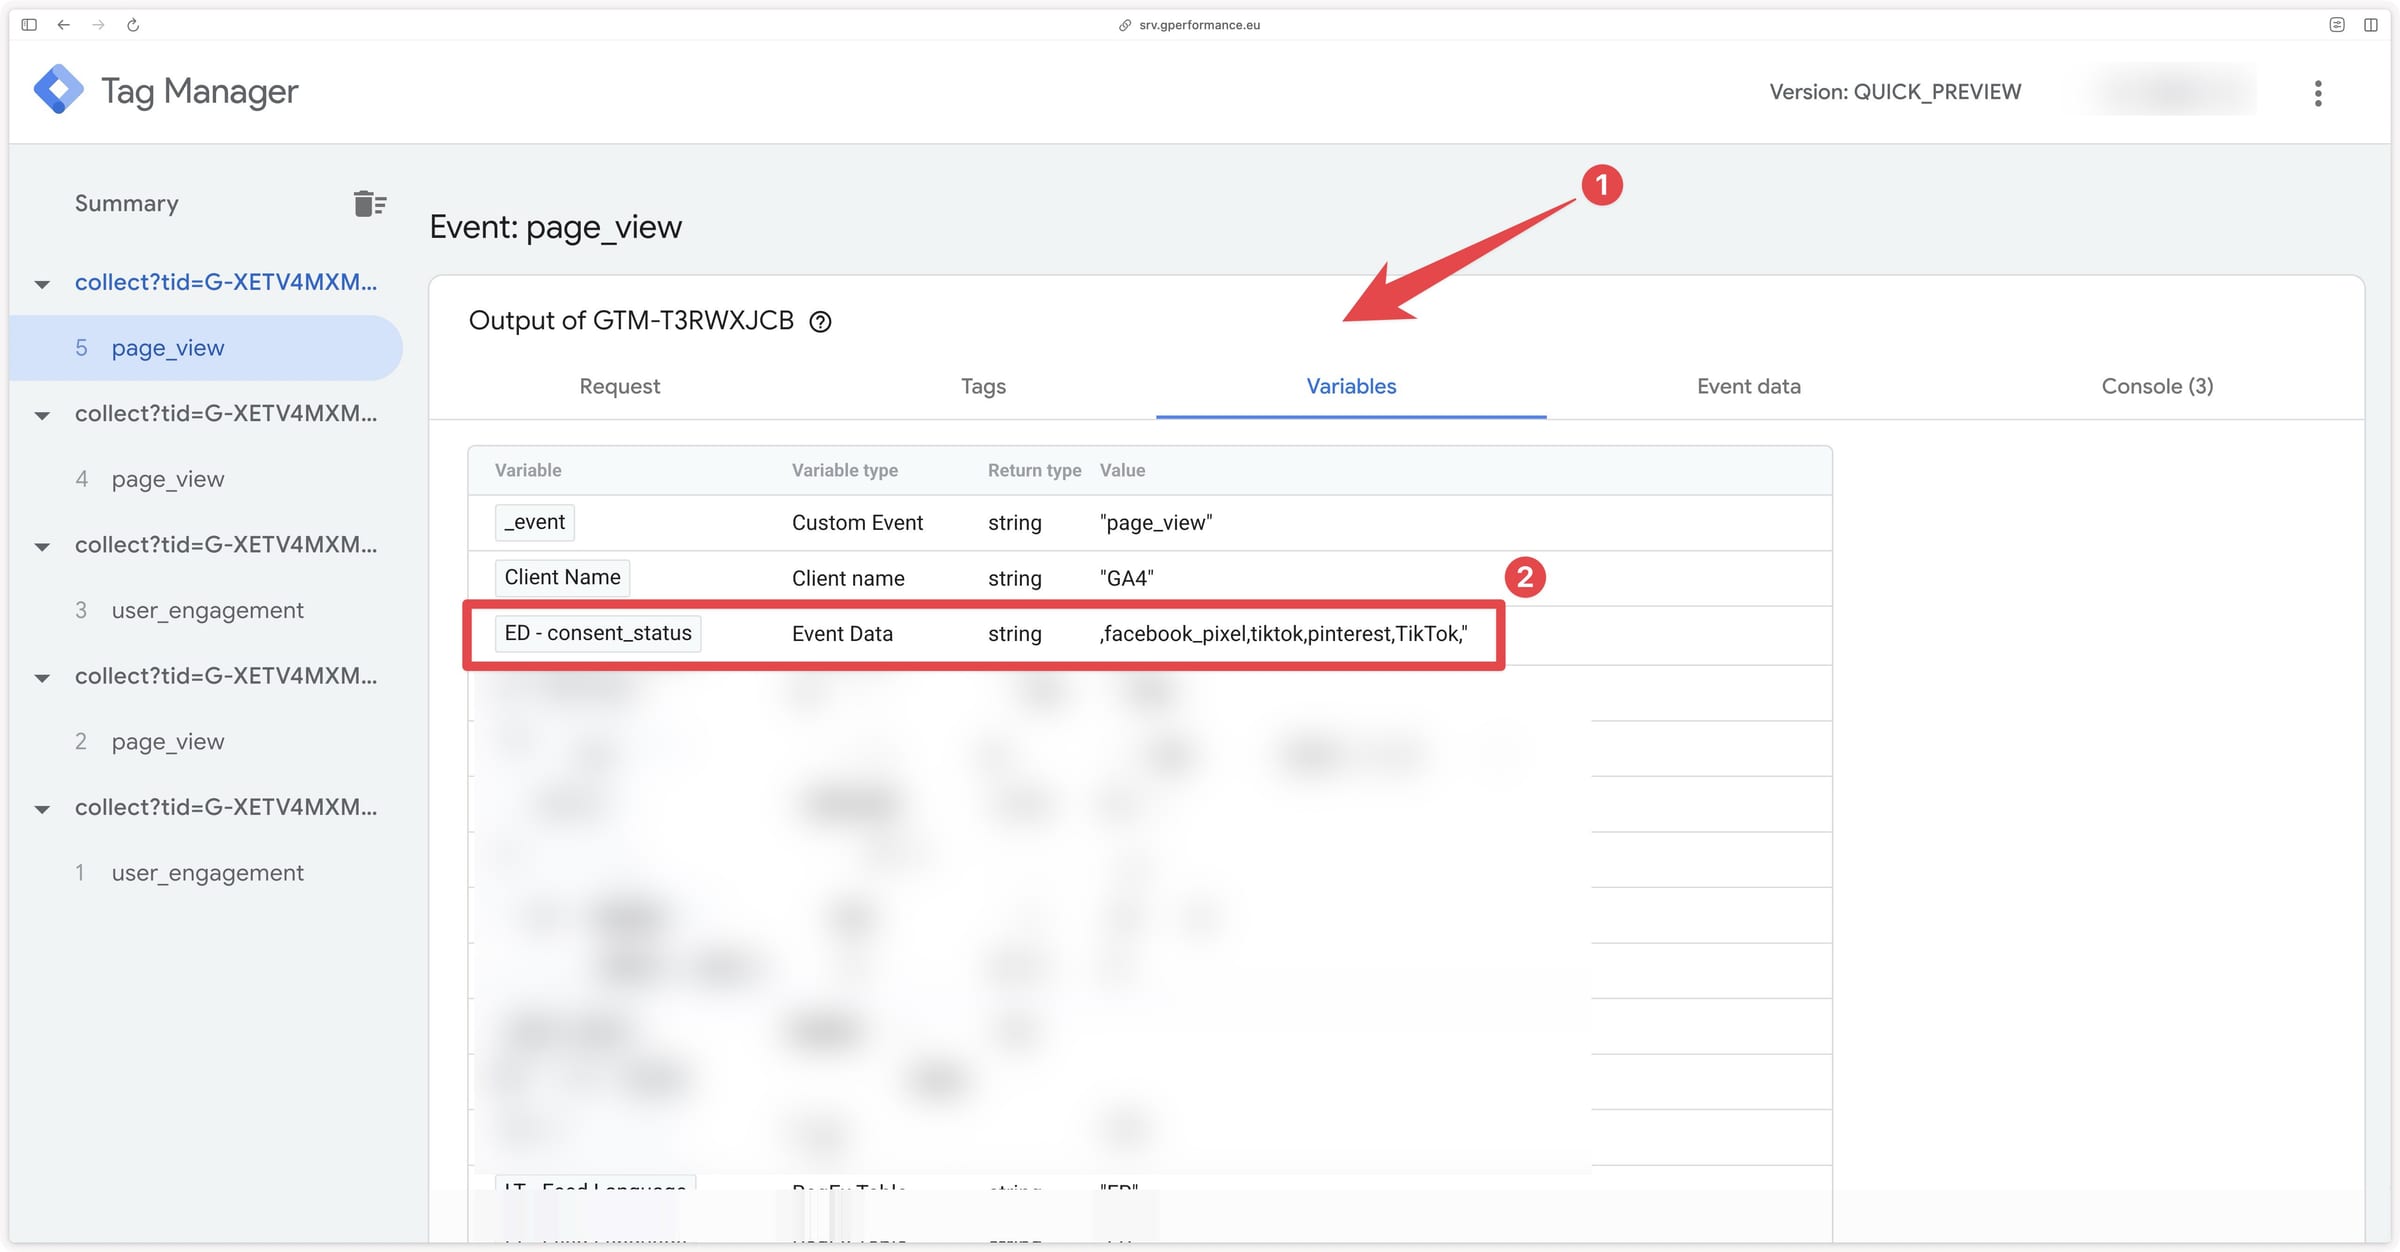
In this same page_view event, check that the Meta tag, or more generally your tags requiring consent, are properly configured.
If vendor consent has not been given, the Meta tag must not fire. It should then be in the Tags not fired section of your GTM Server preview.
Congratulations
Congratulations! You have successfully set up consent management with Axeptio and Google Tag Manager Server. Your server-side tags are now conditioned based on user consent.
If you encounter any difficulty during these steps, do not hesitate to contact our support team.