Shopify tracking (GA4, Meta, Google Ads): which solution to choose?
The importance of customized tracking for e-merchants
Customized e-commerce tracking is essential for correct attribution of media campaigns and accurate performance analysis. Without total control over the allocation and quality of data sent to media partners, advertising investments lose effectiveness, which has a direct impact on sales growth.
Custom tracking makes it possible:
- Control over data sent to Meta, Pinterest, Google Ads, Google Analytics 4, etc.
- Correct attribution of conversions to advertising campaigns.
- Sending qualitative user and product data to your analytics tools and media partners.
- Migration from traditional tracking to server-side tracking, to improve web performance, governance and data quality.
Before exploring the possible solutions for setting up customized tracking for your site, it’s crucial to understand the issues unique to Shopify, linked in particular to the restrictions on checkout and order confirmation pages.
A Shopify-specific challenge: checkout page restrictions
On a Shopify site, three types of pages coexist:
- The shop pages: from the home page to the product, customer account or shopping cart pages.
- Checkout page(s): where users finalize their order by entering their information (e-mail, address, payment method).
- The order confirmation page: once the purchase has been validated.
What’s changed:
- Before: it was relatively easy to edit the theme of your site from the Shopify back office, in order to manage your tracking on the three types of pages: store, checkout and order confirmation. It was therefore possible to customise tracking on the checkout and order confirmation sections by adding custom Javascript, or by modifying the scripts on these pages.
- Now: with Checkout Extensibility, Shopify imposes a secure environment where only the use of Custom Pixels is authorized to capture interactions on checkout pages. It is therefore no longer possible to insert code on checkout pages to manage tracking.
- From August 2025: files on checkout and order confirmation pages that enabled dedicated tracking will be definitively abandoned.
This transition makes the implementation of customised tracking more technically demanding.
3 options for tracking your Shopify site, their advantages and drawbacks
Let’s review the 3 existing solutions, all of which track events on the store, checkout and order confirmation pages.
Option 1: the Shopify “Google & YouTube” app.
This app simplifies the integration and automation of advertising processes as well as the referencing of Shopify products on the Google and YouTube ecosystems, making these advertising channels easily accessible.
Advantages
- Automatic synchronization: Your Shopify store’s products are synchronized with Google’s main tools, including Google Merchant Center, keeping your product catalog always up-to-date on Google.
- Simplified connection: Direct link between your Google Ads account and your Shopify shop, making it easier to create and manage advertising campaigns (Google Shopping, Search Ads, Display Ads and now YouTube Ads).
- Tracking made easy: simplified implementation of conversion tracking (purchases, clicks or other important actions) directly in Google Ads or Google Analytics 4.
Drawbacks (for tracking)
- No tracking customization: Impossible to modify events sent by default, as the application doesn’t offer customization.
- Google exclusivity: Conversions cannot be sent to other advertising platforms outside the Google environment.
- Consent management: The application does not offer features to manually manage user consent.
- No server-side tracking: It is not possible to integrate a carrier into a server container for server-side tracking migration.
Is this the right solution for your needs?
This solution is recommended for basic analytics needs on Google Analytics 4, but not for sending data to advertising platforms. As soon as you want to customize your tracking, share data with media partners or switch to server-side you need to abandon this approach, leave the Google & Youtube app running only for its other functionalities, and deactivate the GA4 and Google Ads tracking option.
Option 2: create a Custom Pixel
A custom pixel is a place where you can subscribe to standard Shopify events, corresponding to the events of a user journey on the site (product view, add to cart, purchase…). These events can then be sent to various third parties, either :
- by providing a datalayer (data layer usable on Google Tag Manager)
- by sending the data directly to partners.
This much more advanced solution lets you regain control over your tracking, by passing your tracking through a TMS like Google Tag Manager.
Advantages
- Solution accessible to all e-merchants: Even Shopify merchants who don’t have the Shopify Plus offer can use this advanced tracking system.
- Enhanced security: Custom Pixels operate in an isolated environment (sandbox), preventing unauthorized script injections and limiting the risk of data leakage.
- More advanced custom tracking is possible.
Drawbacks
- No DOM access: The ability to manipulate page elements (DOM) is impossible. Certain GTM triggers are therefore impossible to set up correctly (clicks, scrolls, etc.).
- Incompatibility with GTM Preview mode : Events are not displayed in GTM’s preview environment, which complicates testing. The use of development tools (DevTools) becomes an obligatory step, requiring more technical skills.
- Cookies will not be sent automatically in requests. Client IDs, and attribution in general, are therefore much more complex to manage.
- Advanced technical skills: this solution requires advanced technical knowledge for successful implementation.
Is this the right solution for your needs?
With this solution, all e-commerce events can be tracked, and tracking customization is possible. But due to its sandboxed environment, and its technical constraints, this setup remains quite complex technically speaking. It is therefore not recommended for users without advanced technical skills in tracking.
Option 3: the Addingwell - GTM & DataLayer application
This last solution has been developed by our teams to make things as easy as possible for you. Our plugin meets the restrictions imposed today and tomorrow by Shopify. The latest Shopify tracking standards are used in this plugin (custom pixel on the checkout part + dedicated code for store page events), with no headaches or special knowledge for the end user.
To implement this solution, all you need is our plugin and a Google Tag manager Web container.
Advantages
- Easy installation of your GTM snippet via the plugin on all site pages.
- Advanced e-commerce tracking implemented effortlessly, on both store and checkout pages, with a single click. Our plugin pushes all major e-commerce events into a datalayer, with the correct GA4 nomenclature. All the e-commerce information required for each event is therefore present (item_id, value, currency…).
- To enable you to send ultra-quality data to your media partners, the user data is also available in the datalayer, in the right format, at the right time.
- A GTM client-side container template can be downloaded from our documentation for fast and efficient installation.
- For Addingwell server-side clients: one-click adblocker bypass. This lets you easily track users who have set up an adblocker on their browser (up to 15% more data tracked, depending on the site).
- For Addingwell server-side clients: cookie maintenance made easy, in just one click.
- Plugin installation is free, allowing you to set up your e-commerce tracking in just a few minutes, with no need for advanced technical skills.
Drawbacks
- Our plugin doesn’t currently allow you to add other Custom events. If you need to set up events in addition to our “classic” e-commerce datalayer events, this is not possible today.
Is this the right solution for your needs?
The Addingwell plugin is ideal for merchants looking for a fast and efficient solution, without requiring advanced skills. It meets current and future standards imposed by Shopify while guaranteeing optimal e-commerce tracking.
Addingwell application configuration - GTM & DataLayer
What is the purpose of addingwell’s Shopify application?
Addingwell’s Shopify app allows you to install Google Tag Manager and a Data Layer GA4 on your Shopify store.
From this DataLayer you can configure Google Tag Manager to send your data to various platforms such as Google Analytics 4, Google Ads or Meta Ads.
As soon as you send your data via Google Tag Manager, you need to disable sales channel conversion tracking in Shopify to avoid double tracking.
Shopify store compatibility
With all the changes to Shopify, you may be wondering if the Addingwell app is compatible with your Shopify store. Our application is compatible with all types of stores.
| Shopify Shop Features | Addingwell App Compatibility |
|---|---|
| Shopify Plan Basic | ✅ |
| Shopify Plan Advanced | ✅ |
| Plan Shopify Grow | ✅ |
| Plan Shopify Plus | ✅ |
| Shop multi-domain | ✅ |
| Shop multi-currency | ✅ |
Configure Addingwell application
Install the Addingwell application on your shop
To get started, download the app from this page or search Addingwell directly in the Shopify App Store .
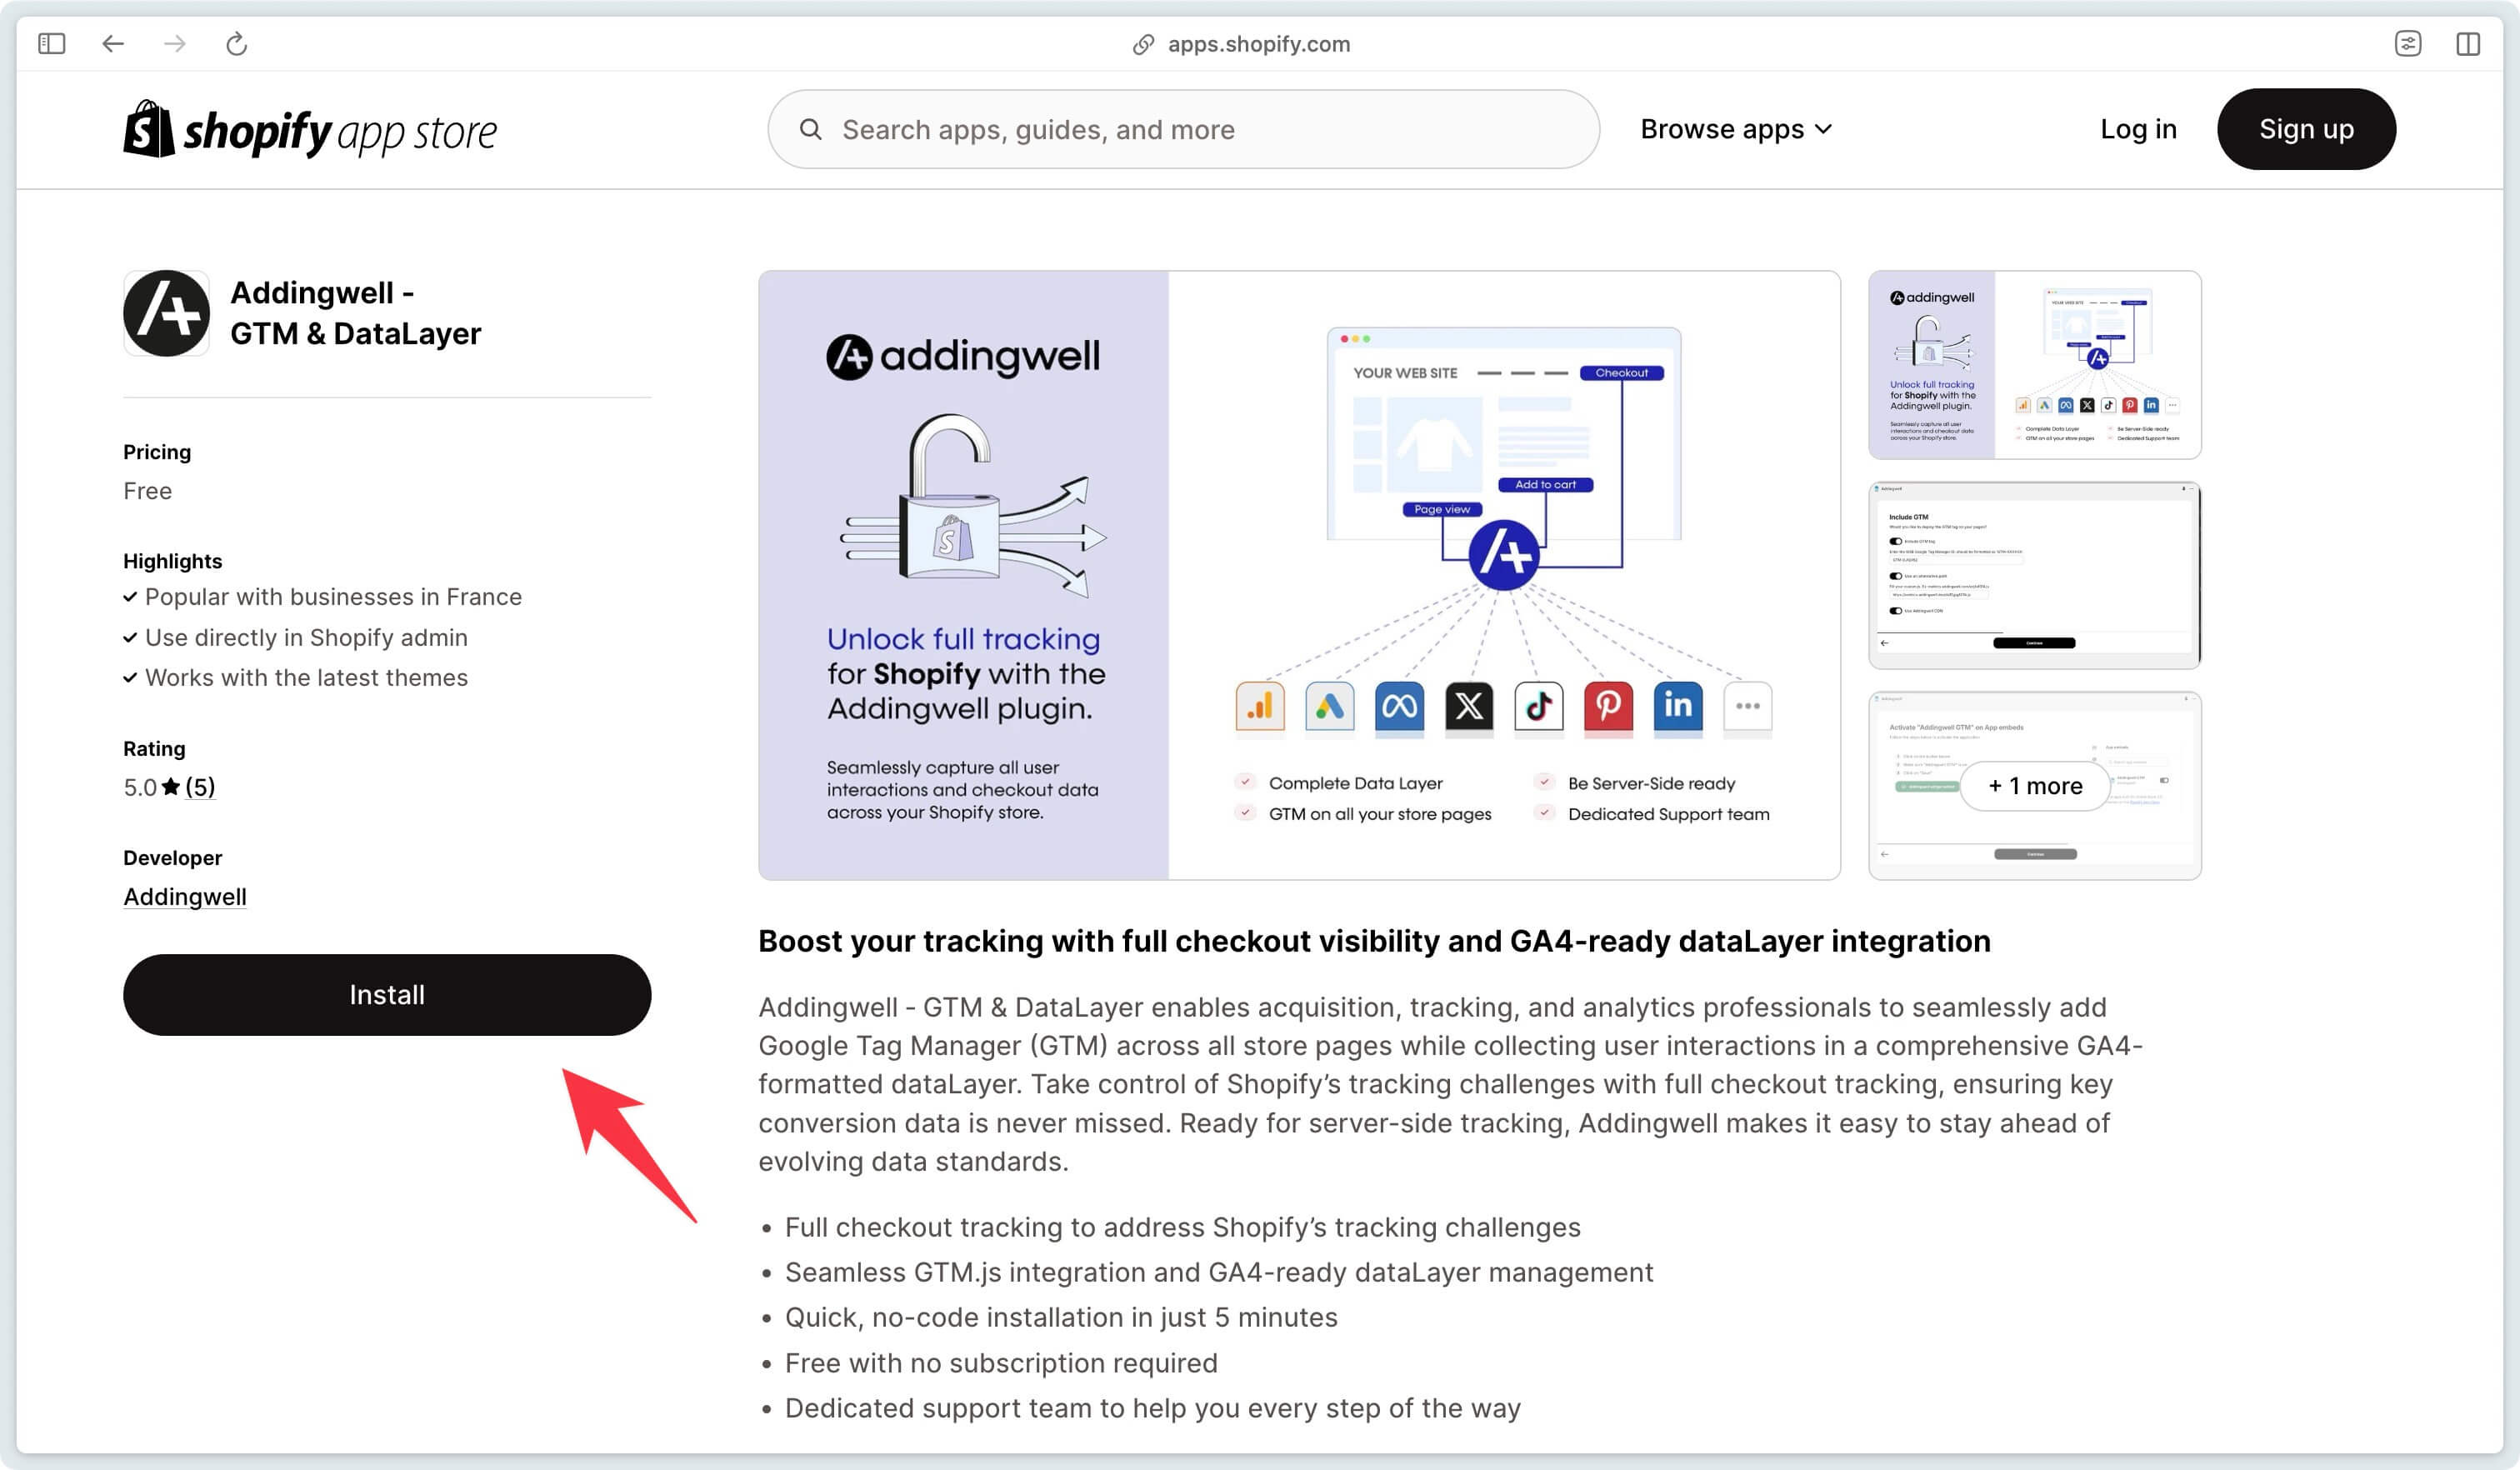
Click Install, and you’ll be redirected to your Shopify store.
Once the application is installed, you’ll be taken to this interface.

Click Continue to begin configuration.
Enable Data Layer
Activating the Data Layer automatically generates a tracker of user events in GA4 format. These events cover most interactions with your site.
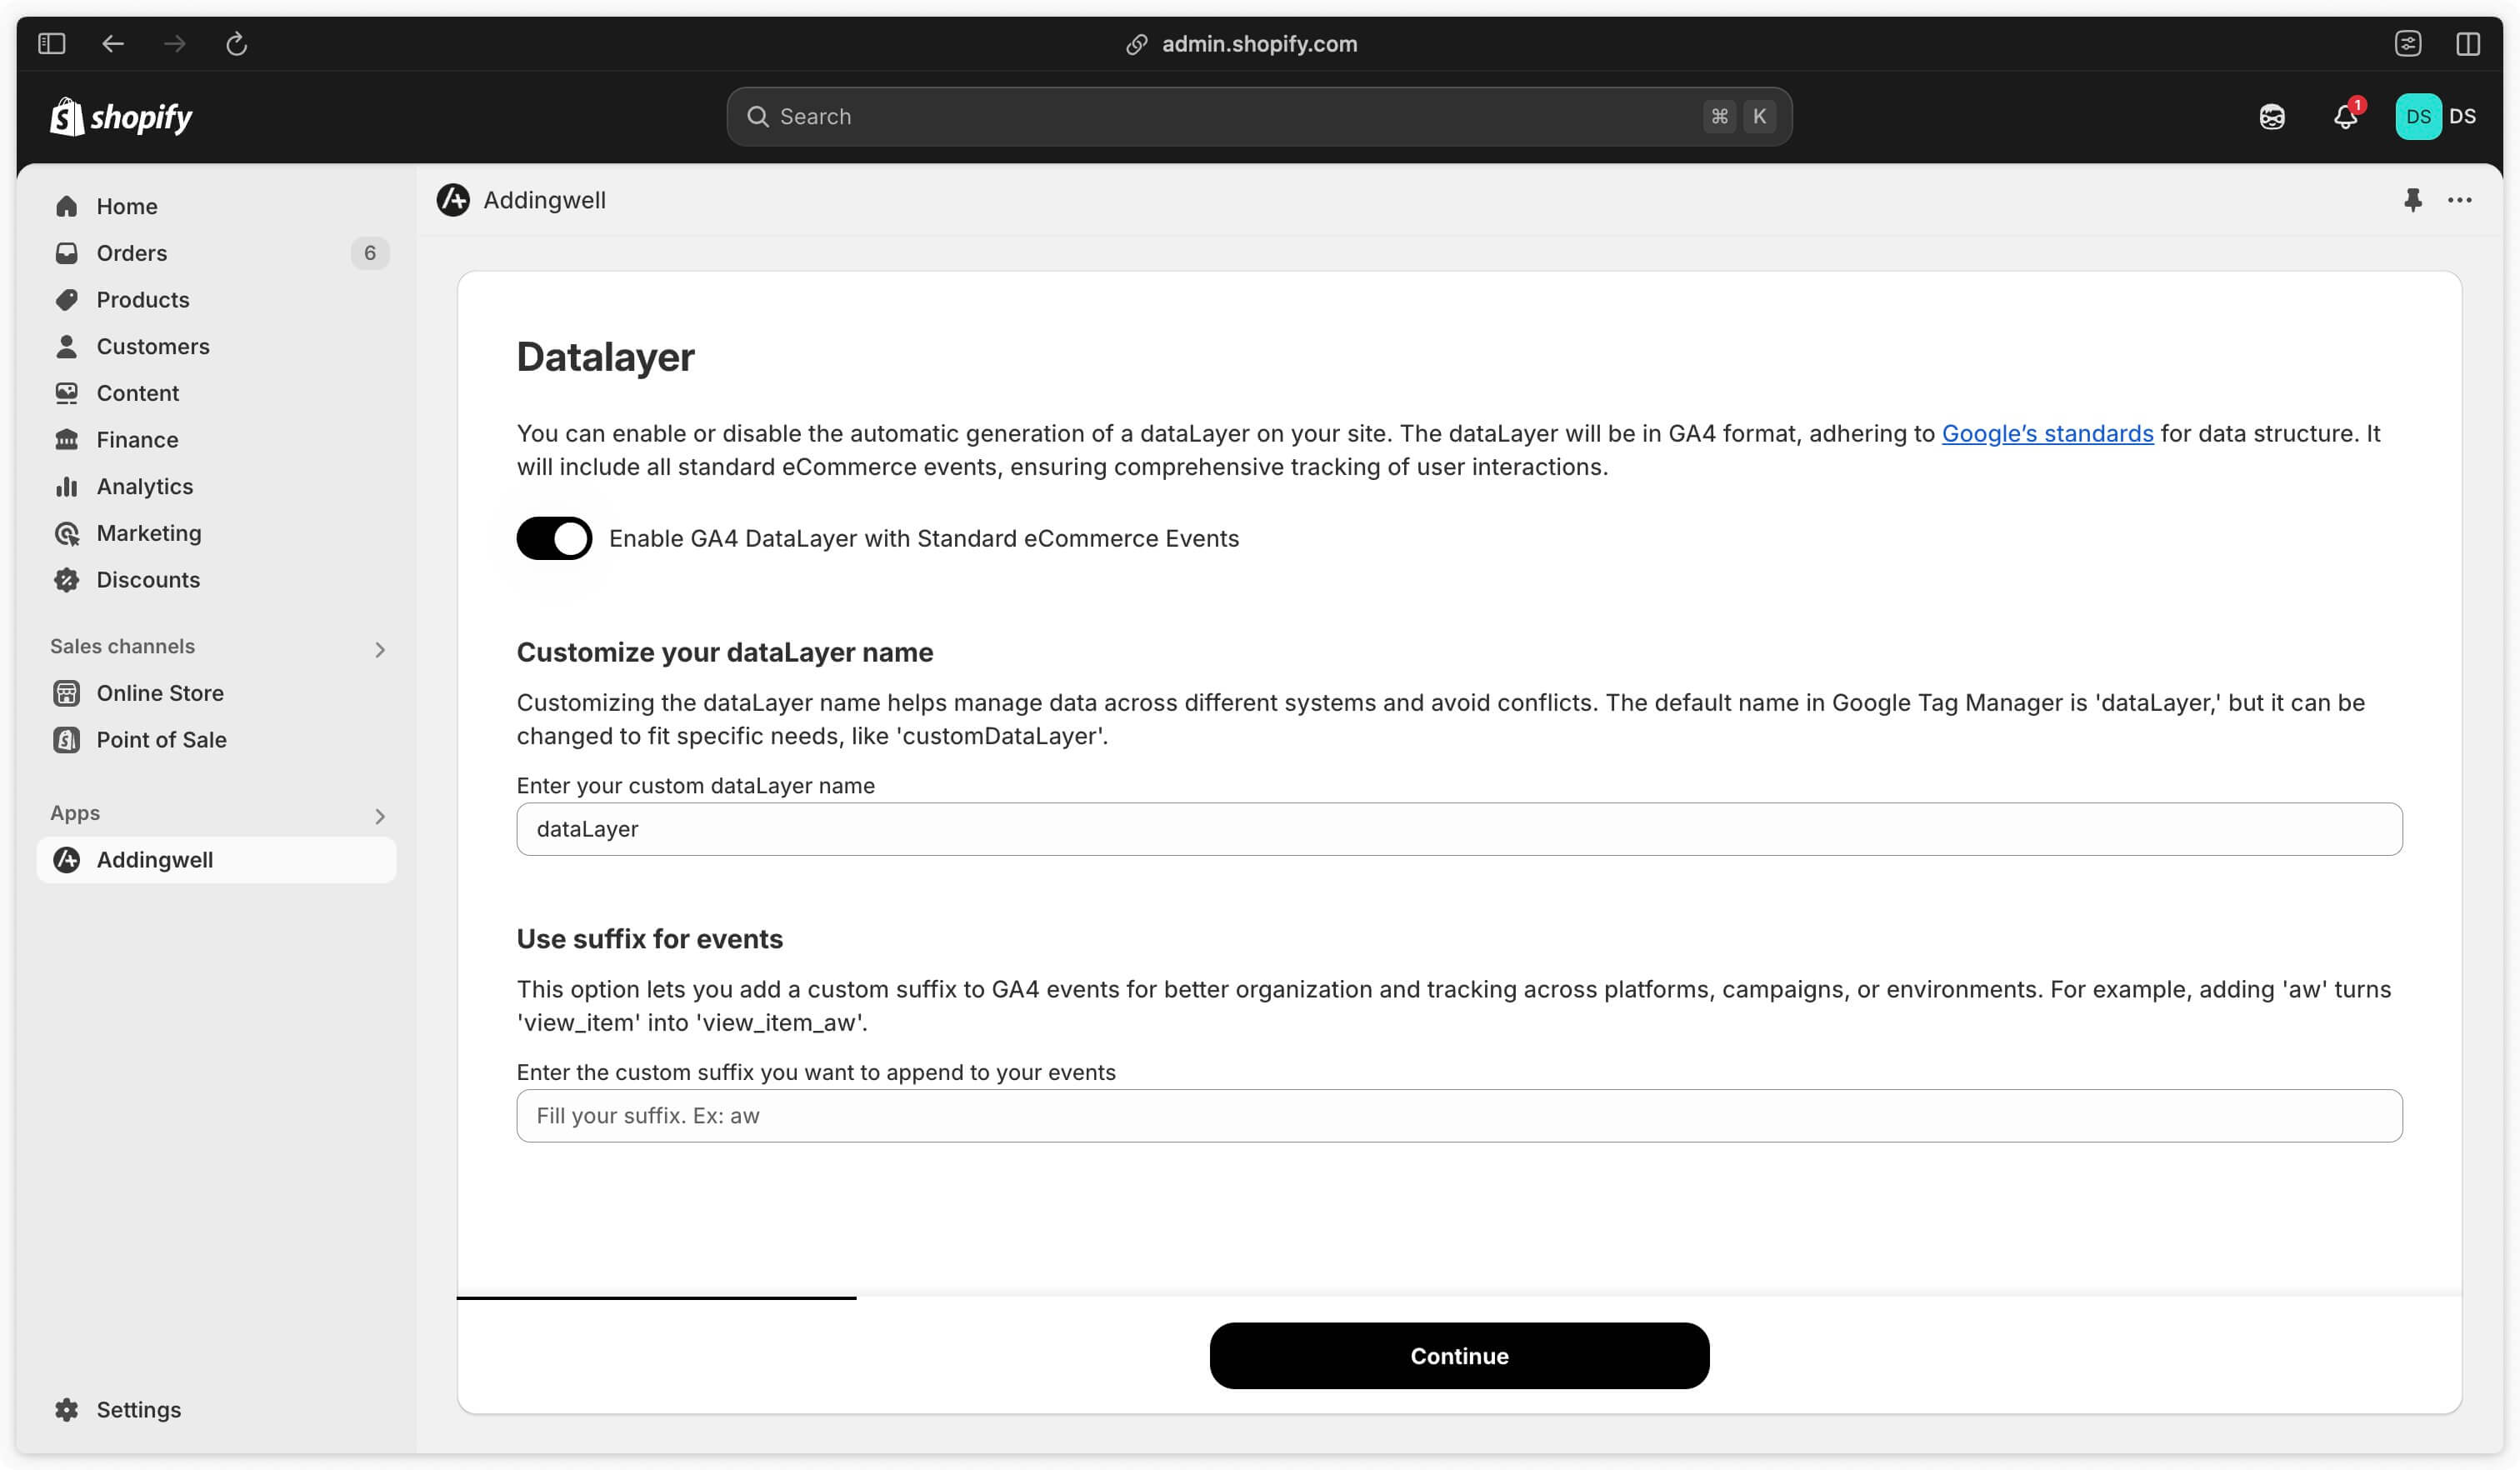
Enable GA4 DataLayer with Standard eCommerce Events
Check this box to enable the sending of Data Layer events.
Customize your dataLayer name (advanced)
For more advanced use cases, you can rename your Data Layer name. The Google Tag Manager injected by the application will then listen to this Data Layer.
The default name is dataLayer.
Use suffix for events
To avoid impacting your current Data Layer triggers in Google Tag Manager, you can add a suffix to the Data Layer events generated by the Addingwell application.
For example, if you put aw in this field, your Data Layer events will be formatted as follows:
page_view_aw- view_item_aw
- and so on.
=> Reference to Data Layer events and parameters supported by the application
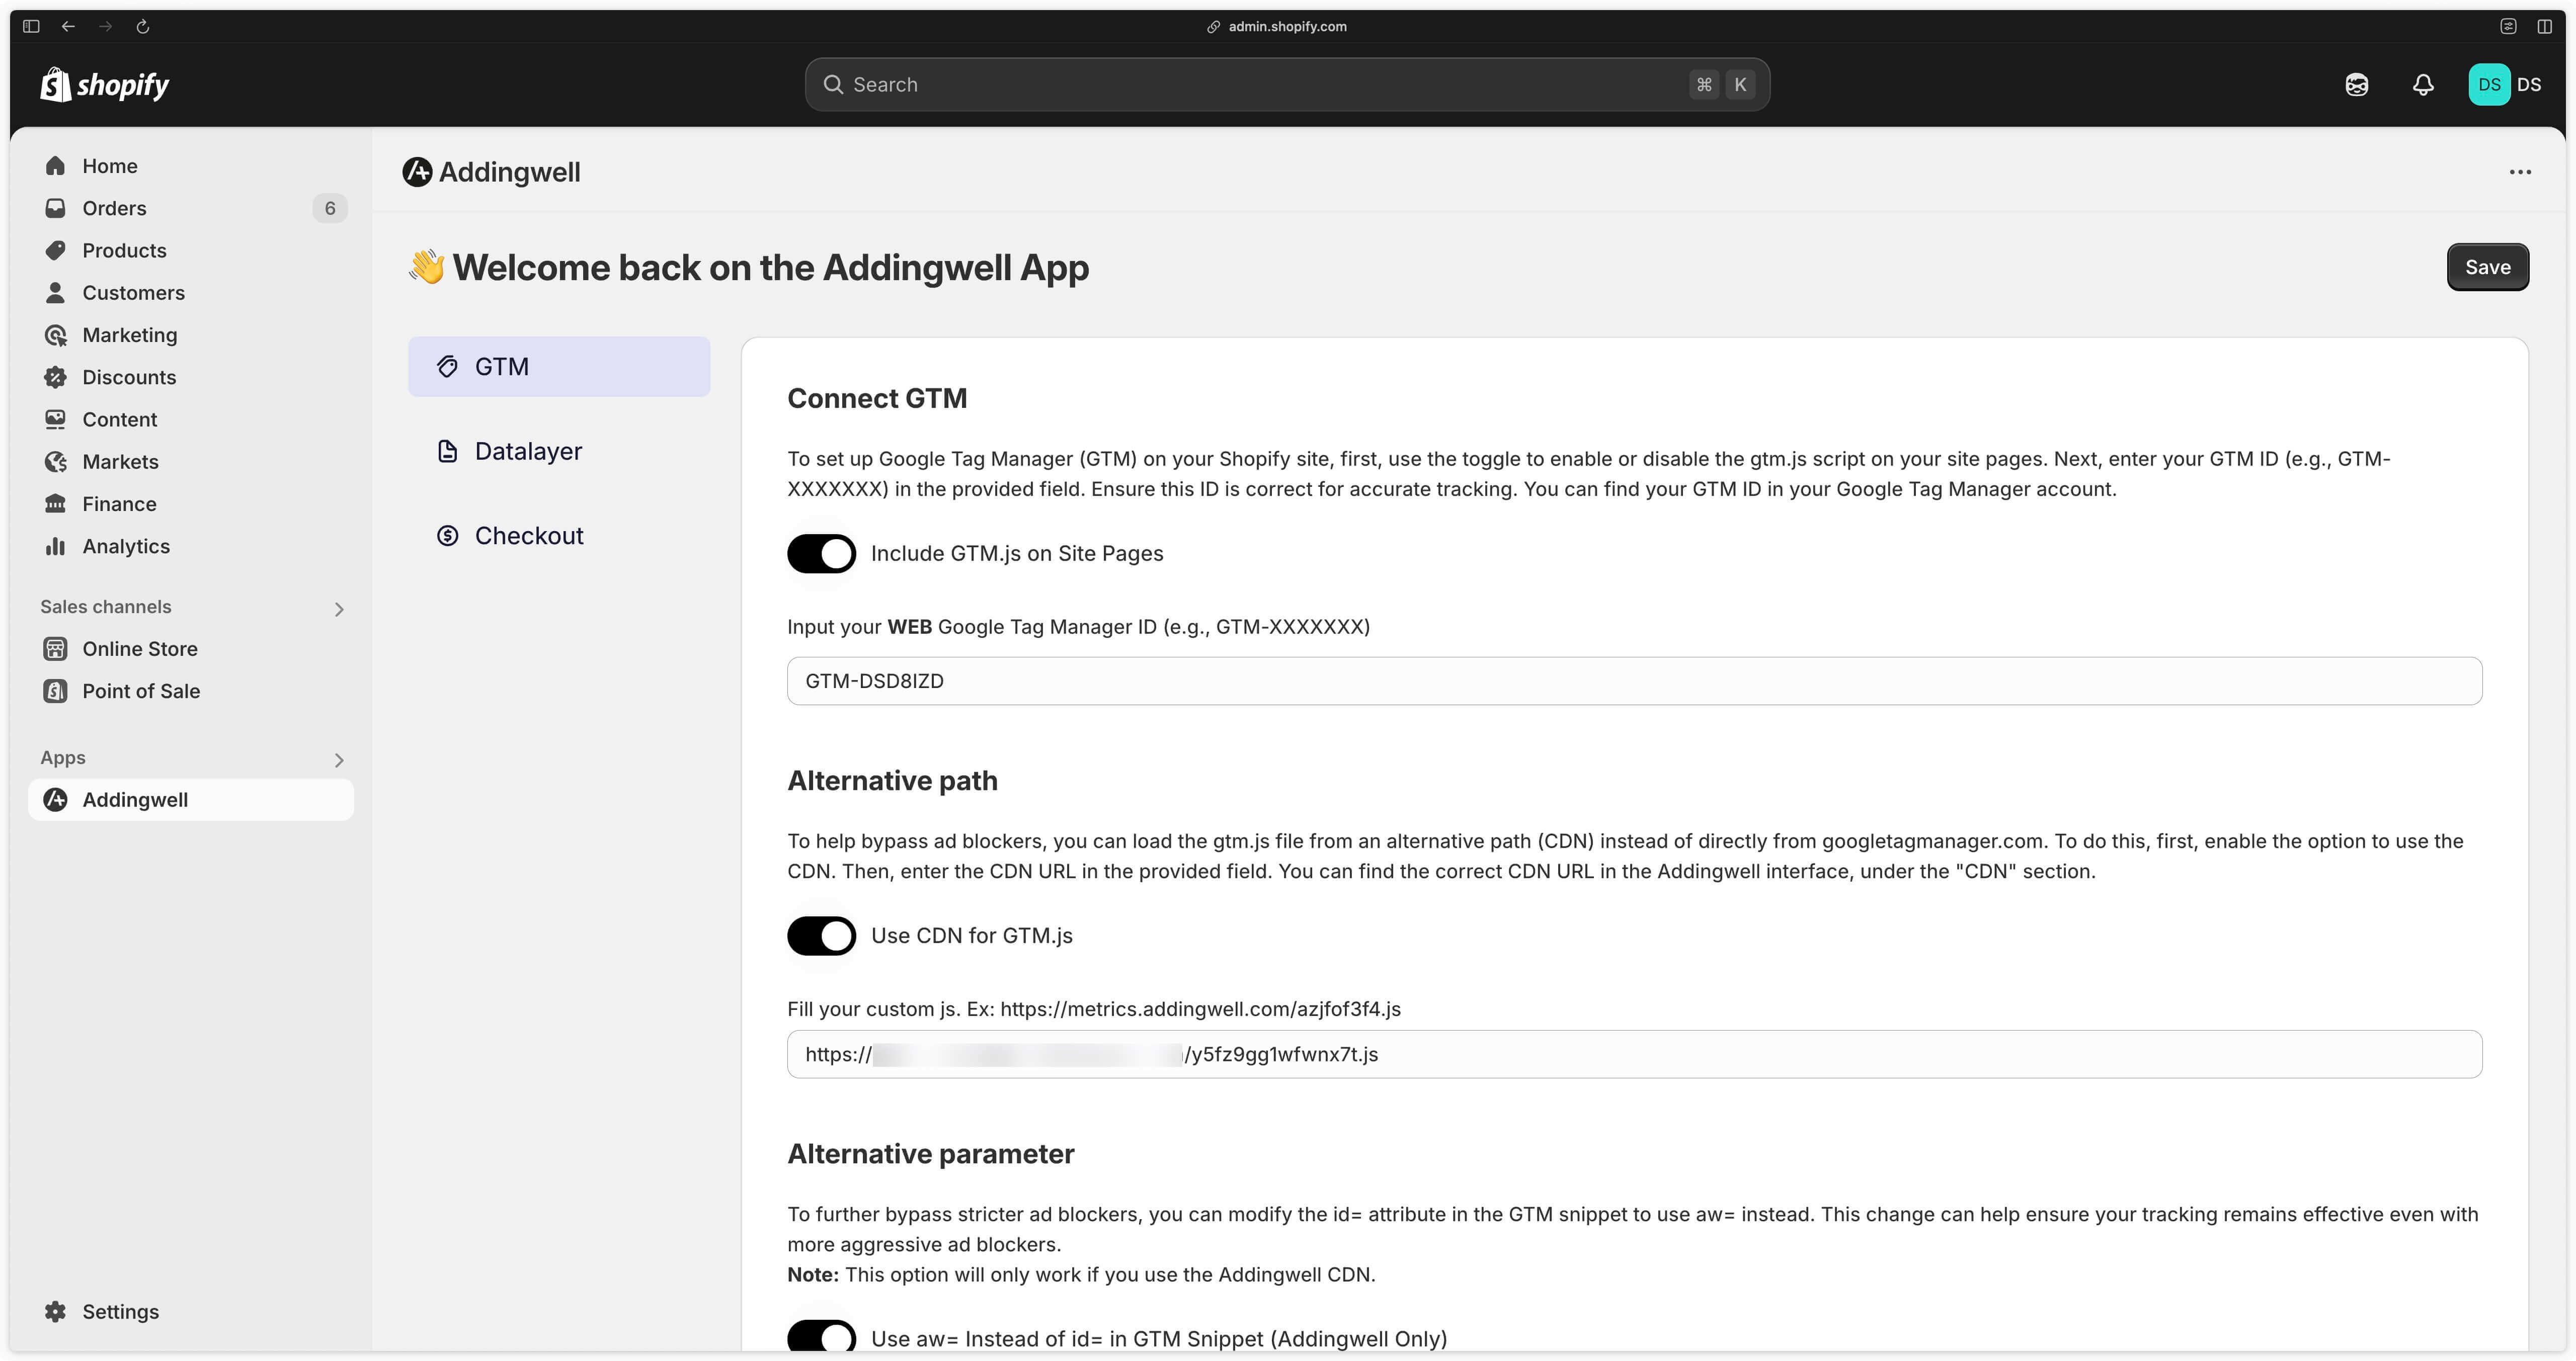
Connect Google Tag Manager
Include GTM.js on Site Pages
To integrate Google Tag Manager into your store, check this box. Then enter your GTM container identifier (in our example: GTM-DSD8IZD).
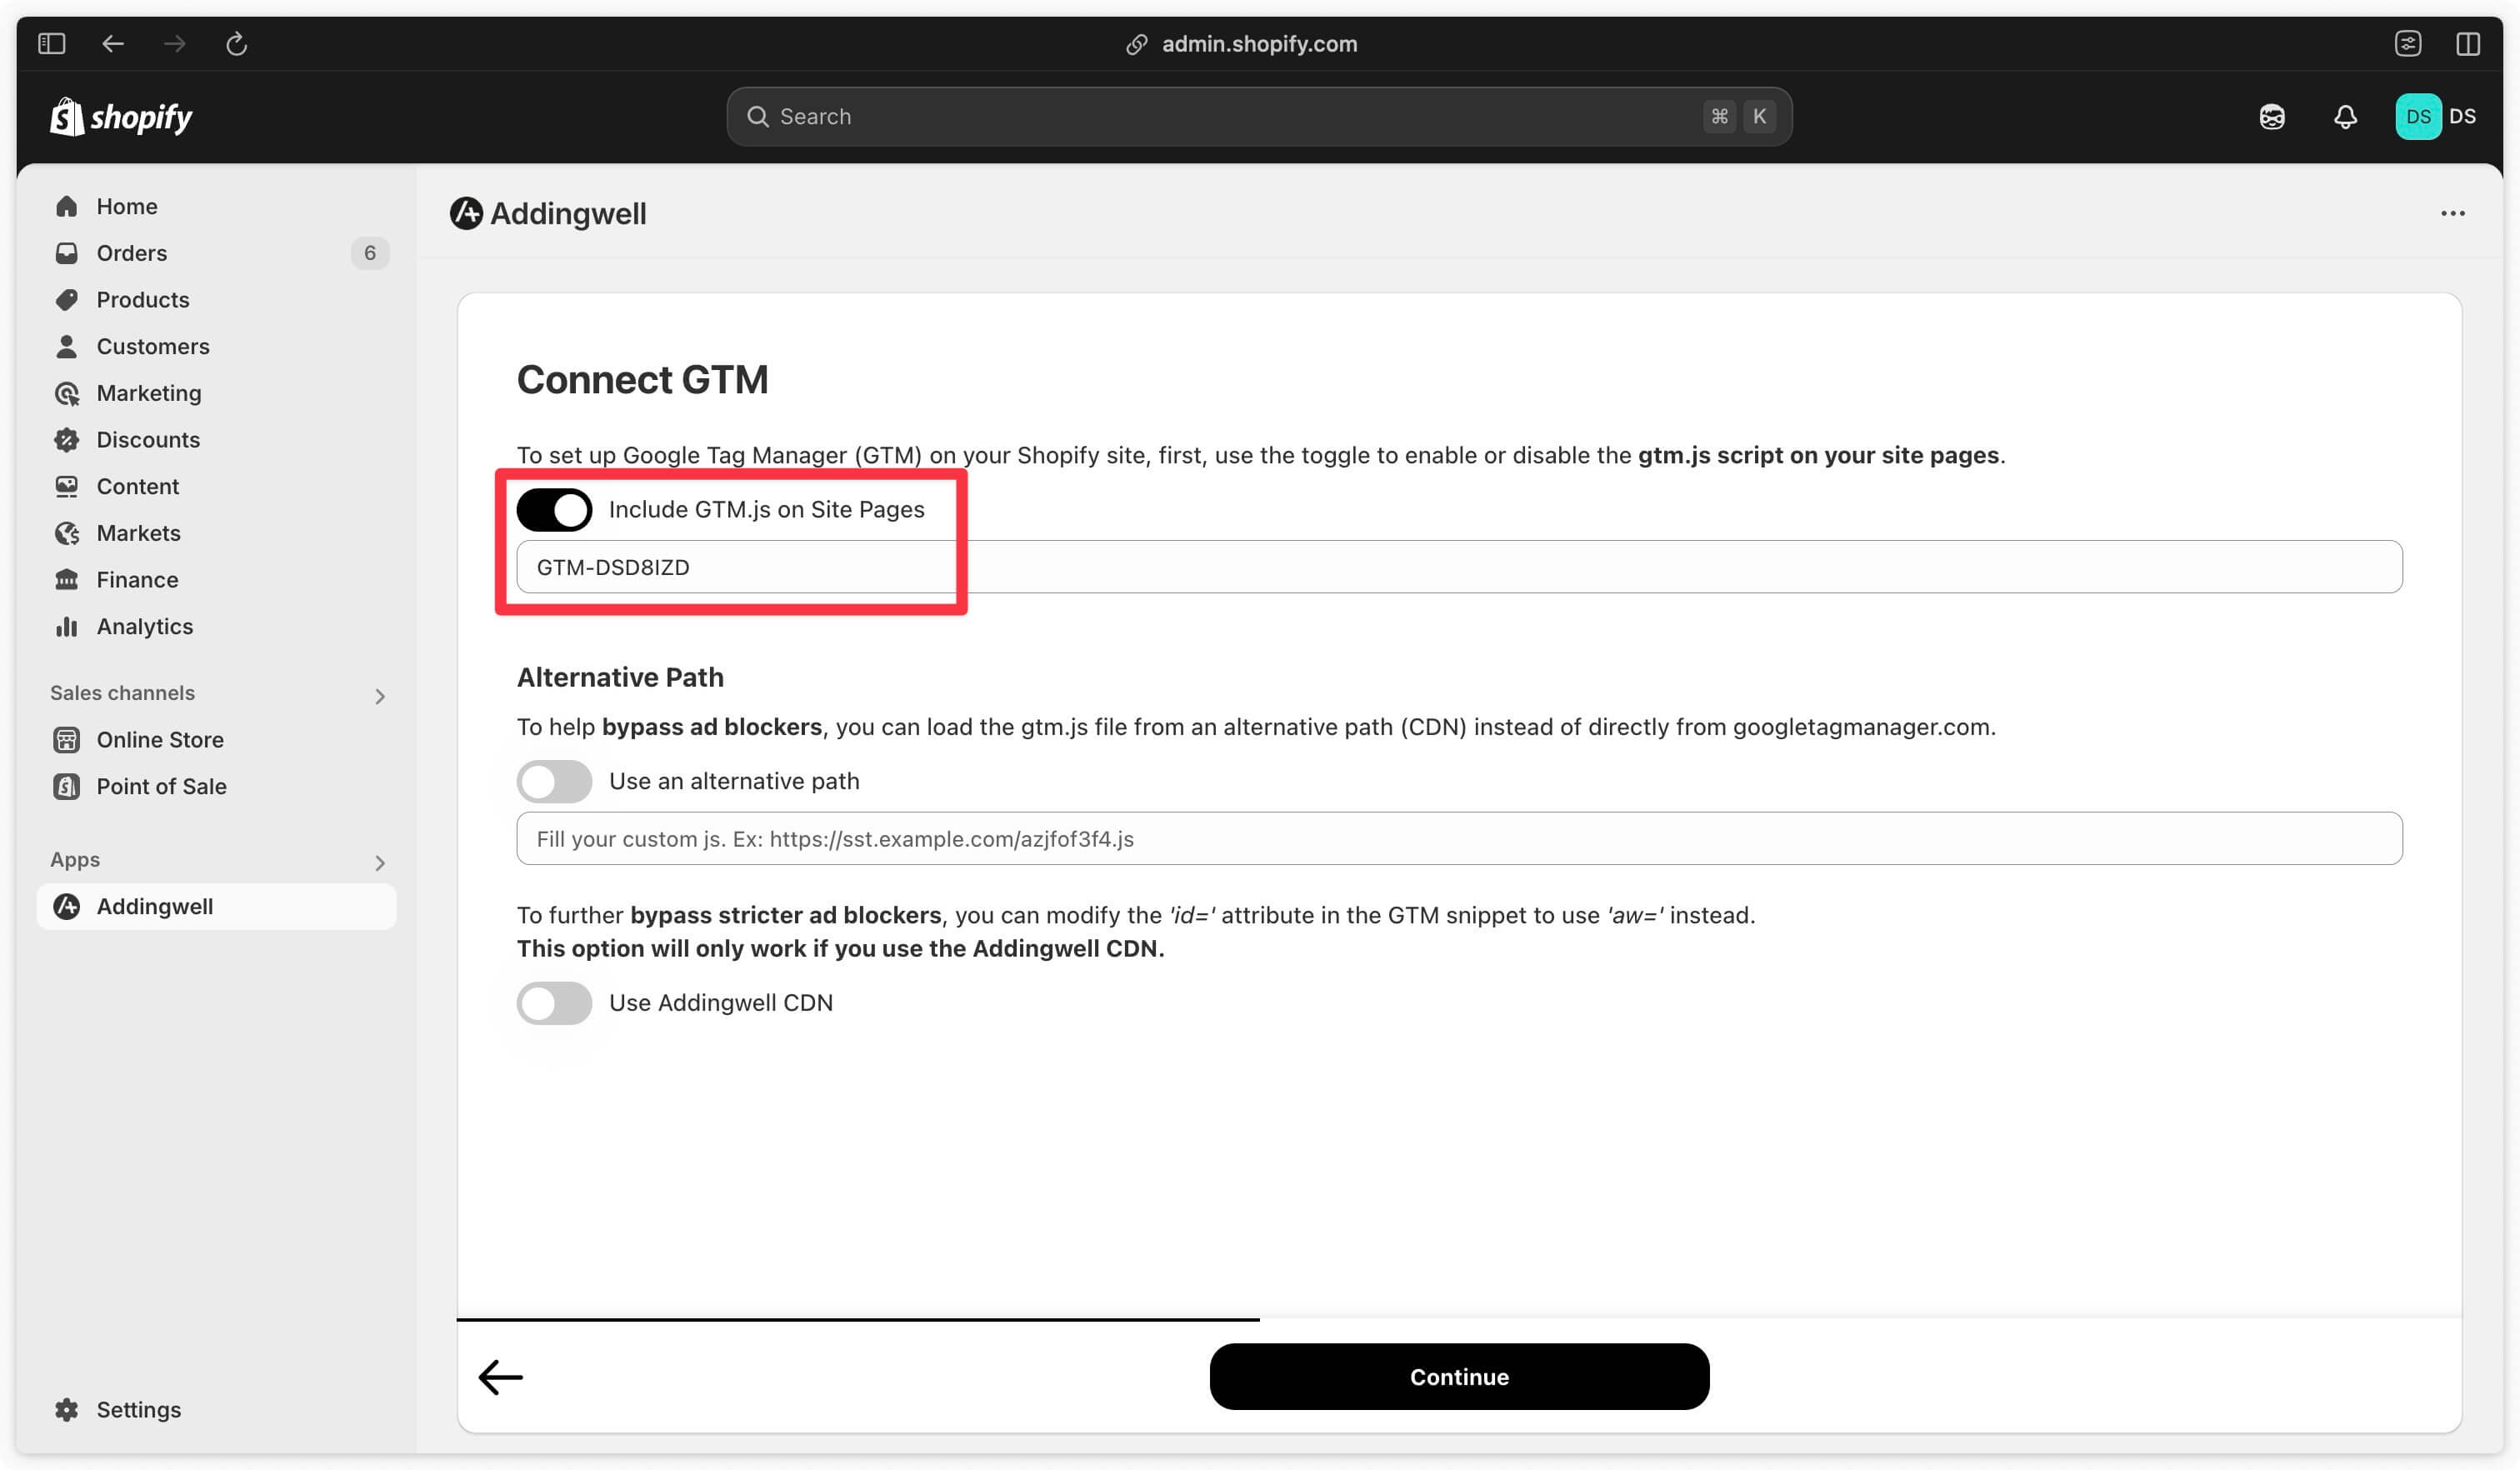
Alternative Path
This section lets you load the Google Tag Manager script from your own server to bypass ad-blockers.
This feature is only available if you have a server.
If you don’t have a server, you can create one for free on Addingwell
From your Addingwell container, go to the CDN section. In the Google Tag Manager Web map, click on How to setup?.
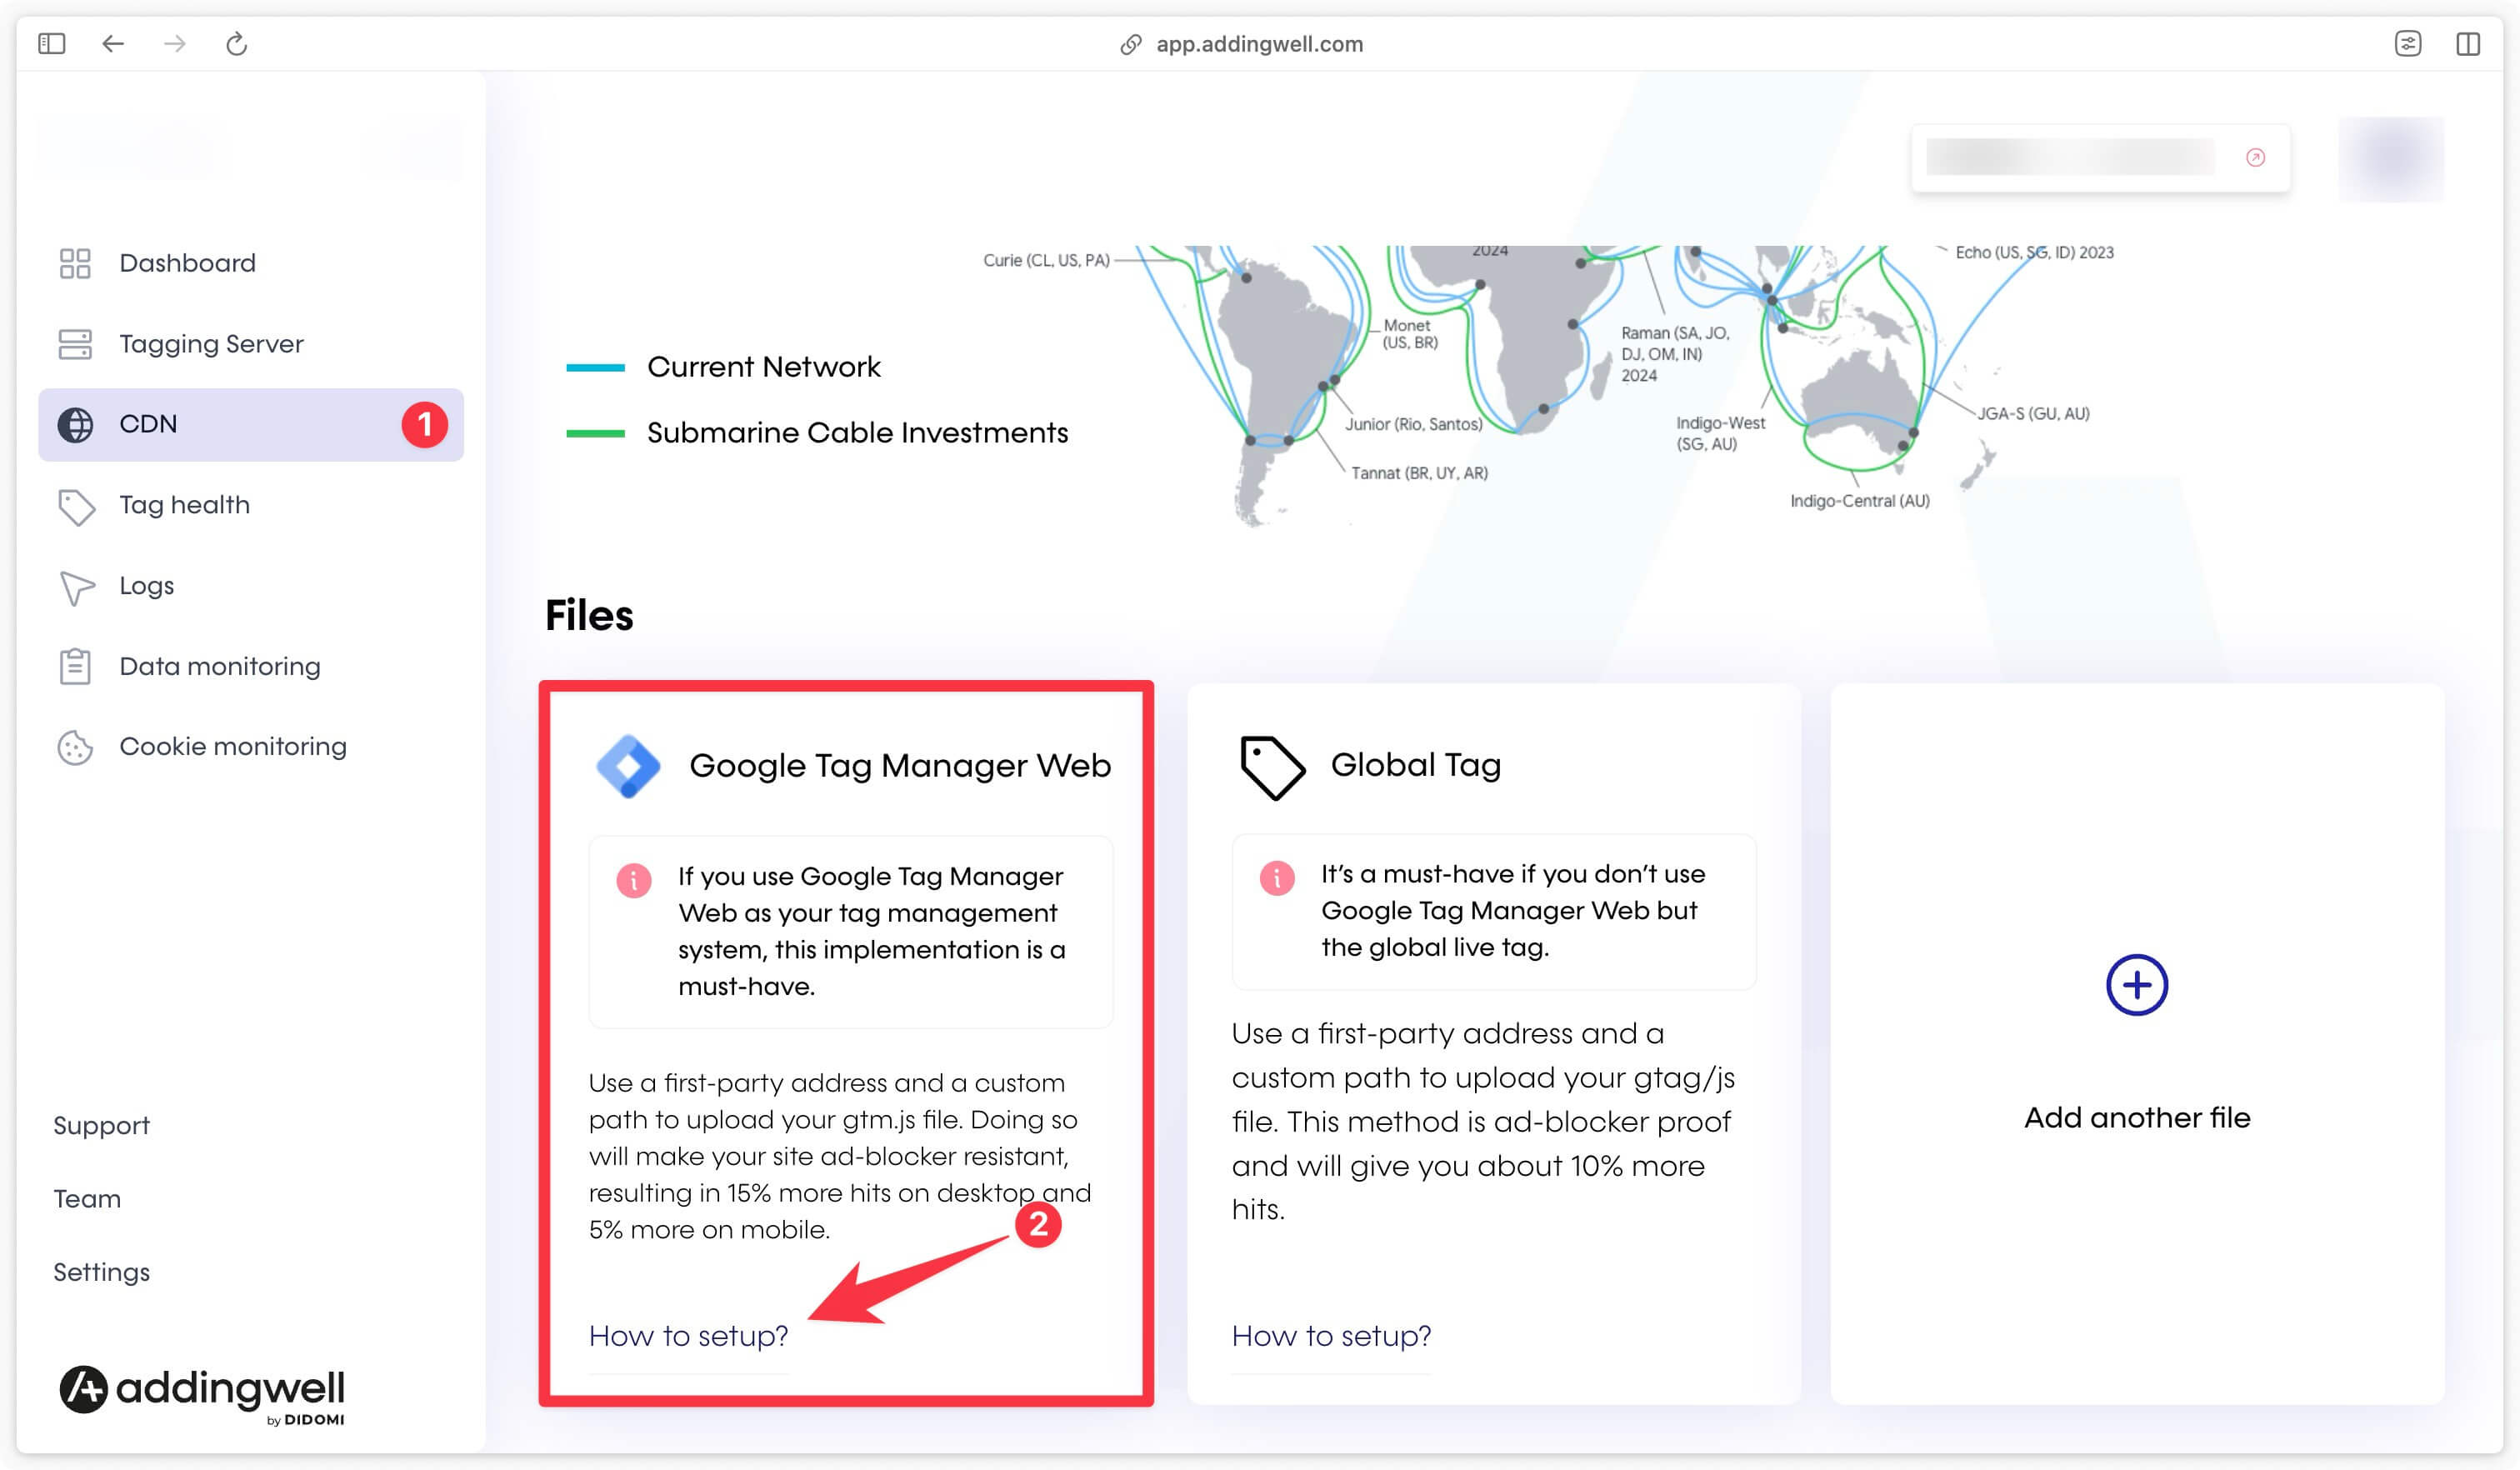
A popup opens, copy the complete URL of the Google Tag Manager file (see screenshot below).

Check the Use an alternative path box and paste the URL.
Then check the Use Addingwel CDN box to bypass ad-blockers completely.
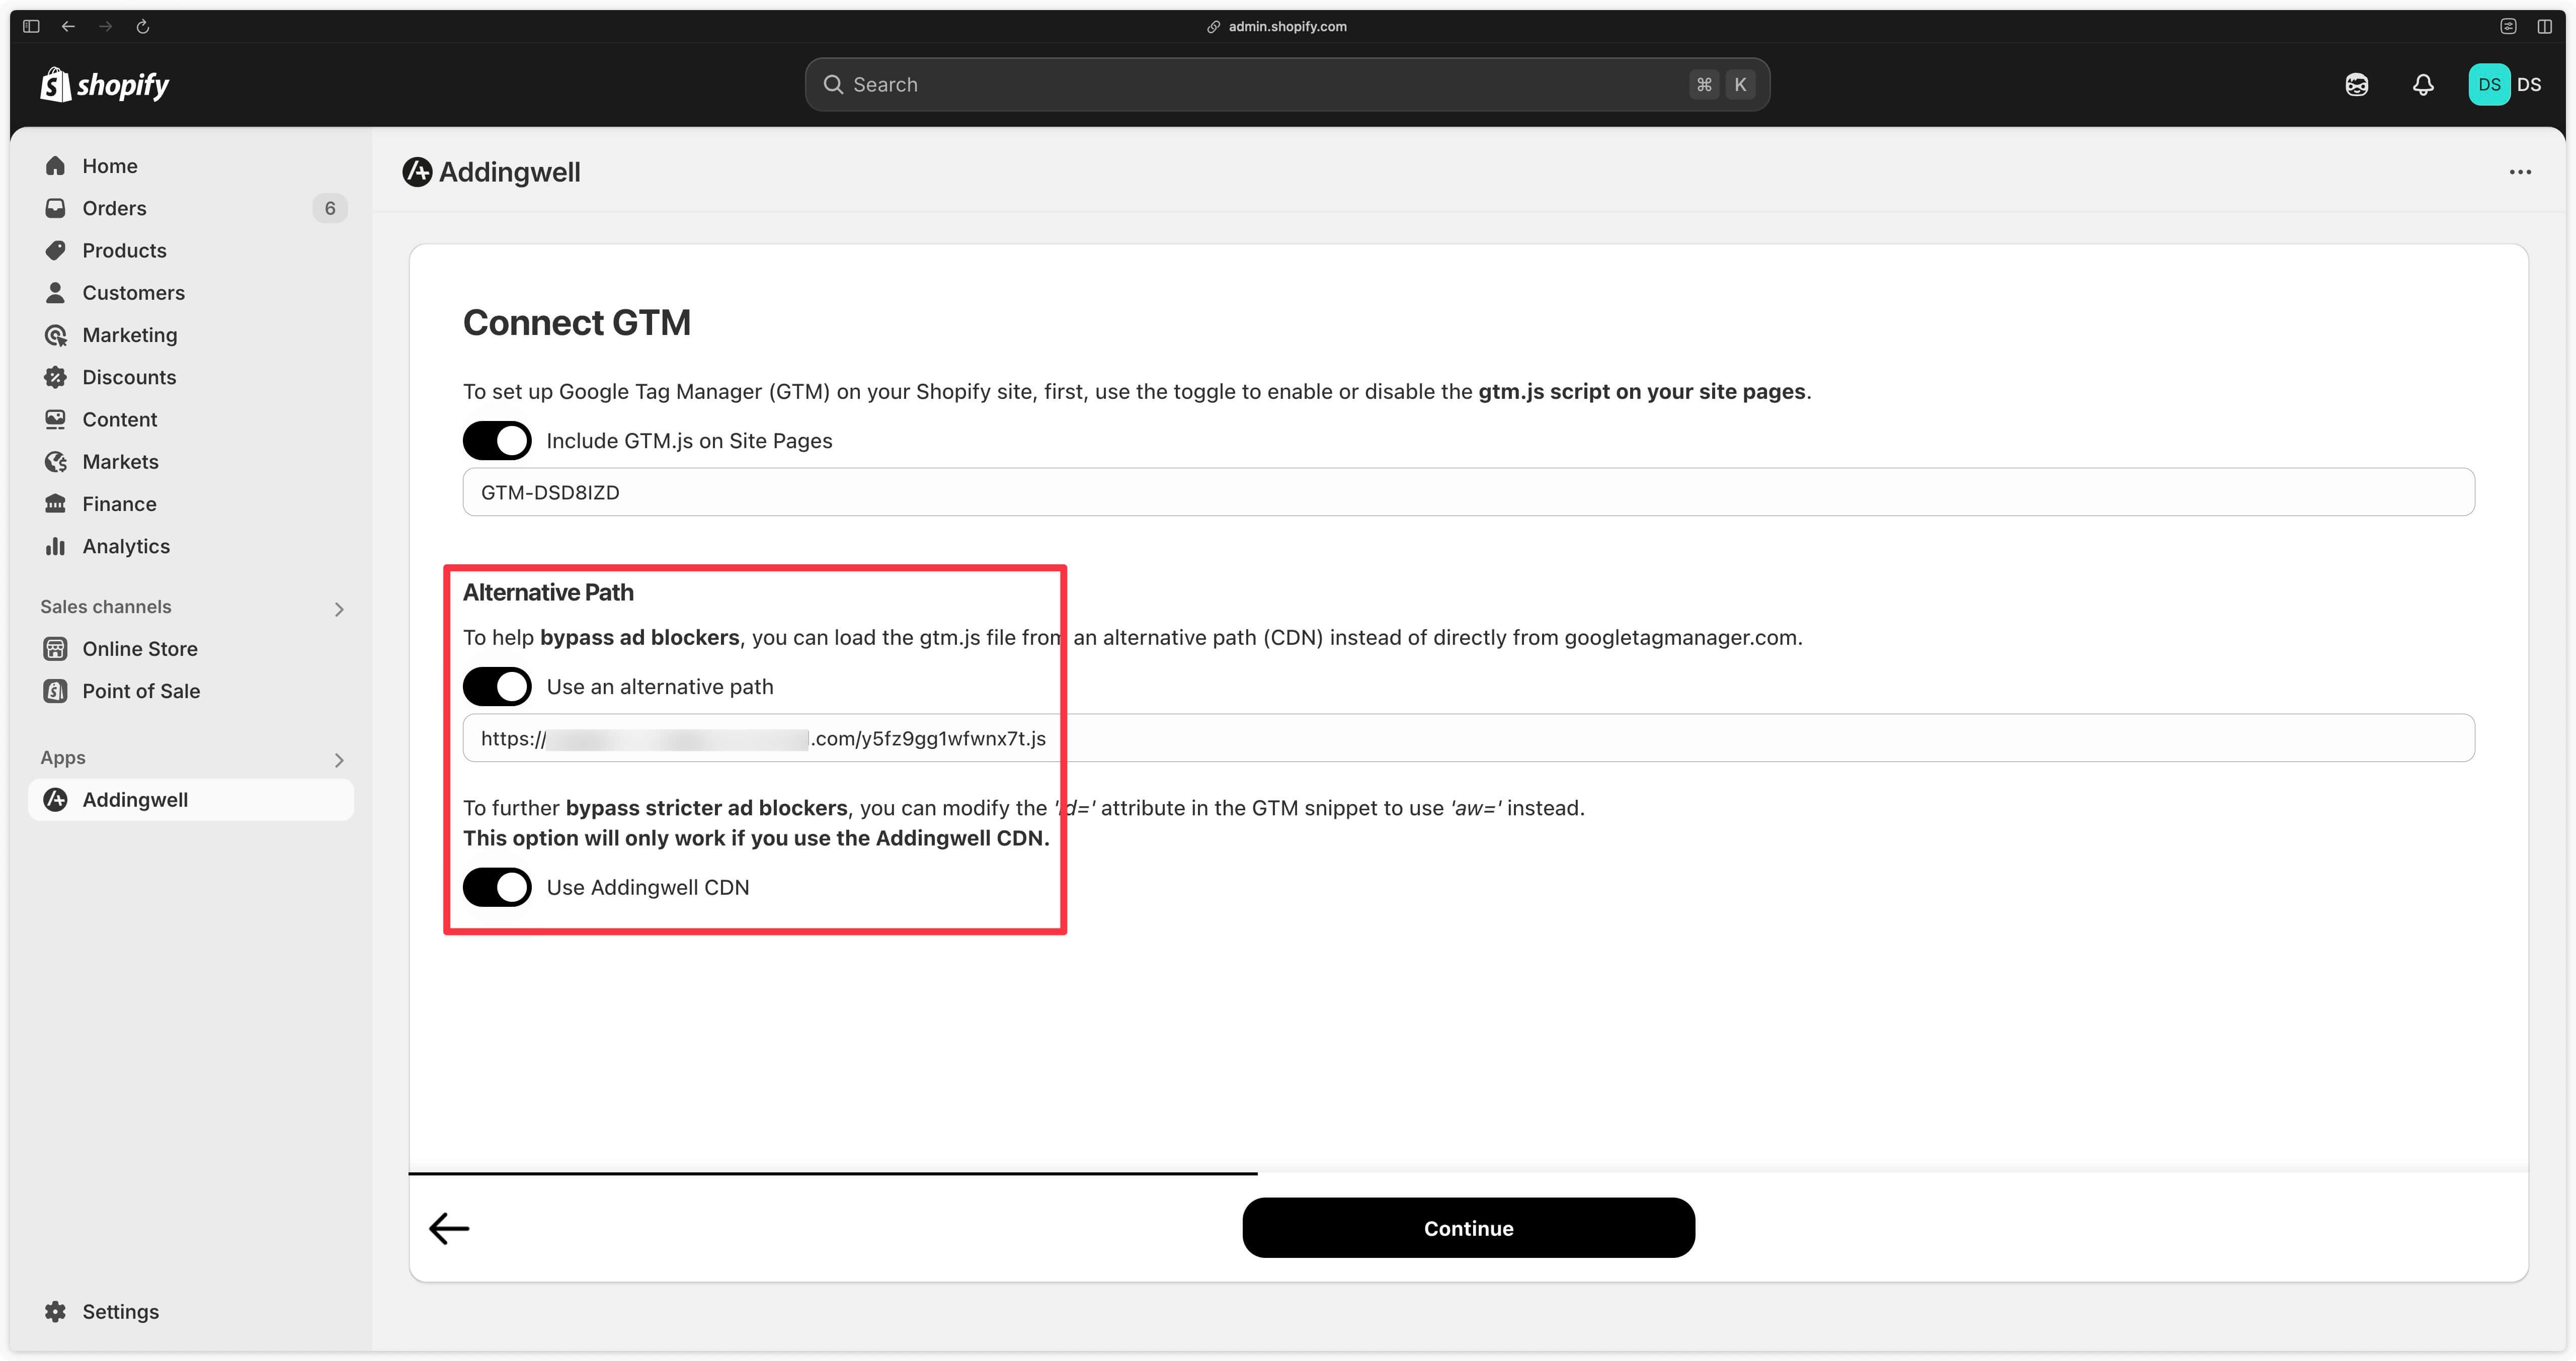
Then click on Continue.
Enable the Addingwell application in your Shopify theme
Click on the Enable Addingwell script button.
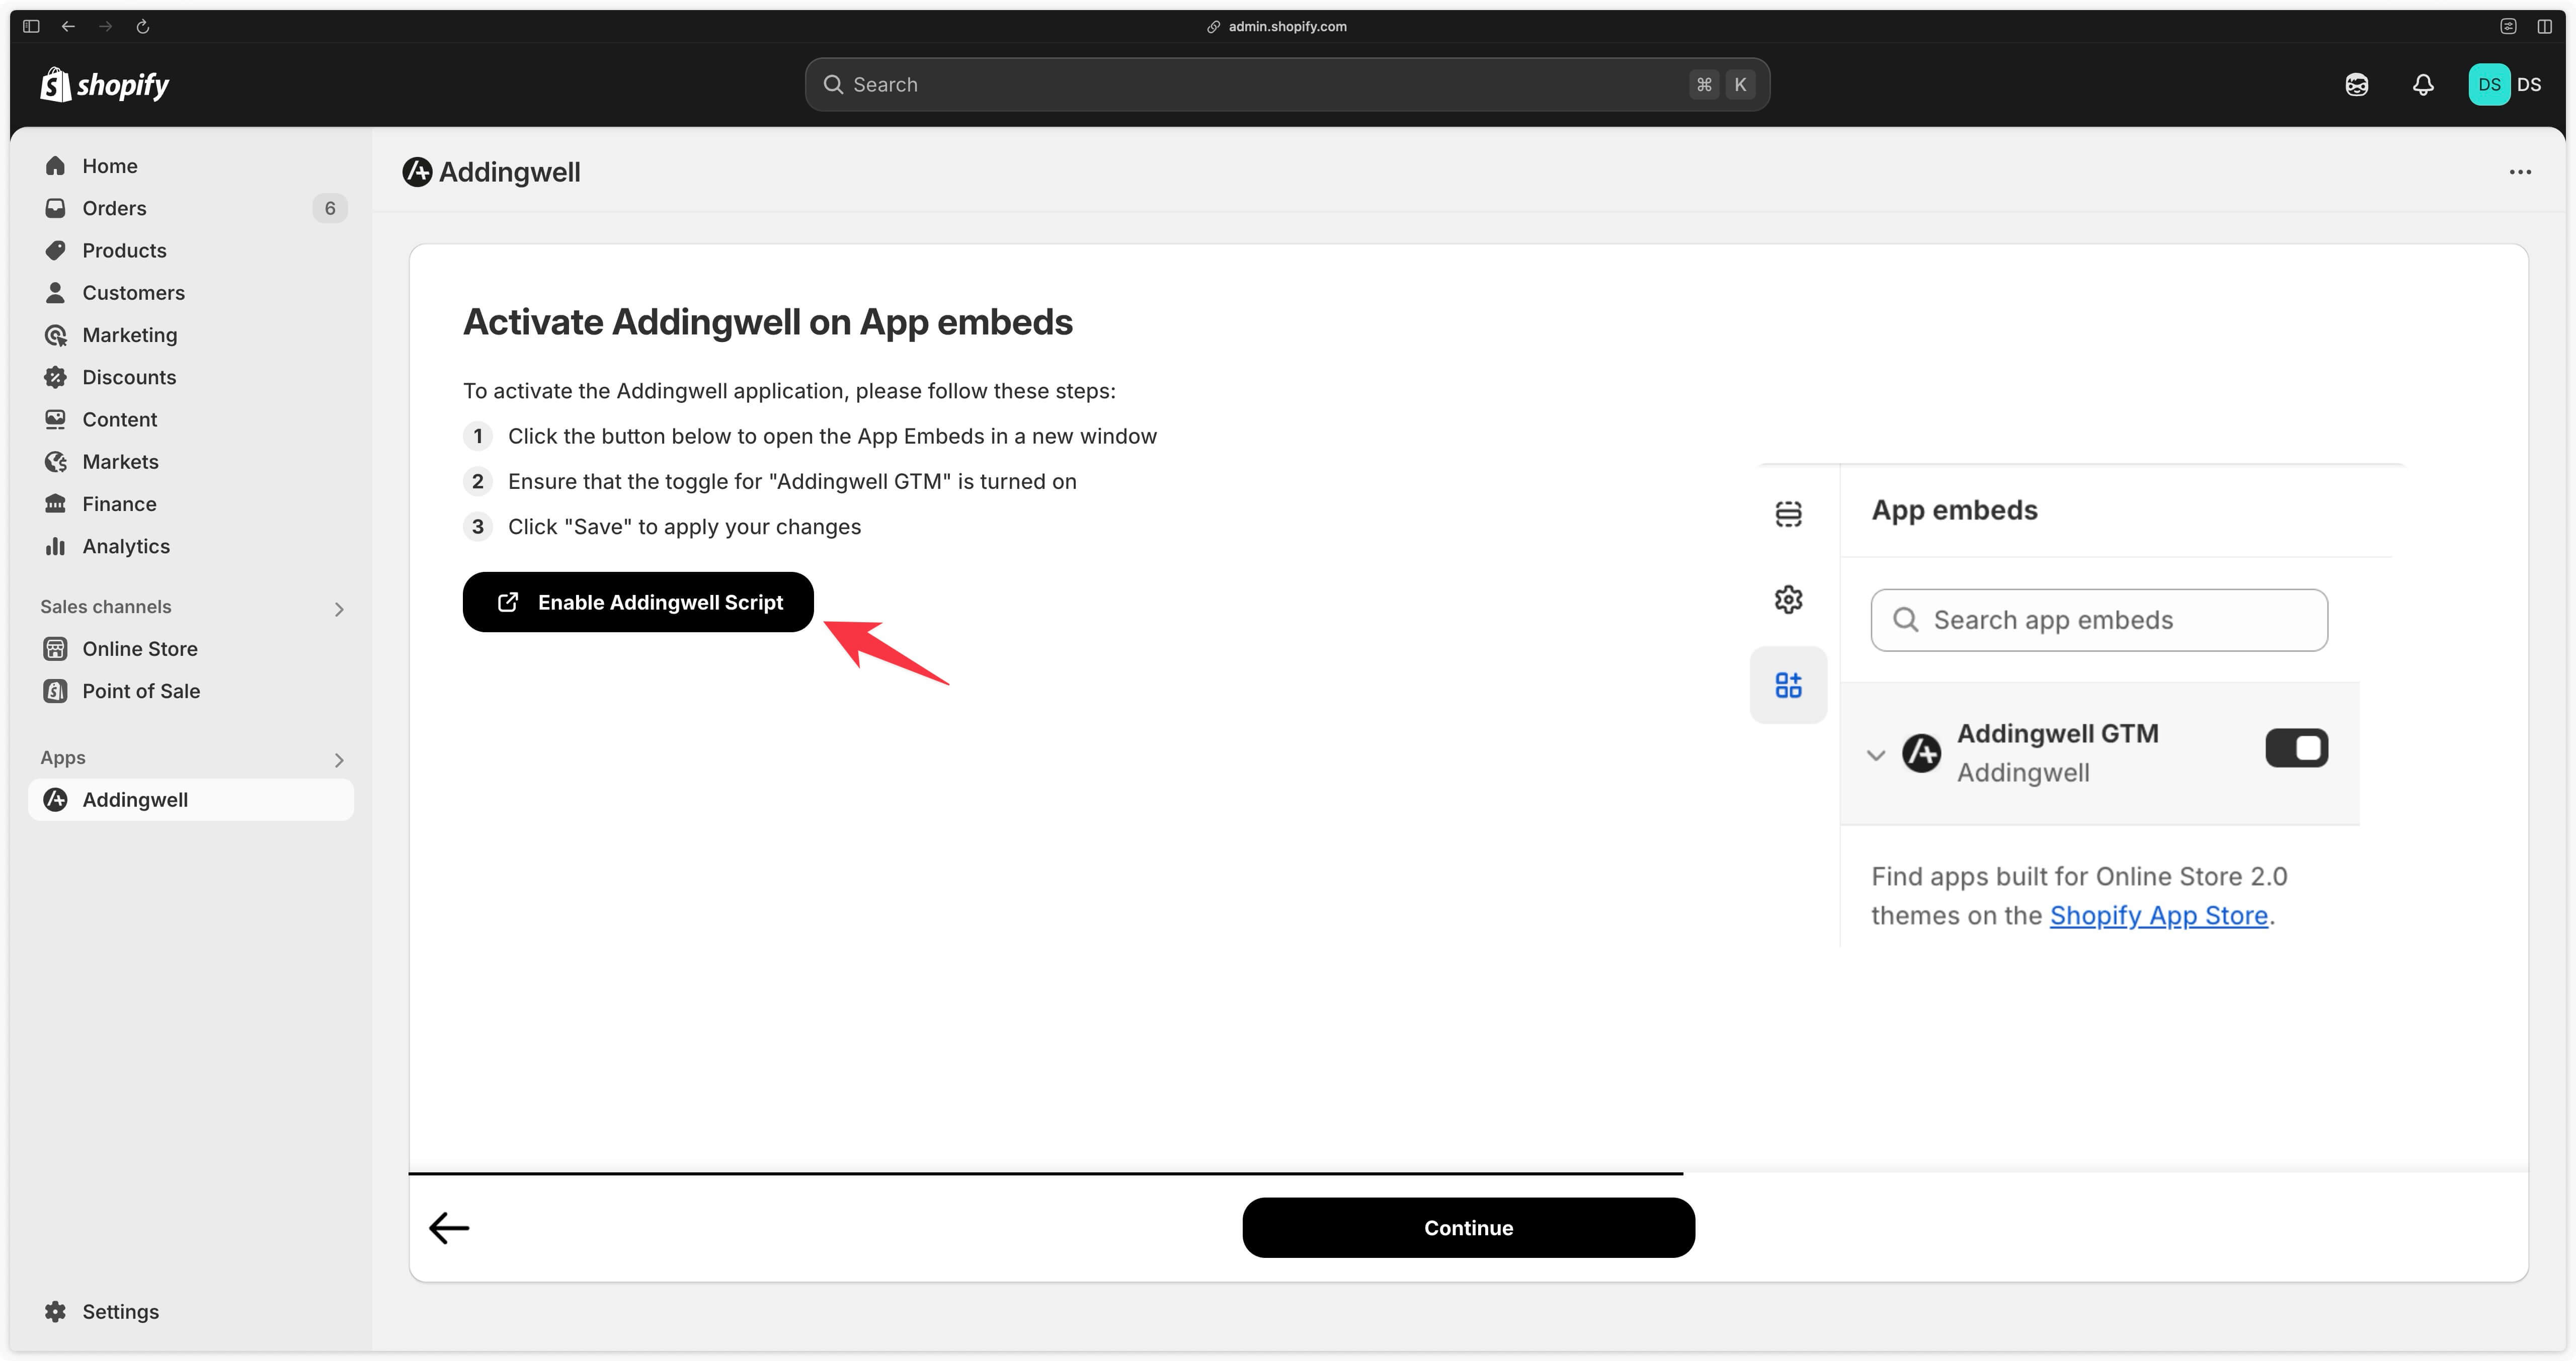
You will then be redirected to your Shopify theme. Activate the Addingwell application, then click on Save in the top right-hand corner.
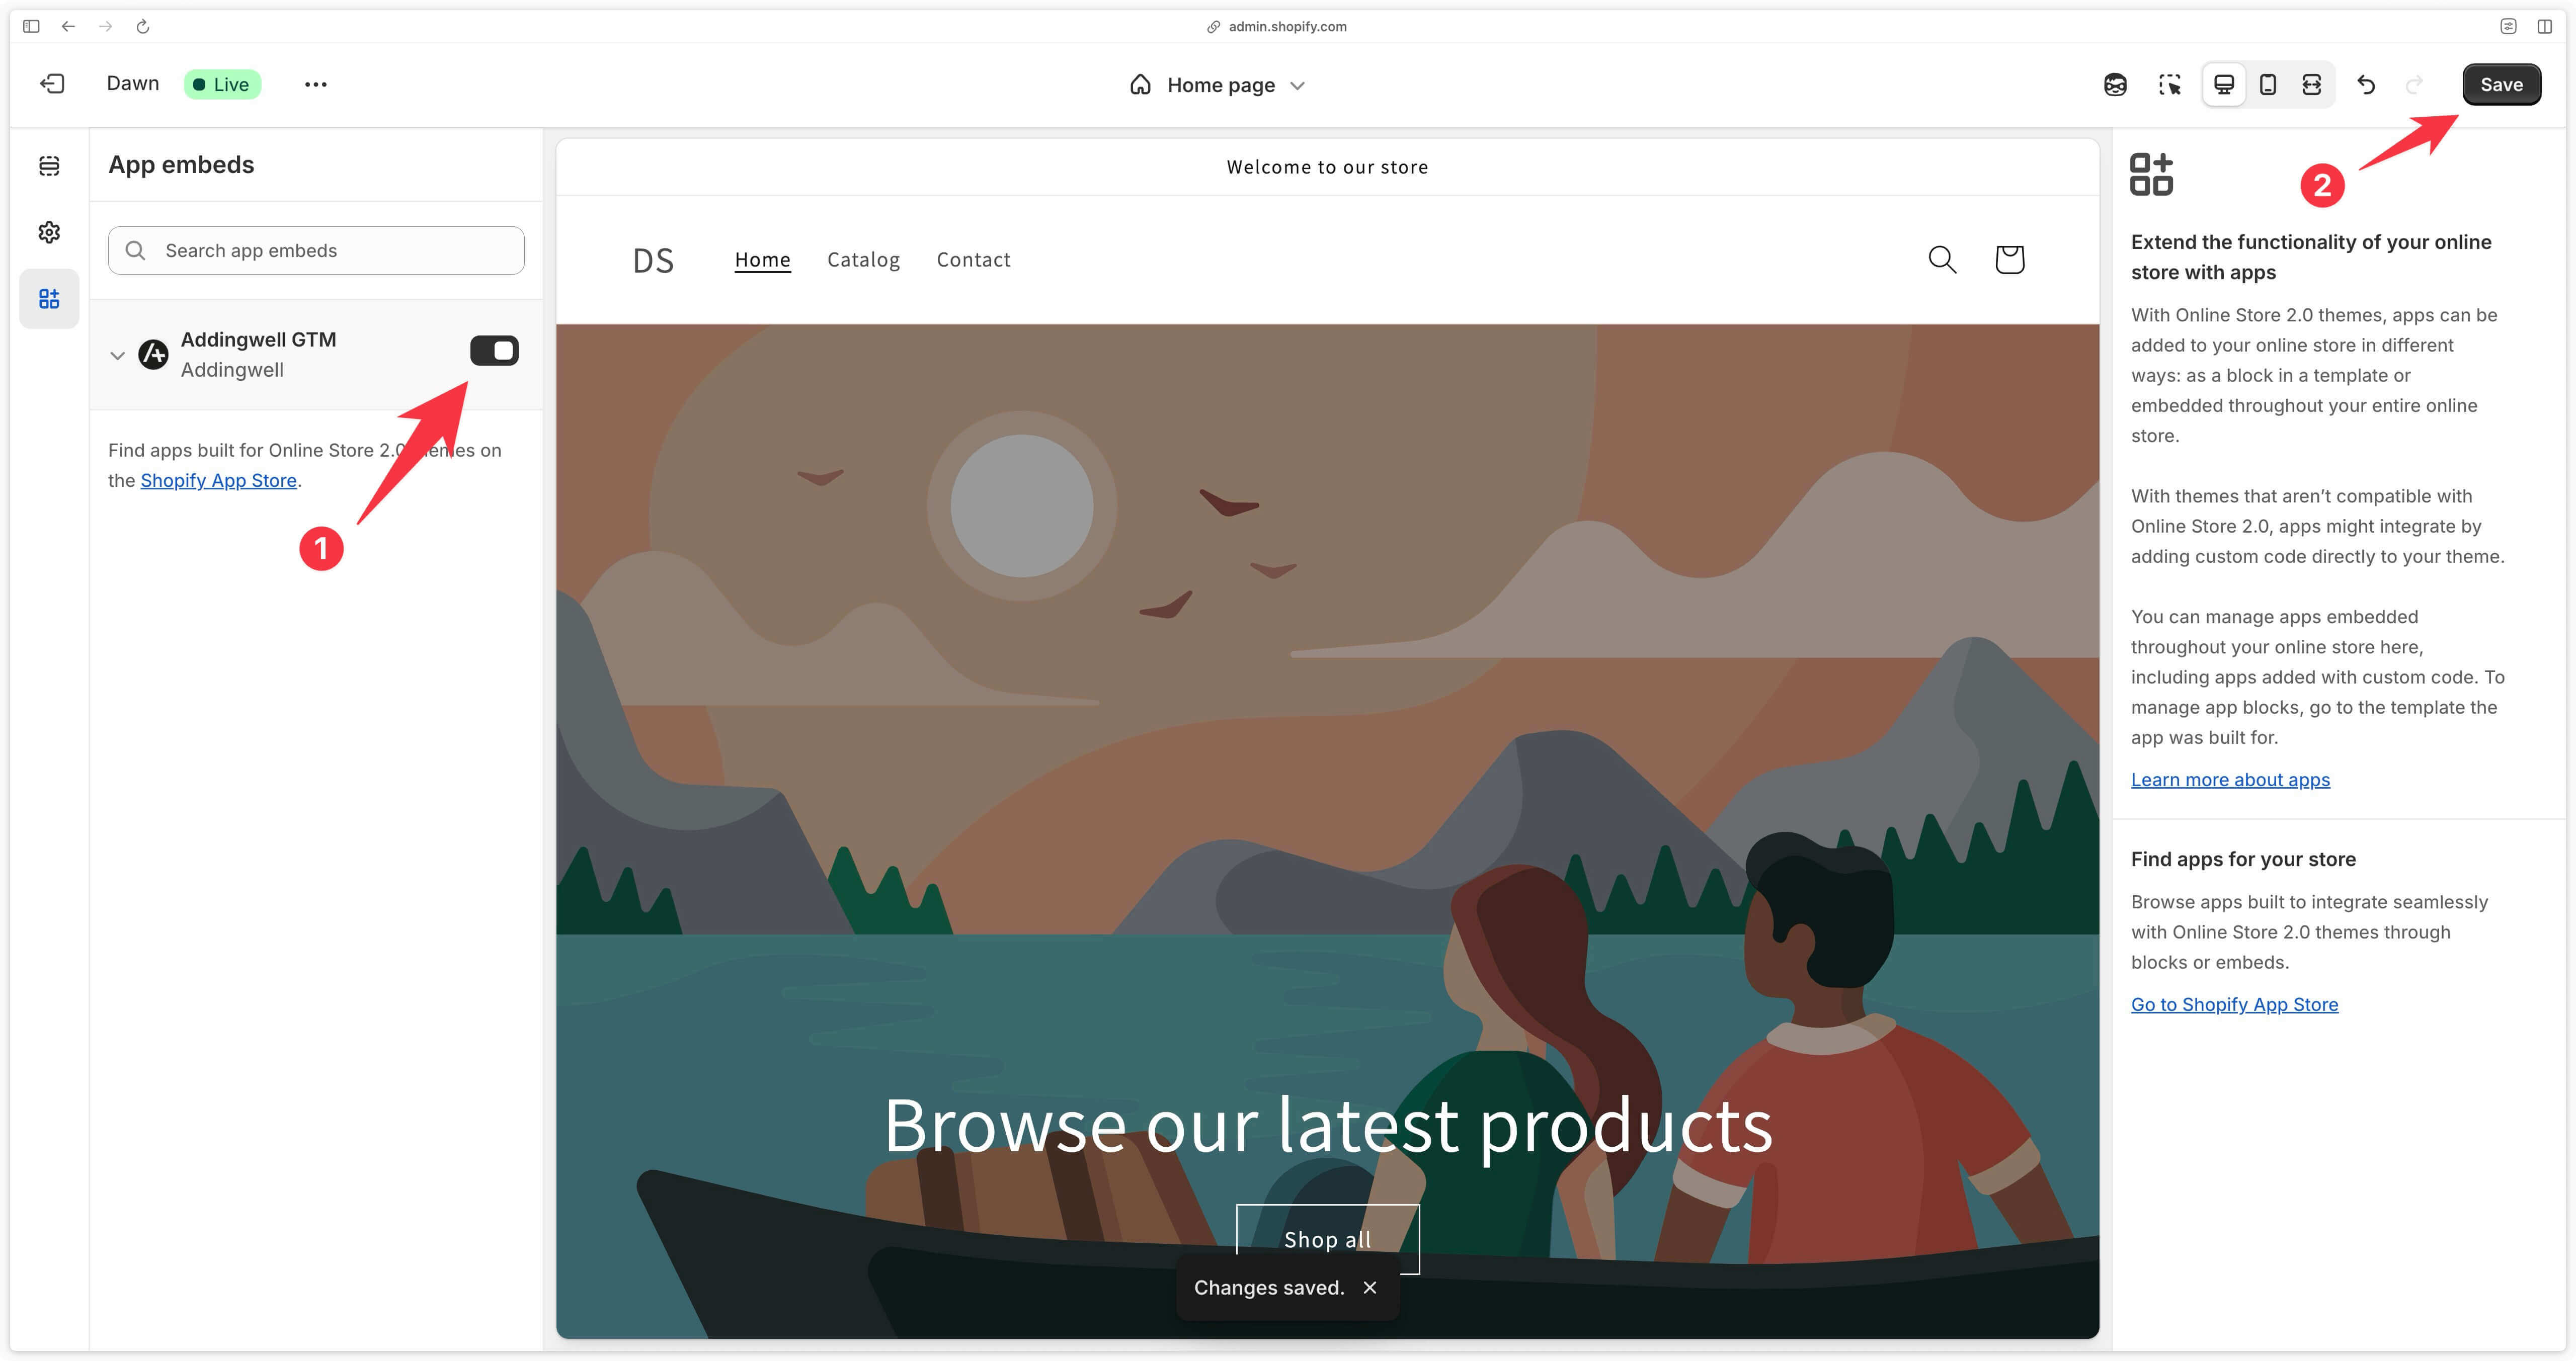
Go back to your application configuration and you should see confirmation that the app has been activated.
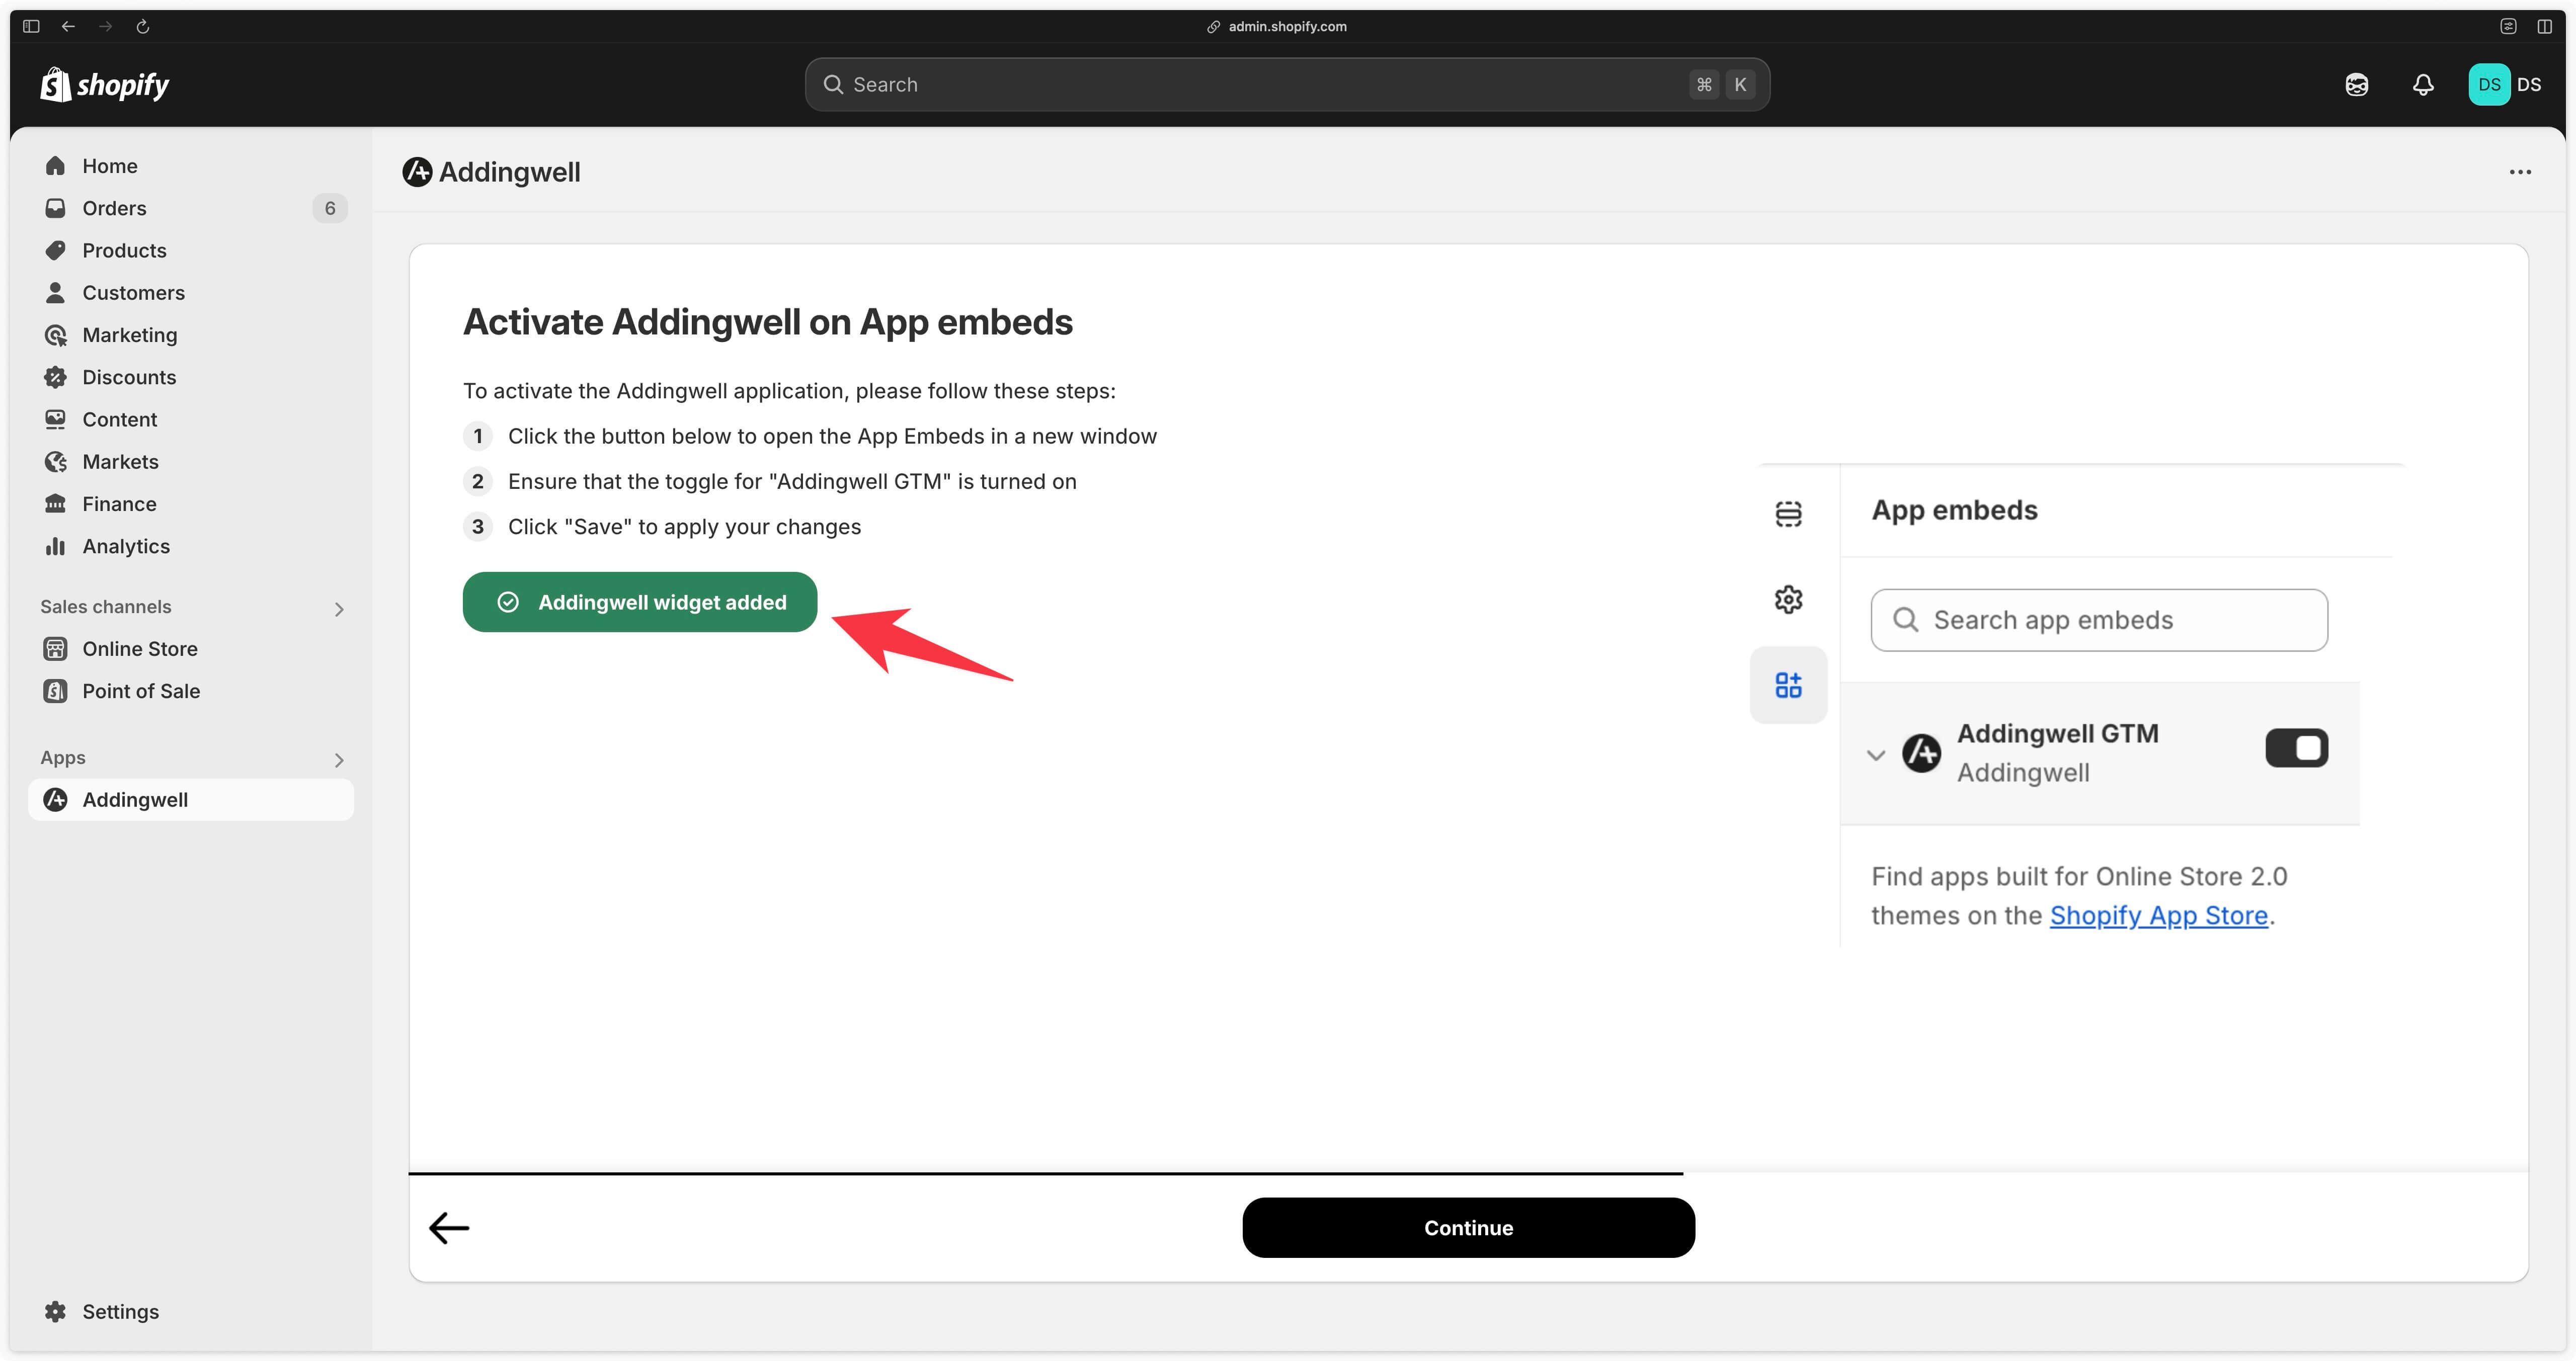
Then click on Continue.
Customer events: tracking in Shopify checkout
Copy the code from the Addingwell application. Then click on the link that will take you directly to the customer events settings.
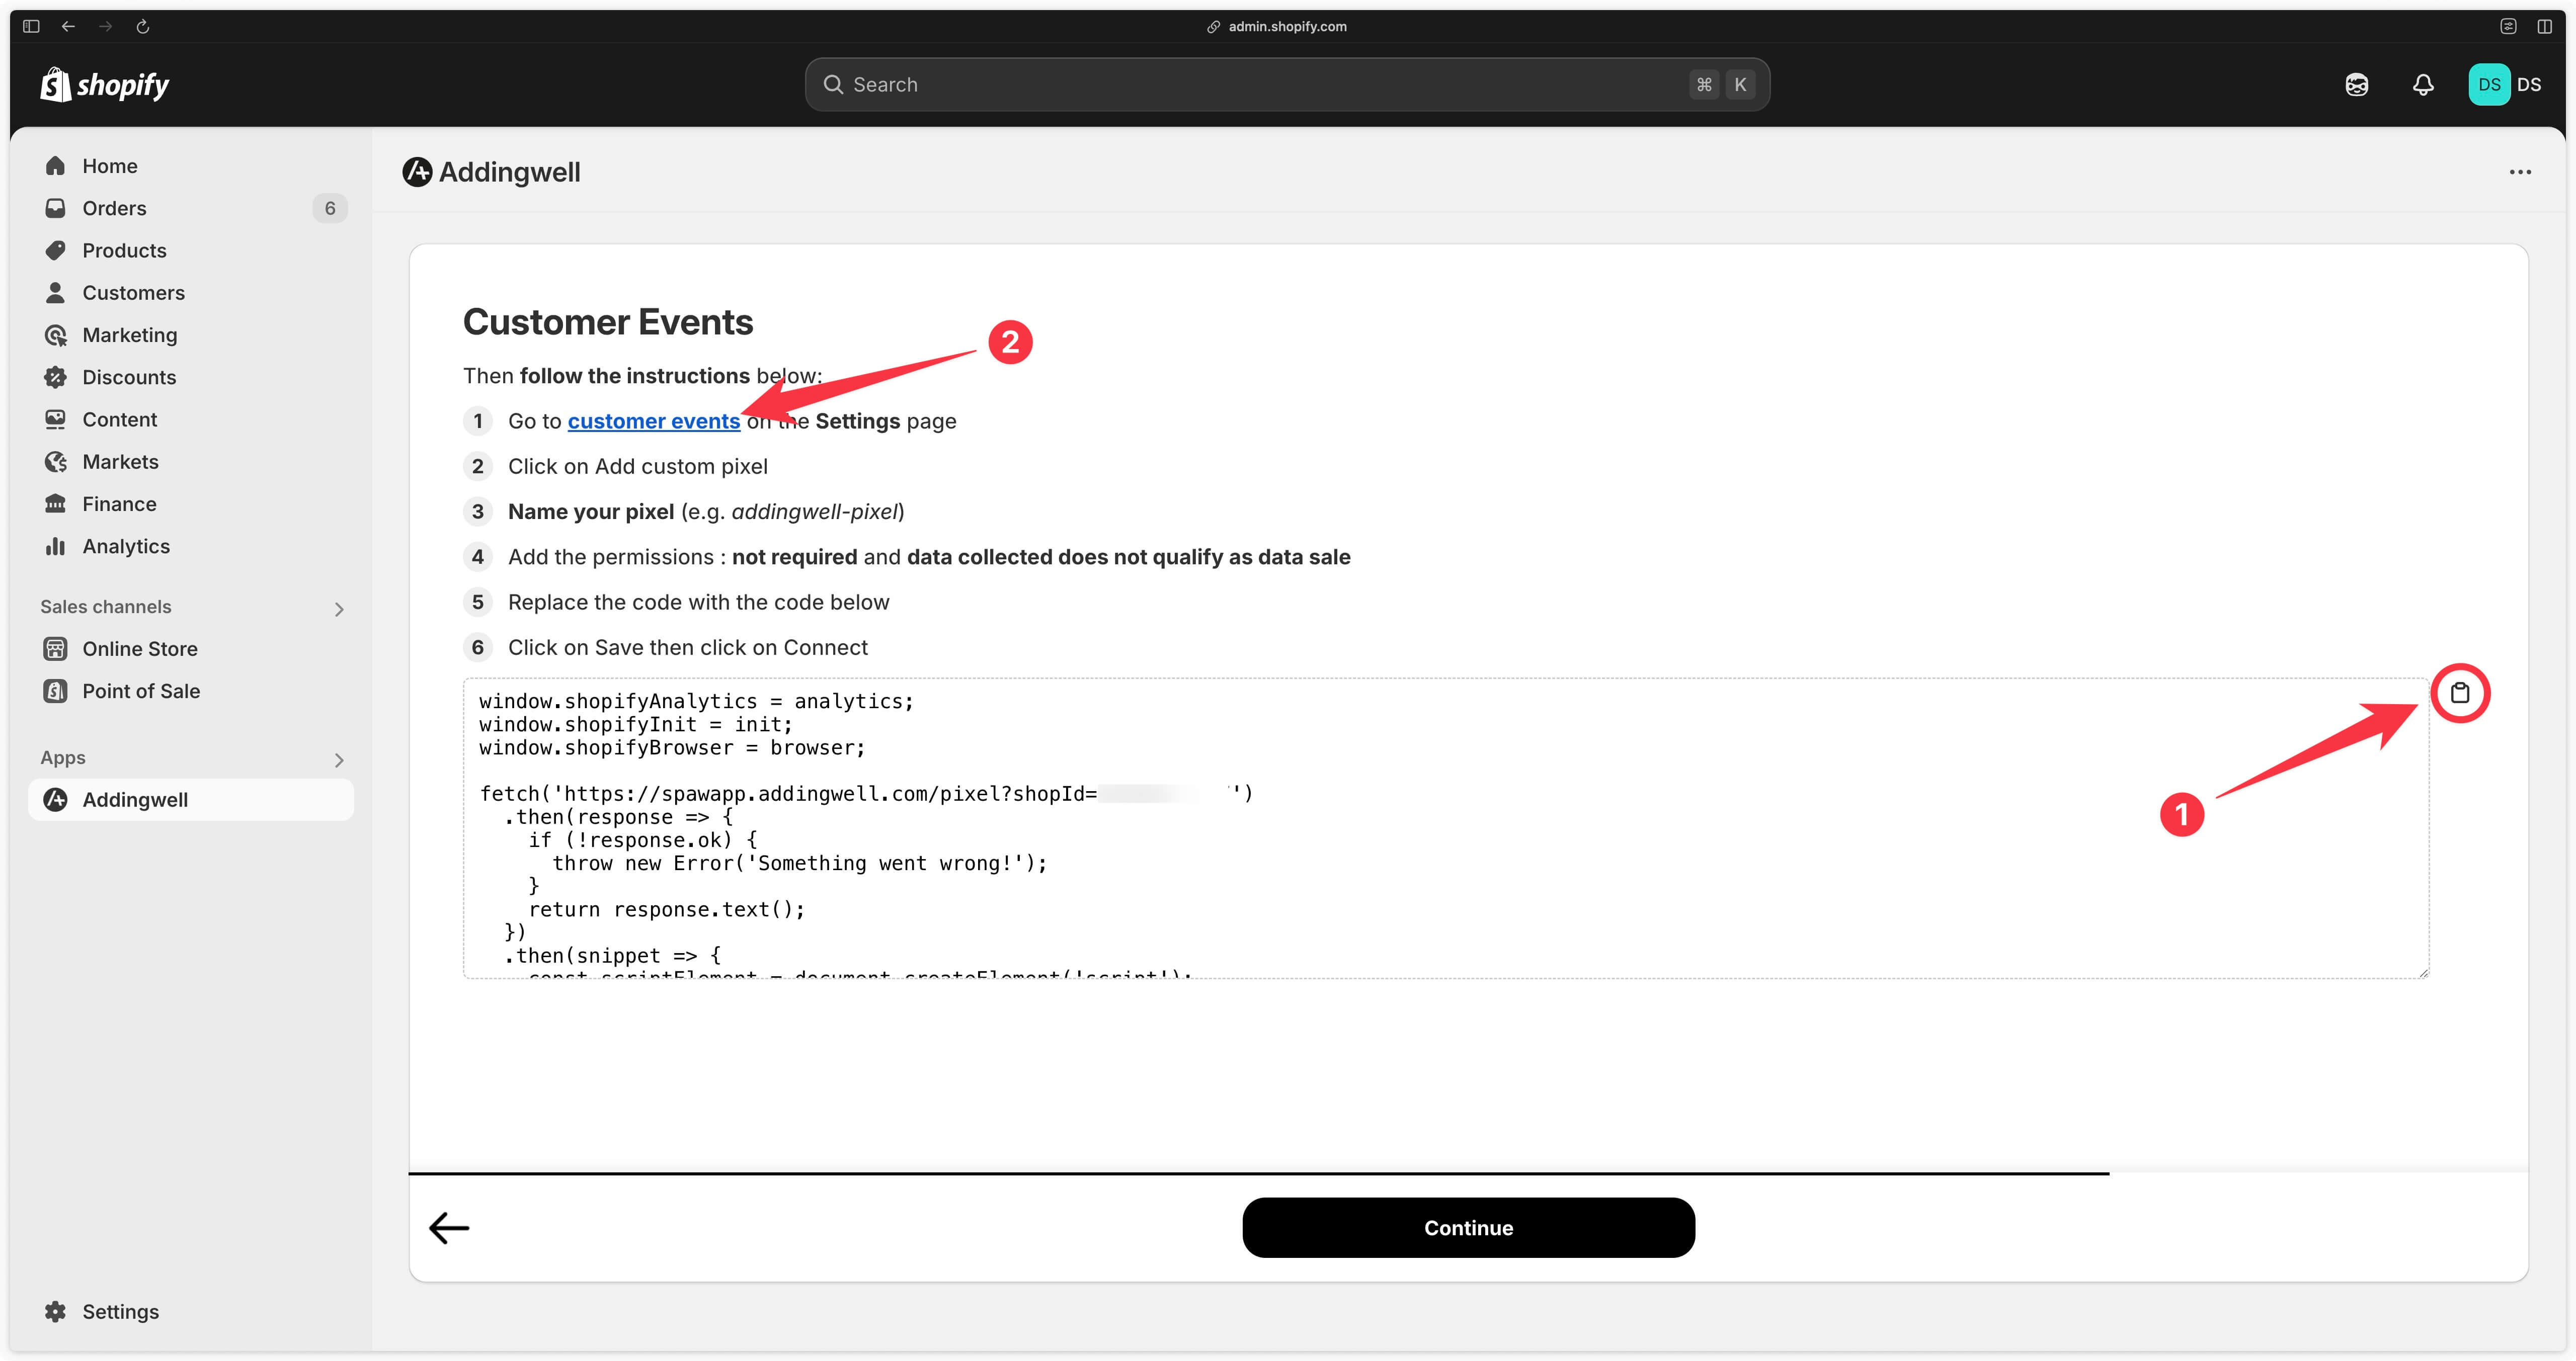
Click on the Add custom pixel button.
A popup will open, give your custom pixel a name (for example: Addingwell pixel).
Then in the Customer privacy section, select :
- Not required
- Data collected does not qualify as data sale
In the Code section, paste the code you copied earlier from the Addingwell application.
Then click Save at the top of the screen to save your changes.
You’ll see the following message, but don’t panic, everything’s normal!
Pixel will not track any customer behavior because it is not subscribed to any events.
Next, click Connect in the top right-hand corner to connect the custom pixel you’ve just created to your Shopify store.
A popup opens, click Connect again.
You can now return to the Addingwell application and click on Continue.
Congratulations, you've completed onboarding
Congratulations 👏! You’ve successfully configured the Addingwell app with your Shopify shop.
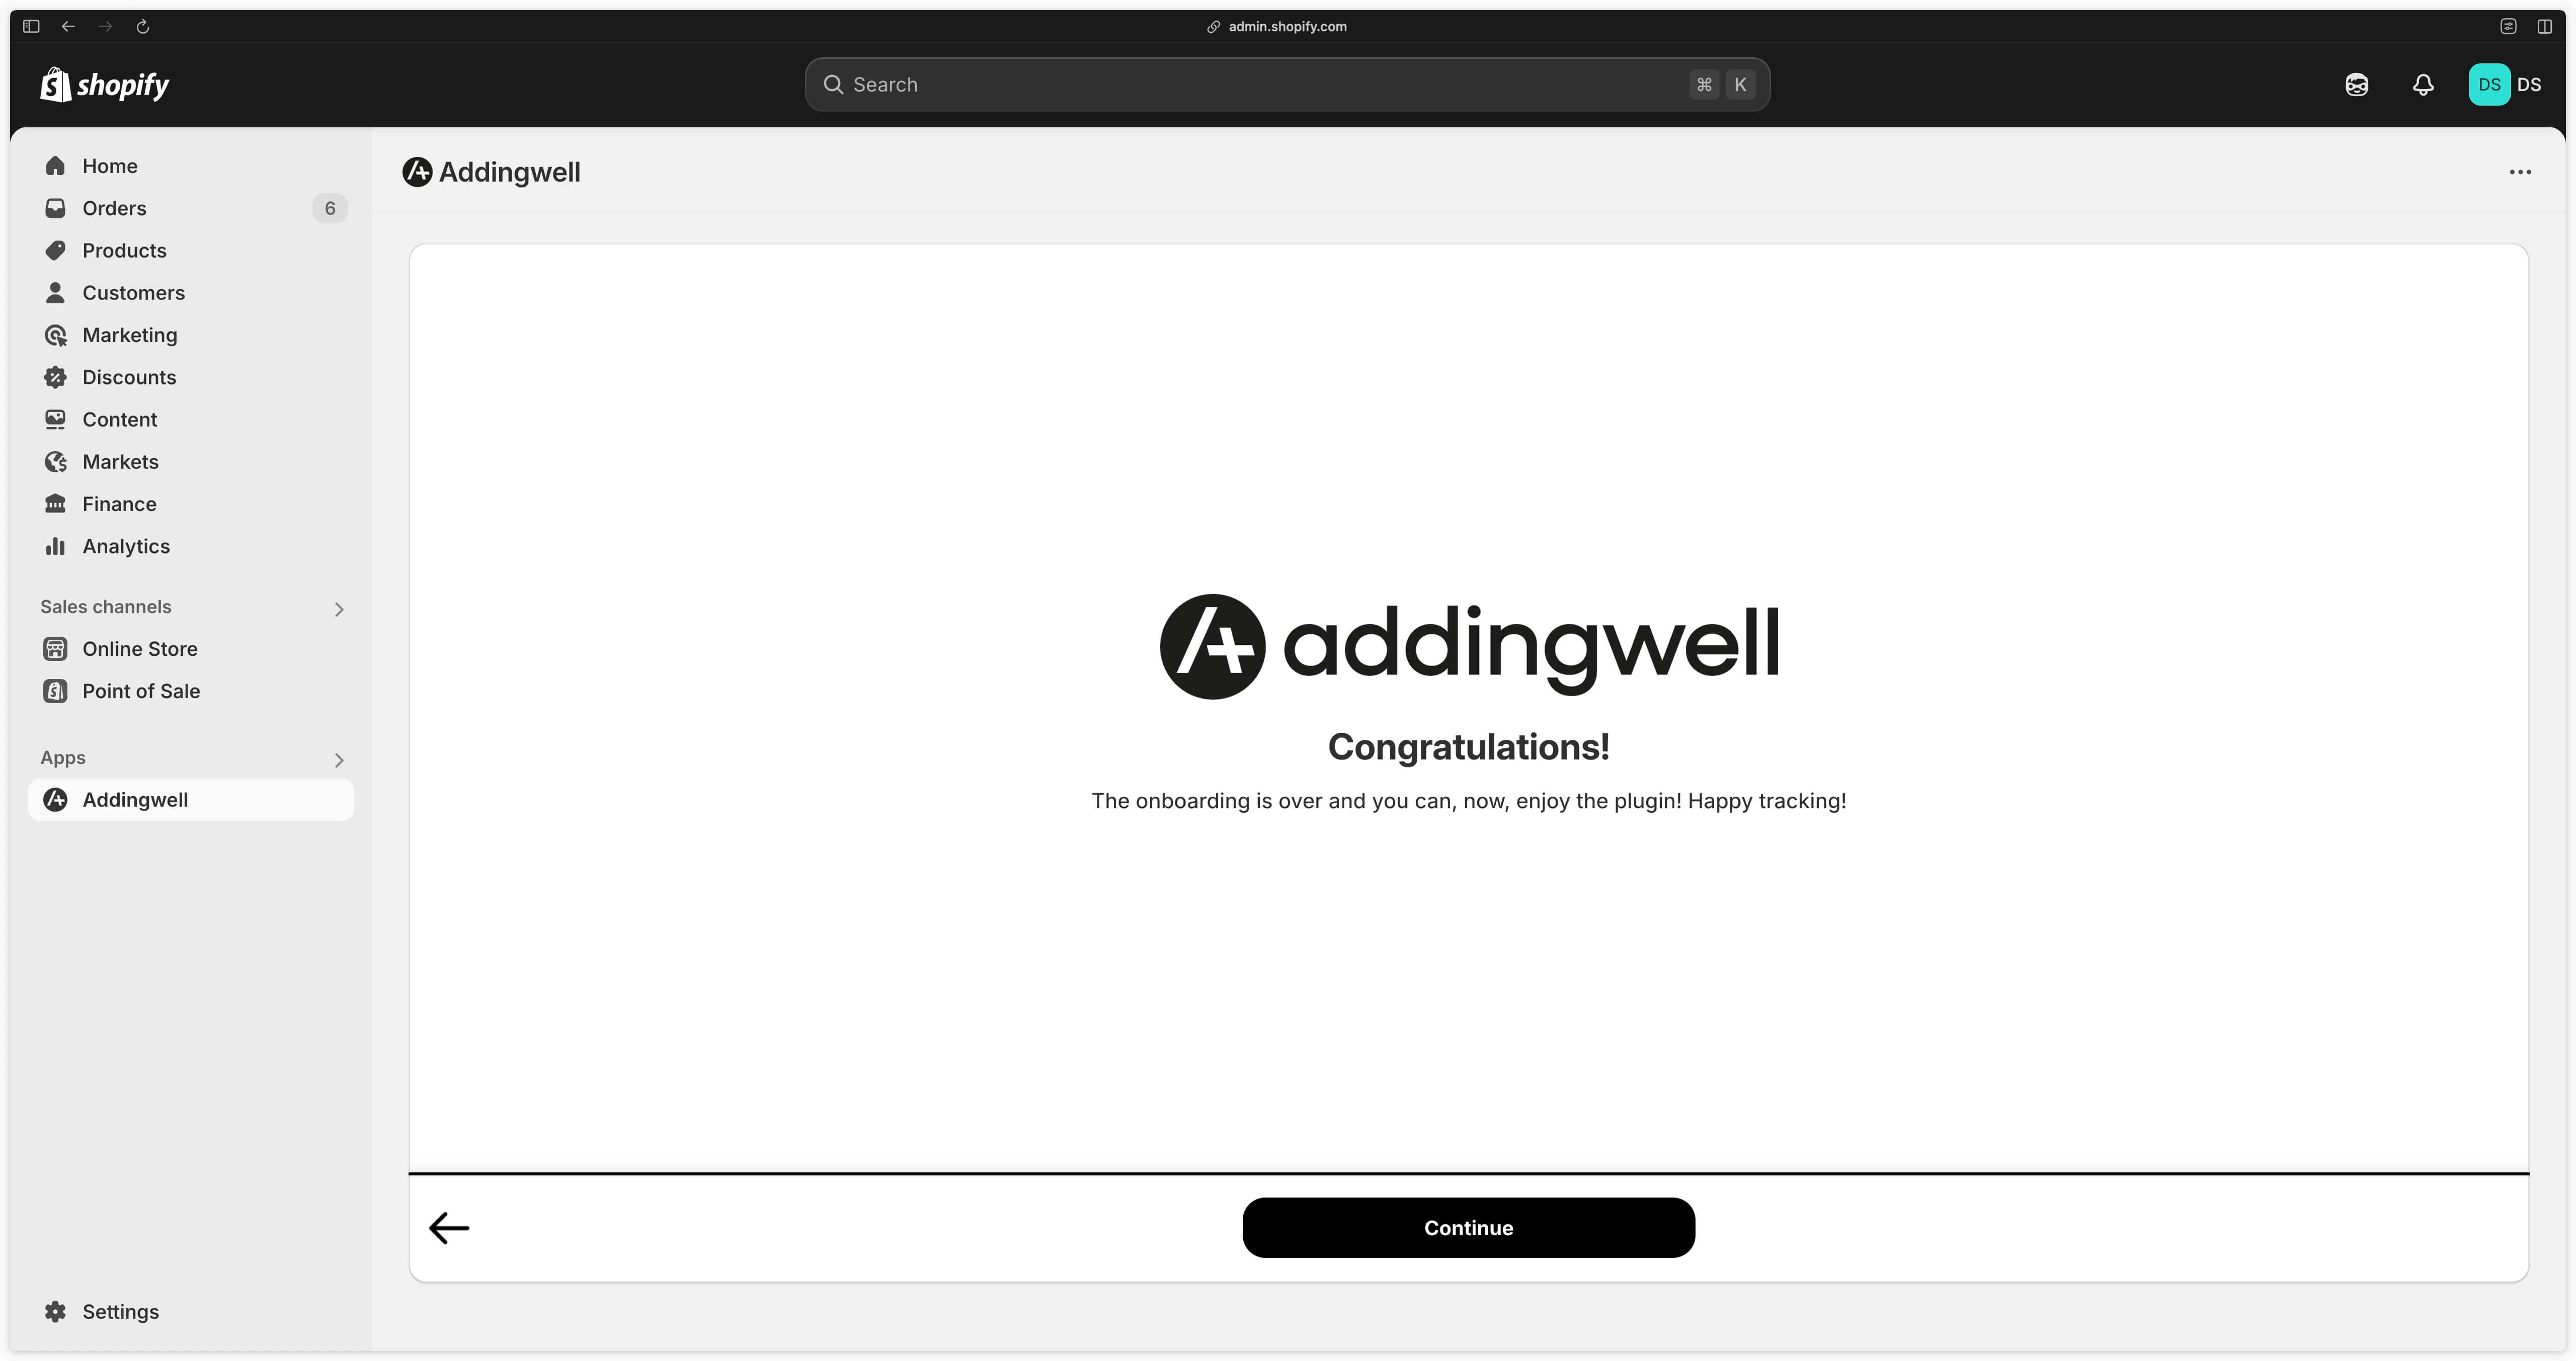
Click on Continue. You can now go back to the configuration made during onboarding if necessary.
Check GTM and DataLayer
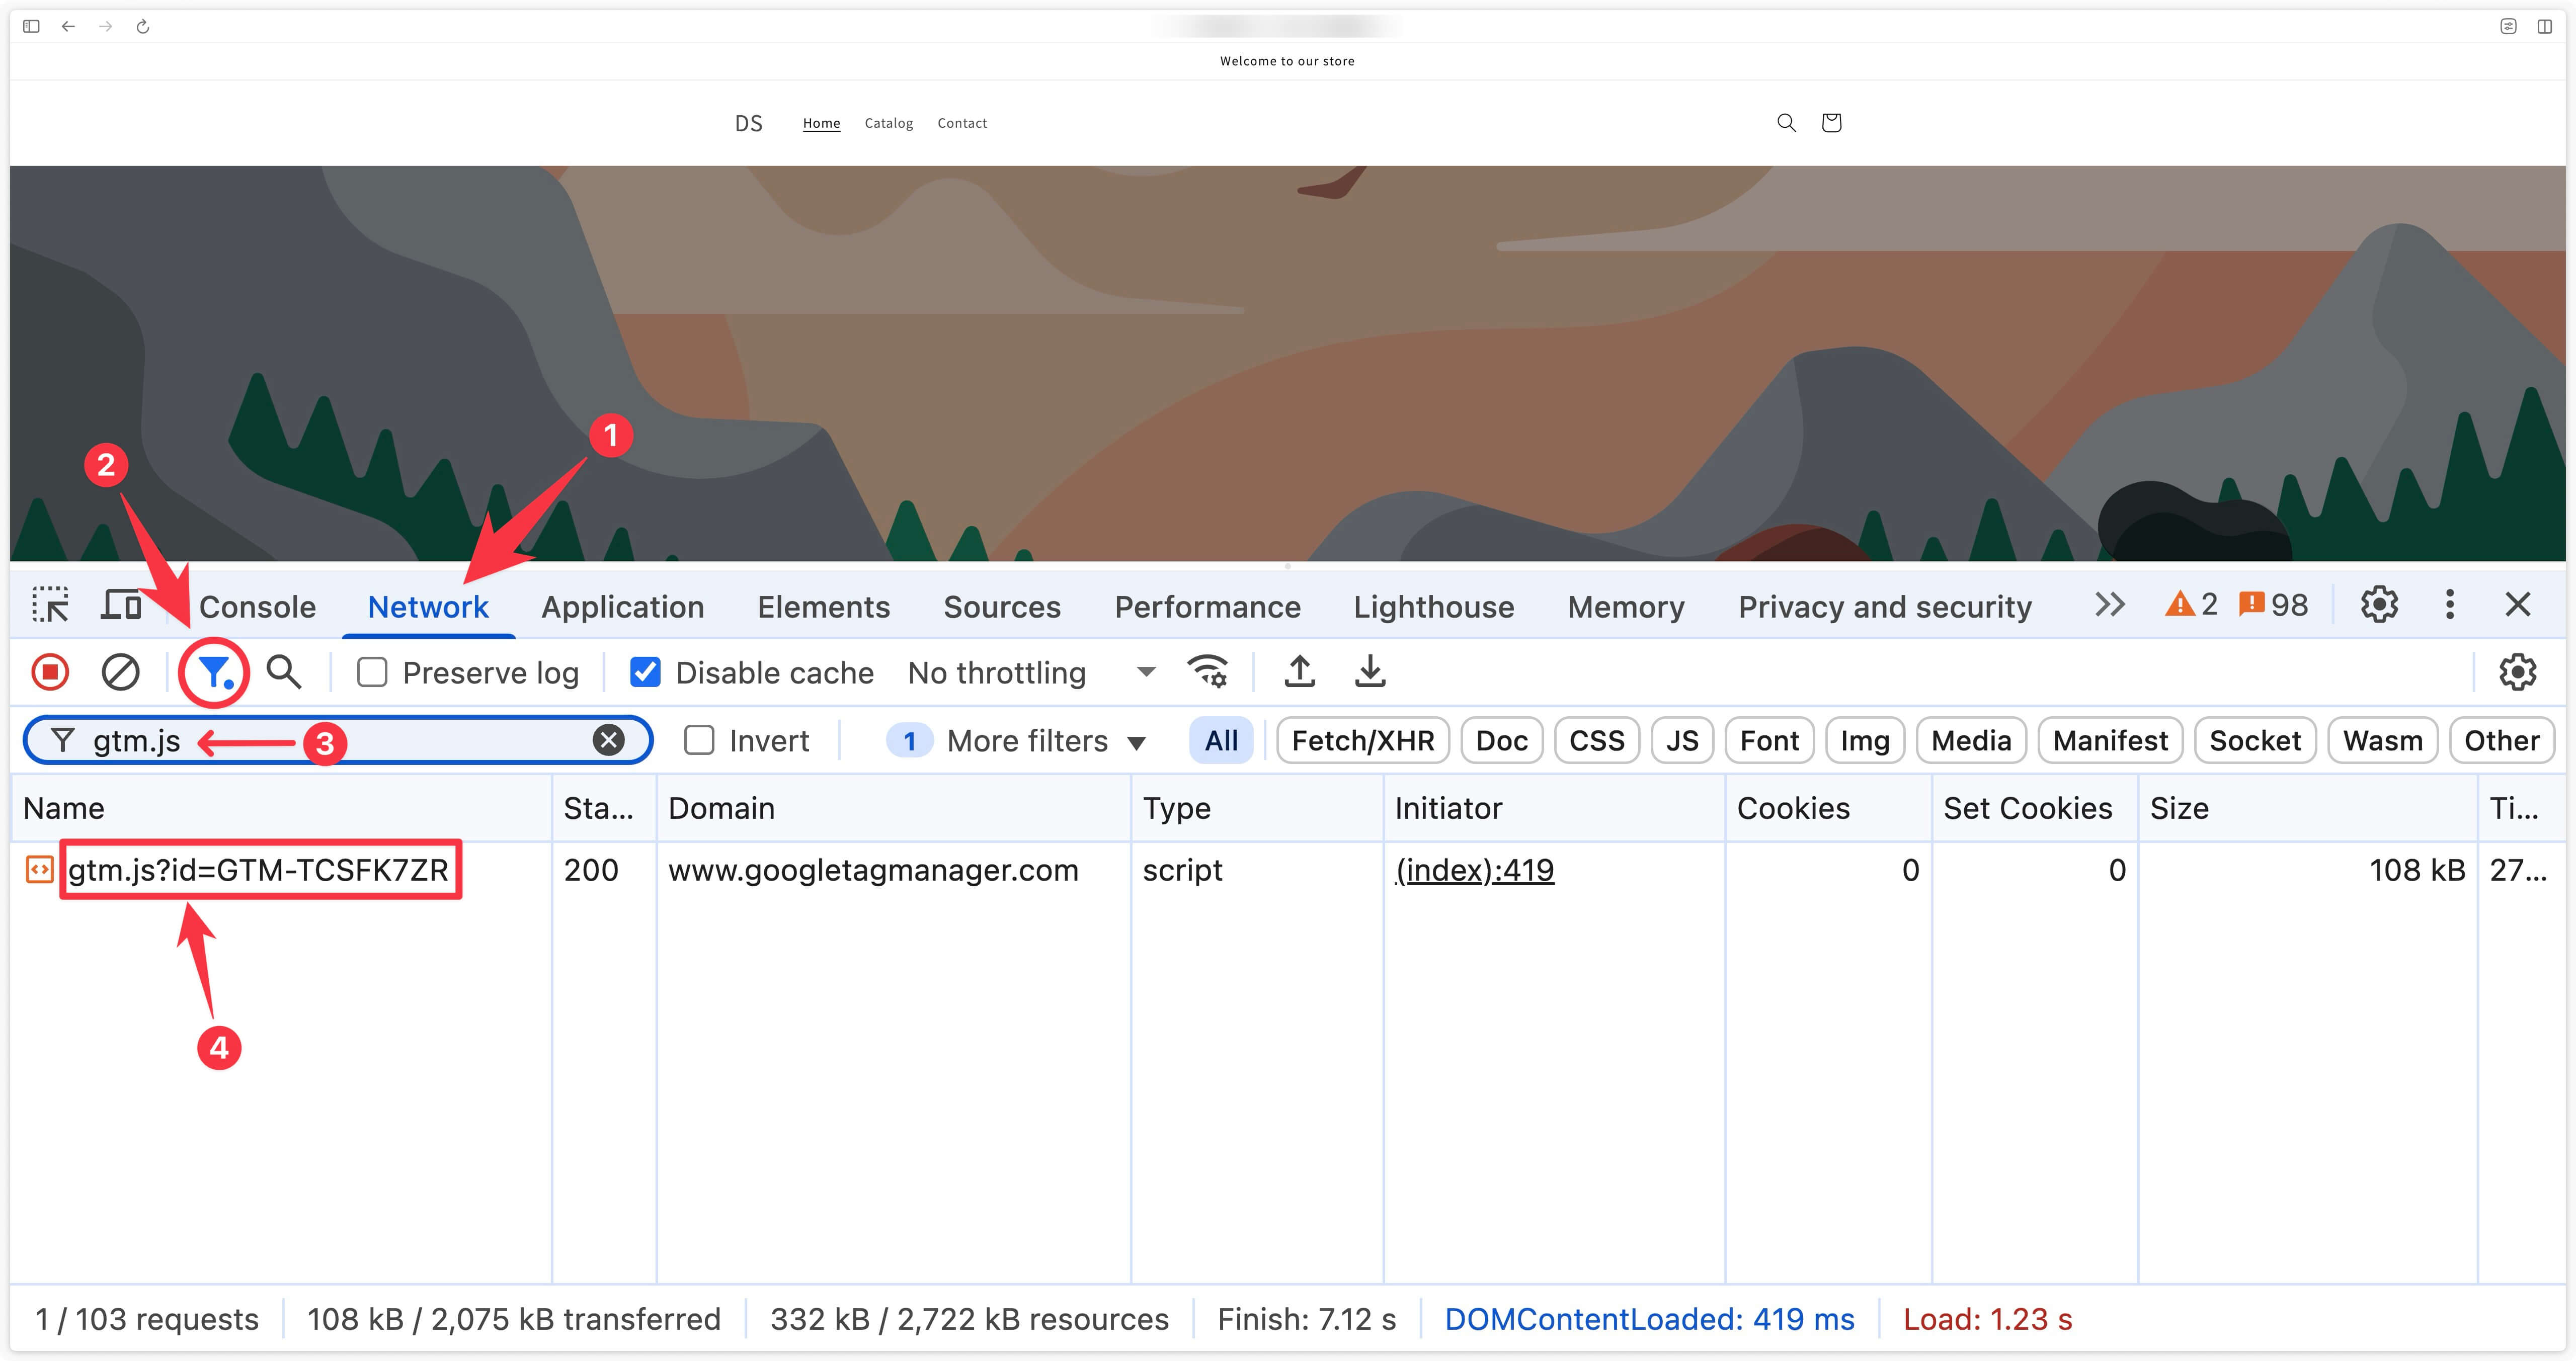
Is Google Tag Manager installed?
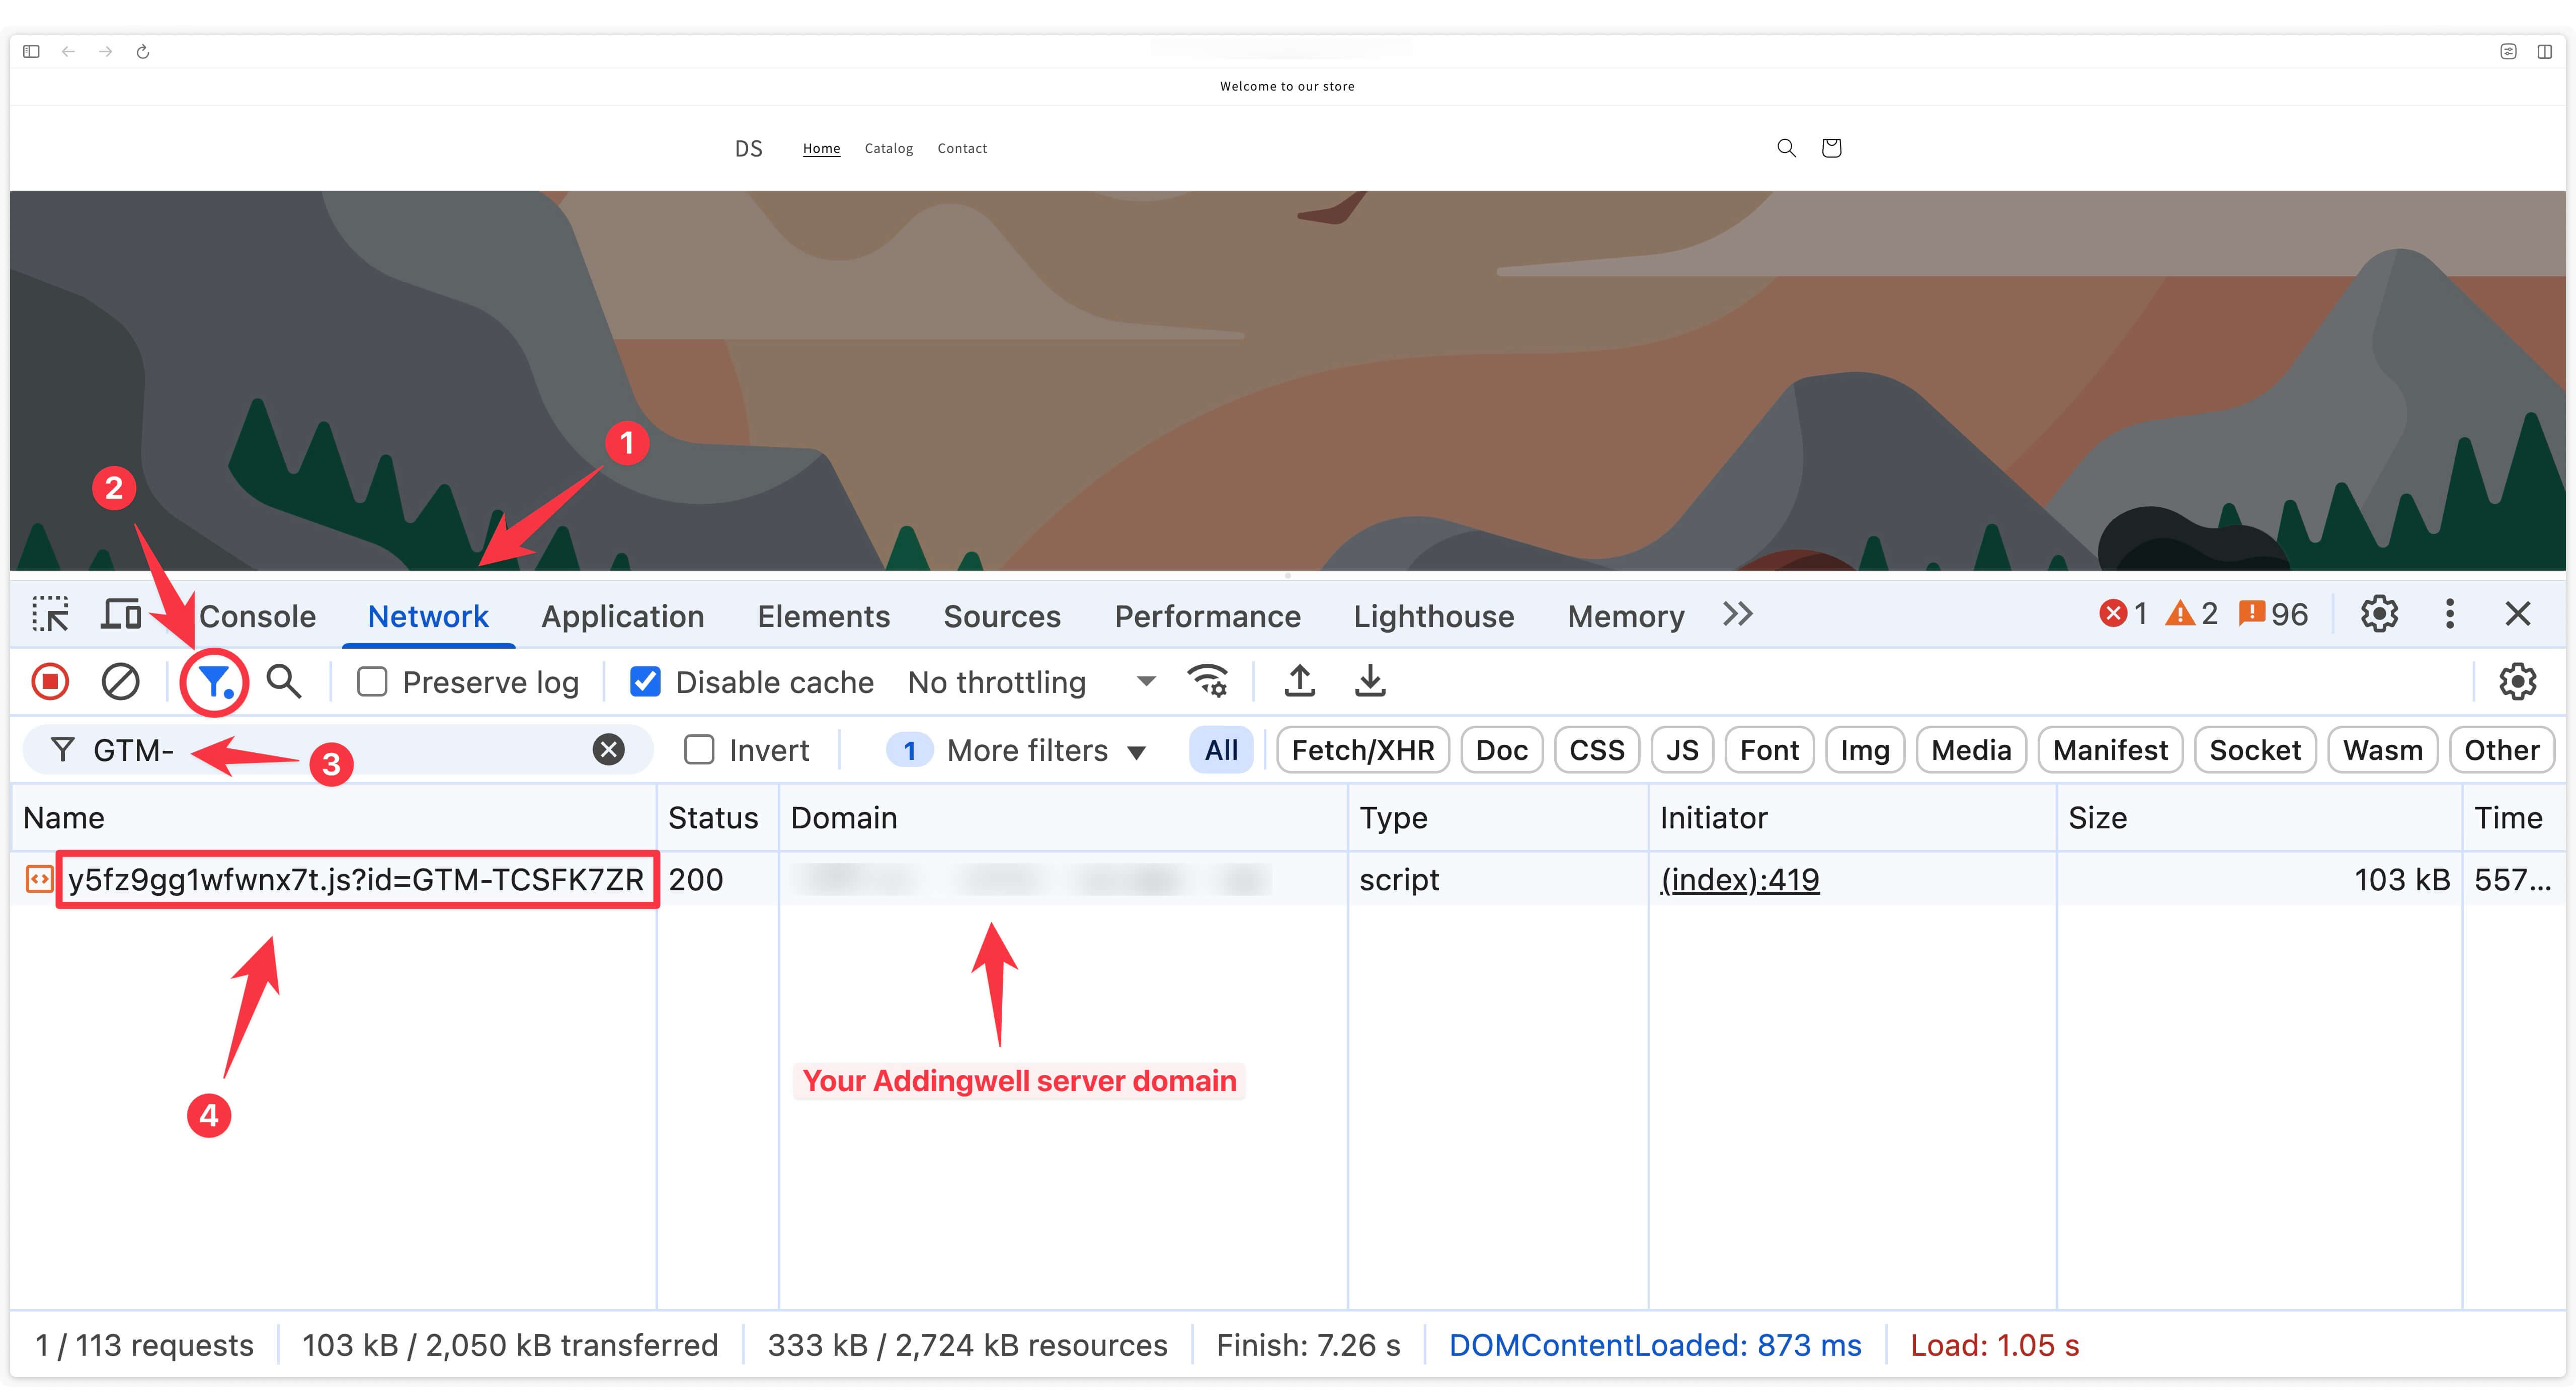
Go to your Shopify store, right-click and click Inspect.
In the Network tab, look for the query that loads GTM.
Depending on your configuration in the Addingwell application, your Addingwell query may look like one of the following 3 queries:
| GTM loading URL | Alternative Path | Alternative Parameter |
|---|---|---|
https://googletagmanager.com/gtm.js?id=GTM-DSD8IZD | NO | NO |
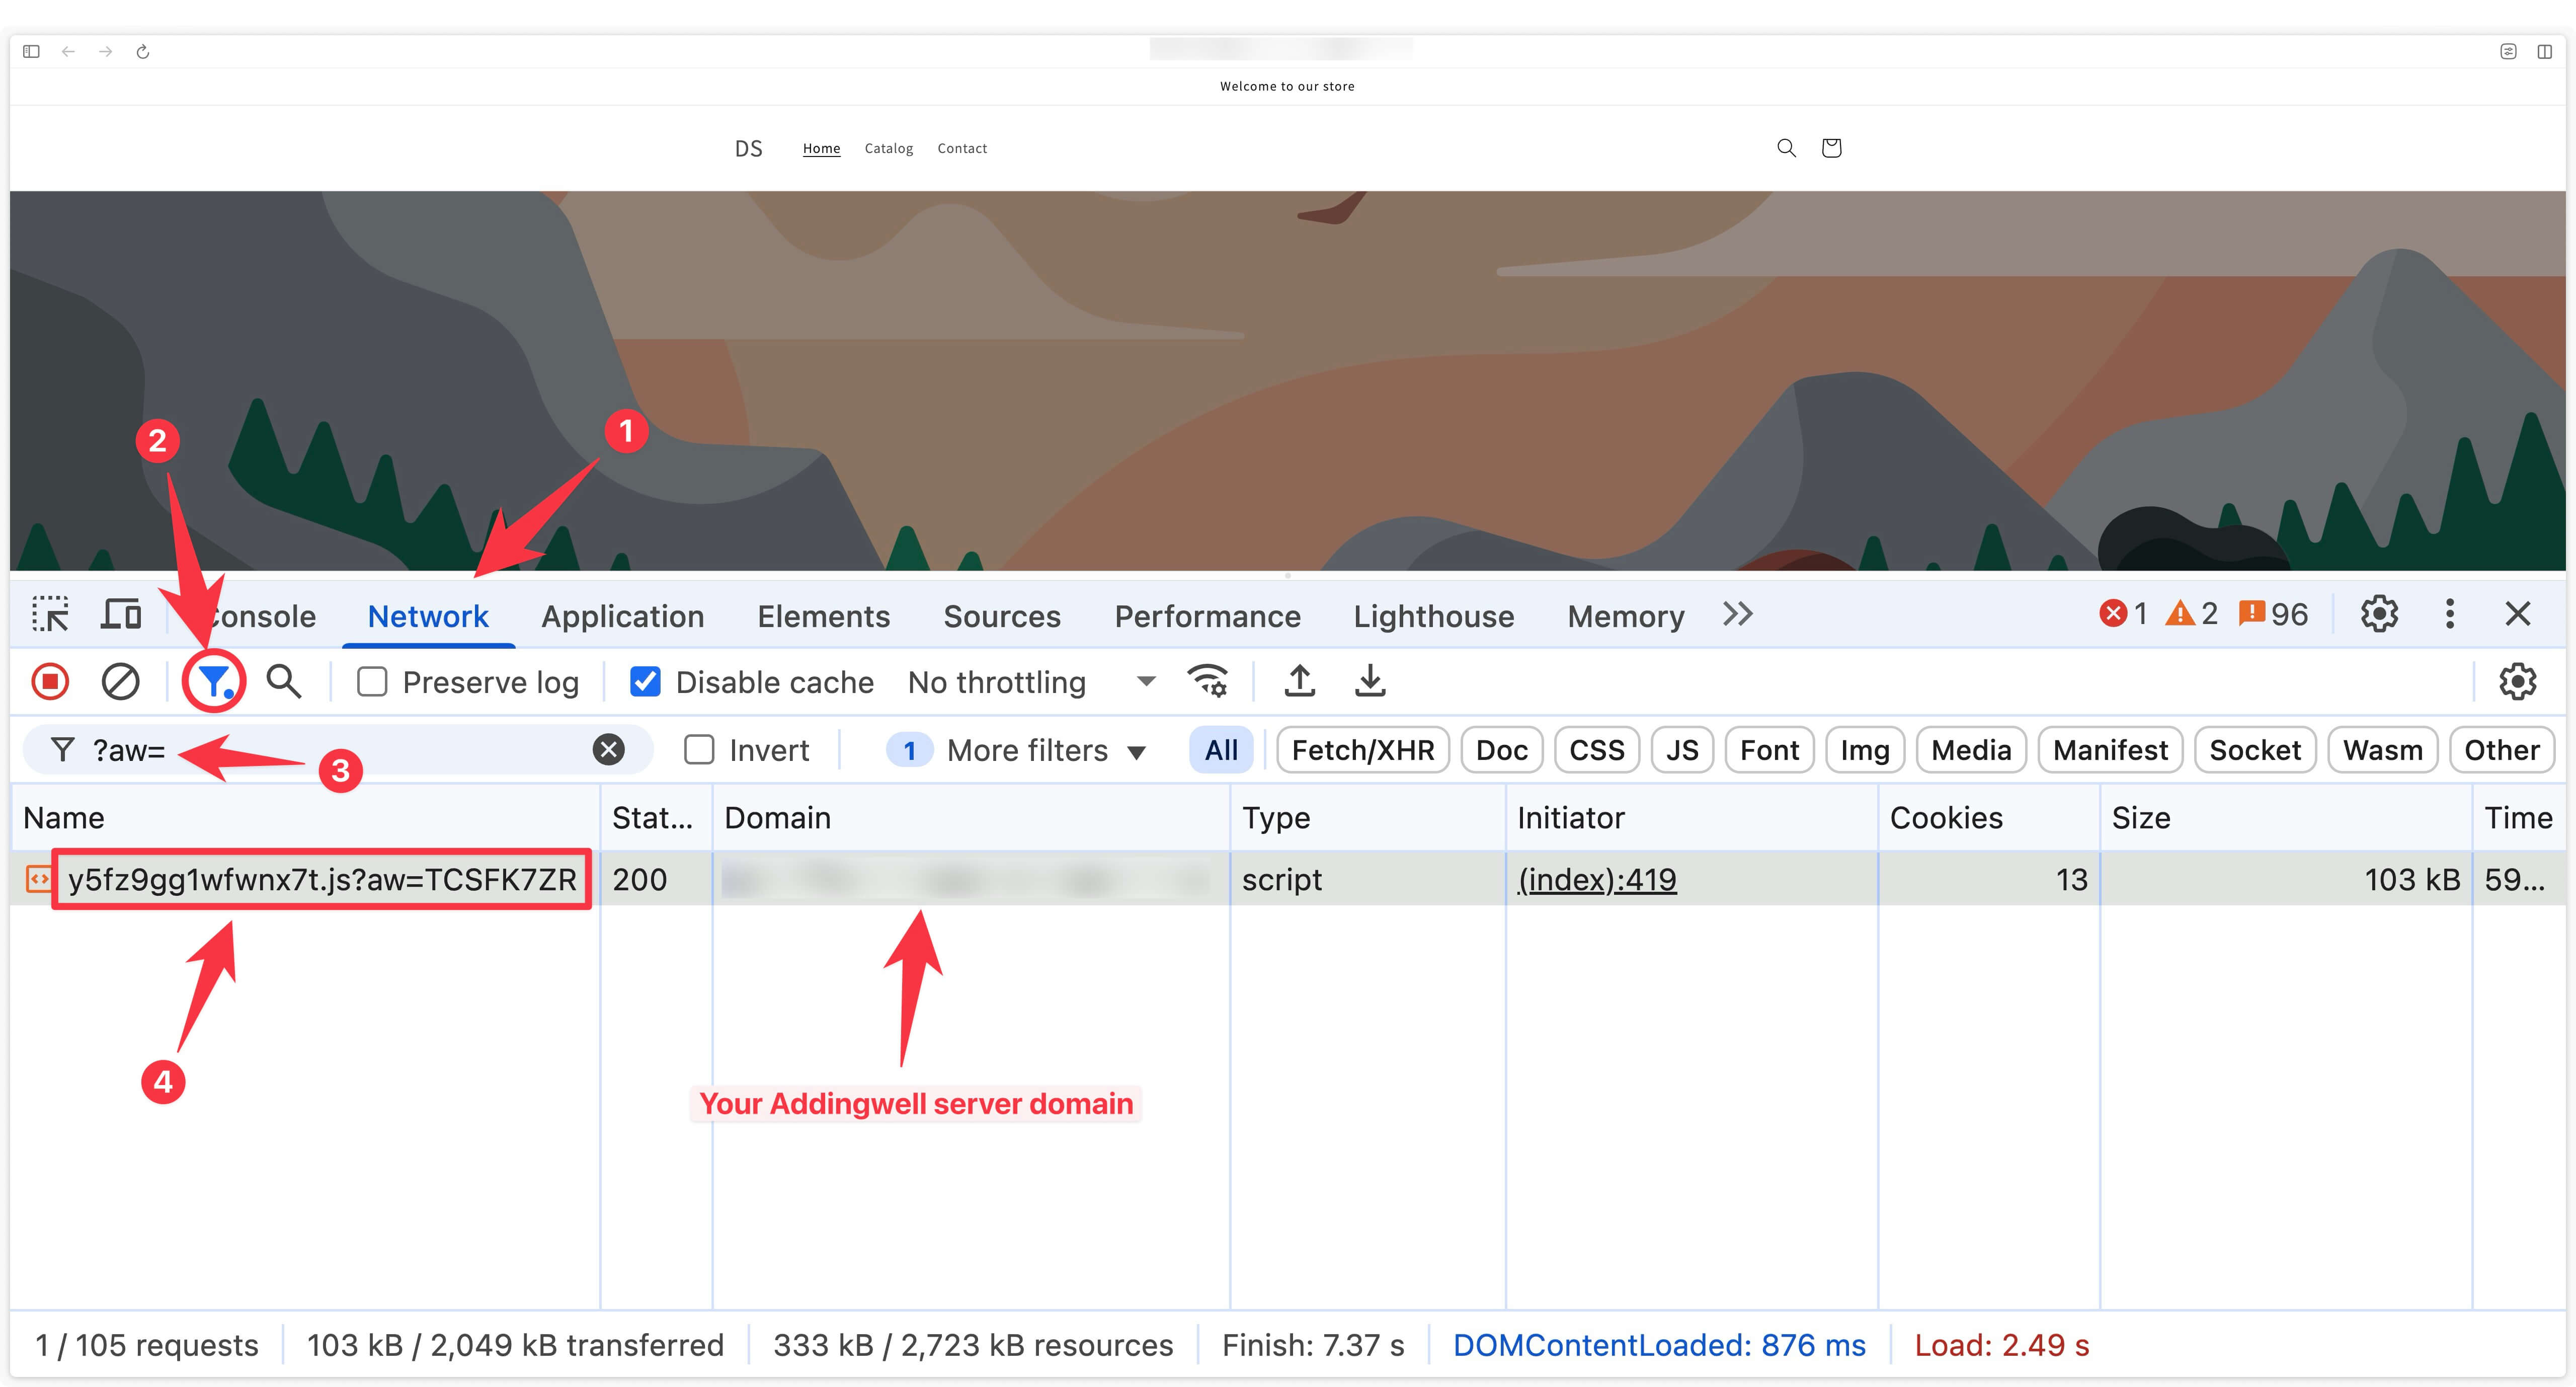
https://metrics.domain.com/b43b534bb45.js?id=GTM-DSD8IZD | YES | NO |
https://metrics.domain.com/b43b534bb45.js?aw=DSD8IZD | YES | YES |
Note here that only the request with the alternative path + the alternative parameter allows ad-blockers to be bypassed.
Here’s how to check for the presence of these queries on your store based on whether or not the alternative path and parameter are present.
without alternative path nor parameter
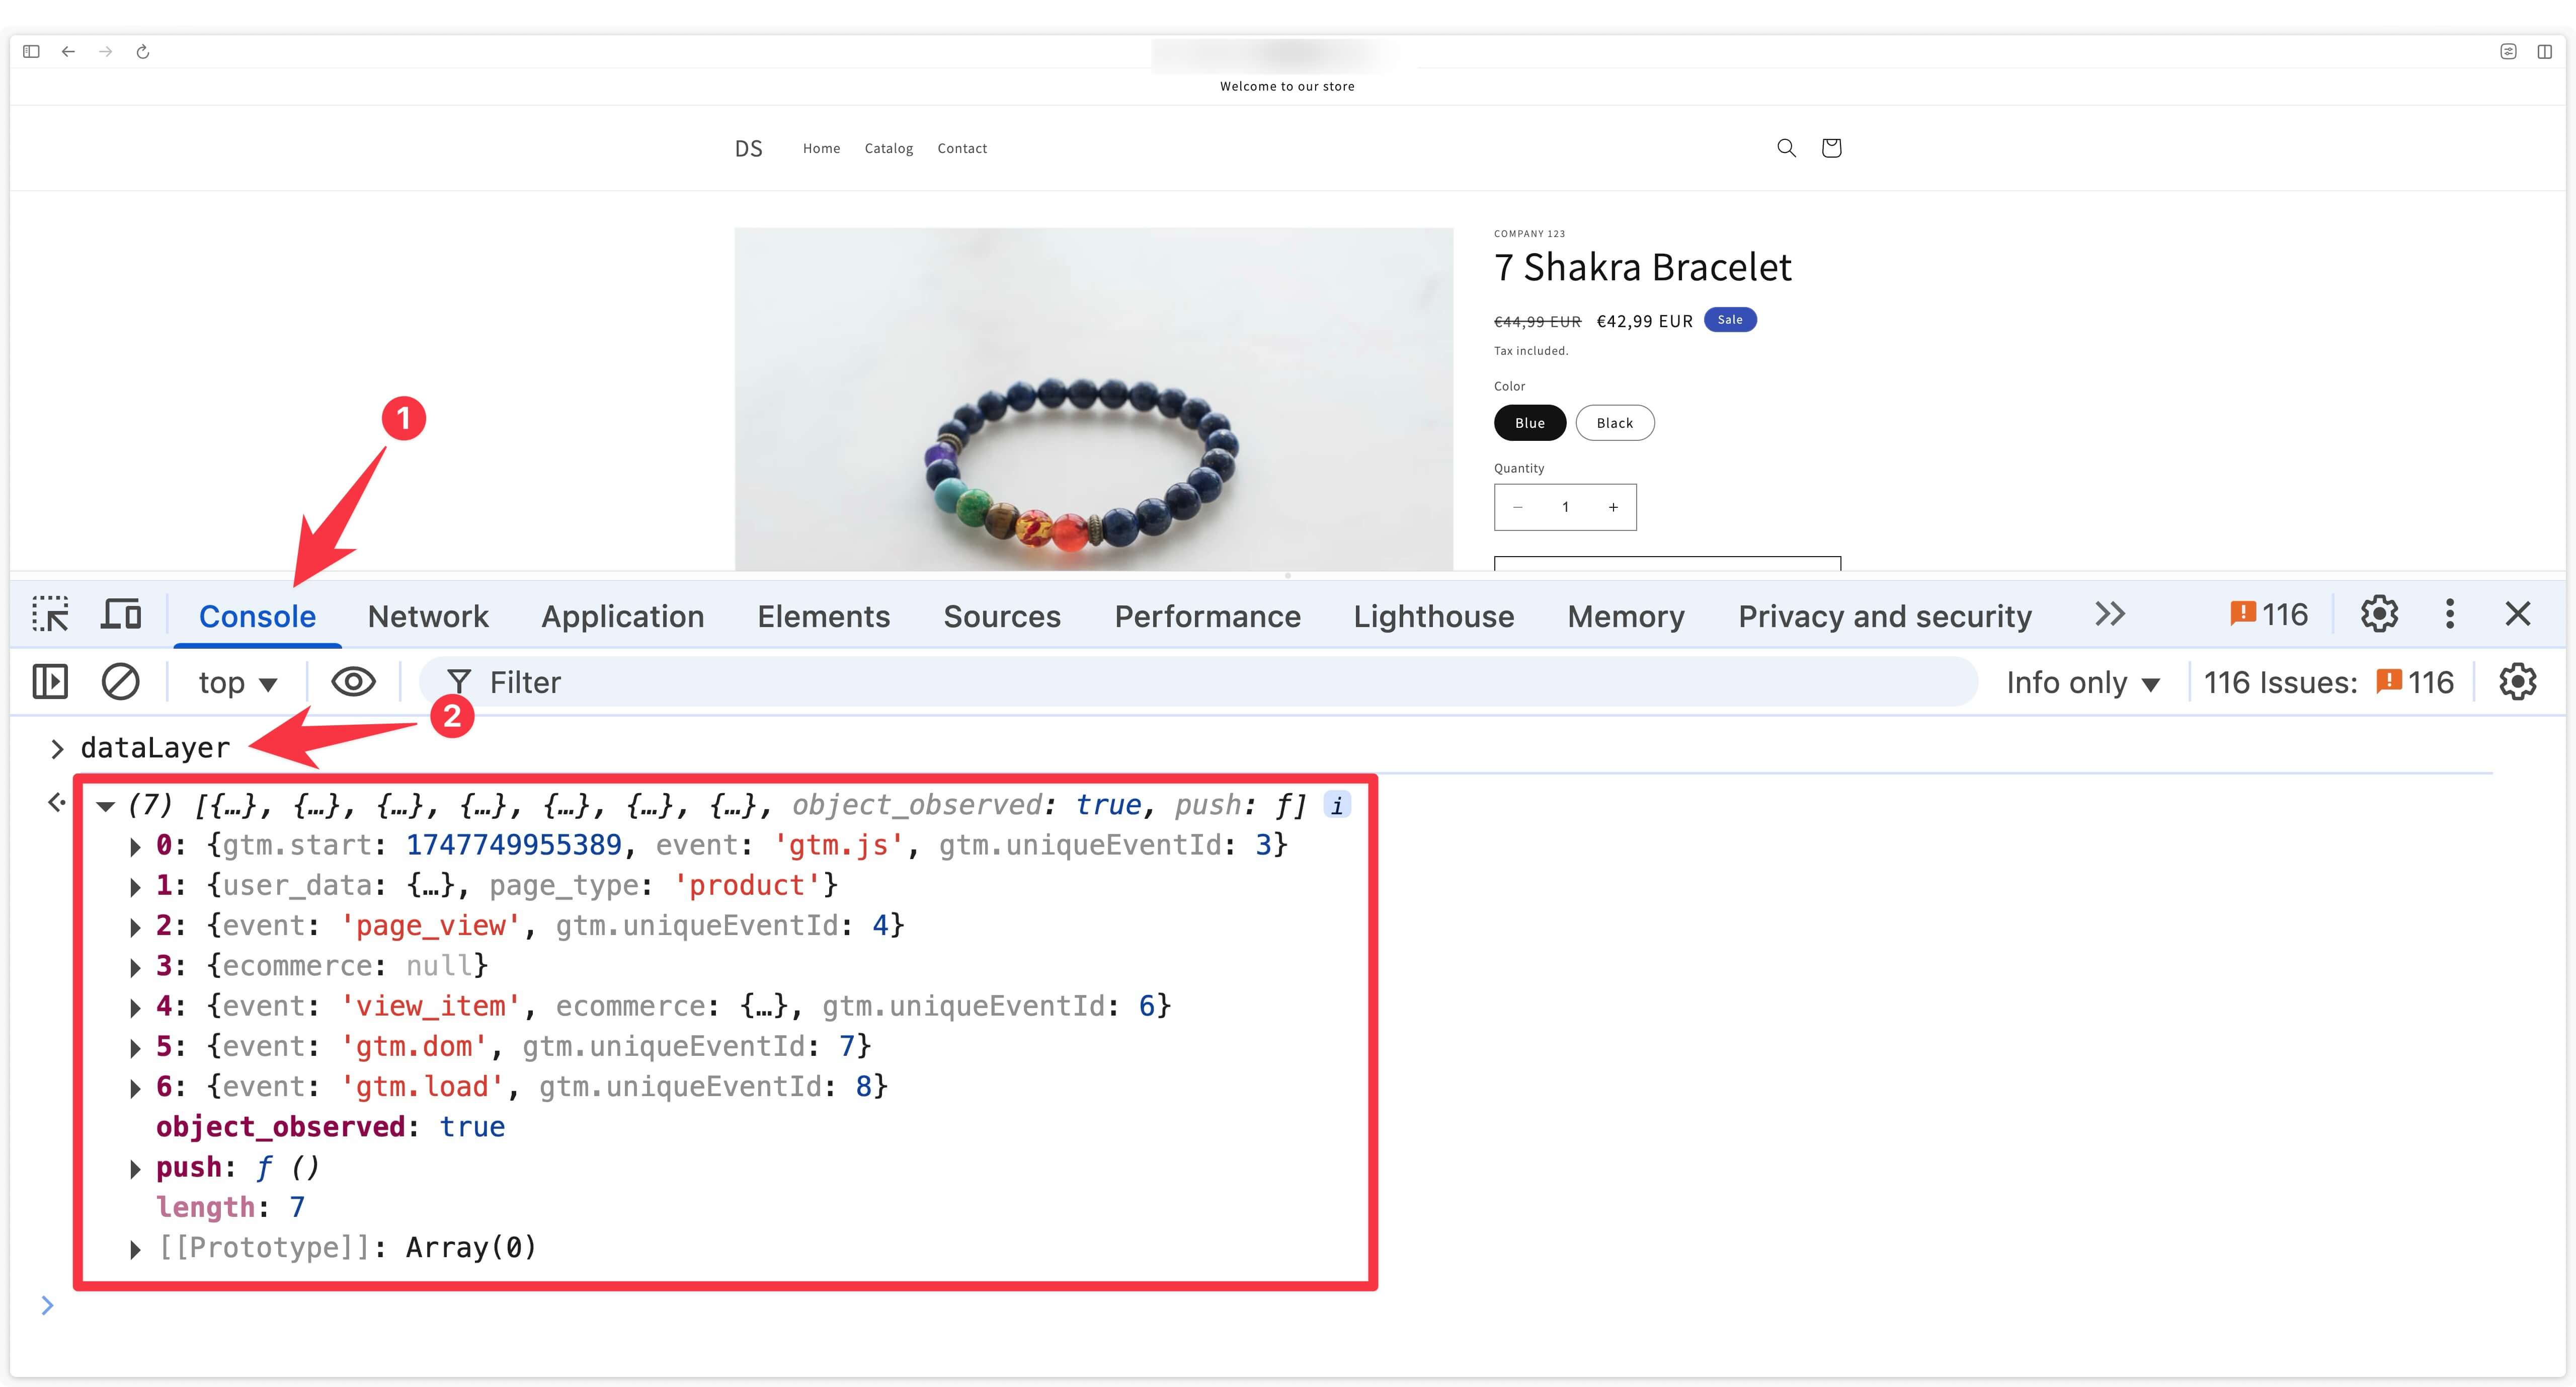
Is the DataLayer present in the theme?
In your theme, for example on a product page, open your console (right-click then inspect). Go to the Console tab and type dataLayer.
Is the DataLayer present in the checkout?
In the checkout, open your console (right-click then inspect). Click on Top then select the custom pixel you added earlier in customer events. The name of this custom pixel starts with web-pixel-sandbox-CUSTOM-{suite of digits}-LAX.
Once you’re inside the custom pixel, type dataLayer.
dataLayer is set to undefined, you may have several custom pixels and not be viewing the Addingwell custom pixel. If this is the case, try choosing another pixel that looks like web-pixel-sandbox-CUSTOM-{suite-of-numbers}-LAX.
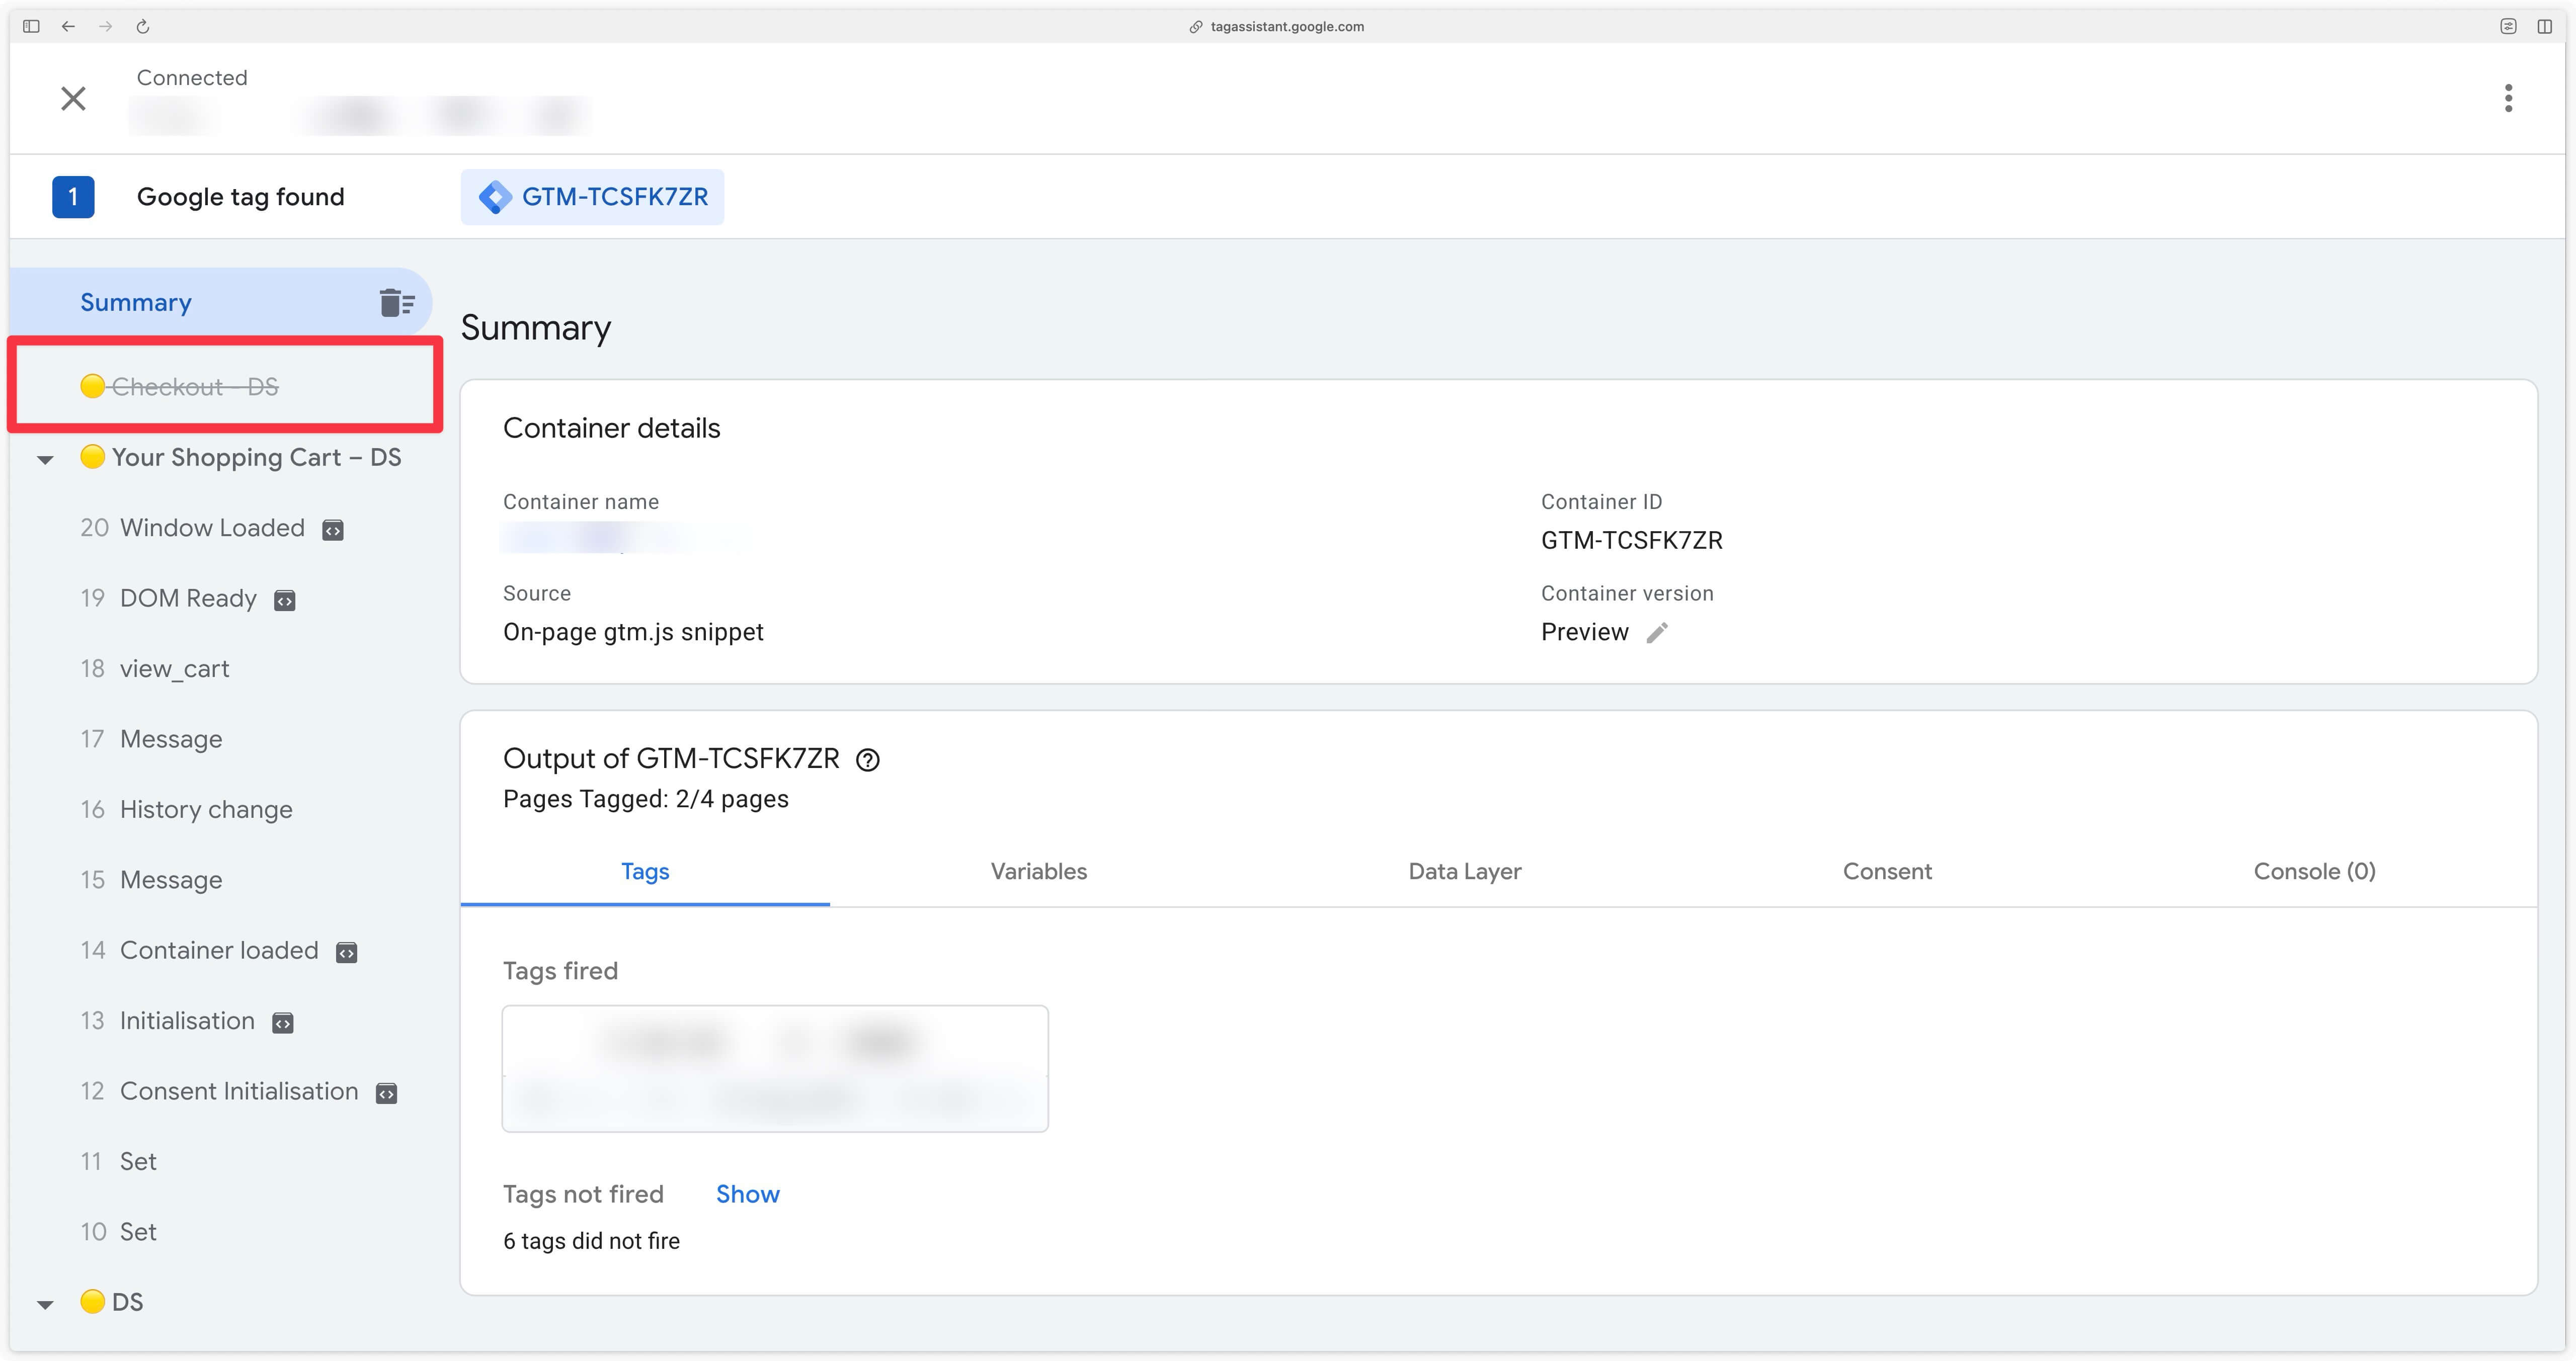
GTM preview works in theme ?
If you’ve completed the Addingwell installation steps correctly, your GTM preview should work in your theme.
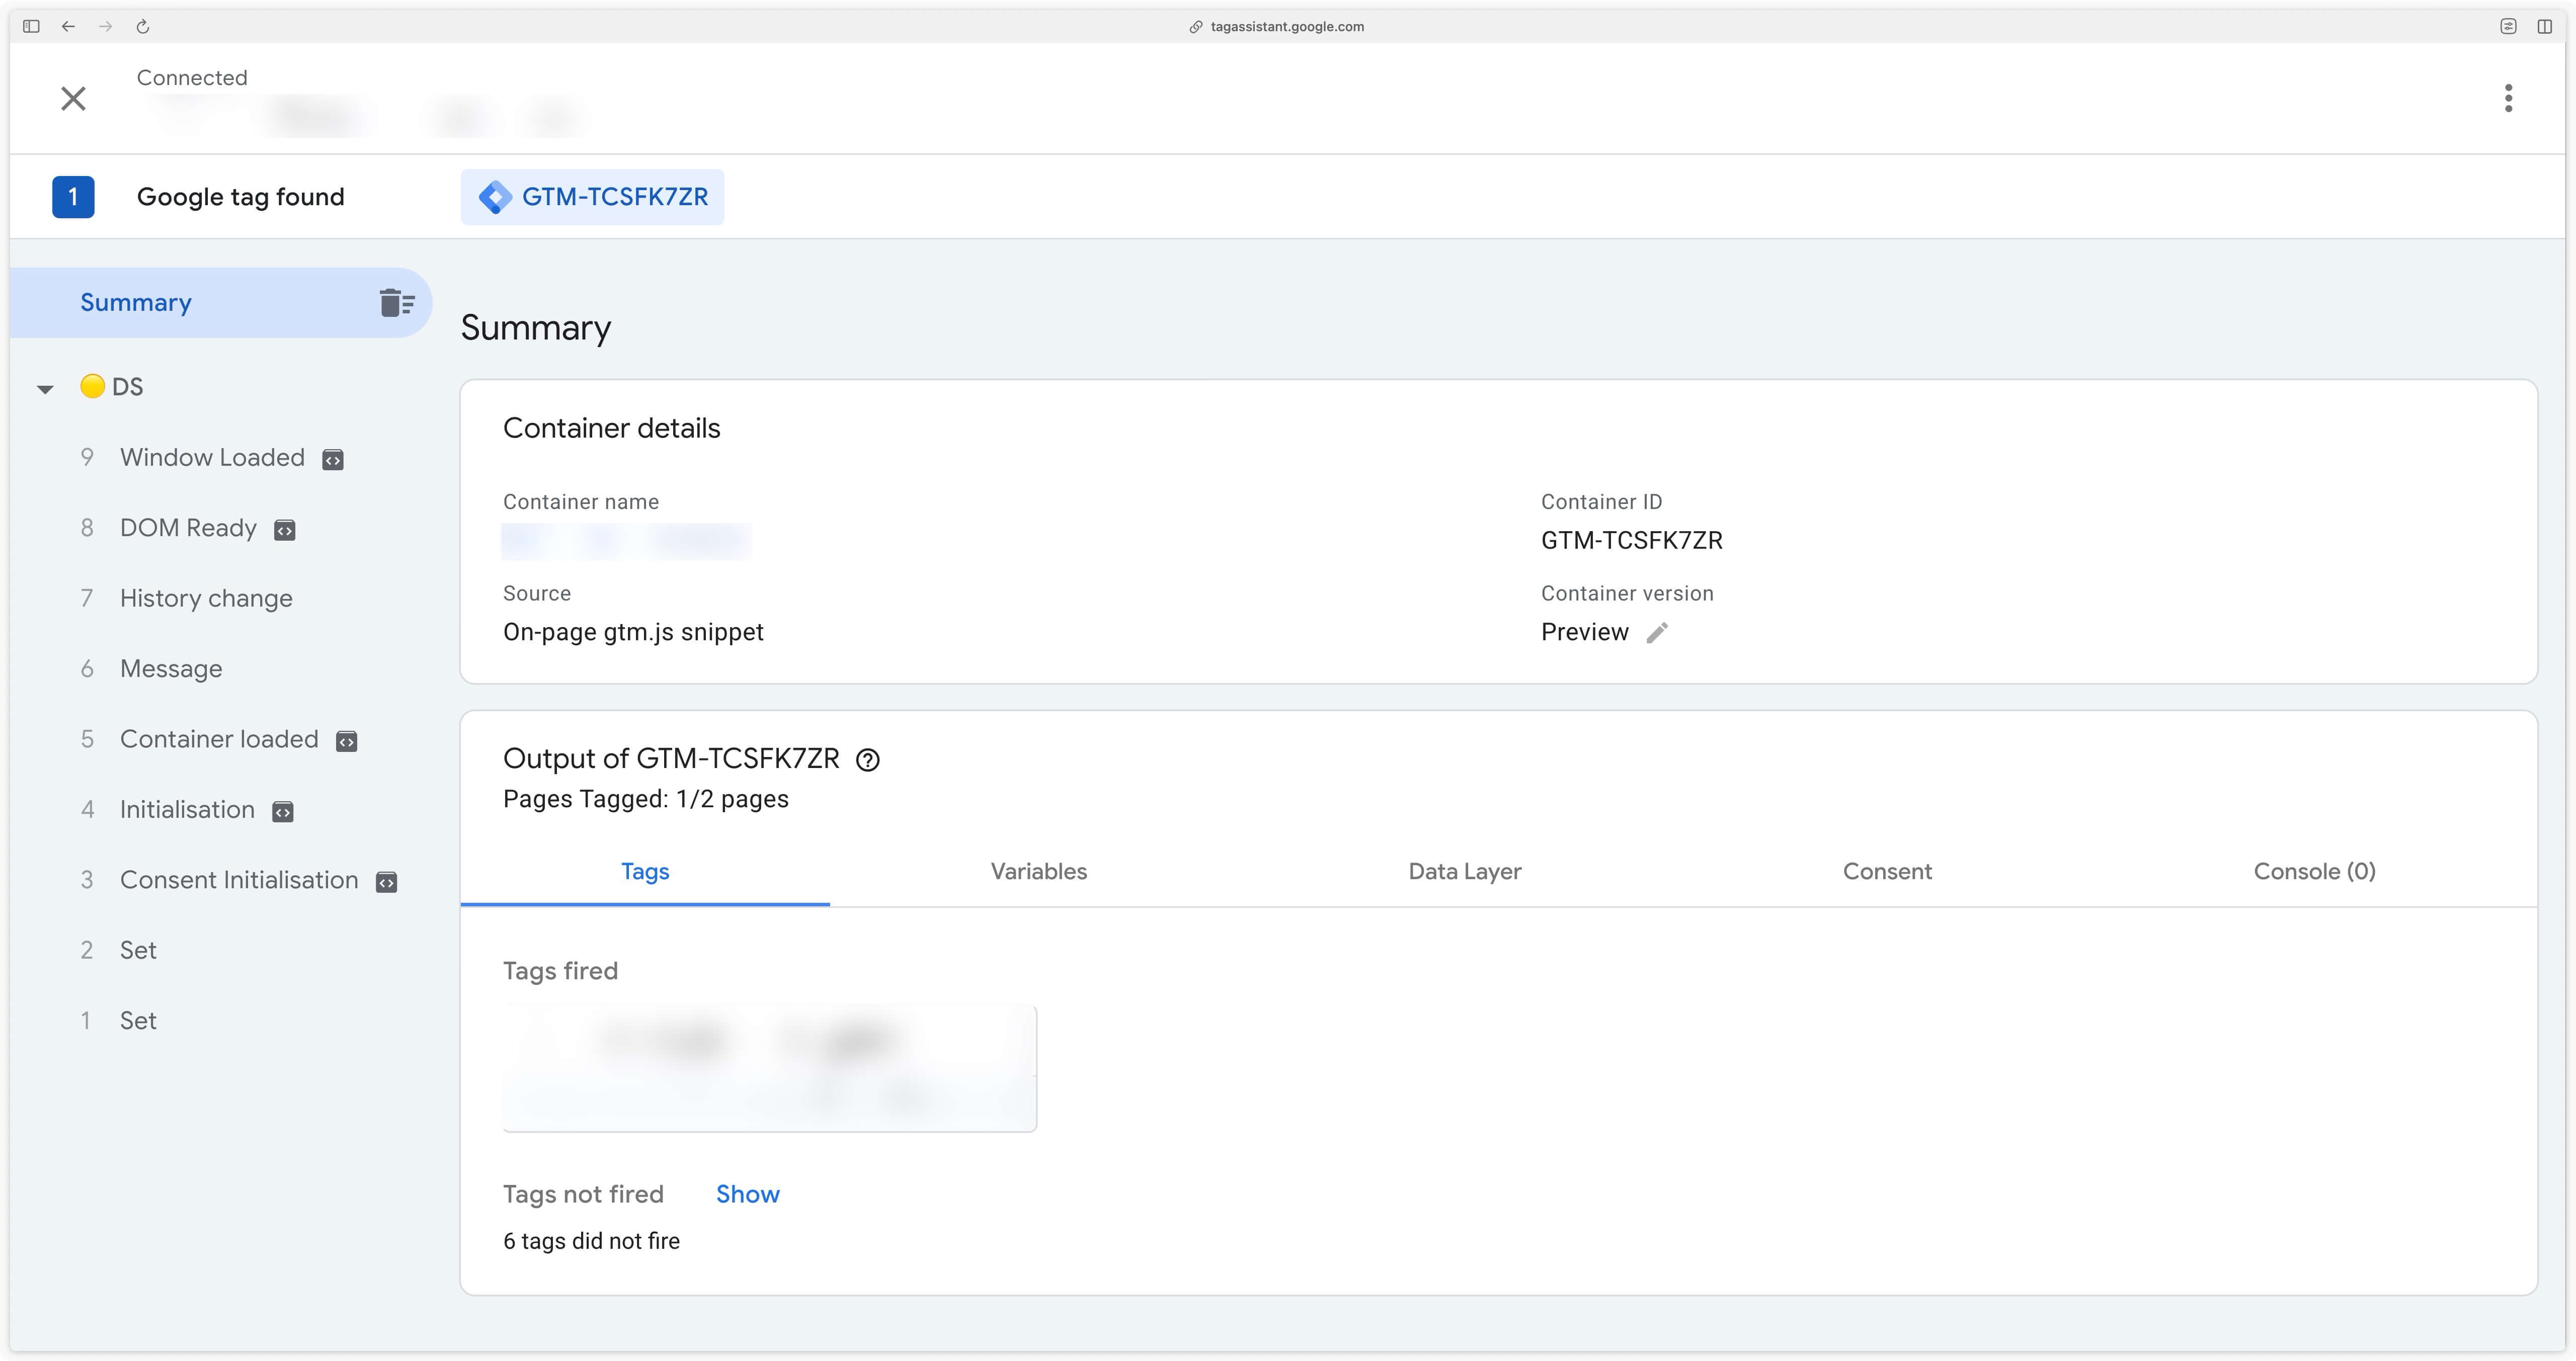
GTM preview works in checkout?
Even with a good configuration, the preview GTM doesn’t work in the checkout (this is a technical limitation of Shopify).
This doesn’t mean that your GTM configuration won’t work, only that the preview doesn’t work.
This is not practical in the sense that you can’t really test a configuration, you have to publish your GTM container so that your configuration is active and visible from the checkout.
GTM Web container template
We’ve created a GTM Web container template to make it easier for you to implement tracking based on the Data Layer of the Addingwell Shopify application.
You can download this template here by clicking on the red circled button below.
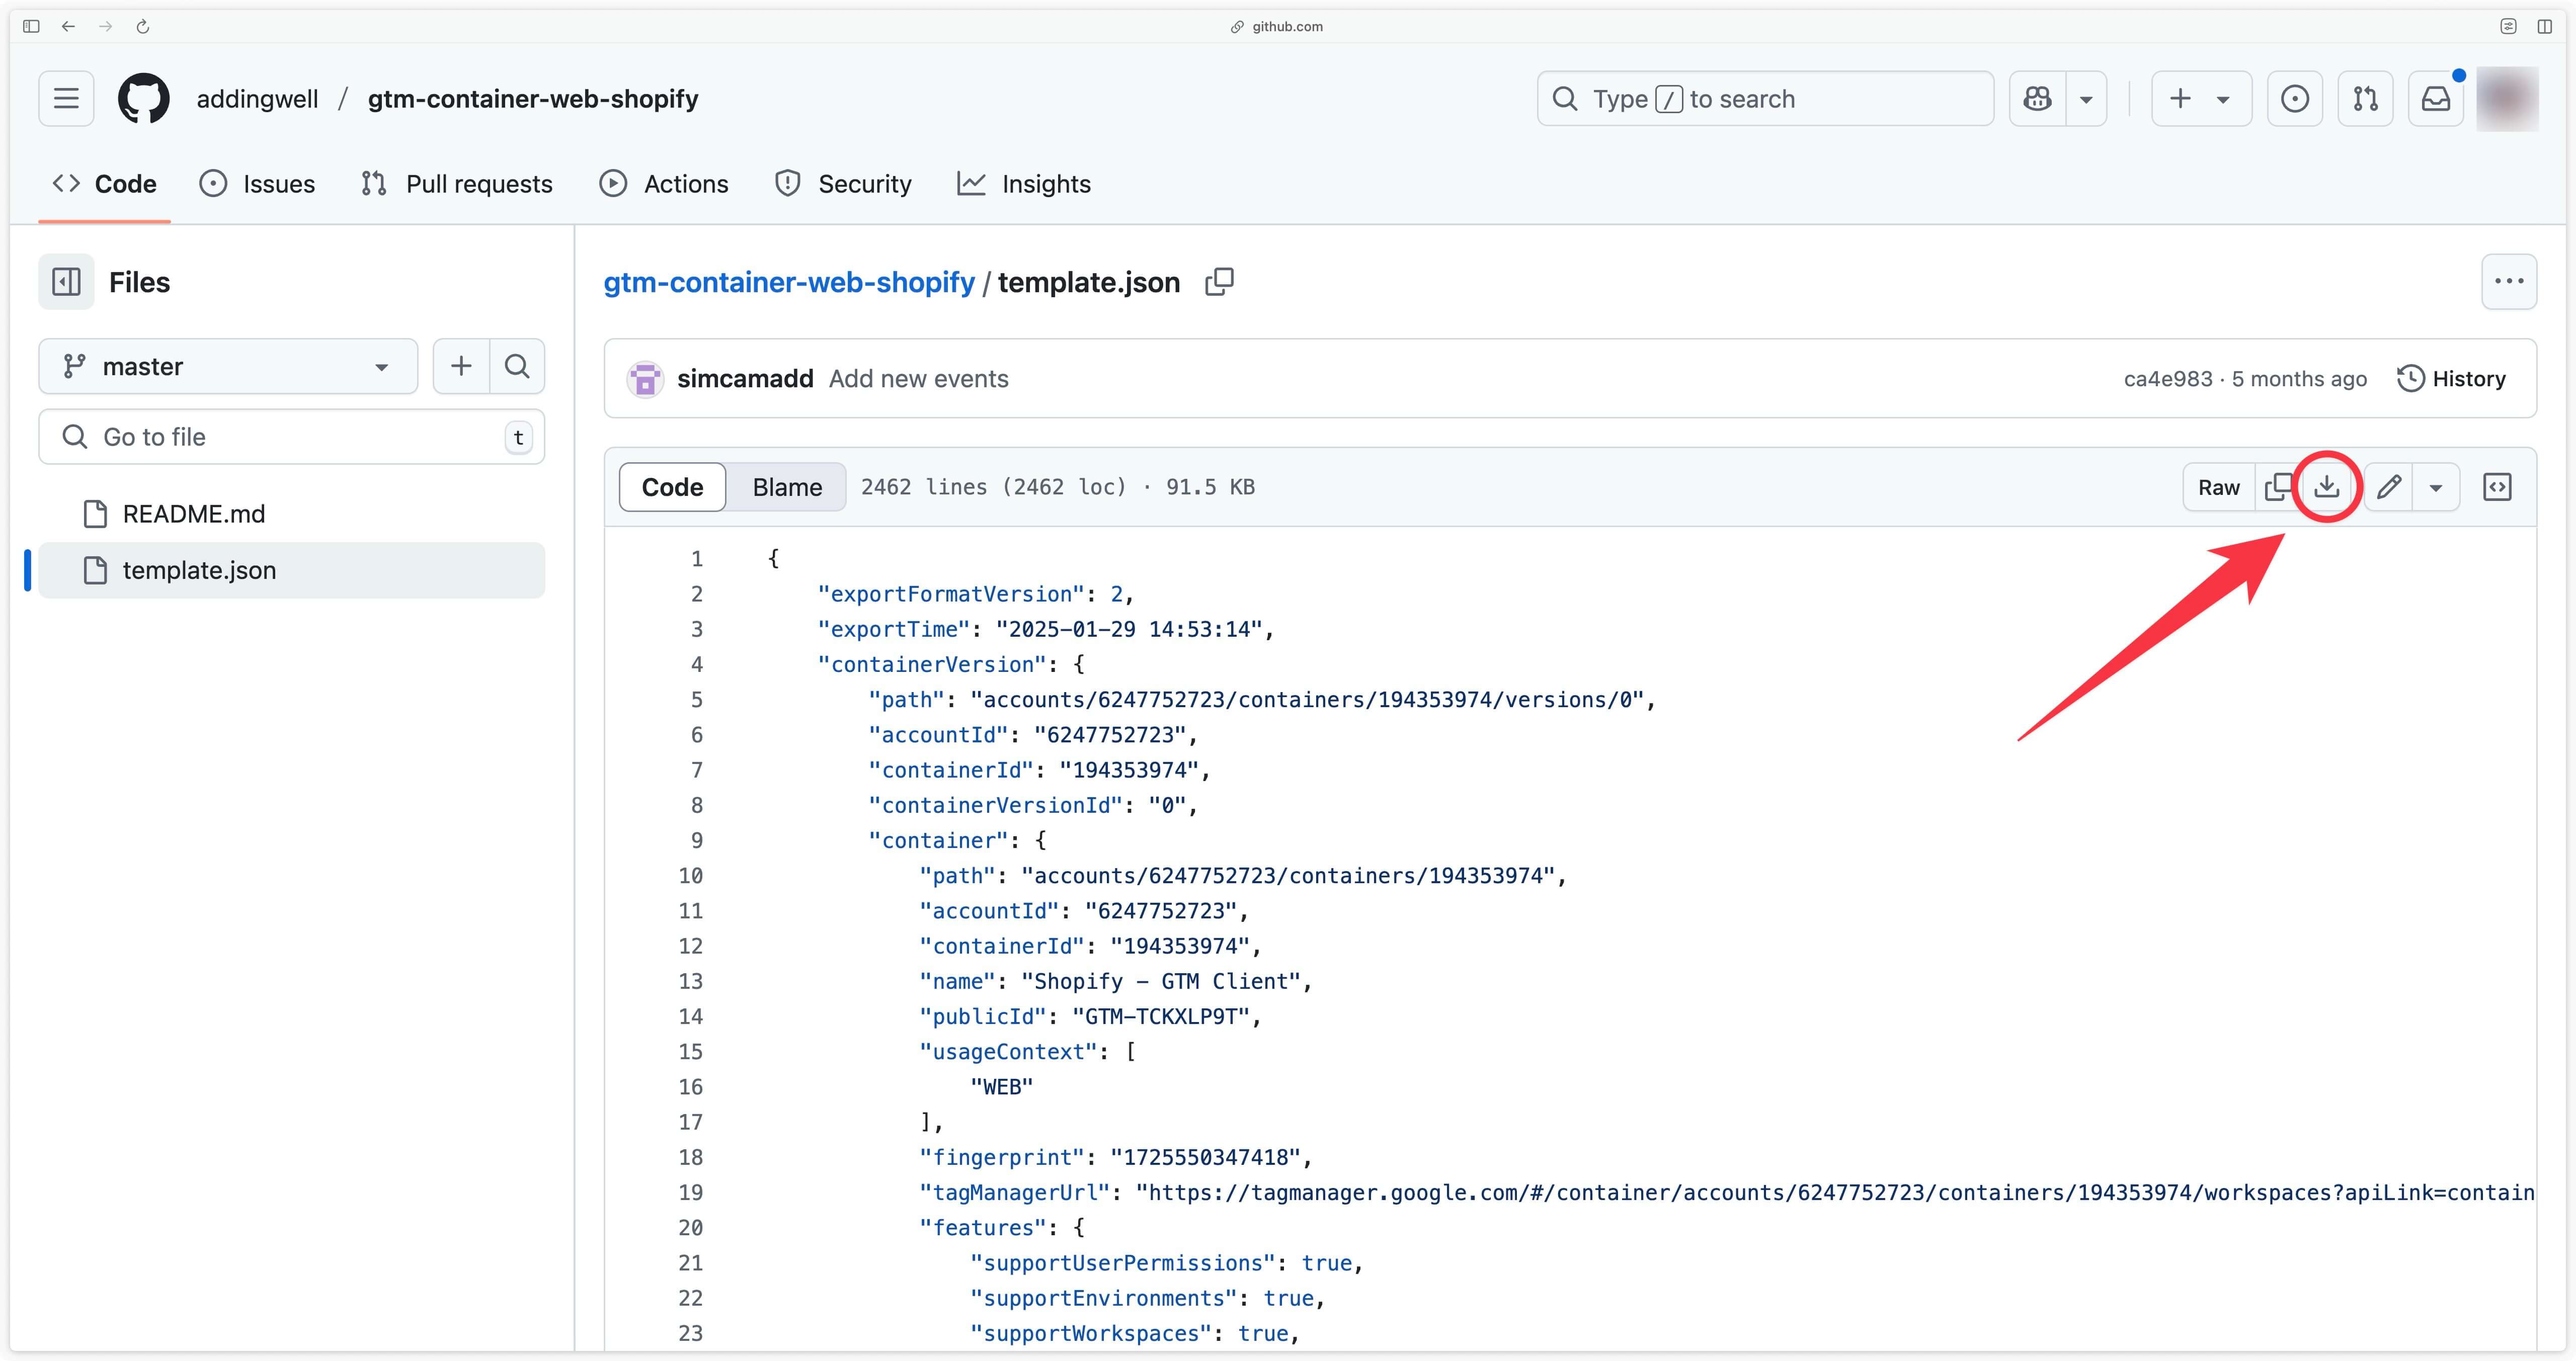
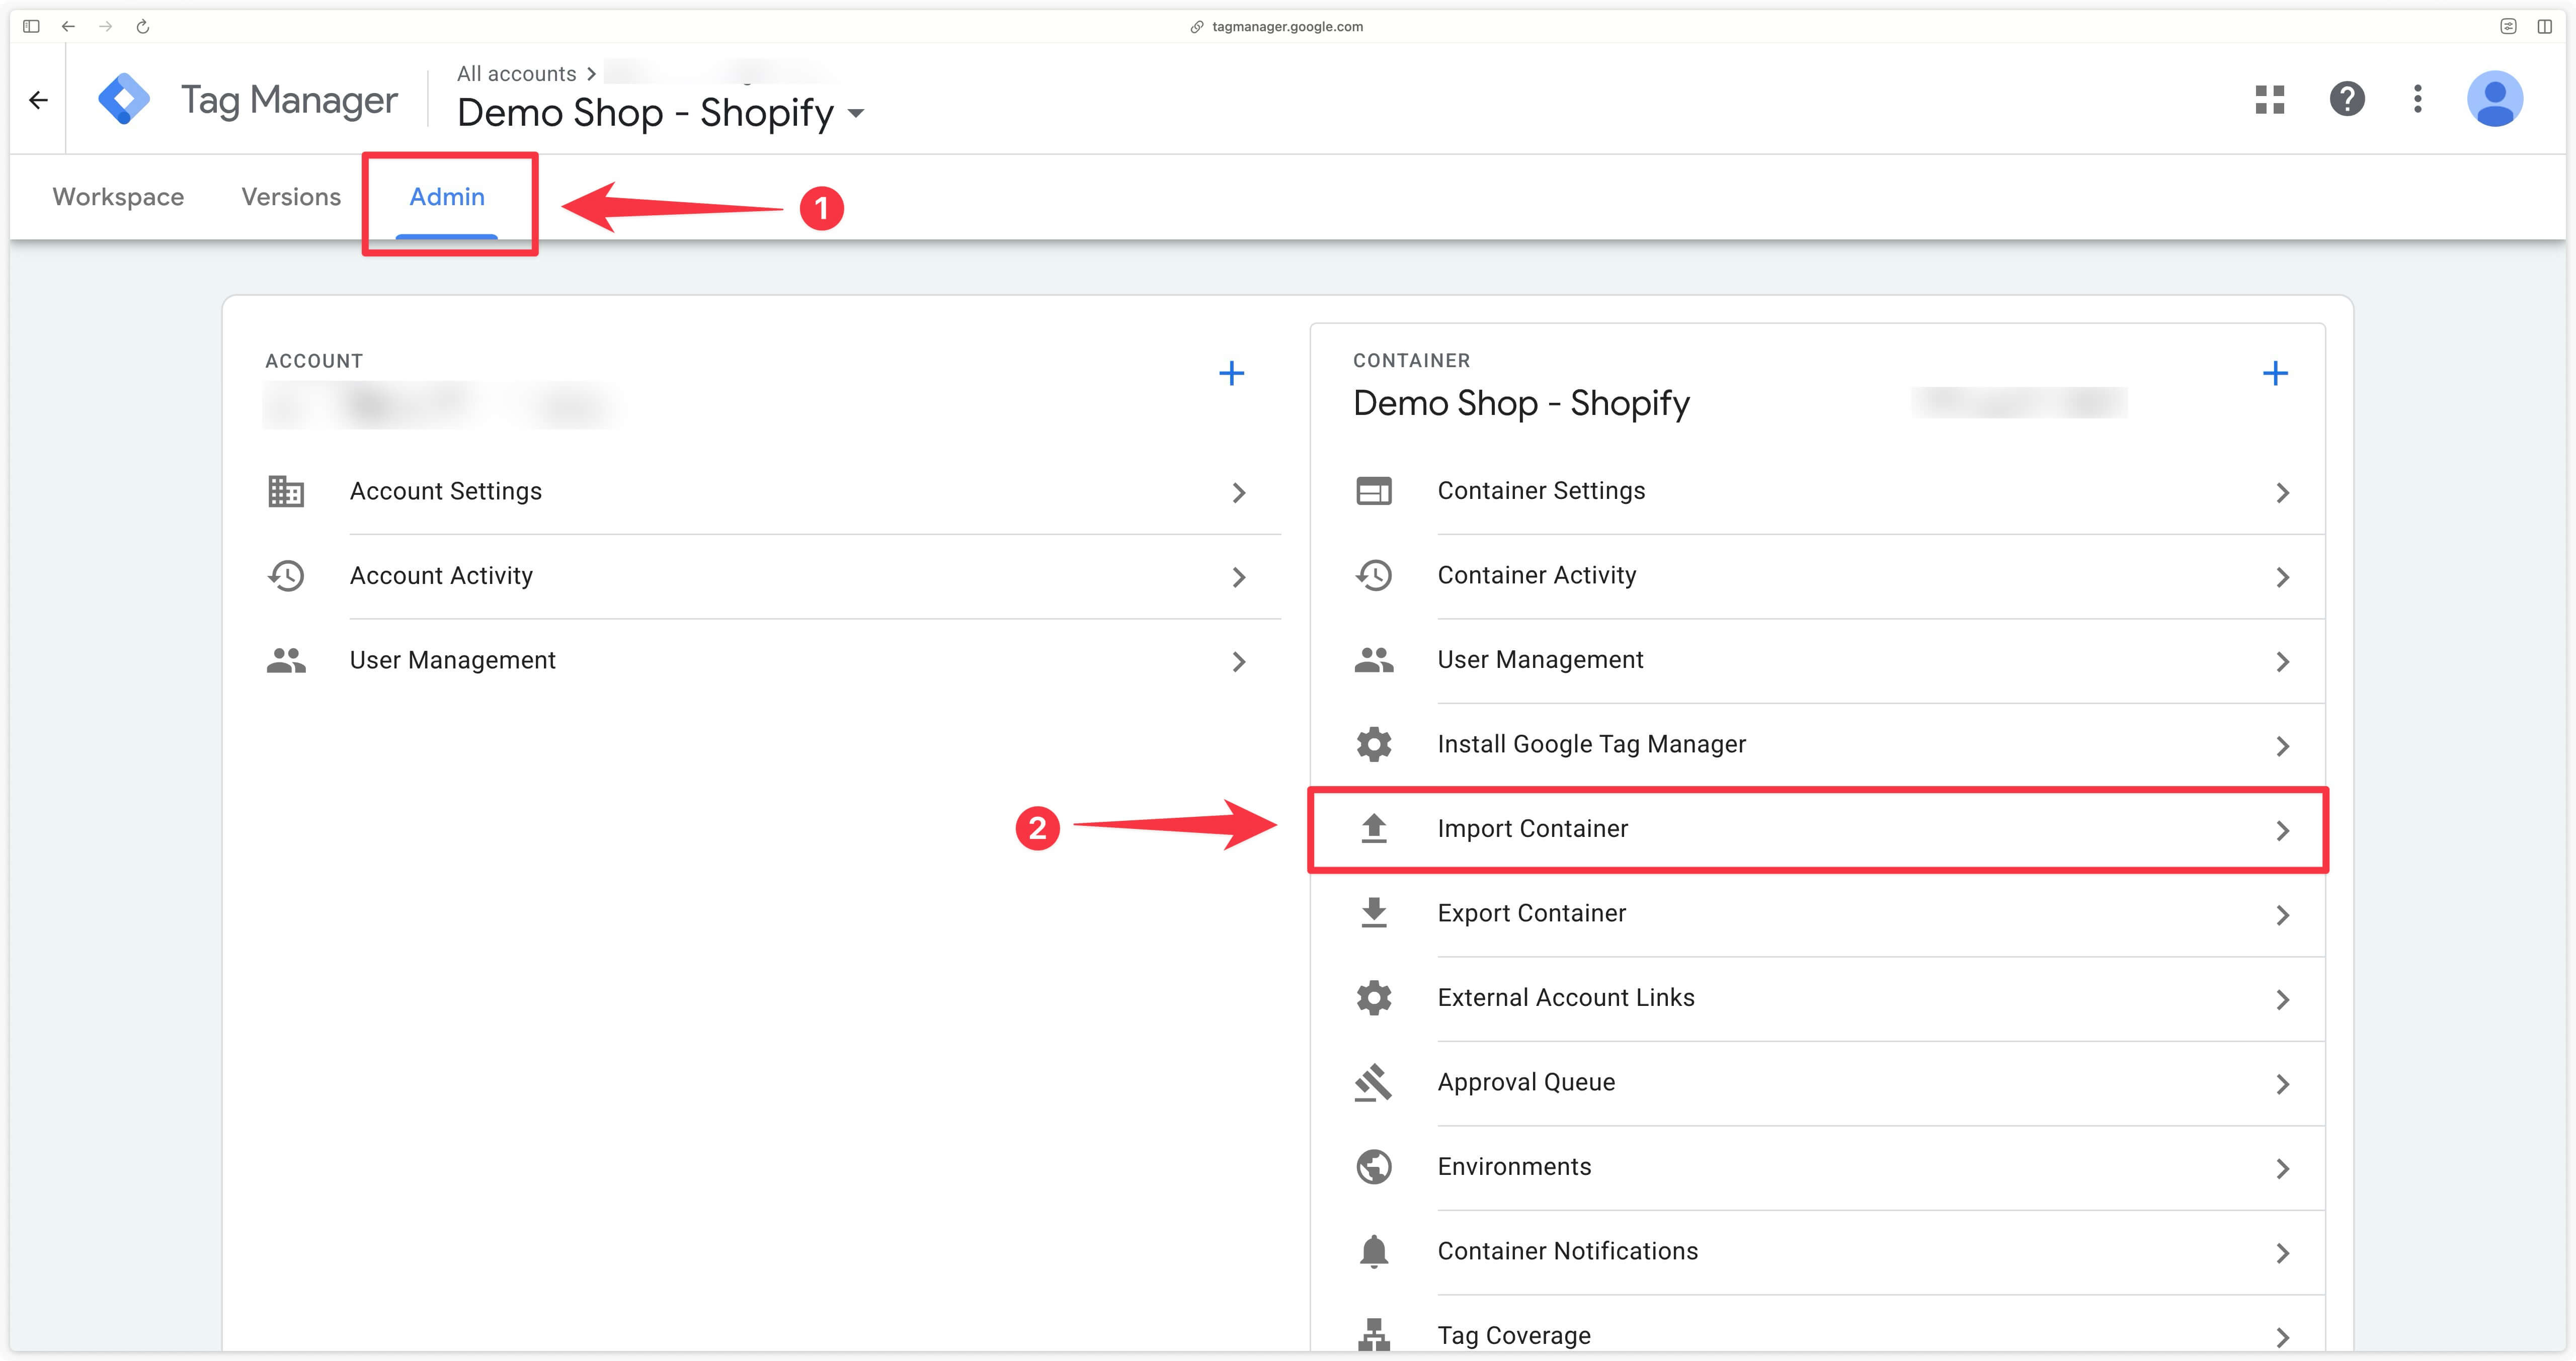
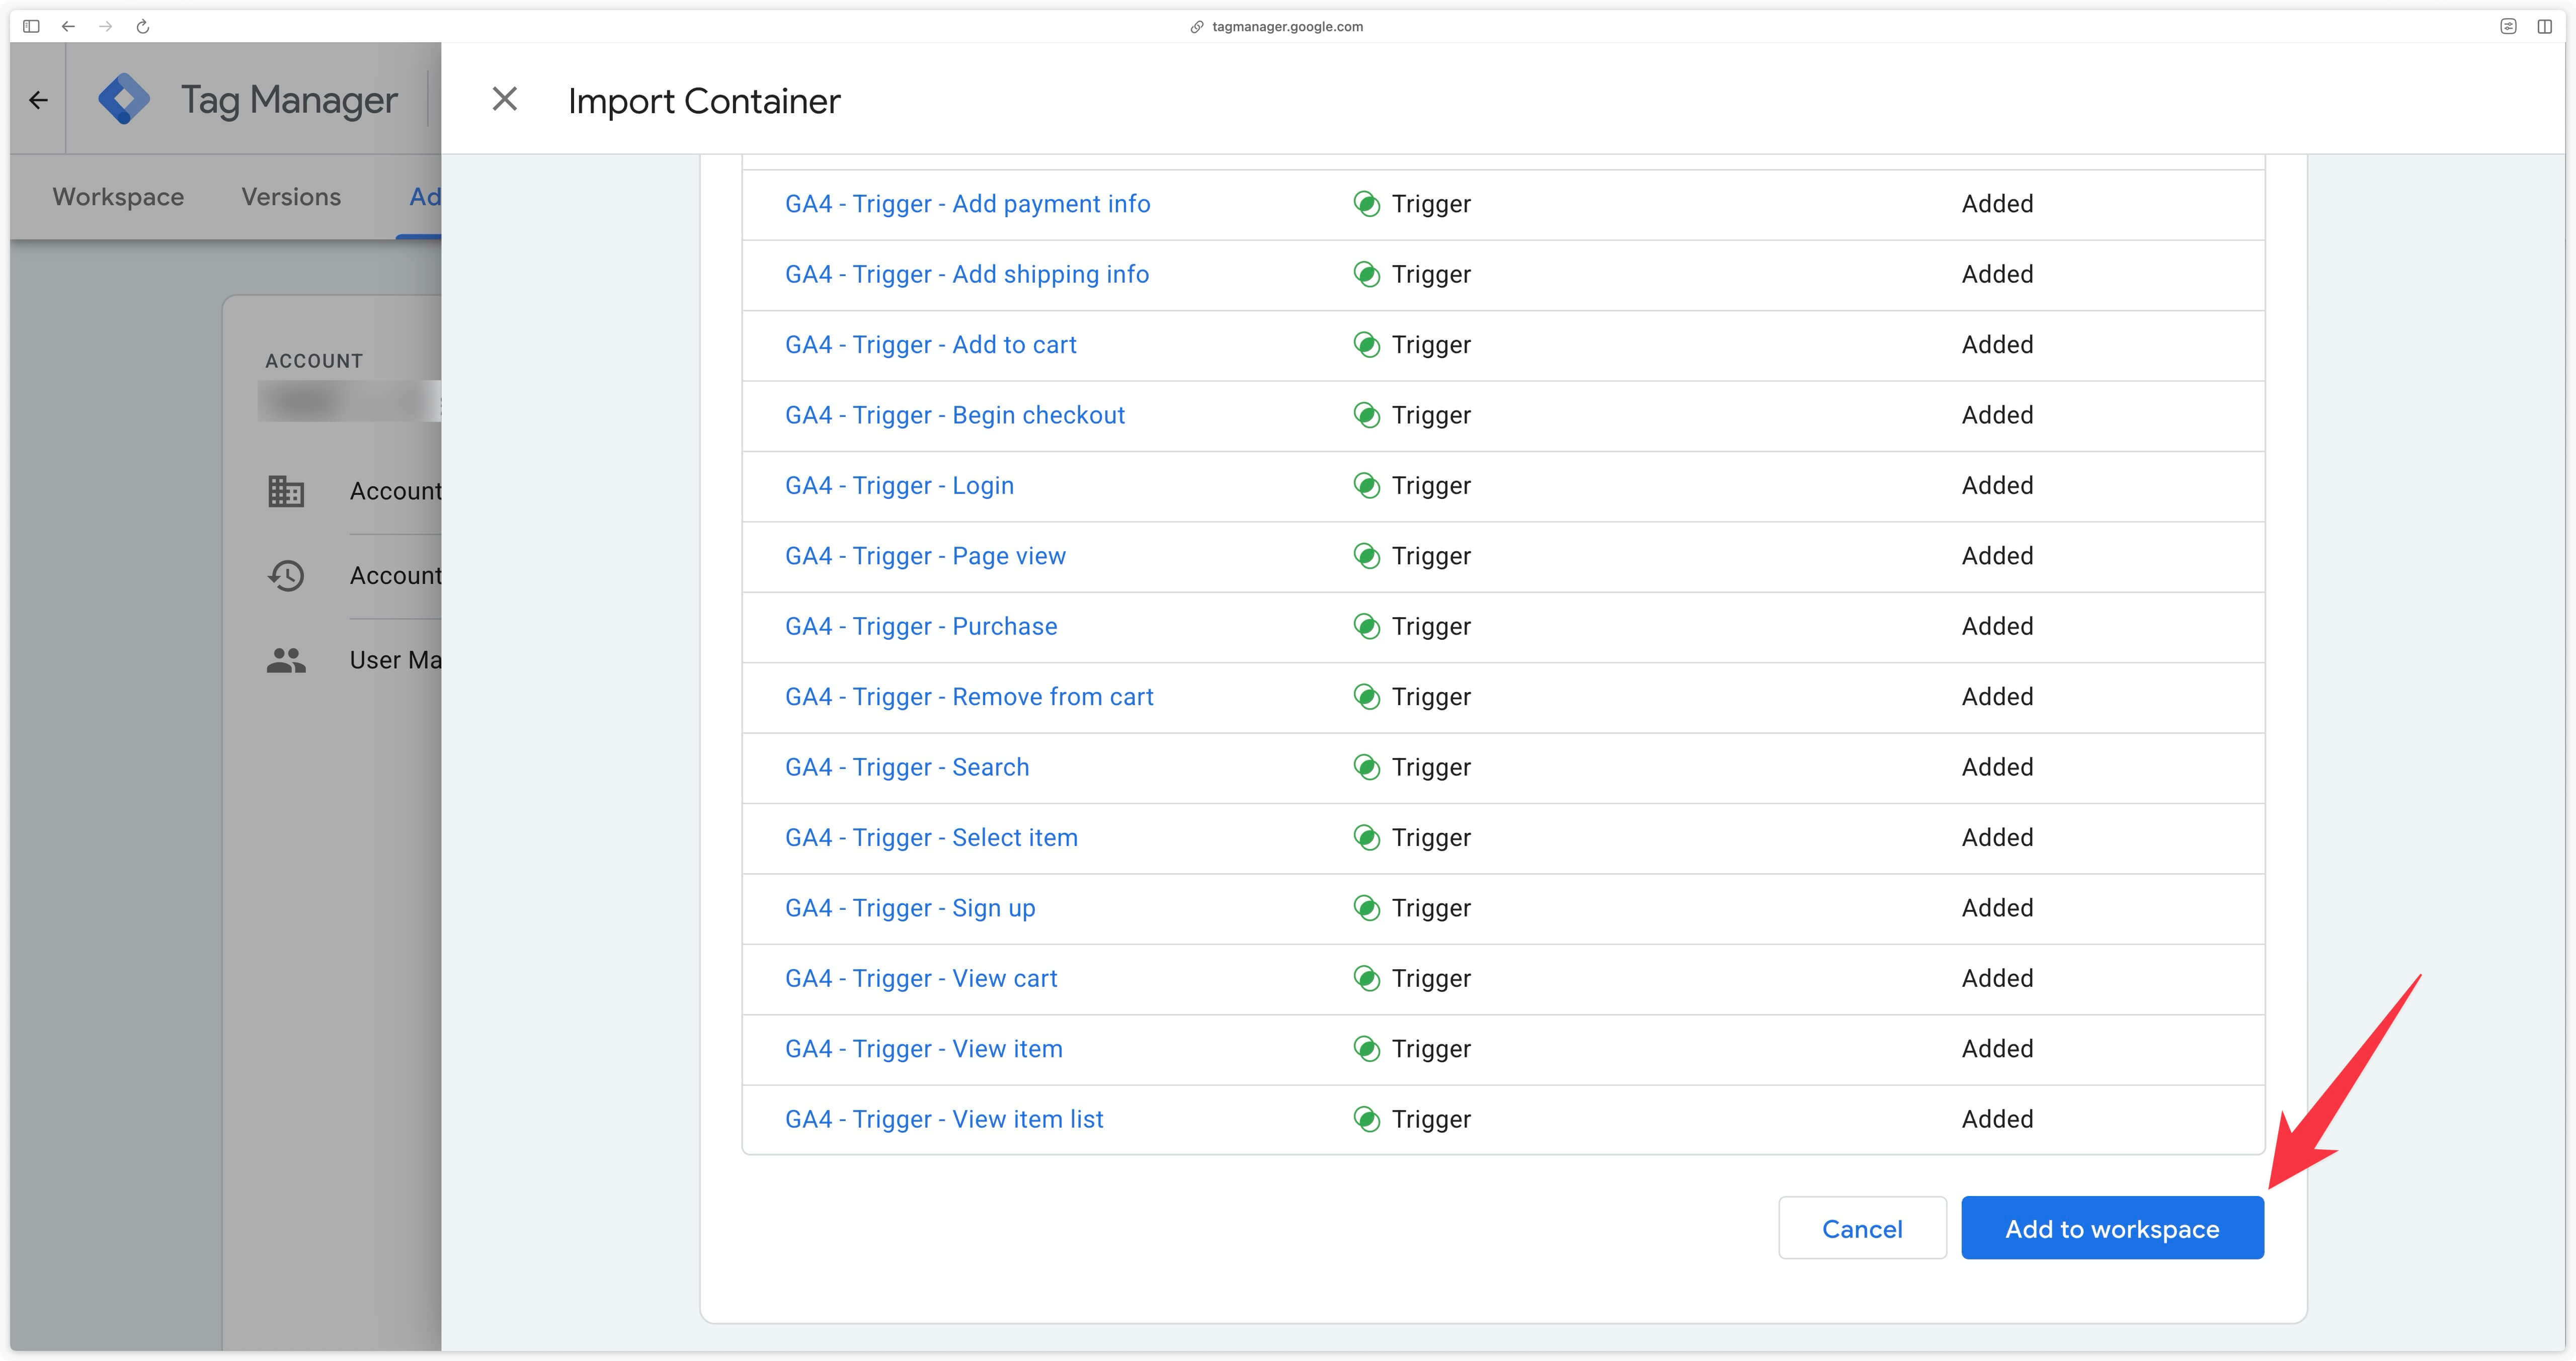
Once you’ve downloaded the template, go to your Google Tag Manager Web container and click on Admin and then Import Container.
Click on Choose container file then select the template.json file previously uploaded.
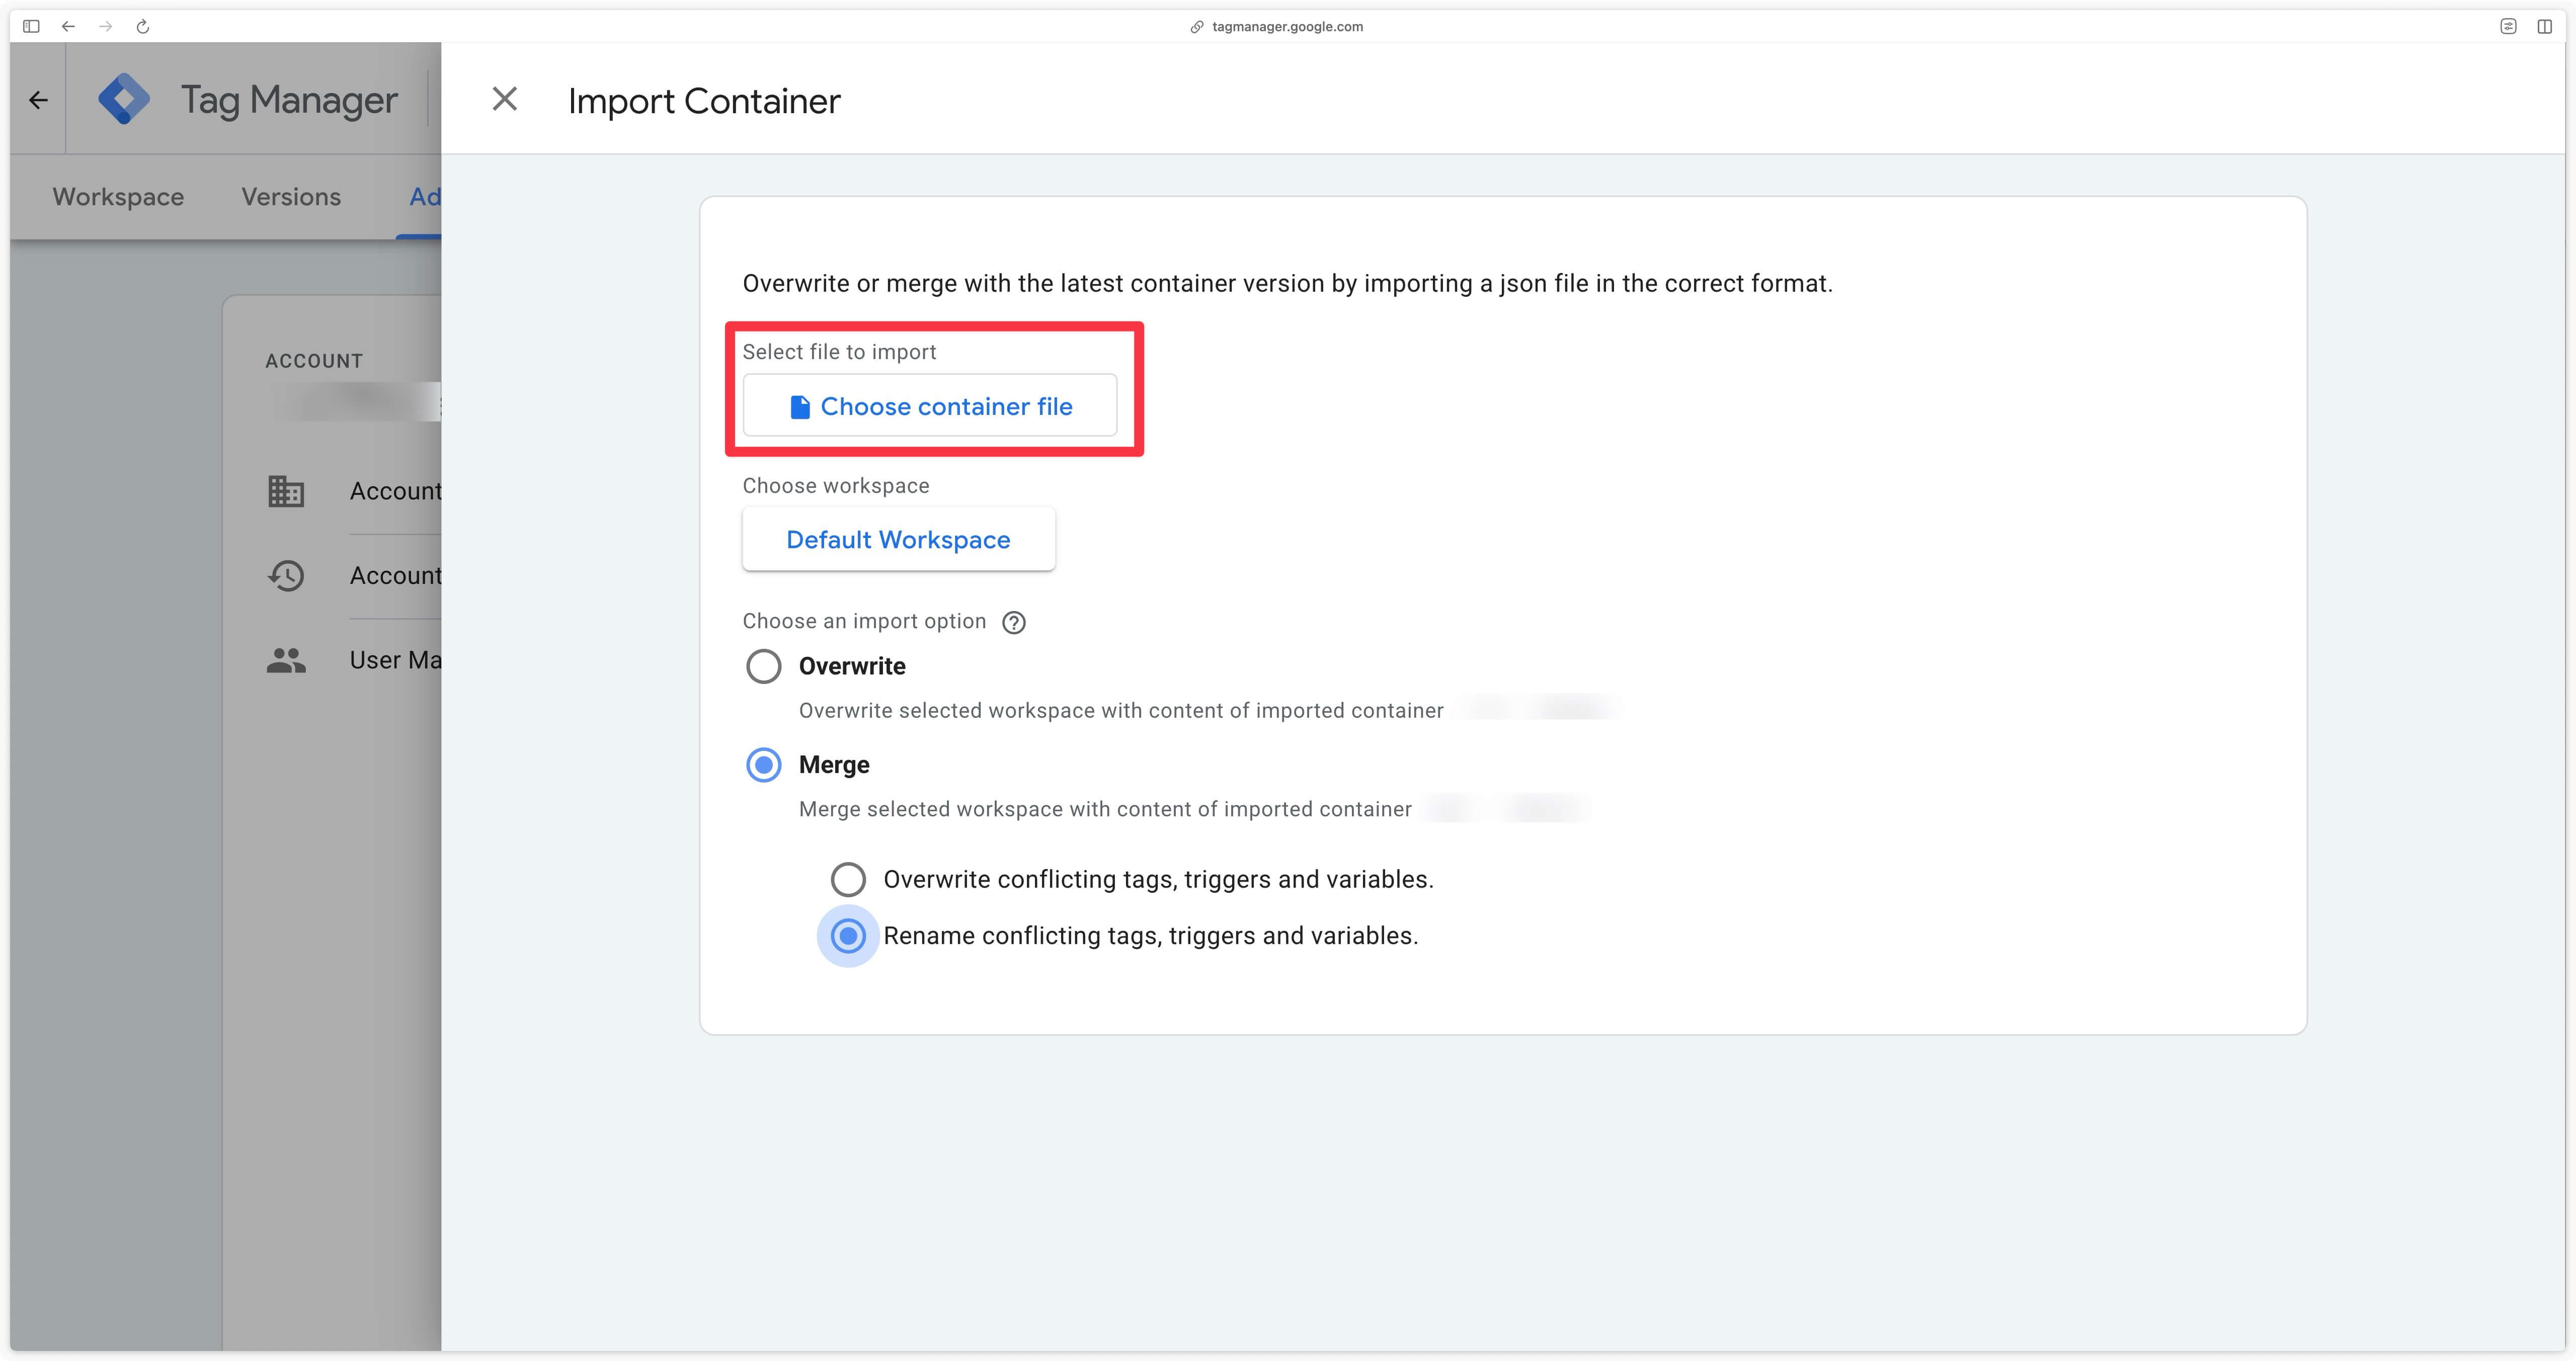
Select the workspace you wish to import into, then select Merge and Rename conflicting tags, triggers and variables..
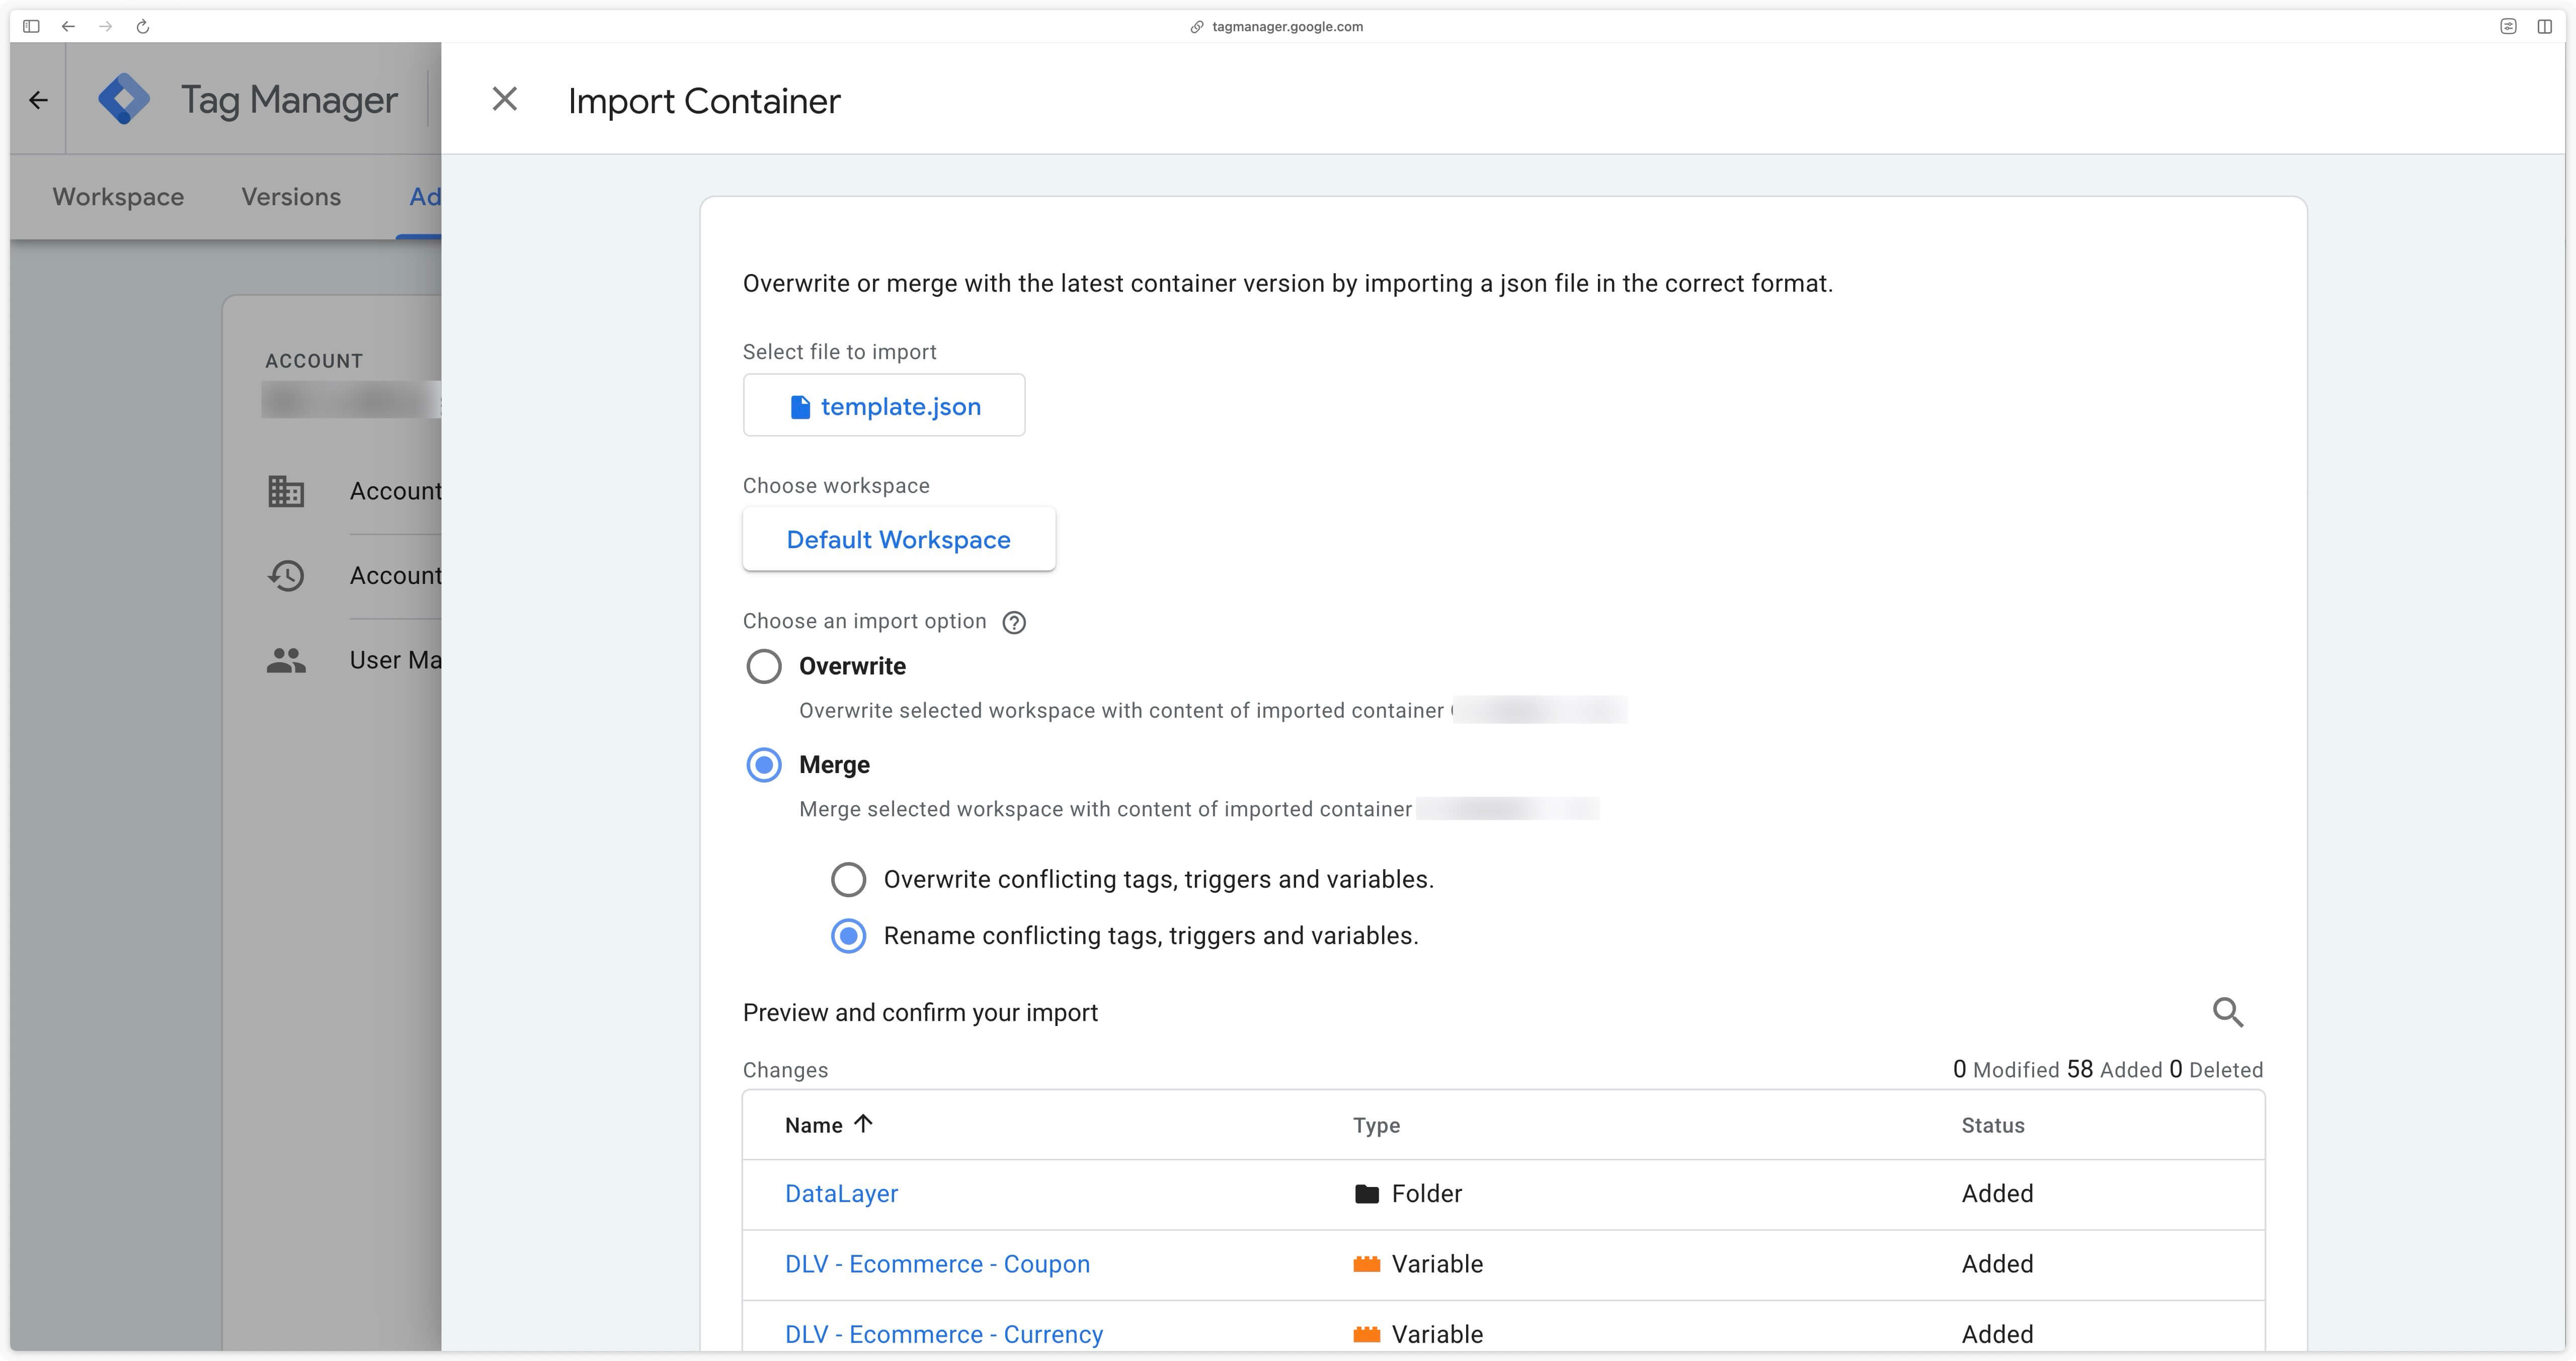
Then scroll down to the bottom of the page and click Add to workspace.
Restore cookies (mandatory on Shopify)
Since the migration to Checkout Extensibility, Shopify tracking has undergone some changes, notably the fact that from checkout onwards, cookies are no longer accessible.
Without cookies, it won’t be possible for your marketing tools to recognize the complete user conversion path on your Shopify store. There will be a “disconnect” from the checkout.
To solve this problem, Addingwell has implemented a server-side cookie restoration mechanism called Cookie Restore.
Follow the steps below to activate this feature.
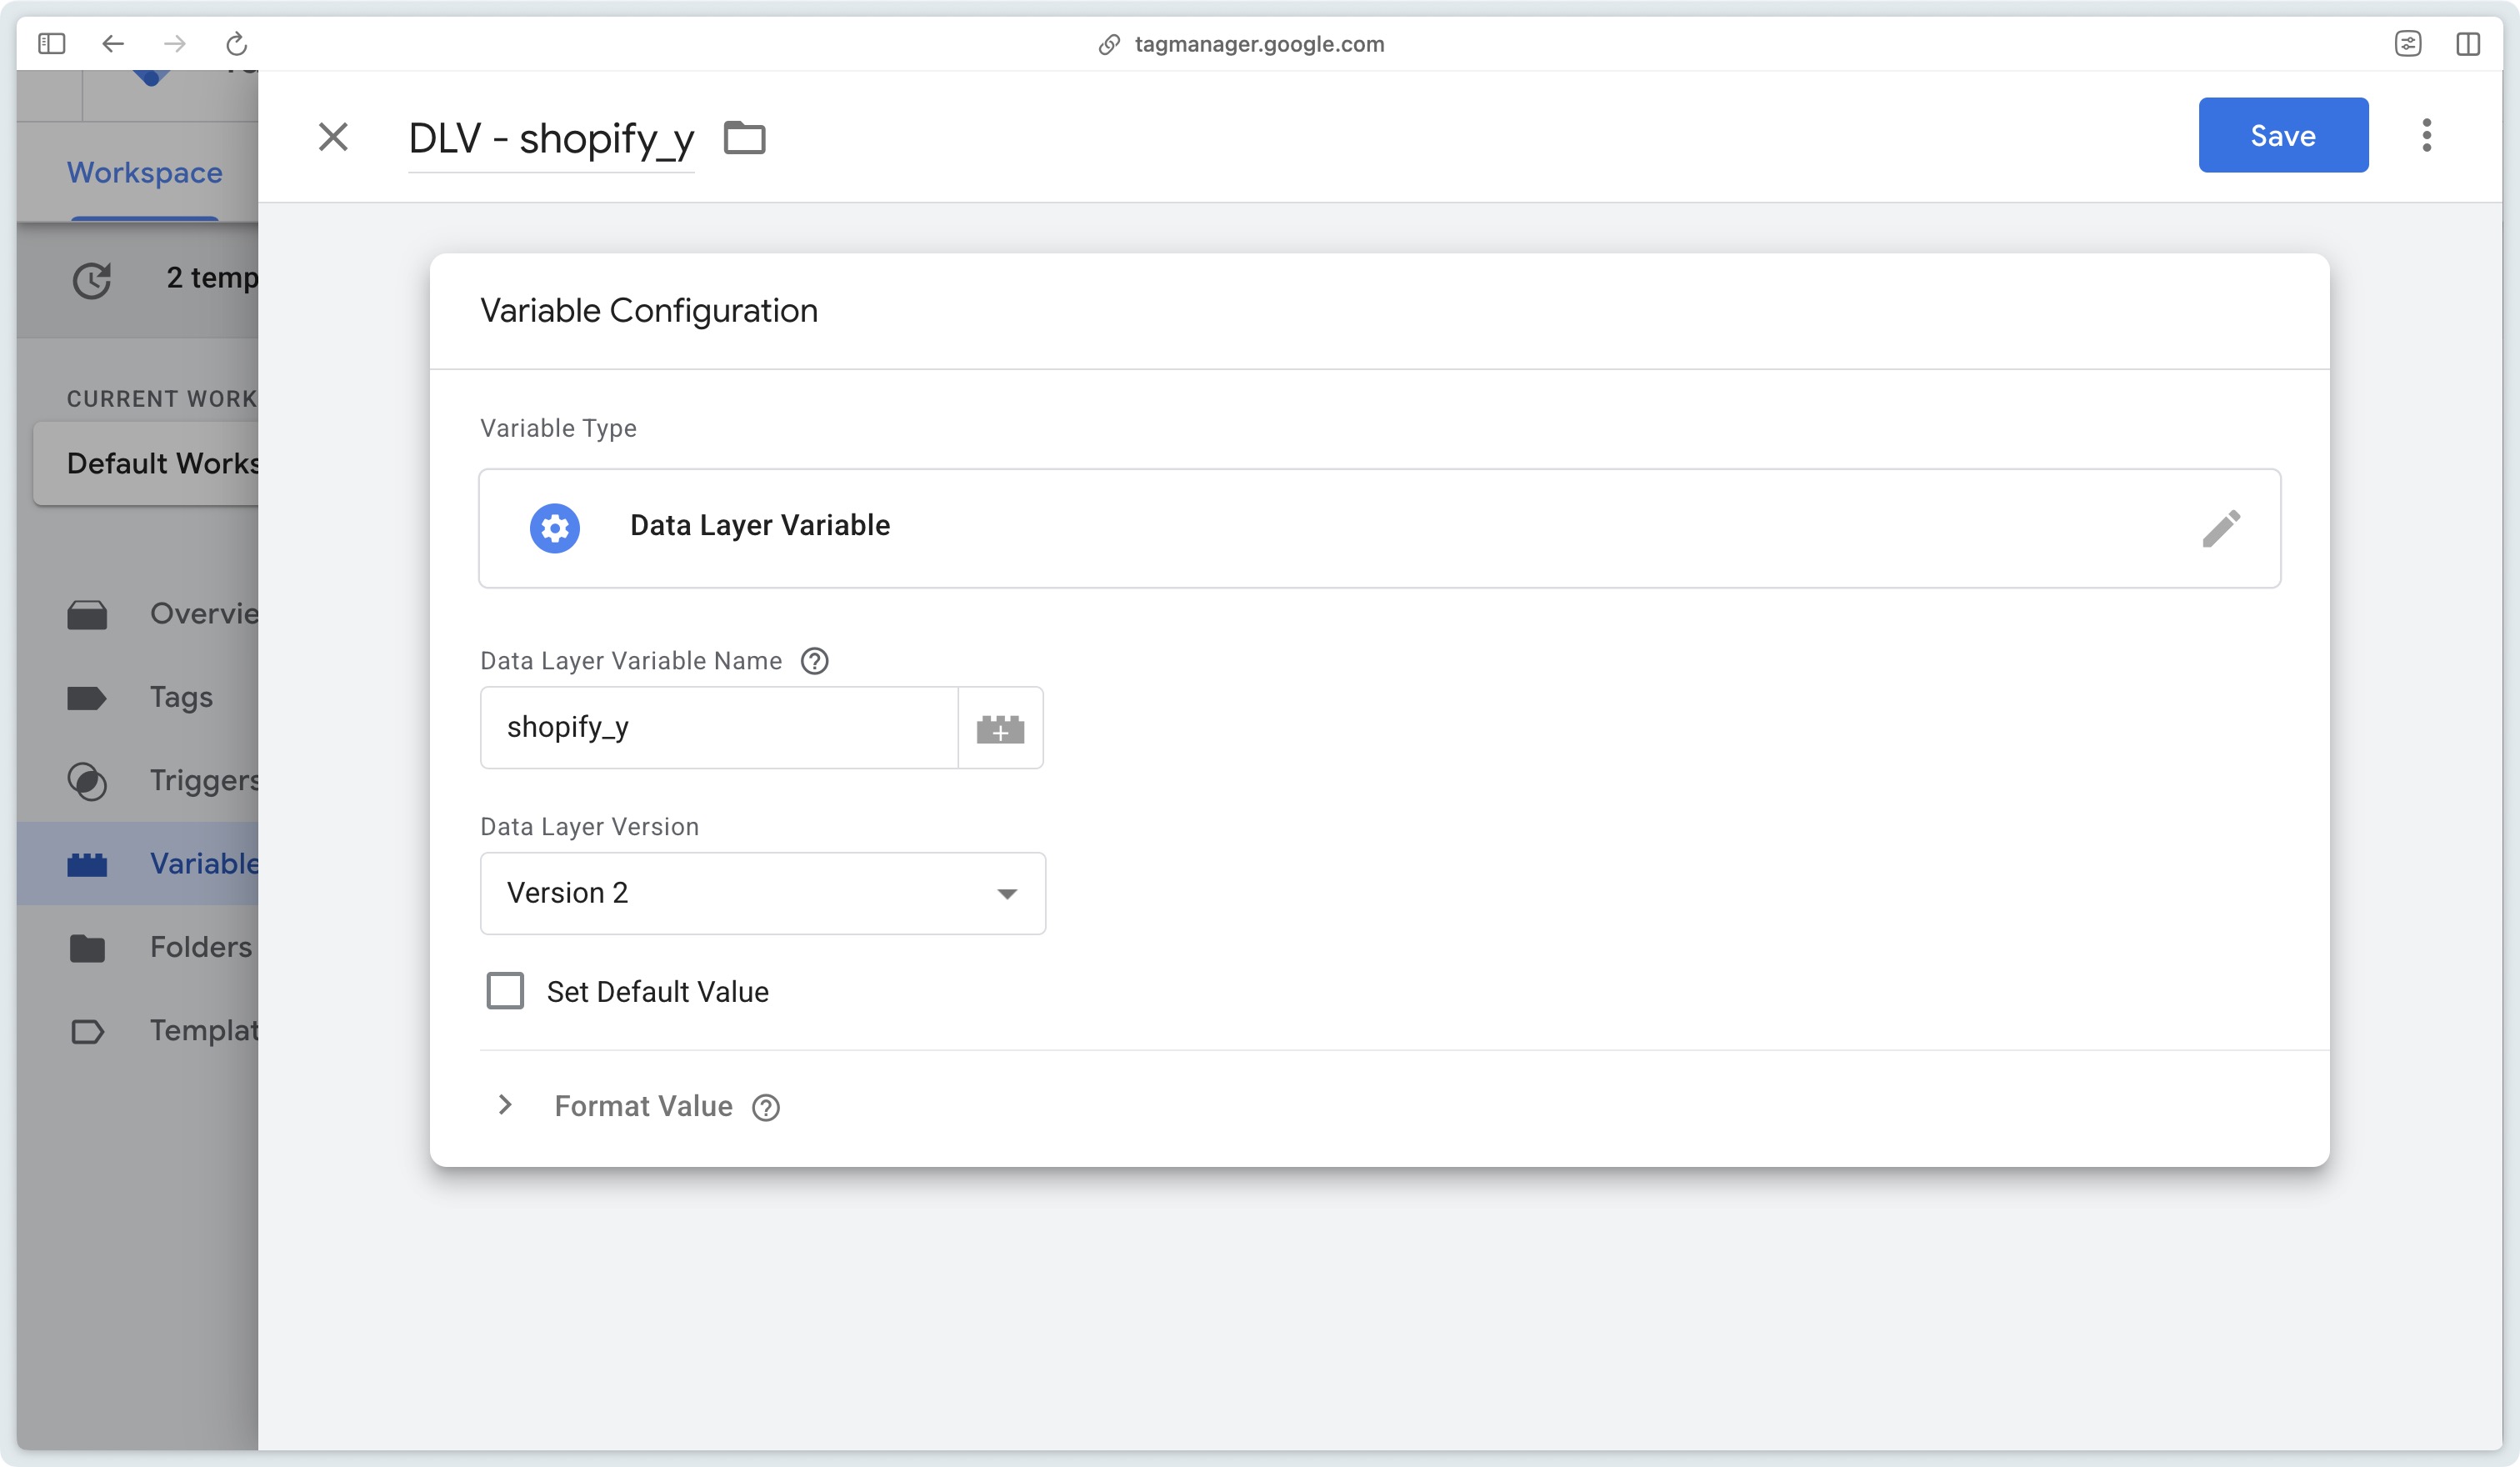
Add parameter shopify_y in GTM
In your Google Tag Manager Web container, create a DataLayer variable to retrieve the visitor’s ID, named shopify_y. This will enable Cookie Restore to work, and thus track the visitor throughout the checkout process.
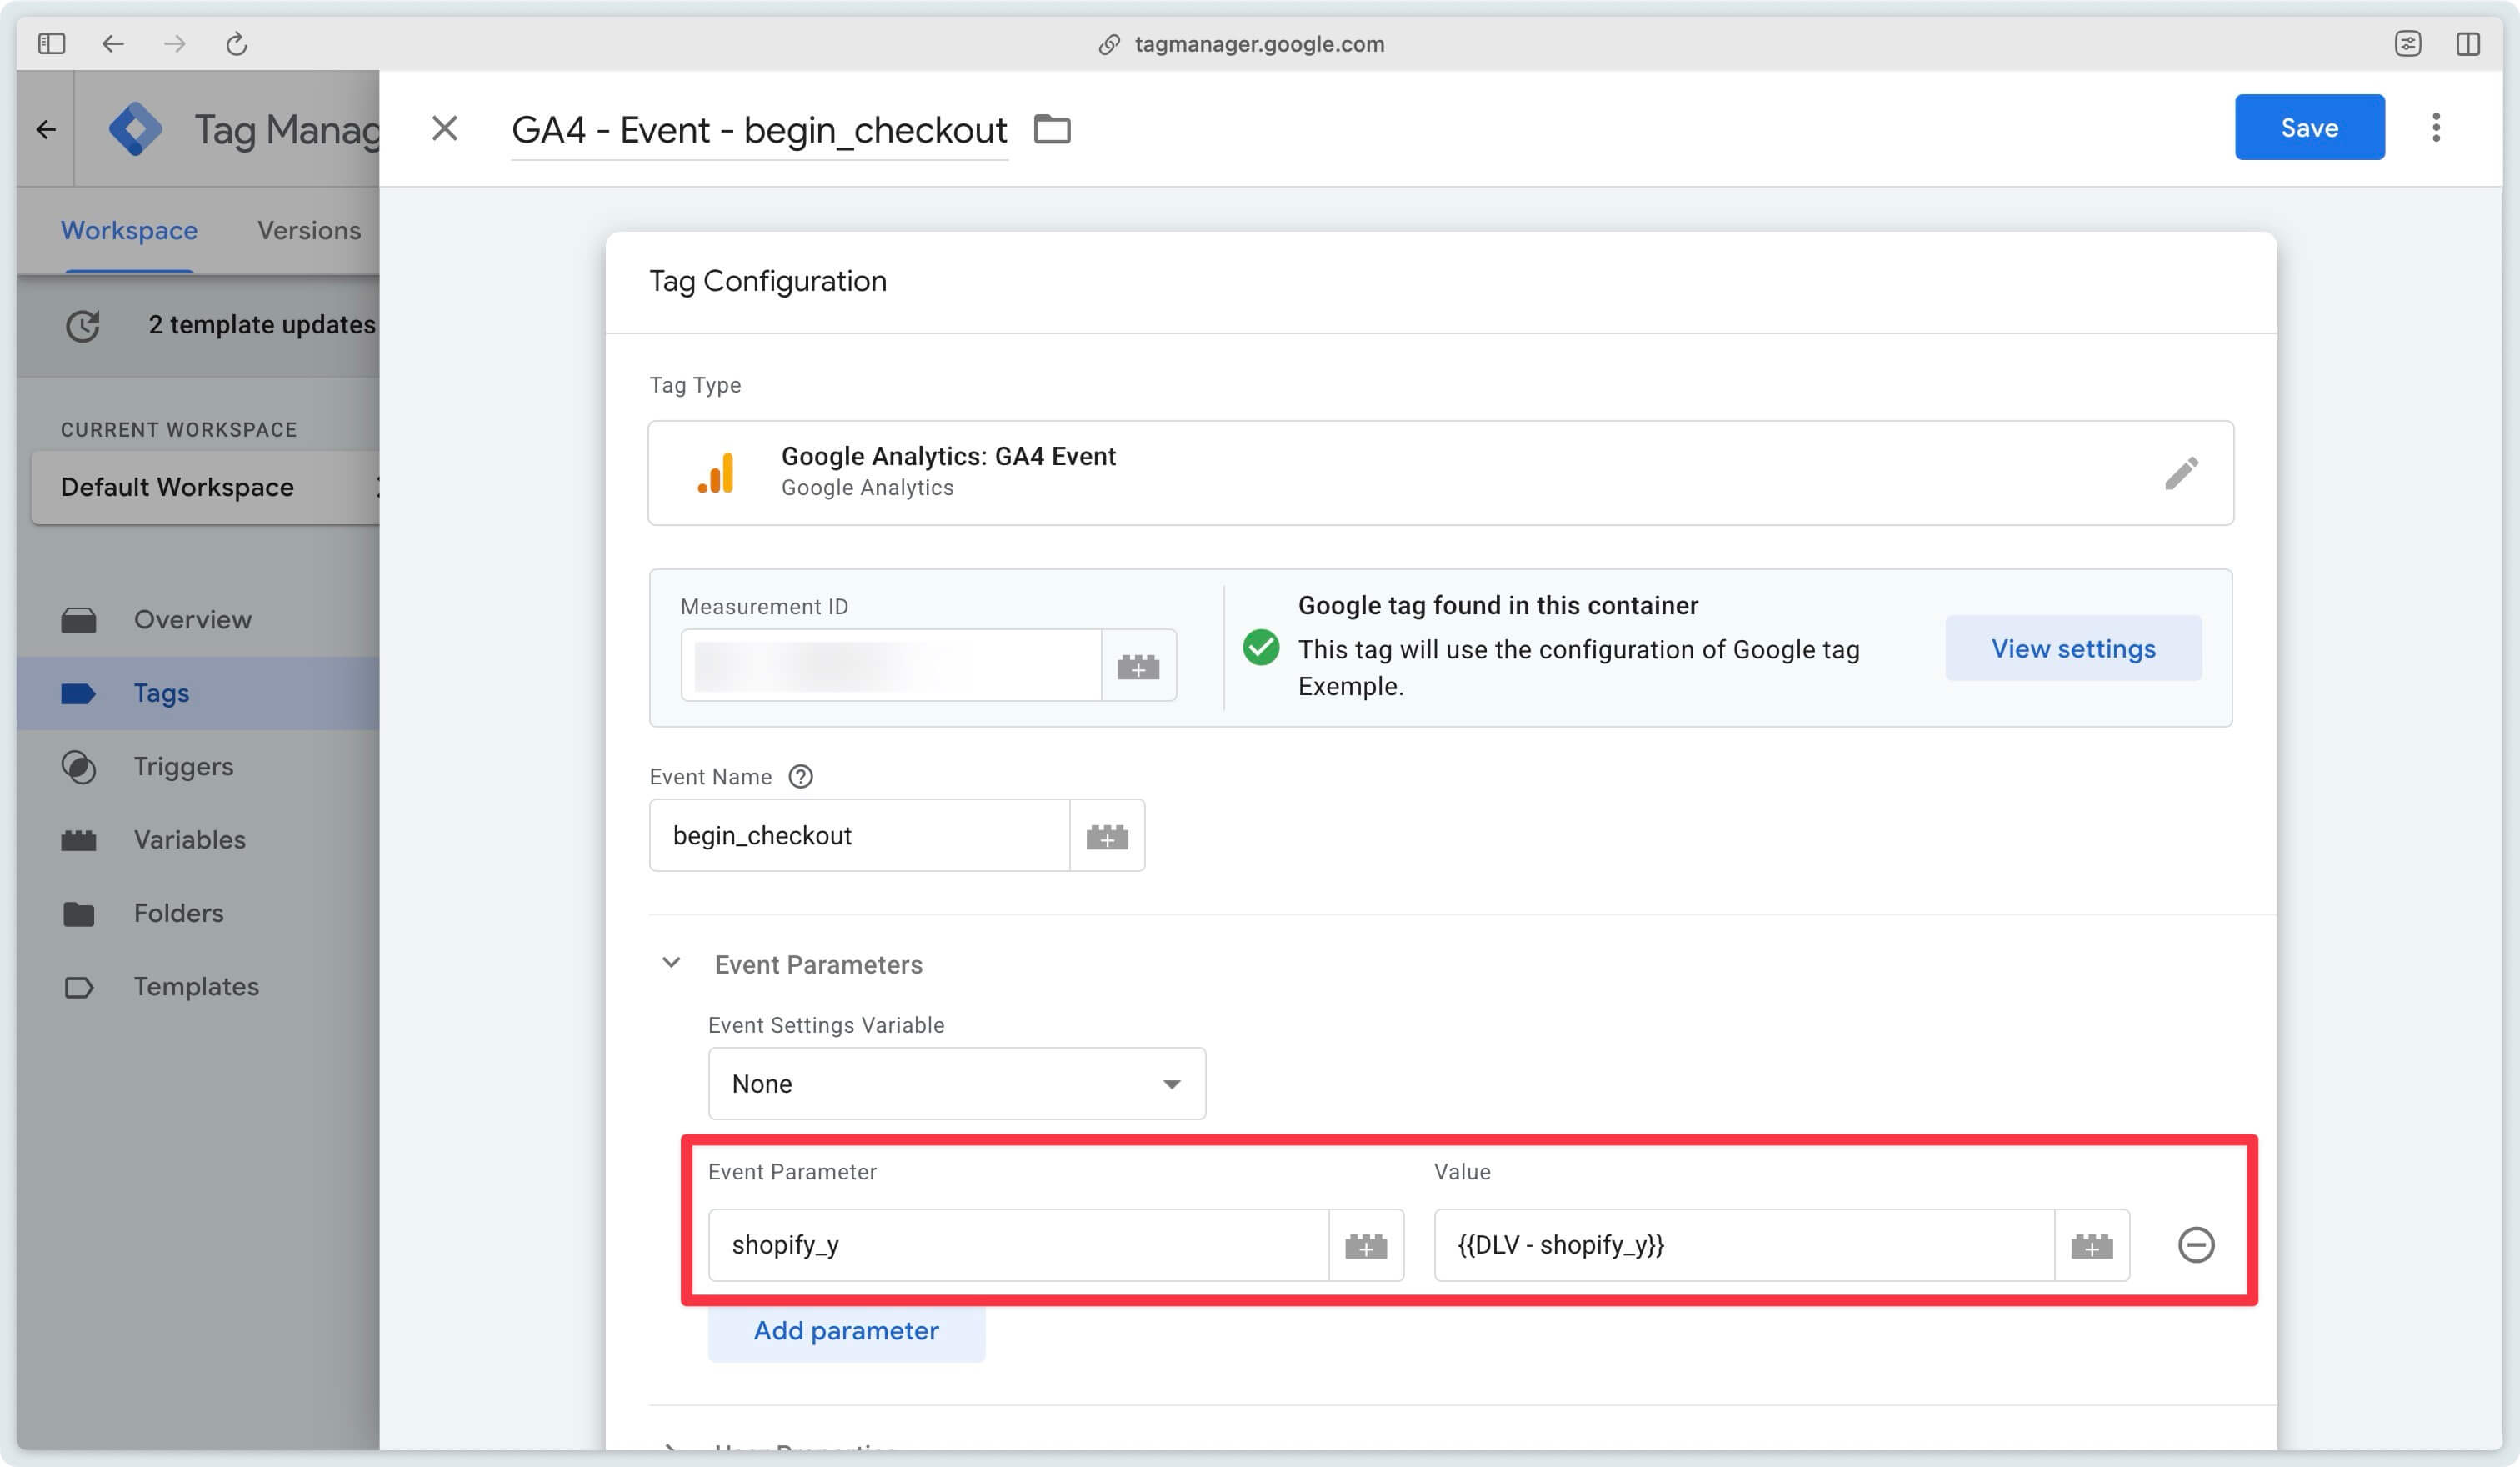
Then add the shopify_y parameter to the GA4 event tags for the checkout steps (events begin_checkout, add_payment_info, add_shipping_info, and purchase).
Here’s an example for the begin_checkout event.
Enable Cookie Restore in Addingwell
In your Addingwell container, go to the Cookie Monitoring section. Then click on the Cookie Restore link for your domain.
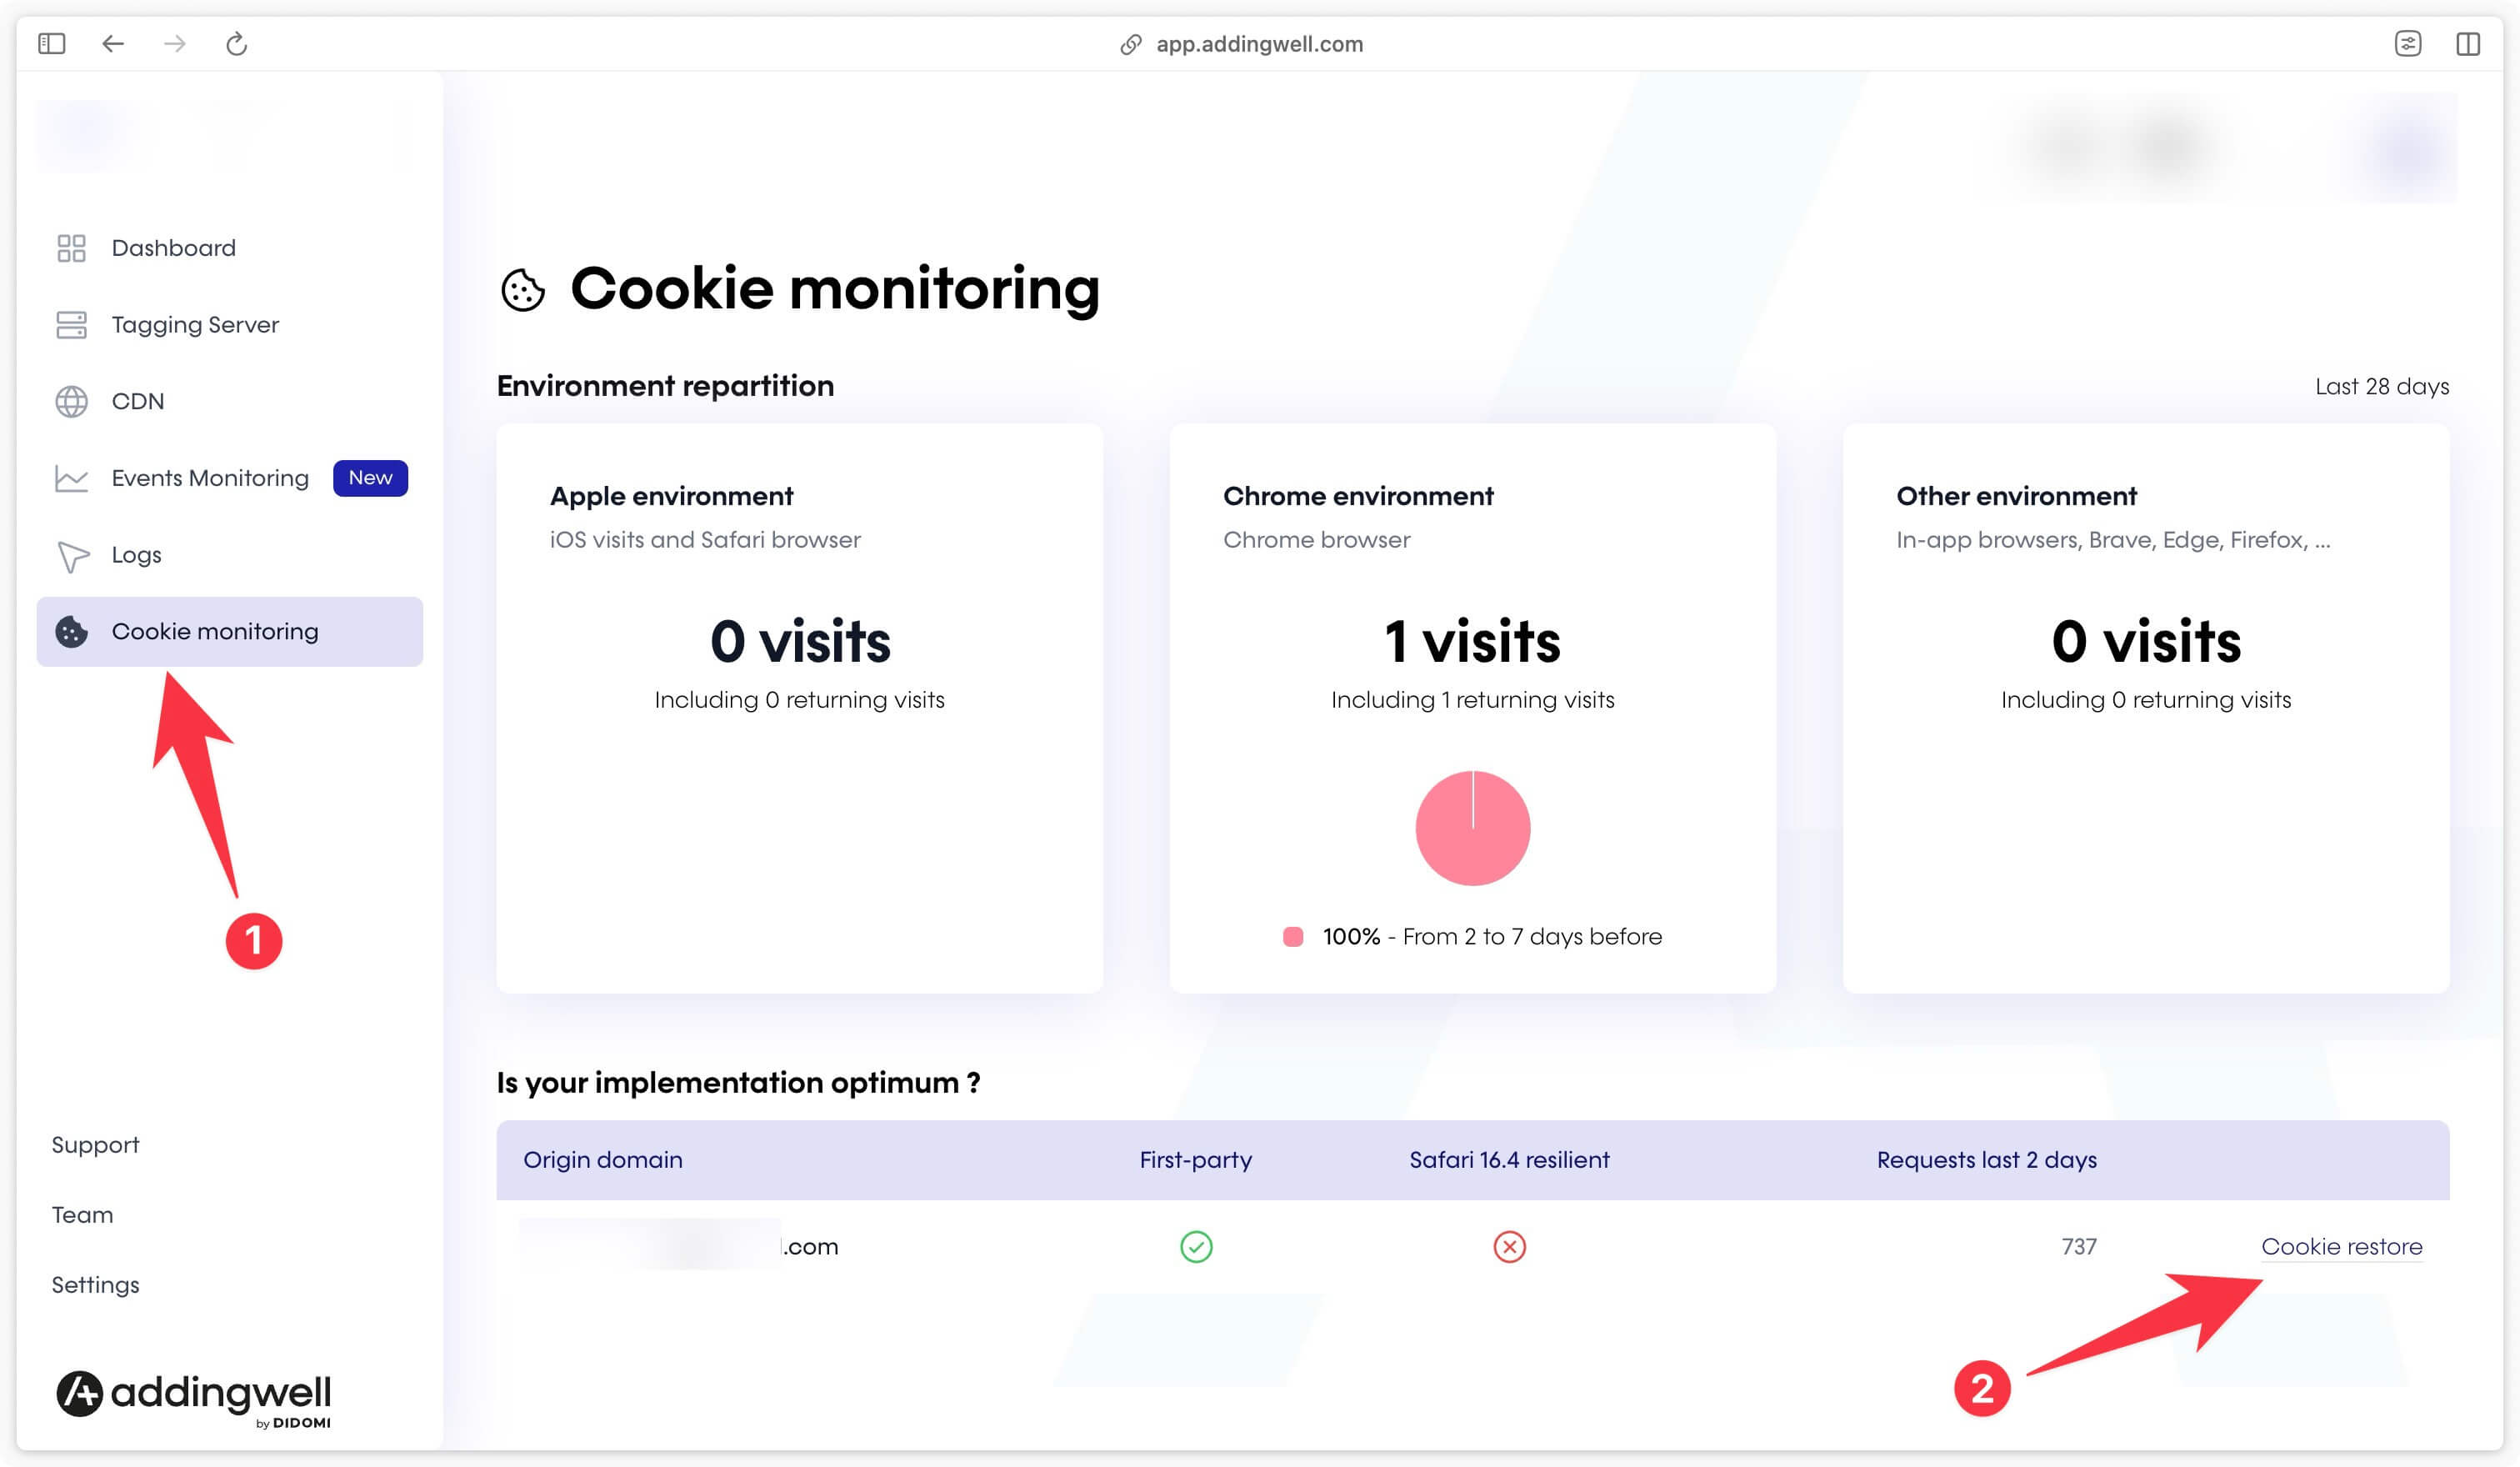
You’ll then be taken to the interface below, where you’ll be prompted to enter 3 pieces of information:
- Target Domain
- Test Subdomain
- Cookie Name

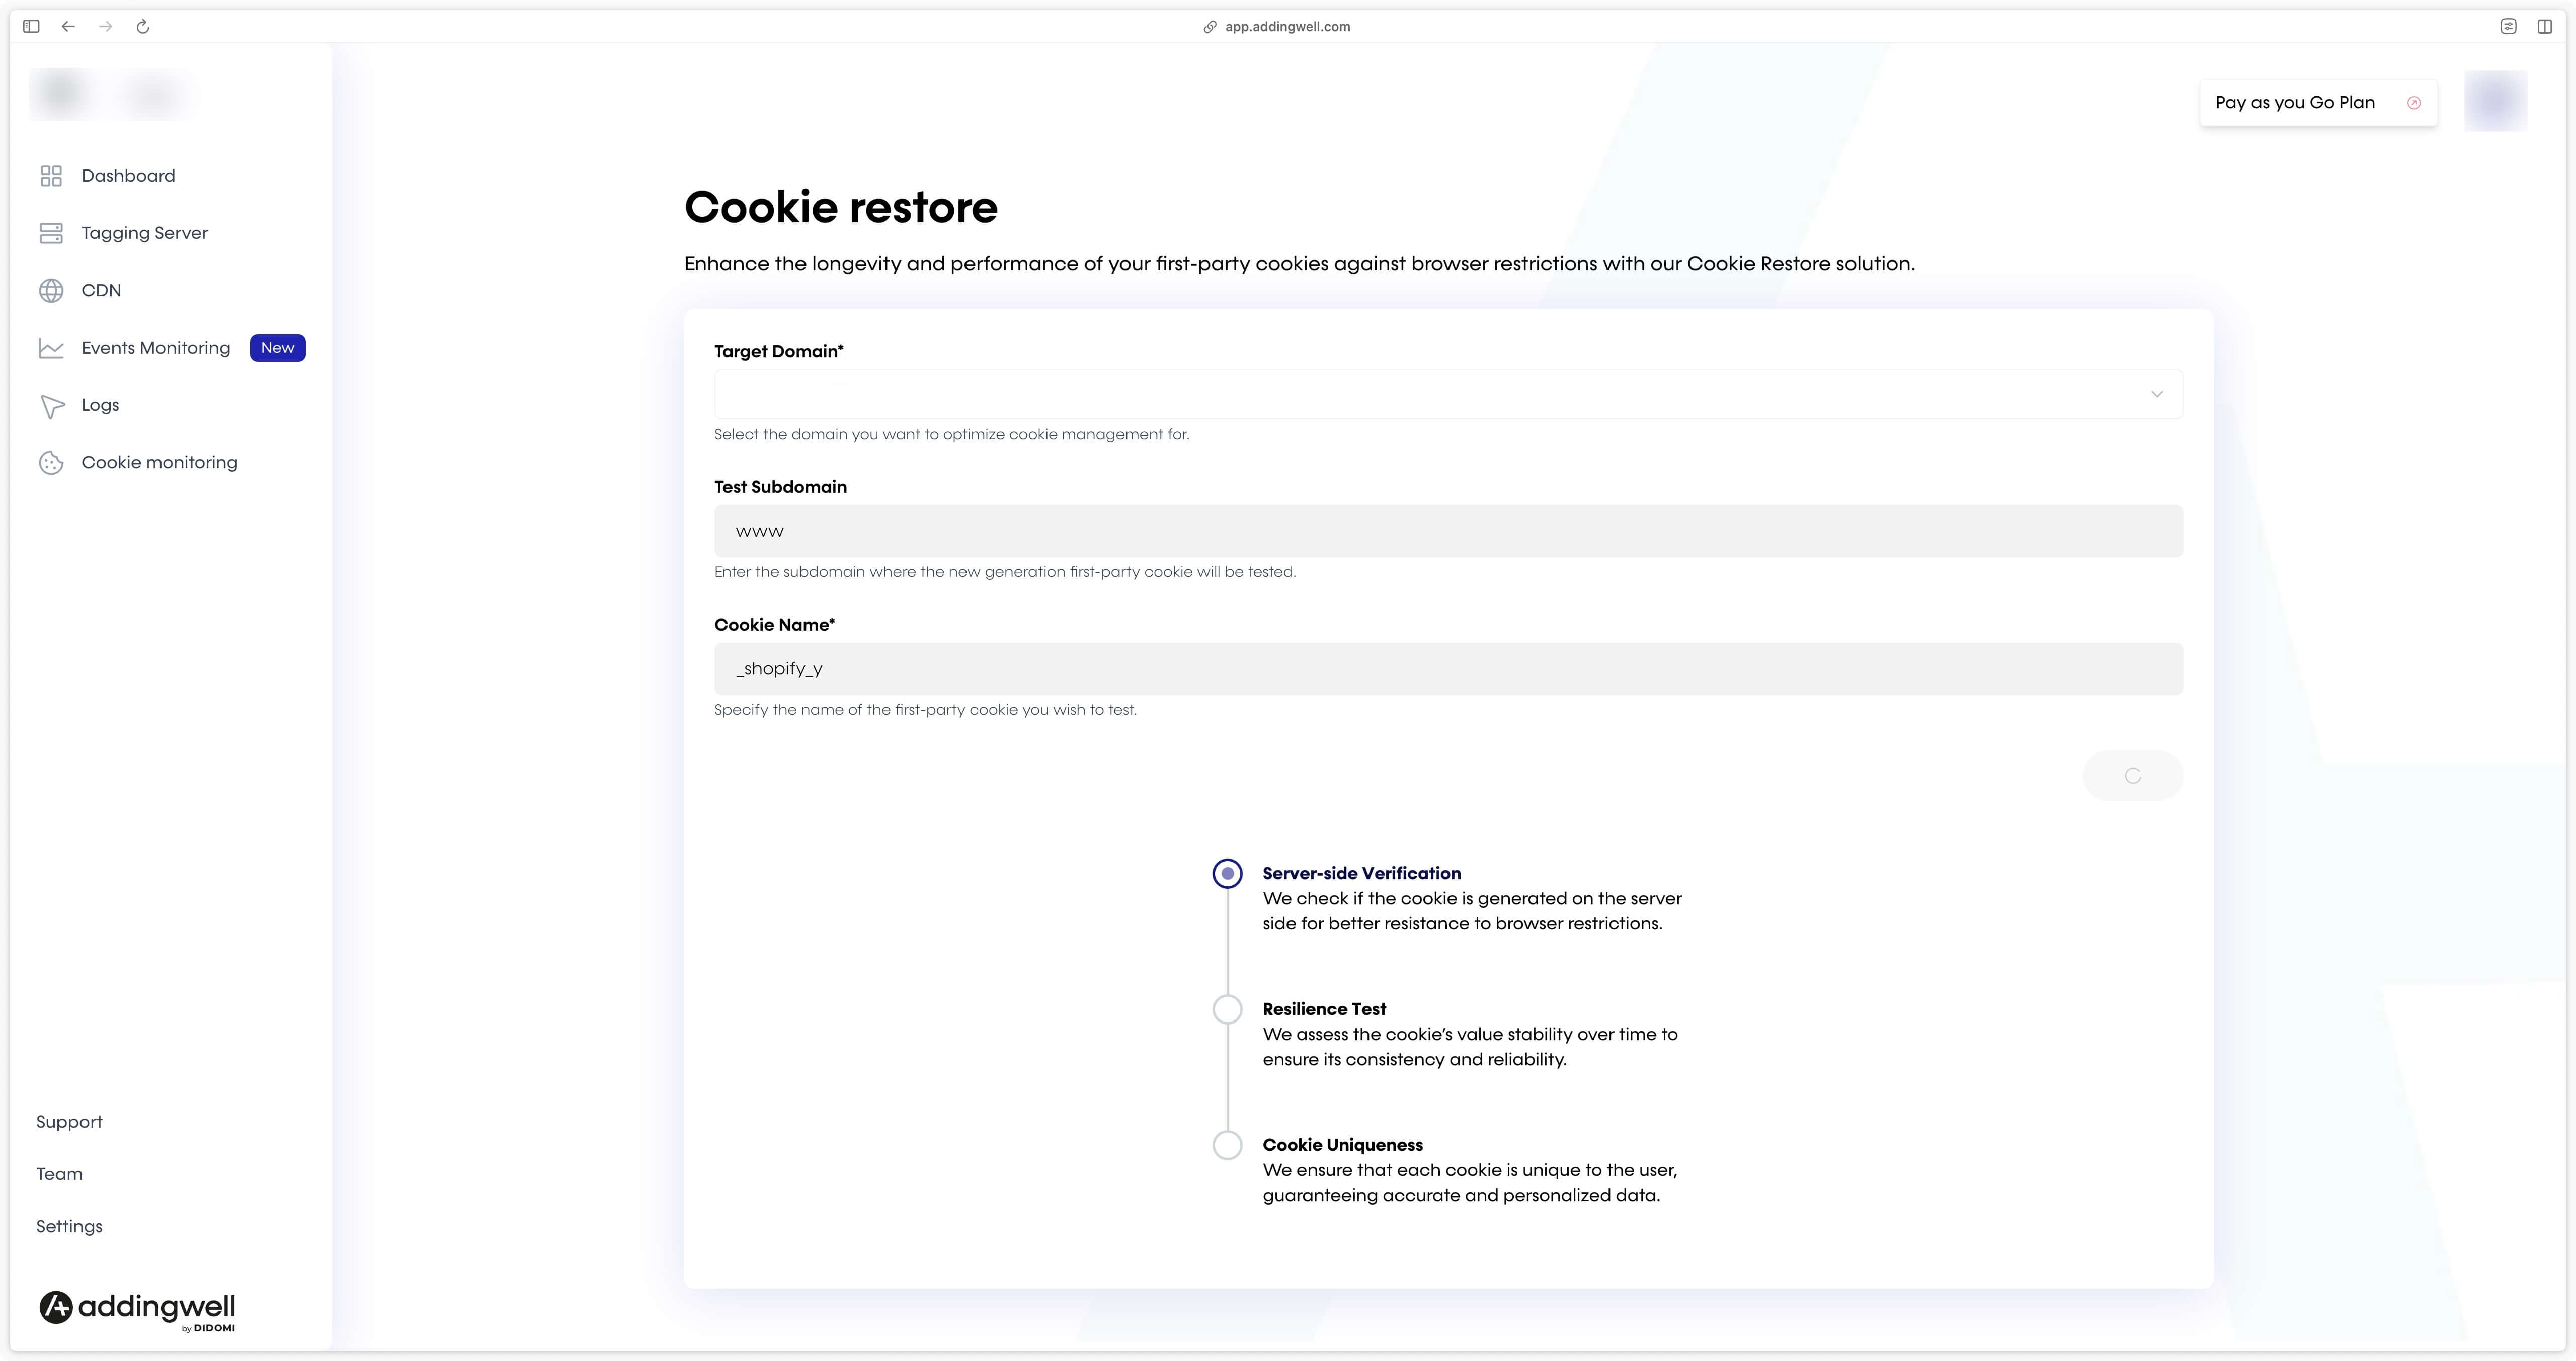
Target Domain
The tagging domain on which you wish to activate the cookie restore. You can choose between all the domains you have added in Addingwell. If you have added only one domain, only one domain will be displayed.
Test Subdomain
Enter your website’s subdomain here, if any, or leave blank (see table below).
| Target subdomain | Field value |
|---|---|
domain.com | Leave empty |
www.domain.com | www (as shown in the screenshot below) |
any.domain.com | any |
Cookie Name
Enter _shopify_y here.
Then click on Verify, and verification of the cookie’s presence on the site will begin.
Next, we check that the _shopify_y cookie has the right value for the use we’re going to make of it.

In the 3rd and final step, we check that the cookie is unique and different for each new user.

Once you’ve passed all the tests, you can activate the Cookie Restore by clicking on the Activate Cookie Restore button.
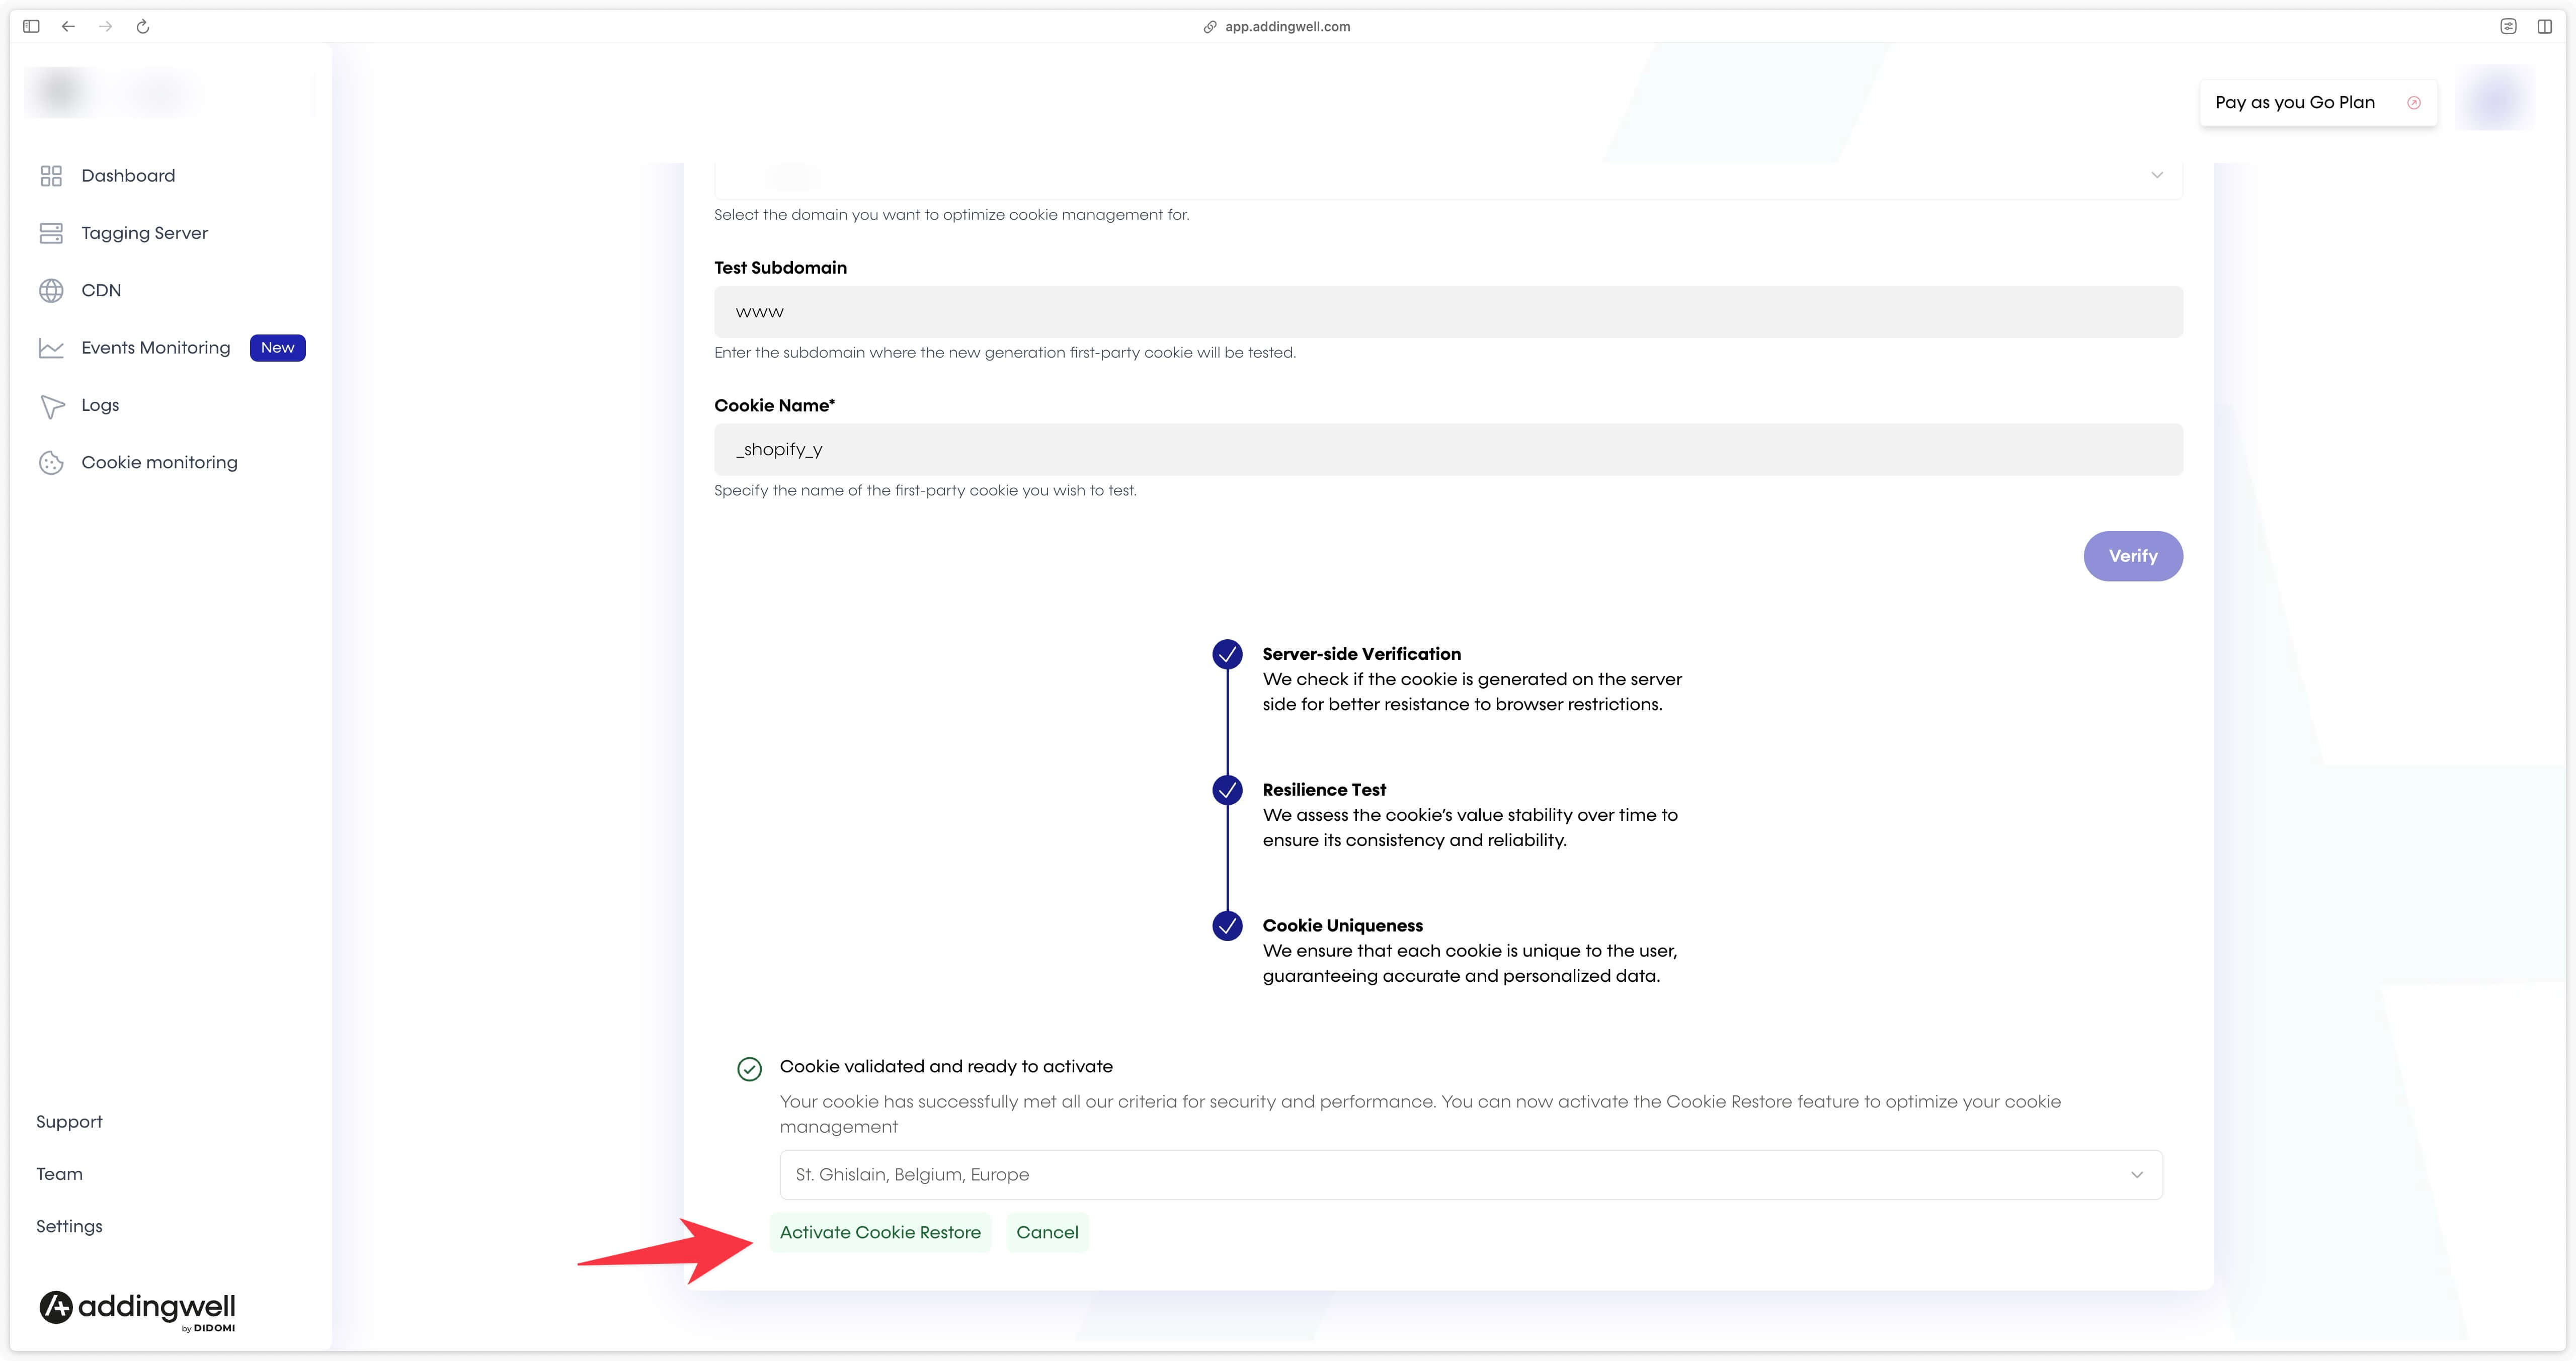
Once Cookie Restore has been activated, in the Cookie Monitoring section, check that the Safari 16.4 resilient column is green for your domain.

Congratulations, you’ve now restored cookies from the checkout on your Shopify store, enabling your tools to recognize the complete user journey.
DataLayer events and parameters reference
General parameters
| Parameter name | Example value/possible values | Comments |
|---|---|---|
user_data.new_customer | true or false | |
user_data.email_address | [email protected] | |
user_data.orders_count | 5 | Available only if the visitor is logged in when arriving in the checkout |
user_data.phone_number | +33612345678 | |
user_data.address.first_name | Michel | |
user_data.address.last_name | Dupont | |
user_data.address.street | 12 rue des Alpes | |
user_data.address.city | Chamonix | |
user_data.address.postal_code | 74400 | |
user_data.address.country | FR | |
page_type | homepage or product or collection or cart or checkout or purchase or login or sign_up or 404 | |
page_location | https://www.northwear.com/checkouts/cn/Z... | Only available in checkout |
page_referrer | https://www.northwear.com/cart | Available only in checkout |
user_id | 124561346 | |
shopify_y | 5e3d7a42-29d3-45e6-bc97-174b882d3642 | Available only in checkout |
master_id | 5e3d7a42-29d3-45e6-bc97-174b882d3642 | Available only in checkout |
is_first_order | true or false | Available only in checkout |
Events and associated parameters
page_view
No parameters associated with the page_view event.
view_item_list
Parameters
| Parameter name | Example value |
|---|---|
item_list_id | 448842954121 |
item_list_name | Get ready for winter |
items |
item parameters
| Parameter name | Example value |
|---|---|
index | 7 |
item_id | 98347283927483 |
item_variant | Arctic Blue / M |
item_variant_id | 98347283927555 |
item_variant_title | Arctic Blue / M |
item_product_id | 98347283927483 |
item_product_title | Men’s Extreme Cold Down Jacket |
item_name | Men’s Extreme Cold Down Jacket |
discount | 15 |
price | 149.99 |
item_brand | Nordic Trail |
item_category | Winter Jackets |
item_list_id | 548210987654 |
item_list_name | Winter Essentials - Men |
sku | WJKT-BLU-M |
url | /products/mens-extreme-cold-down-jacket |
quantity | 2 |
inventory_quantity | 36 |
select_item
Parameters
| Parameter name | Example value |
|---|---|
item_list_id | 448842954121 |
item_list_name | Get ready for winter |
items |
item parameters
| Parameter name | Example value |
|---|---|
index | 1 |
item_id | 8471824171319 |
item_variant | Glacier Gray / S |
item_variant_id | 45775624012087 |
item_variant_title | Glacier Gray / S |
item_product_id | 8471824171319 |
item_product_title | Women’s Thermal Base Layer Top |
item_name | Women’s Thermal Base Layer Top |
discount | 5 |
price | 39.99 |
item_brand | Alpine Edge |
item_category | Base Layers |
item_list_id | 76239847123 |
item_list_name | Winter Essentials - Women |
sku | BASETOP-GRAY-S |
url | /products/womens-thermal-base-layer-top |
quantity | 1 |
inventory_quantity | 0 |
view_item
Parameters
| Parameter name | Example value |
|---|---|
currency | EUR |
value | 59.99 |
items |
item settings
| Parameter name | Example value |
|---|---|
index | 1 |
item_id | 8471824171319 |
item_variant | Glacier Gray / S |
item_variant_id | 45775624012087 |
item_variant_title | Glacier Gray / S |
item_product_id | 8471824171319 |
item_product_title | Women’s Thermal Base Layer Top |
item_name | Women’s Thermal Base Layer Top |
discount | 5 |
price | 39.99 |
item_brand | Alpine Edge |
item_category | Base Layers |
item_list_id | 76239847123 |
item_list_name | Winter Essentials - Women |
sku | BASETOP-GRAY-S |
url | /products/womens-thermal-base-layer-top |
quantity | 1 |
inventory_quantity | 5 |
search
Parameters
| Parameter name | Example value |
|---|---|
search_term | alpine edge base layer |
results_count | 12 |
items |
item settings
| Parameter name | Example value |
|---|---|
index | 3 |
item_id | 92618374651234 |
item_variant | Forest Green / L |
item_variant_id | 92618374657890 |
item_variant_title | Forest Green / L |
item_product_id | 92618374651234 |
item_product_title | Men’s Insulated Fleece Hoodie |
item_name | Men’s Insulated Fleece Hoodie |
price | 89.99 |
item_brand | PolarCraft |
item_category | Hoodies |
sku | FLEECE-GRN-L |
url | /products/mens-insulated-fleece-hoodie |
quantity | 1 |
inventory_quantity | 12 |
add_to_cart
Parameters
| Parameter name | Example value |
|---|---|
currency | EUR |
value | 59.99 |
items |
item settings
| Parameter name | Example value |
|---|---|
item_id | 8471824171319 |
item_variant | Blue |
item_variant_id | 45775624012087 |
item_variant_title | Blue |
item_name | 7 Chakra Bracelet |
item_product_id | 8471824171319 |
item_product_title | 7 Chakra Bracelet |
sku | BRACE-7CHAKRA-BLUE |
discount | 0 |
price | 42.99 |
item_brand | Spirit Stones |
item_category | Bracelets |
quantity | 1 |
coupon | (empty) |
url | /products/7-chakra-bracelet?variant=45775624012087 |
view_cart
Parameters
| Parameter name | Example value |
|---|---|
currency | EUR |
value | 59.99 |
items |
item settings
| Parameter name | Example value |
|---|---|
item_id | 7638291736452 |
item_variant | Arctic Blue / XL |
item_variant_title | Arctic Blue / XL |
item_variant_id | 9823749823741 |
item_product_id | 7638291736452 |
item_product_title | Men’s Thermal Base Layer Top |
item_name | Men’s Thermal Base Layer Top |
price | 42.99 |
discount | 10 |
item_brand | Alpine Shield |
item_category | Base Layers |
item_list_name | Winter Essentials 2025 |
item_list_id | 2025-WINTER-COLLECTION |
quantity | 3 |
sku | BASETOP-ABL-XL |
url | /products/mens-thermal-base-layer-top?variant=9823749823741 |
remove_from_cart
Parameters
| Parameter name | Example value |
|---|---|
currency | EUR |
value | 59.99 |
items |
item settings
| Parameter name | Example value |
|---|---|
item_id | 7638291736452 |
item_variant | Arctic Blue / XL |
item_variant_id | 9823749823741 |
item_variant_title | Arctic Blue / XL |
item_name | Men’s Waterproof Insulated Jacket |
item_product_id | 7638291736452 |
item_product_title | Men’s Waterproof Insulated Jacket |
sku | JKT-ARTICBLU-XL |
discount | 10 |
price | 119.99 |
item_brand | Alpine Shield |
item_category | Winter Jackets |
quantity | 1 |
coupon | WINTER10 |
url | /products/mens-waterproof-insulated-jacket?variant=9823749823741 |
begin_checkout
The dataLayer begin_checkout event is linked to the standard Shopify checkout_started event. See Shopify documentation
Parameters
| Parameter name | Example value |
|---|---|
currency | EUR |
| value` | 51.79 |
coupon | WINTER10 |
discount | 0 |
payment_type | undefined or creditCard or redeemable or deferred or local or manualPayment or paymentOnDelivery or wallet or offsite or customOnSite or other |
shipping | 8.8 |
tax | 0 |
shipping_tier | Standard |
items |
item parameters
| Parameter name | Example value |
|---|---|
item_id | 9238471923847 |
item_variant | Charcoal Grey / M |
item_variant_id | 9283749283749 |
item_variant_title | Charcoal Grey / M |
item_product_id | 9238471923847 |
item_product_title | Men's Thermal Base Layer Top |
item_name | Men's Thermal Base Layer Top |
item_brand | Frostline Apparel |
item_category | Base Layers |
price | 42.99 |
quantity | 2 |
sku | WINTER-BLT-001-M-GREY |
discount | 5 |
coupon | WINTER10 |
url | /products/thermal-base-top |
add_contact_info
The dataLayer event add_contact_info is linked to the standard Shopify event checkout_contact_info_submitted. See Shopify documentation
| Parameter name | Example value |
|---|---|
currency | EUR |
value | 63.79 |
coupon | WINTER10 |
payment_type | undefined or creditCard or redeemable or deferred or local or manualPayment or paymentOnDelivery or wallet or offsite or customOnSite or other |
discount | 5 |
shipping | 8.8 |
tax | 0 |
shipping_tier | Standard |
items |
item parameters
| Parameter name | Example value |
|---|---|
item_id | 9238471923847 |
item_variant | Navy Blue / One Size |
item_variant_id | VAR-0001-NS |
item_variant_title | Navy Blue / One Size |
item_product_id | WINTER-HAT-0001 |
item_product_title | Insulated Fleece Winter Hat |
item_name | Insulated Fleece Winter Hat |
item_brand | NordLayer |
item_category | Winter Accessories |
price | 59.99 |
quantity | 1 |
sku | HAT-WIN-NVY |
discount | 5 |
coupon | WINTER10 |
url | /products/insulated-fleece-winter-hat |
add_address_info
The dataLayer add_address_info event is linked to the standard Shopify checkout_address_info_submitted event. See Shopify documentation
Parameters
| Parameter name | Example value |
|---|---|
currency | EUR |
value | 63.79 |
coupon | WINTER10 |
discount | 5 |
payment_type | undefined or creditCard or redeemable or deferred or local or manualPayment or paymentOnDelivery or wallet or offsite or customOnSite or other |
shipping | 8.8 |
tax | 0 |
shipping_tier | Standard |
items |
item parameters
| Parameter name | Example value |
|---|---|
item_id | 9238471923847 |
item_variant | Navy Blue / One Size |
item_variant_id | VAR-0001-NS |
item_variant_title | Navy Blue / One Size |
item_product_id | WINTER-HAT-0001 |
item_product_title | Insulated Fleece Winter Hat |
item_name | Insulated Fleece Winter Hat |
item_brand | NordLayer |
item_category | Winter Accessories |
price | 59.99 |
quantity | 1 |
sku | HAT-WIN-NVY |
discount | 5 |
coupon | WINTER10 |
url | /products/insulated-fleece-winter-hat |
add_shipping_info
The dataLayer event add_shipping_info is linked to the standard Shopify event checkout_shipping_info_submitted. See Shopify documentation
Parameters
| Parameter name | Example value |
|---|---|
currency | EUR |
| value` | 94.77 |
coupon | WINTER10 |
discount | 5 |
payment_type | undefined or creditCard or redeemable or deferred or local or manualPayment or paymentOnDelivery or wallet or offsite or customOnSite or other |
shipping | 9.99 |
tax | 0 |
shipping_tier | Standard |
items |
item parameters
| Parameter name | Example value |
|---|---|
item_id | 9238471923847 |
item_variant | Charcoal Grey / M |
item_variant_id | 9283749283749 |
item_variant_title | Charcoal Grey / M |
item_product_id | 9238471923847 |
item_product_title | Men's Thermal Base Layer Top |
item_name | Men's Thermal Base Layer Top |
item_brand | Frostline Apparel |
item_category | Base Layers |
price | 42.99 |
quantity | 2 |
sku | WINTER-BLT-001-M-GREY |
discount | 5 |
coupon | WINTER10 |
url | /products/mens-thermal-base-layer-top |
add_payment_info
The dataLayer event add_payment_info is linked to the standard Shopify event payment_info_submitted. See Shopify documentation
Parameters
| Parameter name | Example value |
|---|---|
currency | EUR |
| value` | 63.79` |
coupon | WINTER10 |
payment_type | undefined or creditCard or redeemable or deferred or local or manualPayment or paymentOnDelivery or wallet or offsite or customOnSite or other |
discount | 5 |
shipping | 8.8 |
tax | 0 |
shipping_tier | Standard |
items |
item parameters
| Parameter name | Example value |
|---|---|
item_id | WINTER-TH-0021 |
item_variant | Charcoal Grey / M |
item_variant_id | VAR-TH-GRY-M |
item_variant_title | Charcoal Grey / M |
item_product_id | WINTER-TH-0021 |
item_product_title | Men's Thermal Base Layer Top |
item_name | Men's Thermal Base Layer Top |
item_brand | Frostline Apparel |
item_category | Base Layers |
price | 54.99 |
quantity | 1 |
sku | TH-BAS-GRY-M |
discount | 5 |
coupon | WINTER10 |
url | /products/mens-thermal-base-layer-top |
purchase
The dataLayer purchase event is linked to the standard Shopify checkout_completed event. See Shopify documentation
Parameters
| Parameter name | Example value |
|---|---|
transaction_id | ORDER-2025-WINTER002 |
currency | EUR |
value | 63.79 |
coupon | WINTER10 |
discount | 5 |
payment_type | undefined or creditCard or redeemable or deferred or local or manualPayment or paymentOnDelivery or wallet or offsite or customOnSite or other |
shipping | 8.8 |
tax | 0 |
shipping_tier | Standard |
items |
item parameters
| Parameter name | Example value |
|---|---|
item_id | WINTER-TH-0021 |
item_variant | Charcoal Grey / M |
item_variant_id | VAR-TH-GRY-M |
item_variant_title | Charcoal Grey / M |
item_product_id | WINTER-TH-0021 |
item_product_title | Men's Thermal Base Layer Top |
item_name | Men's Thermal Base Layer Top |
item_brand | Frostline Apparel |
item_category | Base Layers |
price | 54.99 |
quantity | 1 |
sku | TH-BAS-GRY-M |
discount | 5 |
coupon | WINTER10 |
url | /products/mens-thermal-base-layer-top |
Conclusion
Congratulations 🎉 ! You’ve finished installing our Shopify app, and your store is now ready to collect user interaction data efficiently and seamlessly.
With this setup, you can accurately track key events, optimize your advertising campaigns and better understand your customers’ behaviors. If you have any questions or difficulties, please don’t hesitate to contact our support team, ready to help you every step of the way.